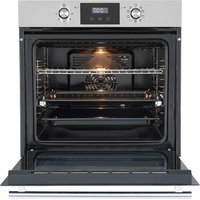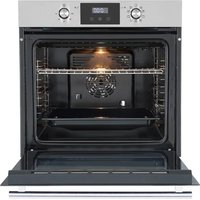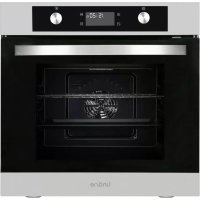
Bordeaux LABO71MPX - Oven Linarie - Free user manual and instructions
Find the device manual for free Bordeaux LABO71MPX Linarie in PDF.


User questions about Bordeaux LABO71MPX Linarie
0 question about this device. Answer the ones you know or ask your own.
Ask a new question about this device
Download the instructions for your Oven in PDF format for free! Find your manual Bordeaux LABO71MPX - Linarie and take your electronic device back in hand. On this page are published all the documents necessary for the use of your device. Bordeaux LABO71MPX by Linarie.
USER MANUAL Bordeaux LABO71MPX Linarie
Electric Built-in Oven
LABO71MPX
LABO71MPB
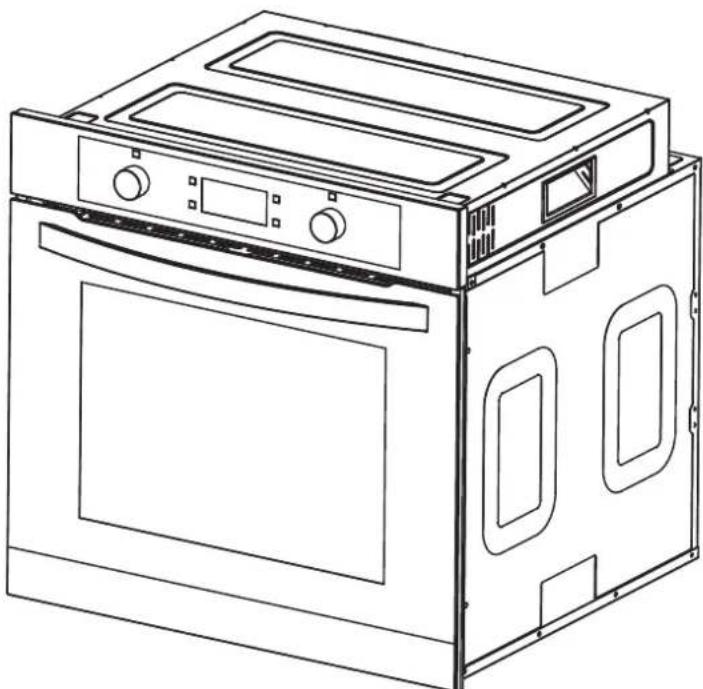
CONGRATULATIONS
Congratulations and thank you for choosing Linarie to introduce a new comfort of cooking in your home. We are sure you will find your new appliance a pleasure to use and a great asset to your kitchen.
This appliance complies with all relevant safety requirements in Australia. Inappropriate use can, however, lead to personal injury and damage to property.
In order to operate the unit correctly and safely, please read this instruction manual carefully before installation and usage. This user manual which provides you with all required instructions related to safety, installation, use and maintenance of the appliance.
For future reference, please store this booklet in a safe place and ensure that all users are familiar with the contents. Pass them on to any future owner of the appliance.
Record Model & Serial Number
Model
Serial Number
Register your product www.linarie.com.au

IMPORTANT
Adherence to the directions for use in this manual is extremely important for health and safety. Failure to strictly adhere to the requirements in this manual may result in personal injury, property damage and affect your ability to make a claim under Linarie's manufacturer's warranty provided with your product. Products must be used, installed and operated in accordance with this manual. You may not be able to claim on Linarie's manufacturer's warranty in the event that your product fault is due to failure to adhere this manual.
Correct Conditions of Use
- The appliance is intended for use in the home and similar environments only. It is not intended for commercial use.
- Danger of fire: do not store items on the cooking surface.
A steam cleaner is not to be used. - The appliance is not intended to be operated by means of an external timer or separate remote control system.
- Ensure that the appliance is switched off before replacing the lamp to avoid the possibility of electric shock. Regarding the instructions for installation and electric connection of the appliance, thanks to refer to the below paragraph of the manual.

Linarie do not assume any liability for damage arising from non-adherence to these documents from improper assembly. The electricity connection be made by a qualified specialist. Installation must comply with the valid standards, regulations and laws. All law and warning information and the operating and installation instructions must be complied with.
TABLE OF CONTENTS
- General Information 03
1.1 Appliance information - General Safety Instructions 03
2.1 General safety information
2.2 Safety instruction - Installation
2.3 Correction use and Operation - Technical data sheet .06
4.Installation 06 - Before using the oven for the first time ...08
- Control panel 09
-
Program functions 10
-
Powering on
7.2. Time setting
7.3.Function choices 10
7.4.Reservation function 11
7.5.Pyrolytic self-cleaning mode 12
7.6. Door lock function
7.7.Error code and solutions 12
7.8. Enquiry function
7.9.RemINDER function 13
7.10. Start/ Pause/ Cancel function
7.11.Other functions 14
8.How to operate the oven 15
9.Baking and Grilling tips 16
Baking tips
Grilling tips
10.Cleaning and maintenance 17
Removing the door from the oven
Attaching the door to the oven
Cleaning the glass doors. 18
Replacement of the oven bulb
11.Troubleshooting 19
12. Accessories 19
13.Environmental tips 20
13.1 Disposal consideration
13.2 Disposing of your old appliance
14.Warranty and after sales 20
14.1 Warranty
14.2 After sales
14.3 Replacement of spareparts
Additional information on products, accessories, warranty, replacement parts and services can be found at www.linarie.com.au
1. GENERAL INFORMATION
1.1 Appliance Information
- A damaged appliance can be dangerous. If you find the appliance is damaged or marked, you must report it within 7 days if you wish to claim for damage/marks under the manufacturer's warranty. This does not affect your statutory rights. Do not use a damaged appliance.
-
The manufacturer's warranty will be invalidated if the appliance is not repaired by a Linärie approved service technician.
-
Faulty components must only be replaced by genuine Linärie spare parts. The manufacturer can only guarantee the safety of the appliance when Linärie replacement parts are used.
- If the power cord is damaged, it must only be replaced by a Linärie authorized service technician or suitably qualified electrician in order to avoid a hazard.
- Linärie cannot be held liable for noncompliance with these instructions, resulting from incorrect or improper use or operation.
2. GENERAL SAFETY INSTRUCTIONS
i
The appliance complies with the stipulated safety requirements in Australia. The user is responsible for appliance cleaning and maintenance as well as its safe use. Improper use can lead to personal injury and damage to property.
Unauthorized Modifications
Unauthorised modifications can cause the appliance to pose risks. Do not conduct any modifications to the appliance.
2.1 General Safety Instructions Children and People with Special Needs

WARNING
This appliance is not intended for use by persons (including children) with reduced physical, sensory or mental capabilities, or lack of experience and knowledge, unless they have been given super-vision or instruction concerning use of the appliance by a person responsible for their safety.
- The appliance is NOT suitable for use by chil-dren without supervision.
- Young children should be supervised near the appliance to ensure they do not play with this appliance.
Cleaning & Maintenance
The device must be cleaned regularly. Dirt can lead to damage or the buildup of odors. (See "Cleaning and maintenance" section). Always clean the appliance exactly as indicated inthe operating instructions. Always ensure the appliance is switched off before cleaning or replacing parts. Clean the appliance immediately after any food spillage and the filter regularly to keep the appliance working efficiently. There is a risk of fire if cleaning is not carried out as described in these operating instructions.
Children may be able to wrap themselves in packing material or pull it over their heads with the risk of suffocation. Keep children away from any packing material.
Make sure no water penetrates inside the device when cleaning. Do not use a steam cleaning appliance to clean this appliance. The steam could reach electrical components and cause a short circuit. In areas which may be subject to infestation by cockroaches or other vermin, pay particular attention to keeping the machine and its surroundings in a clean condition at all times. Any damage which may be caused by cock-roaches or other vermin will not be covered by the machine warranty.
2.2 Safety Instructions - Installation

WARNING
The appliance must only be installed and assembled by trained specialists who are familiar with and comply with the standard national regulations and supplementary regulations of ventilation systems.
In order to avoid any potential hazard, the installation instructions must be followed.
- Observe all regional regulations for the installation of ventilation systems. During
- installation, maintenance and repair work, the appliance must be disconnected from
2.1 General Safety Instructions
- For safety reasons, this appliance may only be used after it has been built in.
Reliable and safe operation of this appliance can only be assured if it has been connected to the mains electricity supply.
- Before using the appliance, ensure that all packaging materials are removed from the appliance and make sure that the connection data on the data plate [voltage (V) and frequen-cy (Hz)] indicated on the appliance corresponds to the voltage and frequency of the power supply in your household. Consult a qualified electrician if in doubt.
DO NOT store or spray flammable materials in the appliance or near this appliance while it is in operation (e.g. aerosols).
Cracks, fissures or fractures in the glass ceramic panels can damage the underlying electronics. Switch off and disconnect the appliance immediately.
- This appliance can become damaged when exposed to excessive heat.
the mains electricity supply. It is only completely isolated from the electricity supply when:
- the mains circuit breaker is switched off, or
-
it is switched off at the wall socket and the plug is withdrawn from the socket.
-
When using this appliance, ensure that an burners in use are always covered by a pan. Switch the cooking zone off when a pan is removed, even for a short time.
- Select a pan which is suitable for the size o the burner.
Regulate the flame so that it does not burn u the sides of the pan. - Avoid overheating the pan (e.g. when cookin with a wok). Always switch the appliance on when a cooking zone is in use, otherwise condensation may collect in the this appliance, which could cause corrosion.
- When cooking with oil or fat, chip pans and deep fat fryers etc., do not leave the pans unattended. Never leave an open grill unattended when grilling. Overheated oil and fat can ignite and could set the rangehood on fire.
3. TECHNICAL DATA SHEET
This appliance is only suitable for cooking food. Do not use it for other purposes, i.e. for storage purposes. Otherwise, it might lead to damage to the appliance or personal injury.
| Parameter Value | |
| Power Supply Voltage | 220-240V ~ 50Hz |
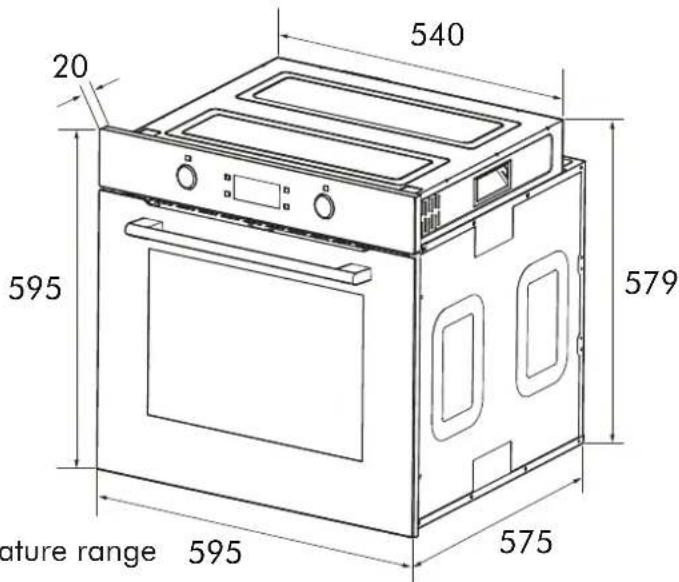
| Dimensions (width, depth x height) | 59.5 x 57.5 x 59.5 |
| Carton Size (width, depth x height) | 65.5 x 67.5 x 66.5 |
| Weight (incl. accessories / packaging) | 39.0kg |
| Weight (NOT incl. accessories / packaging) | 34.5kg |
| Connected load | 2.8KW |
| Capacity (L) | 70L |
| 50-250°CTem | |
| YesTimer | |
| YesLamp | |
| YesDefrost | |
| AluminumHan | |
| Door (Quadrupled glazed cool touch) | Yes |
| Pyrolytic self-cleaning | Yes |
- Control panel
- Fan motor (behind the steel plate)
-
Oven tray
-
Wire rack
- Door
- Handle
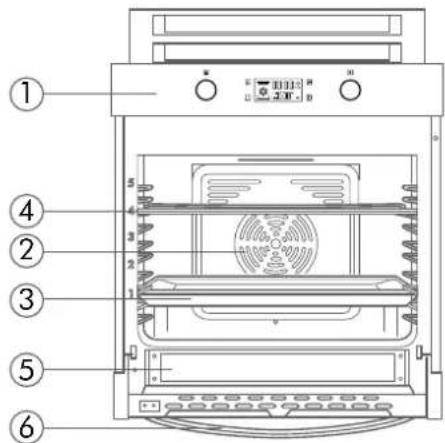
4. INSTALLATION
INSTALLATION NOTES
This appliance should be built in the cabinet. Keep a safety distance between the appliance and the wall.
- Surfaces, synthetic laminates and adhesive used must be heat resistant (100°C minimum) and near appliance unit up to 70°C.
INSTALLATION METHOD
Installation and connection. The door and/or handle must be used for lifting or moving the appliance.
-
For installation the appliance must be installed in accordance with all local gas and/ or electrical regulation.
-
Kitchen cabinets must be set on equal level. A gap of 5mm is required between other appliance and surrounding unit fronts.
-
If there is a drawer beneath the oven, a shelf must be installed between oven and the drawer.
-
Carry the appliance with at least two persons.
-
Use the slots or wire handles located on both side in moving the appliance.
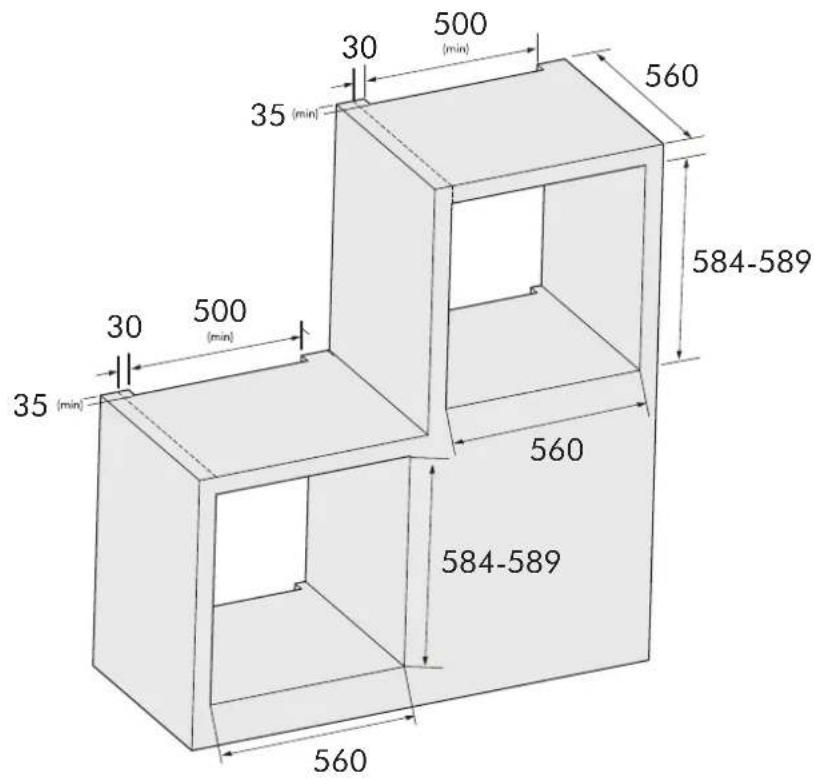
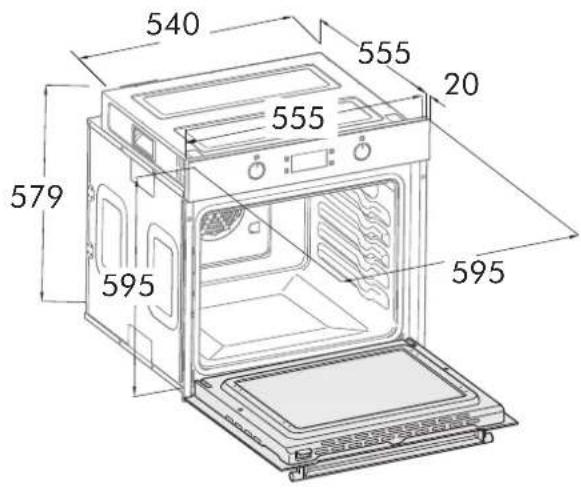
Unit is in (mm)
① Slide the oven through the cabinet aperture, align and secure.
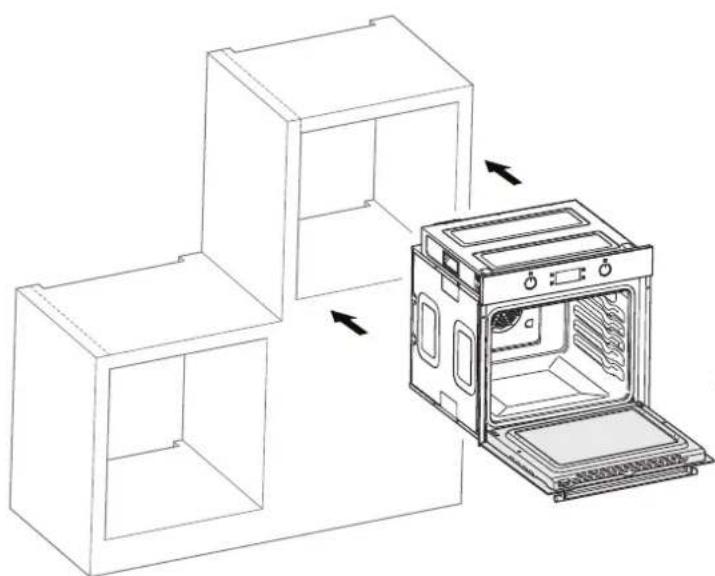
Fix your oven with the 2 screws and washers as indicated in the image.
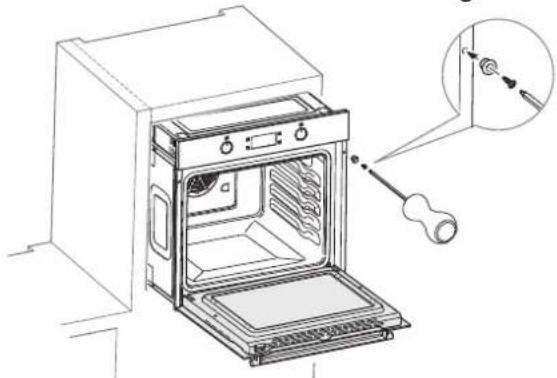
③ Final checking
- Connect the appliance to the main electrical supply correctly and switch on the main supply.
- brown 220-240V~/50Hz
-
blue 4 yellow - green
-
Check the appliance and its functions.
5. BEFORE USING THE OVEN FOR THE FIRST TIME
5.1 Heating up the oven
To remove the new cooker smell, heat up the oven when it is empty and closed. An hour of top/ bottom heating at 240^ C is ideal for this purpose. Ensure that no packaging remnants have been left in the cooking compartment.
Use the function selector to set the top/ bottom heating. Set the temperature selector to 240^ After an hour, switch off the oven. To do so, turn off the function selector to off position.
5.2 Cleaning the accessories
Before you use the accessories for the first time, clean it thoroughly with hot soapy water and a soft dish cloth.
5.3 Energy saving tips
The following information will help you to use your appliance in an ecological way, and to save energy.
Use dark coloured or enamel coated cookware in the oven since the heat transmission will be better.
While cooking your dishes, perform a preheating operation if it is advised in the user manual or cooking instructions.
Do not open the door of the oven frequently during cooking.
Try to cook more than one dish in the oven at the same time, whenever possible. You can cook by placing two vessels on to the wire grill. Cook more than one dish one after another.
The oven will already be hot. You can save energy by switching off your oven a few minutes before the cooking time.
Do not open the oven door. Defrost frozen dishes before cooking them.
6. CONTROL PANEL

回
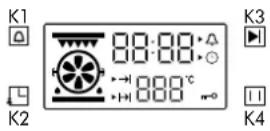

K1:Reminder/parameter (temperature/time)
K2: Clocl/ reservation
K3:Start-up
K4:Reminder/parameter (temperature/time)
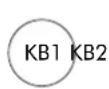
KB1: Plus/ minus (cooking function)
KB2:Plus/minus (temperature/time)
Function icon instruction
| FunctionIcon | FunctionIcon | ||
| - | Top outer heat element | - | Top inner heat element |
| * | Heating fan (defrost) | - | Bottom heat element |
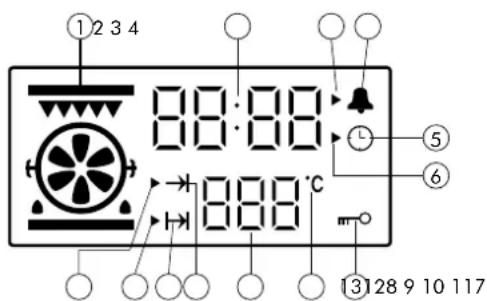
Display sectionButtons
- Function icon
- Time value display
- Reminder time setting icon
- Reminder time icon
- System time icon
- System time setting icon
- Work parameter setting icon
- Cooking end time setting icon
- Reservation function
- Oven working icon
- Temperature value display
- Unit of degree celsius
- Lock function
7.PROGRAM FUNCTIONS
7.1. Powering on
Connect your appliance to the main supply, all indicator lights of the display board will light up for 1 second and then enter the clock setting state. Default time show 12:00, hour "12" flashes, the system clock setting icon "▶" flashes, and the system clock icon "⑤" is always on. The clock can be input at this time, refer to clock setting requirement for details.
After 10 seconds without any operation and the oven will enter to adjust minute automatically.
- Within 10 seconds without any operation when adjusting minute, the oven will enter standby mode automatically.
7.2 Time setting
In the standby mode, touching the "L" button once to enter the system clock setting state. At this time, the hour value of the clock and the setting icon "▶" flash (1s/1 time) and the hour is set by rotating the switch KB2. (0 23 0 is recyclable)
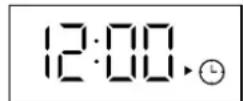
After adjusting the hours, re-touch to switch to minute adjustment. Minute value and the setting icon "▶" flash at this time, you can set minute time by rotating programming switch KB2.(0~59).
After adjusting the minutes, re-touch the "L" to confirm, clock setting accomplished. And at this time, the clock setting icon "▶" goes out and the second icon : " flashes (1s/1 time).
7.3 Function choices
- Under standby status, switch different functions by rotating the programming switch KB1 in turn, refer to shown below for the order. (The oven will remember the last operation)

- When selecting the function, the clock position shows the default cooking time of the corresponding function (it will show "Eco" under Eco mode), the temperature position shows the default temperature of the corresponding function. For temperature adjustable function mode, temperature place will display default temperature value of corresponding function and flash, temperature icon "☑" will flash, and the working parameter setting
Initial standby mode
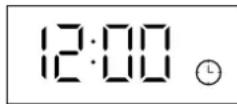
- Under the standby mode, the display always shows system time.(Refer to image below.)
- When the oven is powered on, the oven door lock will start to self-inspection. During the self-inspection, the door lock will run back and forth automatically. If there is no abnormal alarm within 20 seconds, then self-inspection is completed. Or if it shows fault code "E-3" during the self-inspection, please refer to protection function for problem analysis, you can touch to cancel the fault code and return to standby mode.
- When the hour and minute are set, the system clock setting icon "▶" flashes and the system clock icon "①" is always on. After confirming, the setting icon "▶" is off and the system clock icon "②" continues to be displayed. In the hour setting, if you do not touch the "③" button to confirm within 10 seconds, it will automatically switch to the minute setting. If the "④" button is not confirmed within 10 seconds after the clock setting is completed, the system defaults to complete the clock setting and automatically returns to the standby state. If the clock is not set within 20 seconds after power-on, the system default clock is 12:00 and enters standby state. If the power is turned off, the clock will be reset.
In the standby state, only the system clock is displayed.
icon " flash as well as the oven working icon " is always on. You can rotate the programming switch KB2 to set the cooking temperature.
- If temperature is not adjustable for that switch KB2 to set the cooking temperature. function level, the default clock value and the working parameter setting icon "▶" flash as well as the oven working icon "→" is always on.
- For temperature adjustable function mode, after the cooking temperature is set, touch " 📁" to switch to cooking time adjustment, display screen clock place will display default cooking time of corresponding function and flash, the working parameter setting icon "▶" flash and working time icon "▶" always on, you can rotate programming switch KB2 to set the cooking time at this time.
cont. program functions
- For temperature is not adjustable function mode, you can set the cooking time directly. Please refer to the above for detailed operation.
- If the cooking time and temperature are not set, or not touching " within 10 seconds of completion, the system automatically returns to standby status. (The cooking functions table are attached behind.)
- Under working status the oven displays as followings:
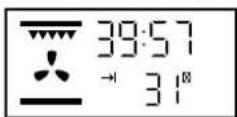
Working status display effect
-
Oven display when working: " cooking time icon will display, clock place will display cooking countdown time, corresponding selection menu display, and the temperature position displays the real-time cavity temperature.
-
When the cooking time is set to 0 minutes, if the reservation function setting is performed at this time, after setting the reservation time, touch the button "the oven will not make a reservation, and the system will automatically return to the standby state.

- When the cooking time or cooking temperature setting are finished, press "▶" button to start the oven and corresponding icon stop flashing. After the oven starts working, the cooking time starts to countdown by second.
Cooking note: When cavity temperature is close to set temperature, oven will prompt for 2 seconds. If cooking time countdown to 0, oven will stop cooking (exhaust fan will continue to work), and the system return to standby status automatically. Buzzer will continuously prompt for 5 minutes(1s/time), exhaust fan will stop working after cavity temperature is below 100^ .
- Temperature display range: not lower than 30^ . It will display Lo^ when lower than 30^ .
Reservation status display effect
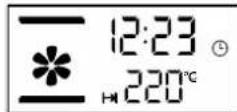
Note:
(1) Normal function cooking time setting range is 0 minutes to 10 hours.
(2) When the cooking time is set to 0 minutes, if the button "▶" is touched at this time, the oven will not work and the system will automatically return to the standby state.
7.4 Reservation function
After setting cooking time and temperature and before touching "to start-up, touch "L" to enter to cooking end time (reservation function) setting (default end time = system time ^+ set cooking time), cooking end time icon "will flash 1s/ time), the reservation function icon is always on and the hour value of the clock position flashes at this time, rotating programming switch KB2 to set the hour. After the hour time setting is completed, touch again to enter the minute time setting. At this time, the minute value of clock position flashes, and the minute time can be set by rotating programming switch KB2.(You can use the "L" to switch hour and minute settings circularly.) After cooking end time setting completed, touch to start, oven will a enter reservation status.
- The longest reservation time is 24 hours. Under reservation status the display screen will display as picture 7. All elements and motors will not work at this time.
-
Reservation status display: "→| reservation icon will display, " ⊙" system clock icon will display, clock position will display system time, the selected menu will display, temperature position will display setting or default cooking temperature.
If more than 10 seconds not confirmed during setting reservation function, the oven will automatically return to standby state. -
Under reservation status, you can touch " " to query the cooking start time (cooking start time=cooking end time-cooking time).
If you need to cancel the reservation setting, you can touch " [1] to cancel it and oven will enter to standby mode.
cont. program functions
Pyrolytic self-cleaning mode7.5
- You can switch to pyrolytic self-cleaning mode by rotating programming switch KB1. The default temperature of this mode is not adjustable, default working time is 1.5 hours. You can rotate KB2 to adjust the working time, adjustable working time range is min. 1.5 hours and max. 2.5 hours.
After selecting the pyrolytic self-cleaning mode and setting working time, touch to start working. At this time, "icon will display, door lock will be activated, door lock icon will always display, indicating that the oven door has been locked and pyrolytic self-cleaning mode starts, touch button can pause or cancel the function.
After the self-cleaning function is confirmed and started, clock position shows working countdown time, temperature position shows "P4H". Oven lamp cannot be used after pyrolytic self-cleaning mode is activated.
- After start self-cleaning, door lock function will be activated automatically, the oven door will be locked and self-cleaning process starts. After self-cleaning process starts, if the display screen shows fault code "E-3", please refer to protection function for problem analysis. You can touch "I" to cancel the fault code and return to standby mode. After clear the fault code, reset self-cleaning function, and touch "▶" again to start.
7.6 Door lock function
6.a Door lock display: When self-cleaning process is completed, oven will enter standby mode. When oven cavity temperature is higher than 300^ display screen will display door lock icon "mO (display effect refer to 1st image shown below.) Door lock will be relieved automatically when cavity temperature is lower than 280^ , door lock icon "mO" on the display screen will extinguish at this time.(Refer to 2nd image shown below)
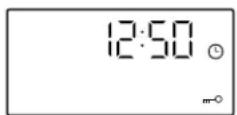
Display effect
Door lock activated display effect under standby status
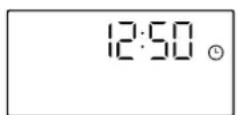
Door lock relieved display effect under standby status
6.b Oven will be locked under following status:
- Among all function mode(except for de frost mode),door lock will automatically be activated when oven cavity temperature is higher than 300^ .
- During self-cleaning process, door lock will be activated.
- When oven is under standby mode, and temperature sensor is open-circuit or short circuit, door lock will be activated and cooling fan still works, display effect will be as the image shown.
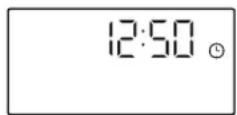
6.c Oven will be unlocked under following situations:
- When self-cleaning process is completed or paused, oven door lock will automatically be relieved only when oven cavity temperature drops to below 280^ . If electricity is cut off during self-cleaning process, oven door will be unlocked only after power on again. (Note: Even if power on again, oven door will be automatically unlocked only when cavity temperature is below 280^ ).
- During other function mode working, if oven temperature is abnormal, the oven door will be relieved only when cavity temperature is below 280^ .
6.d Forced unlocking: In the case of oven lock, you can press and hold the "K2+K4" button to unlock in the oven standby state. When you hear the sound "Di" the door lock is forced unlock, the door lock icon will be extinguished. The door can be opened and door lock function is disabled.
Note: After the oven door lock is forcibly unlocked, the oven must be powered off and re-powered. The door lock will be self-tested after the power-on process, and the oven can be used normally after self-test.
cont. program functions
7.7 Error code & Solutions
7.a Display will show E-1 if sensor is short circuit or open circuit under cooking mode, buzzer will continuously prompt for 10 times (1s/time), refer to display effect 10. Oven will be locked at this time, touch "1" button can return to standby mode.
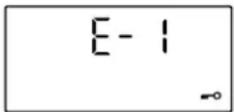
Pic 10: Sensor abnormal alarm display effect
7.b When the temperature is below 35^ after 5 minutes of heating(except for defrost mode and Eco mode), it means the heating element have a problem, display will show E-2, buzzer will continuously prompt for 10 times(1s/time), refer to display effect shown as pic 11. Touch "1" button can return to standby status at this time.
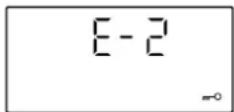
Pic 11: Heat element abnormal alarm display effect
7.c During self-cleaning process, if display screen shows fault code "E-3" when door is locked into place, it means door lock or detection circuit is faulty. When the fault code appears, the buzzer will continuously prompt for 10 times (1s/time), display effect as below pic 12). Touch " " button can return to standby status.
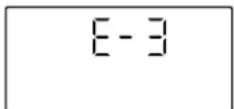
Pic 12: Door lock abnormal alarm display effect
7.d In any state, when the power board cannot receive valid communication data from the display board for 20 seconds, the power board automatically turns off all loads, and the display board displays "E-5". When the display board cannot receive valid communication data from the power board for 20 seconds, the display board sends data to close all loads, and the display board displays "E-6".
| Error code | Description | Reason |
| E-1 | Open or shorted sensor Sensor | or detection circuit failure |
| E-2 | Sensor failure Sensor or heating | element failure |
| E-3 | Door lock failure circuit failure | |
| E-4 | MCU Register failure MCU failure | |
| E-5 | The power board cannot receive the effective communication data from the display board for 20 seconds, and the power board automatically turns off all loads. | Communication line failure |
| E-6 | The display board cannot receive valid communication data from the power board for 20 seconds, and the display board sends data to turn off the load. | Communication line failure |
| E-7 | High temperature protection occurs, and the load is turned off within 10 seconds. | Defective sensor or heating element drive circuit |
7.8 Enquiry function
(1) When the oven is working, touch " button once can query system time, the clock position shows the current time of the system, second icon will flash. Re-touch " button or 10s later automatically return to the barbecue time display.
(2) After the reminder time setting is completed, and the oven in the reservation or working state, touch "□" can query the alarm remaining countdown. Re-touch "□" button or 10s later automatically return to its original state. You can query the remaining alarm time and reset the alarm time under standby state. When the alarm countdown time is less than 1 minute, the clock position show 0:00 .
(3) In the reservation status, first touch of the" can query the cooking start time, the clock position shows the cooking start time, clock value flashes. Re-touch " button or 10s later automatically return to the system time display.
cont. program functions
7.9 Reminder function
Touch " button under standby state to enter to reminder function setting, at this time the clock position hour value will flash, minute value will long lit. The reminder time setting icon " flashes, the reminder time icon " is always on.
1) Rotate programming switch KB2 to set the hour, at this time the hour value is always bright, the value setting range is 0-23;
(2) Touch "□" button again, minute value flashes, and hour value keeps bright;
(3) Rotate programming switch KB2 to set the minute, at this time the value of the minute is always bright, the setting range is 0-59.
(4) When the alarm time is set, you can touch "▶" for confirmation. At this time, the display shows the system time, the reminder time setting icon "▶" goes out, the second icon " : " flashes, the "▶"is always on, and the reminder time starts to count down in seconds. When the time countdown is 00:00, buzzer will sound for 1 minute (1s/time), and the reminder time icon "▶" is always flashing (1s/time), then press any button to stop flashing.
Note:
(1) During setup, second icon " : " and alarm clock icon " 喜 will always bright.
(2) During setup, touch "按钮 will cancel the current reminder time setting and return to standby state.
(3) If a reminder function has been set, then reminder icon "A" should always be displayed when the menu is working, and the reminder time can be queried.
7.10 Start/pause/cancel function
After setting up the cooking function, touch " button to start working; if touching " button when the cooking is suspended, you can restart the work.
During oven cooking, touch " button once can pause the cooking, temperature and time will flash display, oven working icon" flashes, function icon is always on; Touch " button again will cancel current cooking.
- When setting system time, press "I" button to exit the clock setting state directly and return to standby state.
- When oven function, cooking time and temperature are set, press "m" button to exit function setting state and return to standby state.
After setting the reservation function or entering the reservation funcation, pressing the " button can return to standby mode directly.
cont. program functions
7.11. Other instructions
- Button sound
- Sound for touching the button.
- Alarm sound: Heating element faulty sound, sensor fault sound.
- Prompt sound: the temperature reaches the set value, the cooking time counts down to 0, and the alarm time counts down to 0.
The required cooking mode is selected using the multifunctional control button. The function that may be selected are:
| Function 1 | * | Defrost mode: The fan runs without heat to reduce the defrosting time of frozen foods. The time required to defrost the food will depend on the room temperature, the quality and type of food. Always check food packaging for defrosting instructions. |
| Function 2 | — | Conventional oven (top outer and lower element) mode: This method of cooking provides traditional cooking, with heat from the top and lower elements. This function is suitable for roasting and baking on on shelf only. |
| Function 3 | * | Conventional grill mode: This method of cooking is a conventional cooking method, the oven heat from top element to lower element, and the fan helps to circulate the heat to achieve an even baking results. This function is suitable for roasting and baking on one shelf only. |
| Function 4 | *** | Half grill mode: This method of cooking utilize the inner part only of the top element, which directs heat downwards onto the food. This function is suitable for grilling small portions of bacon, toast and meat etc. |
A. The exhaust motor works at low speed under function 1 to function 7 state and ECO function, and the exhaust motor stops working when cavity temperature is lower than 100^ in the standby state.
B. Under any function, if the cavity temperature is higher than 300^ the exhaust motor will work at high speed.
| Function 5 |  | Full grill mode: This method of cooking utilize the inner part and outer of the top element, which directs heat downwards onto the food. This function is suitable for grilling medium or large portions of sausages, bacon, steaks, fish etc. |
| Function 6 |  | Fan heating and grill mode: This mode by using top heat element and fan together, to let the inner heating circulate quickly. It is suitable for needing bake food quickly and locking the inner moisture food, such as beefsteak, hamburger, and some vegetables. |
| Function 7 |  | Fan and bottom element mode: This method utilizes the bottom element in conjunction with the fan, which helps to circulate the heat quickly. This function is suitable for food needing to heat bottom. e.g. pizza etc. |
| Function 8 |  | Energy saving grilling mode: This method of cooking uses the top inner ring and the bottom heating element to control the temperature, making the grilling more energy saving. Mainly suitable for large food, oven temperature rises slowly, the heat fully penetrates and the excess heat consumption is reduced. |
| Function 9 | \( \square \) | Self-cleaning mode ( the display will show " PuJ \( {}^{\mathrm{a}} \) 1. Before use of self-cleaning function, all the accessories such as the wire rack, oven pan and side shelves must be taken out of the oven. other- wise the high temperature will damage the fittings. 2. When the temperature of the cavity reaches the high temperature of carbonization, the grease and food residue will be carbonized for easy cleaning. |
General information on baking, roasting and grilling and risk of scalding by hot steam!
Take care when opening the oven door as steam may get out.
Roasting
- Seasoning with lemon juice and black pepper will improve the cooking performance when cooking a whole chicken, turkey or a large piece of meat.
- Meat with bones takes about 15 to 30 minutes longer before it is cooked than a roast of the same size without bones.
- You should calculate about 4 to 5 minutes cooking time per centimetre height of the meat.
- Let meat rest in the oven for about 10 minutes after the cooking time. The juice is better distributed all over the roast and does not run out when the meat is cut.
- Fish in a fire-resistant dish should be placed on the rack at the medium or lower level.
Baking
- Use non-stick coated appropriate metal plates or aluminium containers or heat - resistant silicone moulds.
- Make best use of the space on the rack.
- It is recommended to place the baking mould in the middle of the rack.
- Keep the oven door closed.
Grilling
Grilling is ideal for cooking meat, fish and poultry and will achieve a nice brown surface without it drying out too much. Flat pieces, meat skewers and sausages are particularly suited for grilling as are vegetables with a high water content such as tomatoes and onions.
Baking tips
How to establish whether sponge cake is baked through. Approximately 10 minutes before the end of the baking time specified in the recipe, stick a cocktail stick into the cake at the highest point. If the cocktail stick comes out clean, the cake is ready.
The cake collapses. Use less fluid next time or set the oven temperature 10 degrees lower. Observe the specified mixing times in the recipe.
- The cake has risen tin the middle but is lower around the edge. Do not grease the sides of the spring form cake tin. After baking, loosen the cake carefully with a knife.
- The cake goes too dark on top. Place it lower in the oven, select a lower temperature and bake the cake for a little longer.
- The cake is too dry. When it is done, make small holes in the cake using a cocktail stick. Then drizzle fruit juice or an alcoholic beverage over it. Next time, select a temperature 10 degree higher and reduce the baking time.
- The bread or cake(e.g. cheesecake) looks good, but is soggy on the inside (sticky, streaked with water). Use slightly less fluid next time and bake for slightly longer at a lower temperature. For cakes with a moist topping, bake the base first. Sprinkle it with almonds or bread crumbs and then place the topping on top. Please follow the recipe and baking times.
- The cake is unevenly browned. Select a slightly lower temperature to ensure that the cake is baked more evenly. Bake delicate pastries on one level using Top/bottom heating. Protruding greaseproof paper can affect the air circulation. For this reason, always cut greaseproof paper to fit the baking tray.
- The bottom of a fruit cake is too light. Place the cake one level lower the next time.
The fruit juice overflows. Next time, use the deeper universal pan, if you have one. - Small baked items made out of yeast dough stick to one another when baking. There should be a gap of approx. 2 cm around each item. This gives enough space for the baked items to expand well and turn brown on all sides.
- You were baking on several levels. The items on the top baking tray are darker than that on the bottom baking tray. Always use 3D hot air to bake on more than one level. Baking trays that are placed in the oven at the same time will not necessarily be ready at t the same time.
- Condensation forms when you bake moist cakes. Baking may result in the formation of water vapor, which escapes above the door. The steam may settle and form water droplets on the control panel or on the fronts of adjacent units. This is natural process.
Grilling tips
- When grilling, preheat the oven for approx. 4 minutes, before placing the food into the cooking compartment. Always grill with the oven door closed.
- As far as possible, the pieces of food you are grilling should be of equal thickness. This will allow them to brown evenly and remain succulent and juicy.
- Turn the food you are grilling after 2/3 of the time.
- Do not add salt to steaks until they have been grilled.
- Add in a little liquid if the meat is lean. Cover the base of the ovenware with approx. 1/2 cm of liquid.
- Add liquid generously for pot roasts. Cover the base of the ovenware with approx. 1 - 2cm of liquid.
- Place the food to be grilled directly on the wire rack. If you are grilling a single piece, the best results are achieved by placing it in the centre of the wire rack. The universal pan should also be inserted at level 1. The meat juices are collected in the pan and the oven is kept cleaner.
- When grilling, do not insert the baking tray or universal pan at level 4 or 5. The high heat distorts it and the cooking compartment can be damaged when removing it.
- The grill element switches on and off continually. This is normal. The grill setting determines how frequently this will happen.
-
When the roast is ready, turn off the oven and allow it to rest for an additional 10 minutes. This allows better distribution of the meat juices.
-
For roast pork with a rind, score the rind in a crossways pattern, then lay the roast in the dish with the rind at the bottom.
- Place whole poultry on the lower wire rack breast-side down. Turn after 2/3 of the specified time.
- For duck or goose, pierce the skin on the underside of the wings. This allows the fat to run out.
- Turn the pieces of fish after 2/3of the time, whole fish does not have to be turned. Place the whole fish in the oven in its swimming position with its dorsal fin facing upwards. Placing half a potato or a small ovenproof container in the stomach cavity of the fish will make it more stable.
- How to tell when the roast is ready. Use a meat thermometer (available from specialist shops) or carry out a "spoon test". Press down on the roast with a spoon. If it feels firm, it is ready. If the spoon can be pressed in, it needs to be cooked for a little longer.
- The roast is too dark and the crackling is partly burnt. Check the shelf height and temperature.
- The roast looks good but the juices are burnt. Next time, use a smaller roasting dish or add more liquid.
- The roast looks good but the juices are too clear and watery. Next time, use a larger roasting dish and use less liquid.
- Steam rises from the roast when basted. This is normal and due to the laws of physics. The majority of the steam escapes through the steam outlet. It may settle and form condensation on the cooler switch panel or on the fronts of adjacent units.
10. CLEANING & MAINTENANCE

GENERAL INFORMATION
- Allow the appliance to cool down completely before cleaning and maintenance.
- The surfaces and controls are susceptible to scratches and abrasion. Please observe the following cleaning instructions.

WARNING
Do not use stainless steel cleaning agents on the controls. Use neutral cleaning agents and avoid using harsh cleaning chemicals, strong household cleaners or products containing abrasive cleaners as this will affect the appearance of the appliance and may remove the printed symbols on the control panel.
- The oven should be thoroughly cleaned before it is operated for the first time and after each use. This will avoid residual food stuffs becoming baked on the oven cavity. After residues have been baked on several times, they are far more difficult to remove.
- Never clean the oven surfaces by steam cleaning.
- The oven cavity should only be cleaned with warm soapy water, using either a sponge or soft cloth. No abrasive cleaners should be used.
-
Any stains that may appear on the bottom of the oven will have originated from food splashes or spilt food, these splashes occur during the cooking process. These could possibly be a result of the food being cooked at an excessively high temperature or being placed in cookware that is too small.
-
You should select a cooking temperature and function that is appropriate for the food that you are cooking. You should also ensure that the food is placed in an adequately sized dish and that you use the drip tray where appropriate.
- Outer parts of the oven should only be cleaned with warm soapy water, using either a sponge or soft cloth. No abrasive cleaners should be used.
If you use any form of oven cleaner on your appliance, then you must check with the manufacturer of the cleaner that it is suitable for use on your appliance. - Any damage that is caused to the appliance by a cleaning product will not be fixed free of charge, even if the appliance is within the guarantee period.
Cleaning the oven
No oven cleaner or any other special cleaning agent is required for cleaning the oven. It is recommended to wipe the oven with a damp cloth while it is still warm.
Cleaning side walls and oven door
- Take down left and right side-shelves, method is pushing the bottom of shelves and pull to sides at the same time, push up side shelves and rotate up to level, and pull out the rack.
- Cleaning left and right sides, order of install is opposite to the order of take down.
Removing the door from the oven
-
To simplify cleaning the interior of the oven, the door can be removed.
The process of removing the door is shown below: -
Fully open the oven door.
- Remove both locking levers located on the right and left hand sides (figure 1).
- Fully close the oven door as far as possible (figure 2). Grip the left and right hand sides of the door with both hands. Close the door slightly more and remove it.
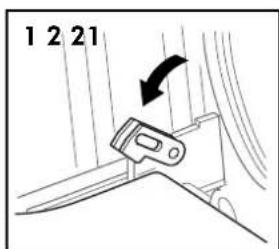
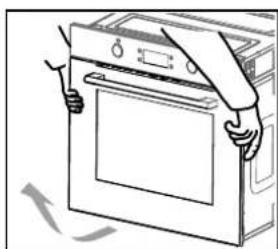
Attaching the door to the oven
The process of installing the door is shown below: Refer to the opposite order when you remove the door.
- When installing the oven door, make sure both hinge plug into openings.
- Both sides of hinge must fit the groove. The door maybe left crooked if hinges are not mounted properly.
- Re-close the attachment levers and close the oven door.
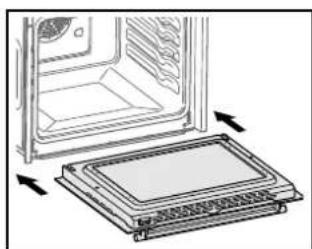
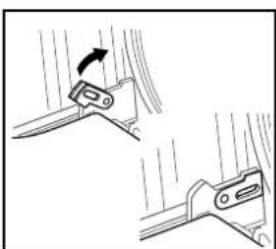
cont. cleaning & maintenance
Cleaning the glass doors
If possible, remove the oven door glass following the manufacture's instructions. Use warm water with a little detergent to clean the glass sections of the door.
- Do not use abrasive products which could damage the glass. Remember that if the surface of the glass panel becomes scratched, it could cause a dangerous failure.
- To simplify the cleaning, the inner glass panel can be taken out of the door. The method for removing the glass from the door is shown below. Install the glass use the opposite steps like removed.
1 Remove oven door and put it on a piece of cloth. Remove the three screws using a cross screwdriver.
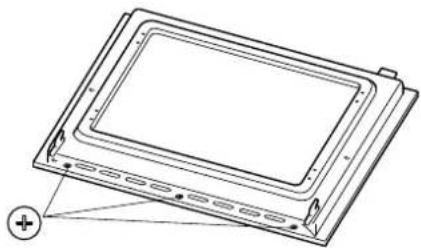
2 Lift up the enamel door and then push forward.
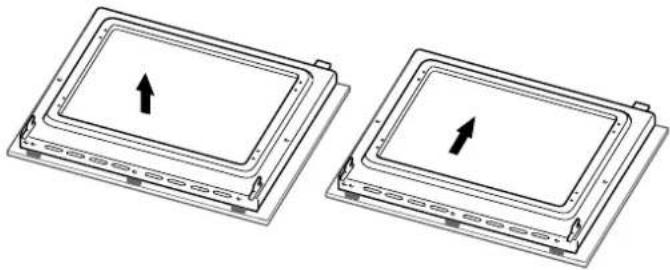
③ Flip the enamel door, remove the four screws using a cross screwdriver.
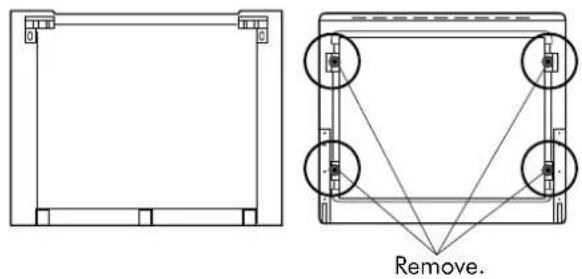
Replacement of the oven light bulb.

CAUTION!
If the glass has some scratches, it may lead to crack. Don't use the glass container corrosive cleaning product or detergent to clean the glass.
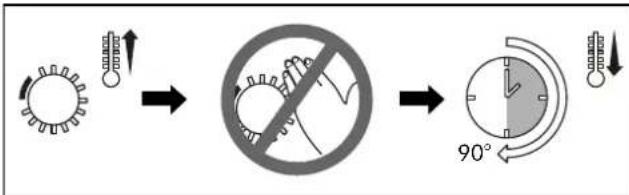
Not covered by the appliance guarantee.

WARNING
Disconnect the appliance from the electrical supply. Open the oven and remove the shelves.
The oven has a light with the following characteristics: 25W and 300^
- During use of the appliance, it becomes hot. Care should be taken and avoid touching the heating elements inside the oven.
- Ensure that the appliance is switch off before replacing the lamp to avoid the possibility of electric shock.
- Remove the glass cover that prote cts the light bulb by turning it counter clockwise.
- Unscrew the old light bulb and dispose it safely and ecologically.
Note: The glass cover may be tight, may need a stronger grip to release it. Please release as shown.
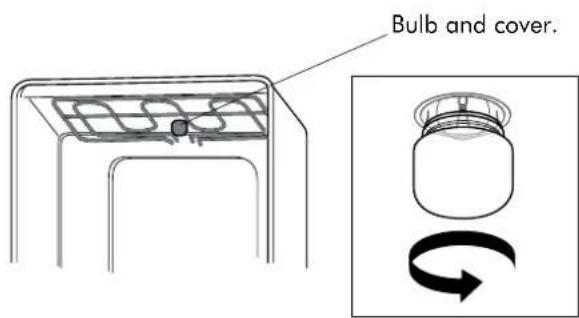
11. TROUBLESHOOTING
Observe all safety and warning information during operation. ( see the General Safety Instructions" section)
| Problem Possible Cause | Possible Solution | |
| The oven is not working | Interrupted electrical current Check other electrical appliances if it is working. | |
| Breaker malfunction Check your breaker if it is working fine. | ||
| Forget the activate the timer function | Reset the timer function | |
| The lamp is not turning on | Defective lamp | Replace with a new lamp. |
| No electrical current Check if the oven have electrical power. | have electrical power. | |
| Oven suddenly stop working | Power interrupted Check for other appliances if it is working. | |
| Normal close thermostat protection | Check if the cooling fan is working. If yes, replace with new thermostat. | |
| Oven is not heating during operation | Can not adjust the temperature controller. | Check and setup the temperature. |
| Timer may have been set up. | Check and adjust the timer. | |
| No power | Check the power box. | |
| Heating element is damaged. | Replace the heating element. | |
| There is water coming out from the glass when operating. | Door seal is worn out. | Replace the door seal. |
| Weak or damage hinges. | Replace the hinges. |
If you have completed all of the above checks and is still experiencing difficulty, please contact your local Linärie Service Center (see the "Warranty and Spare Parts" sections).

WARNING
Any electrical repairs to this appliance must conform to your local, state and federal laws. Please contact the service center if in any doubt before undertaking any of the above. Always disconnect the unit from the power source when opening the unit.
12. ACCESSORIES
Baking tray
For moist cake, pastries, frozen meals and large roasts. It can also be used to catch dripping fat when you are grilling directly on the wire rack.
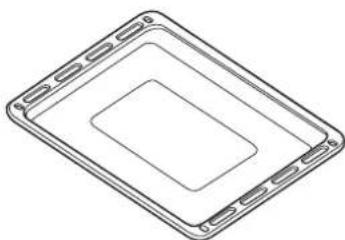
Wire rack
Used for roasting and placing the food to be baked, roasted or cooked in casserole dishes.
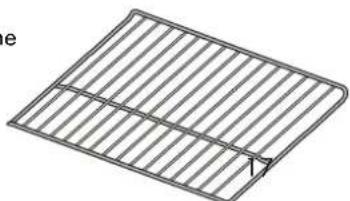
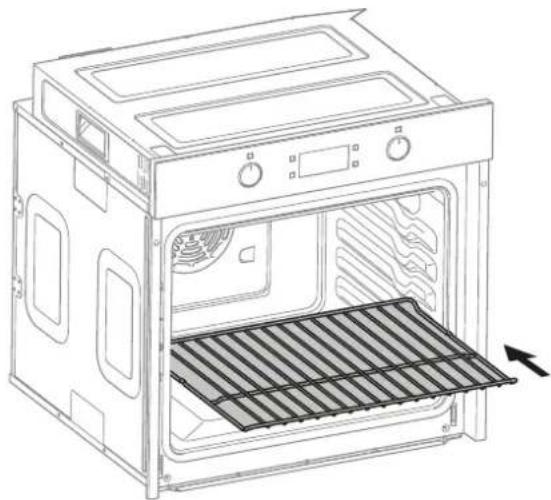
Put the wire rack into the oven as shown. Push it horizontally until it snaps.
13. ENVIRONMENTAL TIPS
Observe all safety and warning information during operation (see the "General Safety Instructions" section).
13.1 Disposal considerations
The transport and protective packaging has been selected from materials which are environmentally friendly for disposal, and can normally be recycled.
Recycling the packaging reduces the use of raw materials in the manufacturing process and also reduces the amount of waste in landfill sites. Ensure that any plastic wrappings, bags etc. are disposed of safely and kept out of the reach of babies and young children. Danger of suffocation.


13.2 Disposing of your old appliance
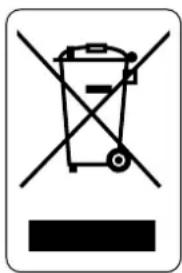
Electrical devices marked with this label may not be disposed of in domestic waste at the end of their service life.
Electrical and electronic appliances often contain valuable materials. They also contain specific materials, compounds and components, which were essential for their correct function and safety. These could be hazardous to human health and to the environment if disposed of with your domestic waste or if handled incorrectly. Please do not, therefore, dispose of your old appliance with your household waste.
Please dispose of those materials by contacting your local authorities and ask for the correct method of disposal. Please ensure that your old appliance poses no risk to children while being stored prior to disposal.
By disposing of this product in accordance with the regulations, you protect the environment and the health of those around you from negative consequences.
14. WARRANTY & AFTER SALES SERVICE
Observe all safety and warning information during operation (see the "General Safety Instructions" section).
In the event of a fault which you cannot remedy yourself, please contact Linarie.
14.1 Warranty 14.3 Replacement of spare parts
The manufacturer's warranty for this appliance is 2 years.
14.2 After sales service
The contact details for Linarie are given at the beginning and of these instructions.
When contacting Linarie, please quote the model and serial number of your appliance. These can be found on the data plate, after removing the grease filter.
Record model & serial number
Model:
Serial Number:
Register your product www.linarie.com.au
Incorrect components can lead to personal injury or damage to the appliance. Use only genuine original Linarie spare parts.
Modifications, additions or alterations to the appliance can lead to safety risks. If spare parts or accessories from other manufacturers are used, the warranty will be invalidated, and Linärie cannot accept liability.
Please check www.linarie.com.au for more information.
LIKE TO KNOW MORE?
For further information on all Linärie appliances, or to obtain detailed dimension and installation information, phone or email our Customer Care team or visit our website:
Australia
hello@linarie.com.au
www.linarie.com.au
Follow Us
@Linarie.Appliances


Linarie
Operating and installation instructions: Original Translation
Mart Online Services Pty Ltd. ACN 657 824 050
Linärie Contact
hello@linarie.com.au
www.linarie.com.au
The distribution and duplication of this document, as well as the use and disclosure of its contents are prohibited unless expressly authorised.
These operating and installation instructions have been drawn up with the greatest of care. But it cannot be ruled out that subsequent technical modifications have not yet been incorporated or the relevant content has not yet been adapted. Please accept our apologies in this eventuality. An updated version can be requested from our team. Subject to printing errors and mistakes.
Linarie
All rights reserved.
BORDEAUX
KB1:Plus/minus (cooking function)
KB2:Plus/minus (temperature/time)
Function icon instruction
hello@linarie.com.au
www.linarie.com.au
Suivez nous sur
@Linarie.Appliances

Linarie