
SMT3211N - Soundbar SAMSUNG - Free user manual and instructions
Find the device manual for free SMT3211N SAMSUNG in PDF.
| Product type | Soundbar |
| Brand | Samsung |
| Model | SMT3211N |
| Total power | 200 W |
| Channels | 2.1 |
| Subwoofer | Wireless |
| Connectivity | Bluetooth, HDMI ARC, optical, USB |
| Dimensions (W x H x D) | 950 x 60 x 85 mm |
| Weight | 2.5 kg |
| Power supply | 100-240 V, 50/60 Hz |
| Consumption | 25 W |
| Functions | Night mode, equalizer, remote control |
| Maintenance and cleaning | Clean with a soft dry cloth. Unplug before cleaning. |
| Safety | Do not expose to moisture. Use a properly grounded outlet. |
| Spare parts | Remote control, power cable, optical cable |
| Repairability | Repairability score not disclosed |
Frequently Asked Questions - SMT3211N SAMSUNG
User questions about SMT3211N SAMSUNG
0 question about this device. Answer the ones you know or ask your own.
Ask a new question about this device
Download the instructions for your Soundbar in PDF format for free! Find your manual SMT3211N - SAMSUNG and take your electronic device back in hand. On this page are published all the documents necessary for the use of your device. SMT3211N by SAMSUNG.
USER MANUAL SMT3211N SAMSUNG
Adjusting the LCD monitor
Troubleshooting
Specifications
Information
Appendix
TFT-LCD Monitor
www.samsung.com

The color and appearance of the product may vary depending on the model, and the product specifications are subject to change without prior notice for reasons of performance enhancement.
Safety Instructions
Notational

Please read the following safety instructions as they are designed to prevent damage to property and harm to the user.

Warning / Caution

Failure to follow directions noted by this symbol could result in bodily harm or damage to the equipment.

Notational Conventions

Prohibited Important to read and understand at all times

Do not disassemble Disconnect the plug from the outlet

Do not touch Ground to prevent an electric shock
Power

When not used for an extended period of time, set your computer to DPM. If using a screen saver, set it to active screen mode.
The images here are for reference only, and are not applicable in all cases (or countries).

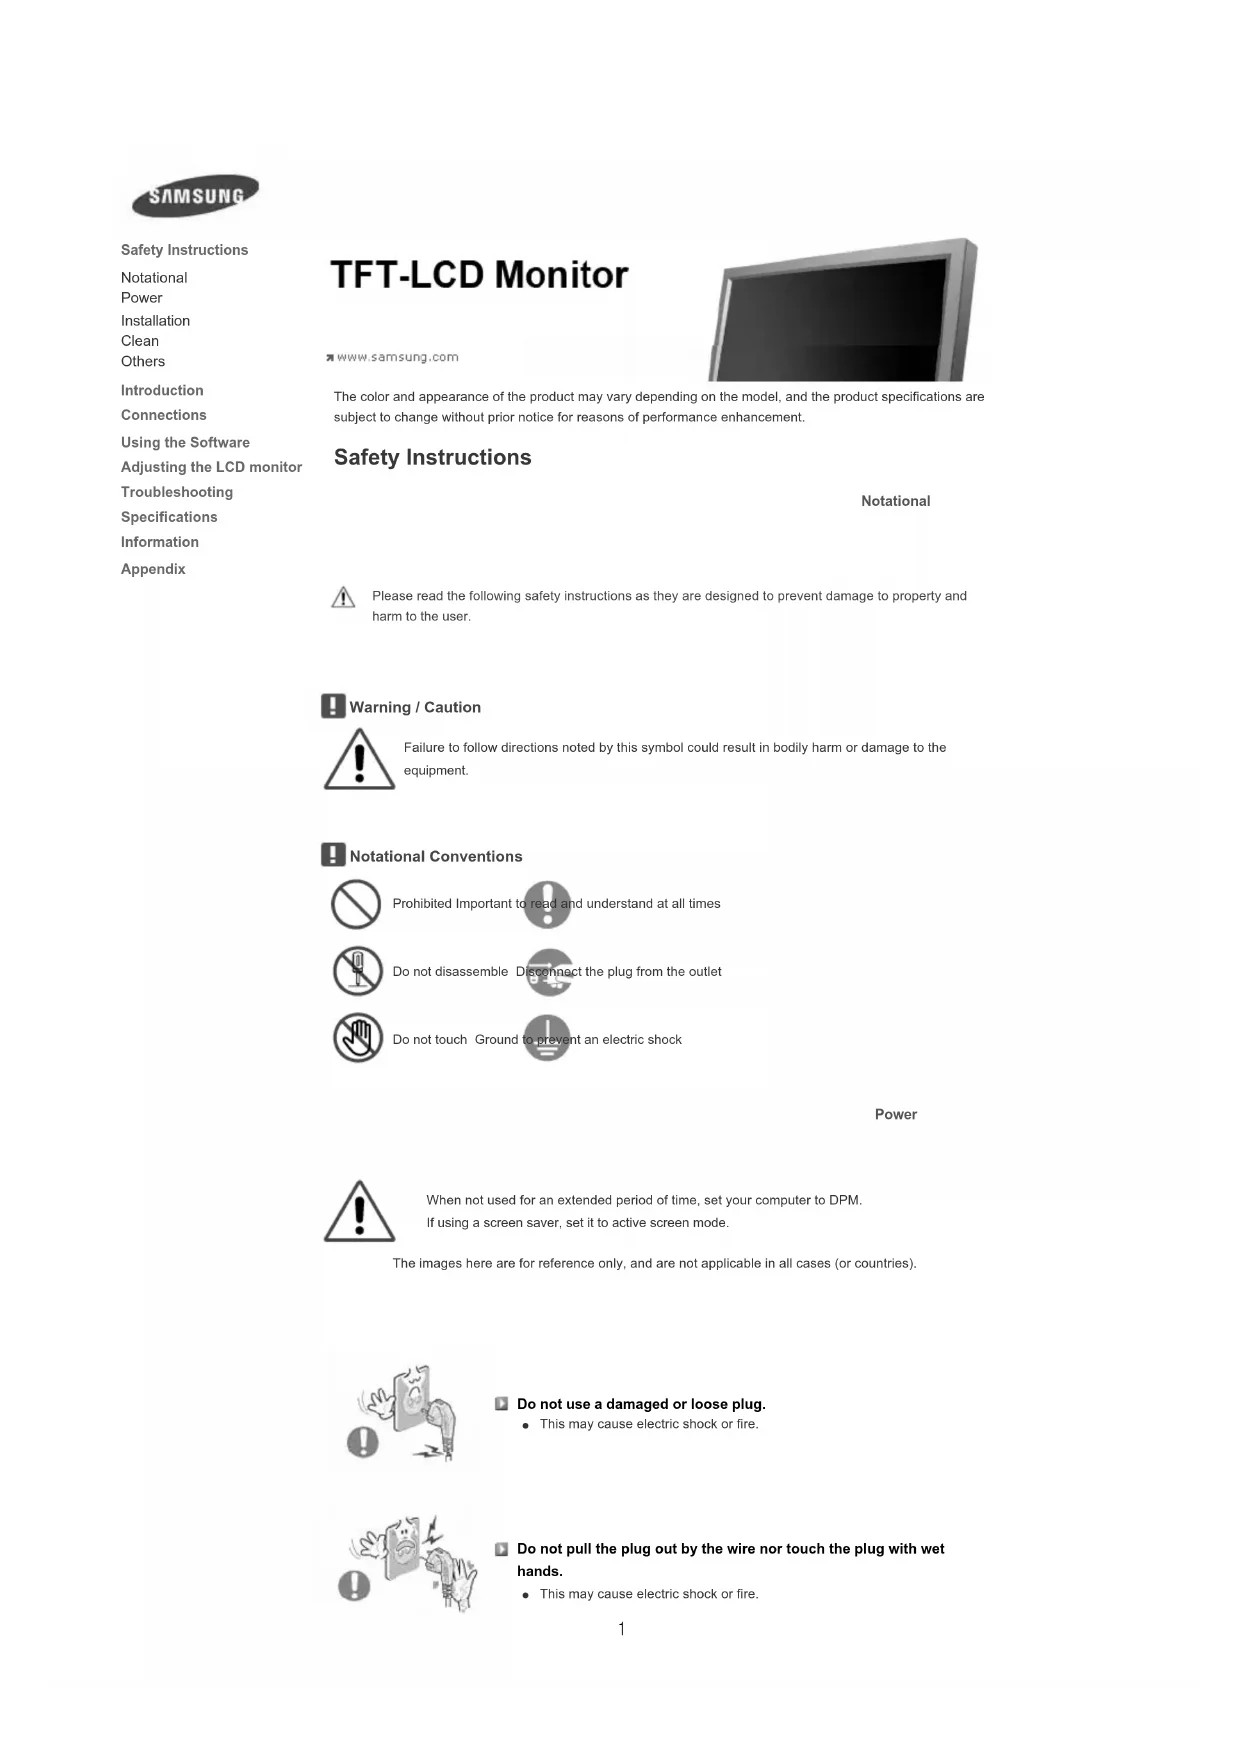
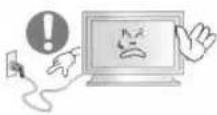
Do not use a damaged or loose plug.
This may cause electric shock or fire.
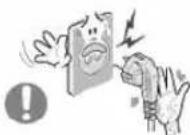
Do not pull the plug out by the wire nor touch the plug with wet hands.
This may cause electric shock or fire.

Use only a properly grounded plug and receptacle.
- An improper ground may cause electric shock or equipment damage.(Class I Equipment only.)

Insert the power plug firmly so that it does not come loose.
- A bad connection may cause fire.
Do not excessively bend the plug and wire nor place heavy objects upon them, which could cause damage.
This may cause electric shock or fire.

Do not connect too many extension cords or plugs to one outlet.
This may cause fire.
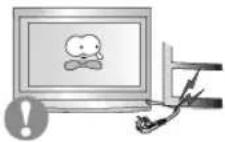
Do not disconnect the power cord while using the LCD monitor.
- A surge may be caused by the separation and may damage the LCD monitor.
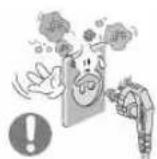
Do not use the power cord when the connector or plug is dusty.
-
If the connector or plug of the power cord is dusty, clean it with a dry cloth.
-
Using the power cord with a dusty plug or connector may cause electric shock or fire.
To disconnect the apparatus from the mains, the plug must be pulled out from the mains socket, therefore the mains plug shall be readily operable.
This may cause electric shock or fire.
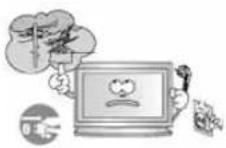
Installation
Be sure to contact an authorized the Service Center, when installing your LCD monitor in a location with heavy dust, high or low temperatures, high humidity, and exposed to chemical substances and where it operates for 24 hours such as at airports, train stations etc.

Failure to do so may cause serious damage to your LCD monitor.
Place your LCD monitor in a location with low humidity and a minimum of dust.
- Failure to do so may cause electric shock or fire inside the LCD monitor.
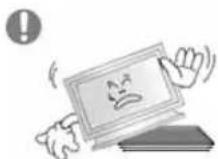
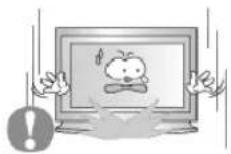
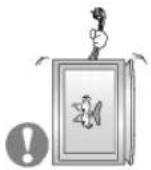
Do not drop the LCD monitor when moving it.
This may cause damage to the product or the person carrying it.
Install the LCD monitor base in a showcase or shelf so that the end of the base does not protrude from the showcase or shelf.
- Dropping the product may cause damage to the product or the person carrying it.
Do not place the product on an unstable or small surface area.
- Place the product on an even and stable surface, as the product may fall and cause harm to someone walking by, specifically children.
Do not place the product on the floor.
Take care, as someone, specifically children may trip over it.
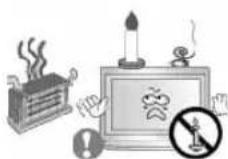
TO PREVENT THE SPREAD OF FIRE, KEEP CANDLES OR OTHER OPEN FLAMES AWAY FROM THIS PRODUCT AT ALL TIMES.
- Otherwise, this may cause fire.
- Keep any heating devices away from the power cable.
A melted coating may cause electric shock or fire.
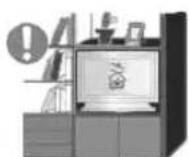
Do not install the product in places with poor ventilation, for instance, a bookshelf, closet, etc.
Any increase in the internal temperature may cause fire.
Put down the LCD monitor carefully.
- Failing to do so may damage the LCD monitor.

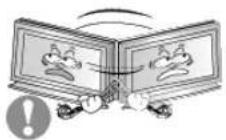
Do not place the LCD monitor face down.
This may damage the TFT-LCD surface.

The installation of the bracket must be done by a qualified professional.
- Installing the bracket by unqualified personnel may result in injury.
Always use the mounting device specified in the owner's manual.
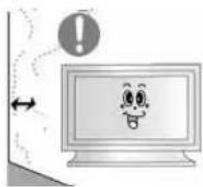
When installing the product, make sure to keep it away from the wall (more than 10cm / 4 inches) for ventilation purposes.
- Poor ventilation may cause an increase in the internal temperature of the product, resulting in a shortened component life and degraded performance.
Keep the plastic packaging (bag) out of children's reach.
The plastic packaging (bag) may cause suffocation if children play with it.
Clean

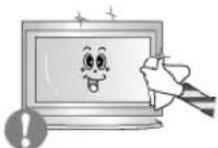
When cleaning the LCD monitor case or the surface of the TFT-LCD screen, wipe with a slightly moistened, soft fabric.
Do not spray water or detergent directly onto the LCD monitor.
This may cause damage, electric shock or fire.
Use the recommended detergent with a smooth cloth.

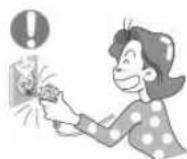
If the connector between the plug and the pin is dusty or dirty, clean it properly using a dry cloth.
- A dirty connector may cause electric shock or fire.
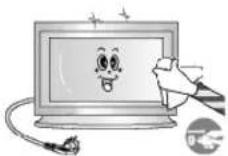
Make sure to unplug the power cord before cleaning the product.
- Otherwise, this may cause electric shock or fire.

Unplug the power cord from the power outlet and wipe the product using a soft, dry cloth.
- Do not use any chemicals such as wax, benzene, alcohol, thinners, insecticide, air freshener, lubricant or detergent.
Others
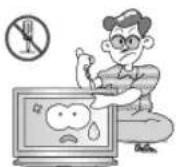
Do not remove the cover (or back).
This may cause electric shock or fire.
Refer to a qualified servicing company.

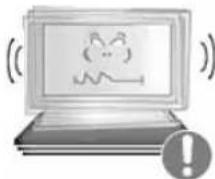
If your LCD monitor does not operate normally - in particular, if there is any unusual sound or smell coming from the LCD monitor - unplug it immediately and contact an authorized dealer or the Service Center.
This may cause electric shock or fire.

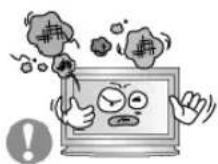
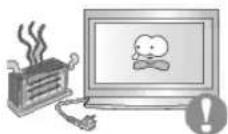
Keep the product away from places exposed to oil, smoke or moisture; do not install inside a vehicle.
This may cause a malfunction, electric shock or fire.
In particular, avoid operating the LCD monitor near water or outdoors where the LCD monitor could be exposed to snow or rain.
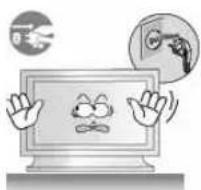
If the LCD monitor is dropped or the casing is damaged, turn the LCD monitor off and unplug the power cord. Then contact the
Service Center.
The LCD monitor may malfunction, causing electric shock or fire.
-
Disconnect the plug from the outlet during storms or lightning or if it is not used for a long period of time.
-
Failure to do so may cause electric shock or fire.
Do not try to move the LCD monitor by pulling only the wire or the signal cable.
- This may cause a breakdown, electric shock or fire due to damage to the cable.
Do not move the LCD monitor right or left by pulling only the wire or the signal cable.
- This may cause a breakdown, electric shock or fire due to damage to the cable.

Do not cover the vents on the LCD monitor cabinet.
Bad ventilation may cause a breakdown or fire.
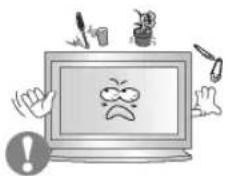
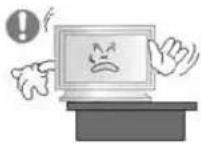
Do not place water containers, chemical products or small metal objects on the LCD monitor.
- This may cause a malfunction, electric shock or fire.
If a foreign substance enters the LCD monitor, unplug the power cord and contact the Service Center.

- Keep the product away from combustible chemical sprays or inflammable substances.
This may cause an explosion or fire.

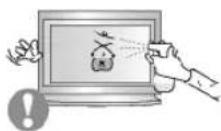
Never insert anything metallic into the LCD monitor openings.
This may cause electric shock, fire or injury.

Do not insert metal objects such as chopsticks, wire and tools or inflammable objects such as paper or matches into the vent, headphone port or AV ports or etc.
- This may cause electric shock or fire. If an alien substances or water enters the product, turn the product off, unplug the power connector from the wall outlet and contact the Service Center.

When viewing a fixed screen for an extended period of time, residual image or blurriness may appear.
- Change the mode to energy saving mode or set a screensaver to a changing picture when away from the LCD monitor for an extended period of time.
Adjusts the resolution and frequency to the level appropriate for the model.
An inappropriate resolution may cause undesirable picture quality. 32 inch (80 cm) - 1360 X 768
Viewing the LCD monitor continuously at a too close angle may result in damage to your eyesight.
To ease eye strain, take at least a five-minute break after every hour of using the LCD monitor.
Do not install the product on an unstable, uneven surface or a location prone to vibrations.
- Dropping the product may cause damage to the product or the person carrying it. Using the product in a location prone to vibrations may shorten the lifetime of the product or may cause the product to catch fire.
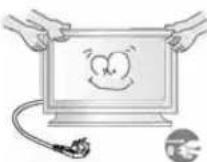
When moving the LCD monitor, turn off and unplug the power cord. Make sure that all cables, including the antenna cable and cables connected to other devices, are disconnected before moving the LCD monitor.
- Failure to disconnect cables may damage it and cause fire or electric shock.
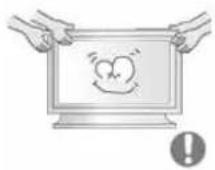
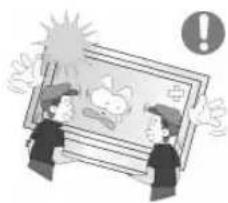
Make sure there are more than two people when moving the product.
- Dropping the product may cause a malfunction or injury to the person carrying it.

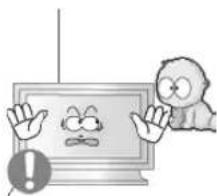
Place the product out of children's reach, as they could damage by hanging onto it.
- A falling product may cause injury to the person or even fatality.
When not using the product for an extended period of time, keep the product unplugged.
- Otherwise, this may cause heat emission from the accumulated dirt or degraded insulation, causing electric shock or fire.

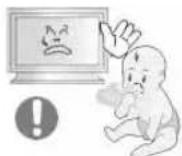
Do not place your children's favorite toys or any other objects of interest on the product.
Children may try to climb on the product to retrieve an object. The product could fall, causing injury or even fatality.

When removing batteries from the remote control, be careful that they are not swallowed by children. keep the batteries out of children's reach.
If the batteries are swallowed, see a doctor immediately.
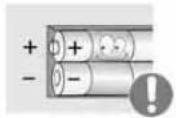
When replacing batteries, place the batteries in the correct +/polarity position as indicated on the battery holder.
The incorrect polarity may cause a battery to break or leak and may cause fire, injury, or contamination (damage).

Use only specified standard batteries. Do not use new and used batteries together.
- This may cause a battery to break or leak and may cause fire, injury, or contamination (damage).

The batteries (and rechargeable batteries) is not ordinary refuse and must be returned for recycling purposes. The customer is responsible for returning the used or rechargeable batteries for recycling purposes as the consumer.
- The customer can return used or rechargeable batteries to a nearby public recycling center or to a store selling the same type of the battery or rechargeable battery.
© 1995-2008 SAMSUNG. ALL Rights Reserved
Contents
Safety Instructions 1
Notational 1
Power 1
Installation 2
Clean 4
Others 5
Introduction 12
Package Contents 12
Your LCD Monitor 13
Mechanical Layout 20
Connections 24
Installing the Stand KIT 24
Connecting the LCD Monitor 25
MDC System 31
Adjusting the LCD Monitor 50
Input 50
Picture [PC/BNC/DVI Mode] 51
Picture [AV / S-Video /Component / DVI-Video Mode] 53
Sound. 55
Setup 56
Multi Control 59
Direct Functions 59
Troubleshooting 60
Self-Test Feature Check 60
Check List 61
Q&A 64
Specifications 65
General 65
PowerSaver 66
Preset Timing Modes 66
Information 68
For Better Display 68
PRODUCT INFORMATION (Image Retention Free) 68
Appendix 72
Contact SAMSUNG WORLDWIDE 72
Terms 74
Correct Disposal 75
Authority 75

Safety Instructions
Introduction
Package Contents
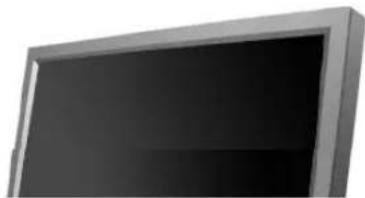
Your LCD monitor
Mechanical Layout
Connections
Using the Software
Adjusting the LCD monitor
Troubleshooting
Specifications
Information
Appendix
TFT-LCD Monitor
www.samsung.com

The color and appearance of the product may vary depending on the model, and the product specifications are subject to change without prior notice for reasons of performance enhancement.
Introduction
Package Contents
Note
- Please make sure the following items are included with your LCD monitor.
If any items are missing, contact your dealer.
Contact a local dealer to buy optional items.
Note
- This stand is not for the Floor Standing Type.
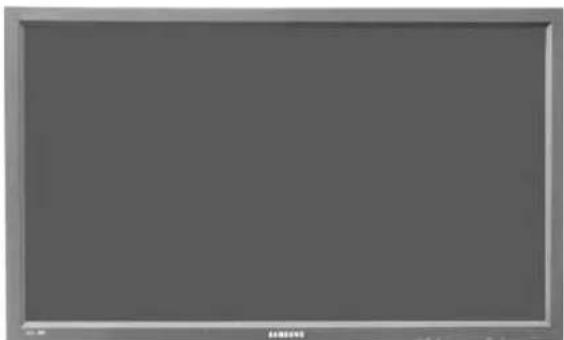
LCD monitor
Manuals

USERS MANUAL

Warranty Card
(Not available in all locations)

User's Guide, MDC Software
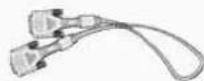
Cables
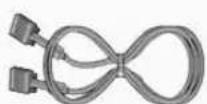

D-Sub Cable Power Cord
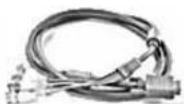
Other

Remote Control Batteries (AAA X 2) Cover-Hole
BNC to RCA Adaptor Jack
Semi Stand
Sold separately

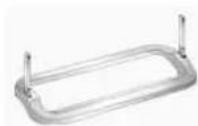
Wall Mount KIT Speaker Set Stand KIT
DVI Cable BNC Cable
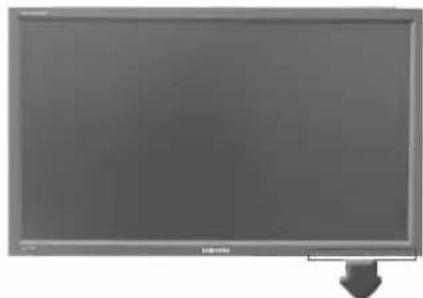
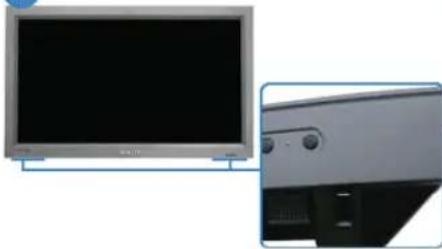
Your LCD monitor
Front

1) MENU
Opens the on-screen menu and exits from the menu or closes the adjustment menu.
2) Navigate buttons (Up-Down buttons)
Moves from one menu item to another vertically or adjusts selected menu values.
3) Adjust buttons (Left-Right buttons)/Volume buttons
Moves from one menu item to another horizontally or adjusts selected menu values.
Adjusts the audio volume.
4) ENTER
Activates a highlighted menu item.
5) SOURCE
Switches from PC mode to Video mode. Changing the source is only allowed for external devices that are connected to the LCD monitor at the time. [PC] [BNC] [DVI] [AV] [S-Video] [Component]
Click here to see an animation clip.
6)PIP
Push the PIP button to turn the PIP screen On / Off.
More than one PIP cannot overlap on screen as BNC and the component use the same terminal.
Click here to see an animation clip.
PC
AV / S-Video / Component Mode
BNC
AV/S-Video Mode
DVI
AV / S-Video / Component Mode
AV/S-Video
PC/BNC/DVI Mode
- Component
PC/DVI Mode

Power button
Turns the LCD monitor On/Off.
8) Power indicator
Shows PowerSaver mode by blinking green.
9) Remote Control Sensor
Aim the remote control towards this spot on the LCD monitor.

- See PowerSaver described in the manual for further information regarding power saving functions. For energy conservation, turn your LCD monitor OFF when it is not needed or when leaving it unattended for long periods.


- For detailed information concerning cable connections, refer to Connecting Cables under Setup. The LCD monitor's configuration at the back may vary slightly depending on the LCD monitor model.
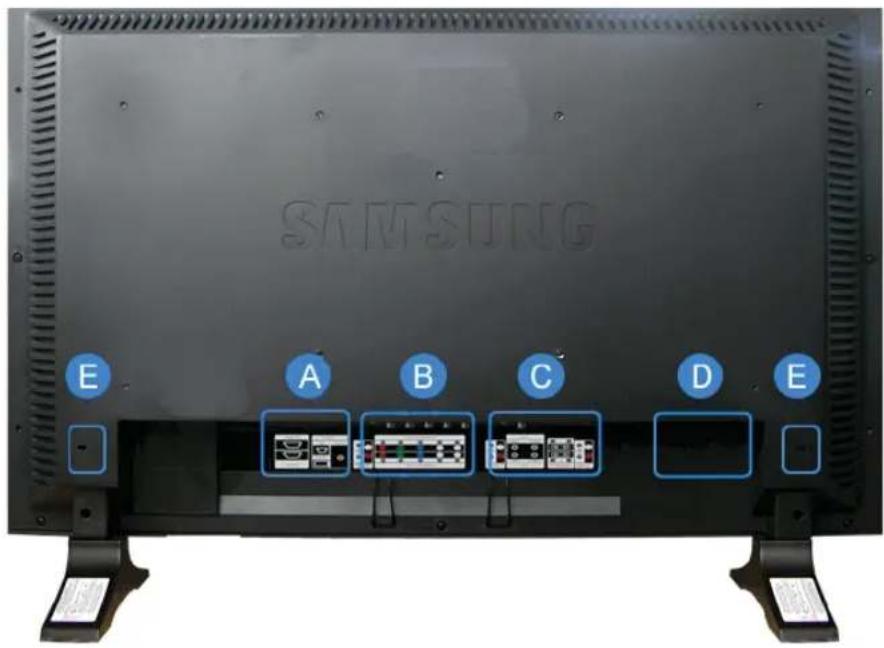
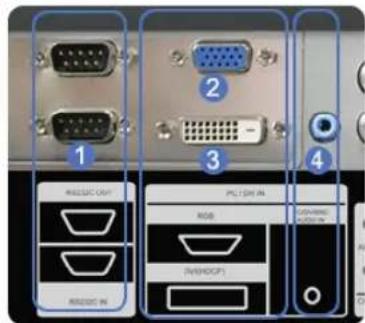
A
(1) RS232C OUT/IN (RS232C Serial PORT)
MDC(Multiple Display Control) Program Port
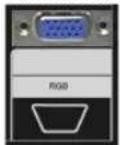
2) DVI / PC IN [RGB] (PC Video Connection Terminal) Using a D-Sub Cable (15 pin D-Sub)-PC mode (Analog PC)
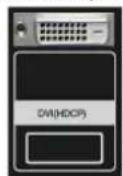
3) DVI / PC IN [DVI(HDCP)] (PC Video Connection Terminal) Using a DVI Cable (DVI-D to DVI-D)-DVI mode (Digital PC)
4) DVI / PC IN [PC/DVI/BNC AUDIO IN] (PC/DVI/BNC Audio Connection Terminal (Input))
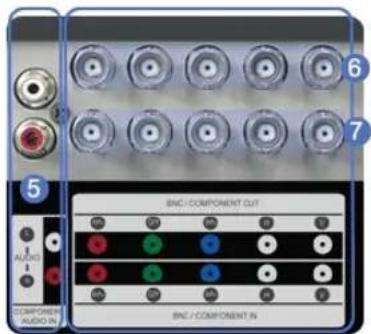
5) COMPONENT AUDIO IN [L-AUDIO-R] (Component Audio Connection Terminal (Input))
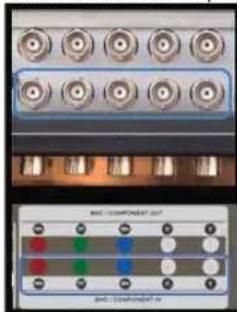
6) BNC/COMPONENT OUT [R/P R, G/Y, B/PB, H, V] (BNC/Component Connection Terminal (Output))
BNC (Analog PC) Connection: connecting the R, G, B, H, V ports
Component Connection: connecting the R, Y, Pb ports
7) BNC/COMPONENT IN [R/PR, G/Y, B/P8, H, V] (BNC/Component Connection Terminal (Input))
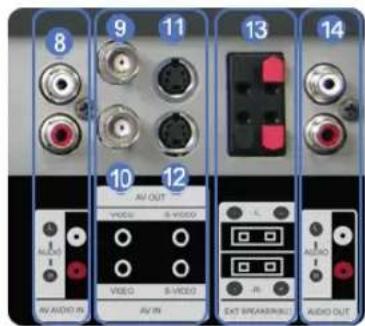
8) AV AUDIO IN [L-AUDIO-R] (LCD Monitor), Audio Connection Terminal (Input))
9) AV OUT [VIDEO] (VIDEO Connection Terminal): AV mode (Output)
10) AV IN [VIDEO] (VIDEO Connection Terminal) (Input)
11) AV OUT [S-VIDEO] (S-VIDEO Connection Terminal): S-VIDEO mode (Output)
12) AV IN [S-VIDEO] (S-VIDEO Connection Terminal) (Input)
B
C
13)EXT SPEAKER(8Ω)[--L-+,-R-+] (EXT Speaker Connection Terminal)
14) AUDIO OUT [L-AUDIO-R] (LCD Monitor Audio Connection Terminal (Output))
AUDIO OUT is the terminal for sound output of PC, DVI or BNC.
D
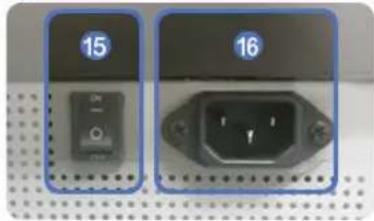
15) POWER S/W ON [ ] / OFF [O]
Switches the LCD Monitor On/Off.
16) POWER IN
The power cord plugs into the LCD Monitor and the wall plug.
Note
- The number of LCD Monitor that can be connected to loopout may differ depending on the cables, signal source etc. With cables where there is no degradation or signal source, up to ten LCD Monitors can be connected.
E
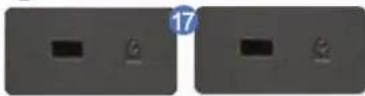
17) Kensington Lock

The Kensington lock is a device used to physically fix the system to something when using it in a public place. (The locking device has to be purchased separately.)
For using a locking device, contact the place of purchase.
Note
See Connecting the LCD Monitor for further information regarding cable connections.
Remote Control
Note
The performance of the remote control may be affected by a TV or other electronic device operating near the LCD Display, causing a malfunction due to interference with the frequency.
- ON/OFF
- MAGICNET
3.MDC - LOCK
- MagicNet buttons
- +100
7.VOL - MUTE
- MENU
- ENTER
12.M/B.P.MODE
13.AUTO - PRE-CH
15.VCH/P A - SOURCE
17 INFO - EXIT
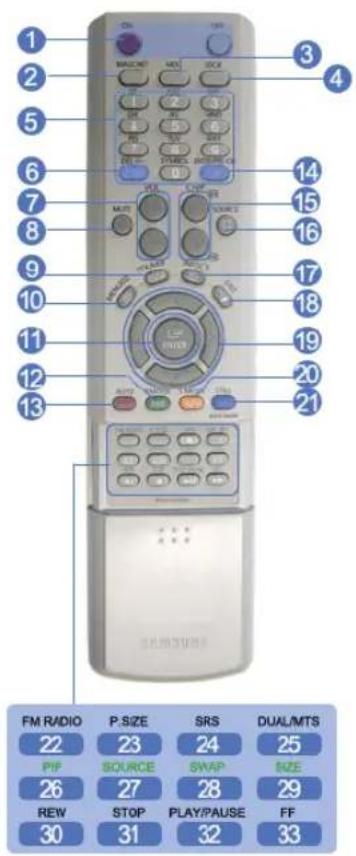
- Up-Down Left-Right buttons
20.讲S.MODE - STILL
- FM RADIO
23.P.SIZE
24.()SRS - H DUAL/MTS
- P
- SOURCE
- SWAP
- SIZE
- REW
- STOP
- PLAY/PAUSE
33.FF
1) ON/OFF
Turns the LCD Monitor On/Off.
2) MAGICNET
MagicNet Quick Launch Button
- This fuction does not work for this monitor.
3) MDC
MDC Quick Launch Button.
4) LOCK
Activates or deactivates all function keys on both the remote control and the LCD Display except for the Power and LOCK buttons.
5) MagicNet buttons
Used for MagicNet.
- Alphanumeric: Used to enter the Internet address.
- DEL: Functions as the backspace.
- SYMBOL: Used to enter the symbols. (O-)
- ENTER: Used to enter values.
- This fuction does not work for this monitor.
6) +100 ---
Press to select channels over 100.
For example, to select channel 121, press "+" and "1".
- This fuction does not work for this monitor.
7) VOL
Adjusts the audio volume.
8)

Pauses (mutes) the audio output temporarily.
This is displayed on the lower left corner of the screen.
The audio resumes if MUTE or - VOL + is pressed in the Mute mode.
9)

TV channels provide text information services via teletext.
- This fuction does not work for this monitor.
10) MENU
Opens the on-screen menu and exits from the menu screen or closes the screen adjustment menu.
11) ENTER
Activates a highlighted menu item.
12) M/B.P.MODE
When you press this button, current picture mode is displayed on the lower center of the screen.
AV / S-Video / Component : P.MODE
The Monitor has four automatic picture settings that are preset at the factory.
Then push button again to circle through available preconfigured modes.
(Dynamic Standard Movie Custom)
PC/DVI/BNC:M/B (MagicBrightTM)
MagicBright™ is a new feature providing the optimum viewing environment depending on the contents of
the image you are watching.
Then push button again to circle through available preconfigured modes.
(Entertain Internet Text Custom)
13) AUTO
Adjusts the screen display automatically in PC mode.
By changing the resolution in the control panel, auto function is performed.
14) PRE-CH
Returns to the immediately previous channel.
- This fuction does not work for this monitor.
15) VCH/PA
In TV mode, selects TV channels.
- This fuction does not work for this monitor.
16) SOURCE
Changes the video source.
17) INFO
The current picture information is displayed in the top left corner of the screen.
Exits from the menu screen.
19) Up-Down Left-Right buttons
Moves from one menu item to another horizontally, vertically or adjusts selected menu values.
20) S.MODE
When pressing this button, the current mode is displayed at the bottom centre of the screen.
The LCD Display has a built-in high fidelity stereo amplifier.
Then press the button again to circle through available preconfigured modes.
(Standard Music Movie Speech Custom)
21) STILL
Press the button once to freeze the screen. Press it again to unfreeze.
22) FM RADIO
Turns the FM Radio on/off.
In PC/DVI mode, sets the SOUND to FM Radio.
In general Video mode, selects FM Radio, and turns off the screen.
In areas where the signal is weak, noise may occur during FM radio broadcasts.
- This fuction does not work for this monitor.
23) P.SIZE
Press to change the screen size.
24) (●)SRS
SRS
25) I-ITDUAL/MTS
DUAL-
STEREO/MONO, DUAL I / DUAL II and MONO/NICAM MONO/NICAM STEREO can be operated depending on the broadcasting type by using the DUAL button on the remote control while watching TV.
MTS-
You can select MTS (Multichannel Television Stereo) mode.
| Audio Type | MTS/S_Mode | Default | |
| FM Stereo | Mono Mono | Manual Change | |
| Stereo | Mono ↔ Stereo | ||
| SAP | Mono ↔ SAP | Mono | |
- This fuction does not work for this monitor.
26) 三PIP
Every time you press the button, a PIP screen appears.
27) SOURCE
Changes the source of the PIP window signal.
28) SWAP
Swaps the contents of the PIP and main image.
The image in the PIP window will appear on the main screen, and the main screen image will appear in the PIP window.
29) SIZE
Switches the PIP Picture Size.
30) REW
Rewind
31) TOP
Stop
32) IAY/PAUSE
Play/Pause
33)
Fast forward
© 1995-2008 SAMSUNG. ALL Rights Reserved

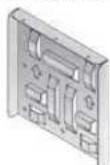
1. Mechanical Layout
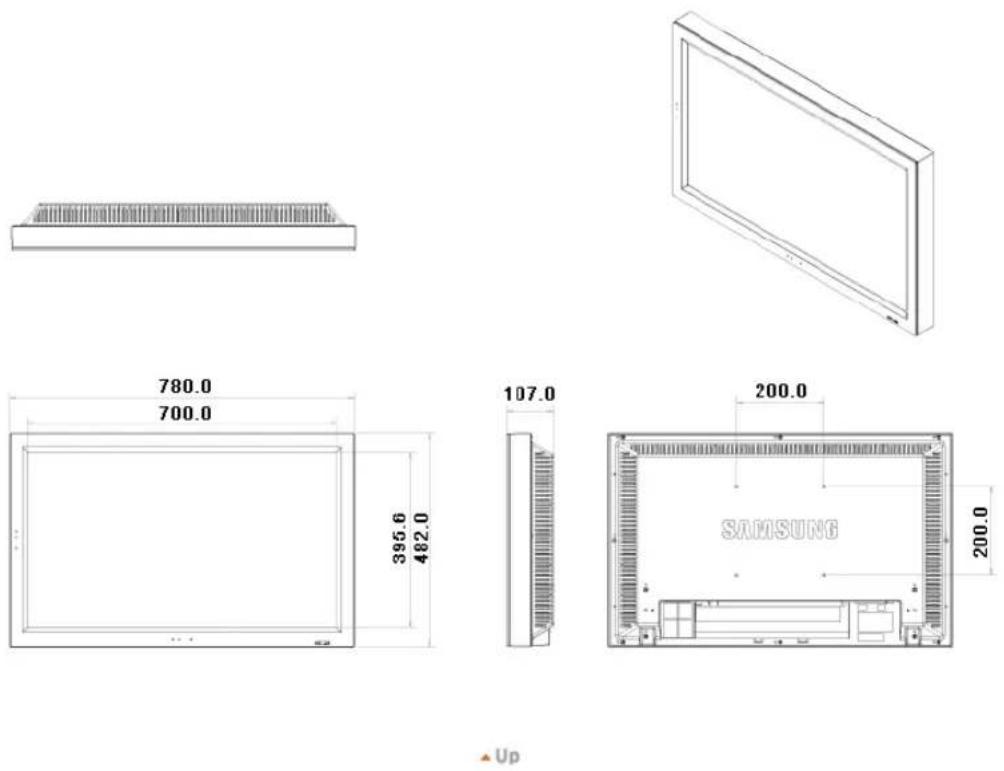
2. Monitor Head
3. Stand

4. Speaker


5. Installation VESA Bracket
- When installing VESA, make sure to comply with the international VESA standards.
- Purchasing VESA Bracket and Installation Information : Please contact your nearest Samsung Distributor to place an order. After your order is placed, installation professionals will visit you and install the bracket.
- At least 2 persons are needed in order to move the LCD Monitor.
Samsung is not responsible for any product damage or any injury caused by installation at customer's discretion.
Dimensions
200.0 (VESA MOUNT)

For securing the bracket on a wall, use only machine screws of 6 mm diameter and 8 to 12 mm length.
UP
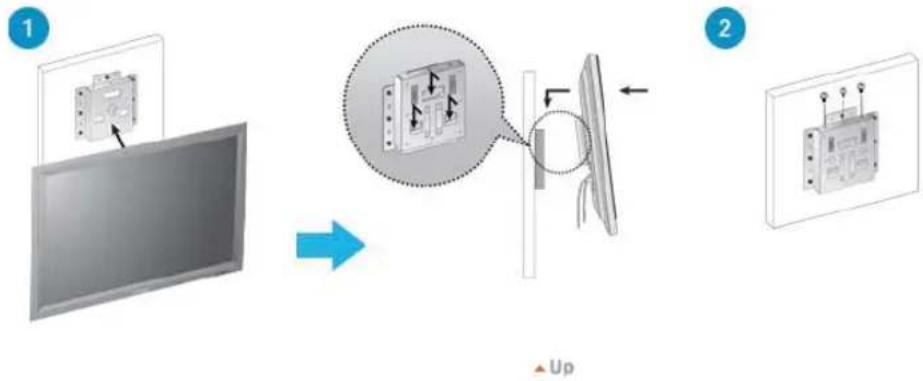
6. Wall Bracket Installation
- Contact a technician for installing the wall bracket.
Samsung Electronics is not responsible for any damages to the product or harm to customers when the installation is done by the customer.
This product is for installing on cement walls. The product may not stay in place when installed on plaster or wood.

Components(Sold separately)
Only use the components and accessories shipped with the product.


M6X L14

M4X L8

M4X L25
m : x = 1 或 3x + 4y + 1 = 0
A Wall-Bracket
B Set-Bracket
c Screw: 8 EA
D Screw 3 EA
Wood Screw: E 7 EA
F Antichlor 7EA
G Installation Guide

How to assemble the Wall Mount Bracket
- Mark the location of hole on the wall.
- Make over 35mm-depth-hole on the marked location using drill.
- Fix anchors F on each hole on the wall.
- Connect wall-bracket A to the wall with wood screws E after fitting anchors F into the wall-bracket A.

If the bracket is not firmly fixed to the wall, set can fall off.
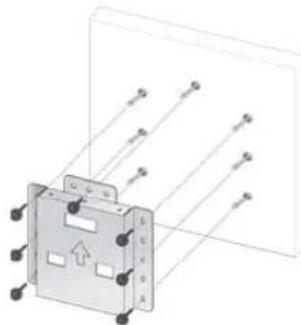
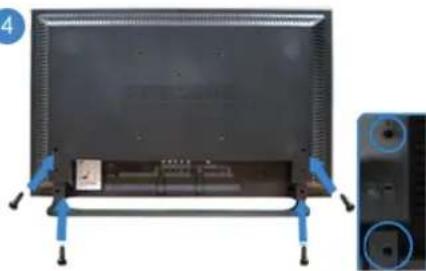
2
- Turn the power off and unplug the power cord from the outlet.
- Place the monitor faced down on a soft cloth or cushion on a table.
- Attach the set-bracket B onto the rear side of the monitor set and secure the screws C.
3 1. Insert three Hangers of the set-bracket B into the grooves of the wall-bracket A.
2. Fix set-bracket B and wall-bracket A with screws D.

Before installing the set on the wall, connect the cables to the set first.

Safety Instructions
Introduction
Connections
Installing the Stand KIT
Connecting the LCD
Display
Using the Software
Adjusting the LCD Display
Troubleshooting
Specifications
Information
Appendix
TFT-LCD Monitor
www.samsung.com

The color and appearance of the product may vary depending on the model, and the product specifications are subject to change without prior notice for reasons of performance enhancement.
Connections
Installing the Stand KIT
Note
- Only the supplied bolts should be used.
Caution
Samsung Electronics will not be responsible for damages caused by using a base other than those specified.
Installing the Semi Stand

Caution
Make sure to install the stand with the Caution label folded backwards.
1) A 'Cover-Protector' is used to protect the hole at the bottom of the LCD Monitor, where the stand is inserted. Be sure to remove the 'Cover-Protector' when attaching the provided Semi Stand or Stand KIT (sold separately) and cover the hole using the 'Cover-Hole' when attaching the wall mount kit.
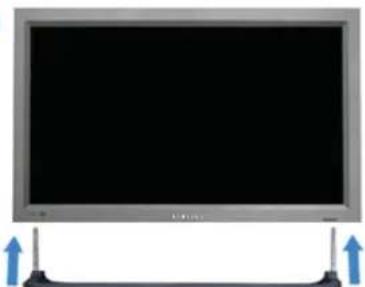
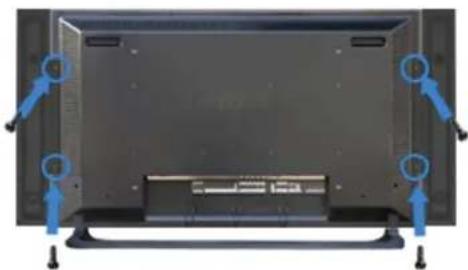
2) Set up the left and right stands respectively.
3) Insert the stand into the hole at the bottom of the LCD Monitor. Insert the screw into the hole indicated and tighten it. (M4 x L15)
Caution
This stand is designed for adjusting the screen angle. The company is not responsible for any problem caused when using this stand. Under no circumstances use the product as a stand for placing something on.
Installing the Stand KIT (sold separately)
1
2
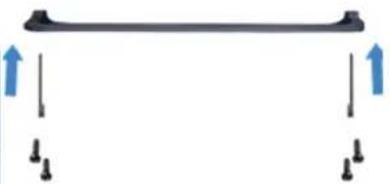
3
4
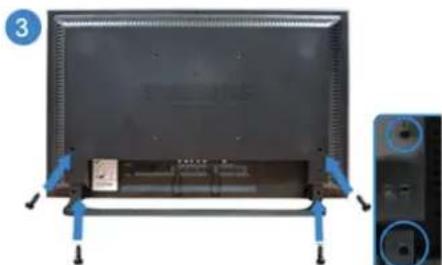
1) A 'Cover-Protection' is used to protect the hole at the bottom of the LCD Monitor, where the stand is inserted. Be sure to remove the 'Cover-Protection' when attaching the provided Semi Stand or Stand KIT (sold separately) and cover the hole using the 'Cover-Hole' when attaching the wall mount kit.
2) Ensure that the parts are inserted in the right direction and in the right place. (M4 x L15)
3) Insert the stand into the hole at the bottom of the LCD Monitor.
4) Insert the screw into the hole indicated and tighten it. (M4 x L15)
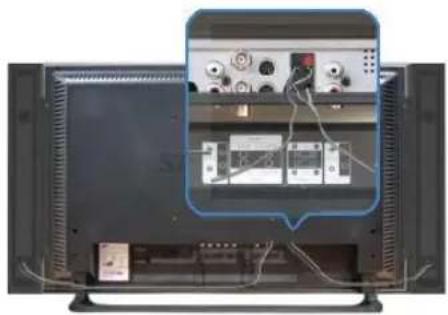
Connecting the LCD Monitor
Using a Power cord with Earth
In the event of failure, the earth lead may cause electric shock. Make sure to wire the earth lead in correctly, before connecting the AC power. When un-wiring the earth lead, make sure to disconn the AC power in advance.

Note
- AV input devices such as DVD players, VCR's or camcorders as well as your computer can be connected to the LCD Monitor. For detailed information on connecting AV input devices, refer to the User Controls under Adjusting Your LCD Monitor.
> Connecting to a Computer

1) Connect the power cord for your LCD Monitor to the power port on the back of the LCD Monitor.
Trun on the power switch.
2) There are 3 ways to connect the D-sub to your LCD Monitor. Choose one of the following:
2-1) Using the D-sub (Analog) connector on the video card. Connect the D-sub to the 15-pin, RGB port on the back of your LCD Monitor and the 15 pin D-sub Port on the computer.
2-2) Using the DVI (Digital) connector on the video card. Connect the DVI Cable to the DVI(HDCP) port on the back of your LCD Monitor and the DVI port on the computer.
2-3) Using the BNC (Analog) connector on the video card. Connect the BNC Cable to the BNC/COMPONENT IN-R,G,B,H,V ports on the back of your LCD Monitor and the 15 pi D-sub Port on the computer.
3) Connect the audio cable for your LCD Monitor to the audio port on the back of your computer.
Note
- Turn on both your computer and the LCD Monitor.
Note
The DVI cable or BNC cable is optional. Contact a local Samsung Electronics Service Center to buy optional items.
Connecting Digital DVD
Note
- Input devices such as digital DVD are connected to the DVI IN terminal of the monitor using the DVI cable.
- Then, start the DVD with a DVD disc inserted.
- Select Digital using the SOURCE button.
Note
The monitor has DVI IN connection terminals to connect DVI input devices digital DVD.
> Connecting to a VCR
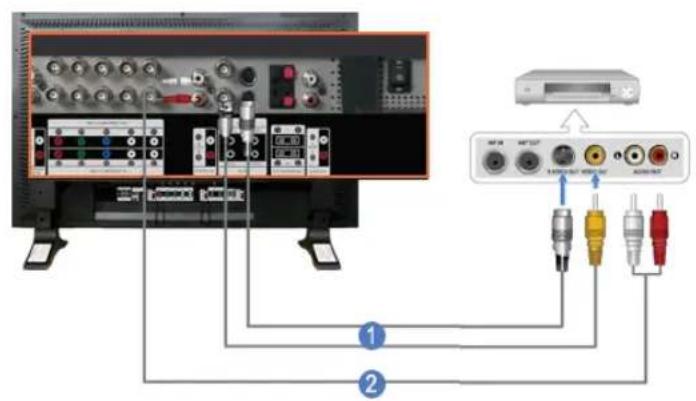
1) AV input devices such as VCRs or Camcorders are connected via the AV IN [VIDEO] or AV IN [S-VIDEO] of the LCD Monitor using an S-VHS or BNC cable.
2) Connect the Audio (L) and Audio (R) terminals of a VCR or Camcorders to the LCD Display's AV AUDIO IN [L-AUDIO -R] using audio cables.
Note
- Select AV or S-Video for a connected VCR or Camcorder using the SOURCE button on the front of the LCD Monitor or on the remote control.
The n, start the VCR or Camcorders with a tape inserted.
Note
The S-VHS or BNC cable is optional.
> Connecting to a DVD Player
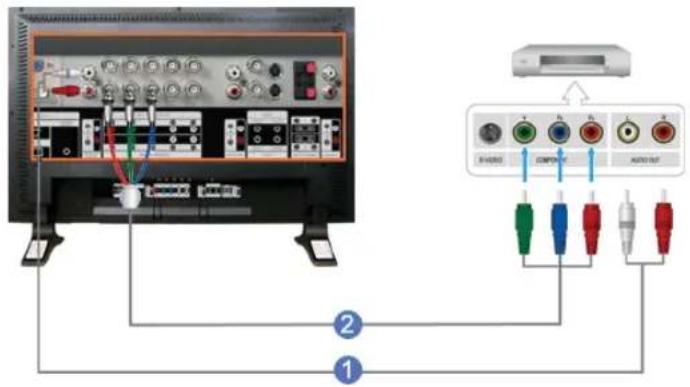
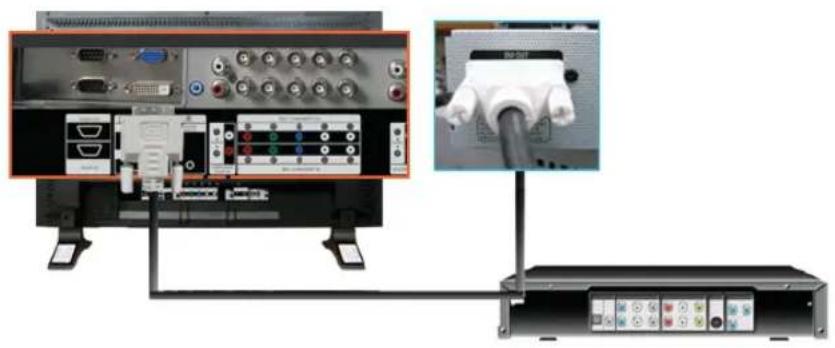
1) Connect a set of audio cables between the COMPONENT AUDIO IN [L-AUDIO-R] on the LCD Monitor and the AUDIO OUT jacks on the DVD player.
2) Connect a Component cable between the BNC/COMPONENT IN - P R, Y, PB port on the LCD Monitor and the PR, Y, PB jacks on the DVD player.
Note
- Select Component for the connection to a DVD player using the SOURCE button on the front of the LCD Monitor or on the remote control.
- Then, start the DVD Player with a DVD disc inserted.
Note
- A component cable is optional. For an explanation of Component video, consult your DVD manual.
> Connecting to a Camcorder
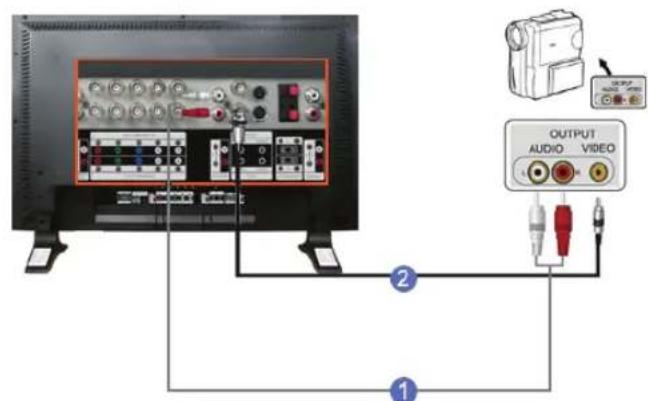
1)Locate the A/V output jacks on the camcorder. They are usually found on the side or back of the camcorder. Connect a set of audio cables between the AUDIO OUTPUT jacks on the camcorder and the AV AUDIO IN [L-AUDIO-R] on the LCD Monitor.
2) Connect a video cable between the VIDEO OUTPUT jack on the camcorder and the AV IN [VIDEO]on the LCD Monitor.
Note
- Select AV for the Camcorder connection using the SOURCE button on the front of the LCD Display or on the remote control.
- Then, start the Camcorders with a tape inserted.
Note
The audio-video cables shown here are usually included with a Camcorder.
(If not, check your local electronics store.)
If your camcorder is stereo, you need to connect a set of two cables.
> Connecting to a DTV Set Top Box
Note
- The connections for a typical Set Top Box are shown below.
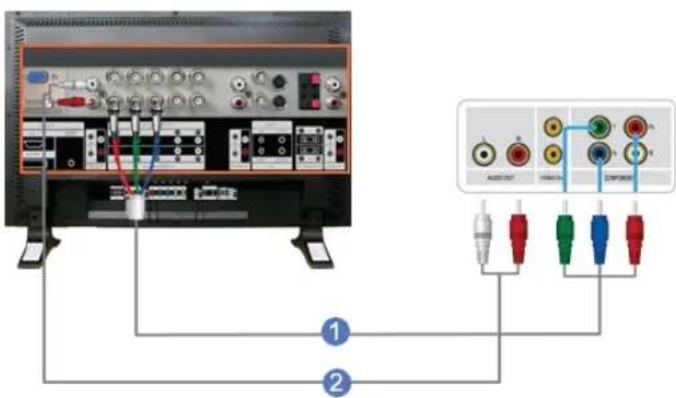
1) Connect a Component cable between the BNC / COMPONENT IN - PR, Y, PB port on the LCD Monitor and the PR, Y, PB jacks on the Set Top Box.
2) Connect a set of audio cables between the COMPONENT AUDIO IN [L-AUDIO-R] on the LCD Monitor and the AUDIO OUT jacks on the Set Top Box.
Note
- Select Component for the connection to a DTV Set Top Box using the SOURCE button on the front of the LCD Monitor or on the remote control.
Note
- For an explanation of Component video, see your Set Top Box owner's manual.
> Connecting Speakers
Note
-
Fasten the SET and the speaker using the screws.
-
Mount the speaker set without the speaker stand.

- Connect the speaker connection cable between the speaker connection jack on the back of the SET and the speaker connection jack on the back of the speaker.

Do not move the SET while the SET is connected to the speakers. The speaker-bracket for connecting the SET speaker my become damaged.
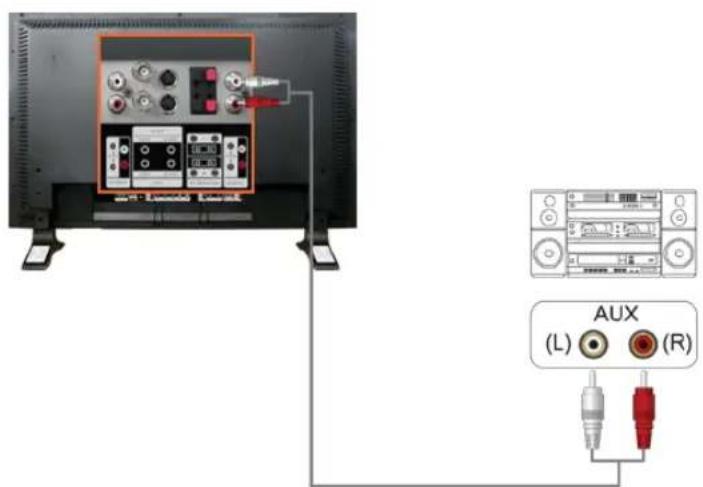
Connecting to an Audio System

- Connect a set of audio cables between the AUX L, R jacks on the AUDIO SYSTEM and the AUDIO OUT [L-AUDIO-R] on LCD Monitor.
© 1995-2008 SAMSUNG. ALL Rights Reserved
Introduction

A Multiple Display Control (MDC) is an application allowing various monitors to be easily and simultaneously operated on a PC. RS-232C, a standard of serial communication, is used for the communication between a PC and a monitor. Therefore, a serial cable should be connected between the serial port on a PC and the serial port on a monitor.
Main Screen
Click Start > Program > Samsung > MDC System to start the program.
Select a set to see the volume of the selected set within the slider.

1 Main Icons Select Button 5
2 Remocon Info Grid 6
3 Safety Lock Monitor Selection 7
4 Port Selection Control Tools 8
- Use the main icons to switch into each screen.
- Allows you to enable or disable the remote control signal receiving function of the monitor unit.
- Set the Safety Lock function.
When setting the Lock function, you can only operate power and lock buttons on the remote control and set.
- The setting for the PC Serial Port can change. The original value is COM1.
- Click Select all or Clear to select or clear all monitors.
- Use Grid to view brief information on selected monitor.
- Select a monitor from monitor Selection.
- Use Control Tools to control monitors.
Port Selection
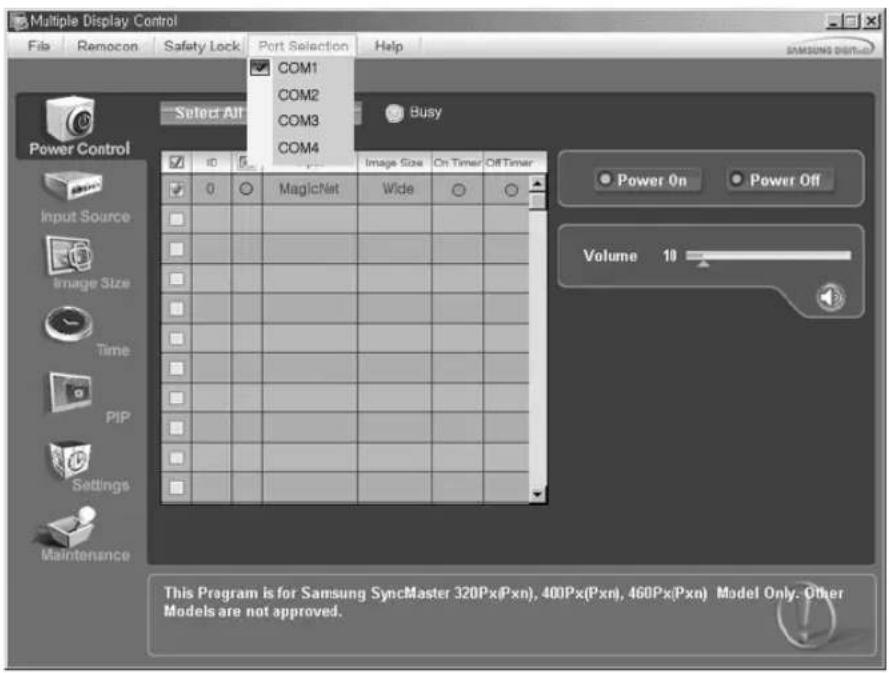
- The Multiple Display Control is originally set to COM1.
- If any port other than COM1 is used, COM1 through COM4 can be selected in the Port Selection Menu.
- If the exact port name that is connected to the LCD monitor using a serial cable is not selected, communication will be unavailable.
- The selected port is stored in the program and used for the next program as well.

Power Control
- Click Power Control of the main icons and the Power Control screen appears.
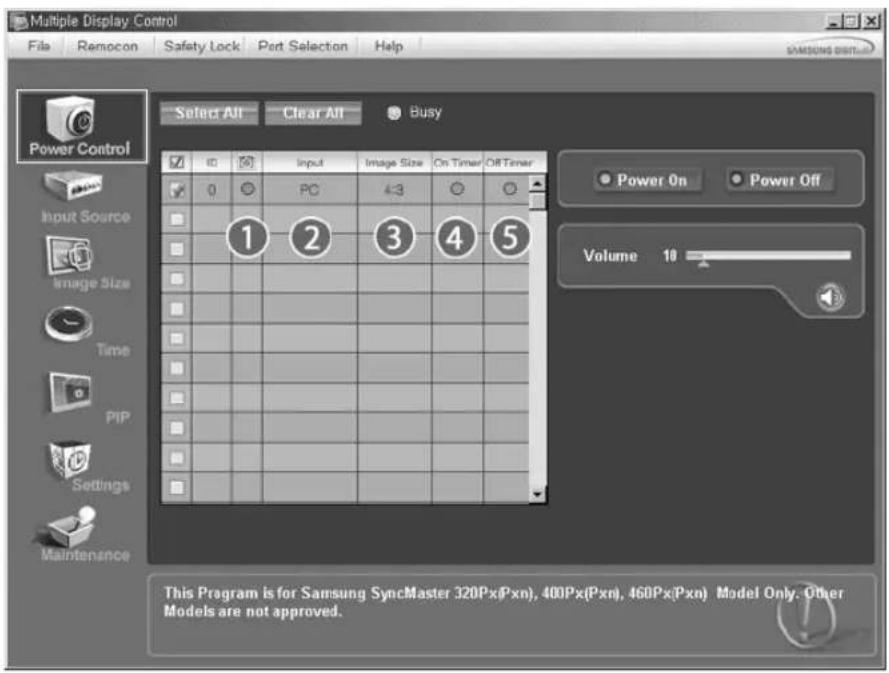
- Info Grid shows some basic information necessary to Power Control.
1) (Power Status)
2) Input
3) Image Size
4) On Timer
5) Off Timer
- Use the Select All button or Check Box to choose a monitor to control.
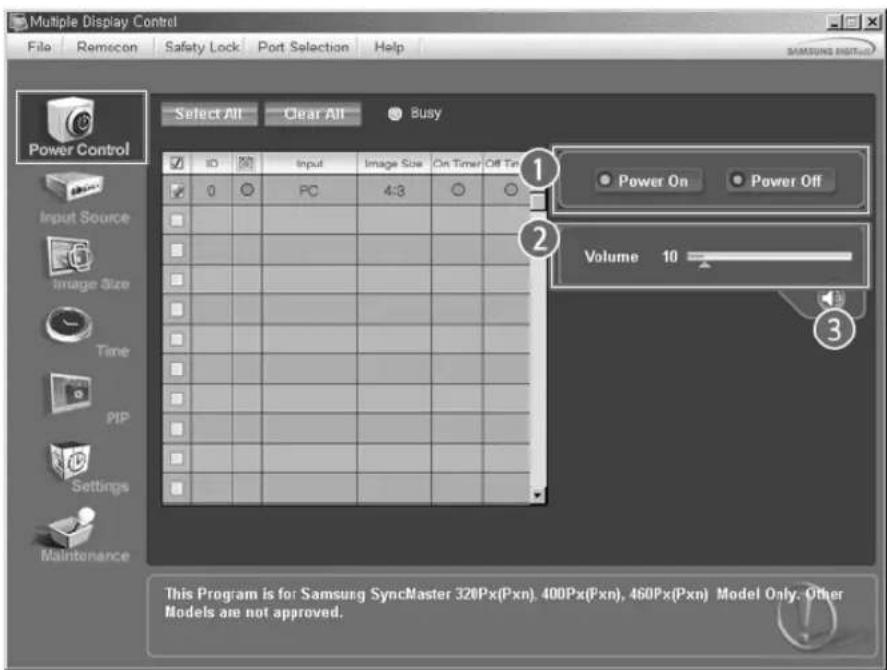
Power Control allows controlling some of the functions of the selected monitor.
1) Power On/Off
Turns the power of the selected monitor On/Off.
2) Volume
- Controls the volume level of the selected monitor.
It receives the volume value of the selected monitor from the sets and monitors it in the slider.
(When you cancel the selection or choose Select All, the value returns to the default value 10)
3) (Mute On/Off)
- Turns on/off the Mute function of the selected monitor.
When selecting one set at a time, turn on the Mute function for the selected set.
The Mute function is disabled automatically when you adjust the volume level.
(The values return to the default settings when you undo the selections or choose "Select All".)
\* The Power Control feature is available for all monitors.
\* The Volume Control and Mute features are available only for the monitors whose power status is ON.

Input Source
- Click Input Source of the main icons and the Input Source control screen appears.
Click Select All or use Check Box to select a monitor to control.
- TV Mode
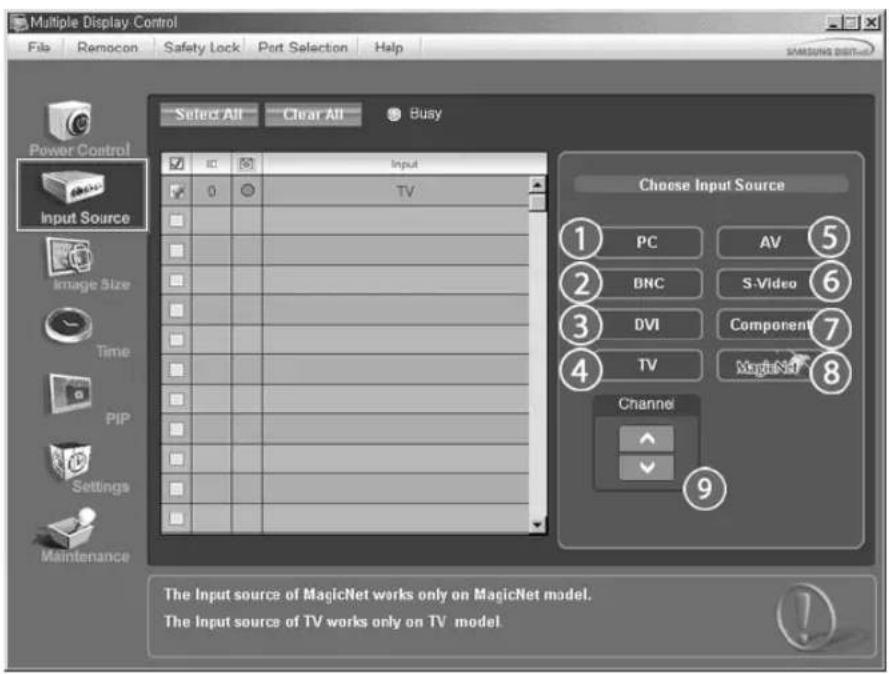
PC Mode

* Info Grid shows some basic information necessary to Input Source Control.
1)PC
- Changes the Input Source of the selected monitor to PC.
2) BNC
- Changes the Input Source of the selected monitor to BNC.
3) DVI
- Changes the Input Source of the selected monitor to DVI.
4) TV
- Changes the Input Source of the selected monitor to TV.
5)AV
- Changes the Input Source of the selected monitor to AV.
6) S-Video
- Changes the Input Source of the selected monitor to S-Video.
7) Component
- Changes the Input Source of the selected monitor to Component.
8) MagicNet
- The Input source of MagicNet works only on MagicNet model.
9) Channel
- Channel arrow appears when the Input Source is TV.
* TV Source can be selected only in products with TV and controlling channels is allowed only when Input Source is TV.
The Input Source Control feature is available only for the monitors whose power status is ON.

Image Size
PC, BNC, DVI
- Click Image Size of the main icons and the Image Size control screen appears.

Info Grid shows some basic information necessary to Image Size Control.
1) (Power Status)
- Shows the power status of the current monitor.
2) Image Size
- Shows the current Image Size of the monitor in use.
3) Input
- Shows the current Input Source of the monitor in use.
4) Info Grid Displays only the monitors whose Input Source is PC, BNC, DVI.
5) PC Source - When you click Image Size, the PC Source tab first appear. The Image Size Control button controls Image Size available for PC, BNC, DVI.
6) Video Source
- Click the Video Source tab to control Image Size for respective Input Source.
The Input source of MagicNet works only on MagicNet model.
Image Size Control is available only for the monitors for which power status is ON.

Image Size
TV, AV, S-Video, Component, DVI(HDCP)
- Click Image Size of the main icons and the Image Size control screen appears.

Info Grid shows some basic information necessary to Image Size Control.
1) Click the Video Source tab to adjust Image Size for TV, AV, S-Video, Component. DVI(HDCP). Click Select All or use Check Box to select a monitor to control.
2) Info Grid Displays only the monitor having TV, AV, S-Video, Component or DVI(HDCP) as input source.
3) Switch Image Size of the selected monitor randomly.
Note: Auto Wide, Zoom1 and Zoom2 are not available for selection when the input signal type for Component and DVI (HDCP) is 720p or 1080i.
The Input source of MagicNet works only on MagicNet model.
* The Image Size Control feature is available only for the monitors whose power status is ON.

Time
- Click Time of the main icons and the Time Control screen appears.
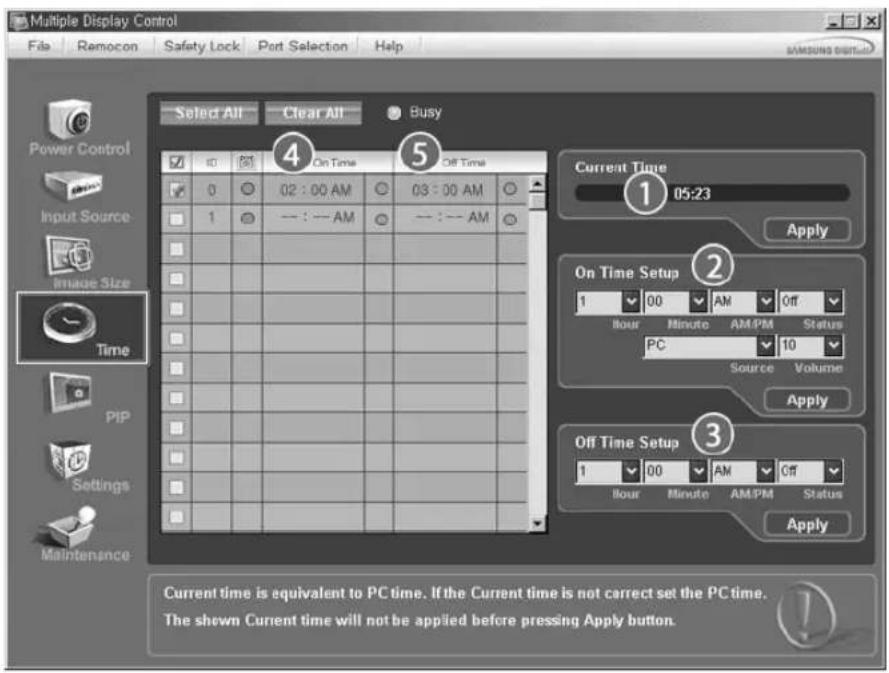
- Info Grid shows some basic information necessary to Time Control.
1) Current Time
- Set the current time for the selected monitor (PC Time).
- To change the current time, first change the PC Time.
2) On Time Setup
- Set the Hour, Minute, AM/PM of On Time Setup, Status, Source, Volume of the selected monitor.
3) Off Time Setup
- Set the Hour, Minute, and AM/PM, Status for Off Time Setup of the selected monitor.
4) Shows the On Time settings.
5) Shows the Off Time settings.
The Input source of MagicNet works only on MagicNet model.
* Time Control is available only for the monitors for which the power status is ON.
* At On Time Setup, TV Source functions only for TV Model.
At On Time Setup, MagicNet Source functions only for MagicNet Model.

PIP
PIP Size
- Click PIP of the main icons and the PIP control screen appears. Click Select All or use Check Box to select a monitor to control.
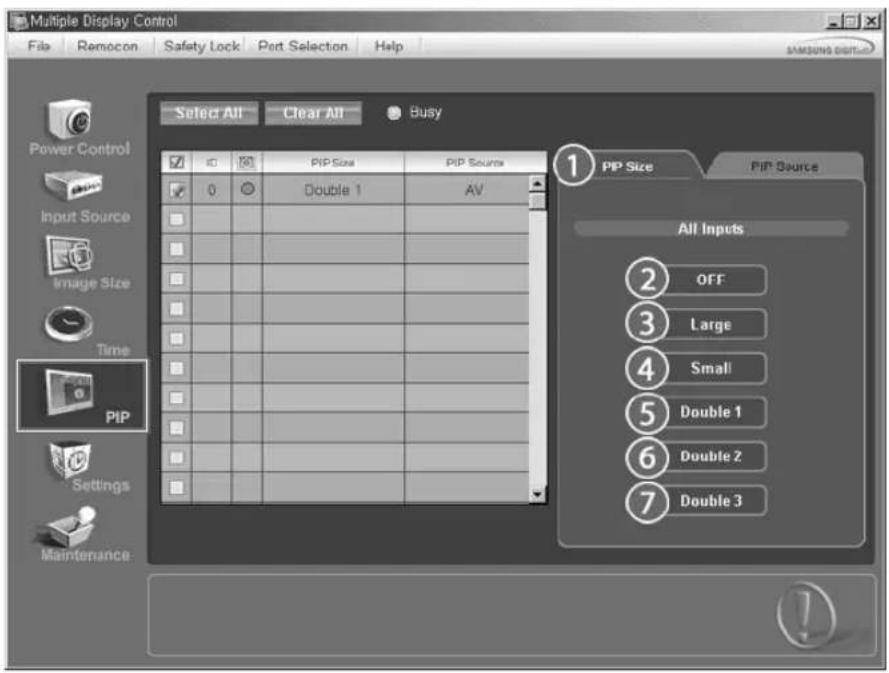
- Info Grid shows some basic information necessary to PIP Size Control.
1)PIP Size
- Shows the current PIP Size of the monitor in use.
2) OFF
- Turns off the PIP of the selected monitor.
3) Large
- Turns on the PIP of the selected monitor and changes the size to Large.
4) Small
- Turns on the PIP of the selected monitor and changes the size to Small.
5) Double 1
- Turns on the PIP of the selected monitor and changes the size to Double 1.
6) Double 2
- Turns on the PIP of the selected monitor and changes the size to Double 2.
7) Double 3 (Picture By Picture)
- Turns on the PBP of the selected monitor and changes the size to Double 3.

The Input source of MagicNet works only on MagicNet model.
PIP Size can be controlled with turning on the LCD monitor power.

PIP
PIP Source
-
Click PIP of the main icons and the PIP control screen appears.
-
PIP TV Mode

- PIP S-Video Mode

- Info Grid shows some basic information necessary to PIP Source Control.
1)PIP Source - PIP Source can be controlled with turning on the LCD monitor power.
2)PC - Changes the source of the PIP of the selected monitor to PC.
3) BNC
Changes the source of the PIP of the selected monitor to BNC.
4) DVI - Changes the source of the PIP of the selected monitor to DVI.
5) TV
-Changes the source of the PIP of the selected monitor to TV.
6)AV
- Changes the source of the PIP of the selected monitor to AV.
7) S-Video
- Changes the source of the PIP of the selected monitor to S-Video.
8) Component
- Changes the source of the PIP of the selected monitor to Component.
9) Channel
- Channel arrow appears when the PIP Source is TV.
Note: Some of the PIP Sources may not be available for selection, depending on the input source type of the Main Screen.
The Input source of MagicNet works only on MagicNet model.
TV Source can be selected only in products with TV and controlling channels is allowed only when PIP Source is TV.
The PIP Control feature is available only for the monitors whose power status is ON and the PIP function is set to ON.

Settings
Picture
- Click Settings of the main icons and the Settings Control screen appears.
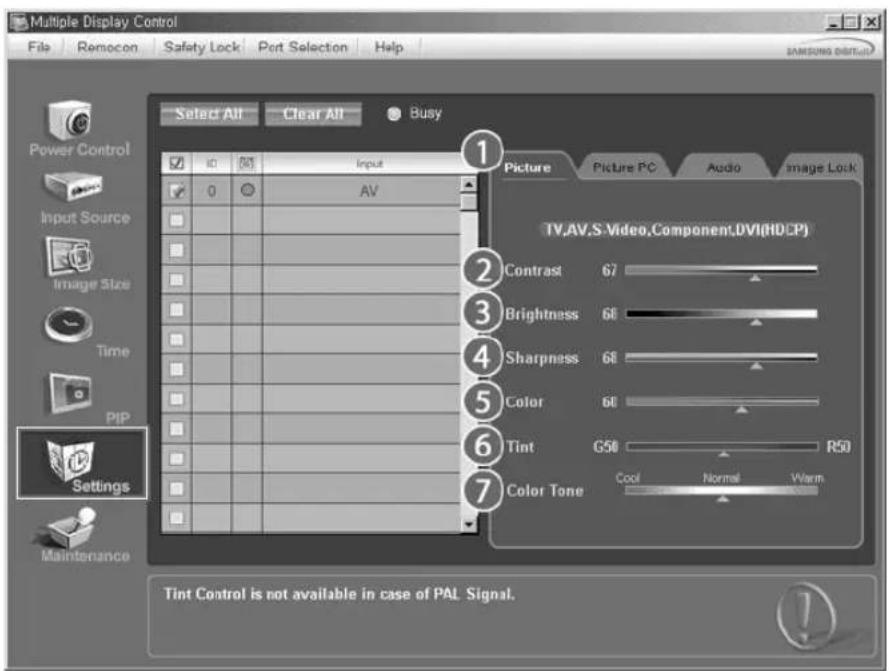

Info Grid shows some basic information necessary to Settings Control.
When each function is selected, the set value of the selected function is Displayed in the slide. When selected, each function fetches the value for the set and Displays it on the slide bar. When "Select All" is chosen, the default value is Displayed. Changing a value in this screen will automatically change the mode to "CUSTOM."
1) Picture
Available only for TV, AV, S-Video, Component, DVI(HDCP).
2) Contrast
- Adjusts Contrast of the selected monitor.
3) Brightness
- Adjusts Brightness of the selected monitor.
4) Sharpness
- Adjusts Sharpness of the selected monitor.
5) Color
- Adjusts Color of the selected monitor.
6)Tint
- Adjusts Tint of the selected monitor.
Available only for NT.
7) Color Tone
- Adjusts the Color Tone for the selected monitor.
The Input source of MagicNet works only on MagicNet model.
* This feature is available only for the monitors whose power status is ON and if no selection is made, the factory default is Displayed.

Settings
Picture PC
- Click Settings of the main icons and the Settings Control screen appears.
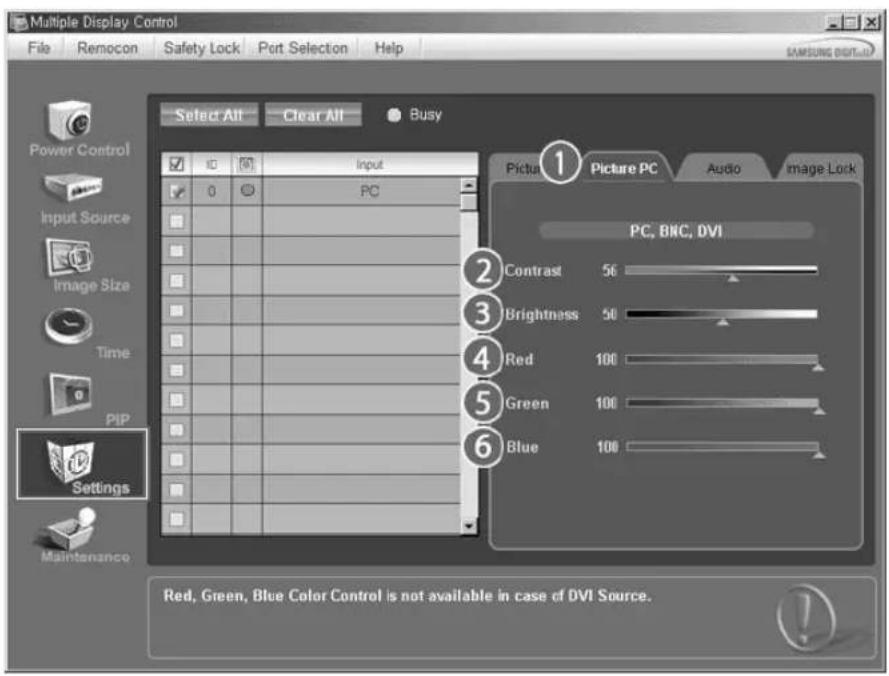
- Info Grid shows some basic information necessary to Settings Control. When each function is selected, the set value of the selected function is Displayed in the slide. When selected, each function fetches the value for the set and Display it on the slide bar. When "Select All" is chosen, the default value is Displayed. Changing a value in this screen will automatically change the mode to "CUSTOM."
1) Picture PC
Available only for PC, BNC, DVI.
2) Contrast
- Adjusts Contrast of the selected monitor.
3) Brightness
- Adjusts Brightness for the selected monitor.
4) Red
- Adjusts red Color of the selected monitor.
Available only for NT.
5) Green
- Adjusts green Color of the selected monitor.
Available only for NT.
6) Blue
- Adjusts blue Color of the selected monitor.
Available only for NT.
The Input source of MagicNet works only on MagicNet model.
* This feature is available only for the monitors whose power status is ON and if no selection is made, the factory default is Displayed.
Audio
- Click Settings of the main icons and the Settings Control screen appears.
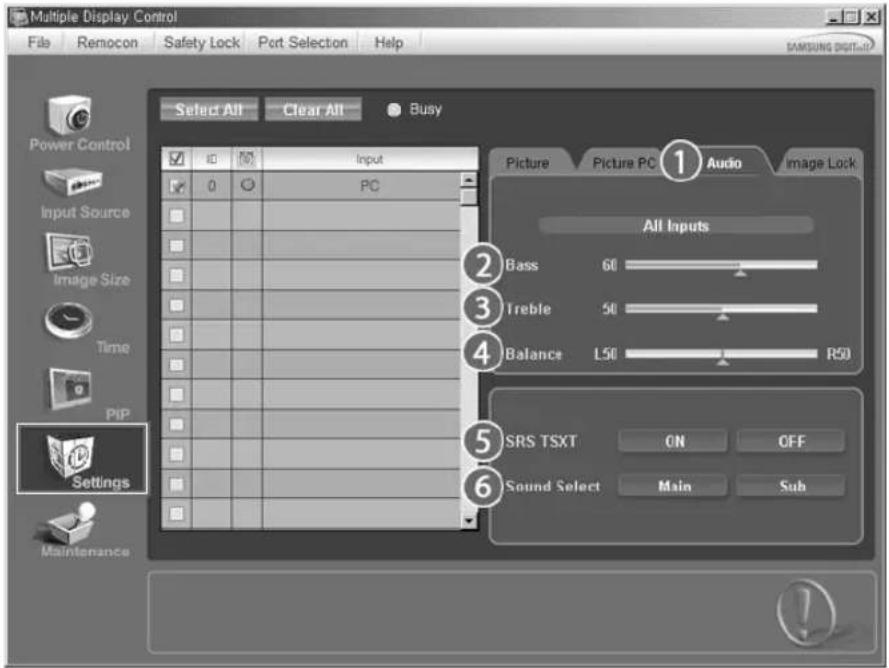
- Info Grid shows some basic information necessary to Settings Control. When each function is selected, the set value of the selected function is Displayed in the slide. When selected, each function fetches the value for the set and Displays it on the slide bar. When "Select All" is chosen, the default value is Displayed. Changing a value in this screen will automatically change the mode to "CUSTOM."
1) Audio
Controls audio settings for all input sources.
2) Bass
- Adjusts Bass of the selected monitor.
3) Treble
- Adjusts Treble of the selected monitor.
4) Balance
- Adjusts Balance of the selected monitor.
5) SRS TSXT
- SRS TSXT Sound ON/OFF of the selected monitor.
6) Sound Select
- Select either Main or Sub when PIP is On.
The Input source of MagicNet works only on MagicNet model.
* This feature is available only for the monitors whose power status is ON and if no selection is made, the factory default is Displayed.

Settings
Image Lock
- Click Settings of the main icons and the Settings Control screen appears.
Info Grid shows some basic information necessary to Settings Control.
1) Image Lock
Available only for PC, BNC.
2) Coarse
- Adjusts Coarse of the selected monitor.
3) Fine
- Adjusts Fine of the selected monitor.
4) Position
- Adjusts Position of the selected monitor.
5) Auto Adjustment
- Self-Adjust to the incoming PC signal.
The Input source of MagicNet works only on MagicNet model.
* Settings Control is available only for the monitors for which the power status is ON.

Maintenance
Lamp Control
- Click on the "Maintenance" icon in the Main Icon column to Display the Maintenance screen.

An "Info Grid" showing several basic data items appears.
1) Maintenance
- Allows the Maintenance Control function for all input sources.
2) Auto Lamp Control
- Automatically adjusts the backlight of the selected monitor at a specified time.
The Manual Lamp Control automatically turns off if you adjust using the Auto Lamp Control.
3) Manual Lamp Control
- Allows you to adjust the backlight of the selected monitor regardless of the time.
The Auto Lamp Control automatically turns off if you adjust using the Manual Lamp Control.
* The Maintenance Control feature is available only for the monitors whose power status is ON.
The Input source of MagicNet works only on MagicNet model.

Maintenance
Scroll
- Click on the "Maintenance" icon in the Main Icon column to Display the Maintenance screen.

1) Safety Screen
- Eliminates the afterimages that can result when the selected monitor stays in Pause mode for an extended period of time. You can set the repeat cycle timer by selecting the "Interval" by hour and "Second" by second. It can be set to Scroll, Pixel, Bar and Eraser by Screen Type.
The Input source of MagicNet works only on MagicNet model.
* Setting Second, you can set to 1, 2, 3, 4, 5 for Scroll Type and to 10, 20, 30, 40, 50 for Pixel, Bar, and Eraser Type.
* The Maintenance Control feature is available only for the monitors whose power status is ON.

Maintenance
Video Wall
- Click on the "Maintenance" icon in the Main Icon column to Display the Maintenance screen.

1) Video Wall
- A Video Wall is a set of video screens that are connected together, so that each screen shows a part of the whole picture or so that the same picture is repeated on each screen.
2) Video Wall (Screen divider)
- The screen can be divided into.
You can select a number of screens with a different layout when dividing.
-Select a mode from Screen divider. - Select a display from Display Selection.
The place will be set up by pressing a number in the selected mode.
The MDC program supplied by Samsung supports up to 4x4 LCD monitores.
3) On/Off
- Turns on/off the Video Wall function of the selected monitor.
4) Format
- The format can be selected to see a divided screen.
Full
Natural
- You may not operate this function in MagicNet.
The Maintenance Control function is available only for the monitors where the power status is ON.
Troubleshooting
-
The monitor you wish to control does not appear on the Power Control Info Grid
-
Check the connection of RS232C. (Check if it is properly connected to the Com1 port)
- Check the monitors to see if any of the other monitors connected have the same ID. If more than one monitors
have the same ID, those monitors are not properly detected by the program due to data conflict. - Check if the monitor Set ID is a number between 0 and 16. (Adjust using the Display menu)
Note: A monitor Set ID must be a value between 0 and 16.
-
The monitor you wish to control does not appear on the other Control Info Grids
-
Check to see if the monitor power is ON. (You can check this in Power Control Info Grid)
-
Check if you can change the input source of the monitor.
-
The dialogue box appears repeatedly.
-
Check to see if the monitor you wish to control is selected.
-
Both On Timer and Off Timer have been set but different time is showing.
-
Apply current time to synchronize the monitor clocks.
-
The remote may not function properly when you turn off the remote Function, disconnect the RS-232C cable, or exit the program in an Irregular manner. Rerun the program and turn the remote function again to Restore normal functions.
Settings Value display In Multiple Display Mode
-
When there are more than one monitors connected, the settings values are displayed as follows.
-
No selection: displays the Factory Default Value.
- Selected one monitor: Fetches and displays the settings value for the selected monitor.
- Selected one monitor (ID1) and add another monitor (ID3): The program, which was displaying the settings value of ID 1, fetches and displays the value of ID3.
- Selected all sets using Select All: Returns to the Factory Default Value.

Safety Instructions
Introduction
Connections
Using the Software
Adjusting the LCD monitor
Input
Picture
[PC / BNC /DVI Mode]
Picture
[AV/S-Video/
Component / DVI-Video
Mode]
Sound
Setup
Multi Control
Direct Functions
Troubleshooting
Specifications
Information
Appendix
TFT-LCD Monitor
www.samsung.com
The color and appearance of the product may vary depending on the model, and the product specifications are subject to change without prior notice for reasons of performance enhancement.
Adjusting the LCD monitor
Input
Available Modes

PC/BNC/DVI

AV

S-Video

Component

DVI-Video
Source List PASCD
[MONTH]→[ENTER]→[ENTER]→[A/V]→[ENTER]
Use to select PC, BNC, or other external input sources connected to the LCD monitor.
Use to select the screen of your choice.
[The direct button on the remote control is the 'SOURCE' button.]

Note
- PIP turns off when the LCD monitor is switched to an external source.
PIP PASCD
When external A/V devices such as VCRs or DVDs are connected to the LCD monitor, PIP allows you to watch video from those devices in a small window super-imposed on the PC Video signal. (Off/On)

Note
- More than one PIP cannot be overlapped on screen as BNC and the component use the same terminal.
1)PIP
[MONTH] [ENTER] [A/V] [ENTER] [ENTER] [A/V] [ENTER]
Turns the PIP Screen Off/On.
-Off
-On
[The direct button on the remote control is the 'PIP' button.]
2) Source
[MONTH]→[ENTER]→[△/V]→[ENTER]→[△/V]→[ENTER]→[△/V]→[ENTER]
Selects the input source for the PIP.
-PC:AV/S-Video/Component Mode
-BNC:AV/S-Video Mode
-DVI:AV/S-Video/ComponentMode
-AV/S-Video:PC/BNC/DVI Mode
- Component:PC/DVI Mode
[The direct button on the remote control is the 'SOURCE' button.]
3) Swap
[MONTH] [ENTER] [A/√] [ENTER] [A/√] [ENTER]
Swaps the contents of the PIP and main image.
The image in the PIP window will appear on the main screen, and the main screen image will appear in the PIP window.
[The direct button on the remote control is the 'SWAP' button.]
4) Size
[MONTH] [ENTER] [A/V] [ENTER] [A/V] [ENTER] [A/V] [ENTER]
Changes the Size of the PIP window.
[The direct button on the remote control is the 'SIZE' button.]
5) Position
[MONTH] [ENTER] [A/V] [ENTER] [A/V] [ENTER] [A/V] [ENTER]
Changes the Position of the PIP window.
6) Transparency
[MONTH] [ENTER] [A/V] [ENTER] [A/V] [ENTER] [A/V] [ENTER]
Adjusts the Transparency of PIP windows.
- High
- Medium
- Low
-Opaque
Note
If you select in Size Position and Transparency will not be activated.
Available Modes: PIP
Edit Name PASC0
[MONTH]→[ENTER]→[^/V]→[ENTER]→[^/V]→[ENTER]→[^/V]→[ENTER]
Name the input device connected to the input jacks to make your input source selection easier.
Picture [PC / BNC / DVI Mode]
Available Modes
PC/BNC/DVI

S-S-Video
Component
DVI-Video
MagicBrightTM
[ \text{[MENU]} \rightarrow [\wedge / \vee] \rightarrow [\text{ENTER} ] \rightarrow [\text{ENTER}] \rightarrow [\wedge / \vee] \rightarrow [\text{ENTER}] ]
MagicBright™ is a new feature providing the optimum viewing environment depending on the contents of the image you are watching.
Currently four different modes are available: Entertain, Internet, Text and Custom.
Each mode has its own pre-configured brightness value. You can easily select one of the four settings by simply pressing the MagicBrightTM control button.
1) Entertain
High brightness
For watching motion pictures such as a DVD or VCD.
2) Internet
Medium brightness
For working with a mixture of images such as the text with graphics added.
3) Text
Normal brightness.
For documentations or work involving a lot of text.
4) Custom
Although the values are carefully chosen by our engineers, the pre-configured values may not be comfortable for your eyes depending on your taste.
If this is the case, Adjusts the brightness and contrast by using the OSD menu.
[The direct button on the remote control is the 'M/B' button.]
Custom P
[ \text{[MENU]} \rightarrow [\wedge / \vee] \rightarrow [\text{ENTER}] \rightarrow [\wedge / \vee] \rightarrow [\text{ENTER}] \rightarrow [\text{ENTER}] \rightarrow [\wedge / \vee] / [< / >] \rightarrow [\text{ENTER}] ]
By using the on-screen menus, the contrast and brightness can be changed to your personal preference.
1) Contrast
Adjusts the Contrast.
2) Brightness
Adjusts the Brightness.
Note
- By adjusting the picture using the Custom function, MagicBright will change to Custom mode.
Color Tone P
[ \text{[MENU]} \rightarrow [\wedge / \vee] \rightarrow [\text{ENTER} ] \rightarrow [\wedge / \vee] \rightarrow [\text{ENTER}] \rightarrow [\wedge / \vee] \rightarrow [\text{ENTER}] ]
The color tones can be changed.
(Available in PC, BNC mode only)
Color Control
[ \text{[MENU]} \rightarrow [\wedge / \vee] \rightarrow [\text{ENTER} ] \rightarrow [\wedge / \vee] \rightarrow [\text{ENTER} ] \rightarrow [\text{ENTER} ] \rightarrow [< / >] \rightarrow [\text{ENTER}] ]
Adjusts the individual R, G, B color controls.
(Available in PC, BNC mode only)
- If you adjust the picture by using the Custom function, Color Tone will turn to the Cusome mode.
Image Lock P
Image Lock is used to fine-tune and get the best image by removing noise that creates unstable images with jitters and shakiness. If satisfactory results are not obtained using the Fine adjustment, use the Coarse adjustment and then use Fine again.
(Available in PC, BNC mode only)
1) Coarse
[MONTH] [A/V] [ENTER] [A/V] [ENTER] [ENTER] [</>] [ENTER]
Removes noise such as vertical stripes. Coarse adjustment may move the screen image area. You may relocate it to the center using the horizontal control menu.
2) Fine
[MENU] [A/√] [ENTER] [A/√] [ENTER] [A/√] [ENTER] [< / >] [ENTER]
Removes noise such as horizontal stripes. If the noise persists even after fine tuning, repeat it after adjusting the frequency (clock speed).
3) Position
[ \text{[MENU]} \rightarrow [\wedge / \vee] \rightarrow [\text{ENTER}] \rightarrow [\wedge / \vee] \rightarrow [\text{ENTER}] \rightarrow [\wedge / \vee] \rightarrow [\text{ENTER}] \rightarrow [< / >] \wedge [\wedge / \vee] \rightarrow [\text{ENTER}] ]
Adjusts the screen location horizontally and vertically.
Auto Adjustment P
[ \text{[MENU]} \rightarrow [\wedge / \vee] \rightarrow [\text{ENTER} ] \rightarrow [\wedge / \vee] \rightarrow [\text{ENTER}] ]
The values of Fine, Coarse, Position are adjusted automatically.
By changing the resolution in the control panel, the auto function is performed.
(Available in PC, BNC mode only)
[The direct button on the remote control is the 'AUTO' button.]
Signal Balance P
This is used to make up for the weak RGB signal transmitted by a long signal cable.
(Available in PC, BNC mode only)
1) Signal Balance
[ \text{[MEN] \rightarrow [A / V] \rightarrow [ENTER] \rightarrow [A / V] \rightarrow [ENTER] \rightarrow [ENTER] \rightarrow [A / V] \rightarrow [ENTER]} ]
Selects either On or Off with the signal control.
2) Signal Control
[MONTH] [AIV] [ENTER] [AIV] [ENTER] [AIV] [ENTER] [AIV] [ENTER]
[ \left[ \land \right] \lor ] \rightarrow \left[ < \right] \rightarrow \left[ \text{ENTER} \right] ]
Adjusts the R Phase, G Phase, B Phase, Gain and Sharpness manually.
Size P
[ \text{[MENU]} \rightarrow [\wedge / \vee] \rightarrow [\text{ENTER} ] \rightarrow [\wedge / \vee] \rightarrow [\text{ENTER}] \rightarrow [\wedge / \vee] \rightarrow [\text{ENTER}] ]
The Size can be switched.
1) 16:9
2) 4:3
PIP Picture P
[MONTH] [A/V] [ENTER] [A/V] [ENTER] [A/V] [ENTER] [A/V] [ENTER] [A/V]
] [ENTER ] [< / > ] [ENTER ]
Adjusts the PIP Screen Settings.
1) Contrast
Adjusts the Contrast of the PIP window on the screen.
2) Brightness
Adjusts the Brightness of the PIP window on the screen.
3) Sharpness
Adjusts the difference between the lightest and darkest areas of the PIP window.
4)Color
Adjusts the Color of the PIP window on the screen.
5) Tint
Adds a natural tone to the PIP window.
You can view a picture from AV, S-Video through the PIP screen in PC, BNC and DVI (PC) mode.
Operates only if the video signal is NTSC.
Available Modes: PIP ON
Picture [AV/S-Video/Component/DVI-Video Mode]
Available Modes
PC/BNC/DVI
AAV
S-S-Video
Component
D DVI-Video
Mode ASCD
[ \text{[MENU]} \rightarrow \left[\frac{\wedge}{\vee}\right] \rightarrow \left[\text{ENTER}\right] \rightarrow \left[\text{ENTER}\right] \rightarrow \left[\frac{\wedge}{\vee}\right] \rightarrow \left[\text{ENTER}\right] ]
The LCD monitor has four automatic picture settings ("Dynamic", "Standard", "Movie" and "Custom") that are
preset at the factory.
Dynamic, Standard, Movie, or Custom can be activated.
[The direct button on the remote control is the 'P.MODE' button.]
Custom ASCD
[ \text{[MENU]} \rightarrow [\wedge / \vee] \rightarrow [\text{ENTER}]\rightarrow [\wedge / \vee] \rightarrow [\text{ENTER}]\rightarrow [\wedge / \vee] \rightarrow [\text{ENTER}]\rightarrow [< I>] \rightarrow [\text{ENTER}] ]
By using the on-screen menus, the contrast and brightness can be changed to your personal preference.
1) Contrast
Adjusts the Contrast.
2) Brightness
Adjusts the Brightness.
3) Sharpness
Adjusts the picture sharpness.
4)Color
Adjusts the picture color.
5) Tint
Adds a natural tone to the monitor.
Operates only for AV and S-Video mode. Operates only if the video signal is NTSC.
Color Tone ASCD
[MONTH] [A/V] [ENTER] [A/V] [ENTER] [A/V] [ENTER]
The color tones can be changed. The individual Color components are also user adjustable.
The Size can be switched.
[The ZOOM1, ZOOM2 are not available in 1080i (or over 720p) of DTV.]
Digital NR (Digital Noise Reduction)
ASCD
[ \text{[MENU]} \rightarrow [\wedge / \vee] \rightarrow [\text{ENTER} ] \rightarrow [\wedge / \vee] \rightarrow [\text{ENTER} ] \rightarrow [\wedge / \vee] \rightarrow [\text{ENTER}] ]
Turns the Digital Noise Reduction feature Off/On.
The Digital Noise Reduction feature allows you to enjoy clearer and crisper images.
1) Off
2) On
Film Mode ASC
[MONTH] [A/V] [ENTER] [A/V] [ENTER] [A/V] [ENTER]
Turns Film Mode Off/On.
The Film Mode feature offers you a theater-quality viewing experience.
Not available in DVI-Video Mode.)
1) Off
2) On
PIP Picture ASCD
[ \text{[MENU]} \rightarrow [\text{A} / \text{V}] \rightarrow [\text{ENTER} ] \rightarrow [\text{A} / \text{V}] \rightarrow [\text{ENTER} ] \rightarrow [\text{A} / \text{V}] \rightarrow [\text{ENTER} ] \rightarrow [\text{A} / \text{V}] \rightarrow [\text{ENTER} ] \rightarrow [\text{A} / \text{V}] \rightarrow [\text{ENTER} ] \rightarrow [\text{A} / \text{V}] \rightarrow [< / >] \rightarrow [\text{ENTER}] ]
Adjusts the PIP Screen Settings.
1) Contrast
Adjusts the Contrast of the PIP window on the screen.
2) Brightness
Adjusts the Brightness of the PIP window on the screen.
Available Modes: PIP
Sound
Available Modes
PC/BNC/DVI
AAV
S-S-Video
Component
D DVI-Video
Mode PASC0
[ \text{[MENU]} \rightarrow [\wedge / \vee] \rightarrow [\text{ENTER} ] \rightarrow [\text{ENTER}] \rightarrow [\wedge / \vee] \rightarrow [\text{ENTER}] ]
The LCD monitor has a built-in high fidelity stereo amplifier.
1) Standard
Selects Standard for the standard factory settings.
2) Music
Selects Music when watching music videos or concerts.
3) Movie
Selects Movie when viewing movies.
4) Speech
Selects Speech when watching a show that is mostly dialogue (i.e., news).
5) Custom
Selects Custom if you want to Adjusts the settings according to your personal preferences.
Custom PASCD
[ \text{[MENU]} \rightarrow [\wedge / \vee] \rightarrow [\text{ENTER}] \rightarrow [\wedge / \vee] \rightarrow [\text{ENTER}] \rightarrow [\wedge / \vee] \rightarrow [\text{ENTER}] \rightarrow [\langle / \rangle] \rightarrow [\text{ENTER}] ]
The sound settings can be adjusted to suit your personal preferences.
1) Bass
Emphasizes low frequency audio.
2) Treble
Emphasizes high frequency audio.
3) Balance
Allows you to Adjusts the sound balance between the left and right speakers.
[You can hear the sound even when sound value is set to 0.]
Note
- If you adjust picture using Sound Custom function, Sound Mode will turn to Custom mode.
Auto Volume PASCD
[ \text{[MENU]} \rightarrow [\wedge / \vee] \rightarrow [\text{ENTER} ] \rightarrow [\wedge / \vee] \rightarrow [\text{ENTER}] \rightarrow [\wedge / \vee] \rightarrow [\text{ENTER}] ]
Reduces the difference in volume control between broadcasters.
1) Off
2) On
SRS TS XT PASC0
[ \text{[MENU]} \rightarrow [\Delta / \mathbb{V}] \rightarrow [\text{ENTER} ] \rightarrow [\Delta / \mathbb{V}] \rightarrow [\text{ENTER} ] \rightarrow [\Delta / \mathbb{V}] \rightarrow [\text{ENTER} ] ]
SRS TS XT is a patented SRS technology that solves the problem of playing 5.1 multichannel content over two speakers. TruSurround delivers a compelling, virtual surround sound experience through any two-speaker playback system, including internal television speakers. It is fully compatible with all multichannel formats.
1) Off
2) On
[The direct button on the remote control is the 'SRS' button.]
Sound Select PASC
[MONTH] [A/V] [ENTER] [A/V] [ENTER] [A/V] [ENTER]
Selects either Main or Sub when PIP is On.
1) Main
2) Sub
[Available Modes:PIP]
Setup
Available Modes
PC/BNC/DVI
AV
S S-Video
Component
D DVI-Video
Language PAsCD
[MONTH] [A/√] [ENTER] [ENTER] [A/√] [ENTER]
You can choose from 11 languages.
Note
The language chosen affects only the language of the OSD. It has no effect on any software running on the computer.
- English, Deutsch, Espanol, Français, Italiano, Svenska, 日本語, 中国语, Pycckn, 汉國詞, Portugués
Time PASCD
Selects from one of 4 time settings, Clock Set, Sleep Timer, On Timer, and Off Timer.
1)Clock Set
[ \text{[MEN] \rightarrow [A / V] \rightarrow [ENTER] \rightarrow [A / V] \rightarrow [ENTER] \rightarrow [ENTER] \rightarrow [< / >] \rightarrow [ENTER]} ] Current Time Setting.
2) Sleep Timer
[ \text{[MENU]} \rightarrow [\text{A} / \text{V}] \rightarrow [\text{ENTER}] \rightarrow [\text{A} / \text{V}] \rightarrow [\text{ENTER}] \rightarrow [\text{A} / \text{V}] \rightarrow [\text{ENTER}] \rightarrow [\text{A} / \text{V}] \rightarrow [\text{ENTER}] \rightarrow [\text{A} / \text{V}] \rightarrow [\text{ENTER}] ]
Turns the LCD monitor off automatically at certain times. (Off, 30, 60, 90, 120, 150, 180)
3) On Timer
[ \text{[MENU]} \rightarrow [\text{A} / \text{V}] \rightarrow [\text{ENTER}] \rightarrow [\text{A} / \text{V}] \rightarrow [\text{ENTER}] \rightarrow [\text{A} / \text{V}] \rightarrow [\text{ENTER}] \rightarrow [\text{A} / \text{V}] \rightarrow [\text{ENTER}] ]
Turns the LCD monitor on automatically at a preset time.
Controls the mode and the volume level at the time the LCD monitor turns on automatically.
4) Off Timer
[ \text{[MENU]} \rightarrow [\Lambda / \vee] \rightarrow [\text{ENTER}] \rightarrow [\Lambda / \vee] \rightarrow [\text{ENTER}] \rightarrow [\Lambda / \vee] \rightarrow [\text{ENTER}] \rightarrow [\Lambda / \vee] \rightarrow [\text{ENTER}] ]
Turns the LCD monitor off automatically at a preset time.
Note
- When selecting Yes for the On Timer or Off Timer when the Clock is not set up, a guiding message pops up: "Set the clock first."
Menu Transparency PASC
[ \text{[MENU]} \rightarrow [\text{A} / \text{V}] \rightarrow [\text{ENTER} ] \rightarrow [\text{A} / \text{V}] \rightarrow [\text{ENTER} ] \rightarrow [\text{A} / \text{V}] \rightarrow [\text{ENTER} ] ]
Changes the opaqueness of the OSD background.
Safety Lock PIN PASC0
[ \text{[MENU]} \rightarrow [\wedge / \vee] \rightarrow [\text{ENTER} ] \rightarrow [\wedge / \vee] \rightarrow [\text{ENTER} ] \rightarrow [0\sim 9] \rightarrow [0\sim 9] \rightarrow [0\sim 9] \rightarrow [0\sim 9] ]
The password can be changed.
Energy Saving PASCD
[ \text{[MENU]} \rightarrow [\wedge / \vee] \rightarrow [\text{ENTER} ] \rightarrow [\wedge / \vee] \rightarrow [\text{ENTER} ] \rightarrow [\wedge / \vee] \rightarrow [\text{ENTER} ] \rightarrow [\text{MENU}] ]
This feature adjusts the power consumption of the unit in order to save energy.
1) On
2) Off
Video Wall PASCD
A Video Wall is a set of video screens connected together, so that each screen shows a part of the whole picture or where the same picture is repeated on each screen.
When the Video Wall is on, you can adjust the Video Wall screen setting.
1) Video Wall
[ \text{[MENU]} \rightarrow [\text{A} / \text{V}] \rightarrow [\text{ENTER} ] \rightarrow [\text{A} / \text{V}] \rightarrow [\text{ENTER} ] \rightarrow [\text{ENTER} ] \rightarrow [\text{A} / \text{V}] \rightarrow [\text{ENTER} ] ]
Turns Off/On the Video Wall function of the selected monitor Off/On.
-Off
- On
2) Format
[MONTH] [A/V] [ENTER] [A/V] [ENTER] [A/V] [ENTER] [A/V] [ENTER]
The format can be selected to see a divided screen.
- Full
Provides a full screen without any margins. - Natural
monitors a natural image with the original aspect ratio intact.
3) Screen Divider
[ \text{[MENU]} \rightarrow [\text{A} / \text{V}] \rightarrow [\text{ENTER} ] \rightarrow [\text{A} / \text{V}] \rightarrow [\text{ENTER} ] \rightarrow [\text{A} / \text{V}] \rightarrow [\text{ENTER} ] \rightarrow [\text{A} / \text{V}] \rightarrow [\text{ENTER} ] ]
The screen can be divided into several images.
A number of screens can be selected with a different layout when dividing.
- Select a mode in Screen Divider.
- Select a monitor in monitor Selection.
The selection will be set up by pressing a number in the selected mode.
-2x2
-3x3
-4x4
-5x5
-1x2
-2x1
-1x5
-5x1
Note
- When Video Wall is running, the PIP, Auto Adjustment, Image Lock, and Size functions are not available. Launching Video Wall while PIP is running, will switch PIP Off.
Safety Screen PASCD
The Safety Screen function is used to prevent afterimages that may appear when a still picture is monitored on the screen over a long time.
- The Screen Scroll function scrolls the screen for the specified period of time.
- This function is not available when the power is turned off.
1) Safety Screen
[MONTH] [AIV] [ENTER] [AV] [ENTER] [ENTER] [AV] [ENTER]
Determines whether to turn the Screen Scroll function Off or On.
-Off
- On
2) Interval
[ \text{[MENU]} \rightarrow [\wedge / \vee] \rightarrow [\text{ENTER}]\rightarrow [\wedge / \vee] \rightarrow [\text{ENTER}]\rightarrow [\wedge / \vee] \rightarrow [\text{ENTER}]\rightarrow [\wedge / \vee] \rightarrow [\text{ENTER}] ]
Determines the time interval to run the Screen Scroll operation. (1~10 Hour)
The time is calculated on the basis of the power on time.
By default, the time is set to 10 hours.
-1~10 Hour
3) Second
[MONTH] [AIV] [ENTER] [AIV] [ENTER] [AIV] [ENTER] [AIV] [ENTER]
Determines the time period to run the Screen Scroll operation. (1~5 Second)
By default, the time is set to 5 seconds.
-
Type-Scroll: 1~5 Second
-
Type-Pixel, Bar, Eraser : 10~50 Second
4) Type
[ \text{[MENU]} \rightarrow \left[\frac{\wedge}{\vee}\right] \rightarrow \left[\text{ENTER}\right] \rightarrow \left[\frac{\wedge}{\vee}\right] \rightarrow \left[\text{ENTER}\right] \rightarrow \left[\frac{\wedge}{\vee}\right] \rightarrow \left[\text{ENTER}\right] \rightarrow \left[\frac{\wedge}{\vee}\right] \rightarrow \left[\text{ENTER}\right] ]
You can change the Safety Screen Type.
- Scroll
- Pixel
- Bar
Eraser
Resolution Select
[ \text{[MENU]} \rightarrow [\text{A} / \text{V}] \rightarrow [\text{ENTER} ] \rightarrow [\text{A} / \text{V}] \rightarrow [\text{ENTER} ] \rightarrow [\text{A} / \text{V}] \rightarrow [\text{ENTER} ] ]
When the picture is not monitored properly on the screen when setting the graphics card resolution of the computer to 1024 × 768 @ 60Hz , 1280 × 768 @ 60Hz , 1360 × 768 @ 60Hz or 1366 × 768 @ 60Hz , by using this function(Resolution Select), you can have the picture monitored on the screen in the specified resolution.
(Available in PC/BNC mode only.)
1) Off
2) 1024 X 768
3) 1280 × 768
4) 1360 X 768
5) 1366 X 768
Note
- Selecting the menu is only allowed when the graphics resolution is set to 1024 x 768 @ 60Hz, 1280 x 768 @ 60Hz, 1360 x 768 @ 60Hz or 1366 x 768 @ 60Hz.
Lamp Control PASCD
[ \text{[MENU]} \rightarrow \left[\frac{\wedge}{\wedge} \vee\right] \rightarrow \left[\text{ENTER}\right] \rightarrow \left[\frac{\wedge}{\wedge} \vee\right] \rightarrow \left[\text{ENTER}\right] \rightarrow \left[\text{ENTER}\right] \rightarrow \left[\frac{<1>}{<1>}\right] \rightarrow \left[\text{ENTER}\right] ]
Adjusts the inverter lamp in order to reduce energy consumption.
Power On Adjustment PASCD
[ \text{[MENU]} \rightarrow [\wedge / \vee] \rightarrow [\text{ENTER}] \rightarrow [\wedge / \vee] \rightarrow [\text{ENTER}] \rightarrow [\text{ENTER}] \rightarrow [\wedge / \vee] \rightarrow [\text{ENTER}] ]
Adjusts the Power On time for the screen.
*Caution: Set the Power On time to be longer to avoid overvoltage.
Reset
The picture parameters are replaced with the factory default values.
1) Image Reset
[ \text{[MENU]} \rightarrow [\wedge / \vee] \rightarrow [\text{ENTER} ] \rightarrow [\wedge / \vee] \rightarrow [\text{ENTER} ] \rightarrow [\text{ENTER} ] \rightarrow [< / >] \rightarrow [\text{ENTER}] ]
(Available in PC/BNC mode only.)
2)Color Reset P
[ \text{[MENU]} \rightarrow [\wedge / \vee] \rightarrow [\text{ENTER}] \rightarrow [\wedge / \vee] \rightarrow [\text{ENTER}] \rightarrow [\wedge / \vee] \rightarrow [\text{ENTER}] \rightarrow [< / >] \rightarrow [\text{ENTER}] ]
Available Modes
PC/BNC/DVI
AV
S S-Video
Component
D DVI-Video
Multi Control
Assigns an individual ID to the SET.
1) ID Setup
[MONTH] [A/V] [ENTER] [A/V] [ENTER] [ENTER] [0~9]
Assigns distinctive IDs to the SET.
2) ID Input
[ \text{[MENU]} \rightarrow \left[\frac{\wedge}{\vee}\right] \rightarrow \left[\text{ENTER}\right] \rightarrow \left[\frac{\wedge}{\vee}\right] \rightarrow \left[\text{ENTER}\right] \rightarrow \left[\text{ENTER}\right] \rightarrow [0-9] ]
Use to select the transmitter functions of the individual SET. Only a SET where the ID corresponds to the transmitter setting becomes activated.
Direct Functions
Available Modes

PC/BNC/DVI
S-S-Video
Component
D DVI-Video
MDC P ASCO
Moves to the Multi Control OSD screen.
LOCK PASC0
Sets the Safely Lock function.
1) Lock On
It will be locked.
2) Lock Off
It will be unlocked.
Note
- When setting the Lock function, you can only operate the lock button on the remote control and set.
The preset password on the LCD monitor is "0000".
Note
- Resetting the password for the function key lock.
Press MUTE 1 8 6 On. The password will be reset to '0000'. The remote control is required for resetting the password.

Safety Instructions
Introduction
Connections
Using the Software
Adjusting the LCD monitor
Troubleshooting
Self-Test Feature Check
Check List
Q&A
Specifications
Information
Appendix
TFT-LCD Monitor
www.samsung.com

The color and appearance of the product may vary depending on the model, and the product specifications are subject to change without prior notice for reasons of performance enhancement.
Troubleshooting
Self-Test Feature Check
Note
- Check the following items yourself before calling for assistance. Contact a Service Center for problems that you cannot solve by yourself.
Self-Test Feature Check
Your LCD monitor provides a self test feature that allows you to check whether your LCD monitor is functioning properly.
1) Turn off both your computer and the LCD monitor.
2) Unplug the video cable from the back of the computer.
3) Turn on the LCD monitor.
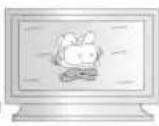
The figure shown below ("Check Signal Cable") appears on a black background when the LCD monitor is working normally even though no video signal is detected. While in the Self-Test mode, the LED power indicator remains green and the figure moves around on the screen.

Check Signal Cable PC
4) Turn off your LCD monitor and reconnect the video cable; then turn on both your computer and the LCD monitor
If your LCD monitor screen remains blank after using the previous procedure, check your video controller and computer system; your LCD monitor is functioning properly.
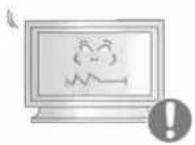
Check Cooling System
If the "Check Cooling System" message is monitored on the screen, this is because the cooling fan has a problem. Contact a service center to repair or replace the fan.
Not Optimum Mode
You can even view the screen at a resolution of 1360X768. However, you will receive the following message for a minute; You can choose to change the screen resolution or stay in the current mode during that time. And if the resolution is more than 85Hz , you will see the black screen because the LCD monitor does not support over 85Hz .
Not Optimum Mode
Recommended Mode 1360x768 60Hz
Note
Refer to Specifications > Preset Timing Modes for the resolutions or frequencies supported by the LCD monitor.
> Maintenance and Cleaning
1) Maintaining the LCD monitor Case.
Clean with a soft cloth after disconnecting the power cord.

- Do not use benzene, thinner or other flammable substances, or a wet cloth.
- We recommend that a Samsung cleansing agent is used to prevent damage to the screen.
2) Maintaining the Flat Panel monitor Screen.
Clean with a soft cloth (cotton flannel) smoothly.

- Never use acetone, benzene or thinner.
They may cause flaws or deformation of the screen surface. - The user will be required to pay costs and related expenses for repairing damages caused.
> Symptoms and Recommended Actions
Note
- A LCD monitor recreates visual signals received from the computer. Therefore, if there is a problem with the computer or the video card, this can cause the LCD monitor to become blank, have poor coloring, become noisy, and video mode not supported, etc. In this case, first check the source of the problem, and then contact a Service Center or your dealer.
1) Check if the power cord and the video cables are properly connected to the computer.
2) Check if the computer beeps more than 3 times when booting. (If it does, request an a service for the main board of the computer.)
3) If you installed a new video card or if you assembled the PC, check if you installed the Adaptor(video).
4) Check if the scanning ratio of the video screen is set to between 50Hz 85Hz . (Do not exceed 60Hz when using the maximum resolution.)
5) If you have problems in installing the Adaptor (video) driver, boot the computer in Safe Mode, remove the display Adaptor in the "Control Panel, System, Device Administrator" and then reboot the computer to reinstall the Adaptor (video) driver.
Check List
Note
- The following table lists possible problems and their solutions. Before calling for assistance, check the information in this section to see if you can remedy any problems for yourself. If you do need assistance, please call the phone number on the Information section or contact your dealer.
For more network-related information, refer to the MagicNet Troubleshooting section.
Problems related to the Installation (PC Mode)

- Problems related to the LCD monitor installation and their solutions are listed.
Problems Solutions
The LCD monitor screen flickers.
- Check if the signal cable between the computer and the LCD
monitor is securely connected.
(Refer to Connecting to a Computer)
Problems related to the Screen

- Problems related to the LCD monitor screen and their solutions are listed.
Problems Solutions
The screen is blank and the power indicator is off.
- Ensure that the power cord is firmly connected and the LCD LCD monitor is on.
(Refer to the Connecting the LCD monitor )
"Check Signal Cable" message.
- Ensure that the signal cable is firmly connected to the PC or video sources.
(Refer to the Connecting the LCD monitor )
- Ensure that the PC or video sources are turned on.
"Not Optimum Mode" message.
-
Check the maximum resolution and the frequency of the video Adaptor.
-
Compare these values with the data in the Preset Timing Modes Chart.
The picture rolls vertically.
- Check if the signal cable is securely connected.
Re-connect it, if necessary.
(Refer to Connecting to a Computer)
The image is not clear; picture is blurred.
Run Frequency Coarse and Fine tuning.
- Turn on again after removing all accessories
(video extension cable, etc.)
- Set the resolution and frequency to the recommended ranges.
The picture image is unstable and shakes.
- Check if the resolution and frequency set for the computer video card falls in the range supported by the LCD monitor.
If not, reset them referring to the current Information under the LCD monitor menu and Preset Timing Modes.
Ghost images are shown in the picture.
- Adjusts the brightness and contrast.
(Refer to the Brightness, Contrast)
The image is too light or too dark.
The screen color is inconsistent.
The color image is distorted by dark shadows.
- Adjust color using Custom under OSD Color Adjustment menu.
The color white is poor.
The power Indicator blinks green.
- The LCD monitor is currently saving the changes made to the settings to the OSD memory.
The screen is blank and the power indicator light is steady green or
The LCD monitor is using its power management system.
- Press a key on the keyboard.
blinks every 0.5 or 1 seconds.
The screen is blank and it is blinking.
- If you see the "TEST GOOD" message on the screen when you pressing the MENU button, check the cable connection between the LCD monitor and the computer to ensure that the connector is properly connected.
Problems related to Audio
Note
- Problems related to audio signals and their solutions are listed below.
Problems Solutions
No sound.
- Ensure that the audio cable is firmly connected to both the audio-in port on your LCD monitor and the audio-out port on your sound card. (Refer to the Connecting the LCD monitor)
- Check the volume level.
The sound level is too low.
- Check the volume level.
- If the volume is still too low after turning the control to its maximum, check the volume control on the computer sound card or software program.
The sound is too high or too low.
- Adjusts the Treble and Bass to the appropriate levels.
Problems related to the Remote Control
Note
- Problems related to the remote control and their solutions are listed.
Problems Solutions
The remote control buttons do not respond.
- Check the polarities (+/-) of the batteries.
- Check if the batteries are empty.
- Check if the power is on.
- Check if the power cord is securely connected.
- Check if a special fluorescent or neon lamp is on in the vicinity.
Question Answer
How can I change the frequency?
The frequency can be changed by reconfiguring the video card.
Note that video card support can vary, depending on the version of the driver used. (Refer to the computer or the video card manual for details.)
How can I Adjust the resolution?
- Windows XP: Set the resolution in the Control Panel Appearance and Themes display Settings.
- Windows ME/2000: Set the resolution in the Control Panel display Settings. Contact the video card manufacturer for details.
How can I set the Power Saving function?
- Windows XP: Set the resolution in the Control Panel Appearance and Themes display Screen Saver. Set the function in the BIOS-SETUP of the computer. (Refer to the Windows / Computer Manual).
- Windows ME/2000: Set the resolution at the Control Panel display Screen Saver. Set the function in the BIOS-SETUP of the computer. (Refer to the Windows / Computer Manual).
How can I clean the outer case/LCD Panel?
Disconnect the power cord and then clean the LCD monitor with a soft cloth, using either a cleaning solution or plain water.
Do not leave any detergent or scratches on the case. Do not let any water enter the LCD monitor.
© 1995-2008 SAMSUNG. ALL Right Reserved
SAMSUNG
Safety Instructions
Introduction
Connections
Using the Software
Adjusting the Monitor
Troubleshooting
Specifications
General
PowerSaver
Preset Timing Modes
Information
Appendix
TFT-LCD Monitor
www.samsung.com
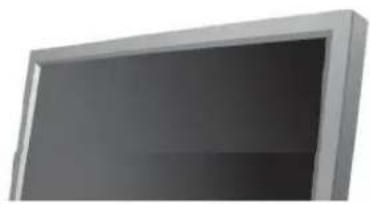
The color and appearance of the product may vary depending on the model, and the product specifications are subject to change without prior notice for reasons of performance enhancement.
Specifications
General
General
General
Model Name SMT-3211
LCD Panel
Size 32" Diagonal (80 cm)
monitor area 697.6845 mm (H) x 392.256 mm (V)
Pixel Pitch 0.51075 mm (H) x 0.51075 mm (V)
Synchronization
Horizontal 30 81kHz
Vertical 56 75Hz
monitorColor
monitor Color 16.7 M Colors
Resolution
Optimum resolution 1360 x 768 / 1366 x 768 @ 60 Hz depends on graphics card used
Maximum resolution 1366 x 768 @ 60 Hz
Input Signal, Terminated
RGB Analog, DVI(Digital Visual Interface) Compliant Digital RGB.
0.7 Vp-p Positive at 75Ω ± 10%
Separate H/V sync, Composite sync, SOG, TTL level, positive or negative.
Maximum Pixel Clock
100MHz
Power Supply
AC 100-240 V~(+/-10%), 50/60 Hz
Signal Cable
15pin to 15pin D-sub cable, Detachable
DVI-D to DVI-D connector, Detachable (option)
Signal Connectors
D-sub, BNC, DVI-D, YPbPr, S-VHS, VCR
Dimensions (WxHxD)/Weight
780 X 482 X 107 mm / 30.1 X 19.0 X 4.6 inch (without Stand)
780 × 530 × 223 mm / 30.1 × 20.9 × 8.8 inch (with Stand), 16.1 kg / 35.4 lbs
VESA Mounting Interface
200 mm x 200 mm (for use with Specialty(Am) Mounting hardware.)
Environmental considerations
Operating
Temperature: 50^ 104^ ( 10^ 40^ )
Humidity: 10% 80% , non-condensing
Temperature: -4^ 113^ (-20°C - 45°C)
Humidity: 5% 95% , non-condensing
Audio Characteristics
Audio Input 1 RCA Jack Red(R) White(L), 0.5 Vrms (-9 dB)
Audio Input 2 RCA Jack Red(R) White(L), 0.5 Vrms (-9 dB)
PC Audio Input 3.5 Ø Stereo Jack, 0.5 Vrms (-9 dB)
Frequency RF: 80Hz 15kHz (at -3 dB)
Response AV: 80 Hz ~ 20 kHz (at -3 dB)
Plug and Play Capability
This monitor can be installed on any Plug & Play compatible system. The interaction of the monitor and the computer systems will provide the best operating conditions and monitor settings. In most cases, the monitor installation will proceed automatically, unless the user wishes to select alternate settings.
Dot Acceptable
TFT LCD panels manufactured by using advanced semiconductor technology with precision of 1ppm (one millionth) above are used for this product. But the pixels of RED, GREEN, BLUE and WHITE color appear to be bright sometimes or some black pixels may be seen. This is not from bad quality and you can use it without any problems.
For example, the number of TFT LCD sub pixels contained in this product are 3,133,440.
Note
- Design and specifications are subject to change without prior notice.
Class B Equipment (Information Communication equipment for residential use)
- This product complies with the Electromagnetic Compatibility Directives for residential use and can be used in all areas including common residential areas. (Class B equipment emits less electromagnetic waves than Class A equipment.)
PowerSaver
This monitor has a built-in power management system called PowerSaver. This system saves energy by switching your monitor to low-power mode when it has not been used for a certain amount of time. The monitor automatically returns to normal operation when you press a key on the keyboard. For energy conservation, turn your monitor OFF when it is not needed, or when leaving it unattended for long periods. The PowerSaver system operates with a VESA DPM compliant video card installed in your computer. Use the software utility installed on your computer to set up this feature.
State
Normal
Power saving
Power off
Power off
Operation
mode
Power Indicator Green Green, Blinking Amber Black
Power Consumption
Less than
Less than 1 W
Less than 1 W
0W
(Off-mode)
(Power button)
(Power Switch)

This monitor is EPA ENERGY STAR ^ 念 compliant and ENERGY2000 compliant when used with a computer equipped with VESA DPM functionality.
As an ENERGY STAR® Partner, SAMSUNG has determined that this product meets the ENERGY STAR® guidelines for energy efficiency.
Preset Timing Modes
> Preset Timing Modes
If the signal transferred from the computer is the same as the following Preset Timing Modes, the screen will be adjusted automatically. However, if the signal differs, the screen may go blank while the power LED is on. Refer to the video card manual and Adjusts the screen as follows.
monitor Mode
Horizontal
Frequency
(kHz)
Vertical
Frequency
(Hz)
Pixel Clock
(MHz)
Sync Polarity
(HV)
MAC,640x48035.00066.66730.240-/-
MAC,832x624 49.726 74.551 49.500
31.469 70.086 25.175 +/-
IBM, 640 x 480 31.469 59.940 25.175 -/-
IBM, 720 x 400 31.469 70.087 28.322 -/+
VESA, 640 x 480 37.861 72.809 31.500 -/
VESA,640x48037.50075.00031.500-/-
VESA, 640 x 480 43.269 85.008 36.000 -f-
VESA,800x60035.15656.25036.000+/+
VESA, 800 x 600 37.879 60.317 40.000 +/-
VESA,800x60048.07772.18850.000+/+
VESA,800x60046.87575.00049.500+/-
VESA,800x60053.67485.00056.250+
VESA, 1024 x 768 48.363 60.004 65.000
VESA, 1024 x 768 56.476 70.069 75.000 -/
VESA, 1024 x 768 60.023 75.029 78.750 +/-
VESA, 1024 x 768 68.677 85.997 94.500 +/-
VESA, 1360 x 768 47.712 60.000 85.500 +/-

Horizontal Frequency
The time to scan one line connecting the right edge to the left edge of the screen horizontally is called the Horizontal Cycle and the inverse number of the Horizontal Cycle is called the Horizontal Frequency. Unit: kHz
Vertical Frequency
Like a fluorescent lamp, the screen has to repeat the same image many times per second to monitor an image to the user. The frequency of this repetition is called the Vertical Frequency or Refresh Rate. Unit: Hz
© 1995~2008 SAMSUNG. ALL Right Reserved

Safety Instructions
Introduction
Connections
Using the Software
Adjusting the LCD monitor
Troubleshooting
Specifications
Information
For Better display
PRODUCT INFORMATION
(ImageretentionFree)
Appendix
TFT-LCD Monitor
www.samsung.com

The color and appearance of the product may vary depending on the model, and the product specifications are subject to change without prior notice for reasons of performance enhancement.
Information
For Better display
Adjust the computer resolution and screen inlection rate (refresh rate) on the computer as described below to enjoy the best picture quality. You can have an uneven picture quality on screen if the best picture quality is not provided for TFT-LCD.
Resolution: 1360 x 768
Vertical frequency (refresh rate): 60 Hz
TFT LCD panels manufactured by using advanced semiconductor technology with a precision of 1ppm (one millionth) and above is used for this product. But the pixels of RED, GREEN, BLUE and WHITE color seem to be bright sometimes or some of black pixels could be seen. This is not from bad quality and you can use it without any problems.
For example, the number of TFT LCD sub pixels contained in this product are 3,133,440
When cleaning the monitor and the panel outside, please apply the recommended small amount of cleaner by using a soft cloth to polish. Do not force the LCD area but rub softly. If excessive force is applied, you may stain it.
If you are not satisfied with the picture quality, you can get better quality of picture by performing the "auto adjustment function" in display screen that is appeared as window termination button is pressed. If there's still noise after the automatic adjustment, use the FINE/COARSE adjustment function.
When viewing a fixed screen for an extended period of time, a residual image or blurriness may appear. Change the mode to energy save or set a screenshot to move the picture when you need to be away from the LCD monitor for an extended period of time.
PRODUCT INFORMATION (Image Retention Free)
What is Image Retention?
Image retention may not occur when a LCD panel is operated under normal conditions.
Normal conditions are defined as continuously changing video patterns. When the LCD panel is operated for a long time with a fixed pattern (over 12 hours), there may be slight difference in voltage between electrodes that work the liquid crystal (LC) in a pixel. The voltage difference between electrodes increases with time, forcing the liquid crystal to lean. When this occurs, the previous image may be seen when the pattern is changed. To prevent this, the accumulated voltage difference must be decreased.
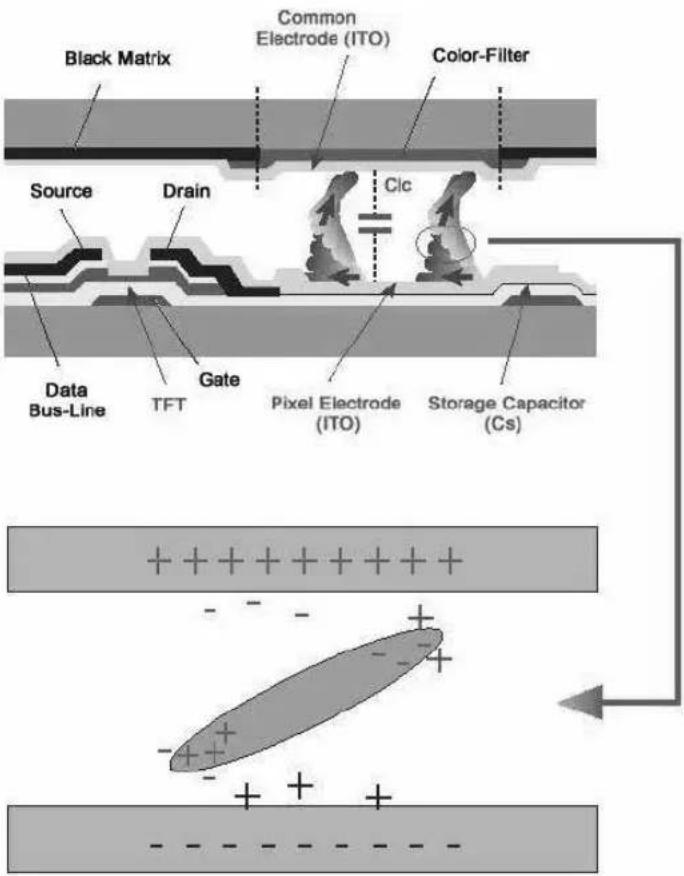
Power Off, Screen Saver, or Power Save Mode
- Turn the power off for 4 hours after 20 hours in use
- Turn the power off for 2 hours after 12 hours in use
- Set the Monitor to power off with the PC display Properties Power Scheme.
- Use a Screen saver if possible - Screen saver in one color or a moving image is recommended.
Change the Color Information periodically
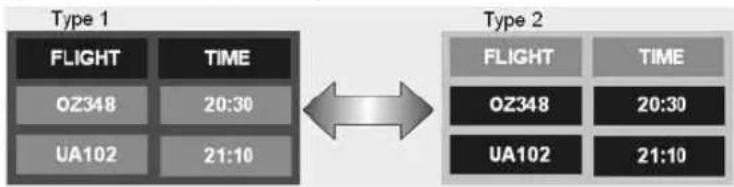

- Use Two different colors
Rotate the Color Information with 2 different colors every 30 minutes.
- Avoid using a combination of characters and background color with large difference in luminance.
Avoid using Grey colors, which can cause Image retention easily.
Avoid: Colors with big difference in luminance (Black & White, Grey)

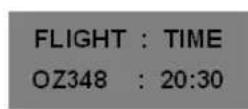
Change the characters color periodically
Use Bright colors with little difference in luminance
- Cycle : Change the characters color and background color every 30 minutes

Every 30 minutes, change the characters with movement.

-
All area display Moving image together with Logo periodically.
-
Cycle: Display moving image together with Logo for 60 seconds after 4 hours in use.
-
The best way to protect your monitor from Image retention is to turn Power off, or set your PC, or System to operate a Screen Saver program when you are not using it. Also Warranty service will be limited based on instruction guide.
Apply the Screen Scroll function on Product
-
Apply the Screen Scroll function
-
Symptom: Horizontal Bar with Black Color move up and down.
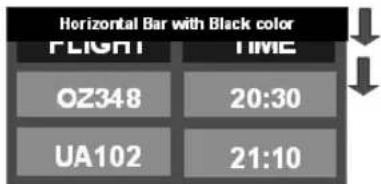
- Select method
Instruction Guide : OSD Menu -> Set Up -> Safety Screen -> Screen Scroll
. Time Interval : 1 ~ 10 hours ( Recommend : 1 )
. Time Period : 1~5 second ( Recommend : 5 )
Note
- (Please check CD's User Guide at "OSD Function", some model's will not available)
Apply the Screen Pixel function on Product
-
Apply the Screen Pixel function
-
Symptom: Dot with Black Color move up and down.
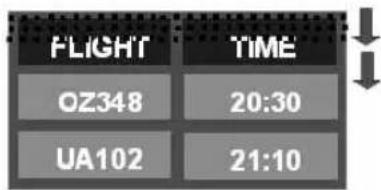
-
Select method
Instruction Guide : OSD Menu -> Set Up -> Safety Screen -> Pixel
. Time Interval : 1 ~ 10 hours ( Recommend : 1 )
Time Period: 10~50 second (Recommend: 50) -
Apply the Screen Bar function
-
Symptom: Horizontal / Vertical Bar with Black Color move up and down.
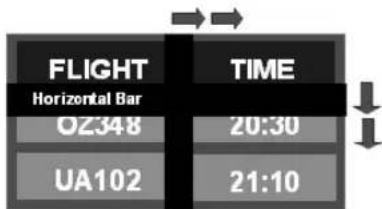
- Select method
. Instruction Guide : OSD Menu -> Set Up -> Safety Screen -> Bar
Time Interval: 1 ~ 10 hours (Recommend: 1)
Time Period: 10~50 second (Recommend: 50)
Note
- (Please check CD's User Guide at "OSD Function", some model's will not available.)
Apply the Screen Erasing function on Product
-
Apply the Screen Erasing function
-
Symptom: 2 Vertical blocks move with erasing the display
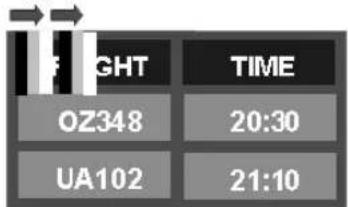
- Select method
. Instruction Guide : OSD Menu -> Set Up -> Safety Screen -> Eraser
. Time Interval : 1 ~ 10 hours ( Recommend : 1 )
Time Period: 10~50 second (Recommend: 50)
Note
- (Please check CD's User Guide at "OSD Function", some model's will not available)
1995-2008 SAMSUNG. ALL Right Reserved
Safety Instructions
Introduction
Connections
Using the Software
Adjusting the LCD monitor
Troubleshooting
Specifications
Information
Appendix
Contact SAMSUNG
WORLDWIDE
Terms
Correct Disposal
Authority
TFT-LCD Monitor
www.samsung.com
The color and appearance of the product may vary depending on the model, and the product specifications are subject to change without prior notice for reasons of performance enhancement.
Appendix
Contact SAMSUNG WORLDWIDE
Note
- If you have any questions or comments relating to Samsung products, please contact the SAMSUNG customer care center.
| North America | |
| U.S.A | 1-800-SAMSUNG(726-7864) http://www.samsung.com |
| CANADA | 1-800-SAMSUNG(726-7864) http://www.samsung.com/ca |
| MEXICO | 01-800-SAMSUNG(726-7864) http://www.samsung.com |
| Latin America | |
| ARGENTINE | 0800-333-3733 http://www.samsung.com/ar |
| BRAZIL | 0800-124-421 http://www.samsung.com/4004-0000 |
| CHILE | 800-SAMSUNG(726-7864) http://www.samsung.com/cl |
| NICARAGUA | 00-1800-5077267 |
| HONDURAS | 800-7919267 |
| COLOMBIA | 01-8000112112 http://www.samsung.com.co |
| COSTA RICA | 0-800-507-7267 http://www.samsung.com/latin |
| ECUADOR | 1-800-10-7267 http://www.samsung.com/latin |
| EL SALVADOR | 800-6225 http://www.samsung.com/latin |
| GUATEMALA | 1-800-299-0013 http://www.samsung.com/latin |
| JAMAICA | 1-800-234-7267 http://www.samsung.com/latin |
| PANAMA | 800-7267 http://www.samsung.com/latin |
| PUERTO RICO | 1-800-682-3180 http://www.samsung.com/latin |
| REP. DOMINICA | 1-800-751-2676 http://www.samsung.com/latin |
| TRINIDAD & TOBAGO | 1-800-SAMSUNG(726-7864) http://www.samsung.com/latin |
| VENEZUELA | 0-800-100-5303 http://www.samsung.com/latin |
Europe
AUSTRIA 0800-SAMSUNG(726-7864) http://www.samsung.com/at
BELGIUM 0032 (0)2 201 24 18 http://www.samsung.com/be
| 844 000 844 | http://www.samsung.com/cz | |
| CZECH REPUBLIC | Distributor pro Českou republiku:Samsung Zrt, Česka organizačni složka Vyskočilova 4,14000 Praha 4 | |
| DENMARK | 70 70 19 70 http://www.samsung.com/dk | |
| FINLAND | 030-6227 515 http://www.samsung.com/fi | |
| FRANCE | 3260 SAMSUNG (€ 0,15/min)08 25 08 65 65 (€ 0,15/min) | http://www.samsung.com |
| GERMANY | 01805-SAMSUNG(726-7864)(€ 0,14/min) | http://www.samsung.com |
| HUNGARY | 06-80-SAMSUNG(726-7864) http://www.samsung.com | |
| ITALIA | 800-SAMSUNG(726-7864) http://www.samsung.com | |
| LUXEMBURG | 0035 (0)2 261 03 710 http://www.samsung.com/be | |
| NETHERLANDS | 0900-SAMSUNG(726-7864)(€ 0,10/min) | http://www.samsung.com/nl |
| NORWAY | 815-56 480 http://www.samsung.com/no | |
| POLAND | 0 801 801 881022-607-93-33 | http://www.samsung.com/pl |
| PORTUGAL | 80820-SAMSUNG(726-7864) http://www.samsung.com/pt | |
| EIRE | 0818 717 100 http://www.samsung.com/ie | |
| SLOVAKIA | 0800-SAMSUNG(726-7864) http://www.samsung.com/sk | |
| SPAIN | 902 10 11 30 http://www.samsung.com | |
| SWEDEN | 0771-400 200 http://www.samsung.com/se | |
| SWITZERLAND | 0800-SAMSUNG(726-7864) www.samsung.com/ch | |
| U.K | 0845 SAMSUNG(726-7864) http://www.samsung.com | |
CIS
| ESTONIA | 800-7267 | http://www.samsung.ee |
| LATVIA | 800-7267 | http://www.samsung.com/lv |
| LITHUANIA | 8-800-77777 | http://www.samsung.lt |
| KAZAKHSTAN | 8-10-800-500-55-500 | http://www.samsung.kz |
| KYRGYZSTAN | 00-800-500-55-500 | |
| RUSSIA | 8-800-555-55-55 | http://www.samsung.com |
| TADJIKISTAN | 8-10-800-500-55-500 | |
| UKRAINE | 8-800-502-0000 | http://www.samsung.com |
| UZBEKISTAN | 8-800-120-0-400 | http://www.samsung.uz |
Asia Pacific
| AUSTRALIA | 1300 362 603 | http://www.samsung.com |
| CHINA | 800-810-5858, 010-6475 1880 | http://www.samsung.com |
| HONG KONG | 3698-4698 | http://www.samsung.com/hk |
| INDIA | 3030 8282, 1800 110011 | http://www.samsung.com |
| INDONESIA | 0800-112-8888 | http://www.samsung.com |
| JAPAN | 0120-327-527 http://www.samsung.com/jp | |
| MALAYSIA | 1800-88-9999 http://www.samsung.com/my | |
| NEW ZEALAND | 0800SAMSUNG(726-7864) | http://www.samsung.com/nz |
| PHILIPPINES | 1800-10-SAMSUNG(726-7864) | http://www.samsung.com/ph |
| SINGAPORE | 1800-SAMSUNG(726-7864) http://www.samsung.com | |
| THAILAND | 1800-29-3232, 02-689-3232 | http://www.samsung.com |
TAIWAN 0800-329-999 http://www.samsung.com/tw
VIETNAM 1800588889http://www.samsung.com
Middle East & Africa
| SOUTH AFRICA | 0860-SAMSUNG(726-7864) http://www.samsung.com |
| TURKEY | 444 77 11 http://www.samsung.com |
| U.A.E | 800-SAMSUNG (726-7864) http://www.samsung.com |
| 8000-4726 |
Terms
Sync Signal
Sync (Synchronized) Signals refer to the standard signals that are required to display desired colors on the LCD monitor. They are divided into Vertical and Horizontal Sync Signals. These signals display normal color images by the set resolution and frequency.
Types of Sync Signals
| Separate | This is a scheme of transmitting individual vertical sync signals to the LCD monitor. |
| Composite | This is a scheme of combining vertical sync signals into one composite signal and transmitting it to the LCD monitor. The LCD monitor monitors the color signals by separating the composite signal into original color signals. |
Dot Pitch
The image on a LCD monitor is composed of red, green and blue dots. The closer the dots, the higher the resolution. The distance between two dots of the same color is called the 'Dot Pitch'. Unit: mm
Vertical Frequency
The screen must be redrawn several times per second in order to create and display an image for the user. The frequency of this repetition per second is called the Vertical Frequency or Refresh Rate. Unit: Hz Example: If the same light repeats itself 60 times per second, this is regarded as 60Hz
Horizontal Frequency
The time to scan one line connecting the right edge to the left edge of the screen horizontally is called the Horizontal Cycle. The inverse number of the Horizontal Cycle is called Horizontal Frequency. Unit: kHz
Interlace and Non-Interlace Methods
Showing the horizontal lines of the screen from the top to the bottom sequentially is called the Non-Interlace method while showing odd lines and then even lines in turn is called the Interlace method. The Non-Interlace method is used for the majority of LCD monitors to ensure a clear image. The Interlace method is the same as that used in TVs.
Plug & Play
This is a function that provides the best quality screen for the user by allowing the computer and the LCD monitor to exchange information automatically. This LCD monitor follows the international standard VESA DDC for the Plug & Play function.
Resolution
The number of horizontal and vertical dots used to compose the screen image is called the 'resolution'. This number shows the accuracy of the display. A high resolution is good for performing multiple tasks as more image information can be shown on the screen.
| Example: | If the resolution is 1360 X 768 , this means the screen is composed of 1360 horizontal dots (horizontal resolution) and 768 vertical lines (vertical resolution). |
Multiple display Control (MDC)
A Multiple display Control (MDC) is an application allowing various monitors to be easily and simultaneously operated on a PC. RS-232C, a standard of serial communication, is used for communicating between a PC and a monitor.
Correct Disposal of This Product (Waste Electrical & Electronic Equipment) - Europe only

(Applicable in the European Union and other European countries with separate collection systems)
This marking shown on the product or its literature, indicates that it should not be disposed with other household waste at the end of its working life. To prevent possible harm to the environment or damage to health from uncontrolled waste disposal, please separate this from other types of waste and recycle it responsibly to promote the sustainable reuse of material resources.
Household users should contact either the retailer where they purchased this product, or their local government office, for details of where and how they can take this item for environmentally safe recycling.
Business users should contact their supplier and check the terms and conditions of the purchase contract. This product should not be mixed with other commercial wastes for disposal.
Authority
Information in this document is subject to change without notice. © 2008 Samsung Electronics Co., Ltd. All rights reserved.
Reproduction in any manner whatsoever without the written permission of Samsung Electronics Co., Ltd. is strictly forbidden.
Samsung Electronics Co., Ltd. shall not be liable for errors contained herein or for incidental or consequential damages in connection with the furnishing, performance, or use of this material.
Samsung is the registered trademark of Samsung Electronics Co., Ltd.; Microsoft, Windows and Windows NT are registered trademarks of Microsoft Corporation; VESA, DPM and DDC are registered trademarks of Video Electronics Standard Association; the ENERGY STAR ® name and logo are registered trademarks of the U.S. Environmental Protection Agency (EPA). As an ENERGY STAR ® Partner, Samsung Electronics Co., Ltd. has determined that this product meets the ENERGY STAR ® guidelines for energy efficiency. All other product names mentioned herein may be the trademarks or registered trademarks of their respective owners.

TruSurround XT, SRS and () Symbol are trademarks of SRS Labs, Inc. TruSurround XT technology is incorporated under license from SRS Labs, Inc.
User's Gids
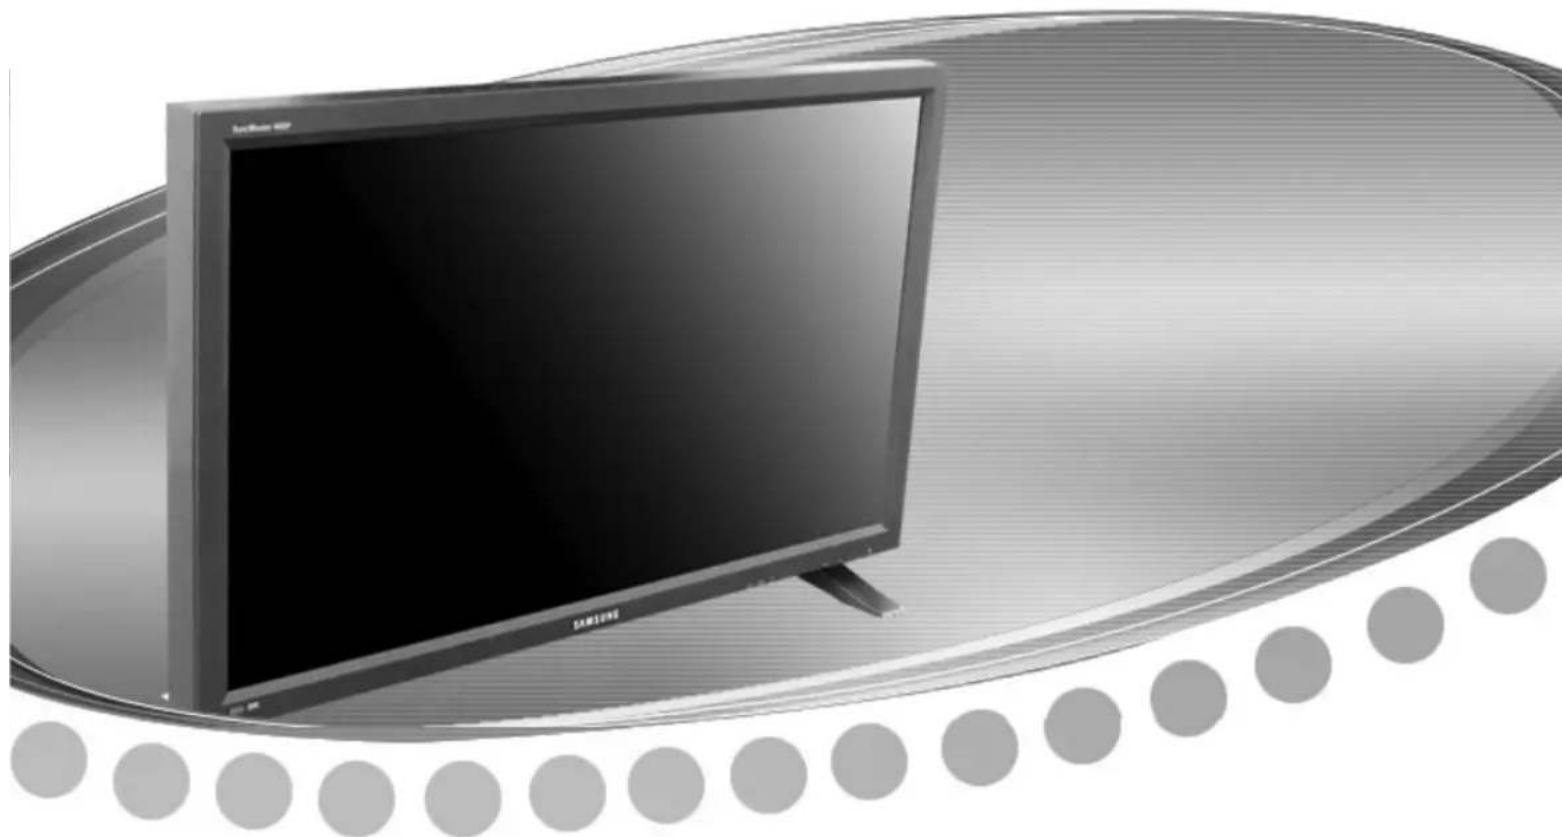

PC/DVI/BNC Mode: M/B (MagicBrightTM)
to assemble the Wall Mount Bracket

- De S-VHS of BNC-kabel is optioneel.
TV, AV, S-Video, Component, DVI(HDCP)
- Adjusts Bass of the selected display.
3) Treble
SRS TSXT Sound On/Off.
6)Sound Select
Digital NR (Digital Noise Reduction) ASCD
[ \text{[MENU]} \rightarrow [\wedge / \vee] \rightarrow [\text{ENTER} ] \rightarrow [\wedge / \vee] \rightarrow [\text{ENTER}] \rightarrow [\wedge / \vee] \rightarrow [\text{ENTER}] ]
Safety Lock PIN PASCD
[ \text{[MENU]} \rightarrow \left[\wedge / \vee\right] \rightarrow \left[\text{ENTER}\right] \rightarrow \left[\wedge / \vee\right] \rightarrow \left[\text{ENTER}\right] \rightarrow [0 \sim 9] \rightarrow [0 \sim 9] \rightarrow [0 \sim 9] ]
Power On Adjustment PASCD
[ \text{[MENU]} \rightarrow [\wedge / \vee] \rightarrow [\text{ENTER} ] \rightarrow [\wedge / \vee] \rightarrow [\text{ENTER} ] \rightarrow [\text{ENTER} ] \rightarrow [\wedge / \vee] \rightarrow [\text{ENTER}] ]
Bericht "Check Signal Cable"
Afmeting 32 inch diagonal (80 cm)
Beeldgroote 697,6845 mm (H) x 392,256 mm (V)
Pixel Pitch 0,51075 mm (H) x 0,51075 mm (V)
Synchronisatie
Horizontal 30~81 kHz
Vertical 56~75 Hz
Beeldschermkleur
Beeldschermkleur
16.7
miljoen
kleuren
Resolutie
Optimale resolutie
Audio Characteristics
Audio Input 1 RCA-jack Rood(R) Wit (L), 0,5 Vrms (-9 dB)
Audio Input 2 RCA-jack Rood(R) Wit (L), 0.5 Vrms (-9 dB)
PC Audio Input 3,5 Ø stereoplug, 0,5 Vrms (-9 dB)
Frequency Radiofrequency: 80Hz 15kHz (bij -3 dB)
Response A/V: 80Hz 20kHz (bij -3 dB)
IBM,720×40031,46970,08728,322-/+
VESA,640x48037,86172,80931,500-/-
VESA,640x48037,50075,00031,500-/-
VESA,640x48043,26985,00836,000-/-
VESA,800x60035,15656,25036,000+
VESA,800x60037,87960,31740,000+/+
VESA,800x60048,07772,18850,000+/+
VESA,800x60046,87575,00049,500+
VESA,800x60053,67485,00056,250+/+
VESA,1024x76848,36360,00465,000-/-
VESA,1024x76856,47670,06975,000-/-
VESA.1024x76860,02375,02978,750+/-
VESA, 1024 x 768 68,677 85,997 94,500 +/-
VESA,1360x76847,71260,00085,500+/-

Horizontale frequenta
- Resolutie: 1360 x 768
Vertical frequency (refresh rate): 60 Hz
Middle East & Africa
| SOUTH AFRICA | 0860-SAMSUNG(726-7864) http://www.samsung.com |
| TURKEY | 444 77 11 http://www.samsung.com |
| U.A.E | 800-SAMSUNG (726-7864) http://www.samsung.com |
| 8000-4726 |
Woordenlijst
Sync-sigmaal
Avertissement/Attention

Displayed on the lower left corner of the screen.
The audio resumes if MUTE or -VOL + is pressed in the Mute mode.
9)

PC/DVI Mode:M/B(MagicBrightTM)
6. Installation murale
S-VHS or BNC cable is optional.
3 Safety Lock Selection de I'ecran

TV, AV, S-Video, Component, DVI(HDCP)
[PC / BNC /DVI Mode]
Image
[AV/S-Video/
Component / DVI-Video]
Son
Configuration
Multi controle
Image [PC / BNC /DVI]
Modes dispensibles
PC/BNC/DVI
AAV
S-Viséo
Composante
D DVI-Video
MagicBrightTM P
[ \text{[MENU]} \rightarrow [\wedge / \vee] \rightarrow [\text{ENTER} ] \rightarrow [\text{ENTER}] \rightarrow [\wedge / \vee] \rightarrow [\text{ENTER}] ]
Verrouillage Image P
Renforce lessonshaute frquence.
3) Balance
[Modes dispensibles:PIP]
Setup(Configuration)
Modes dispensibles
PC/BNC/DVI
AAV
S S-Video
Composante
D DVI-Video
Langue PAsCD
[ \text{[MENU]} \rightarrow [\text{A} / \text{V}] \rightarrow [\text{ENTER} ] \rightarrow [\text{ENTER} ] \rightarrow [\text{A} / \text{V}] \rightarrow [\text{ENTER} ] ]
VESA Interface de support
Middle East & Africa
| SOUTH AFRICA | 0860-SAMSUNG(726-7864) http://www.samsung.com |
| TURKEY | 444 77 11 http://www.samsung.com |
| U.A.E | 800-SAMSUNG (726-7864) http://www.samsung.com |
| 8000-4726 |
Terme
© 1995~2008 SAMSUNG. ALL Rights Reserved
Inhalt
Then push button again to circle through available preconfigured modes.
(Standard Music Movie Speech Custom)
21) STILL
© 1995~2008 SAMSUNG. ALL Rights Reserved

1. Bauplan

2. Monitoroberteil
3. Ständer
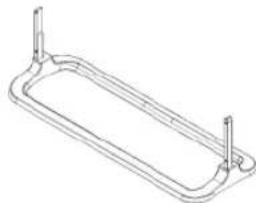


4. Lautsprecher
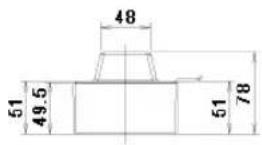


© 1995-2008 SAMSUNG. ALL Rights Reserved
Einführung
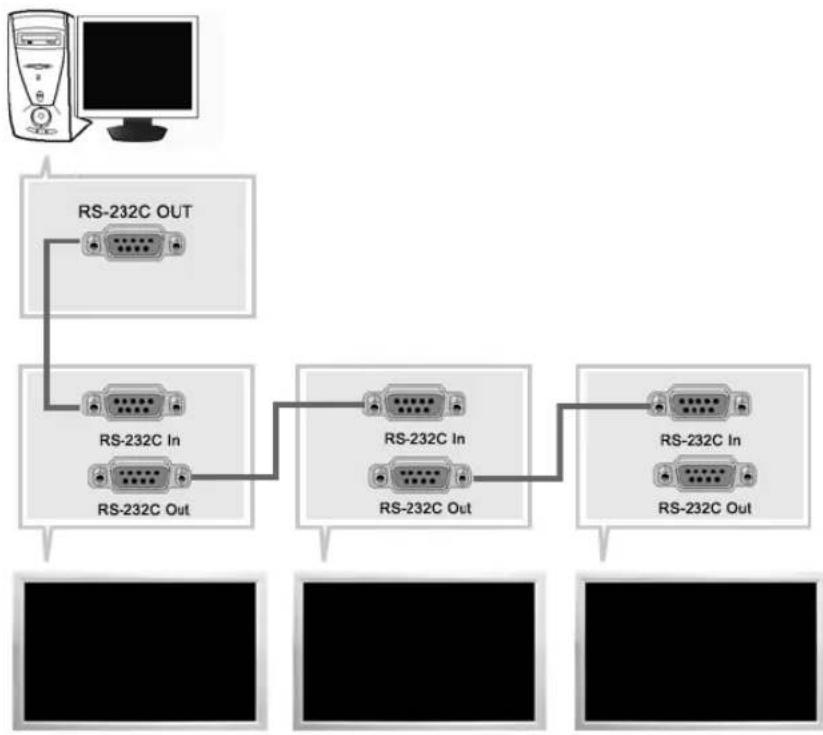
Main Screen
TV, AV, S-Video, Component, DVI(HDCP)
7) Double 3 (Picture By Picture)
© 1995~2008 SAMSUNG. ALL Rights Reserved

© 1995-2008 SAMSUNG. ALL Right Reserved
SAMSUNG
Sicherheitshinweise
Einführung
Grosse 32,0 Zolldiagonale (80 cm)
Display Fläche 697,6845 mm (H) x 392,256 mm (V)
Pixel Stufe 0,51075 mm (H) x 0,51075 mm (V)
Synchronisierung
Horizontal 30 81kHz
Vertikal 56 75Hz
Anzeigefarbe
MAC,832x624 49,726 74,551 49,500 +/+
IBM,640x35031,46970,08625,175+/-
IBM, 640 x 480 31,469 59,940 25,175 -/
IBM, 720 x 400 31,469 70,087 28,322 -/+
VESA,640x48037,86172,80931,500-
VESA,640x48037,50075,00031,500-/-
VESA,640x480 43,269 85,008 36,000 -/-
VESA,800x60035,15656,25036,000+
VESA,800x60037,87960,31740,000+/-
VESA,800x60048,07772,18850,000+/-
VESA,800x60046,87575,00049,500+
VESA,800x60053,67485,00056,250+
VESA,1024x768 48,363 60,004 65,000 -/-
VESA,1024x76856,47670,06975,000-/-
VESA, 1024 x 768 60,023 75,029 78,750 +/-
VESA, 1024 x 768 68,677 85,997 94,500 +/-
VESA,1360x76847,71260,00085,500+
Horizontalfrequenz
© 1995-2008 SAMSUNG. ALL Right Reserved

© 1995-2008 SAMSUNG. ALL Right Reserved
Middle East & Africa
SOUTH AFRICA 0860-SAMSUNG(726-7864) http://www.samsung.com
TURKEY 4447711 http://www.samsung.com
U.A.E 800-SAMSUNG (726-7864) http://www.samsung.com
Bezeichnungen
Sync.-Signal
© 1995-2008 SAMSUNG. ALL Rights Reserved
Contenuo
Imagine [PC/BNC/DVI] 52
Imagine [AV/S-Video/Comp./DVI-Video] 54
Suono 56
Impostazione 57
Controllo multi-schemo 60
Tasto MDC Quick Launch.
4) LOCK
In PC/DVI mode, sets only SOUND to FM Radio.
© 1995-2008 SAMSUNG. ALL Rights Reserved
1. Layout mecanico
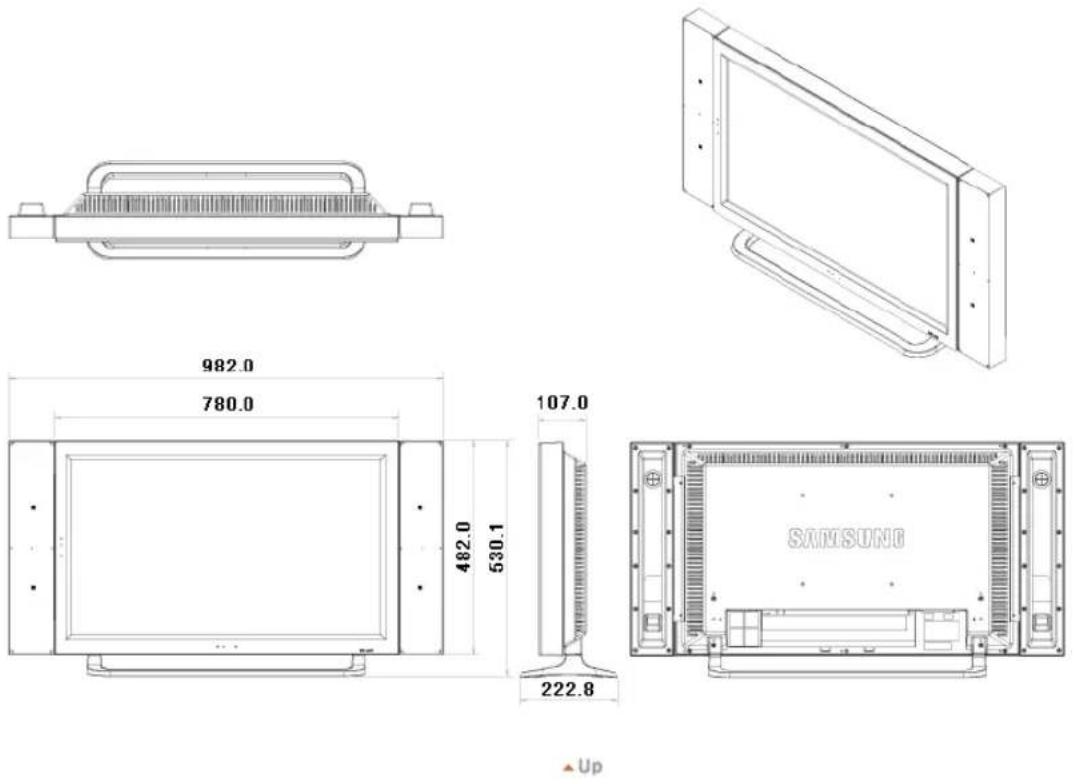
2. Testa del monitor
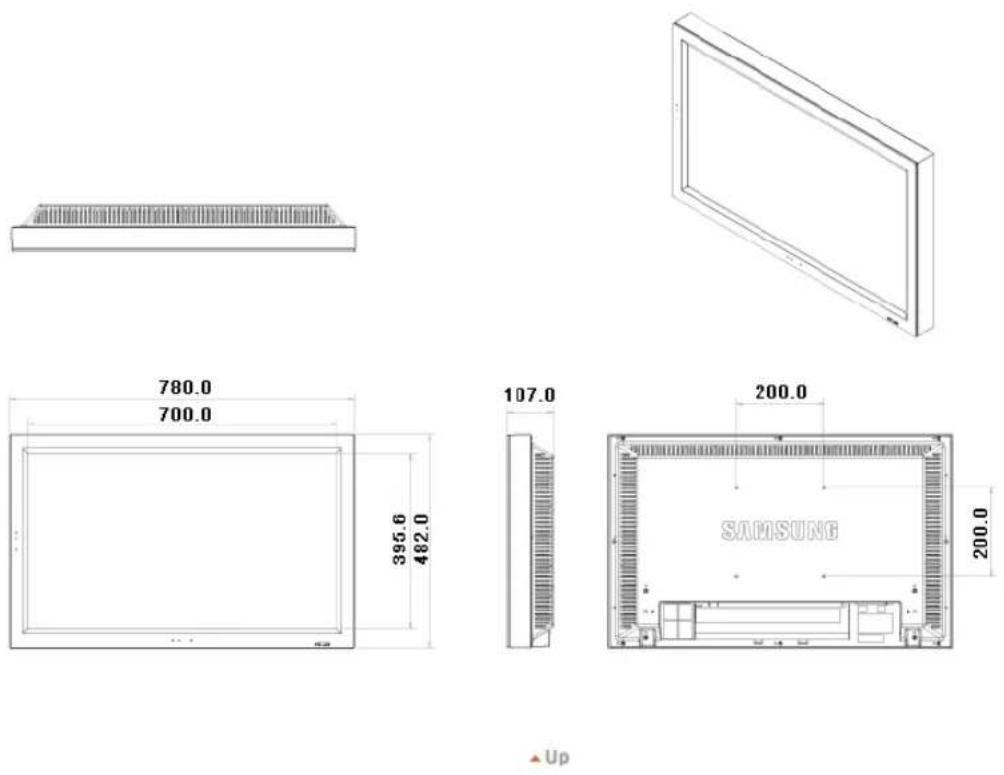
2-2) Utilizzo del connettore DVI (digitale) con la schedavideo. Connect the DVI Cable to the DVI(HDCP) port on the back of your monitor and the DVI port on the computer.
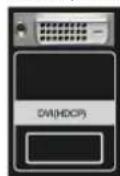
© 1995~2008 SAMSUNG. ALL Rights Reserved
Introduzione

TV, AV, S-Video, Component, DVI(HDCP)
- Adjusts Color Tone of the selected display.
Controllo multi-schemo
Turn the PIP Screen on or off.
-Off
-On
Emphasize low frequency audio.
2) Alti
Emphasize high frequency audio.
Controllo multi-schemo
Controllo multi-schemo PASC
[ \text{[MENU]} \rightarrow [\wedge / \vee] \rightarrow [\text{ENTER} ] \rightarrow [\wedge / \vee] \rightarrow [\text{ENTER} ] \rightarrow [\text{ENTER} ] \rightarrow [0 \sim 9] ]
© 1995~2008 SAMSUNG. ALL Rights Reserved

© 1995-2008 SAMSUNG. ALL Right Reserved
SAMSUNG
MAC,832x62449,72674,55149,500+/+
IBM, 640 x 350 31,469 70,086 25,175 +/-
IBM, 640 x 480 31,469 59,940 25,175 -/
IBM,720x40031,46970,08728,322-/+
VESA,640x48037,86172,80931,500-/-
VESA,640x48037,50075,00031,500-/-
VESA,640x48043,26985,00836,000-/-
VESA,800x60035,15656,25036,000+/+
VESA,800x60037,87960,31740,000+/-
VESA,800x60048,07772,18850,000+/-
VESA,800x60046,87575,00049,500+
VESA,800x60053,67485,00056,250+
VESA,1024x76848,36360,00465,000-/-
VESA,1024×76856,47670,06975,000-/-
VESA, 1024 x 768 60,023 75,029 78,750 +/-
VESA, 1024 × 768 68,677 85,997 94,500 +/-
VESA, 1360 x 768 47,712 60,000 85,500 +/-
© 1995-2008 SAMSUNG. ALL Right Reserved

© 1995-2008 SAMSUNG. ALL Right Reserved
Middle East & Africa
| SOUTH AFRICA | 0860-SAMSUNG(726-7864) http://www.samsung.com |
| TURKEY | 444 77 11 http://www.samsung.com |
| U.A.E | 800-SAMSUNG (726-7864) http://www.samsung.com |
| 8000-4726 |
Termini
Segnale Sinc
Picture [PC/BNC/DVI] 51
Picture [AV / S-Video /Component / DVI-Video] 53
Sound. 55
Setup 56
Multi Control 59
Pilot Baterie (AAA X 2) Zaslepka
TV, AV, S-Video, Component, DVI(HDCP)
Picture [PC / BNC /DVI]
Dostepne tryby
PC/BNC/DVI

S S-Video
Component
D VDI-Video
MagicBrightTM
[ \text{[MENU]} \rightarrow [\wedge / \vee] \rightarrow [\text{ENTER} ] \rightarrow [\text{ENTER}] \rightarrow [\wedge / \vee] \rightarrow [\text{ENTER}] ]
MagicBright™ to nowa funkja offeruja opymalne warunki ogladania w zaleznosci od zwartosci
Parametry R Phase, G Phase, B Phase, Gain and Sharpnessfoundland et c.
Size
[MONTH] [A/V] [ENTER] [A/V] [ENTER] [A/V] [ENTER]
Adjusts the picture Tint.
Digital NR (Digital Noise Reduction) ASCD
[ \text{[MENU]} \rightarrow [\wedge / \vee] \rightarrow [\text{ENTER}]\rightarrow [\wedge / \vee] \rightarrow [\text{ENTER}]\rightarrow [\wedge / \vee] \rightarrow [\text{ENTER}] ]
The Film Mode feature offers you a theater-quality viewing experience.
Safety Lock PIN PASCD
[ \text{[MENU]} \rightarrow [\wedge / \vee] \rightarrow [\text{ENTER}] \rightarrow [\wedge / \vee] \rightarrow [\text{ENTER}] \rightarrow [0-9] \rightarrow [0-9] \rightarrow [0-9] ]
Haslo所提供zmienic.
Energy Saving PASCD
[ \text{[MENU]} \rightarrow [\wedge / \vee] \rightarrow [\text{ENTER} ] \rightarrow [\wedge / \vee] \rightarrow [\text{ENTER} ] \rightarrow [\wedge / \vee] \rightarrow [\text{ENTER} ] \rightarrow [\text{MENU}] ]
© 1995~2008 Samsung Electronics Co., Ltd.

Check Signal Cable PC
Picture image is unstable and vibrates.
© 1995~2008 Samsung Electronics Co., Ltd.

© 1995-2008 SAMSUNG. ALL Right Reserved

Middle East & Africa
| SOUTH AFRICA | 0860-SAMSUNG(726-7864) http://www.samsung.com |
| TURKEY | 444 77 11 http://www.samsung.com |
| U.A.E | 800-SAMSUNG (726-7864) http://www.samsung.com |
| 8000-4726 |
Terminologia
Sync Signal
Types of Sync Signals
MDC (Multiple Display Control)
PpoHTaTe CnEduuHInCTpyKmN no 6eOnNaHcOHTN, nockoBky OH npEnHa3HaHeHbI dtn npedotbaueHn HaeceHn yiepeBa mMyeCTBy n pnuHHeHn Bpda nonb30aTeTnM.

IpeDynpKdEHe / npEoCTepKeHne

IeBbINONHeHnE yka3aHHn, 0603NaueHHbIX 3TMM CnMBONOM, MOKeT npINBeCTN K TeneChbIM TpaBMm INOBpeXdEHnM O6OpyDobAHn.

CNMBONBI 0603HaeyHn

3anpeueH %aXHO pOChTeB n NOCToRHHO 06 3TOM NOMHHTb

!e pa36mpatb &TcoeMHHTb wTencenb ot po3eTK

Ie Tporarb 3aemnne, npedynpejaouee 3neKtpueckn wok
Ntahne

Ecn He nCnOJb3yETcB TeUHeHne DnntelbHoro BpEmHn, yCTaHOBHTe %aW KOMNbIOTep BpeKIMe 3KOHOMM 3NEKTPONITAHN.
Ecnncnnonb3yETcXpaHNTenbKpKaHa, npBEdnte erB aKTHBHe coCTOHHe.
PnBaeHbIe 3decb NIO6paKeHn npedHa3NaHeHb ToJIbKO nIcNpAaKn MOryt bbl HeepnmeHmbl BO BceX cnUyaaX (iIN CTpaHax).

He nCnoB3yTe NOBpeKeHbI Hn NIOxo 3aKpeNHeHbI Wtencenb.
TO MOKET Bb3BaTb 9eKTPueckn WOK NIN 3aRopahne.
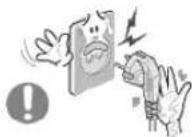
He TnHTe wTencEnb n3 po3eKn 3a WHyp H He Tpo"ae e"o BnaxHbIMn pyKAMN.
TO MOKET Bbl3BaTb 3neKTpuCeckn WOK INN 3aropaHne.

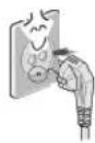
IcnoJIb3yIteToIbKO3a3eMnEHHbIeNo npabUNAM WTeNCenbN po3eTKy.
!IenpaBnBHe 3a3eMHeHne MoKet Bb3BaT b3KeTpUecknn Wok nnoBpeXdHe H o6pyoDaHn.(TOnbko dny o6pyoDaHnKnaccA1.)

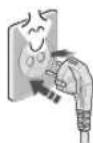
HadexHo,6e3 cna6nHbI, BCTaBbTe BuNkY nHTAHJ.
!eyctoHBOe coeHNHeHMe MOKET nocnykntb npuHHOB 03rOpaHna.
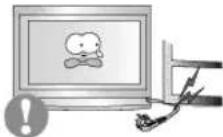
He donyckaIte n3nIuHHe"o n3"nbAHn uHypa co 7TeNceIem Hne NOMEuaIte Ha HIX TAgKeIbIe PpeDMeTbI, YTO MOKeT Bbl3BaTb NOBpeXdHeHne.
TO MOKET Bbl3BbT bJKeTpHecn WOK INN 3aRopaHne.
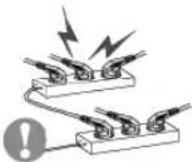
He nooCoeHNHnTe cNnKOM MHO"O ydnnHnTeNe H wTe nCeNe B Ody po3ety.
TO MOKET Bbl3BaT 3aRopaHne.

He oToeDnHnTe Ka6eBb NHTaHn BO BpeM nCNoIb3ObaHHN MOHTOPa.
- PnO tCOeMHHeHH MoKET Bo3HkATb BpocK HApJKeHH, Bpe3yIbTaTe KToTporo BO3MOxHO NOBpeXdHeH MeHHTopa.
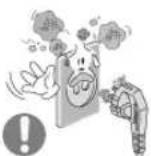
He ncoNob3yTe Ka6eBn NHTAHn,ecn BnIka nn pa3bEm 3a"p3HeHbl.
% cnyuae nonadHnBbINB Bnky nIN pa3bem npOTpTe IN MkKoTKaHbO.
VcnoIb3ObaHHe Ka6eI NHTAHN C bInbHOB BnIKoH INpa3bEOM MOKET npBecT KBO3rOpAHIO INN NOPAKEHNO 3NEKTPNHECKM TOKOM.
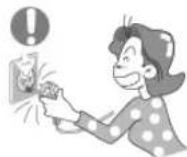
4T06bIOTKN&yHTb yctpoCTBO O3NEKTPoCETN,cneJeYET N3Bnueb Bnky Ka6eJIaNTAHN H3 po3eTKN 3NEKTPoNTAHN.Ka6eJIb NtAHN pH NTOM OCBOOHTCg IIN BbINOJIHeHNA DaJIbHeJHX DeICTBN.
TO MOKET Bbl3BaTb 3neKtpueckn WOK INN 3aropaHne.
YCTaHOBka

npedha3hauhenbix npa60tbc xmmuueckmmpeakTbAm,rge n3dene 6ydet 3KcnnpyatnoBaTcB KpyrIocyTOHHO BOK3anax,BaPONOpTAX,nT.
IeBbINONHeHMe 3Toro yCIOBnMOKET npBecrN K cepbe3HOMy NOBpeKdHNO MOHTopoA.
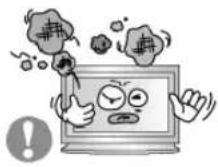
YCTAHABINBAIte MOHITOP B CYXOM HENbJIbHOM MecTe.
% npOTHBOM Cnyae 3TO MOKET pINBECTN K KOPOTKMOY 3aMbKAHIO HnI 3aRopAHIO BHTPN MOHTopa.
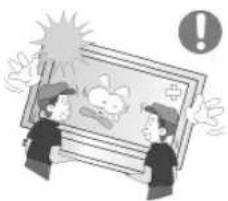
IpeBn"ar MOHITOp, He ypoHHTe e"o.
TO MOKET npBECTN K ERO NOBpeXeHIO UIN K TeneChbIM TpaBMAM.

YctahOBHTe OCHOBAHHe MOHITOPa Ha CTeHN HnHa NoJky TaK, TTo6bl KpaOCHOBAHn He BbICTyana 3a"paHnbl.
- PaedHne n3dennr MOKeT NOBpeNTb ero HnHaHeCTN TpaBMy.

He yctahabnbaite H3dene Ha HeycToHBy& nobepxhoctb nHa noBepxHOCTb C HeoctatoaHouPioua&.
- YctahabnBaIte n3denne Ha poBHyO, yCTOHmByIO nobepxHocTb, HnAe H3denne MoKet ynaCTb IN npuHHntb Bpe, HeNoBEky, HaxoJaEmycnoBn3OCTn,OCoBHeHO DetM.
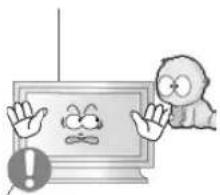
He yctaHaBnBaIe n3dennHa nony.
% 3TOM CNYae O HERO MOXHO CNOTKHHTBCRA, BOCO6eHHOCTN 3TO OTHOCHTCAKETAM.
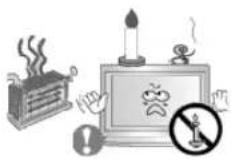
\*O N36EXAHNE \*O3ROPAHNA HNKOrDA HE PACNOIAGAITE C\*EHN INDpyrNE nCTOCHNk OTKpBITORO OTRH PRAOM C DAHHbIM N3DEINEM.
% npoTUBHOM Cnyueae 3TO MOKeT pNBecTe K BO3rOpaHIO.
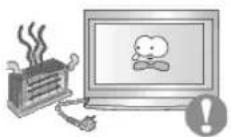
He yctanabnbaite Ha"peBaTeIbHbIe np6opbl prdom co shypom nHTaH.
PacnabBueeecnokpbTneUHpyaMoKet npBeCTn K npaeHHIO 3NEKTPnHEcKIM TOKOM HIN BO3ROPaHHIO.
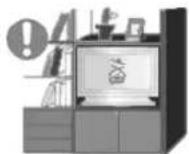
He yctahabnbaute H3dene B MeCTa C nnoxO BENTHnIaue, HAnpMep,B KHNKbIe NOJIKN, B CTeHHo WkaΦ N.T.D.
IIO6oe noBbIeHHe BHyTpEHHe TemnepaTypbI n3dennr MOKeT npNBeCTN K BO3ropanHO.
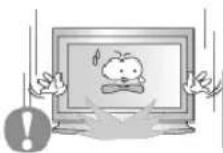
OnyckaTe MOHHTOp Ha IpeHa3HaueHHoe MecTo C OCTopoXHOCTb.&.
Ero moxho noBpeuMbnn cnoMaTb.

He cTabbTe MOHHTOP 3KpaHOM BHN3.
Ero noBepxHOCTb MOKcT 6bITb NOBpeKeHa.

MoTauxKPOHwTeHaIaKpenHeHaCTeHoDJIKe H BbIOJNHTbCBAHINHUPOBAHbIMNEPCOHANOM.
% npoTHBOM Cnyae MOxHO NOnyHtB TpaBMY.
&63aTeBnHO HcNoB3yIe INHCTpyMeHTb IINr yCTaHOBKn, yKa3aHHbE B pyKOBOCTBE NOnb3OBAteJIa.
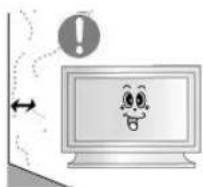
Ipn yctaHOBKe Heo6xOaHMo ocTaBnTb 3aOp MeKdy N3deHem H cTeHo (6oone 10 cm/4 d&Ma), YTO6bHe npenrTcBOBaTb BEHTUNAun.
!IeOCTaTOHnA BENTINIA MOKET npNBECTN K YBEENHHeB HByTpEHHTe TMNEpATpyb N3dEnn,HTO,B CBOIO OHepeDb,MOKET pNBECTN K COkpaueHnO cPOKOB 3KcNpyaTALIN KOMNOHEHOB IN CHIXeHNIO KaueCTBa pa60tBu3dEnn.

XpaHNTe nactKOBy& ynaKOBky (naket) B HeDocrynHom dIra deTei MECTE.
VrpaDeTeC nactKOBOn ynaKOBKO (naketOM) MOKET CTaTB npuHHOydyuB.
YnCTka

HuaTe KOpNc MOHToPa Hn NOBepXHOCTb Ero 3KpaHa CnerKa BnaXHO MAnKO TKAHbO.

He onpbicknbaTe MOHNTOP Mo&uM CpeCTBOM.
TO MOKET BbI3BaTb NOBpeXdEHn, 3NEKtpueckn IOK nHn 3aRopaHne.

IpnntaTe peKOMeHDoBaHHbIM MOUcIM cpeCTBOM Mrgkyo TkaHB.

Ecnn coeunHntelbHbI uHyp mExdy wTeNcEm n po3rKo pXaBBn nn rpa3HbI, nouCTnte erO KA cneyet cyxOn TKaHbI.
- P3Hb COEHNHTeBbHb HHP MOKET Bb3BaT bNeKTPnCkN WOK Nn 3aropaHne.
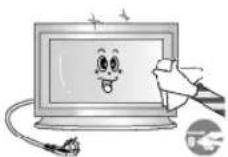
IpeepnCTkOuH3dEINy6eDntecb,TOoHyp nHTaHnOtKIOHoeN.
% npOTINBOM CNyue 3TO MOKeT pNpMBecTN KnpaKeHIO 3NeKTPueckM TOKOM INI BO3ROPAHIO.
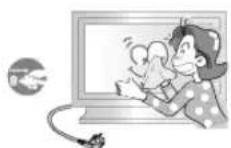
OTKIOHTeIHyp NHTAHnO TcTeBOH po3eTKn HnpotpTe H3dENRA MRKO, CYX0 TKaHBIO.
- le nclonb3yTe XmHmHeckne cpeCTBa, HanpImep, npapnH, Seh3nH, cnHPT, pactBopHTen, HnCeKTHuNbI, OCBekHTenb Bo3dyxa, CMA3ky MIOUoune cpeCTBa.
Dpyroe
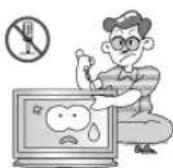
He CHIMaIe KpbIuKy (nIn 3aNDIOKpbIuKy).
TO MOKET Bbl3BtB 3JKeTPTnEckm WOK INN 3aRopaHne.
&6cnyKBAHHe DoJXHO npoBOnTbcra KBaJIncnIpObaHHbIM TeHXnuecknM nepcoHAnOM.
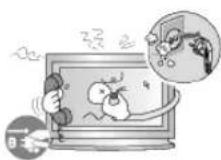
Ecnn MOHnTOp He pa6oTaet HopMaIbHo - B OOC6eHHOCTn, ecnn H3 Hero Nuyr Heo6bUHbIe 3ByKn Hnn 3aAnx - HEmeDneHNO OTKnHOHTeeroOT CTeN No6paTnTEcb K ABTopu3OBAHHOMy DInepy nnB U cHTp TEXnueckoro 06cnykBaHn.
TO MOKET Bb3BaTb 3NEKTPnueckm WOK NIN 3aropahme.
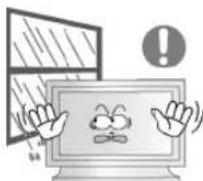
YctahabnBaTe n3dJIne TAK, YTO6bI n36eXaTb BO3dEChTBnHa Hrero MacNa, dIbMa HIN NOBbIeHHeN BnAIXHOCTn; He yctahabnBaTe n3dJIne B TpaHCnOpTHOM CpeDCTBe.
TO MOKET PnBECTN K BO3HKNHOBEOHN HOVCnpaBHOCTN, NopaeHHO 3NEKTPnueckm TOKOM MIN NOXAPY.
%oc06eHHoN36eRaIteHcNoIb30BaTbMOHITOpB6n3nBOBbINHaOTKpbITOMBO3dyXe,rHeHAHERO MoKETNONaDaTbDOJkbNNCHer.
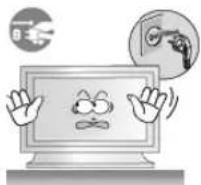
Bcnyae naeHnMaONHTopa nnnnopeXJeHHKoprnyCa BbIKNoHTe erO H BbIHbTe BNkky n3 po3eTKN. 3aTeM CBxHtEcB C ceHTpOM o6cnyKuBAHHa.
% npOTNBHOM CNYAe BO3MOXHO BO3HNIKHOBEHe HEnCnPaBHOCTN, NOPaXHEH 3JNEKTPnEeCKMM TOKOM NIN NoKap.
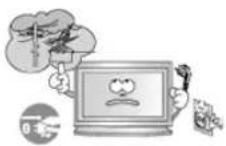
*bIKn&yainTe nHTaHne MOHTopo BO Bpemra "po3bl Nn Ko"da OH He HcnoJIb3yETcB TeueHHe npOdoJNKeTEnbHO"o nepnoDa BpeMeHN...
% npOTnHBOM Cnyae BO3MOXHO BO3HKNHOBEHNE HCNpABHOCTM, NOPaKeHne 3NEKTPnHeCKIM TOKOM NIN NOxap.

He nbitaTcB NOBHyb MOHITOP,NOTAHYB TOnbKO 3a npOBd HnCn"HaNbHbKabEnb.
TOMOKETBb3BaTbNOJOMky,3NEKTPuyeckmIUKIN3aropAHneH3-3a NOBPExDeHnKa6en.
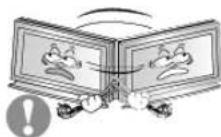
He cTapaIeTcB NOBHyTb MOHITOP BJIeBO HIN BnPaBO,ep"ar 3a UHPnnn Cn"HanbHbN Ka6enb.
TO MOKET Bb3BaTb NOLOMKY, 3JIeKTPnueckm WOK INN 3aRopAHne IN-3a NOBpeXDeHn. Ka6en.
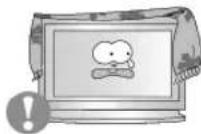
He 3aKpbIbAaTe BeHTnIaHIOHHbIe OTBepCTNa Ha Kopnyce MOHITOPa.
- IIOxA BENTINIaM MoKet Bb3BaTb IOBpeXeHne Nn 3aropAHne.
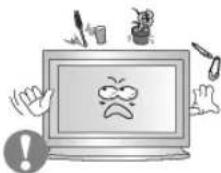
He nomeuahe Ha MOHTop eMKoCTn C BDOJ, XMMueckne peakTBBbl Nnn MeKne MeTALNNueCKNe PpeDMtB.
TO MOKET PINBECTN K BO3HKNHOBEHNHO HENCNPABHOCTN, NOPAKEHNO 3NEKTPNCHEKM TOKOM MN NOXAPy.
% cnuyae nonaHa HByTp b MOHtOp a NOCTOPOHHX BBeueCTB BbHbTe BNky uHypa nHTAHn V3 PO3ETKN CBAKITcEcb C cHTPOM OcCnyKBAHNA.
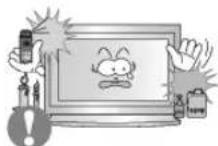
DepKnte n3dene BdaeneKe ot BocnnaMeHa&uxcra a3po3oNe nnBeeCTB.
TO MOKET npBecTN K B3pbly INN 3aRopaHIO..

Hnko"da He BCTaBJIte MeTaNIIueCKne npedMeTbI B OTBepCTNa HMOHTope.
TO MOKET Bb3BaTb 3eKtpnueckn WOK, 3aropahne HIN TpaBMy.
He bctabnIte metanlneecckne npedmetbl, taKne KAK KYCKN npobolokn Hnn wypynbl HNN BocnnaMeH&meC6OBekTb, KaH anpnmep 6yMa"u nn cnuKN B BeHTnlaUHOHoe OTBepCTne,

pa3bem nI HayuHnKOB nn nopTb AV.
*TO MoKET npHBeCTN K npopaeKeHHO 3neKtpnueckm TOKOM HIN BO3rOpAHIO. EcnB IN3dEIne nonana Boga INn INHO BeUcTeBO, BbIKNoHTe erO, OTCoeDInHte KaBEnb NITaHnO T pO3eTKN IOBpaTInTeCB B CepBnCHbl CEHTP.

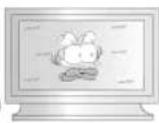
Ipn OTo6paXeHHn HEnoDbNkHo KApTnHKn B TeueHne npOdoJIKTeBHo"O nepHOa BpeMeHN Mo"yt NOBnTBcA OCTatoOHbIe H3OpaXeHHn HInn Hepe3KoCTb.
Ecn%bI He cO6paTeCb NcNOb30BaTb MOHITOp B TeCHHe NdNTeBHO BpEmHn, nepeKnIOHTe ero B pexm 3heproc6peXeHn Hn AKTbN3pyte XpaHntB 3KpHa, OTo6paKaiou nOdbNKHoe IIO6paXeHne.
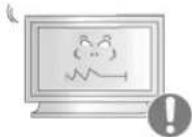
Hactpoite pa3peuHHe n cactOy co"JacHO yPOBnM, COOTBeTCTBy&mMaHHO MoeHn.
!IenpaBnHbHa yCTaHOBKa yPObHe npa3peuHn H aCtOTb MoKet npBecT K NOBpExeHmIgna3.
32dHIOMOB(80cm)-1360X768
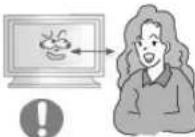
IpoDIOJIKNITeHbHnnpOCMOTpMOHTOPaNOcOCTpbIMy"nomMOXET Bb13BaTb np6nEMbI CO 3peHnEM.

4 Tro6bI CHN3NTb Ha"py3ky Ha "nasa BO Bpemra pa60tby MOHToPa, dAaTe nTMMHHTbI nepepbIB qeep3 kaxdbI qac.
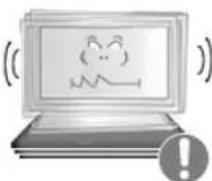
He yctahabnbaTe n3dennHe Ha yeCyToHBy&, HepoBHy& NOBepxHOCTb mN B MeTO, NoDBepKeHHoe B6paun.
- PAneHHe N3dEHN MoKet NOBpeNTb erO HnH HaeCTn TpaBMy. KcNpyataaHnDenn B MceTe, NoDBepKeHHOM B6paun MoKet COKpatntb cPck erO cnky6bl nnn npNBECTn K BocnnaMeHeHIO.
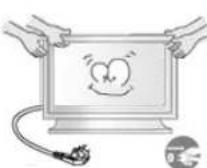
Ipn nepemeenu HMOHTopa Ha py"oe MeTo nepebeHnTe BbIK&yateB NTaHnB B COCTOHN H NOTCOeHNHTe HHP NTaHn. Ipeed nepemeueHem MOHTopa 6o3aTeJbHO OTcoeHNHTe BCE KaBen, BkN&yau ANTEHHBI Ka6eNB N COeHNHTeJbHbIe Ka6eN Dpy"nx yctpoiCTB.
- 1eBbnonHeHnE 3TOI Tpe6oBaHnRA MoKet npMBecrN K NOBpeKeHnIO KaBen, BO3ropaHnIO INI NopaeHnIO 3NeKTPueeCKM TOKOM.

TpaHcnpTnpoBka Hn npemaehne H3dennnoJokhnaocyuectbIbTBcB6oonee Yem DByMnIOdbmN.
- PadeHne n3dennMOKeT npBecTN Kero NOBpeKDeHHIO Nn TpaBMe YenOBeka.

YCTAHOBHTe H3dene TAK, YTO6bI y6peyEero OT DeTei (DETMORYT NOBPeNTb H3dene, 3a6npaCb Ha Hero).
- PanaeHne n3dennn MOKeT npBecn K TpaBMam nn daKe rn6en.
EcnH3dene He HcnoJb3yeTcB TeueHne npoDOnKHTenbHoro BpeMeHH, xpaHNTe ERO OTKNIOUeHHbIM OT NHTAHN.
% npoTHBOM Cnyae 3TO MOKET npuBecTN K BbIeJeHnIO TELNA I3-3a CKONBWeJcRp3N NIN NOBpeJeHnIO N3OJIuN, QTO B CBOIO Ouepeb MOKET npuBecTN K NOPaKeHmIO N3EKNPTPNueckHM TOKOM.

He knaIte Ha n3dJeHne IIO6MbIe npEmTebl detEi (nIINpeDMbI, MORYUe Bb13BaTb HX INHTepc).
=ETM MORYTNONbIATbC3a6paTbCnHaN3dEInna, YTO8bI B3aTBnX. N3dEInne MOKET yNaCTb, BB3BaB TpABMy nHn DaKe RnBn.

Iocne n3Bleehn6atapeHnNyblTaHCTaHNOHOY npabHeHHxpaHHTe Hx BHe DOcraemocTOn DTet, KOtOpbleMOryt Hx npornotb. Bepernte 6atapen ot Detet.
% cnyuae nx cnyuahoropnpornatbbaHn HEmeJeHHo o6paHTecbK BPaY.

Pn3ame He 6aTape BCTABNHe Ix B NOJoxeHn COOTBETCTByHOUcEM npabINbHOH NOJAPHOCTn +/-, yKa3AHHOHa KOpnyce 6aTape.
!IecobHHeHneNoJpHocTHMOKeTnpBecTNKbIXOy6BatapeH3CTpo HnnYteHKeNHeEe3NEKtpoNTa,aTaKHe npBecTN B03rOpAHIO, TpaBMAMnN3aqr3HEHNOOKpyXauoero npocTpaHCTBA(NOBpeXdeHIO yctpoHCTBa).

IcnoJb3yIte ToJIbKO 6aTapeH yKa3aHHOro cTAndapTa. He IcnoJb3yIte OndHOBpeMeHNO HOByU n CTapYIO 6aTapeNky.
*TO MOKET npBecTKe N Ke NOBpeXeHnIO Unn yTeUke BHyTpEnerHO BcIeCTBa, a TaKKe MOKET Bb3BaTb BOrOpaHne, TpaMbY nn 3aqr3HeHne (NOBpeXeHne).

Баразен, равно кад и Akkymлгторье 6разен, Heялг&Tса obikhoberHHbIMn 6bITOBbIMN OTXODAMN И NOДпжат сдачдп nepepa60kn.Кak notpe6ntelb 6разен, NOIb3ObaTeNB 6bra3an cdaTb OTpa6oTaHHbIe 6разен ИИн Akkymлгторье 6разен дд nepepa60kn.
&tpa60taHbIe 6bapen HnAkkymyIaTOpHbIe 6bapen MoXHO cdaTB B 6bnkaaHmrocydapcTBHeHHbIeHTp nepepa60TKn OTxOIOB HnB Maarain, MeIOuMn B npOdaKe Otpa60taHHbIe 6bapen HnAkkymyIaTOpHbIe 6bapen TAKORo Xe Tnna.
© 1995-2008 SAMSUNG. ALL Rights Reserved
Copepkanne
IpaBnlaTexHnK6e3oNaChocTn 1
Hnfoepmaue 1
Питане 1
YcTaHOBKa 2
UncTka 4
Дргroe 5
\*BedeHne 12
Coepexmoe ynaKOBkn 12
BaM MoHITop 13
Mexahnueckay KOMnoHOBka 20
Iopkn&yHne 24
KoMnJIeKT dIy yCTaHOBKn IODCTaBKn 24
IoknueHne MoHTopa 25
MDC 31
Hactpoika MoHTopa 51
BxoD 51
I3o6paKeHne [I.K/BNC/DVI Pexm] 52
I3o6paKeHne [AV / S-Video / KomnoHeNt. / DVI-Video PeknM] 55
3ByK 56
YcTaHOBka 57
Mhoroakp. Ynp. 60
Функци npramoro ynpablenna 60
YcTpaHHe HeNCnPaBHoCTe 62
Функциа Camonpoверки 62
Cnncok IpoBepok 63
%onpocbl&TBetbl 65
Cneunpkauu 67
&67
*KOHOMaI3ep 68
Φa6pHnO!actpoKn=ncnpe 68
HnΦopMaζη 70
70
N!Φ&PMAUJIY &E I3=ENIIN (IpeoXpaHHe OE t 0fФeKta ocTaOHTHO n3o6paKeHn) ....70
Appendix 74
C8a3bBaTecb c SAMSUNG no Bcemy mpy 74
TepMNbI 76
Полимочь 77
SAMSUNG
PpabunTaXnKn
6e30nacCHOCTN
BVeJdHeHne
Copepkmoe ynaKOBKn
BaM MOHITOP
%exaHueckKa KOMNOHOBka
TnKn"eHne
Pa60a c nporppaMMHbIM
06cne"eHnem
Hacrponka MOHTOPa
*ctpaheHne
HEnCnpaBHOCTeN
Cneunfkaumn
HnΦopMaun
PpJIOKeHne
TFT-LCD Monitor
www.samsung.com
BETN BHeHnBnD n3dEINMOryT pa3nnaTbC8 B 3aBNCMOCTN OT MOnEN, a XapakTePmCTNK n3dEIN
MOrTy N3MeHrTbC863 npEeBapuTeIbHoro yBeDoMneHn C cIeJIy ycOBepWeHCTBOBaHn.
BVeJeHne
CoepxHmoe ynaKOBKn
Приимechанинe
- Ptoxanynta, npOBepbTe, BCE Nn HIXepeHcneHHbIe Yactn HAXOITCBY yNakOBKe Bmecte C
MOHHTOPOM.
Icnnyero-to Hxbataet,CBXKNTecc C BauHm Dnnepom.
Pn Heo6xOaMocTn NOKynKn DonONHntBbX KOMNoHErTOB ObaPHTecb K MeCTHOmy DInnepey KOMnaHN.
N PnIMeuaHne
- He yctaHaBnBaIte n3dene Ha nony.
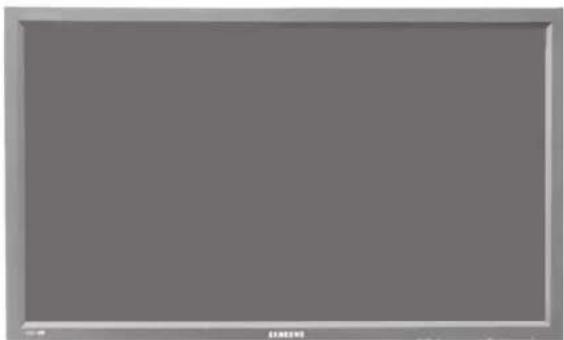
MOHITOP
PykoBODCTBO

PYKOBOCTBO NOJB3OBATEN

TapaHTnHbI TaIOH
(BbIaETcH BO BCEx
pernohax)

PykoBOdCTBO
NOLb3OBaTeNa
nporpaMMHoe oecne"ehne
MDC
Ka6enb
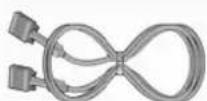

CnHnBnKa6eB(15-xtbipkoBbD-SUB)Ka6eB3JekpOnntAHN
Dpyroe
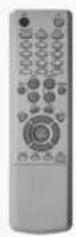
KhONKn nynbTa dNCTaunHOHOrO ynpabNeHH
6atapen(AAAX2)
KpbIka dIg OTBepCTHa

AV/S-Video/KomnoHeHT PekIM
BNC
AV/S-VideoPekim
DVI
AV/S-Video/KomnoHeHT
AV/S-Video
PC/BNC/DVI PeXMM
KOMNOHEHT
PC / DVI PeXMM
7) C
Knabuwa-BbiknioateB
3Ta KhoNka CnyKNT DnB BKNIOUeHn N BbIKIOUeHn MOHITopa.
8) INHdkatop peknma nHTaHna
InHdkatop pexkma nitaHn 3aropaetc npn Bknuehen nitaHn. Cm. pa3den Texnueckne XapakTepeNTKn.
9) DaTnK DnCTaHcNoHHOrO ynpaBneHn
HanpaBnIte npblT dNCTaHIOHOHO ynpabLeHn Ha 3Ty TOky MOHITOPa
MeyaHne
PaedekHOHOMa3epcoepKNT daIbHeuIINHOpMaunIO, KacaiouyocSyHKnpeKIMa 3KOHOHN 3NEKTPOINTAHNA. Ia CoXPAHENH 3HeprMn, OTKIOUaHTe MOHITOP, ECNI OH He HyKeH, INI ECNI OH OCTaETcA HNCNOLb3OBAHbIM B TeueHne DOnrTOB PBeMeHN.
Bn
c3a
Meuahne
- PódrpóbHyu HnΦopMaHIO O pOKnIQUeHm KabeNe CM. B nyHKTe "PódkIQUeHne KabeNeS" B pa3dJe "YcTaHOBKa" KoHpfuRpyaua 3aHei naHei MoHITOpB pa3NHybIX ModeNe MoKeT He3NaHTenbHO OTNIHaTbcra.
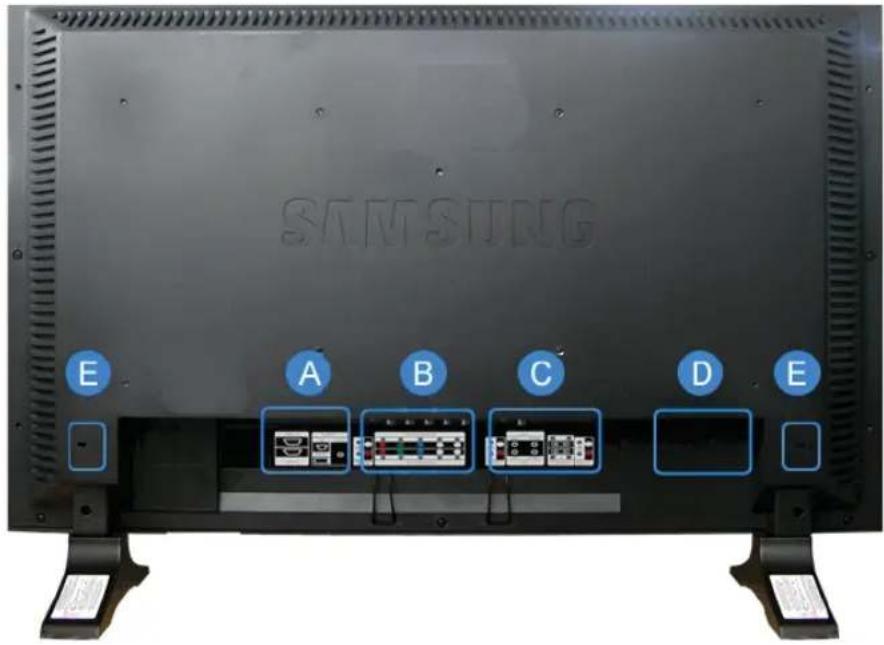
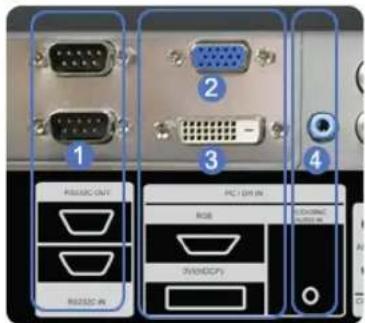
A
1) RS232C OUT/IN (nocneobateNBb nopt RS232C): IporpaMMHb nopt MDC (Multiple Display Control)
2)PC IN(RGB)(Pa3bEmnnoIIOKIOHEnBnDEOCnIHanaOTKOMnbHOtepa):15-ItbipkOBb pa3bEm D-Sub -pekm PC(aHAnorOBb CnHAn OTIK)
3)PCIN([DVI(HDCP)])(Pa3bEmIaI NOKIOueHnBnDEoCnHaJaOT KOMNbHOtepa):DVI-D-DVI-D-peXIM DVI (UdpboBcun HnA ot PI)
4) DVI / PC IN [PC/DVI/BNC AUDIO IN] (KneMaaydnocnHana PC/BNC/DVI (BxoD))
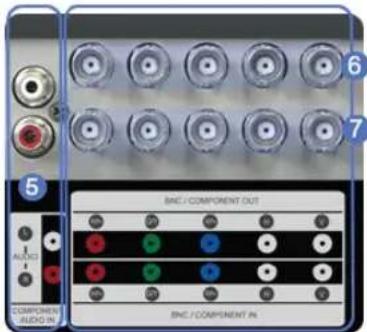
B
5) COMPONENT AUDIO IN [L-AUDIO-R] (KJEMMA aydnochnaIa KOMNOHETOB (BXO))
6) BNC/COMPONENT OUT [R/P R, G/Y, B/PB, H,V] (Pa3bem nIy noKIOUcHHe BNDeocnHana ot KOMNbIoTepa / Pa3bem nIy noKIOUcHHe KOMNOHeHTOB (BbIXoD)) IOnKIOUcHHe BNC (aHaIOrObbl cHrHal ot PIK): noKIOUcHHe npTOB R, G, B, H, V noKIOUcHHe KOMNOHeHTOB: noKIOUcHHe npTOB PR, Y, PB
7) BNC/COMPONENT IN [R/P R, G/Y, B/PB, H, V] (Pa3bem DnnoKIOHcHn BnDEoCHrHa n oT KOMIbIoTepa / Pa3bem DnnoKIOHcHn KOMNOHeHTOB (BXO))
8)AV AUDIO IN [L-AUDIO-R] (Pa3bEm nIa noKluueHnayuDIOcHrHaNA MONITOR) (BxoJ)
9)AVOUTVIDEO:PexmAV(BbyxOaD)
10) AV IN [VIDEO] (Pazbem Дуюнкючения Video) (Bxod)
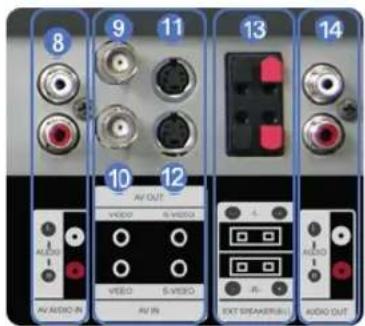
C
11)AVOUT[S-VIDEO](Pa3bEmdIJIIOKIOHHeNnS-Video)PexmS-Video(BbIXoD)
12) AV IN [S-VIDEO] (Pazbem Дяп подклоченя S-Video) (BXoJ)
13)EXT SPEAKER(8Ω)[--L-+,--R-]+(KJIeMMblI INIOKIIIOHNEINHAMNKOB(8Ω))
14) AUDIO OUT [L-AUDIO-R] (Pa3bEmДлг
нордкючениaydnocnhrana MONITOR)
(BbyxOd)
BbIXOJ-MOHHTOP: noKIOHHeHne KOMNHOTePA PC, DVI, BNC
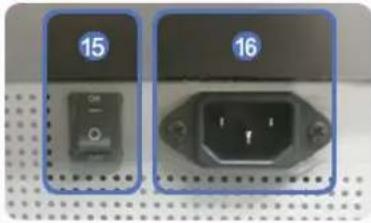
D
KoJIuHcTeBO MOHTOpOB, KOtOpBle MoXHO NOCoEHNHTb K NetNebOMy BixOy, 3aBNCIT O Ka6enr, HCTOUYHnKa CnHana n T.D. EcnN Ka6eBb He yxUdaeT yPOBeH CBnHana nn 3ΦΦeKTHBHOCTb HCTOUYHnKa CnHana, TO MoXHO NOCoEHNHTb DecaTb MOHTOpOB.

E
Displayed on the lower left corner of the screen.
Pn Haxatnn KhoKm Mute nn KhoKn - VOL + b pexnme Mute BocnpounBedeHne aydnocnHaIa BO306HOBnRETCR.
9) TTX/MIX
Tekehaalb oecneHBAOT ycnry nepeaHTeKCTOBHnHΦopMaun,Ha3bIaEMyTO TeTeKTOM.
[BEBPone BOCOBHOM nCnOJIb3yeTcR TTX/MIX.]
10) MENU
3Ta KhoNka NcNoIb3yETcIaONyOeKpbItnE3KpaHnro MeHIO (OSD) n AKTINBaZauu NblJeIeHHoro nyHKta MEHIO.
11) ENTER
AKTINBn3npyET Bb6paHHbI NyHKT MeHIO.
12) M/B.P.MODE
HactpoiKa H3obpaKeHnHa MoHTope NyTeM BbIbopa OndHn 3aBoDcKnx (nnn nepcoHanbHbIX) Hactpoek.
AV / S-Video /KomnoheHT. Mode : P.MODE
MoHITOp IMeHT YeTbIpe IpeyCTaHOBnEHbIX Ha 3aBOe-3rTOBtTeE BapnaHTa aBTOMaTueckOyCTaHOBknpapameTPOH3o6paKHeHn.
IpyuKnHecckoro Bb6opa npedBaPteJIbHO HAcTpoEHbIX peXIMOB HAKMITE NOcne 3TORO KHONKy epe pa3.
BkIouaET HnDnKaTOp, COOTBeTCTByUoIe N TeKyuEmy BxOdHOMy CnHany, McNoJIb3ayEmomy MOHITOpOM.
17) INFO
B BepxHem neBom yrny 3kpaHa oTo6pKaaeTcN HOpmaun O TekyIeM nO6paKeHN.
In PC/DVI mode, sets only SOUND to FM Radio.
In general Video SOURCE mode, sets to FM RADIO, turning off the screen.
In areas where signal is weak, noise may occur while FM radio is broadcast.
-Функин HeoctynHЯ dIЯ 3TOrO MOHITopa.
23) P.SIZE
Cnykntnna3meHeHpa3MePoB 3KpaHa.
24) (SRS
SRS
25] I-II DUAL/MTS
DUAL-
Pexmbi CTEPEO/MOHO, DBOHOH I / DBOHOI II MOHO/NICAM MOHO/NICAM CTEPEO moryBkIOuOaTbCp npnpocmTope TelenporpamM B 3abncnmoCTn OT Tna BeuaHn c nmoou KhoNkDUAL Ha npnbTe DY.
MTS-
BbnoJIHReT nepeKIOHeHnepeKIMOB MOHO/CTEPEO, DBOHO1/DBOH02 mMOHO/NICAM MOHO/NICAM CTEPEO.
| Тицberry: | MTS/S_Mode Пуу | Мочаиму | |
| FM stepeo | Моно Моу | Замена вруунуо | |
| Стөрө | Моно « Стөрө | ||
| От.ayd.np. | Моно «'От.ayd.np. | Моно |
-Функцн HeoctynHа nToro MOHTopa.
26) PIP
YnpabneHHe OKHom 306paXeHHa PIP.
27) SOURCE
BknHuaet HnDnKATOP, COOTBeTCTByIOuIe NTeKyuSeMy BxOHDMy CNrHany, IcNOnb3yEmomy MOHTOpOM.
28) SWAP
MeHReT MeCTaMn COePxKIMoe PIP IN OCHOBHOe N3o6paXeHne.
I3o6paKaHe OKHa PIP oTo6pa3ntcH a OCHOBHOM 3kpaH, a I3o6paKaHe OCHOBHOrO 3kpaHa oTo6pa3ntcB oKHe PIP.
29) SIZE
P03B0BnEeT BbIbupaTb pa3nnHbIe pa3mepbI n3o6paKeHHa.
30) RENV
O6paTHa nepemOTka
31) STOP
Stop (Cron)
32) PAAY/PAUSE
Bocpon3BeHne/Naay3a
33)FF
YckopenHHa
nepeMoTka
Bnpe
© 1995~2008 SAMSUNG. ALL Rights Reserved
1. MexaHnuecka KOMNoHOBKa

2. Bepx MoHtopa

3. Побстакa
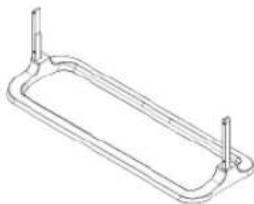
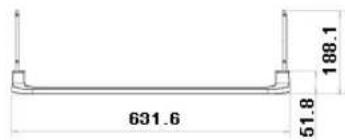
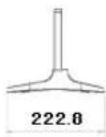

4.ДиHamNK
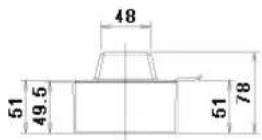

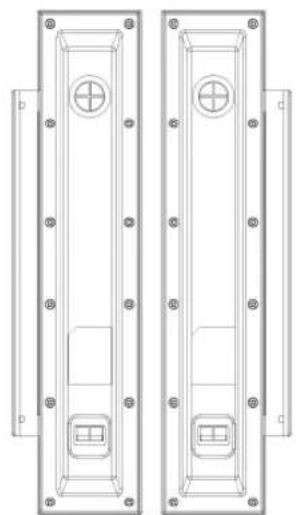

5. KaYcTaHOBtB KpOHwTeH VESA
- Pn yctahOBKe VESA Heo6xOIMNo HAnuHne COOTBeTCTBnC MeKdyHapOnbHmN CTAHaDpTamVESA.
Hfopmaunno nokynke n yctahOBKe kpoHtTeHa VESA: YTO6bI NOaTb 3aka3, OpaTnTeCb K bNkaWemy DnCTPn6bHTOpOy fnpMb Samsung. Nocne pa3MeueHnna 3aka3a kpoHtTeH 6yET yCTaHOJIe CNEuaJIntTaM. - Iepemeuatab MOHTOP c KK-dncnneem doJXHbI, no kpaHne Mepe, 2 HeNoBaKa.
KOMnHaHnSamsung He Hecet OTBcTCTBeHHocTh 3a NIObIe NOBpeXdHnN N3DeNnN INI TpaMbbl, pOn3OweDnne B Cnyae camoCToTeJbHoY cTaHOBKe KpENHeHn Ha CTHe NOKyNaTeJeM.
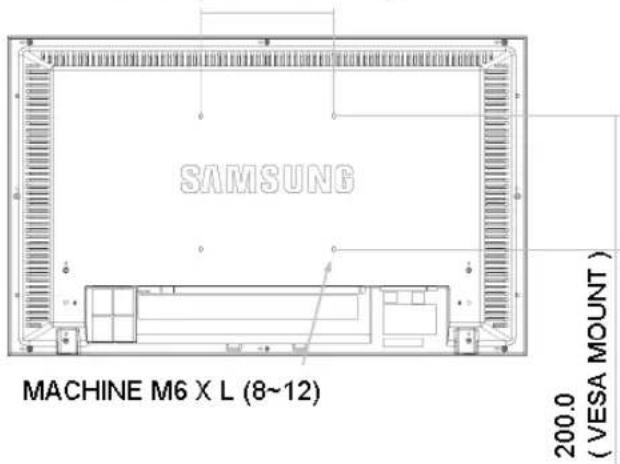
200.0 (VESA MOUNT)

MOnTaxKa KPOHwTeHa Ha CTHe HcNoJIb3yIe ToJIbKO KpeENKHbIe BnHTbI C rONOBKO NOd WnU dAmETpOM 6 MM N dNHOH O T 8 Do 12 MM.

6. YctahOBka HacteHHoro KPOHtTeHa
-Дяуctановкинстеного крштейна образиесь к сецалпс'tу.
Samsung Electronics He Hecet OTBETCTBEHOCTN 3a NOBpeXeHn I3dEHN nn yuep6 notpe6nten npnyctahOBKe n3deJnnoTpe6ntenm.
I3dene npedna3nueHO nla yctahOBKn Ha 6eTOHHbIX CTehax. Pnp ycTaHOBKe Ha OTWtYkATypeHHbIe HnnepeBAAHbIe NOBepxHOCTN N3dene MOKET DEpKaTbCHe HADEXHO.

HOHeHTbI (HE BXOaT B KOMJIneKT NOCTaBKn)
IcnoJIb3yIte TOnbKO Te KOMNOHEThb I npHnAdNExKHOCTN, KOToPbIe NOCTABIAIOTCB MBeCTe C 3dJIeHMe.
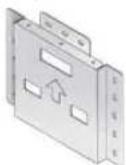
A
HacteHHbKpOHHTeH
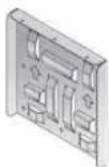
B
KpOHTeH nmoHTopa a

M6X L14

M4X L8

M4X L25

m = 311
G
PykoBOcTBo no yCTaHOBKe

aHOBka HAcTeHHORo MOHTaxHORo KpOHTeHa
1.
- OTMeTbTe Ha cTeHe TOckn DnIe CBepNeHr OTBepCTm
- PpocBepnnte OTBepCTne Iy6H0N 35 MM B OTMeueHHoTouke.
- 3akpenite aHkepbI F B OTBepCTmX Ha CTeHe.
- COBmectnTe aHkepbF COTBepCTnMM B HacteHHOM KPOHHTeHHe A npKpennTe ero wypnAmK CTHe E.

Ecnn KpoHHTeIN npKpenJEN KCTHe HeHaedxHO, KnDKOKpncTaNJUneckn MOHtOp cKK MoKet ynaCTb.
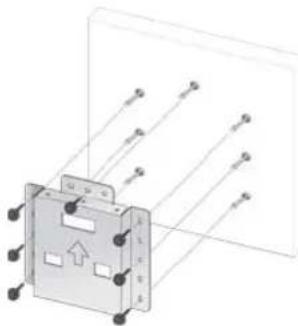
2.1.OTKIOUHTe NITAHNE INOTCOEINHITe Ka6eNB NITAHNtO p03ETK.
- NIOJXNTe MOHITOp Ha CTOn 3KpaHOM BHN3, npeBapntbHO NOIIOXIN KaOJ-NIO6O MraKm MaTePnAJI.
- PpIKpeNTe KPOHHTeH BMOHTopA K 3aDHeN NaHEEN MOHTOp C KKaN 3aKpeNTe erO BnHTamC
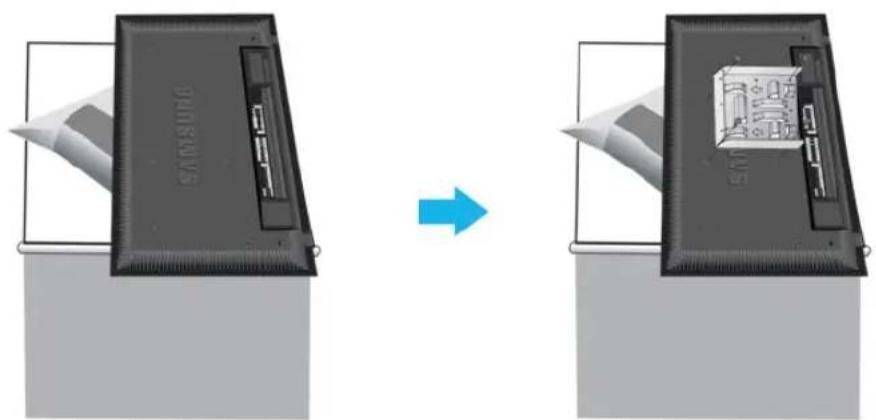
3.1.Bctabte yeTbpe depkataen KpoHtneHa Bdno MOHTopa B npope3n HacteHHoro KpoHtneHa A
2.3aKpeHnTe BnHTamn D KpOHNTeHnI MaHOTopa B Ha HAcTeHHOM KpoHnTeHneA.

PpmeaHne. PpeXeJe Yem BbInoNHa MOnTaX Ha CTeHe, ChaAna NoCoEHHte K MOHTopa BCE KaBeJI.

PpabnTaXHKn
6e30nacHocTn
BVeDHeHne
NoeknHueHne
KOMNNEKT Pny yctaHOBKn NOCTABKN
IopKIOHOUeHMe MOHITOPa
PaoTa c nporpaMMHbIM oecneueHem
Hacpoa MoHTopa
YcTpaHHeHne
HEnCnpaBHOCTeN
CneuФнkaun
HOpMaun
PpnooxeHne
TFT-LCD Monitor
www.samsung.com
Lbet H BHeHnBn H3dEINM Oryr pa3nuaTbC B 3aBcIMOCtN OT MOn, a xapakTePcHcTN H3dEINM Oryr n3MeHantbC6e3 npDabapntenbHorO yBcDMENHc C cEnbOycOBepHcHcBOBaHH.
Iopdklouyehne
KoMnJIeKT dIy yCTAHOBKn noCTaBKn
PnMMeAHne
- INONBJyTE TOnbKO BuHtBI, BKJIOUeHHBIE B KOMPNEKNT NOCTABKN.
npeodoctepexeHne
Samsung Electronics He Hecet OTBETCTBEHHOCTa noBpejdeHn B pe3yNbTate nCnonb3oBaHn KpOHTeHOB,OTJNAHOUxCXcOT ONCAHHbX BVIIe.
YctahOBKa BpeMeHHa noCTabKa
!npedoctepeKeHne
PepepepeheTaeBny"CAUTION".

1)3aunthna KpbuHa Hcnoh3yetc Dnna 3auntbbOTBepCTH B HxNHe YacTH MoHITOPa, Kyda BcTabnreTc noctabKa.ObaTeNbHO ydaNTe 3auTHyo KpbuHK npnpncOeHNHH BxOJaee B KomnKt BPemEHNO NOCTABKN INN KOMnNEkTA NOCTABKn (npOaETC OTeJbHO), a npnpncOeHNHH KOMnNEkTA dnyctAHOBKn Ha cte Haekpoite OTBepCTHe, nCNoIb3y KpbuHK dNOr OTBepCTNa.
2)YCTaHOBNTe nebyIO npabyIO NOCTaBNK.
3)BCTaBtBe NOCTABKBY B OTBepCTNe BOCHOBAHMH MOHITOPA. BCTaBtBe BHT BYkazahHHe OTBepCTNe H 3abepHHT erO.(M4 x L15)
npeodoctepexeHne
Dannnna nndctabka npedhnaHaeena dner perynpobk ytna o63opa kpaHa. Komnna Hne He cet OTBCTBEHNOCTA 3a yueep, Bo3HMKnB B pe3yntate NIOBOrO INONbOBAHHN NOdCTABKn. HnkOrDa HnONb3yTe N3dJeNE B KaucTBe NOdCTABKn NOd NIObIe PpeMetbl.
KOMnJIeKT dIy yCTaHOBKn NOdCTaBKn (npOdaetc oTdeJbHO)
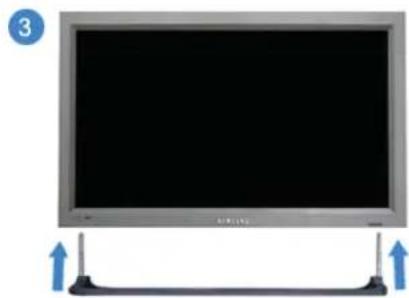
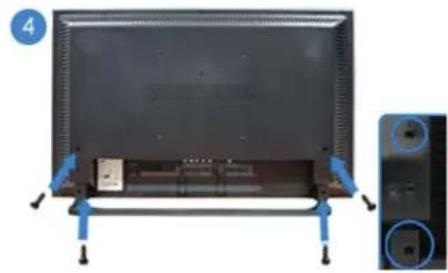
1)3aunTHa KpbuHa NcnoB3yETcI 3aunTbOTBepCTMa B HnKHeYactn MoHITopa,KyaBCTabJIeTcN oOCTabKa.ObaTeNbHO ydaNTte 3auThHyo KpbuKy npn pncOeHNHeHH BXOJaee B KomnEKT BpeMeHHo NOCTABKn IIN KOMnNeKTA NOCTABKn (npOaTeCt OTdEhBO), a npn npncOeHNHeHH NOMnEKA dnyctAHOBKn HA cTeHe 3akpoite OTBepCTHe,NCNoB3y KpbuKy dNOr OTBepCTNa.
2)O6paTIne BHHMaHHe Ha To, YTO6bI DetanH 6bHN yCTaHOBHeB b I npabINbHom nonoKeHM N B COOTBTCTByIOme no3nM. (M4 x L15)
3) BCTaBbTe NOCTaBky B OTBepCtne B OCHOBaHIM MOHITopa.
4) BCTaBBTe BHT B yka3aHHoe OTBepCTne n 3aBepHnTe erO. (M4 x L15)
PoioknoueHne MoHntopa
Ka6eBnHTaHn3a3emne
B cnuyae HecnpabHoctn npoOd 3a3eMneHn moKet npnbEctn K npopaxenio 3neKtpueckm TOKOM. BblonHNTe npabInbHOe noKnIOHcHHe npoBOda 3a3eMneHn nepeod noKnIOUeHNEM yCTPOCTBA K 3NEKTPocETn. Ppi OTknIOHcHn npoBOda 3a3eMneHn npedBaHTelbHO OTKIOHnTe yCTPOCTBO O 3JNEKTPocETn.

PpMM 0aHNN
K MOHITOPY, KpOme KOMIbIeTepa, MoKHO NoDKnIOHTaB TaKHe NCTOHNy ayINO-BuNecOcHnAOB, KaKDVDnpOHrpBbATEH, BnDEOMarHHToFOHb HIN BnDEOKaMEpbI. NpOp6HyO HnΦOpMaUHNO NO NOkKnOeHHNOHCTOHNKOB ayINO-BuNcOcHnAOB CM. BpyHKTe"CpeIcTBa ynpabNeHnONb30BaTeA" B pa3dene"HAcTpoKa moHITOPa".
PoiKIOHueHne KOMNbIOTepy
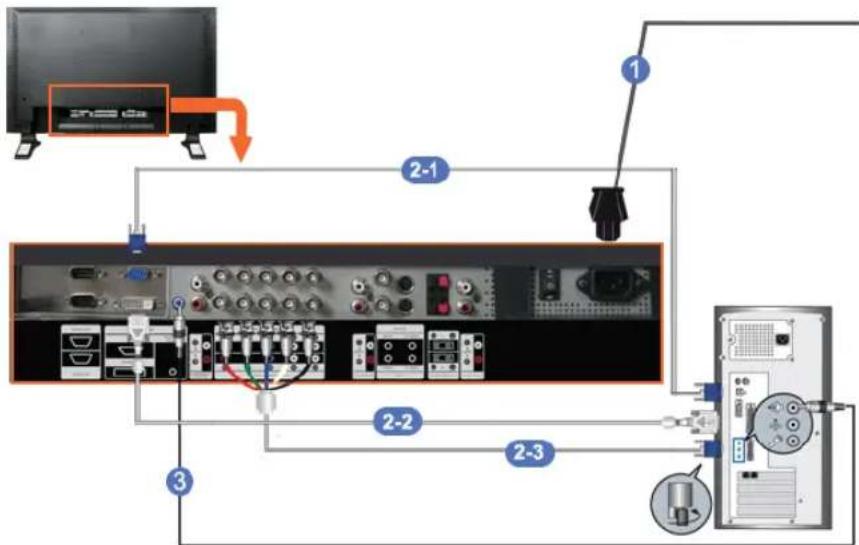
1)ПлдсоeиннеэкгчecншypBaweroMOHITOPaKpa3bemynTANHa 3aDHeNnaHEnMOHITOPa.
BKNIOHTE BbIKNIOHTEN NITAHNA.
2) CyuectByet 3 cnoc6a D-sub ka6en K MOHITOPY.
Bb6epTe OINH N0NCAHHbIX HnKe CnOcO6OB:
2-1)Icnonb3oBaHne coeHHTeTnD-sub (aHAnorOBOr) H BAeONnTaE.
IIOKINHHTe Ka6eBb D-SUB K 15-KoHTaKTHOMy npTy RGB Ha 3aHHe NaHeN MoHITopa H 15-KOHTaKTHOMy npTy D-SUB HA KOMNbIOTepo.
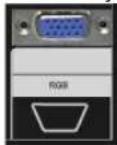
2-2) Ncnonb3OBAHne coeHHnHTeN DVI (uΦpOBOr) Ha BnDeonnate.
PnKnHouTe Ka6enB DVI Knopty DVI(HDCP) Ha 3aHaen naHaen MoHTop a K npOty DVI Ha

KOMNbHTpe.
2-3)IcnoIb3ObaHne coeHHnTeBNC (aHaNoRorBOr) Ha BnDeonnate.
IIOKnHnOHTe K6eB BNC K npoty BNC/COMPONENT IN - R, G, B, H, V Ha 3aHne nane MoHITopApK 15-KoHTaKTHomY npoty D-SUB HA KOmNbIoTepe
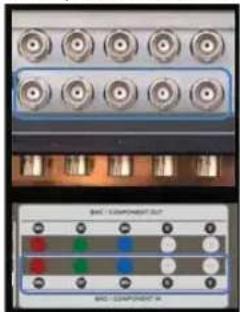
3) CoeHInHTe ayDnokakpenm npBeMb Audio (L) n Audio (R) DVD-nponrpbIbaTeN, BundeomarHtofoHa HIN BnEOKaMepbc pa3bEmAmn ayDnO-BxOIOB MOHITOPa L n R.
Ppimmeaune
BKNHOHTeKOMNbOtePmOHITOp.
PIMMeyaHne
Ka6eB DVI nBNC He BxOaNT B KOMnNeKT NoCTaBKn.
Iy noKynKn DononHntenbHoro o6OpyDobAHnOBpaauTecb MeCThbl cePBnCHbl CEHTP Samsung Electronics.
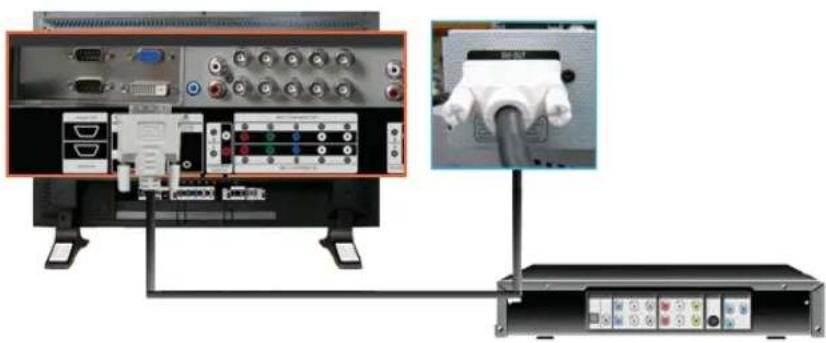
PnoknoueHne unpoBOr nponrpBaTeTn DVD
PnMMeHaHHe
Takne HcTOHnK CNHana, KaunuPBOB npomrPBbATEb DVD, noaKlHOaOTcKa pa3bemy MoHITopa DVI IN c nOMOsbIO ka6eIa DVI.
- Pocne 3TO R BCTABTe DNCK DVD B nponrpBbATENB KIOHHTe BOCPON3BeHe
BbIePte LHpOba npn nmoOnKhONK SOURCE.
PpMMeHaHHe
- MoHntop ochaueh coeHNHTbHbIM pa3bEAMM DVI nIy noKluOHeHHn cToHHka cnHana DVI Hanp.. cnppoBoro nporipbataen DVD.
IopKIOUOHeHNE BUNDeOMaHTOnTOPOHa

1)Bce yctpoiCTBA -HcTOHHN AAYIO-BINEOCHHANOB, HnnpMep,BVDEOMARHTOPOHbI HIN BVDOKAMpebl. nokkIOuayoTcK p3aBemy Pa3bem IIN NOOKIOUeHNAV IN [VIDeo] NIN Pa3bem IIN NOKIOUeHNAV IN [S-VIDE0] HA MOHHTOpe c NMOOsbIO KABeIe S-VHS INBNC.
2)ПОДКИСИТЕ раьемьl Audio (L) (Aудno (Л)) n Audio (R) (Aудno (П)) BИDEOMARHITOPOHA HIN BИDEOKAMEPB k pa3bEMAM MOHITOPa AV AUDIO IN [L-AUDIO-R] c nOMOцьkoKabenei.
PnmmueaHne
Bb6epnte BxO4 AVnnS-Vide, K KOTOPMOI NOKIOHOUEN BnDEOMAHITOpOH nIN BnDEOKaMepa, NcnoJIb3yKHONKY Bb6opa ITOCHNka (Source) Ha nepeDHeN naHenn MOHTOPa.
3aTeM 3anycntte BndeomarHHTofoH nnn Bndeokamepy, npedapntenbHO BCTabuB DVD-dnck nn kaccety.
PnMMeuaHne
KaBbS-VHSnnBNC He BXoNT B KOMnneKT noCTABKn.
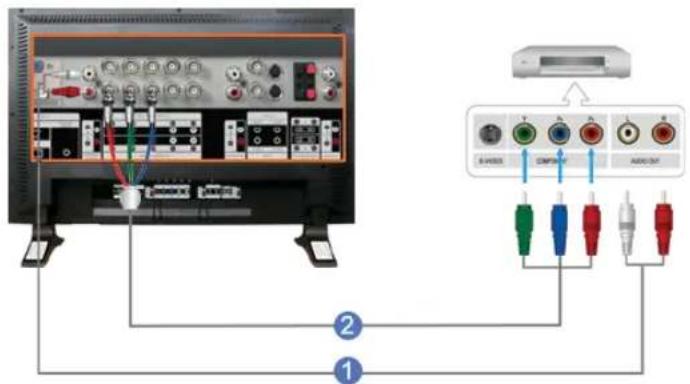
1) CoeHNHTe c nOMOIbIO KOMnIeKTA ayDINO-ka5eIeIa3BeMbI bByXoJa aayNocHana (AUDIO OUTPUT) BnDEOKAMepbI IN BXoIHbIe pa3BembI ayDINOcHHaIa COMPONENT AUDIO IN [L-AUDIO-R] HA MOHITope.
2) CoeHnHte c nOmoBbU BnDcokA6EJIpa3bEm BbIXoDA BnDEocnHana (VIDEO OUTPUT) Ha BnDEOKaMepe m BxOHOH pa3bEM BnDEOCnHana BNC/COMPONENT IN - noDKNoChne npToB P, PB ha MOHtOpe.
PnMMeAHmE
Bb6epnte Bxod Component, K KOTOPMny NOKIOH DVN-poourpmbaTeNB, HcnoIb3y KhoNky Bb6opa nCTOHHka (Source) Ha nepeHne naHn MOHTOPa.
- 3aTeM 3anyctnte DVD-npOurpbBATEnb, npEbpAteNBbCTABNV DVD-dnck.
PnMMeAHmE
Kaebb Component He BxOaHT B KOMIeK T NOCTABK. OncaHHe BixOa Component video cm, B pyKOoDCTBe noIb3oBaTeRA DVD-npOIRpbBaTeRA.
PoioknloueHne Bndeokamepbi
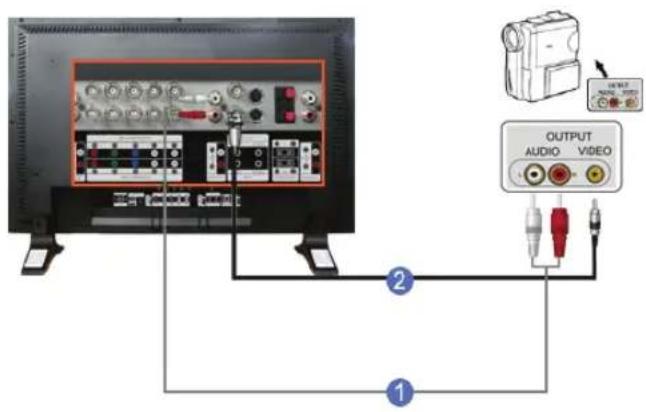
1)HaIInTe BbIXoHbIe pa3bEmbl ayDIO/BnDEocnHanaOB HBaBIOekamepe.ObbHNO OHn HaxOaTcH a 6koBOHnn 3aDneH CTOpOHe. CoDNHTe C nmoIbIO KOMNKeTA ayDIO-Kabenei pa3bEmbl BbXoJa ayDIOcHana (AUDIO OUTPUT) BnEOKAMepb IN BXoHbIe pa3bEmbl ayDIOcHana AV AUDIO IN [L-AUDIO-R] HA MOHTope.
2) CoeHnHTe c nomou BnDoeKa6eBnpa3bem BbyxoDA BnDoeocnHaA (VIDEO OUTPUT) H BnDoeKaMepe H BXoHOH pa3bem BnDEOCnHaA AV IN [VIDEO] HA MOHtOpe.
Ppmm eahme
Bb6epTe BxO A,V, K KOtOpOMy NOKIOHcH BnDEOKaMepa, HcnoJIb3y KHOIky Bb6opa NCTOHHKa (Source)Ha nepeDHe nAeHm MOHTOPa.
-3aTeM 3aNyctnte BnDoeKamepy, npEbnBapntelbHO BCTaBnB Kaccety.
Ппм eаннe
-1306paXeHHbIe ayDIO-BuDeOka6enn 06bUHO BXoJrT B KOMnNeK T npHauNexKHOCTeB BuDEOKaMepbl.
(B pOToMbHOM CnUyae Hx HxKHO pIno6pcttn.)
Ecnn Bndeokamepa 06ecneHbAeT Ctepeo-3anncb 3Byka,To Heoo6xOdM KOMPnKTe N3 dByx KaBeNe.
PnoknIOueHne BnDeoepntabKn
PnmeaHne
© 1995~2008 SAMSUNG. ALL Rights Reserved
BVeDHeNc

IporpmaMa ynpabHeHn HeckbKmM MoHTopam (Multiple Display Control; MDC) npedctabIeT cboB npinoXeHne, no3BOJHOoee pa6OtaTB Ha NK OJHOBPemHo C HeckbKmM MoHTopAM. Dnra CB3N MeKdy PI K MOHTOpOM nCIOJIb3yETc TcHApTbH IOcIeObaTeNbH b INThepEeRS-232C. IOTOMy MeKdy NOcIEOBAteNbHMn NpTaMn NK mMOHTOpOM Heo6xOdmo IcNOB3OBaT Ka6eNb NocIeObaTeNbHoro INThepFoeCa.
Haayano pa60TbI - TnaBHOe OKHO
Длэлэпураимь Вьбepит Start > Program > Samsung > MDC System.
Bb6epnte MoHtOp Ia npOBepKn ypoBn rpoMkoCTn B npedeJax nOla no3yHaKa.
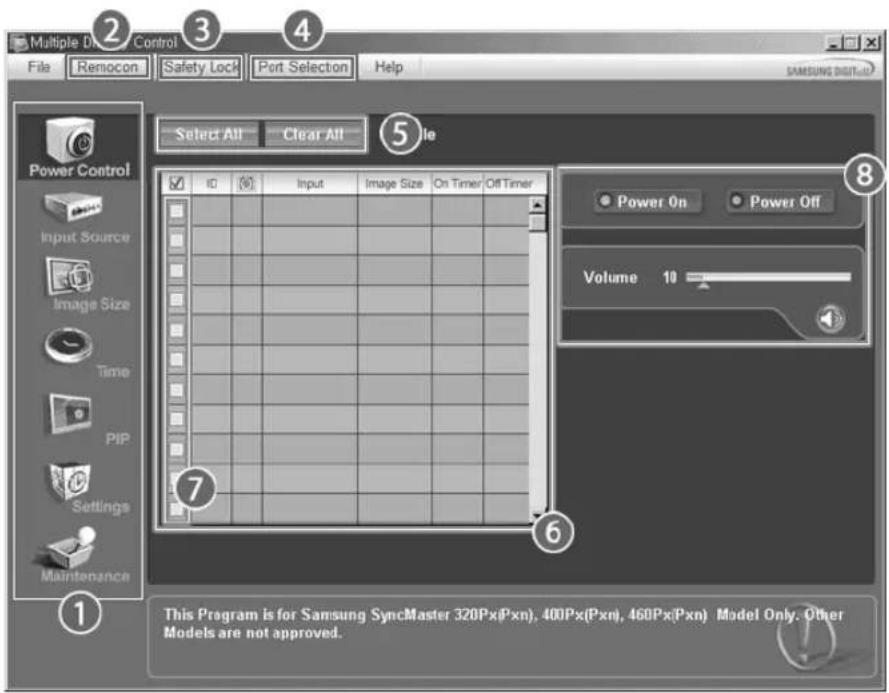
1 OCHOBHbIe 3NauchK KhonKa Bbl6opa 5
Remocon INΦopMaunOHnha Ta6nna 6
3 Safety Lock Bb6op MOHUTOPA 7
4 Port Selection 3nementb ynpabneHn8
1.OCHOBHbIe 3HaKIN CNOJb3yOTcI Ia nepeKIOueHn Ha IIO60I KpaH.
2.ПОЗВОЛЯТ AKТИВИЗИРОВАТ bIJI 6IOKIPOBaT bФYHKUHIO pIeMa CnIHana DnCTAHUNHO rYnpaBNeHn MOHITOPOM.
3.YctaHaBImBaetyHkUIO6NoKIpOBKM.
4. YctaHabnBaet yHKuio 6IOKupOBKn. IIO yMOJuaHHIO BbIbpaH nopT COM1.
5. Khonk Select All Clear All nolb3yotc nBb6opa nC6pocx MoHtopoB.
6.Дя npocmoTpa kpatKoI INHΦopMaunO BbIbpaHHom MOHTope IcNoJIb3yETcTaSbIua.
7. Bb6epnte dncnnn B nyHKe Display Selection (Bb6op nncnne)
8.3nemeHbI ynpaBHeHn IcNoIb3yIOrC IINy npaBHeHMoHHTopAMN.
<πpmea.> *yHKUaKTHB3aUH/6IokpOBKn (Enable/Disable) dIcTaHIOHO ynpabHeNJaIeCTByET He3aBNCMO OT TOFO, BKNIOEHO pITAHne NIN HET, n 3TO npABINO pACnPOCTpaHReTc Ha BCE MOHTOpB, NOKJIIOUeHHbIE K MOHTOPaM, NOKJIIOUeHHbIM K MDC OJHaKO, HE3aBICMOOT CTAtyCa, cyueCTbYIOUeBO B MOMENT 3aKpyITNA MDC, nlaФyHKUm npHema CrrHana DnCTaHIOHOHO ynpabNeHnB Bcex MOHTOpOB yctahAbNBAeTc 3aHaHHe Enable, korga MDC 3akpbIto.
Port Selection

- *yHKUmae Multy Dispaly Cnrol no yMOnuHaHNo yCTaHOBHeA da nra pa6oTb c nopToM COM1.
- Ecnn nncnblbetyra IIO60Ipyro npT,HexeHn COM1,TO B MeHIO Port Selection MoKHO BbIpaTb npT B dnaanaOHe COM1 \~ COM4.
3.EcHHe Bb6paHO ToUHoe HmApTa, NODKIOUeHHOro K MOHTOpy C NOMOuBIO NOCNEOBaTeNbHOrO Ka6Era,CBA3b 6yET HeBO3MOxHOH. - Bb6paHHbI npOT coXpAHReTcB INporpAMMe nHcNoJIb3yETcTaKKe i dIe cIeDyUoSe I porpAMMbI.

Power Control
- LcENKHTeMbIbHOHaOCHOBHOM3HauekeBkIIOUeHHa/BbIKIOUeHHaPiTaHHa (Power Control),OTKpbIbAEcRgOKHO Power Control.

B INΦOPMaIOHHO TabJIe coDEPKHTc HekOTopA 6a3OBa INΦOpMaIg, Heo6xOIMaIg Ira peAln3aIg FyHKUIN Power Control.
1) Power Status ( :TaTc nTahnia
2) Input Source
3) Image Size
4) On Timer Status
5) Off Timer Status
-BKIOHuae/TbIKHOaET NITAHHe (On/Off) BbI6paHHoro.
2) Volume
-PerynpyeT ypoBeHb rpmKocTH Bbl6paHHOro MOHTopoA.
3Ta cyHKnI npHmMaet 3aueHHe rpoMKoCTn BbIbpaHHoro MOHTopo aT MOHTopoB n OTbpaXaET erHa non3yHke peryIaTopa.
(B CNYaee OTMHeBb6paHoro 3HaueHn nn npn Bb6ope onuui Select All yctaHaBnBaetc 3HaueHne 10, nCnoJb3yEmoe no yMOnuHaHIO)
3) Mute On/Off
-BKIIIOaET/BbIKIIOaETyHKUIO OTKIOUeHn 3ByKa Bb6paHHoro MOHITopa.
EcnB Kaxkbim MOMENT BpemeHN BBiBnpaetc OINH MOHTOP,TO
Korda B BbIpaHOM MOHTope yKe yCTaHOBHeHa FyHKUma MUTE, Heo6xOuMo OTMeTuMb MOHToP c FyHKUneMUTE.
(EcInBb6pHaФyHKUaOTMeHbBb6paHHbIX3HaueHn(undo)INBb6paHaOnuA Select All,ДЯВCEnpaMeTPOB yCTaHAbNBAIOr3HaueHn,INCNoIb3yEmbIe NO yMOnuHaHnO).
ΦyHKnra Power Control npmehreTc nBce MoHtopoB.
*Функцн Volume Mute DeIcTByIOT TOnbKO B MOHITOPaX C BKJIIOUeHHbIM NHTAHmE (CTATYC NNTAHN ON).

Input Source
- LcENKHIne MbiHbO Ha OCHOBOM 3Haueke Input Source, OTKpbIbAetcR OKHO ynpaBHeH NCTOCHNkOM BXoHOro CnHana (Input Source Control).
Bb6epnte Select All ("Bb6paTb BCE") nnn yctahOBnTE fnaXOK Ira Bb6opa ynpabnemoro MoHToPA.
- TV Mode

- PC Mode
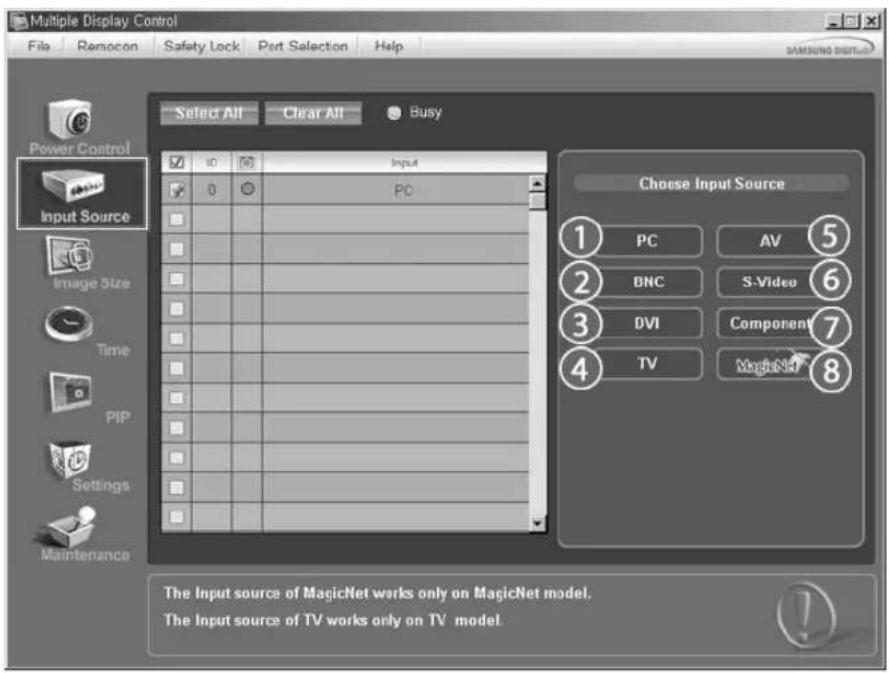

B INHΦopMaIHOH TabIe CoepKHTc HekOTopA 6a3OBa INHΦopMaIHa, Heo6xOIMa IynpaBHeHnФyHKmEIn Input Source Control.
1)PC
- IMeHReT NCTOCHNK BXoDHorO CnHaIa IyBbpaHHOro MOHToP0 ha PC.
2) BNC
- IN3MeHReT NCTOuHnK BXoDHorO CnHaJa DnBb6paHHoro MoHHTopa Ha BNC.
3) DVI
- I3MeHReT NCTOuHnBxODHOro CnHana DnBb6paHHoro MOHITopa Ha DVI.
4) TV
- I3MeHReT NCTOuHnK BXoDHorO CnHnAa IyBbI6paHHoro MoHHTopa Ha PC.
5) AV
- V3MeHReT NCTOCHIK BXODHORO CINHaIa Iy BbI6paHHOrO MOHHTopa Ha AV.
6) S-Video
- I3MehnaretIOCTOuyHk BXoDHoro CnHaJa DnBbIbpaHHoro MOHHTopa Ha S-Video.
7) Component
- I3MeHReT NCTOuyHK BXoDHorO CnHaIa IyBbpaHHOro MOHTopa Ha Component.
8) MagicNet
- IcToHmK BbOa dIra MagicNet pa6oTaET TOnbKO dIra MoDenI MagicNet.
9) Channel
- Ctpenika KaHaNIOB OTo6paKaAeTcR, KOrDa TeneBn3Op RaIaeTcR Input Source (NCTOCHNKOM BXoDHoro CNHana).

TeneBn3Op B KaueCTBe HcToUHnKa CnHaJa MoKeT 6bItb Bbl6paH TOnbko Ha yCtpoiCTBaX C
TeJeBn3Opom HynpaBHeHem KaHanaMn, ecN NCTOCHKOM BxOHO RHaJa ABJraTc TaJeBn3Op.

DyHKnna IpuSorCulntoTbKO JnMOHTOPOB,NTAHNE KOTOpBX BKNIOUOHeHO
(cocToHHe nHTaHn-ON)

Image Size
PC, BNC, DVI
- Haxmnte Ha nKtorpammy Image Size ("Pa3mep n3o6paXeHn") cpei OCHOBbIX nKtorpAMM, noBtca KpaH ynpaBHeHH pa3MePOM n3o6paXeHH.

B INΦopMaioHHoT Ta6nue OTO6paKaetcra OCHOBHna INΦopMaua, Heo6xOIMa nIynpabHeHpa3MePOM 1306paJKeHn.
1) Power Status (Ctatync nntaHnA
- Yka3bIbAeCTaTyc NITaHnTeKyuIero MOHtOpa.
2) Image Size
-Показь白癜风 pa3меры n30брахеня дя Bырного монтopa.
3) Input
SYka3bBaetekyuiuNIOCTOuyHk BXoDnHO CnHaI NcONb3yeMOrBO DaHHbIMOMeHTMOHITOpa.
4) B INHΦOpMaUHOHHo Ta6nue OTo6paXaKoTcra ToIbKO MOHHTopbl, BXOHNbIM HCTOHHKOM KOToPbIX RaBnEePC, BNC, DVI.
5) PC Source - Pnp Bb6ope Image Size ("Pa3mep n3o6paxen") Chayana noBnHOTc KAPTOKN PC, BNC, DVI.
-KHonka Image Size Control ("YnpabNeHne pa3Mepom n36paXeHn") no3BOJrT ynpaBnTB BO3MOxHbIM pa3Mepom n36paXeHn dIyNCTOuHnKa PC, BNC, DVI.
6) Video Source
- ⅢeKNHTe Ha KapToHKe Video Source dIy yCTaHOBKn pa3Mepa n3o6paXeHn IIN COOTBeTCTByIOUeBOxOHDoro NCTOCHNKA CnHaJa.
XctouHnBbOaIraMagicNetpa6oTaetTobkoIraModenMagicNet.
KhONka Image Size Control doctynha TOnbKO dN MaHToPOB, NHTAHne KOTOpbIX BKIOUeHO (coCTOHNHe NTaHn - ON)

Image Size
TV, AV, S-Video, Component, DVI(HDCP)
- Haxmnte Ha nKtorpammy Image Size ("Pa3mep n3o6paXeHnra") cpeHn oChOBbIX nKtorpamM, noBHTcR 3kpan ynpabHeHH pa3MePOM n3o6paXeHnra.
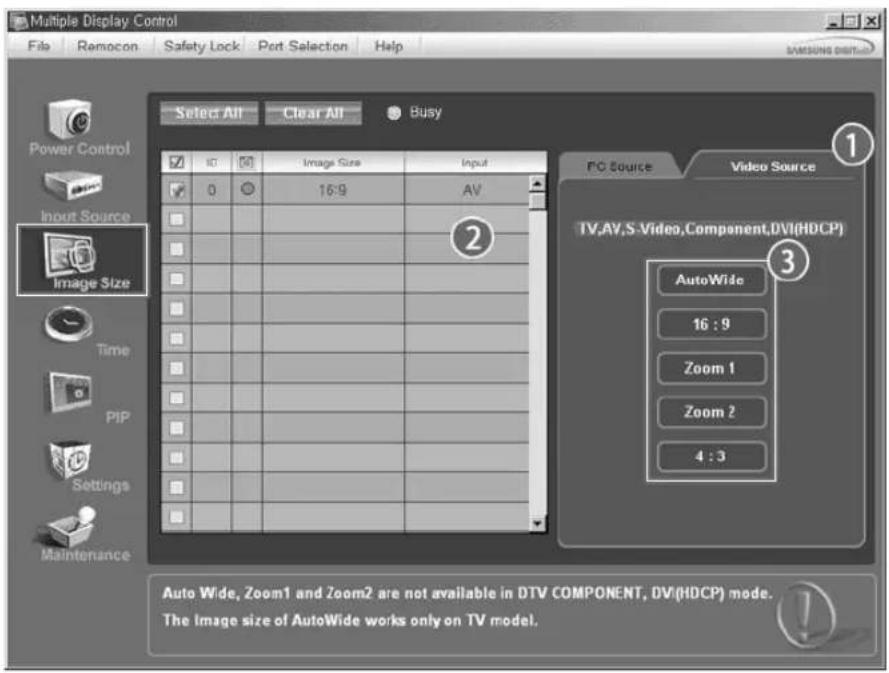
B INΦopMaioHHoT Ta6nue OTO6paKaetcra OCHOBHna INΦopMaua, Heo6xOIMa nIynpabHeHpa3MePOM H306paJKeHn.
- BbIKHIOaET ΦyHKUIO PIP Ha BbI6paHHOM MOHHTope.
3) Large
- BkHouaET cyHKUHO PIP Ha bbl6paHHOM MOHTope n 3MeHReT pa3Mep ee OKHa HA Large.
4) Small
-BKIIIOaETyHKUIO PIP Ha BbIbpaHHOM MOHHTope Nn3MeHReT pa3Mep ee OkHa Ha Small.
5) Double1
- BkIIOaET ΦyHKUIO PIP Ha BB6paHHOM MOHHTope n 3MeHReT pa3Mep ee OKHa Ha Double 1.
6) Double2
- BkIIOaET cyHKUIO PIP Ha BaIbpaHOM MOHTope n 3MeHReT pa3Mep ee OKHa Ha Double 2.
7) Double3 (Picture By Picture)
- BkIIOuAeT cyHKUIO PIP Ha BaIbpaHOM MOHTope n 3MHeReT pa3Mepe ee OKHa Ha Double 3.

IcToHnK BbOa dna MagicNet pa6oTaet TOnbko dna moen MagicNet.

Pa3Mep OKHa PIP MOKHO peryHnPOBaTb npN BkIOHeHHOM NHTAHMHoHTopa.

PIP
PIP Source
-
HaxMMte Ha NIKTORpAMMy PIP ("KapTNHka B KapTHHe") cpeIN OCHOBbIX NIKTORpAMM, NOBNTcR 3kpaH ynpaBHeHpa3mepom OKHa PIP.
-
PIP TV Mode
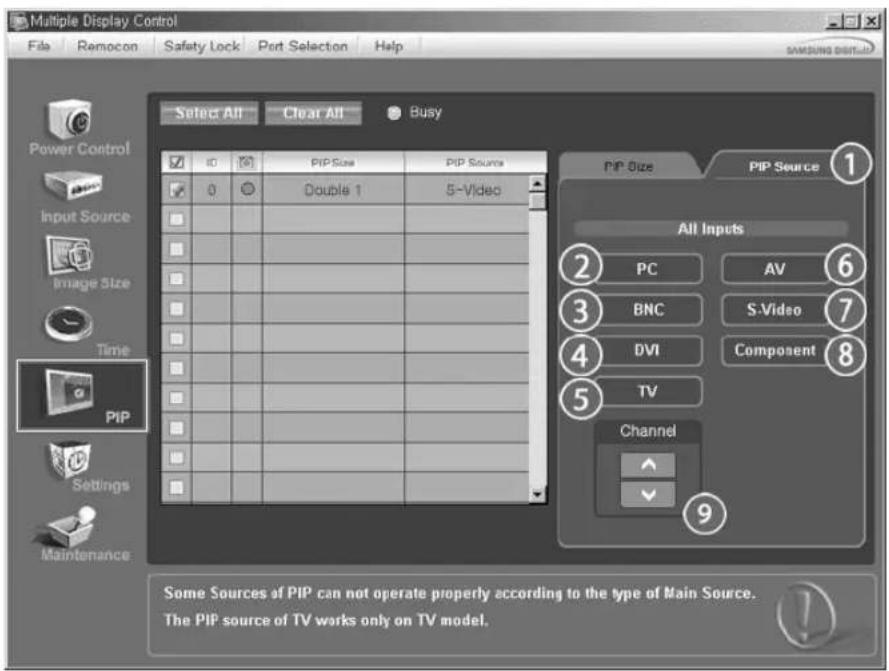
- PIP S-Video Mode
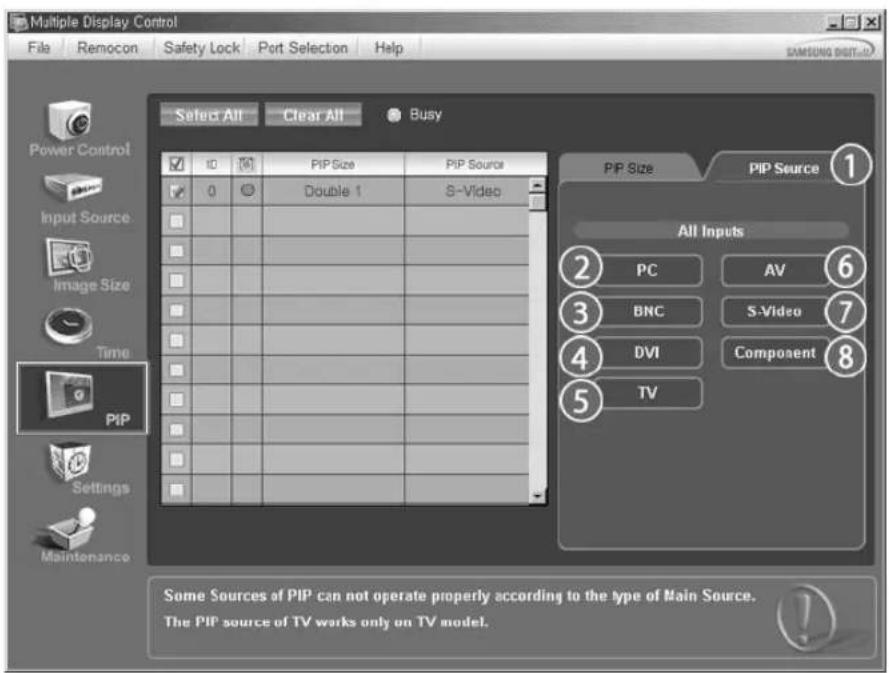
B INHΦOPMaUHOHHo Ta6nue OTo6paXaETcA OCHOBHAR INHΦOpMaUN, Heo6xOuMmA Dn ynpabHeHn MCTOHTN KnHana OKHa PIP.
1)PIP Source
- YnpabnTb NCTOCHNkOM CnHnA PIP MOXHO pN BKNIOeHHOM NTaHm MOHTopa.
2)PC
-ИЗмehЯETнСToUHнКсгнаPIPHa BbIbpaHHomMOHHTopeHaPC.
3) BNC
- N3MeHReT HcToHHK CnHaP PIP Ha Bb6paHHOM MOHTope Ha BNC.
4) DVI
-ИЗмehягпсюнк синда PIP Ha BыбpaанHom MOHTope Ha DVI.
5) TV
- IN3MeHReT NCTOCHNK CNHana PIP Ha Bbl6paHOM MOHTope Ha TV.
6) AV
- N3meHReT nCTOCHNK CnHana PIP Ha BbI6paHHOM MOHHTope Ha AV.
7) S-Video
-ИЗменияntСTOУнКсгнэРIPHAВБбранHOMMOHHTopeHaS-Video.
8) Component
-ИЗмehуетИСТОчнКсгнанa PIP Ha BbIбpaHHOM MOHITope Ha Component.
9) Channel
- CtpeIka KaHAnOB OTo6paKaAeTcRA, KOrda NCTOCHNKOM DnIyFHKUIN PIP ABJIeTcTcTeNeBUN3Op.
PnmeHHe. HeKOTOpbIe H3 NcTOuHKnOB PIP MOrY 6bITb HeOCTynHbI dRy Bbl6pa. 3To 3aBNCt OT Tnna nctouHnKa BXoHORo CnHaHa Na OCHOBHom kpaHe.
HcToUHK BBOda dna MagicNet pa6oTaET ToIbKO dna Moedn MagicNet.
TeNEBn3Op B KaeeCTBe HcToHnKa CnHaJa MoKet 6bItb BbIbpaH ToIbko Ha yctpoiCTBaX C TeNEBn3Opm N ynpabLeHem KaHaJAM, eCIn HcToHnKOM dIyHKUIN PIP ABJIeTcA Te
*ФункцИР Control (ynpabneHne peKIMOM PIP)doCTynHa TOnbKO nIaTex MOHTopoB,NTaHne KOTopbIX yCTaHOBNeHO BpeKIM ON (BkIIOueHo),nФункцИР PIP KOtOpbIX TAKKe YCTaHOBNeHa BpeKIM ON (BkIOueHo).

Settings
Picture
- ⅢeKHTeMbHbHaOCHOBHOM3HaUke Settings,OTKpbBaetcKaOKHO HACTPOIKNnapaMetpoB (Settings Control).
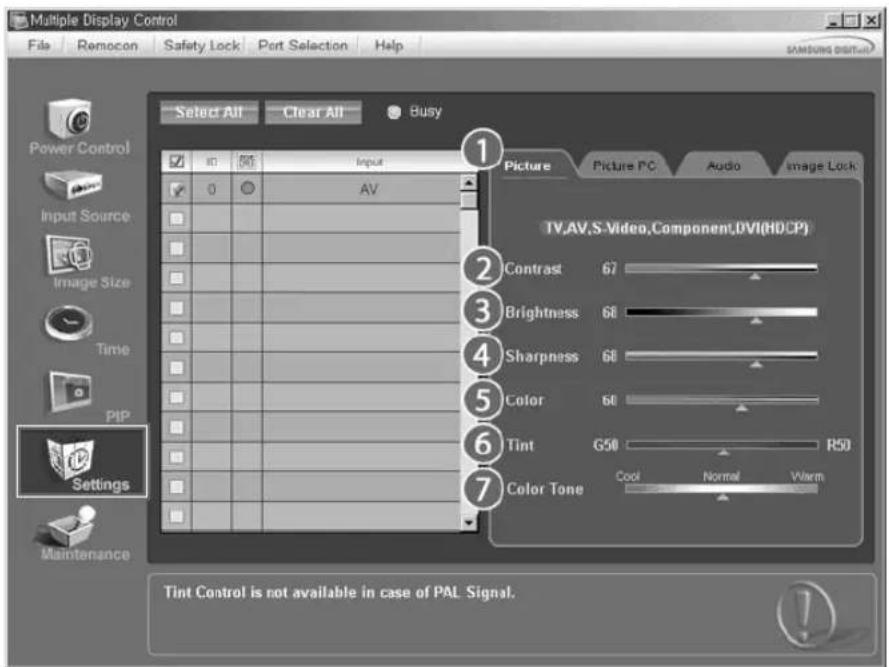
B INHΦopMaioHHo Ta6nue npedctabHeHa HeKOTOPa8 6a3OBa HΦopMaua, Heo6xOIMa dIpeaIN3auN ΦHKm Settings Control.
PnBbIbope kaxdoi 3fynkui Ha cnaJe oTo6paxaetcBb6paHoe nHee 3haueHne. Pn Bblope onuin Select All OTo6paxaetc 3haueHne no ymouanHIO (50).
I3MeHeHne 3HaueHnHa 3TOM 3KpaHepnpBODNT K ABTOMaTIneCKOMy I3MeHeHIO pexkMHa H "CUSTOM" (noJb3oBaTeNbckn).
1) Picture
- OTo6paKaJaTcra TOnIbKo IaI onIuI TV, AV, S-Video, Component, DVI(HDCP).
2) Contrast
- NcnoIb3yeTcra Iya perynipOBK KOHtpaTcTn BblpaHHoro MOHHTopa.
3) Brightness
- McnoIb3yeTcraIpeRynipOBK npKoCTBb6paHoro MOHTopa.
4) Sharpness
- McnoIb3yeTcraI pyerynipOBk pe3KoCTn Bbl6paHHoro MOHTopa.
5) Color
- Ncnonb3yETcra HacTpoKu CBeTOB BbIbpaHHOro MOHToPa.
6)Tint
- IcnoIb3yeTcraIpeRynipOBKnHacbiueHHoCTN Bb6paHHoro MOHHTopa.
7) Color Tone
- Hactpoika CBetOBoro ToHa BbIbpaHHoro MOHITopa.
HctouHH BBOda da MagicNet pa60taet TOnbKO da Moedn MagicNet.
3Ta yHKpIaIOCTyTHA TObko dIg DNcNIIeB, NITAHne KOTopbIX BKNIOyeHO, a ECnN Bbl6Op He CdeNaH, To OTO6paKaTeCA 3aBOcka HAcTPOka No YMOnuHaHIO.

Settings
Picture PC
- ⅢeKHTe MblbHa OCHOBHOM 3Haueke Settings, oKpbBaetcOHO hAcpoKn npametpob (Settings Control).
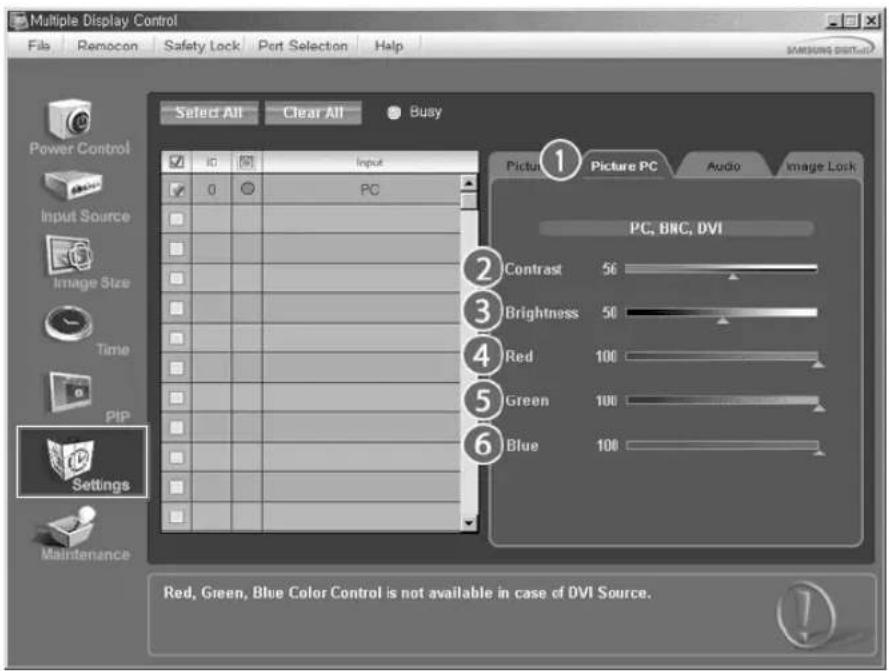
B INHOpMaOnHOH TAbIe npEcdTabIeHa HeKOTopA 6a3OBa HINHOpMaUH, HeoXoIMMae IpeaN3auHn FyHKmN Settings Control. Pn BbIbope kaxdoH n3 FyHKmHa cnaJe OTo6paKaetcBbIbpaHoe dHn Hee 3NaHeHne.
PnBbIbOpoeOnuN selctAIO6paKaTc3HaueHHe no yMOnUaHnIO(50).
N3MeHeHne 3HaHeHnHa 3TOM 3KpaHe npBODNT K ABTOMaTHueCKOMy N3MeHeHIO pEKIMHa "CUSTOM"(
1) Picture PC
- OTo6paKaTaTc TOnbko DnA onCm PC, BNC, DVI.
2) Contrast
- NcnoB3yeTcI dIpeRyInpOBKn KOthpaTocTb Bbl6paHoro MOHToPa.
3) Brightness
-ИспόньуетсдяруларовуразкостиБыбраHHORO MOHITOPa.
4) Red
- Hacptpoka zebetoboy TemnepaTpyb Bb6paHHoro MOHTopa.
5) Green
- HactpoMa Ka ZbEToBoT TempeaTpby BbIbpaHOrO MoHtOpa.
6) Blue
- HactpoMa Ka ZbEToBo TEmnepaTpyb BbIbpaHOrO MoHtopa.
* IctouHk BBoDA pR MagicNet pa6oTaET TOnbKO dR MaOeHN MagicNet.
3TaФyHKUHIOCTYUNHATOJbKO DnI DNHCNIIeB,NTAHNE KOTOpbIX BKNHOeHO,a ECIN BBIO6p He CdeNaH, TO OTO6paKaTeC3aBOcKra HAcTPOJa NO YMOnuHaHo.
Audio
- ΒeIKNHHTeMbIbHO Ha OCHOBHom 3HaayKe Settings, oTKpbBaTeCk OKHO HAcTPOIKn NapaMeTpOB (Settings Control).
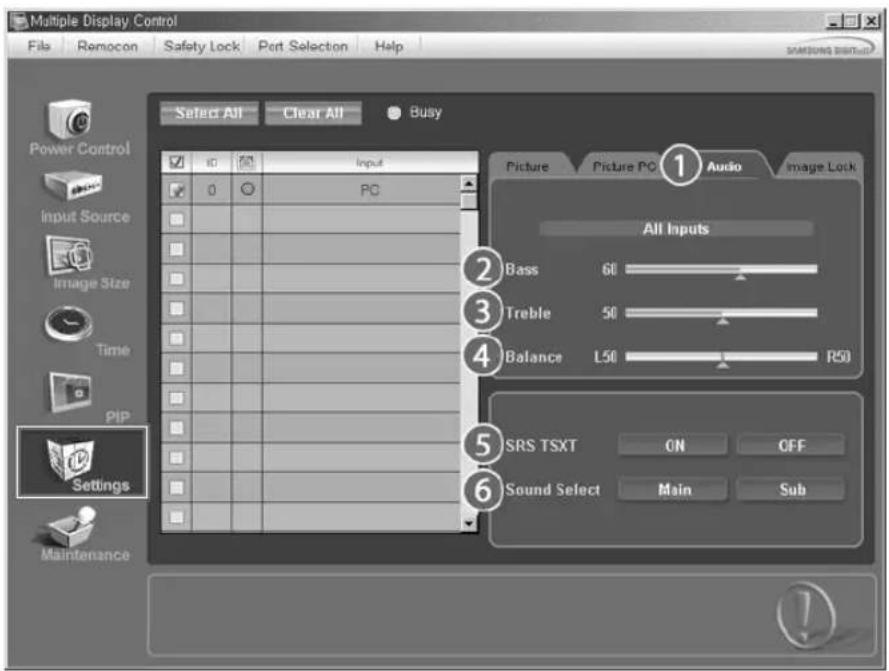
B INHOpMaHOHHo Ta6nue npeCTaBHeHa HeKOTopA 6a3OBa HINHOpMaun, Heo6xOIMMa dIpeaH3auu HYNKcMn Settings Control. PnB BbIbope kaxdoi h3 FyHKU HA cnaJe OTObpaKaeTcB bIbpaHoe dIne Hee 3NaueHne.
PnBbIbOpe onuun Select All oTo6paKaTeTc3aHueHeNo yMoJUHaHHo (50).
N3MeHeHne 3aHuEe H a TOM 3KpaAe NpBIOvNT K ABTOMATUHECKOMy N3MeHeHIO pEKIMa Ha "CUSTOM" (
1) Audio
- IcnoIb3yETcT dIa perynipOBKn Audio cactot BbIpaHnO MOHTopa.
2) Bass
- IcnoIb3yeTcraIpeRyIuPObKn Hn3KnX YaCTOT BbIbpaHHoro MOHITopa.
3) Treble
- NcnoB3yeTcraI pyerynnpOBKn BbICOKnx qactOT Bbl6paHHoro MOHITopa.
4) Balance
- IccnoIb3yeTcraIperynipOBKn6aHaHcBaIbpaHHoro MoHToPa.
5) SRS TSXT
- BkIOHeHne/BBKIOHeHne 3ByaHnS R5 TSXT.
6) BbI6Op 3Byka
-ПиВКIOUeHHOДФИKHUNIPIPMOKHO BbIbpaTbMainnSub.
* NcToUHnK BBOda nla MagicNet pa6oTaET TOnbKO nla MoeHN MagicNet.
3TaФyHKUHIOCTYINHATOJIbKO DnIaHcNIIeB,NIITAHNE KOTOpbIX BKNIOyeHO,aECINBBbI6Op He CdeNaH, TO OTO6paKaTeC3aBOckA HAcTPOiKA NO YMOLuHaHIO.
Image Lock
- JIeKHTe MblbHa OCHOBHOM 3Haueke Settings, OTKpbBaetcOHO HAcTpoiKn npaMeTPOB (Settings Control).

B INHΦopMaioHHoT Ta6nue npedctabHeHa HeKOTopa 6a3OBa HΦopMaqra, Heo6xOIMma dna peaIINaCn
fynkun Settings Control.
1) Image Lock
-
OTo6paKaTaTc TOnbKo DnA onCn PC, BNC.
2) Coarse -
IcnoIbayetcIЯ NaHctpoiK Coarse MoHHTopa.
3) Fine
-Исноьуетсдянскгп Fine moHntopa.
4) Position
-
IcnoIb3yeTcI dIaHCTpOuIKI NOIOKeHnI 13o6paXeHnI Bb6paHHOro MOHHTopa.
5) Auto Adjustment -
ABTomatnueckar aadantauK cnHany, noctynaoemy OT KOMnbTepe.
-
HctouHk BBoDa dЯ MagicNet pa6oTaET TOnbko dЯ moeIn MagicNet.
*FyHKnra Settings Control deHCTByET TObko B MOHHTopax C BKIOUeHHbIM NNTAHmE (CTATYC NNTAHN ON).

Maintenance
Lamp Control
1.卍KHTHe Ha 3aHKe "Maintenance" B cTOn6e OCHOBbIX 3aHcKOB. PONBtCkpaH Maintenance (o6cIyKBAHne).
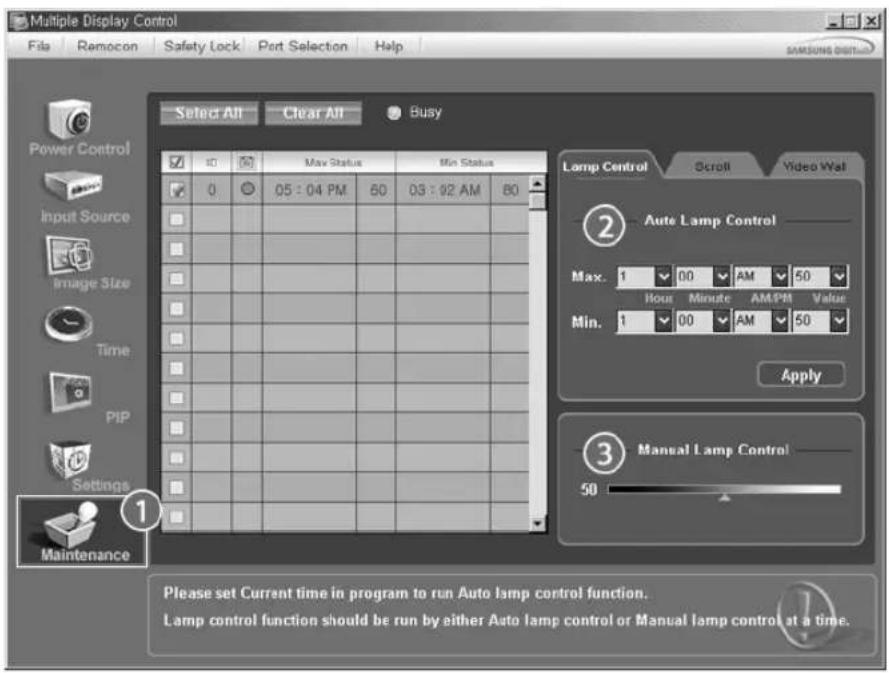
B INHOPmaIOHOHHoT a6nue("Info Grid") nOKa3aHbI HeKOTOpbIe OCHOBHbIe daHHbIe.
1) Maintenance
-AkTNBn3Npyet yHKuO ynpaBHeHnOBcIyKbAHHem (Maintenance Control) nra Bcex BXoDbix nctOHNKOB.
2) Auto Lamp Control
- ABToMaTuYeCKn HAcTpaNbaET NoCDBeTKy BbI6paHHoro MOHHTopa Byka3aHHoe BpeMra.
Функць� ManuaL Lamp Control abTomatueckn BbIKIOaETc npn BbIOnHeHn HAcTpoK n noMoUbO yHKznyu pyHoro ynpabNeHn noCBeTkoH Auto Lamp Control.
3) Manual Lamp Control
- No3BOJRAET HAcTpaBbTb NOcBcTky BbI6paHrO MOHITopa B JIO6oM MOMENT BpEmHeN.
Функць Auto Lamp Control abTomatueckn Bbikluoayetc npn BblonHeHn HactpoKn C nomoBIO yHKuyn pyHoro ynpablenen noDcBeTkoi Manual Lamp Control.
*Функua Maintenance Control (ynpabneHne 06cnyxuBaHnEM) DOCTyHa TOnbKO nMa MOHtOpOB, nHTAHNE KOtOpbIX yctAHOBHeO B pexMM ON (BkIoueHo).
* HctouHk BbOa dIa MagicNet pa6oTaET TOnbko dIa MoeIN MagicNet.

Maintenance
Scroll
- ⅢeIeKHTHe Ha 3aHKe "Maintenance" B cTOn6be OCHOBbIX 3aHcKOB. IoRbITcK kpaH Maintenance (O6cnyKbAHne).
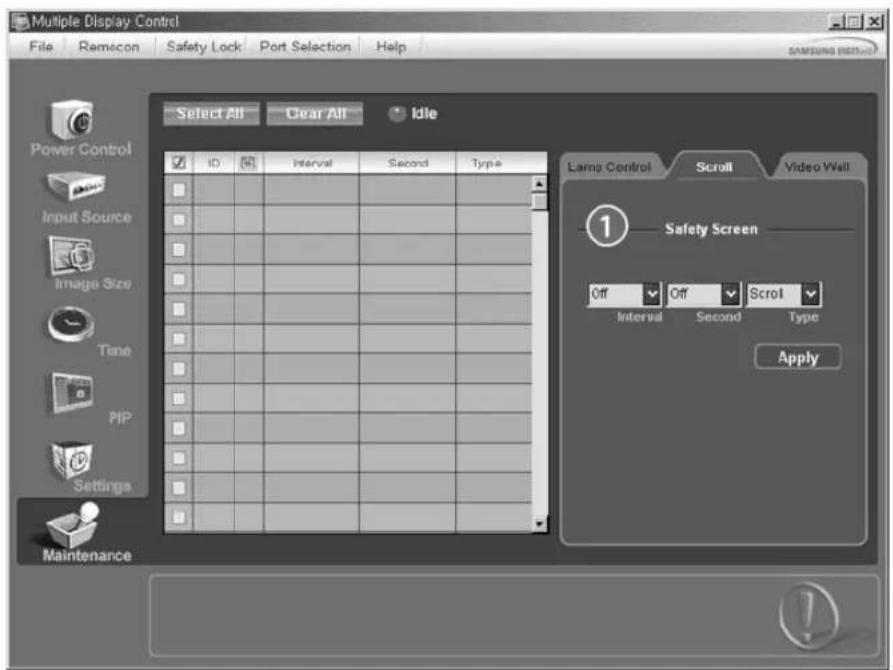
1) Safety Screen
- NCKIIIOaET NOBILHNEOCTaOHTbIX 3IO6paXeHn, BO3HNKAIooHx B pe3yIbTaTe DIINTEbHO pa60tBJ Bb6paHHORO MOHITOPA B pEXKIMPe na3by. MoXHO yCTaHOBnT b TaMep ZIKNA NOBTOpeHn pyTEM Bb6opa 3HaueHn "Interval" n "Second".
Moxho yctahOBtnbnapaMetpbScoll (Ppokpyka), Pixel (PiKceu), Bar (Tpoka) Eraser (YdaJIeHne)c nOmoIbHaCTpoKn Screen Type (Tn 3kpaHa).
*IctouHk BbOa dna MagicNet pa6oTaet TOnbko dna MoeJin MagicNet.
* npapamtpa cekyhbmoKHO yctahOBnTB 3aueHn1,2,3,4,5 nra Tnna npokpyTKn 3aueHn 10,20,30,40,50 nnkceen, cTPOKN Tnna ydaJeHn.
品 FyHKnma Maintenance Control (ynpabneHne 6cIyKbAHmE) DOCTynHa TOnbKO dR MOHTopoB, nTahHe KOtOpbIX yCTaHOBNeHo B pexm ON (BkIOUeHo).

Maintenance
Video Wall
- ⅢeIKNHHe Ha 3aueKe "Maintenance" B cTOn6be OCHOBbIX 3aHcKOB. IpoBtC8 kpaH Maintenance (o6cnyKbaHne).

1) Video Wall
-BndeocTeHa 3TO HeckoJIbKO CoeINHeHHbIX BmEcTe BnDeOeKpaHOB, KaJbI N3 KOtpbIX NOKa3bBAet qactb O6uero n306paXeHn I IN CoeINHeHHbIe BnDeOeKpaHbI, KaJbI N3 KOTpBIX NOKa3bBAET OHO I TO JKe N306paXeHne.
2) Screen Divider
-3KpaH MoXeT 6bITb pa3deneH.
Pn pa3deneHm MOxHO Bb6paTb KOInueCTBO 3KpaHOB C pa3HOI KOMNOHOBKOJ.
BbI6epnte pexim B nyHkTe Screen divider (Pa3dennTeb 3KpaHa)
Bb6op BxOdHoro nctOTHnKa CnHana dnnyHKnPiP
-PC/DVI:AV/S-Video/KomnoHeHT Pe&MM
- BNC: AV / S-Video Pe&um
-DVI:AV/S-Video/KOMNOHErPe&MM
-AV/S-Video:PC/BNC/DVI Pe&nm
- KOMNOHEHT: PC / DVI Pe&MM
[Дя npmaoro BblOba 3ToH Φнк"и HA nIyIbTe D'нсnonb3yeTc KhONka 'SOURCE']
3) CmeHa
[MONTH] [ENTER] [A/V] [ENTER] [A/V] [ENTER]
MeHReT MeCTaMn COePXMoe PIP n OCHOBHe n3OpaKeHne.
I3o6paKeHne OKHa PIP oTo6pa3nTcHa Ha OCHOBHom 3KpaHe, a I3o6paKeHne OCHOBHoro 3KpaHa oTo6pa3nTcB oKHe PIP.
[Длгпрмогу Вьзова 3ToHФннHa hynte DNY nCnObl3yETcR Khonka 'SWAP']
4) \*a3Mep
[ \text{[MENU]} \rightarrow \text{[ENTER]} \rightarrow [\wedge / \vee] \rightarrow \text{[ENTER]} \rightarrow [\wedge / \vee] \rightarrow \text{[ENTER]} \rightarrow [\wedge / \vee] \rightarrow \text{[ENTER]} ]
daet BO3MOXHOCTb Nolb3ObaTeNIO BbIKIOHaTb 3KpaH PIP nnn HacTpbanBaTb ero pa3Mep.
[Длп npMOrO BbI3OBA 3ToN ΦyHк"ин Ha nyIbTe DYNCnONb3yETcK hONka 'SIZE']
5)Пози"ия
[MONTH] [ENTER] [A/V] [ENTER] [A/V] [ENTER] [A/V] [ENTER]
I3MeHeHne no3nO nOKHa PIP.
6)Пpo3paHocTb
[MONTH] [ENTER] [A/V] [ENTER] [A/V] [ENTER] [A/V] [ENTER]
HactpoiKa ypOBnI npO3paUHOCTn OKOH PIP (KapTInHkBA KapTInHke).
- BbICOKa
- CpeHn
-Hn3kaj - Henp03p
PpIMMeuHne
- PnBb6ope -MeKSize npHKtI Po3uHn Transparencycncy He 6ydt AKTINBupoBaHbI.
DocyHbpeKmbi:PIP
*eJaKtnp.Ha3B.PASCD
[MONTH] [ENTER] [A/V] [ENTER] [A/V] [ENTER] [A/V] [ENTER]
PncB0te MeHa yctpoCTBaM, NOKIOUeHbIM KO BxOdbIM pa3bEmAM TeEBN3Opa, TTO6bi OSeIHTB DabHeuem Bb6op NcToHnka BxOHOrO CnHana.
XOT3N 3NaHEnH6bIIN TtAteHbNO NOO6paHbHaaMMn HKeHePamN OH, OJHaKO, MOrT OKa3aTbCn HEKOMΦOpTHbIMN DnHEKOTOpbIX NOnb3ObaTeNe, TAK KAK 3aBNCIT OT INHdNBdyanHbIX OC6eHHoCTepeHn.
B 3OM cnyae OtperynnpyTe npKocTb (Brightness) n KOHTpactHocTb (Contrast) c nomoubIO kpaHHoro MeHIO.
[Дя npmaO bI3Oba 3ToHФн"и Ha nyIbTe Yu nCnoJIb3yertc KhoNka'M/B].
Pnbl3
[ \text{[MENU]} \rightarrow [\wedge / \vee] \rightarrow [\text{ENTER}] \rightarrow [\wedge / \vee] \rightarrow [\text{ENTER}] \rightarrow [\text{ENTER}] \rightarrow [\wedge / \vee] / [< / >] \rightarrow [\text{ENTER}] ]
IcnoB3y 3KpaHbIe MeHIO, MoXHO 3MeHATb KOHTpactHOCTb I apKOCTb 3o6paKeHnA corNaCHO NmHbIM npedNoTHeHnM.
1) KoHTpACT
BbInonHnre perynipOBky Kohtpact.
2)RpokocTb
BbnonnHTe perynnpOBky RpkocTB.
Ппмочаиме
- Пи Насгюке ИЗбрахеня сиспьзованем Функци Custom MeHо MagicBright nepexodHT bpexim Custom.
OTTeHOK P
[MONTH] [A/V] [ENTER] [A/V] [ENTER] [A/V] [ENTER]
ToH zBETA MOXHO N3MeHrTb OT KpachOBaTO-6nOro Do rOly6oBaTO-6nOro.
1)Xon
2)O&bIyHoe
3) Tenn
4)Ппьз
YctaHOBky npametpoB R Phase, G Phase, B Phase, YcIneHne N YeTKocTb MoKHO npOn3BOoNTb BpyHyIO.

Pa3Mep P
[MENU] [ / ] [ENTER] [ / ] [ENTER] [ / ] [ENTER]
T03B0nAeT BbIbnpaTb pa3NnHbIe pa3MebpI n3o6paKeHn.
1) 16:9
2) 4:3
3kpah PIP
[ \text{[MENU]} \rightarrow [\wedge / \vee] \rightarrow [\text{ENTER}] \rightarrow [\wedge / \vee] \rightarrow [\text{ENTER}] \rightarrow [\wedge / \vee] \rightarrow [\text{ENTER}] \rightarrow [\wedge / \vee] \rightarrow [\text{ENTER}] \rightarrow [\wedge / \vee] \rightarrow [\text{ENTER}] \rightarrow [\wedge / \vee] \rightarrow [\text{ENTER}] \rightarrow [\wedge / \vee] \rightarrow [\text{T} ] \rightarrow [\text{ENTER}] \rightarrow [\text{T} ] \rightarrow [\text{ENTER}] \rightarrow [\text{T} ] \rightarrow [\text{ENTER}] \rightarrow [\text{T} ] \rightarrow [\text{ENTER}] \rightarrow [\text{T} ] \rightarrow [\text{ENTER}] \rightarrow [\text{T} ] \rightarrow [\text{ENTER}] \rightarrow [\text{T} ] \rightarrow [\text{ENTER}] \rightarrow [\text{T} ] \rightarrow [\text{ENTER}]
Mozho perynipoBaTb HAcToPmKn 3kpaHa PIP.
1)KoHTpACT
P03BONJET HACPTb npaMetp Contrast (KoHTpactHocTb) OKHa PIP Ha 3KpaHe.
2)JrKocTb
P03B0JrE T HAcTpOuTB npaMeTp Brightness (Rpkoctb) OkHa PIP Ha 3kpaHe.
3) YeTKOCTb
IcnoJIb3yETcI pyeIIpOBKn pa3nUHm MEXdy Hau6Oonee JRPKIMn Hau6Oonee TEMHbIMN 3OHAMN BOKHe PIP.
4)UBeT
OtperynnpyTe napametp Color (Lbet) nra OKha PIP ha 3kpahe.
5) ToH
D6aBnRECTeCTBeHHoCTnUbTeaOKHyPIP.
BpeKHe "PC", BNC"MOCKHO pOcMaTpBaTb N3o6paKeHne Ha 3kPaHe PIP, nCnONb3y NCTOChK BXoDHoro CnHana "AV", S-Video . Pa6oTaet TOnbKO dNn BnDeocnHana NTSC.
DocyHbEpeXmbi:PIP
DocTyNbIepeXmbl PC/BNC/DVI AV S-Video KomnoHcT DVI-Video
Pekim ASCD
[ \text{[MENU]} \rightarrow [\wedge / \vee] \rightarrow [\text{ENTER} ] \rightarrow [\text{ENTER}] \rightarrow [\wedge / \vee] \rightarrow [\text{ENTER}] ]
MoHTOp IMeET YteIpe npEcyTahOBnEHbIX Ha 3aBode-N3rOToBnTeNe BapnaHTa aBTOMaTHeCKo yCTaHOKnnapametpo N3o6pa&enHn.HactpoKa napametpo Ducnner.
1)Dunham
2) CtaHapTH .Pa6ToaTeT TOnbKO DnR BnDeocnHana NTSC.
3) KIno Docynhpiepexmbi:PIP 4)IoiB3
[Длп npamor Bo b3Oba 3ToI Φнкин H a n lyte Dу HcnoNb3yeteK hONka'P.MODE']
H3o6paXeHne[AV / S-Video / KomnoHeHT. / DVI-Video
56
Non3 ASCD
[ \text{[MENU]} \rightarrow \left[\wedge / \vee\right] \rightarrow \left[\text{ENTER}\right] \rightarrow \left[\wedge / \vee\right] \rightarrow \left[\text{ENTER}\right] \rightarrow \left[\wedge / \vee\right] \rightarrow \left[\text{ENTER}\right] \rightarrow \left[\langle < / >\right] \rightarrow \left[\text{ENTER}\right] ]
NcnoB3y %KpaHbIe MeHIO, MO&HO N3MeHbTb KOHTpactHOCTb I apKOcTB N3o6pa&ehnA corIaCHO NmHbIM npedNoTHEm.
1)KoHTpact
!pnaet HATypanbHoctb UBEtOBOMy TOHy n3o6pa&eHn.
2)RpKocTb
Perynipobka npKoCTN
3) YeTKoCTb
Perynupobka pe3KocTn 1306pa&eHna.
4) LBeT
Perynpobka zbeta n3o6pa&ehna.
5) ToH
D6abnreT OTo6pa&aemomy N3o6pa&eHHIO eCTeCTBeHHOCtB Ubeta.
Pabotaet tobnko B peximax AV n S-Video. Pa6otaet tolbko dny Bndeocirhana NTSC.
OTTEHOK ASCD
[ \text{[MENU]} \rightarrow [\text{A} / \text{V}] \rightarrow [\text{ENTER} ] \rightarrow [\text{A} / \text{V}] \rightarrow [\text{ENTER} ] \rightarrow [\text{A} / \text{V}] \rightarrow [\text{ENTER} ] ]
ToH zBeta Mo&Ho 3mHeTb OTo KpachOBaTO-6BenO To rOly6oBaTO-6BenO.To H zBeta Mo&Ho 3mHeTb OTo KpachOBaTO-6BenO To rOly6oBaTO-6BenO.
1) Xon.2
2) Xon.1
3)O6bIyHoe
4) Tenn.1
5) Temn.2
Pa3Mep ASCD
[ \text{[MENU]} \rightarrow [\wedge / \vee] \rightarrow [\text{ENTER} ] \rightarrow [\wedge / \vee] \rightarrow [\text{ENTER}] \rightarrow [\wedge / \vee] \rightarrow [\text{ENTER}] ]
I03BONJET BbIbIpaTb pa3nUHbIe pa3mpe bI3O6pa&eHna.
1) 16:9
2)YBen.1
3)YBen.2
4) 4:3
[3haeHnYBEn.1,YBEn.2,PaHopama HeocTyNbI B pexImax 1080i (nnn Bblwe 720p) nTTDTV.]
UΦp. w/ noA
[MENU] [A/V] [ENTER] [A/V] [ENTER] [A/V] [ENTER]
BKNHOUHTb HIN BbIKHOUHTb FyHKUHO NOaBNeHmI WymA.
Функця поадьненя сфровоушma no3bonrae nolyaet noyayta6 goee yehkoe n3o6pa&ehne.
1)BbIKn.
2)ПОИ.
Pexm"ΦnMb" ASC
[MENU] [A/V] [ENTER] [A/V] [ENTER] [A/V] [ENTER]
103BONJET BKNIOHTb NIN BBYKIOHTb pe&n m npocmotpa nIbMoB (Film Mode).
Функшpe&иma npocmoTpaфьmoB (Film Mode) obecneuBaert %ффekt OT Bocnpnra H3o6pa&eHn,
aHaONHnBn NOCEeHNIO KNHOteaT
(BpeKmMax DVI-Video yHKnHa Heoctynha)
1)BbIKn.
2)PonH.
3KpaH PIP ASCD
[MONTH] [A/V] [ENTER] [A/V] [ENTER] [A/V] [ENTER] [A/V] [ENTER] [</>] [ENTER]
Mo&Ho perynipoBaT hAcToPouK %kpaHa PIP.
1) KoHTpACT
PerynpoBka KOthpacta OKha PIP Ha %KpaHe.
2)RpKocTb
PerynpoBka npKocTn OKHa PIP Ha %KpaHe.
DocTyNhbIepeKIMbli:PIP
3ByK
OoctyNhbépeXmbl


PC/BNC/DVI
Pekum PASC0
[MONTH] [A/√] [ENTER] [ENTER] [A/√] [ENTER]
MOHTOP IMeET BCTPOEHHBbBICOKOKaueCTBeHHbI CTepeOyCNITEnb 3BYKOBORO CNHana.
2) Music
1)CTaHdapTH
Bb6epte pe&m Standard 1n B03BaueHnK cTahapTHbIM yCTaHOBkAM.
Bb6epntpe&nM Music npn npocmotpe My3bikabhbx Bndeonporpamm nn KOHcepTOB.
3) KInHO
Bb6epntpe&um Movie nna npocmTopa hnmbMOB.
4) Peyb
Bb6epHpe pe&MM Speech npn npocMOrpe nporpaMM, coep&auix B ochOBHom pehy n dHaonr (HanpMep, HOBOTe).
5)Пльз
MOHITOP IMeET BCTPOEHHHB BbICOKOKaueCTBeHHb CTpeOeyCNNTeB 3ByKOBORo CnHana.
Pn3 PASC0
[MENU] [A/V] [ENTER] [A/V] [ENTER] [A/V] [ENTER] [</>] [ENTER]
MOHTOP IMeET BCTPOEHBIyBCOKOKaHcTeBHHc TCEpeOycnITb 3ByKOBORo CMHana.
1) H/
IOpHepKnBaet3ByuHaHHe Hn3Knx TaCTOT.
2) B/4
IOnyepKnBaet3ByuHHe BBICOKx YactOT.
3)Баланс
BanaHc 3Byka = > No3BOnraT perynipOBaTB 6anaHC 3ByaHaM MExdy JneBbIM npaBBIM dHaAMKaM.
3Byk cnblweh dake B TOM cnyae,ecn dnn rpoMkoT yctahOBneHO 3aueHHe 0.
Приимechанинe
-Пин Habсторе ИЗБрахекпс CИСТОЛБЗВАнгел ФУнкци Custom MeHIO MagicBright nepexodnt B peKIM Custom.
PASCD
[MONTH] [A/V] [ENTER] [A/V] [ENTER] [A/V] [ENTER]
Reduces the differences in volume level among broadcasters.
1)BbIKn.
2)ПОЛн.
SRS TS XT PASCD
[MONTH] [A/V] [ENTER] [A/V] [ENTER] [A/V] [ENTER]
SRS TS XT YANETCZ anateHToBAHHO TExHONorE SRS, KOTOPaNo3BOJrT BOCPOn3BODy5.1- KaHbIbI 38yK Hepe3 Dba DNAMnKa. FHyKzIaTRuSurround oecneuBaET BOCpOn3BeDeHne 3XBaTbIbAIOUero BuPTyAnbHorO obemHoro 3ByuaHnuepe3 CCTeMy C DByMnHNAMKAM, BKNKouaB BCTPOEHHbIe DNAMKnTeNEBnOpa. FHyKzIa pa6otaet CO BCEMN MHOroKaHaJIbHbIMm fOpMaTAM.
1) BbIKn.
2)Полн.
[Дя npamorO bI3OBA 3ToI ΦyHKuHa nIyIbTe IY mCnONb3yETcK hONKa 'SRS'].
PASCD
[MONTH] [A/V] [ENTER] [A/V] [ENTER] [A/V] [ENTER]
Pn BkHueHHo FyHKuIN PIP MoKHO Bb6paTb Main uN Sub.
1)OCH
2)Дон
[DocTynHbIe pexNMBi:PIP]
YCTaHOBka
DocyHbpeKmbi
PC/BNC/DVI
AAV
S-S-Video
KOMnoHEHT
D Vl-Video
Y3bIK PASC0
[MONTH] [A/V] [ENTER] [ENTER] [A/V] [ENTER]
IaIINMeHHeNRA3bIka 3KpaHHbIX MEHIO BbINOJIHHTe OINCAHbIE Hnke Opeaun.
N PnMMeaHne
-IMMeHEHNE np03paHOCHTn FOHa MEHO OSD.
OH He BnraeHa nporpammbl, BbInonHr eMbIe B KOMNbOtepe.
- English, Deutsch, Espanol, Français, Italiano, Svenska, 日本語,中国語, Pycckn, 汉國詞, Portugués
Bpem PASCD
NcnoIb3yETcra nIy Bb6pa OAnHn 3 YcTbipex fynKuH yacob - "YCT.Yacob", "TaMep cHa", "TaMep BKn." N "TaMep BbKn".
1)YCT.4acob
$$ [ M E N U ] \rightarrow [ \wedge / \vee ] \rightarrow [ E N T E R ] \rightarrow [ \wedge / \vee ] \rightarrow [ E N T E R ] \rightarrow [ E N T E R ] \rightarrow [ < / > ] \rightarrow [ E N T E R ] $$
Tekyua yctahOBka BpeMeHn.
2) TaHmep cHa
$$ \begin{array}{l}\text {[ M E N U ]} \rightarrow [ \wedge / \vee ] \rightarrow [ \text {E N T E R} ] \rightarrow [ \wedge / \vee ] \rightarrow [ \text {E N T E R} ] \rightarrow [ \wedge / \vee ] \rightarrow [ \text {E N T E R} ] \rightarrow [ \wedge / \vee ] \rightarrow\[ \text {E N T E R} ] \rightarrow [ < / > ] \rightarrow [ \wedge / \vee ] \rightarrow [ \text {E N T E R} ]\end{array} $$
IcnoJIb3yETcIaIyABOMATUeCKOToKTIIOUeHnMoHITOpaYepe33aHaHHbI npOMeKyTOK BpEmHn(B mHyTax). (BbIKI., 30, 60, 90, 120, 150, 180)
3) TaHmep BKn
$$ \begin{array}{l}\text {[ M E N U ]} \rightarrow [ \wedge / \vee ] \rightarrow [ \text {E N T E R} ] \rightarrow [ \wedge / \vee ] \rightarrow [ \text {E N T E R} ] \rightarrow [ \wedge / \vee ] \rightarrow [ \text {E N T E R} ] - [ < / > ] \rightarrow [ \wedge / \vee ] \rightarrow\[ \text {E N T E R} ]\end{array} $$
Icnonb3yetyra nA BtOMaTHueCKORo BKHIOeHn MOHITOPaB npeBaPntbHO 3aDaHHO BPeMa.
Ecn nnapameptob TaMeBk. n TaMeB bblKn. yctahOBHeo 3haeHne p , a napameTp YcT.yacob He hactpoeh, oTo6pa3ntc coo6uehne "Chana yctaHObITE cacbl".
4) TaMep BbIKN
$$ \begin{array}{l}\text {[ M E N U ]} \rightarrow [ \wedge / \vee ] \rightarrow [ \text {E N T E R} ] \rightarrow [ \wedge / \vee ] \rightarrow [ \text {E N T E R} ] \rightarrow [ \wedge / \vee ] \rightarrow [ \text {E N T E R} ] - [ < / > ] \rightarrow [ \wedge / \vee ] \rightarrow\[ \text {E N T E R} ]\end{array} $$
IcnoIb3yETcIaIbAROMATUeCKoBbIKIOeHmHO MOHTOPaBnpBaPITeINbHO 3aHaHHe BpMa npYcTaHOBnEHOM yPOBHe rPOMKCTN pEKMIME.
PnIMeuaHne
- Ecnn nnapametpoB TaHmep BkN. n TaHmep BbIK. yCTaHOBeHo 3HaHe Hne p , a napametp YcT. hacob He hactpoen, oTo6pa3ntC coo6eHne "Chayana yctaHOBNTe HaCb".
PpO3paHocTb MeHIO PASC0
[ \text{[MENU]} \rightarrow [\wedge / \vee] \rightarrow [\text{ENTER} ] \rightarrow [\wedge / \vee] \rightarrow [\text{ENTER} ] \rightarrow [\wedge / \vee] \rightarrow [\text{ENTER} ] ]
I3MeHHe Ipo3paHocT foHa MeHIO OSD.
1) BbICOKa
2) CpeHn
3) Hn3kay
4) Henp03p
YctaHOBka NcXoHbIX napaMeTPOB

[ \text{[MENU]} > [\text{A} / \text{V}] > [\text{ENTER}] > [\text{A} / \text{V}] > [\text{ENTER}] > [0-9] > [0-9] > [0-9] ]
Paponb MOxHO N3MeHHTb.
Energy Saving PASCD
[ \text{[MENU]} \rightarrow [\wedge / \vee] \rightarrow [\text{ENTER} ] \rightarrow [\wedge / \vee] \rightarrow [\text{ENTER}] \rightarrow [\wedge / \vee] \rightarrow [\text{ENTER}] \rightarrow [\text{MENU}] ]
Iporpamma MDC, npedoctabnemar komnaHnei Samsung, noedepknaeT naHb 4x4 KK-dncnneeB.
1)PonH.
2)BbIKn.
Ппмочане
- Pn Heo6xOIMOCtN Ch3ntb Notpe6JIeHHe 3Heprn B pexmme OxndAHH, yctahOBte dna napametpa 3KOH. 3Heprn 3HaueHHe BKn. Ondako, ecnn n npapameTp a Energy Saving yctahOBneHO 3HaueHHe BKn, fYHKIO ydaenHoro BKIOHcHnIaTHn Power On mHorokpAHORO ynpabHnMDC n fYHKIO WOL (Wake On LAN) nporpaMMb MagicNet nconl30BaT HeIb3.
Video Wall PASCD
BundeocTeHa 3To HeckoIbK coeINHeHHbX BMeCTe BIndeOe3KpaHOB, KaJdbN I3 KOtOpbIX noka3bIbAet Yactb
06Iero I3o6paKeHnI Nn CoeINHeHHbE BIndeOe3KpaHbI, KaJdbN I3 KOTopbIX noka3bIbAET OdHO I TO Xe
n3o6paKeHne.
Korda BknIOeH peKIM Video Wall, moXHO hactpontb napaMeTpbl 3kpHa Video Wall.
1) Bndeota&no
[MONTH] [A/V] [ENTER] [A/V] [ENTER] [ENTER] [A/V] [ENTER]
BkIouHHe/ByIKIouHHe yHKm Video Wall (BndeocTeHa) BbipaHHoro dncnnera.
BbIKn.
-Nonn.
2)ΦopMaT
[ \text{[MENU]} \rightarrow [\text{A} / \text{V}] \rightarrow [\text{ENTER}] \rightarrow [\text{A} / \text{V}] \rightarrow [\text{ENTER}] \rightarrow [\text{A} / \text{V}] \rightarrow [\text{ENTER}] \rightarrow [\text{A} / \text{V}] \rightarrow [\text{ENTER}] ]
Moxho Bb6paBf pOpmT dNn npocmoTpa pa3deneHHoro 3kpaHa.
Full
PonHcKpaHHoe n306paXeHne 6e3 nonei.
- Natural
OTo6paKeHHe eCTeBHeHHOro H306paKeHnC coXpaHeHmE mCxOdHOro foPmaTa.
3) Pa3deneHrTeJIb 3KpaHa
[ \text{[MENU]} \rightarrow [\wedge / \vee] \rightarrow [\text{ENTER} ] \rightarrow [\wedge / \vee] \rightarrow [\text{ENTER} ] \rightarrow [\wedge / \vee] \rightarrow [\text{ENTER} ] \rightarrow [\wedge / \vee] \rightarrow [\text{ENTER}] ]
3KpaH MoXeT 6bItb pa3deneH.
Ppna3aDeneHm MOKHO Bbl6paTb KOINueCTBO 3kpaHOB C pa3HOI KOMHOHOKoi.
- Bb6epTe peKIM B nyHKTe Screen divider (Pa3dennenb kpaHa).
- Bыберпг дснney в nyнкг Display Selection (Bыбор дснney).
-ПиннakатилфрьВьб�анHOMpeKHMe6yETyCTAHOBHeMOcTeONONOKeHMe.
-2x2
-3x3
-4x4
-5x5
-1x2
-2x1
-1x5
-5x1
PnmeuHne
YCTaHOBka HcXoHbIx npaMeTpOB
1) C&poc hactp P
$$ [ M E N U ] \rightarrow [ \wedge / \vee ] \rightarrow [ E N T E R ] \rightarrow [ \wedge / \vee ] \rightarrow [ E N T E R ] \rightarrow [ E N T E R ] \rightarrow [ < t > ] \rightarrow [ E N T E R ] $$
$$ (\Phi \mathrm {Y N K} ^ {\prime \prime}) \text {H A D O C T y n h a T o l b k o B p e x i m e P C / B N C)} $$
2) Boccr."Bera P
$$ [ M E N U ] \rightarrow [ \wedge / \vee ] \rightarrow [ E N T E R ] \rightarrow [ \wedge / \vee ] \rightarrow [ E N T E R ] \rightarrow [ \wedge / \vee ] \rightarrow [ E N T E R ] \rightarrow [ < / > ] \rightarrow [ E N T E R ] $$
Mhoro3kp. Ynp
DocTyHbIepeKIMbl
PC/BNC/DVI
A AV
S S-Video
C KomnoheHT
D DVI-Video
Mhoro3kp.Ynp
$$ [ \text {M E N U} ] \rightarrow [ \wedge / \vee ] \rightarrow [ \text {E N T E R} ] \rightarrow [ \wedge / \vee ] \rightarrow [ \text {E N T E R} ] \rightarrow [ \text {E N T E R} ] \rightarrow [ 0 \sim 9 ] $$
YcTaHOBka pa3bIX nDeHTnФkATOpOB dIa annapata.
1) Yct. ID
YcTaHOBKa pa3HbIX NIDEHTUΦnKaTOpB dIra annapata.
2)BbOaID
IcnoIb3yETcIraIbIbopaФyHKuINnepeaTnkaOTdIbHoro annapata.BKIOUaETcTOnIbKO annapat, IeHTNΦkATOp KOTOPORo COOTBETCTByET HactpoKe nepeaTnka.
Функ"и npЯмого
ynpaBHeHn
Docynhbiepexmbi
PC/BNC/DVI
AV
S S-Video
G KomnoHeHT
D DVI-Video
MDC P ASCD
PepenDITBE3KpaHHeMeHIO MagicNet.
LOCK PASC
YcTaHOBnTeФyHKnIO3aunTHa6boknPOBka.
1) BkN. &JIoKnIpOBoKy
OH6yJeT3aBnOKIpOBaH.
2) BbIKJ. &nOKpOBky
OH6ydtpa36nokpOBAH.
PnimeaHne
-Пин Habroну Достоюпс Фундь Lock MokHNO ynpabnTb TOnbKO KhoNkAMu Lock Ha nIyIbTe duCTaHNoHHoro ynpabnHn I TeBEn3Ope.
Pepdabapntenbno 3aadHHbI password (naponb) MoHITopa - "0000".
PIMMeaHne
C6poc npoIa7bokpoBkFyHKUHOHaBbHbXKHOK.
HaKMTe KONM MUTE 1,8,6On. NapoB 6pyed c6poWeHdo3aueHn0000'.
© 1995~2008 SAMSUNG. ALL Rights Reserved

Ppabnna TeHHNK
6e3onacHcTn
BVeIeHne
IopdknloyuHne
Pa60aC nporpamMhbIM
06ecneenuem
HactpoKa MOHTOPa
YctpaHHeHne
HEnCnpaBHOCTe
Функця CamonpoBepKn
Cnncok PpOBepk
Bonpocbn OTBebti
CneuФнkaun
Hdopmaun
PpIIOJKeHne
TFT-LCD Monitor
www.samsung.com
LbETN BHeHnBnI N3dEINMAORYTpaNNaHTbcB 3aBNCIMOCTNOT MOnELA, aXapakTePcNTMK N3dEINMAORYT N3MeHrTaBCe3 npedBaPntelbHorO yBeOMENHcN CLeNoyCOBepueHCTBOAHIN.
YcTpaHHe HeCnPaBHOCTe
Функця CamonpoBepkn
Приимechанинe
- PpeT TEM, KAK oBpaaTaBc B CepBnchbIeHTp, npOBepBe TcNeDyUoHne NyKbI camOCToRteNbHO. Ecnkakme-nb6 npObnembl BHe Me MoKeTe yCtpaHITb cAmOCToRteNbHO, 0paTntecB CepBnchbIeHTp.
ФункцуСamonpoBepkn
B MOHITope IMeETcA FyHKUa ABTOCTnPOBaHnA, KOtOPa NO3BOJrT NOBepN, npabINbHO Jn pa6Otae MOHHP.
1) BbIKIOHHTe BaUN KOMNBIOTep N MOHITOP.
2)OTcoeINHtBeBnDEOKa6enbOT3aHHeNnaHEnKoMnBIOTepe.
3) BKNIOHHTe MOHITOP.
IokaaHHoe Hnke n3o6paeKeHe ("PpOBepntb CnH. KaBeb") Ha cpeHom fOe NOBnEETcK, KOrda MOHITOP HaxoNDTCB HOpMaNBOM paOohem COCToHN, HO Ha Hero He noaH BnDEOCnHAn: B pexkme camonpoBepK CBTeODIOhB hNDAKATOP NHTAHO CoXpaHReT 3eNEHb IeT, a noka3aHHe Ha PnCyHKe n3o6paeKeHe nepMeMaTaE TcNo ekpany.

Check Signal Cable PC
4) OTCYCTBNE OJHORO IN 3TINX KBaDpaTOB MOxET O3HaaybI npo6nmbc MoHHTOpOM.
Ecnn 3kpan MOHNTOPA OCTaETC NcTbIM NOcne npOdenaHHbx npOeDpy, npOBepbTe BnDeokapTy NKMBIOTEp; BaW MoHNTOP pa6oTaET HOpMaIbHo.
Check Cooling System
EcnHa 3kpahe OTo6paKaetc4 Coo6eHne "Check Cooling System", 3HaHT, npOn30weN c5oB OxAnkaDauOeM BEHTINrAtope. O6patntecb CepBnchbl ceHTp DnpeMoHTa INI 3meHb BEHTINrAtope.
HeonTMaJIbHbI pexHM
Moxho yctahobntb dae 60nbue pa3pehenhe, em 1360 x 768. B teuehme mHytb 6ydt oTo6paKaTbcra cootBcTCTbyuouee coo6uHne. 3a 3to Bpem Moxho Bbl6paTb Mekdy nMeHHnem pa3peHnna 3kpaHa HncoxpaHHeM Tekyuero pexHMa. B cnyae ecn h cactota o6HbNEHn npebbiAet 85 T, oTo6paHTcra YepHbI 3kpan, Tak kak MOHTOP He noDdePkmBaet qactoty o6HbNEHn Bblue 85 T.
Not Optimum Mode
Recommended Mode 1360x768 60Hz
Плимочаиме
-3aHnpmauee noDpejkmbaemopnpaepaaouenCnooc6hoctn yactotax obohne Hna 6pataTeceK pa3dny TexHmueckne 3abOckne HacptpoKn Dcnnner.
> yxodn nuctka
1)YxOДЗаКорпсусOMMOHITOPa.
OuCTKMOHITOPa npo3BODTe YCHTOI MRAKO TKAHbIO, npeBaPHTeBHO OTCoeDINHB WHyp NITAHIA.

He nCnoB3yIte 6eH3nH, pactBopHTeIN HnDpyTne orHeonacHbIe BEECTBa, a TAIKe MOKpyIO TKAHb.
-Bo n36e9aHne noBpeKdEHHa 3kpaHa peKoMeHdyetcN cNoIb30BaTb OHuaHOyIO KIOKOCTb, peKoMeHdoBaHHyO Samsung.
2)YxOa3aekpaHOMIIOCKONaHEbHO MOHTopoA.
OuCTky 3kpaH npoINBODIne OCTOPOXHO MRAKOH TKAHbIO (XONHATOBMyMAHHOI pHaHeIbIO).

HnB Koem cnyae He nncnoIb3yIte aIeToH,6eH3nHnn paCTbOpHTJIb.
(3To MoXeT Bb3BaT nobpeKdHHe UIN DeFOMaUHO NOBepxHocTH 3kpaHa).
CTONMOCTbYcTpaHHeHHNoBpeKdHn, npOn3oUeJHX NO BnHE NOb30BaTeIa, INCB3aHHbIe C3TNM 3aTpTaIb ONNaHBAOTcR NOb30BaTeIeM.
Henonadkn cnoco&blnx yctpaHnna
Плгимechанинe
- MoHHTOP BOCNPOIN3BODNT Bn3yAInhIe CnHnIb, nonyaemble OT KOMNBOTepa. CneOBATEnbHO, npo6nEMbICOMNBJOTepm IIN BnDaeokapTaoM OryT bIbI npuHHO nponaxn 306paXeHnHa MOHTope, noTePnB UCBete, yMa, nobBiWeHnY aCtOtB, nT.I. B TAKOM cnyae cchane nonunite HcTOHHK npo6nEMbI, a 3aTeM CBxKITecb C CEHTpOM texHnueckoro 0cbnykBaHnI IN C BaAMM dInlepoM.
1)PpOBepbTe, npaBnIbHo JIN NOcOeHHeH K KOMNbIOpTepy 3JeKTPuYeckm HHyp N Ka6eB.
2)Поверъ, He n3daet nI KOMNbIOTep 6Oone Tpex 3ByKOBbIX CnHAnOB npn BKNIOeHNN. (Ecnn da, Heo6xOIMTOxNHueckoe 0c5cnykBaHme MaTePNHCKO nnatb KOMNbIOTepa).
3)EcnnBb noctabunno Hobyu BndeokapTy nnn ecnn Bbl cmontnpobann KOMnbotep, npoebpTe, yctahOBneHb nn dpaBep BndeoadaTepa n dpaBep MOHTOPa.
4)Y6eHNTecb,HTO3NaueHHe NaCToBtckAaHmPoBaHHn BInDeo3KpaHa 50Tc-85Tc(He CTabTe BblIe 60TpnpMakCMmaHbHom p3peHenn.)
5) EcnB 03HnKaeI np6Iema C yctaHOBKoi dpaIbepa (BnDeo)adantepa, nepeBeJeTe KOMNbIeTp B BezonacnB Pekm, ydaInte AanTep Dncnnre cep3 cyHKmPiHaNb YnpabHeHn, CnCTema, =dminHcTpaOp UcTpoiCTB, a 3aTeM nepe3arpy3HTe KOMNbIeTp, TTObl nepeHcTannipobatb dpaiBep (BnDeo)adantepa.
Cnncok PpoBepok
PnmeaHne
Bcndyuee TaabnuepeuHne B03mKHe np6bEmn nCno6bHx pa3peuHn. Npeed Tem, kak obaaatacb a cepnbchn utep, 03hakombTebc c HNFOpmauene 3Toro pa3dena, YTO bY He mokeTe peWnt bpno6bemy camoCTOteNbHO. Ecnn Bam deHCTBnTEbHO Tpe6yeTcna NOMUb, no3BOHNTe, noXanyIcTa, no TenefoHy, yka3AHOM By rapaHTNHOM Tanohe IINBpa3dene "InHcpmaun" daHHoro pykoBOcTBa, INN CBAHN Dnepom.
PpO6JIeMbI,CBRAaHbIe C yCTaHOBKOI (PC)
PnmeaHne
Hnke nepeunncnehbl np6bnbI, cBra3aHHbIe C yctaHOBKO MOHTopa, n cnoocboix pa3pehenia.
Ipo6nema Cnooc6 pa3peuHn
3KpaH MOHTOPa Mmraet.
PpoepeBte, HadeKHO Nn noKnHouen 3akpenne BHeOka6eIb,NyUyniOT KOMNbOTepa KMOHTopy. (Cm.pa3denPiokliuOHeHNE KOMNbIOTepy)
PpO6JIeMbI, CBA3aHHbIe C 3KpaHOM MOHHTopa
PpIMMeaHne
Hnke nepueineneb npoBneMb,CBA3aHHbIe C 3KpaHOM MOHITopa u cnoCo6blnx pa3peHnna.
Ipo6Jema Cnoc06 pa3pehenna
3KpaH npCT, mHnkaTOp nHTaHnBbIKNoeH.
- PpOBeBpTe, HApEckHO Nn PoKnIOChen UHyp NtTaHnA, IN BKnIOHeHO Nn NtTaHmE LCD-MoHITopa. (CM. pa3dEn POnkIOChENe K KomIbIoTepy)
IpoBnEeTc coo6eHne "PpOBepntb cnH. ka6eJb"
- PioBepbTe, HndexHIOI NIOKIOUeHN BInEOka6eBb K KOMNbIOTepy UIN NCTOCHNY BInEOcINrHana. (Cm. pa3dEn IIOKIIIOUeHN E KOMNbIOTepy)
- PioBepbTe, BKNIOUeHN IIOKMOBIOTepy UIN NCTOCHNK BInEOcINrHana.
IorBnreTc coo6eHne HeonTMalbHy peKm
- PpOBepbTe MaKcImMaIbHyu pa3peWaiUoiyU cnOco6HocTb I NaCTOTy BnDeoAaNTepa.
- CpaBHTte 3tN 3HaueHmI c DaHHbIM b Ta6nIe (Cm. pa3dJI PoDKnIOueHHe TeLEBnIOHOHOrO CnHana.)
1306paXeHne"6exnT"B BepTKaJIbHOM HapabJeHN.
- PnoBepbTe, HadeXHo IIN noDknIOeH BIndeOka6enb. HadeXHo noDknIOuHTe erO. (Cm. pa3dien IIOKnIOUeHne K KomnbIOTepy)
№6paKeHne HeeTeKoe npa3MbItoe. 06paKeHne HcEeTkoe npa3MbItoe.
BbInOnHnTe rpy6yio Tpy6o NToCHyIO ToHO hAcTpoNky HAcToTbI.
H3o6paXeHHe HecTa6nIbHoe n npoxnt.
BkIOHHTMOHITOP3aHO,npEiBaHTeIbHOOTKIOUHB BCE akceccyapbl (BndeokabEnb-ynHHTeIbN T.D.)
HmEHTcpaHTOMhBie H3o6paKeHH.
- UcTaHOBnTE peKOMeHnyeMbIe 3NaueHnIpa3peuOuIeCNOCo6HOCTN uACTOTbI o6HOBnEHnI.
1306paXeHne CnIuKOM CBetJIOe HNJ CNIuKOM TEMHOE.
PpOBepbTe, HaxoJATcN 3NaHaeHn pa3peaioue cnoc6hOCTn uacToby, yCTAHOBJIeHbIe IINBUNEOJIaTbKOMNbIOtepa, B NOdEpcKIMBaEMOM MOHITOpOM dHaana3OHe. EcnHET, TO nepeyctaHOHTe INCOrnaCHO TEkyuIm DaHHbIM "InHΦopMaUry" B MeHIO MOHITOpA n Ta6nIe 3abOdcKe NaCTPOkN DnCnIe.
HecootBetCTBNE uBeTob 3KpaHa.
- HactpoTe RaKoCTb N KoHTpact 1306paKeHnA. (Refer to the Brightness, Contrast)
Zbeta n3o6paXeHnIckaxKeHbI
HactpoTeUBeT,HCnoIb3yra NyHKT"PiNb3oBaT.PeKIMB 64
TEMHBIMNTEHMNI.
MeHIO HAcTpoKINOSD "LBet".
Hn3Koe KaueCTBO 6enoro Ubeta.
Muraet 3eIeHbI HndkaTOp nHTAHIA.
- MoHITop B daHHbI MOpHT BbINOHrTe COxpaHeHne N3MeHeHIn yCTaHOBOK B nAMrTn OSD.
3KpaH nyCT, HndkaTOp nHTAHy yCToIuBO CBETTCa 3eNeHbIM CBeTOM NIN Mnraet KaXdbie 0,5 nn1 cekHy.
MoHITOp HaxoDITcBpeXmE3HePrc6epeKeHnA.
- PerédeBnHbTe MbIb IIN HAXMITE IHObyIO KnaBnUy HA KnaBnAType KOMNbHTepa.
3KpaH npct mepuaet.
Ecn nocne hakatna KhoNkMN MENU noBnreTc coocheHne "TEST GOOD", npOBepTe, naEeNo IIOKNoH e Ka6bI Mekdy MOHITOPM IN KOMNbOtePOM.
Pp6nemblcBra3AHbIeC3KpaHOMMOHITopa
Примочаиме
Hnke nepeuNCHeBb 03MOXHbIe npoBneMbI, CB8aHHbIe cayIOcIRHaAMn, nCNOcO6bIX pa3peWenH.
Ipo6JIema Cnoc6 pa3peuHn
Het 3Byka
- PpOeBpTe, HApExKHO Nn NpOKnIOuH eAynIOKa6eBb K0 BxOJHOMy ayDNO-NOpTy Ha MOHITope N BbIXoHOMy ayDIO-NOpTy Ha 3ByKOBoi nIaTe. (Cm. pa3den IOnkIOuHHe N KOMNbIOTepy)
PpOBepeTe ypoBeHrpoMkoCTN.
CINUKOM HN3KN ypoBeHb rpOMKoCTH
- PpOBeBpeYpOBeHrpOMKocTH.
EcnnoeYCTAHOBMMAKCMAMbHOro ypOBHr pOMKOCTByKaNo-PrpexHemy HeOcTaTOHa, POBepTe YCTAHOBKYPOBHR pOMKOTn Ha 3ByKOBoI NaTe KOMbTopea IIN BCOOTBeTCTBHyOeM nporpaMMHom ObecneHm.
CINUKOM60JIbwoecoepJAHNE BbICOKNXHINHN3KNXCACTOT.
- OtperynpyTe napametpy "BbIcOKne yactoTby" n "Hn3Kne YactoTby"do npneMmeroYpOBH.
Ipo6nemblcBra3aHHbIe CnyltomDnctaHOnHOynpabHeHH
PnIMeuaHne
Hnke nepeuncneHbBo3MOxHbI npo6nemblcBraaHHbI cnyltom ductaunohoro ynpabneHn, nCloocobixpa3peeHn.
Ipo6JIema CnocO6 pa3peWENH
MontophepearnyetHa HaxatneKHOHOKyIbTa AnCTAHUONHOYnpaJIeHnA.
- PpOBeBpTe nonApHocThb6aTapei (+ / - )
PpOBeBpTe, He n3pacXoOBoH nn pecypc 6aTapei. - PpOBepbTe, BKNIOUeHO JIN NITaHne.
- PpOBepbTe, HAdExKHO nI noDknOueH wHyp nHTaHn.
- PpOeBpTe, HeT JIN B NOIe DeHCTBnI PyNbTa IINCTaHIOHOHORO ynpAbeHnIcEuaJIbHbIX FInIOopeCueHTbIX INI HeOHOBbIX naMn.
BonpocbN OTBtB
Bonpoc OTBet
Kak MoXHo N3MeHnTb YaCTOу?
Yactota n3MeHReTc npTeM n3MeHeHn KOHpyaun BnDeokapTb.
3aMetbTe,HTO NOdepkKa BnDeoekapTb 3aBNCNT OT BepCN
HcnoB3yEmo DpaBepa.(NoDpo6Ho 06 3ToM B B INHCTpyKUHX KOMNbHOtepy NIN K BIDeo.)
KaK MoXHO OTperyNIpOBAbTa pa3peLeHne?
Windows XP:
I3mEnIte pa3pe7aOu7yO cnoc6Hoc7b, Bbl6paB IaHeIb
ynpabJIeHHa OΦopMJIeHne I TeMbI 3KpaH IpaMaTePbI.
Windows ME/2000:
I3MEnHte pa3peWauOuYku CnOco6HoCTb, BbI6paB PaHeJIb
ynpabHeHnra 3KpAa NapaMeTpbl. ^* C8Rkntecb c u3rTOBHTenEM BnDEoKaPTbI dnyTOUHeHn.
KaHactpontbФyHK"mIO 3KohOMn3Heprn?
© 1995-2008 SAMSUNG. ALL Right Reserved

Ppabnna TeHHNK
6e3onacHcTn
BVeHne
Iopdknloyehne
Pa60aC nporpaMMHbIM
06ecneenuem
HacrpoKa MOHTopa
yctpaehne
HEnCnpaBHOCTeI
Cneunfkaa
06nne
3KOHOMa3ep
Φa6pnuHou HacTpoKu
DnCnnner
HnΦopMaun
PpJIOKeHne
TFT-LCD Monitor
www.samsung.com
BETN BHeunn BnI 3dennr Moryt pa3nnHcBcR 3aBNCIMOCTN OT MOeNN, a XapakTePncTNI3dennr
Moryt H3MeHbTaBc6e3 npedBaPntelbHorO yBeDoMneHnC cIeIbYycOBepHCTBOBaHn.
Cneunkaun
067ne
06u
O6uhe
Ha3BaHne Moden SMT-3211
NaHEnbKKD
Pa3Mep dnaarOHaJIb 32 dIOIMOB (80 cm)
06nactbH3o6paKeHH 697,6845 MM (Top) x 392,256 MM (Bepr)
Uar nukcen 0,51075 MM (Top) x 0,51075 MM (Bepr)
CnHxpoH3aun
Tnropn3oHTan 30\~81K
NoBepTnKaann 56-75
UBETn
LBeT DmCnner 16.7M Ubeta LBa
Pazpeшени
1360x768/1366x768@60TgB3aBNCMOCTHOTHCNOJIb3yEMOJ
rpaΦnueckoK KapTbI
MakcmaBhoepaPeWeHne
1366x768@60
BxOaun cnHan, npeBaH
AHaIorOBbI RGB, cHpOBoR RGB, COBMeTmblc DVI (nHTepaKTHBHe cHpOBoe Bndeo).0,7 Vp-p
nookntbhl np750m ±10% Pa3dehba CnHxpoH3aunrTop. n Bept. pa3BepTK, KOMnO3HTbI
CINXP.SOG,nonoxntenbHbI INN OTPnuaTeBHy ypoBeHbTTL.
MaKcImaMbHaYacToTa
100 MHz
3NeKtpoHa6xehnE
Переменнын TOK 100-240 B, (+/- 10%), 50/60 Г.
Notpe6nemar Moocctb
Ka6eIb 15pin-to-15pin D-sub,cbemHbI
Ka6eB DVI-D to DVI-D, cBeMhBn (Onu)
UnpoBpa3bem
D-sub, BNC, DVI-D, YPbPr, S-VHS, VCR
Pa3mepb1(UxDxBx)/Be
780X482X107MM/30.1X19.0X4.6IOHMOB(6e3noCTABKN)
780X530X223MM/30,1X20,9X8,8HouMoB(CnoCTabKo)16,1Kr/35,4yHTOB
HHTeppeicnoctabKVESA
200 MM x 200 MM (Дян И сплбовая CO cneuaNBbIM annapatbIM npeCTBaMn NOCTaBKM (Дяpyк)
KINMATNueckne
Pa604a
TEMnepa:tpa:ot 10^ 40^ (50^ 104^)
BnaxHoctb:10%~80%,HeKoHdeCnpyiouinca
Temnepa:ot-20°C~45°C(-4°F~113°F)
XpaHEnn
BlaJxHoctb:5%~95%,HeKoHdeCnpyuOui
AydnoxapakTepeNCTnKn
AydmoBxO1 THe3o RCA KpaChbI (I) 6bIy (I), 0,5 B (-9 dB)
CoBMeCTHMOCTb C Plug & Play
3TOT MOHITOP MOKET 6bIb yCTaHOBEN Ha IIOBOH IN CSOBMECTMlbix C Plug & Play cnCTem. B3aIMoDEeCTBMEKdy MOHITOPOM I KOMMbHTOpom OBeCEneuBaet HAnLIyUWne YCLOBnI da PaobToI h NaCTpoIK MOnHTopoA.
B60bnHCTBe CnyaEB MOHITOP HAcTpaNBAETCA ABTomATnHECKNI, ECNI TOnbKO NOnb3OBaTeNB He NOKeNaET Bbl6pabDpynE napAMetpbI.
DonyctHMoe KOINHcCTBO TOeK
B daHno moDen nCnoIb3yeTc TOnKoIeNoHna KK-naHeB (TFT-LCD), n3roToBnEHHa c npMmeHemm COBpeMeHHo TexHOrnn noynpOboDnIKOB C ToHocTbIO 1 ppm (Oda MmNIOHOHa). HOrda NIKCebl KPACHO, 3EJIHoro, CInHErO n BENOTO CTaHOBTcRA pKIMM ININ YepHBIM. 3TO He ABnETCa cnctbEm nioxoro KaeeCTBa n He BblBaet Heydo6tB b pa6ote.
Hanpimep, konuheCTBO cy6-nKceneB DAHNOM n3dennn coCTaBnEeT 3.133.440.
MnmeaHne
BHOCTbCn3MeHHeHn6e3 npEaBapntelbHorO yBeOMneHn "Kn3HeHHbI uKn-7Net
06opyoBaHne Knaccs B (HnFopmaunohno-KOMmyHKaunOHoe 6opyoBaHne dIy HcnoB3OBAHHB D oMaunHX ycNoBnx)
JaHnbl npOdyKT COOTBETCTBYET Tpe6OBaHNrM DInpeKTHbI 3neKtpOMaHHTHO CoMBecTUMOCtN NO NcIOJIb3OBaHHBO B DOMaUHINX YCNOBHX MOKeT NCPOJIb3OBaTbCBA JIObIX NOMEueHINX, BKJIOHAR O6bUHbIe XUNIbe NOMEueHIN.
(ObopyoBaHne Knapca B n3nyaet Mehbe 3eKpMaHnTHbX BoH, 6m o6opyoBaHne Knapca A.)
3koHOMaH3ep
B 3TOT MOHITOP BCTPOEHa CUSCTEMA ynpabneHnRA 3NEKTPoNHTAHnEM, HAsbBaema 3KOHOMa3ep. 3Ta CNTeMa 3KOHOMIT 3NEKTPO3HePnIO nyTEM nepeKnIOUeHnBAWero MOHITOP h peXIM NOHNKeHHORo Ntpe6BeHnEA 3NEKTPuYeCTBa, KOrda OH 6e3JeCTByET B TeEHNe OnpTeENHORo BPemHn. MoHITOP ABOMATNUeCKn BO3BpaAaETc K HopMaIbHO npBoTe, KOrda Bbl nepeDbIRaTe Mblb IIN HAJIMaTe Ha JIObHy IKNABNuHa KnaBnAtype. B CEIXx 3KOHOMIN 3NEKTPo3HePnIByBkIIIOuAte Me HONTOp, KOrda OH He B paBOte IIN KOrda Bbl OCTAbnIeTe ERO HA DoJIroe BpEMr. CusCTEMA 3KOHOMa3ep paBOtaET ha COBMeCTMmC VESA DPM BInDeOekapTe, BCTPOEHNO B BaW kOMNbToEp. IcNoIb3yIte nporpamMHyO yTHNHTY, INCTaJIINpOBaHHyO B BAOW KOMNbIpTe dp nprimeHHeHn 3ToI ΦyHKun.
© 1995-2008 SAMSUNG. ALL Right Reserved

Ppabnna TeHHNK
6e3onacHcTn
BVeIeHne
IopdknloyuHne
Pa6ota c nporppaMMHbIM
06ecneenuem
HactpoKa MOHTopa
YctpaHHeHne
HEnCnpaBHOCTeI
Cneunpkauu
HnΦopMaun
DnB6Oonee BbICOKoro
KaueCTBa H3o6paXeHn
NHΦOPMAUNRAOB
IM3DEINI
(Ппсдoxраннго ot 3фхekta octatoHoro n3o6paKeHH)
PpIJIoxKeHne
TFT-LCD Monitor
www.samsung.com
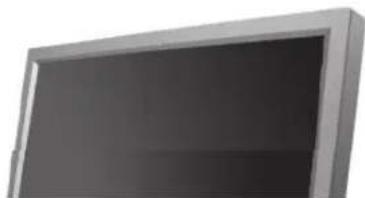
LbETN BHeHnBnI N3dEINMAOTy pa3nHATcB 3aBNCIMOCTN OT MOnEIN, aXapakTePNCTKN I3dEINMAOTY IN3MeHrTcB6e npedBaPntelhoro yBeDOMNEHnC LcBko YCOBepueHCTBOAHIN.
HOpmaia
Ja60Jee BBICOKO KAeCTBa
n3o6paXeHHN
Дя поуеня ontmanbHoro kauctBa H36paexHЯ B KOHTponbHoi naHEn KOMnbIotepa Hactpoite pa3peuHne H KO3ФpHnueHENT HKKeKm 3kpaHa (HacToTy pereHepaun) cornaHo HIXeCneDyUcIM nyHKTAM nHCTpyKUn. CyueCTByET BeporTHocB noLuyenHn36paXeHЯ HepOBHoro KaeeCTBA,ecn BB He BbIbepeTe DnRA Baew TohkonneHohHO KK-naHEn (TFT-LCD) ontmanbHoe KaeeCTBO H36paXeHЯ.
-Pa3peeHHe:1360x768
Vertical frequency 60
B D aHHO Moen Hcnoh3yetc ToKoennHeuHnA KK-naHEnb (TFT-LCD), nroToBHeHHa c npimHeHmecOBpeMeHHo TeXHoNOrn noynpoBoDnIKOB C ToHocTbO 1 ppm (OHa MInIOHHa). HOrda NkCenbl KPACHO, 3EJIeHO, CNHEO u BENTO ceTob cTaHOBra TcRpKMMn HepHBIMN.
3TO He AEBTcR CNECTBnEM NNOXOrO KaueCTBa H He Bb3bIbAeT HeyDo6CTB Pa6ote.
Hapmep, konueCTBO cy6-nKceneB daHHOM nndnn coctabnreT 3.133.440.
Дячсн ChapукMonHToPаианeнHaHecnTe He6oJIbwoe KoJInHeCTBo peKOMeHnyEmoro 电TRE BoeCtBaHa cyxHy mRkyTKaHbN npOTpIte NoBepXHoCTN. He npKnaDbBaIte n3mUHee DabNeHne Ha KK-3kpan, npocTo octopoxHo erO npOTpIte.
PnH3NIMHEm DaBHeHH Bb MoKeTe ero NOBpeDHTb.
BbI CMOKTe NOJYuHTb BOJIe KAnCTBeHHeNIO3OpaeKeHHe,ecJIN AKTINBn3IpyTe Ha 3KpaHe ONUHO "aTOHaCTPouKa("auto adjustment function").
Ecnn noce aBTOHaCTpoKn Bce eue npCyTCTByOT nomexn, nCnoIb3yIe pejkm ToHko HAcToPkn (FINE/COARSE).
PnOTo6paKeHm HEnoDnKHO KApTnKn B TeueHHe npOdoNKeTeNbHoro nepNoa BpeMeHn MOryt NOBnTbC8 OCTaOHTbHe N3o6paKeHn Hn Hepe3KocTb.
EcnBbHe cobpaTecb NcnoIb3oBaTb MOHITOP B TeueHEni dIInTeIbHorO BpeMeHN, npeKIOUHTe erO bpekm 3heprosc6epexehn Hnn AKTINBn3npyTe XpaHntelb 3kpaHa, oTo6pkaiou npodBnKHOe n3o6paKeHne.
INHOPMALUNOBN3DEENNN(NpeoopaenneOt3Φfekta
octaToCHoro u3o6paXeHHa
4To TaKoe 3ΦΦeKT OCTaTOUHOrO H3o6paKeHnE?
30000000000000000000000000000000000000000000000000000000000000000000000000000000000000000000000000000
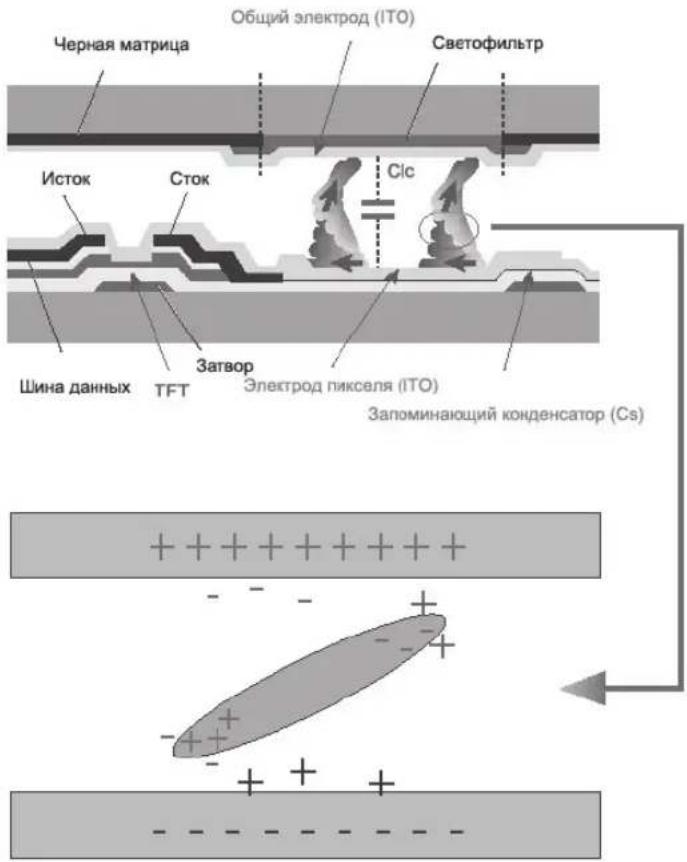
BbIKIOHHe HHTaHnY, yCTaHObKa 3KpaHHo 3AcTaBKn NIIpeXIM 3Heproc&epExeHHN
BbIKHouaTe nHTAHHe Ha 4 yaca noCne 20-ycaBOrO nCnOJIb3OBaHnA.
BbIKHouaTe nHTAHHe Ha 2 yaca nocne 12-ACOBORIO nCnonb3OBAHA.
BbIKIOHaiTe MOHTOP C NOMOuHO CXEMbl ynpaBNEHnI NTAHm B MEHIO CBOINCTB INCNner KOMNbOTepa.
- Ecnn Bo3MOKHO, nCOnb3yTe 3kpanHyIO 3actABky. - PekomeHdyETcNcNoB3OBaTb 3kpaHHyIO 3actABky ODHoro CBeta NIN DBNKUeecr NIO6paKeHne.
PepnoDnueckoe 3MeHeHne HOpMa"m O Bete
PnIMeuaHHe
© 1995-2008 SAMSUNG. ALL Right Reserved

PapBnIaTexHnKn
&e3onachoctn
BVeDHeHne
IopdknloyuHne
*a&ota c nporpamMhbIM
o&ecneueHnem
HactpoKa MOHTopa
yctpaehne
HEnCnpaBHOCTeI
Cne"uФнka"m
HnΦopMa"n
Appendix
CB83bBaIeTecBc
BETN BHeuHn BnI3dEINM MOrTy pa3nnHaTbcra 3aBNCIMOCTN OT MOeIN, a XapakTePncNTK IN3dEIN
MoryT H3MeHbTaBc6e3 npEdbapntelbHOrO yBeDOMneHnC cIeJIbO yCOBepWeHCTBOBaHn.
Appendix
CBAIbAIaTecb c SAMSUNG no Bcemy
Mnpy
!pimmeanhe
Ecn y bac ectb npednoeHnBnnpocno npooykTam Samsung, cB3baiTecb C HΦopmaioHHbIM CEHTpOM Samsung.
North America
U.S.A 1-800-SAMSUNG(726-7864) http://www.samsung.com
CANADA 1-800-SAMSUNG(726-7864) http://www.samsung.com/ca
MEXICO 01-800-SAMSUNG(726-7864) http://www.samsung.com
Latin America
ARGENTINE 0800-333-3733 http://www.samsung.com/ar
0800-124-421 http://www.samsung.com
BRAZIL 4004-0000
CHILE 800-SAMSUNG(726-7864) http://www.samsung.com/c/
NICARAGUA 00-1800-5077267
HONDURAS 800-7919267
COLOMBIA 01-8000112112 http://www.samsung.com.co
COSTARICA 0-800-507-7267 http://www.samsung.com/latin
ECUADOR 1-800-10-7267 http://www.samsung.com/latin
EL SALVADOR 800-6225 http://www.samsung.com/latin
GUATEMALA 1-800-299-0013 http://www.samsung.com/latin
JAMAICA 1-800-234-7267 http://www.samsung.com/latin
PANAMA 800-7267 http://www.samsung.com/latin
PUERTO RICO 1-800-682-3180 http://www.samsung.com/latin
REP. DOMINICA 1-800-751-2676 http://www.samsung.com/latin
TRINIDAD & TOBAGO 1-800-SAMSUNG(726-7864) http://www.samsung.com/latin
VENEZUELA 0-800-100-5303 http://www.samsung.com/latin
Europe
AUSTRIA 0800-SAMSUNG(726-7864) http://www.samsung.com/at
BELGIUM 0032 (0)2 201 24 18 http://www.samsung.com/be
| 844 000 844 http://www.samsung.com/cz Distributor pro Českou republiku: Samsung Zrt., Česka organizačni složka Vyskočilova 4, 14000 Praha 4 | ||
| CZECH REPUBLIC | 70 70 19 70 http://www.samsung.com/dk | |
| DENMARK | 030-6227 515 http://www.samsung.com/fi | |
| FINLAND | 3260 SAMSUNG (€ 0,15/min) 08 25 08 65 65 (€ 0,15/min) http://www.samsung.com | |
| FRANCE | 01805-SAMSUNG(726-7864) (€ 0,14/min) http://www.samsung.com | |
| GERMANY | ||
| HUNGARY | 06-80-SAMSUNG(726-7864) http://www.samsung.com | |
| ITALIA | 800-SAMSUNG(726-7864) http://www.samsung.com | |
| LUXEMBURG | 0035 (0)2 261 03 710 http://www.samsung.com/be | |
| NETHERLANDS | 0900-SAMSUNG(726-7864) (€ 0,10/min) http://www.samsung.com/nl | |
| NORWAY | 815-56 480 http://www.samsung.com/no | |
| POLAND | 0 801 801 881 022-607-93-33 http://www.samsung.com/pl | |
| PORTUGAL | 80820-SAMSUNG(726-7864) http://www.samsung.com/pt | |
| EIRE | 0818 717 100 http://www.samsung.com/ie | |
| SLOVAKIA | 0800-SAMSUNG(726-7864) http://www.samsung.com/sk | |
| SPAIN | 902 10 11 30 http://www.samsung.com | |
| SWEDEN | 0771-400 200 http://www.samsung.com/se | |
| SWITZERLAND | 0800-SAMSUNG(726-7864) www.samsung.com/ch | |
| U.K | 0845 SAMSUNG(726-7864) http://www.samsung.com | |
CIS
| ESTONIA | 800-7267 | http://www.samsung.ee |
| LATVIA | 800-7267 | http://www.samsung.com/lv |
| LITHUANIA | 8-800-77777 | http://www.samsung.lt |
| KAZAKHSTAN | 8-10-800-500-55-500 | http://www.samsung.kz |
| KYRGYZSTAN | 00-800-500-55-500 | |
| RUSSIA | 8-800-555-55-55 | http://www.samsung.com |
| TADJIKISTAN | 8-10-800-500-55-500 | |
| UKRAINE | 8-800-502-0000 | http://www.samsung.com |
| UZBEKISTAN | 8-800-120-0-400 | http://www.samsung.uz |
Asia Pacific
| AUSTRALIA | 1300 362 603 | http://www.samsung.com |
| CHINA | 800-810-5858, 010-6475 1880 | http://www.samsung.com |
| HONG KONG | 3698-4698 | http://www.samsung.com/hk |
| INDIA | 3030 8282, 1800 110011 | http://www.samsung.com |
| INDONESIA | 0800-112-8888 | http://www.samsung.com |
| JAPAN | 0120-327-527 http://www.samsung.com/jp | |
| MALAYSIA | 1800-88-9999 http://www.samsung.com/my | |
| NEW ZEALAND | 0800SAMSUNG(726-7864) | http://www.samsung.com/nz |
| PHILIPPINES | 1800-10-SAMSUNG(726-7864) | http://www.samsung.com/ph |
| SINGAPORE | 1800-SAMSUNG(726-7864) http://www.samsung.com | |
| THAILAND | 1800-29-3232, 02-689-3232 | http://www.samsung.com |
TAIWAN 0800-329-999 http://www.samsung.com/tw
VIETNAM 1800588889http://www.samsung.com
Middle East & Africa
| SOUTH AFRICA | 0860-SAMSUNG(726-7864) http://www.samsung.com |
| TURKEY | 444 77 11 http://www.samsung.com |
| U.A.E | 800-SAMSUNG (726-7864) http://www.samsung.com |
| 8000-4726 |
TepMHbI
CnHxpcnHan
CnHxocnHnAmnHa3bIaOTCCTaHdaptThbE CnHnbl,Heo6xoMmblDnOTo6paKeHnHa MoHnTope TpeSyebMbixCBetOB.OHnNoPda3dienlAOCTHa CnHnblBepTnKaNbHOINrop3oHTaNBOHcNHXPOH3aU. 3TN CnHnblObecneuBaIOT OTo6paKeHHe HOpMaNbHbIX CBETbXu3o6paKeHm c yctahOBnHbIMn pa3peWauOe cnocO6HoCTbIO uactOtOo OBHbENHn.
TnblcHxpcnHaIOB
Yactota no Togn3oHTaH
BpMaHa npopncobbIaHHe OndHcTpOKn, coednHooe npabbI n IeBbI Kpaar 3KpaHa no rOpnsOHTanm, na3bIaEeTcR TOpnsOHTaIbHbIM PepnoDM. ObpaTHoe TOpnsOHTaIbHOMy PepnoDy HcNTo Ha3bIbaeTcA cTtoi no TOpnsOHTanM. EdnHua n3MepeHn: KtU.
qTeOdbI Uepe3CTpOuHn HHe-Uepe3CTpOuHn pa3BepTKn
TOKa3 roPHTaBbHx HnHH Ha 3KpaHe B npAke CBepxBy HnH3 HAsbBaETcM MeTOOM He-uepe3ctPOuHO pa3BeptTK, TOrda KaK noka3 no OChepdi ChauHa a HeeTHbX LnHH, a Notom HeeTHbX, HAsbBaETc MToDOM uepe3ctpOHO pa3BePTK. B60bnHCTBe MOHtOpOB NcONb3yEtc MToD He-uepe3ctPOUHO pa3BeptTK, YTO ObecneHBAet YeTkoE h3o6paXeHHe. MeToD uepe3ctPOUHO pa3BeptTK 3TO TO MeTO, KOTOpBI INcOnb3yETcB TeneBn3opax.
© 1995-2008 SAMSUNG. ALL Rights Reserved
Contidente
Conector adaptor BNC a RCA.
Soporte temporal
AV/S-Video/Component Mode:P.MODE
© 1995~2008 SAMSUNG. ALL Rights Reserved
© 1995~2008 SAMSUNG. ALL Rights Reserved
Introduccion

TV, AV, S-Video, Component, DVI(HDCP)
7) Double3 (Picture By Picture)
[PC / BNC /DVI Modo]
Picture
[AV/S-Video/
Component / DVI-Video
Modo]
Sonido
Setup
Control multiple
Characteristicas de Control
Directo
Picture [PC / BNC /DVI Modo]
Modos disponibles
PC/BNC/DVI
AAV
S-S-Video
Componente
D VDI-Video
MagicBrightTM
[ \text{[MENU]} \rightarrow [\wedge / \vee] \rightarrow [\text{ENTER} ] \rightarrow [\text{ENTER}] \rightarrow [\wedge / \vee] \rightarrow [\text{ENTER}] ]
Aúnque los valores se han elegido con minuciosidad por nuestros ingenieros, los valores preconfiguradosSEO.SEOSEOSEOSEOSEOSEOSEOSEOSEOSEOSEOSEOSEOSEOSEOSEOSEOSEOSEOSEOSEOSEOSEOSEOSEOSEOSEOSEOSEOSEOSEOSEOSEOSEOSEOSEOSEOSEOSEOSEOSEOSEOSEOSEOSEOSEOSEOSEOSEOSEOSEOSEOSEOSEOSEOSEOSEOSEOSEOSEOSEOSEOSEOSEOSEOSEOSEOSEOSEOSEOSEOSEOSEOSEOSEOSEOSEOSEOSEOSEOSEOSEOSEOSEOSEOSEOSEOSEOSEOSEOSEOSEOSEOSEOSEOSEOSEOSEOSEOSEO SEO
© 1995~2008 SAMSUNG. ALL Rights Reserved
© 1995~2008 SAMSUNG. ALL Right Reserved

© 1995-2008 SAMSUNG. ALL Right Reserved

© 1995-2008 SAMSUNG. ALL Right Reserved
Middle East & Africa
| SOUTH AFRICA | 0860-SAMSUNG(726-7864) http://www.samsung.com |
| TURKEY | 444 77 11 http://www.samsung.com |
| U.A.E | 800-SAMSUNG (726-7864) http://www.samsung.com |
| 8000-4726 |
Téminos
Fax:01(55)5747.5202/01.800.849.1743
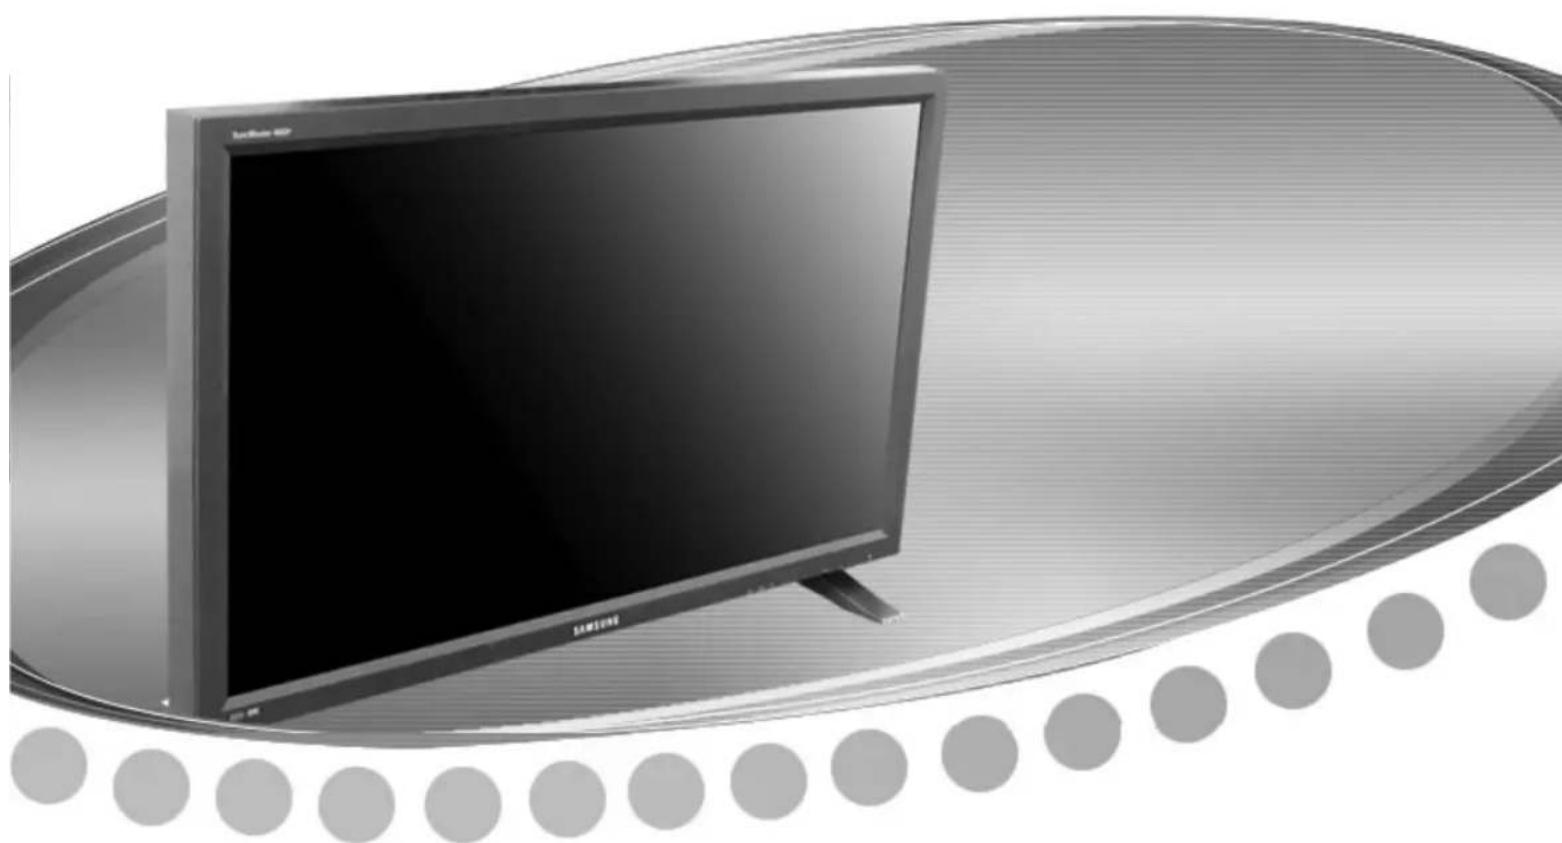

© 1995~2008 SAMSUNG. ALL Rights Reserved
Içindekiler
© 1995~2008 SAMSUNG. ALL Rights Reserved
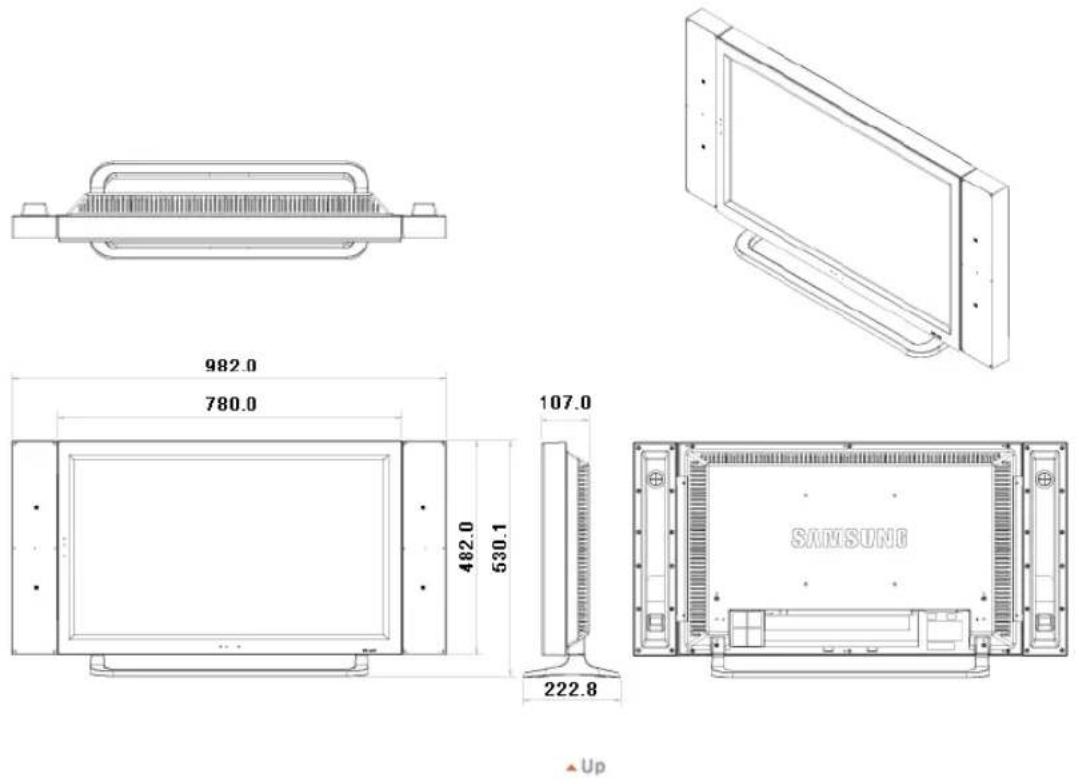
1. Mekanik Düzen
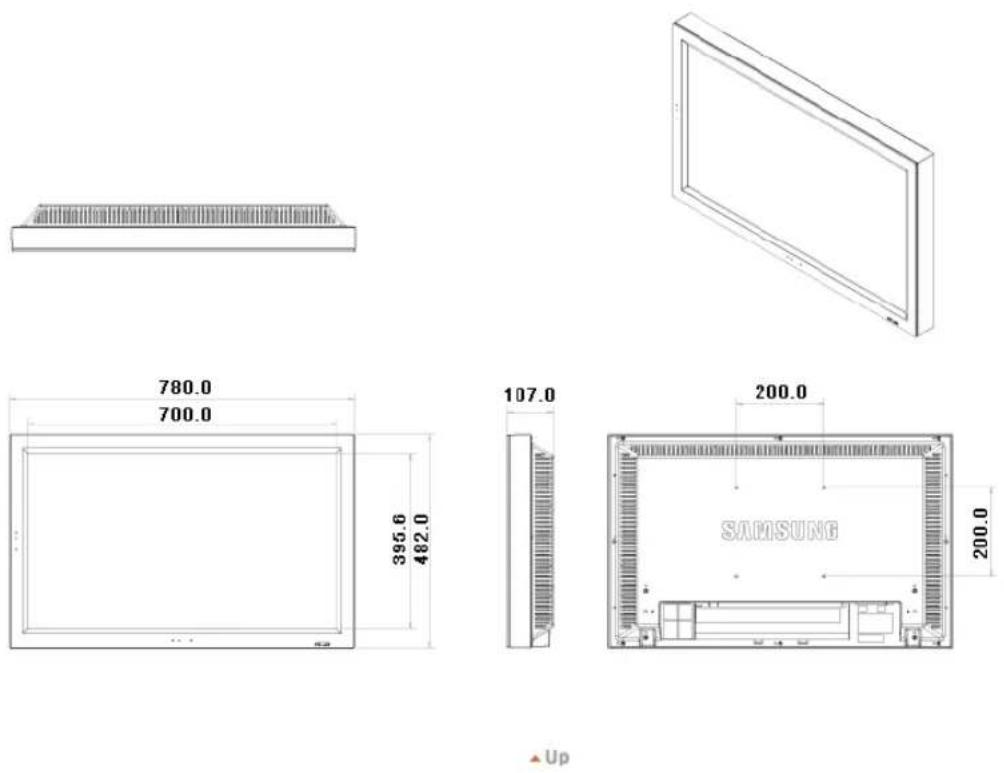
2. Monitor Kafasi
3. Altlik

4. Hoparlör


5. VESA Braketinin Takilmasi
© 1995~2008 SAMSUNG. ALL Rights Reserved
Giris

TV, AV, S-Video, Component, DVI(HDCP)
[PC / BNC /DVI Mode]
Picture
[AV/S-Video/
Component / DVI-Video
Mode]
Sound
Setup
Multi Control
Dogrudan Istevler
Sorun Giderme
Özellikler
Bilgiler
Appendix
TFT-LCD Monitor
www.samsung.com
Picture [PC / BNC / DVI Mode]
Safety Lock PIN PASCD
[ \text{[MENU]} \rightarrow [\wedge / \vee] \rightarrow [\text{ENTER}] \rightarrow [\wedge / \vee] \rightarrow [\text{ENTER}] \rightarrow [0 \sim 9] \rightarrow [0 \sim 9] \rightarrow [0 \sim 9] ]
Power On Adjustment PASCD
[ \text{[MENU]} \rightarrow [\wedge / \vee] \rightarrow [\text{ENTER} ] \rightarrow [\wedge / \vee] \rightarrow [\text{ENTER} ] \rightarrow [\text{ENTER} ] \rightarrow [\wedge / \vee] \rightarrow [\text{ENTER} ] ]
Ekranin Power On time degerini ayarlayin.
Check Signal Cable PC
- Adjust the Treble and Bass to appropriate level.
© 1995-2008 SAMSUNG. ALL Right Reserved

Boyut 32,0 inc (diagonal) (80 cm)
Gorntu alani 697,6845 mm (H) x 392,256 mm (V)
Piksel Araiigi 0,51075 mm (H) x 0,51075 mm (V)
Senkronizasyon
Yatay 30 81kHz
Dikey 56 75Hz
Ekran Rengi
Ekran Rengi 16,7 M renkler
Özünurlük
En iyozunurluk 1360x768/1366x768@60Hz,kullanangrafikkartaglidir
Maksimum czunurluk 1366 x 768 @ 60 Hz
Giris Sinyali, Sonlu
RGB Analog, DVI (Dijital Gorsel Arayuz) Uyumlu Dijital RGB.
75U ±%10'da 0,7Vp-p Pozitif Ayri H/V senk, Kompozit senk, SOG, TTL seviyesi, positif ya da negatif.
Maksimum Pikel Hizi
100MHz
Güç Kaynag
AC 100 - 240 V~ (+/- %10), 50/60 Hz
Sinyal Kablosu
15 pin - 15 pin D-sub kablo, cikarilabilir
IBM,720x40031,46970,08728,322-/+
VESA,640x48037,86172,80931,500-/-
VESA,640x48037,50075,00031,500-/-
VESA,640×480 43,269 85,008 36,000 -/-
VESA,800x60035,15656,25036,000+/+
VESA,800x60037,87960,31740,000+/-
VESA,800x60048,07772,18850,000+
VESA,800x60046,87575,00049,500+/+
VESA,800×60053,67485,00056,250+/+
VESA,1024x76848,36360,00465,000-/-
VESA,1024x76856,47670,06975,000-
VESA, 1024 x 768 60,023 75,029 78,750 +/-
VESA, 1024 x 768 68,677 85,997 94,500 +/-
VESA,1360x76847,71260,00085,500+

Yatay Frekans
© 1995-2008 SAMSUNG. ALL Right Reserved

© 1995-2008 SAMSUNG. ALL Right Reserved
Dunyanin her yerinden
SAMSUNG a ulasin
Kosullar
Yetki Bildirimi
TFT-LCD Monitor
www.samsung.com
Dunyanin her yerinden SAMSUNG' a ulasin
Not
Middle East & Africa
| SOUTH AFRICA | 0860-SAMSUNG(726-7864) http://www.samsung.com |
| TURKEY | 444 77 11 http://www.samsung.com |
| U.A.E | 800-SAMSUNG (726-7864) http://www.samsung.com |
| 8000-4726 |
Kosullar
Senk. Sinyali
Senk. (Senkronize) Sinyaller, monitörde istenen renkleri进展情况 ergebnis gereken standart sinyalleri belirtir. Dikey ve Yatay Senk. Sinyalleri olarak ikiye ayinir. Bu sinyaller ayarlanan gozunurluk ve frekansta normal renkli进展情况 gesterir.
© 2008 Samsung Electronics Co., Ltd. All rights reserved.
Manufacturer:SAMSUNG ELECTRONICS CO.,LTD
12th FL., Samsung Main Bldg., 250, 2-ga, Taepyung-Ro
Seoul, Korea
Tel:+8227277114
LVD: P.O. Box 73 Blindern, N-0314 Oslo, Norway
Tel)47-22-96-03-30,Fax)44-22-96-05-50
EMC: Samsung Electronics Co., Ltd. EMC Test Laboratory
416 Maetan-3 Dong, Yeongtong-gu, Suwon City, Gyeonggi-do,
Korea, 442-742
Tel)82-31-200-2185,Fax)82-31-200-2189

TruSurround xt, SRS ve (●) Sembolu SRS Labs, Inc. in ticari markalandir. TruSurround xt teknojisi SRS Labs, Inc. in lisansiyla kullanilmistr.