WB110MA - Scale TANITA - Free user manual and instructions
Find the device manual for free WB110MA TANITA in PDF.
User questions about WB110MA TANITA
0 question about this device. Answer the ones you know or ask your own.
Ask a new question about this device
Download the instructions for your Scale in PDF format for free! Find your manual WB110MA - TANITA and take your electronic device back in hand. On this page are published all the documents necessary for the use of your device. WB110MA by TANITA.
USER MANUAL WB110MA TANITA
Monitoring Year Results
GB
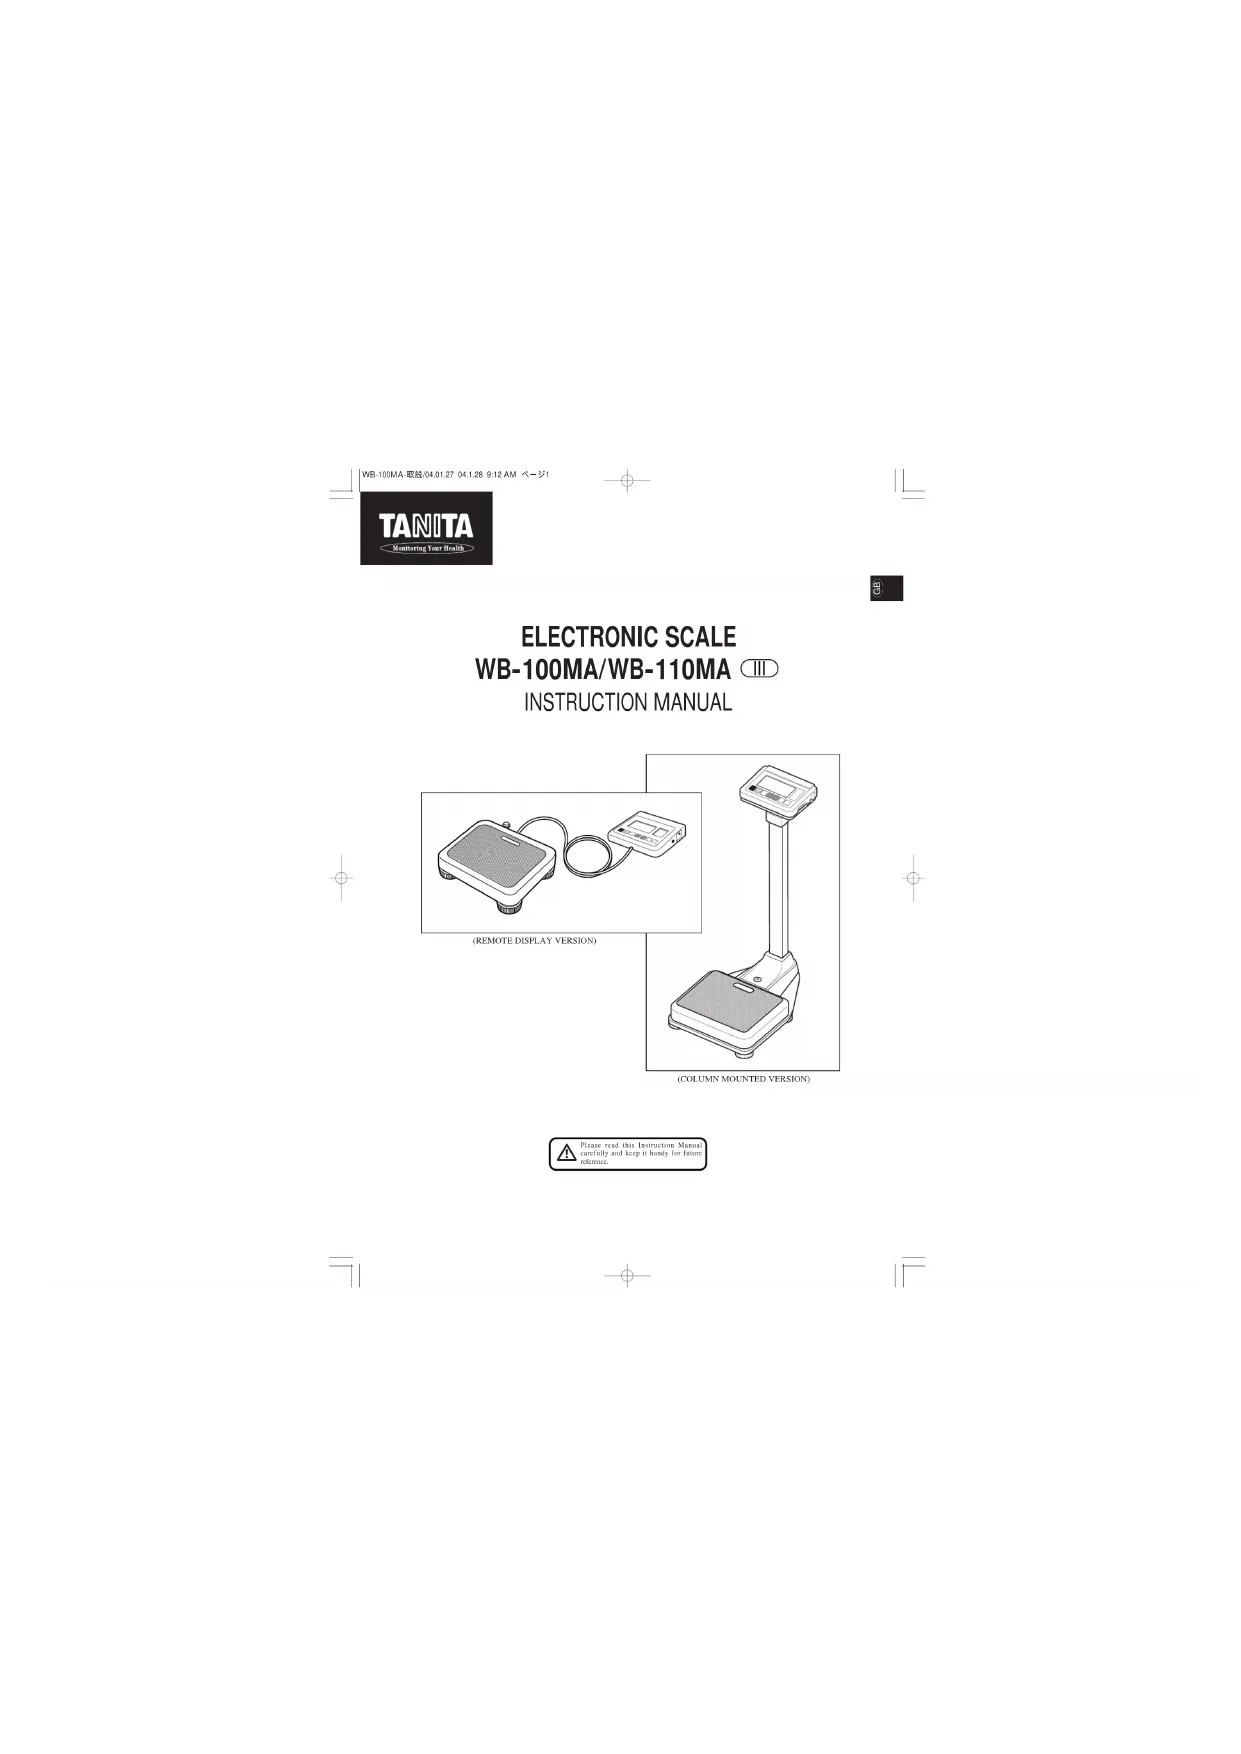
ELECTRONIC SCALE WB-100MA/WB-110MA
INSTRUCTION MANUAL
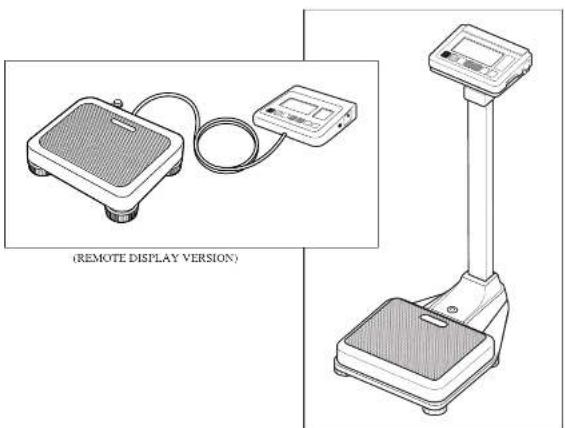
(COLUMN MOUNTED VERSION)
WB-100MA-取段040127041289-12AM-3/2
C
Table of Contents
Table of Contents
Applications 4
□Safety Notes 4
Caution Symbols 4
Caution 4
Mantenance 5
[Instruetioes for Measurement] 5
- Product Assembly and Components 6
Product Components
(Rermote Display Version)
Control Panel 7
Symbol and their Meanings 7
2.Preparation for Use 8
Level Adjustment
(Remote Display Version)
(Column Mounled Version)
■ Installation of the Equipment 8
(Remote Display Version)
Prepare Power Source 9
- Operating Instructions 10
4.RS-232C Communication Specifications 12
■ Specifications 12
Names and connection methods for signal lines 12
Weighing Made 12
■EMI Mode 12
5.Troubleshooting 13
Possible Problems 13
□ Specifications Back cover
2
3
WB-100MA-取/0401.2704128912AM
Applications
This equipment has been calibrated as a precision weighing instrument and can be used to certify weights and/or business transactions.
- It can be used to obtain reference data during medical examinations, such as periodic checkups, and can help the prevention of obesity.
Safety Notes
Caution Symbols
In this Instruction Manual and the descriptions on the equipment, there are various caution symbols that will enable you to use this equipment safely and correctly so that harm to you and other people and loss of your property will be prevented.
The symbols and their meanings are as follows. Please understand them well before proceeding with the Instruction Manual.

This symbol indicates the risk of death or serious injury if the safety instructions are ignored and the equipment is misused.

This symbol indicates the risk of physical Injury and/or damage to the equipment if the safety instructions are ignored and the equipment is misused.
This symbol indicates general precautions that should be taken when using this equipment.
Warning
To prevent electric shocks,
Do not insert or remove the power plug with wet hands.
To prevent fire hazards,
Always use a correctly wired 230V AC hot multiple extension cords.
Caution
To prevent the spread of infections,
Always clean the Weiglung platform after use. Sterilize the platform with an appropriate alcohol-based cleaning fluid before each use.
- Installation of the Weighing Platform
Ensure the weighing platform is placed on a level and stable surface. If the equipment is used when the Platform is unstable, for example because not all the feet are on a level surface, there is a risk that it will topple over and it will be impossible to obtain an accurate measurement.
To avoid the risk of injury and damage to the equipment, never jump on the platform.
How to handle the equipment when moving it
Since the Platform is heavy, please lift it by holding the Platform firmly with both hands so that you do not drop
AC Adapter
Instinct that the adapter supplied (model A32PUG) is always used with this equipment. Other adapters may cause malfunctions.
- Battery
When changing batteries, ensure that the new batteries are inserted with the correct polarity , the polarity is incorrect, then the batteries may leak and damage the equipment.
- The circuit board incorporates a fuse (100mA, 125V) for electronic equipment. If devices other than the original AC adapter are used or a large electrical current is applied, the fuse will be blown for safely purposes. If the fuse is blown, the unit must be inspected and repaired. As the fuse forms a fixed part of the unit and cannot be easily disassembled by the customer, please consult your nearest Tanita sales office or agent when the fuse needs to be replaced.

[Maintenance]
This is a precision manufactured and accurately calibrated product. Please observe the following instructions.
- Never disassemble or adjust the equipment, as this may cause malfunctions. The equipment should only be inspected in accordance with the regulations in each country.
- When not in use for a long time, unplug the AC Adapter from the wall socket
- When not in use for a long time, remove the batteries before storing the equipment.
Do not wipe the equipment with corrosive chemicals (benzene, cleaner, etc.). Please use a neutral detergent to clean the equipment.
- Avoid subjecting the equipment to excessive shocks or vibrations.
- When disposing of this unit, please do so in accordance with the prevailing regulations in each country.
- If an unauthorised personal attempts to disassemble or repair any of the parts, the warranty will become invalid. When the unit退货ments, please consult your nearest Tanla sales office or agent.
![TANITA WB110MA - [Maintenance] - 1](/content/2026/03/489599/images/e194b84da53caf5615c930c5fabe9bb0ef7685ca21961716573152b77db850a9.jpg)
[Instructions for Measurement]
- Measurement may not be possible on a surface that is strongly vibrating. In such cases transfer the equipment to a stable surface with little or no vibration.
- When the equipment has been transferred to another location with a temperature difference of more than 20^ , leave at least two hours before using.
While taking measurements, please keep any persons using transmitters, such as a mobile phone, away from the unit to avoid causing margin errors.
Temperature Range for Use: 0^ / +35^
Relative Humidity: 30% - 80% (without condensation)
Temperature Range of Environment: -10^ + 50^
Range of Relative Humidity : 10% / 90% (without condensation)
To avoid malfunctions, do not store the equipment in direct sunlight, significant temperature changes, the risk of
dampness, a large amount of dust, in the vicinity of fires or where there is a risk of receiving vibrations or shocks.
| Voltage Range | Value Range 230VAC |
| Frequency Range | 50Hz |
| Electric Current Range | 65mA |
WB-100MA-取芯040127041289-12AM-
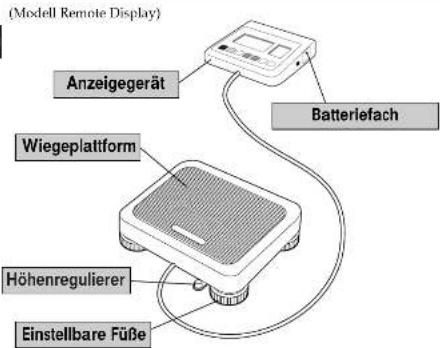
1.Product Assembly and Components
Product Components Please verify that the following components are in the package. (Remote Display Version)
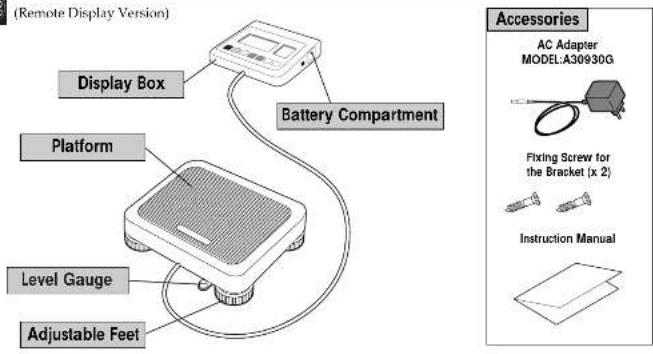
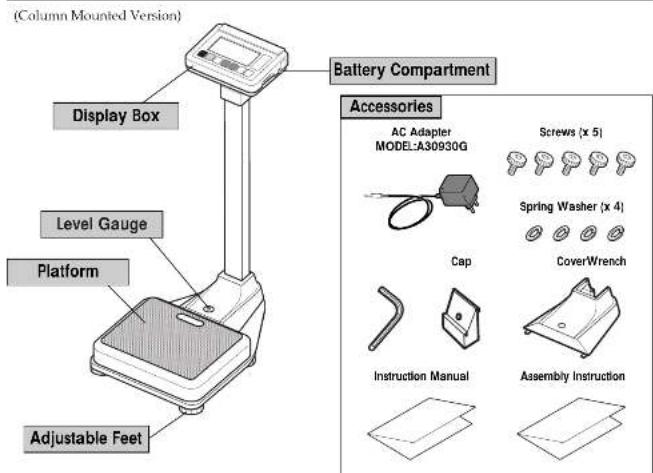
6
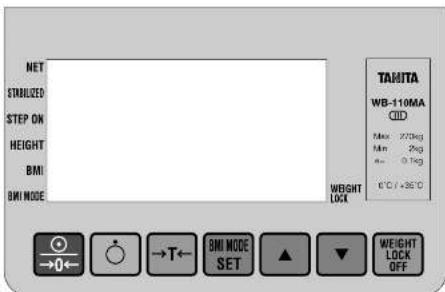
Control Panel

Tower on and/or reset the display to zero.
NETmark
An arrow appears next to this icon when the tare weighing function is on.

Poweroff.
STABILIZED mark:
Indicates that the displayed figure has stabilized.

Tare weighing function.
STEP ON mark (Ready mark):
Indicates that the scale is ready to begin measurements.

BMI mode, and/or height setting.
HEIGHT mark (Unit of height):
Indicates the height is set

Mode selection or Increase numerical values.
BMI mark
Indicates that MM calculation.

Mode selection or decrease numerical values.
BMI MODEF mark:
Indicates when BMI mode is on.

Symbols and
Weight Lock Release
WEIGHT LOCK mark:
Indicates when the measurement is stabilized.
It appears only when the Weight Lock Switch is on.
| : Display Unit On. | : Display Unit Off. | ---: Direct current |
| : Class II Equipment | : Type B applied part | →0←: Zero reset |
| →T←: Turn on the hare weighting function. | : Caution. Refer to the attached notes. | C else: Conformity with Medical Device Directive 90/42/EEC |
7
WB-100MA-取/40127041289-12AM-3/8
2.Preparation for Use
Level Adjustment
Remote Display Version)
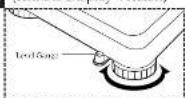
Adjust the variables retaining the unadjusted fact.
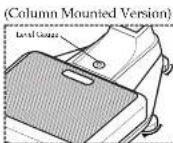
Adjust the level by rotating the acceleration law.
For accurate measurement, place the unit on as flat a surface as possible and adjust the level with the adjustable feet so the bubble in the level gauge is in the center of the frame.
Caution
Place the equipment on a level surface. If the equipment is not stable, for example because not all the feet are on a level surface, there is a risk that it will topple over and it will be impossible to obtain an accurate measurement.
Installation of the Equipment (Remote Display Version)
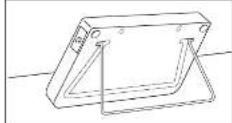
When using the stand
Please pull out the stand at the back of the display box. When putting away the display box, please insert the stand in the slot on the back of the display box.
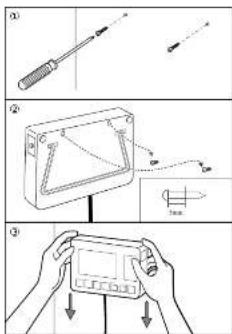
When Installing the display box on the wall
1Screw the wall hanging screws into the wall I leave the screws proccading from the wall be 5 mm.
Insert the screw head in the holes on the back of the display box. Pull down the display box separately into place.
- If the Display Box is not fixed or/and properly, there is a danger that it may fall down.
- Avoid installing the Display Box in a place where users may step on or get caught by the cable.
- Do not swing the Display Box by the cable.
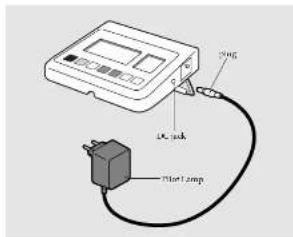
Prepare Power Source
① When using the AC Adapter
When using dry cell batteries

Insert the cable plug for the AC Adapter into the DC jack on the side of the Display Box, and insert the AC Adapter plug into a 231V AC mains DC jack.
Then confirm the Pilol Lamp on the AC Adapter lights up.
Warning
- To avoid electric shocks, do not insert and remove the plug with wet hands.
Caution
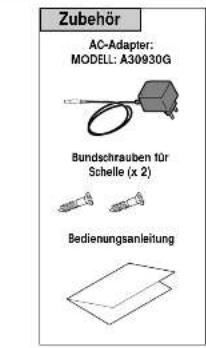
- Use only the AC adapter (MODEL: A30930G) specified. Using an AC Adapter other than that specified may cause malfunctions.
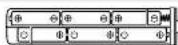
Unscrew the Fixing Screws for the Battery Compartment on the eight side of the Display Box and pull out the Battery Compartment. Place dry cell batteries LR6 (AA1) in the correct positions as instructed inside the Battery Compartment and fix the Battery Compartment with the Fixing Screws.
It is displayed on the Display, please replace all the six brightness I fit (A) with new ones.
_总10% appears when the battery voltage is lower than 6.5 V.
A Please change the batteries IRA (AA) carefully to avoid dropping them on your feet.
- Ensure that the batteries are inserted with the correct velocity. - The velocity is incorrect, then the batteries
may leak and damage the equipment. - When not in use for a long time, remove the batteries before storing the equipment.
- When the equipment has been transferred to another location with a temperature difference of more than 20^ , leave at least two hours before using.
Auto Power off Interval Setting
When the Scale power off, Press [key and hold.
Piss key
Release the holding key
The Expby tums to "Aioo Power Off Intenatl Setting Mode"
showing"20"as 20 minutes power off setting is default.
Press (up arrow) or (down arrow) key and set 10 for 10 minutes and/or CONT for continuous setting if required.
Prrse 40000000000000000000000000000000000000000000000000000
WB-100MA-取/04.01.27 04.1289-12AM-一
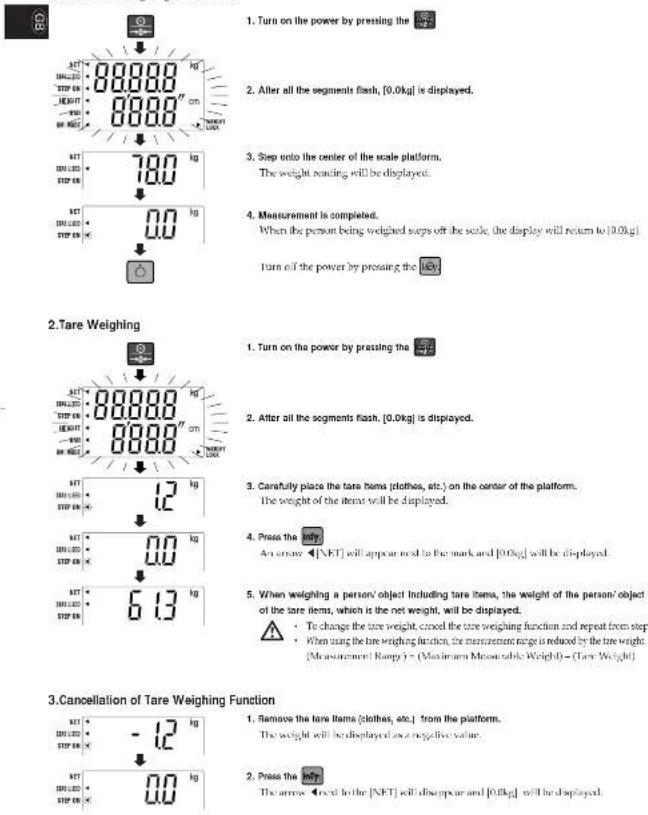
3.Operating Instructions
- Standard Weighing Procedures
4.BMI Calculation:
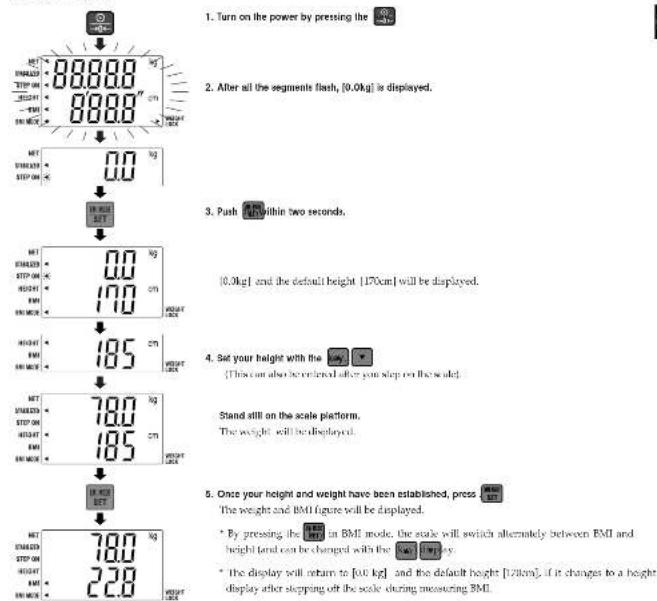
Guidelines based on NIH/ WHO BMI
| Under Weight | BMI < 18.5 | |
| Normal Range | 18.5 ≤ BMI < 25 | |
| Prevalence | 25 ≤ BMI < 30 | |
| Obese | CLASS I | 30 ≤ BMI < 35 |
| Obese | CLASS II | 35 ≤ BMI < 40 |
| Obese | CLASS III | BMI ≥ 40 |
WB-100MA取/04.0127 94.128 9.12 AB
4. RS-232C Communication Specifications

■ Specifications
| Communication method | EIA RS-232C |
| Signal speed 2,400 bit/s | |
| Data bit length 2 bit | |
| Parity EVEN | |
| Sleep bit 1 bit |
Names and connection methods for signal lines
| terminal no. | Signal name |
| 1 | |
| 2 | TXD |
| 3 | EXD |
| 4 | |
| 5 | GND |
| 6 | |
| 7 | |
| 8 | |
| 9 |
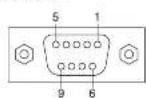

An RS-28C connector (D side 9 pin female) is attached to the side of the display box.
- When controlling the display box with a personal computer, etc., please use an RS-232C straight cable.
Use the RS232 cable absorber than 1m long.
Weighing Mode
When receiving 4 bytes of data as indicated in 1-1 while using the scale in weighing mode, weight data will be output in 14 bytes as indicated in 1-2.
11 Reception data

1-2 Transmission data

| ### | |||
| ### | ### | 2 ### fixed | SD: Unitele 5; ### S###. Over####. |
| ### | Separator | 2 ### fixod | 2 ### |
| ### | Weight data | 6 ### fixed | Right aligned |
| ### | ### | 2 ### fixed | Kegk |
| ### | Terminator | 2 ### fixod | CR-DF |
BMI Mode
③ When receiving a byte of data, as indicated in 1-3, the scale will calculate your BMI using the currently input height figure, and 26 bytes of data will be output, as indicated in 2.1 or 2.2, depending on the measurement unit.
When receiving 11 bytes of data, including measurement units and height figures, in the form indicated in 1-2 or 1-3, the scale will
calulate your BMI using these figures, and 26 byes of data will be output as indicated in 2-1 or 2-2, depoing on the mssuree
unit
1-1 Taxpimn data

1-2 Reception data (height data when using kg)

*Please input 90-95mm height value as 0.00-0.95
2-1 Transmission data (kgf/m)
| Details of EMI made transmission data | |||
| By line no. 1-2 | Hocntor | 2 byes fixed | SD:Chunle 3:Stane to Overland,etc. |
| Bye nes no. 3-4 | Separator | 2 byes fixed | 2 spaces |
| Bye nes no. 5-10 | Weight data | 6 byes fixed | Right aligned |
| Bye nes no. 11-12 | Konzernmeters | 2 byes fixed | Kg/kg |
| Bye nes no. 13 | Separator | 1 byes fixed | 1 comma |
| Bye nes no. 14-18 | Weight data | 5 byes fixed | Ripid aligned |
| Bye nes no. 19 | Separator | 1 byes fixed | comma |
| Bye nes no. 20-21 | BMI data | 5 byes fixed | Right aligned |
| Bye nes no. 25-26 | Terminator | 2 byes fixed | CR-LF |
1 2 3 4 5 6 7 8 9 10 11 12 13 14 15 16 17 18 19 20 21 22 23 24 25 26 S D I 7 5 0 H K g 1 8 0 2 3 1 GRLF
5.Troubleshooting
Possible Problems
If problems occur, please refer to the following instructions. If the problem persists contact your nearest Tanla sales or repel center.

| Problem | Solution |
| The unit does not turn on when the key is pressed. | •When Using with the AC Adapter Ensure that the AC Adapter cable is properly connected with the Display Unit. Ensure that the AC Adapter is correctly inserted in the main DC jack. •Using dry cell batteries The batteries may have run out. Confirm that the equipment is working by using the AC Adapter or new batteries. |
| Measurement is not correct. | •Please confirm that all the adjustable feel are resting on a level surface. |
| Measurement does not become stable. Display turns on and off. | •Measurement may be impossible in the case of excessive vibration. Use the equipment in another place. |
| displayed. | •It is possible that the maximum weight capacity has been exceeded. Please stop measuring. |
| displayed. | •Do not stand on or put objects on the Platform before starting measurement. Start measurement after confirming there is nothing on the Platform. |
WB-100MA-取/04.01.27 04.1289-12AM-一
Specifications
| TYPE WR-IRIMA WR-1IMA | |||
| Power Source | AC adaptCentre minimaMODEL A309/200CLASS 2 Input Voltage: 230VAC50Hz5mA Output Voltage: 9VDC10.45VDC Rated Current: 300mA No Load Input Voltage: 12VDC6.06VDC LR6 (AA Alkaline battery) x 8, Not included | ||
| Power Consumption Q.W. max | |||
| Weight Measurement System | Strain Gauge Load Cell | ||
| Maximum Capacity/Minimum Graduation | 200kgM1kg | ||
| Accuracy at test calibration | ±0.1kg | ||
| Input Items | Height | 90 - 249cm/1km increments | |
| Output Items Display | Weight | 270kg/0kg increments | |
| Height | 50 - 350mm/1km increments | ||
| BMI | 0.1 increments | ||
| Size (Rest Part Version) | Display | 159×209×50mm | |
| Platform | 331×330×80mm | ||
| Cable Length | 3m | ||
| Size (Column Mounted Version) | 336×600×100mm | ||
| Display | Upper Digit and Lower 4Digits LCD Height of numerals 25mm | ||
| Output Data Interface | RS-232C (D-sub 9xins Female Connector) | ||
| Temperature Range of usage | (0°C+35°C) | ||
| Relative Humidity | 30%~80% (without condensation) | ||
| Weight or Equipment (Remote Display Version) | 5.1kg (except battery) | ||
| Rated Power | 10.1kg (except Battery)/Weight of Equipment (Colu | ||
| Battery Life | DC5V 300mA (LR6 (AA Alkaline battery) x 6 not included) | ||
| approximately 100ms of continuous use when using LR6 (AA Alkaline battery) | |||
This product meets the following requirements:
Mailand Tatice Direcice (93/42/FPC)
Safety Standard: EN601-1-1390,AM No.1: 1953,AM No.2: 1956
100
2Non-Automatic weighing Instruments (50/384/FFC)

D The Bank, Pristinae Coast, Wadawy,
Widthouten
UK 2001-1985: United Kingdom
Tel.: +44 1933-6385777; Fax: +44 1936-6385111
Web: www.njw.co.uk

TANITA Corporation
1431000000000000000
1
002,sp1
10
TAMITA Corporation of America, Inc.
235
Arlington, Texas 60205 U.S.A.
Toll Free: (800) 826-4825
1
+82-447-642-52b1
TID:CAAAATCCTT
TANITA Health Equipment H.K.LTD.
101301/635WcoCoPc
07.2018-034
Kowal, Hang Kang
[4]:4852-2008-711
F1222067
TAMITA Europe GmbH
F
5.710554869
Germany
Te:07031-61896
F0:0021-81827
http://www.cninfo.com.cn
TAMITA FINCE S.A.
华
92200Nm/s-5km/hr.
Fina
11-24-99
11552488
http://www.british.com
2017年9月1日
A Birmour, Sir sbuch der Brinvergassung, singling, half and bowing Sir am the court.
WB-100MA-取/04.01.27 04.1289-12AM-一

Inhaltsverzeichnis
Inhaltsverzichris 17
Anwendungen 18
(Model Remote Display)

WB-100MA取股040127041289-12AM-3/22
(Model Remote Display)


1760- 1820. The group is in BPD-Wedt forward (Klein-Kugel, 1946 in 22; Jena, 202; Hochschild, 2003), whence it may be made (Molischke) under the name of Pyrexus ausgeschied.

TAMITA Corporation of America, Inc.
2325 South Clearrock Drive,
Baltimore, MD 20876
Tal Price:1800.526-4215
1
:47-64-5961
10
TANITA Health Equipment M.K.LTD.
101301/635WooGoPc
62 Study Road, Talmolaki East
Kowost, Harg Kang
101-452-2898-7111E-mail:zbs@zzb.com.cn
FXX:432-28596697
TAMITA Europe GmbH
F
E-71065 Streetlings
Cermonry
To:0703148965E-mail:zbs@zzb.com.cn
01031827
10p048.312.3
TAMITA FINCE S.A.
华
68 scuivare sordure
92200Nn-5n-Sn
Fone
14.15.02.13.14
1
http://www.british.com
增持-2.26
BALANCE ELECTRONIQUE WB-100MA/WB-110MA MODE D'EMPLOI
Please read this Instruction Manual for your use and keep it handy for future reference.
WB-100MA-取/04.01.27 04.1289-12AM-一

Table des matieres
The Bar, Pribets Coee, Yawsky
TANITA Corporation of America, Inc.
235 South Clantrock B/S
12005648
1
:447-645-5661
10.2.1.1.1
TANITA Health Equipment H.K.LTD.
http://wltp.cninfo.com.cn
62 Study Road, Tramsplatskii East
Kowoz, Hang Kang
m = 311 ;
1
BILANCIA ELETTRONICA WB-100MA/WB-110MA MANUALE DI ISTRUZIONI
Prouse it taste 1000000000000
51
WB-100MA-取/04.01.27 04.1289-12AM-一52
Corporation Responsible in the EU Region

The Bar, Pribets Coee, Yawsky
再与工质的热流
0877Y,UnalKing
10474935897
TANITA Corporation
142100Nn#
Tobin's law
101.65395
10.10.398-2271/31226740A1001397170
TAMITA Corporation of America, Inc.
235
Arlington Hospital, Illinois 60205 U.S.A.
Toll Free: (800) 826-4825
14408
0
10
TANITA Health Equipment M.K.LTD.
101301385WooOnPn
02Medy Road, Tmingshui East
Kowoz, Harg Kang
101-42-283-71115
F
TAMITA Europe GmbH
F
E-71065 Streetings
Germany
1e:0703161896
07031-918971债券代码:122064
10p048.312.3
TAMITA FINCE S.A.
华
68 scuivare foundry
92200Nn-5n-Sn
F
10 11.55-24-39-69 5x 14.55-24-39-69
1
http://www.british.com
增持-2.26
WB-100MA-取/04.01.27 04.1289-12AM-一58
M
Indices
□Indice 59
Functions 60
Medidas de seguridad 60
Simbolos de precaucion 60
Atencion 60
Precaution 60
[Manenlnto] 61
[Instrucciones para la medicnion] 61
WB-100MA-股24.27.18.12AM=364
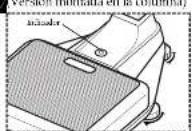
Dion (e mpted on h column)
a aae eae aeae aeae aeae aeae aeae aeae aeae aeae aeae aeae aeae aeae aeae aeae aeae aeae aeae aeae aeae aeae aeae aeae aeae aeae aeae aeae aeae aeae aeae aeae aeae aeae aeae aeae aeae aeae aeae aeae aeae aeae aeae aeae aeae aeae aeae aeae aeae aeae aeae aeae aaee
WB-100MA-股24.27.18.12AM=368
4. Especillas del Sistema de communicator RS-232C
Especificaiones
| Companhariae norte | H4 RS-232C |
| Xeno de comaricalia | inotrocho |
| Velecidad de la seral | 2403 mandes |
| Izugada la Bs doda | 7 bits |
| Paridad PAR | |
| El de pesta 1 bit |
Corporation Responsible in the EU Region

Tina Bar, Projector Chris Yuenley/ Moderate
UB77Ry,UnlalKingdom
T+4-1855-43557 Fx 44-1855-43551
http://www.british.com

TANITA Corporation
14210000000000000000
Taiyo, Japan
Tel:003968-2123/155968-7048
and N.K.LTD. TONITA Europe GmbH
1
122, D-71055 Sindelings
Cannnnn
150703-61896
http://www.tafta.net
TAMITA FRANCE S.A.
18 Eououou Bourin
200
Fees 10,471.198
F01524468
http://www.cninfo.com.cn
特此公告。