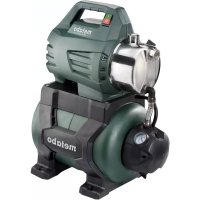
HWW 450025 Inox - Pump METABO - Free user manual and instructions
Find the device manual for free HWW 450025 Inox METABO in PDF.



| Product type | Sanitary water station / Garden pump |
| Brand | Metabo |
| Model | HWW 450025 Inox |
| Category | Pump |
| Intended use | Discharging clean water, watering, irrigation, wells, rainwater, emptying pools |
| Maximum fluid temperature | 35 °C |
| Pump housing material | Stainless steel |
| Pressure tank | Yes, with rubber bellows |
| Tank pre-charge pressure | 1,5 bar |
| Integrated check valve | Yes (depending on equipment) |
| Dry-run protection | Yes (electronic) |
| Restart protection | Yes (adjustable) |
| Power supply | 230 V ~ 50 Hz (estimated) |
| Required protective device | Residual current device (RCD) ≤ 30 mA |
| Suction connection | Internal thread, minimum diameter 1" (25 mm) |
| Pressure connection | Internal thread, pressure-resistant (≥ 10 bar) and heat-resistant (≥ 100 °C) |
| Maximum suction height | Depending on model (not specified in manual) |
| Routine maintenance | Cleaning the filter, checking pre-charge pressure, verifying tightness |
| Frost protection | Required (temperature < 4 °C) |
| Spare parts and repairability | Spare parts lists available at www.metabo.com; repairs by qualified electrician |
Frequently Asked Questions - HWW 450025 Inox METABO
User questions about HWW 450025 Inox METABO
0 question about this device. Answer the ones you know or ask your own.
Ask a new question about this device
Download the instructions for your Pump in PDF format for free! Find your manual HWW 450025 Inox - METABO and take your electronic device back in hand. On this page are published all the documents necessary for the use of your device. HWW 450025 Inox by METABO.
USER MANUAL HWW 450025 Inox METABO

(Vice President Product Engineering & Quality)
*4) Metabowerke GmbH - Metabo-Allee 1 - 72622 Nuertingen,
Germany
Original Instructions
1. Declaration of Conformity
We hereby declare that these pumps/domestic water works/domestic water automatic systems, identified by type and serial number *1), meet all relevant requirements of directives *2) and standards *3). Technical documents for *4) - see page 3.
2. Specified Use
This device is used for conveying clean water in the house and garden area, for sprinkling and watering, as a well pump, rain pump and domestic water pump and for pumping out swimming pools, garden ponds and water tanks.
The maximum permissible temperature of the conveyed medium is 35° C.
The device must not be used for supplying drinking water or for conveying food supplies.
Explosive, combustible, aggressive or other substances that are harmful to health must not be conveyed.
The device is not suitable for commercial or industrial use.
This device is not designed for the use of persons (including children) with limited physical, sensory or mental aptitude or lack of experience and/or knowledge.
Unauthorised modifications to the device and the use of parts that are not tested and approved by the manufacturer are prohibited.
All improper use of the device is regarded as non-specified use; this can result in unpredictable damage! The user bears sole responsibility for any damage caused by inappropriate use.
Generally accepted accident prevention regulations and the enclosed safety information must be observed.
3. General Safety Instructions

Pay attention to all parts of the text that are marked with this symbol for your own protection and for the protection of your device!

WARNING – Reading the operating instructions will reduce the risk of injury.

WARNING Read all safety warnings and instructions. Failure to follow all safety ings and instructions may result in electric k, fire and/or serious injury.
Keep all safety instructions and information for future reference.
Pass on your pump only together with these documents.
Information in these operating instructions is designated as shown below:

Danger! Risk of personal injury or environmental damage.

Risk of electric shock! Risk of personal injury from electric shock.

Caution! Risk of material damage.
4. Special Safety Instructions
Children, adolescents and persons who are not familiar with the operating instructions must not use the device.
Children should be supervised to ensure that they do not play with the device.
The provisions of DIN VDE 0100-702 and -738 must be observed when the pump is being used in swimming pools and garden ponds and in the protected areas around them.
The device must be supplied with a rated residual current of max. 30 mA through a residual-current device (RCD).
The device must not be used if there are persons in the water.
The statutory water and waste water specifications and the provisions of DIN 1988 must be observed when used for the domestic water supply.
The following residual risks essentially remain when operating pumps and pressure vessels (equipment-specific) – they cannot be fully eliminated even if safety measures have been introduced.
4.1 Danger from the environment!
Do not expose the device to rain. Do not operate the device in a damp or wet environment.
Do not use the pump in potentially explosive locations or near flammable liquids or gases!
4.2 Danger from hot water!
Danger! Install a check valve at the suction connection (12) to prevent water from flowing back into the suction line. This can reduce the following danger:
Hot water can cause damage and leaks on the device and the connection lines, allowing hot water to escape. Danger of scalding!
Devices with the designation HWW...: if the shut-off pressure of the pressure switch cannot be reached due to poor pressure conditions or a defective pressure switch, the water can heat up within the device as a result of internal circulation.
Devices with the designation P...: do not operate the device against a closed discharge line for longer than 5 minutes. Water that circulates inside the device is heated up.
In the event of a fault, unplug the device from the power supply system and allow it to cool. A specialist must check the system to make sure it is in perfect working order before it can be used again.
4.3 Risk of electric shock!
Never direct the water jet directly at the device or other electrical components! Risk of fatal electric shock!
Always disconnect the device from the power supply system prior to installation and maintenance tasks.
Do not touch the plug with wet hands! Always pull on the plug and not the power cable to disconnect it.
Do not buckle, squeeze, drag or drive over the power cable or extension cables; protect them from sharp edges, oil and heat.
4.4 Danger due to deficiencies or faults on the device!
Check the device for possible damage - especially the mains cable, mains plug and electrical components before each use. Risk of fatal electric shock!
A damaged device must only be reused after it has been correctly repaired.
Do not attempt to repair the device yourself! Only specialists are permitted to repair pumps and pressure vessels (equipment-specific).

Caution! To prevent water damage, such as flooded oms, caused by deficiencies or results on the device:
- Provide appropriate safety measures, e.g. alarm device or collection tank with monitoring The manufacturer is not liable for any damage caused by:
- Improper use of the pump.
- Overloading of the pump through continuous operation.
- Failure to operate and store the pump in a frost-free environment.
- Unauthorised modification of the pump. Repairs to electrical equipment may only be carried out by qualified electricians!
- Use of spare parts which have not been tested and approved by the manufacturer.
- Use of unsuitable installation materials (fittings, connection lines etc.).
Suitable installation materials:
- pressure-resistant (min. 10 bar)
- heat-resistant (min. 100°C).
When using universal swivel couplings (bayonet couplings), only use versions with an additional securing ring to ensure safe sealing.
5. Overview
See page 2. The illustrations are regarded as exemplary for all devices.
1 On/Off switch
2 LED (error) *
3 LED (on, standby, info) *
4 Button (on, off, "mode A", reset if necessary) *
5 Control panel *
6 Pump
7 Pressure vessel ("vessel") *
8 Air valve for pilot pressure *
9 Water drain screw
10 Pressure switch *
11 Pressure gauge (water pressure) *
12 Suction connection
13 Water filling screw
14 Pressure connection
15 Key
16 Cover *
17 Filter unit *
18 Receptacle *
19 Filter *
20 Check valve *
*equipment-specific
6. Commissioning
6.1 Installation
The device must be positioned on a horizontal, flat surface that is suitable for the device weight with water filling.
The device should not be bolted on but rather positioned on a resilient base to avoid vibrations.
The place of installation should be well ventilated and protect against weather influences. Protecting against frost - see section 8.3.
The device must be installed in a flood-proof location and secured against falling in for operation in garden ponds and swimming pools. Additional statutory requirements must be taken into consideration.
6.2 Connecting the suction line
Caution! The suction line must be installed in such a way that no mechanical or twisting forces are exerted on the pump.
Caution! Use an intake filter to protect the pump against sand and contamination.
Caution! The check valve is absolutely essential to prevent the water from draining when the pump is switched off. We recommend the installation of check valves at the intake opening of the suction hose and at the suction connection (12) of the pump. A check valve may already be integrated depending on the model (see section 13. Technical Specifications).
Seal all fittings with thread seal tape (approx. 10-15 windings in the thread direction). Leaks result in the intake of air and reduce or prevent the intake of water.
The suction line should have an internal diameter of at least 1" (25 mm); it must be kink- and vacuum-resistant.
The suction line should be as short as possible because the longer the line length, the lower the conveying capacity.
The suction line should rise uniformly towards the pump to prevent air pockets.
An adequate supply of water must be guaranteed and the end of the suction line should always be under water.
6.3 Connecting the discharge line
Caution! The discharge line must be installed in such a way that no mechanical or twisting forces are exerted on the pump.
Note: HWWI..., HWAI... (Pumps with integrated filter): fill the pump before connecting it (see section 6.7).
Seal all fittings with thread seal tape to prevent water leakage (approx. 10-15 windings in the thread direction).
All discharge line components must be pressure-resistant and installed correctly.
Danger! The discharge line can burst during operation if non-pressure-resistant components are installed or they are assembled incorrectly. Injuries are possible if highly pressurised fluids are ejected!
6.4 Connection to a pipe network
The device should be connected to the pipe network with flexible hose lines to reduce vibration and noises.
6.5 Power supply connection
Risk of electric shock! Never operate the device in a wet environment and only under the following conditions:
- Connect it only to an earthed outlet that is properly installed, earthed and tested.
- The mains voltage, mains frequency and fuse protection must correspond to those stated in the "Technical Specifications".
- The device must be supplied with a rated residual current of max. 30 mA through a residual-current device (RCD).
- The electrical connections must not be under water and must be located in a flood-proof area. The connections must be splash-proof for outdoor use.
- Extension cables must have sufficient conductor cross sections. Cable reels must be fully unrolled.
- National installation specifications must be observed.
6.6 Setting the pilot pressure (only HWW..., HWWI...)
Set the pilot pressure before the initial operation. See section 9.4.
6.7 Filling the pump and suction
Caution! The pump must be filled with water with every new connection and in the case of water loss or air intake. Operating the pump without filling it with water will destroy it!
Note: HWWI..., HWAI... (Pumps with integrated filter): to fill the pump, remove the filter and additionally fill it through the pressure connection (14).
- Unscrew the water filling screw (13) with gasket.
- Slowly pour in clean water until the pump is filled. - Screw in the water filling screw (13) with gasket again.
- Open the discharge line (open the water tap or spray nozzle) so that air can escape during suction.
- Switch on the device (see section 7.).
- The device is ready for operation when water emerges evenly.
Note: the suction line does not need to be filled because the pump is self-priming. However, it may take some time until pressure is built up depending on the length and diameter of the line. To shorten the suction time: install a check valve at the intake opening of the suction hose and fill the suction line too.
7. Operation
Caution! The pump and suction line must be connected and filled (see section 6.). Caution! The pump must not be allowed to run dry. There must always be sufficient conveying medium (water) available.
A protective circuit shuts down the motor if the pump is blocked by foreign bodies or the motor is overheated.
7.1 Electronic functions (only for devices with electronics, devices see table page 3 - E)
Shutting down the pump when the discharge line is closed:
HWW..., HWA..., HWWI..., HWAI...: he pump switches to standby mode after a follow-up time. If the discharge line is closed when the pump is running (close the water tap or spray nozzle). The electronics monitor at regular intervals whether water is flowing through the pump. The LED (3) flashes green for 40 or 70 seconds (depending on the model) if not water flow is detected. The pump motor is then switched off and the LED (3) slowly flashes green to indicate the automatic startup when opening the discharge line.
P 6000 Inox: the LED (3) slowly flashes green for 20 seconds and then quickly for a further 5 seconds if no water flow is detected. Then the pump motor is switched off and the LED (3) lights up red.
Dry run protection:
The LED (3) starts to slowly flash red if the pump cannot convey water after 20 seconds. The pump motor stops for 5 seconds (LED (3) flashes red + green quickly) and then tries convey water for 3 further cycles if no water can be conveyed after a further 100 seconds. The pump stops and the LED (2) lights up red continuously if water can then still not be conveyed.
Putting the pump back into operation: press the ON/OFF button (4) briefly.
Restart protection:
The device has a factory preset restart protection function that prevents it restarting unintentionally in the event of a fault or power failure.
The device does not start up automatically after a power failure and must be put back into operation by pressing the ON/OFF button (4).
Note: it is not possible to use watering control systems or ballasts (timer, Hydromat) when the restart protection is activated. The restart protection can be deactivated in all devices (with electronics) by changing the operating mode.
Changing the operating mode / using ballasts:
Insert the mains plug and press button (4) for longer than 3 seconds. The LED (3) switches from green to blue. The pump can now be repositioned and connected to the ballast. Returning to "normal mode": insert the mains plug and press button (4) for longer than 3 seconds. The LED (3) switches from blue to green. The pump can also be switched on/off in "mode A" with button (4). The dry run protection operates in the same way as in normal mode.
7.2 Using the device
Garden pump
(Device designation P...)
Principle of operation: the device runs when it is switched on.
Danger! P 4500 Inox: run the pump for a maximum of 5 minutes if the discharge line is closed because otherwise overheating of the water in the pump can cause damage.
- Insert the mains plug.
- Fill the pump if necessary - see section 6.7
-
Switch on the device: P 4500 Inox: turn on the device at the switch (1). P 6000 Inox: to switch on the device, press button (4) (ON/OFF) briefly, the LED lights up green (blue in operating mode "A").
-
Open the discharge line (open the water tap or spray nozzle).
-
Check that water emerges!
-
Switch off the device when work is complete. P 4500 Inox: Turn off the device at the switch (1).
P 6000 Inox: to switch off the device, press
ENGLISHen
button (4) (ON/OFF) briefly. The pump
switches to fault and the red LED lights up if this is not observed, see section 7.1.
Only with the P 6000 Inox: if the pump is activated by a ballast (e.g. Hydromat, timer), it needs to be switched to "mode A", see section 7.1.
Domestic water automatic system
(Device designation HWA..., HWAI...)
Principle of operation: the device switches on when the removal of water causes the water pressure to fall below the switch-on pressure; it switches off again when switch-off pressure is reached.
- Insert the mains plug.
- Fill the pump if necessary - see section 6.7
-
Switch on the device:
To switch on the device, press button (4) (ON/OFF) briefly, the LED lights up green (blue in operating mode "A"). -
Open the discharge line (open the water tap or spray nozzle).
-
Check that water emerges! The device is not ready for operation.
-
The device switches on and off as required. (See section 7.1)
Domestic water works
(Device designation HWW..., HWWI...)
Principle of operation: the device switches on when the removal of water causes the water pressure to fall below the switch-on pressure; it switches off again when switch-off pressure is reached. The pressure vessel contains rubber bellows that are under air pressure ("pilot pressure") when delivered; this permits the removal of small volumes of water without the pump starting up.
- Insert the mains plug
- Fill the pump if necessary - see section 6.7
-
Switch on the device: Devices without electronics (see table 1, E): Turn on the device at the switch (1). Devices with electronics (see table 1, E): To switch on the device, press button (4) (ON/OFF) briefly, the LED lights up green (blue in operating mode "A").
-
Open the discharge line (open the water tap or spray nozzle).
-
Check that water emerges! The device is not ready for operation.
-
The device switches on and off as required. (See section 7.1)
8. Maintenance

Danger! Prior to all work on the device:
- Disconnect the mains plug.
- Ensure that the device and connected accessories are depressurised.
- Repair and maintenance work other than that described in this section should only be carried out by qualified specialists.
8.1 Regular maintenance
- Check device and accessories for damage, in particular electrical and pressurised components, and repair if necessary.
- Check suction and discharge lines for leaks.
- Clean the intake filter and filter element (if installed) and replace if necessary if the conveying capacity decreases.
- Check the pilot pressure of the pressure vessel (7) (equipment-specific) and increase it if necessary (see section 9.4 Increasing the pilot pressure).
8.2 Cleaning the suction filter (equipment-specific)
- Unscrew the cover (16) (using the key (15) if necessary).
- Pull the filter unit (17) vertically upwards.
- Disassembling the filter unit: hold the receptacle (18), turn the filter (19) clockwise and remove it from the receptacle (bayonet fitting).
- Clean the receptacle (18) under running water and the filter (19) with a soft brush.
- Assembly again in reverse order. Make sure that the filter unit (17) is inserted until it stops.
8.3 If there is a risk of frost

Caution! Frost (< 4 °C) destroys the pump and accessories as both always contain
water!
- Disassemble the pump and accessories and store them in frost-free conditions (see the following section) if there is a risk of frost.
8.4 Disassembling and storing the device
- Switch off the device. Disconnect the mains plug.
- Open the discharge line (open the water tap or spray nozzle), allow water to drain off completely.
- Completely drain the pump (6) and vessel (7) as follows:
- unscrew the water drain screw (9).
- remove the suction and discharge lines from the device.
- store the device in a frost-free room (min. 5 °C).
9. Troubleshooting

Danger!
- Prior to all work on the device:
- Disconnect the mains plug.
- Ensure that the device and connected accessories are depressurised.
9.1 Pump does not run
- No mains voltage.
- Check the on/off switch, cables, plug, socket and mains fuse.
- Mains voltage too low.
- Use an extension cable with an adequate conductor diameter.
- Dry run protection has tripped - red LED lights up (only devices with electronics, devices see table page 3 - E)
- Ensure that enough water is available.
- Press button (4) (ON/OFF) briefly to switch the device on again.
- P 6000 Inox: safety switch-off when the discharge line is closed - red LED lights up
- Open the discharge line
- Press button (4) (ON/OFF) briefly to switch the device on again.
- Motor overheated; motor protection relay has tripped.
- After cooling the pump will switch ON again.
- Ensure that there is adequate ventilation, keep air slots free.
- Observe the maximum supply temperature.
- Motor hums, but does not start.
- Insert a screwdriver or similar object through the air slots on the motor when the motor is switch off and turn the fan impeller.
- Pump clogged or defective.
- Disassemble and clean the pump. Clean the diffuser and replace if necessary. Clean the impeller and replace if necessary. See section 11.
9.2 Pump not drawing in correctly or running very loudly:
- Lack of water.
- Ensure that there is an adequate supply of water.
- Lack of water, dry run protection is activated. (Devices with electronics (see table 1E) Red LED flashes, green LED lights up continuously, see section 7.1
- Ensure that enough water is available.
- Pump not sufficiently filled with water.
See section 6.7.
- Suction line leaking.
- Seal the suction line, tighten the screw couplings.
- Suction height too high.
- Observe the maximum suction height.
- Insert the check valve, fill the suction line with water.
- Intake filter (accessories) obstructed.
- Clean and replace if necessary.
- Check valve (accessories) blocked.
- Clean and replace if necessary.
• Water discharge between motor and pump, shaft seal leaking. (Minor discharge of water (max. approx. 30 drops per day) is normal with the use of shaft seals).
- Replace the shaft seal. See section 11.
- Pump clogged or defective.
- See section 9.1.
9.3 Pressure too low or pumps runs continuously (continuous switch-on/off):
- Suction line leaking or suction height too high.
- See section 9.2.
- Pump clogged or defective.
- See section 9.1
- HWW...: pressure switch adjusted.
- Read off the switch-on and switch-off pressure on the pressure gauge (11) and check the values (see section 13 Technical Specifications). Please contact Metabo Customer Service if a modification is required. See section 11.
- HWW...: pump starts up even after a small volume of water is removed (approx. 0.5 l).
- Check whether the pilot pressure in the pressure vessel is too low. Increase the pressure if necessary. See section 9.4.
- HWA..., HWAI...: pump continuously switches on/off because of a low flow rate (less than approx. 60 l/h, depending on the model).
- The use of an expansion tank is required when small volumes are removed.
- Domestic water works (HWW..., HWWI...) are suitable for the removal of small volumes of water.
- HWW...: water is running out of the air valve.
- Rubber bellows in the pressure vessel are leaking, replace them. See section 11.
- All devices with electronics, see table 1 E: LED (3) lights up blue.
- "Mode A" is activated. See section 7.1
9.4 Increasing the pilot pressure (only HWW...)
If – in the course of time – the pump starts up even after the removal of a small volume of water (approx. 0.5 l), the pilot pressure in the vessel must be restored.
Note: the vessel pilot pressure (air pressure) cannot be read on the pressure gauge (water pressure) (11).
- Disconnect the mains plug.
- Open the discharge line (open the water tap or spray nozzle), allow water to drain off completely.
- Unscrew the plastic cap on the front face of the pressure vessel; the air valve is located behind it.
- Mount the air pump or compressor hose with a "tyre valve" connection and pressure gauge on the air valve.
- Pump up to the specified pilot pressure (1.5 bar; see section 13. Technical Specifications).
- Connect the device again and check it works.
10. Accessories
Use only genuine Metabo accessories.
Use only accessories that fulfil the requirements and specifications listed in these operating instructions.
See www.metabo.com or the catalogue for a complete range of accessories.
11. Repairs
Danger! Repairs to this device must be carried out by qualified electricians only!
Please contact your Metabo service centre if you have Metabo devices that require repairs. See www.metabo.com for addresses.
For shipment: drain the pump and vessel completely (see section 8.4).
You can download a list of spare parts from www.metabo.com.
12. Environmental Protection
Observe the national regulations on environmentally compatible disposal and on the recycling of disused tools, packaging and accessories.
Only for EU countries: never dispose of power tools in your household waste! Used power tools must be collected separately and handed in for environmentally compatible recycling in accordance with European Directive
2002/96/EC on waste electrical and electronic equipment and its implementation in national legal systems.
13. Technical Specifications
Explanatory notes on the specifications on page 3.
Subject to change in accordance with technical progress.
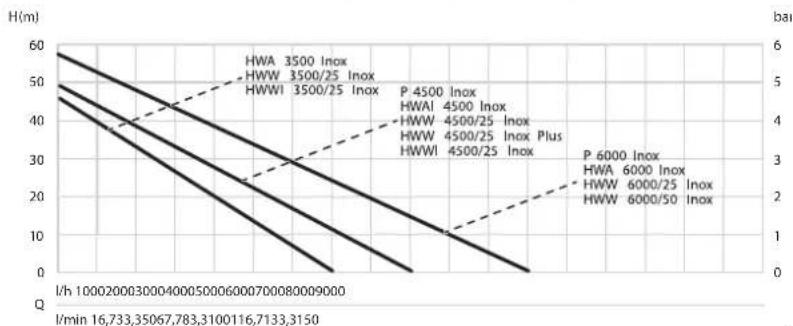
The pump characteristic curve (diagram on page
3) shows the conveying capacity that can be reached depending on the conveying height (suction height 0.5 m and 1" suction hose).
E = Electronics / dry run protection
V = Check valve (20) integrated on the
suction connection (12) of the pump
| K | = | M | a | i | n | s | c | a | b | l | e | ||
| U | = | M | a | i | n | s | v | o | l | t | a | g | e |
| f | = | F | r | e | q | u | e | n | c | y | |||
| P1 | =Rated input power | ||||||||||||
| l | = | R | a | t | e | d | p | o | w | e | r | ||
C = Operating condenser
n = Rated speed
FV,max = Max. conveying capacity
Fh,max =Max. conveying height
Fp, = Max. conveying pressure
p1' =Pressure switch switch-on pressure
p2 =Pressure switch switch-off pressure
Sh,max =Max. suction height
Stemp =Max.supply temperature
Ttemp =Ambient temperature
S1 =Splash protection class
S2 =Protection class
S3- =Insulation class
MP =Pump housing material
MB =Pump shaft material
MW =Pump impeller material
Ds =Suction connection female thread
Dp = Pressure connection female thread
Tvr =Vessel volume
Tp,max =Max. vessel pressure
Tp.1 =Vessel pilot pressure
A=Dimensions:
length x width x height
=Weight (with mains cable)
\~ AC power
The technical specifications quoted are subject to tolerances (in compliance with the relevant valid standards).
Emission values
These values make it possible to assess the emissions from the power tool and to compare different power tools. The actual load may be higher or lower depending on the operating conditions, the condition of the power tool or the accessories. Please allow for breaks and periods for assessment purposes when the load is lower. Arrange protective measures for the user, such as organisational measures based on the adjusted estimates.
Typical A-effective perceived sound levels:
LpA =Sound-pressure level
LWA = Acoustic power level
KpA, KWA = Uncertainty
LWA(G) = Guaranteed acoustic power level as per/2000/14/EC


Wear ear protectors!
Notice originale
3 LED (on, standby, info) *
4 Knop (aan, uit, indien nodig "Mode A", reset) *
5 Bedieningspaneel
6 P o m p
7 Drukvat ("ketel") *
- Pomp verstopt of defect.
- Pomp verstopt of defect.
- Pomp verstopt of defect.
- Zie hoofdstuk9.1.
- Para volver a encender, pulse brevemente el botón (4) (on/off).
- Para volver a encender, pulse brevemente el botón (4) (on/off).
3 LED (ON, STANDBY, Info) *
4 Painike (ON, OFF, tarv. "Mode A", RESET) *
5 Ohjaustaulu *
6 P u m p p u
LnA =äänen painetaso
LWA =äänen tehotaso
KpA, KWA = epävarmuus


- ORIGINAL INSTRUCTIONS
- DECLARATION OF CONFORMITY
- SPECIFIED USE
- GENERAL SAFETY INSTRUCTIONS
- SPECIAL SAFETY INSTRUCTIONS
- 4.1 DANGER FROM THE ENVIRONMENT
- 4.2 DANGER FROM HOT WATER
- 4.3 RISK OF ELECTRIC SHOCK
- 4.4 DANGER DUE TO DEFICIENCIES OR FAULTS ON THE DEVICE
- OVERVIEW
- COMMISSIONING
- 6.1 INSTALLATION
- 6.2 CONNECTING THE SUCTION LINE
- 6.3 CONNECTING THE DISCHARGE LINE
- 6.4 CONNECTION TO A PIPE NETWORK
- 6.5 POWER SUPPLY CONNECTION
- 6.6 SETTING THE PILOT PRESSURE (ONLY HWW..., HWWI...)
- 6.7 FILLING THE PUMP AND SUCTION
- OPERATION
- 7.1 ELECTRONIC FUNCTIONS (ONLY FOR DEVICES WITH ELECTRONICS, DEVICES SEE TABLE PAGE 3 - E)
- SHUTTING DOWN THE PUMP WHEN THE DISCHARGE LINE IS CLOSED
- DRY RUN PROTECTION
- RESTART PROTECTION
- CHANGING THE OPERATING MODE / USING BALLASTS
- 7.2 USING THE DEVICE
- GARDEN PUMP
- (DEVICE DESIGNATION P...)
- ENGLISHEN
- DOMESTIC WATER AUTOMATIC SYSTEM
- (DEVICE DESIGNATION HWA..., HWAI...)
- DOMESTIC WATER WORKS
- (DEVICE DESIGNATION HWW..., HWWI...)
- MAINTENANCE
- 8.1 REGULAR MAINTENANCE
- 8.2 CLEANING THE SUCTION FILTER (EQUIPMENT-SPECIFIC)
- 8.3 IF THERE IS A RISK OF FROST
- 8.4 DISASSEMBLING AND STORING THE DEVICE
- TROUBLESHOOTING
- 9.1 PUMP DOES NOT RUN
- 9.2 PUMP NOT DRAWING IN CORRECTLY OR RUNNING VERY LOUDLY
- 9.3 PRESSURE TOO LOW OR PUMPS RUNS CONTINUOUSLY (CONTINUOUS SWITCH-ON/OFF)
- 9.4 INCREASING THE PILOT PRESSURE (ONLY HWW...)
- ACCESSORIES
- REPAIRS
- DANGER! REPAIRS TO THIS DEVICE MUST BE CARRIED OUT BY QUALIFIED ELECTRICIANS ONLY
- ENVIRONMENTAL PROTECTION
- TECHNICAL SPECIFICATIONS
- EMISSION VALUES
- NOTICE ORIGINALE
Brand : METABO
Model : HWW 450025 Inox
Category : Pump