PQ321QE - Monitor ASUS - Free user manual and instructions
Find the device manual for free PQ321QE ASUS in PDF.
User questions about PQ321QE ASUS
0 question about this device. Answer the ones you know or ask your own.
Ask a new question about this device
Download the instructions for your Monitor in PDF format for free! Find your manual PQ321QE - ASUS and take your electronic device back in hand. On this page are published all the documents necessary for the use of your device. PQ321QE by ASUS.
USER MANUAL PQ321QE ASUS
IMPORTANT! To aid reporting in case of loss or theft, please record the product's model and serial numbers in the space provided. The numbers are located in the rear of the product.
Model No.:
Serial No.:
U8461
May 2013
First Edition
Contents
[ENGLISH]
IMPORTANT INFORMATION 1
SAFETY PRECAUTIONS 2
SAFETY INSTRUCTION 3
MOUNTING PRECAUTIONS 4
Supplied Components 4
Installing the stand (supplied) 5
Connections 6
Turning Power On/Off 7
Specifications 8
Mounting Precautions 8
IMPORTANT INFORMATION
WARNING: TO REDUCE THE RISK OF FIRE OR ELECTRIC SHOCK, DO NOT EXPOSE THIS PRODUCT TO RAIN OR MOISTURE.

CAUTION
RISK OF ELECTRIC
SHOCK
DO NOT OPEN

CAUTION: TO REDUCE THE RISK OF ELECTRIC SHOCK, DO NOT REMOVE COVER.
NO USER-SERVICEABLE PARTS INSIDE.
REFER SERVICING TO QUALIFIED SERVICE
PERSONNEL.

The lightning flash with arrowhead symbol, within a triangle, is intended to alert the user to the presence of uninsulated "dangerous voltage" within the product's enclosure that may be of sufficient magnitude to constitute a risk of electric shock to persons.

The exclamation point within a triangle is intended to alert the user to the presence of important operating and maintenance (servicing) instructions in the literature accompanying the product.
SAFETY PRECAUTIONS
Electricity is used to perform many useful functions, but it can also cause personal injuries and property damage if improperly handled. This product has been engineered and manufactured with the highest priority on safety. However, improper use can result in electric shock and/or fire. In order to prevent potential danger, please observe the following instructions when installing, operating and cleaning the product. To ensure your safety and prolong the service life of your LCD product, please read the following precautions carefully before using the product.
- Read instructions — All operating instructions must be read and understood before the product is operated.
- Keep this manual in a safe place - These safety and operating instructions must be kept in a safe place for future reference.
- Observe warnings - All warnings on the product and in the instructions must be observed closely.
- Follow instructions — All operating instructions must be followed.
- Cleaning — Unplug the power cord from the AC outlet before cleaning the product. Use a dry cloth to clean the product. Do not use liquid cleaners or aerosol cleaners.
- Attachments — Do not use attachments not recommended by the manufacturer. Use of inadequate attachments can result in accidents.
- Water and moisture - Do not use the product near water. Do not install the product in a place where water may splash onto it. Be careful of equipment which drains water such as an air-conditioner.
- Ventilation — The vents and other openings in the cabinet are designed for ventilation.
Do not cover or block these vents and openings since insufficient ventilation can cause overheating and/or shorten the life of the product. Do not place the product on a sofa, rug or other similar surface, since they can block ventilation openings. Do not place the product in an enclosed place such as a bookcase or rack, unless proper ventilation is provided or the manufacturer's instructions are followed.
- Power cord protection — The power cords must be routed properly to prevent people from stepping on them or objects from resting on them.
- The LCD panel used in this product is made of glass. Therefore, it can break when the product is dropped or applied with impact. Be careful not to be injured by broken glass pieces in case the LCD panel breaks.
- Overloading — Do not overload AC outlets or extension cords. Overloading can cause fire or electric shock.
- Entering of objects and liquids — Never insert an object into the product through vents or openings. High voltage flows in the product, and inserting an object can cause electric shock and/or short internal parts.
For the same reason, do not spill water or liquid on the product.
- Servicing — Do not attempt to service the product yourself. Removing covers can expose you to high voltage and other dangerous conditions. Request a qualified service person to perform servicing.
- Repair — If any of the following conditions occurs, unplug the power cord from the AC outlet, and request a qualified service person to perform repairs.
a. When the power cord or plug is damaged.
b. When a liquid was spilled on the product or when objects have fallen into the product.
c. When the product has been exposed to rain or water.
d. When the product does not operate properly as described in the operating instructions. Do not touch the controls other than those described in the operating instructions. Improper adjustment of controls not described in the instructions can cause damage, which often requires extensive adjustment work by a qualified technician.
e. When the product has been dropped or damaged.
f. When the product displays an abnormal condition. Any noticeable abnormality in the product indicates that the product needs servicing.
- Replacement parts — In case the product needs replacement parts, make sure that the service person uses replacement parts specified by the manufacturer, or those with the same characteristics and performance as the original parts. Use of unauthorized parts can result in fire, electric shock and/or other danger.
- Safety checks — Upon completion of service or repair work, request the service technician to perform safety checks to ensure that the product is in proper operating condition.
- Wall mounting — When mounting the product on a wall, be sure to install the product according to the method recommended by the manufacturer.
- Heat sources - Keep the product away from heat sources such as radiators, heaters, stoves and other heat-generating products (including amplifiers).
- Usage of the monitor must not be accompanied by fatal risks or dangers that, could lead directly to death, personal injury, severe physical damage or other loss, including nuclear reaction control in nuclear facility, medical life support system, and missile launch control in a weapon system.
- Do not stay in contact with the parts of the product that become hot for long periods of time. Doing so may result in low-temperature burns.
SAFETY PRECAUTIONS (Continued)
To maintain compliance with EMC regulations, use shielded cables to connect to the DisplayPort input terminal.
If a monitor is not positioned in a sufficiently stable location, it can be potentially hazardous due to falling. Many injuries, particularly to children, can be avoided by taking simple precautions such as:
- Using fixing devices like wall mount brackets recommended by the manufacturer.
- Only using furniture that can safely support the monitor.
- Ensuring the monitor is not overhanging the edge of the supporting furniture.
- Not placing the monitor on tall furniture (for example, cupboards or bookcases) without anchoring both the furniture and the monitor to a suitable support.
- Not standing the monitors on cloth or other materials placed between the monitor and supporting furniture.
Educating children about the dangers of climbing on furniture to reach the monitor or its controls.
Especially for child safety
- Don't allow children to climb on or play with the monitor.
- Don't place the monitor on furniture that can easily be used as steps, such as a chest of drawers.
- Remember that children can become excited while watching a program, especially on a "larger than life" monitor. Care should be taken to place or install the monitor where it cannot be pushed, pulled over, or knocked down.
- Care should be taken to route all cords and cables connected to the monitor so that they cannot be pulled or grabbed by curious children.
SAFETYINSTRUCTION
- Do not use the monitor where there is a lot of dust, where humidity is high, or where the monitor may come into contact with oil or steam, as this could lead to fire.
- Ensure that the monitor does not come into contact with water or other fluids. Ensure that no objects such as paper clips or pins enter the monitor as this could lead to fire or electric shock.
- Do not place the monitor on top of unstable objects or in unsafe places. Do not allow the monitor to receive strong shocks or to strongly vibrate. Causing the monitor to fall or topple over may damage it.
- Do not use the monitor near heating equipment or in places where there is likelihood of high temperature, as this may lead to generation of excessive heat and outbreak of fire.
- Do not use the monitor in places where it may be exposed to direct sunlight.
- The AC outlet shall be installed near the equipment and shall be easily accessible.
The Power Cord and AC adapter
- Use only the power cord and AC adapter supplied with the monitor.
-
When handling the AC adapter, observe the following: Incorrect handling may result in fire, electric shock, or injury.
-
Do not drop the AC adapter or subject it to impact.
-
Never disassemble the AC adapter. It contains high voltage parts that are dangerous to touch.
- The AC adapter is for indoor use only. Do not use it outside.
-
Do not use the supplied AC adapter with other devices.
-
Do not damage the power cord and AC adapter nor place heavy objects on it, stretch it or over bend it. Also, do not add extension cords. Damage to the cord may result in fire or electric shock.
- Do not use the power cord with a power tap.
Adding an extension cord may lead to fire as a result of overheating. - Do not remove or insert the power plug with wet hands. Doing so could result in electric shock.
- Unplug the power cord if it is not used for a long time.
- Do not attempt to repair the power cord if it is broken or malfunctioning. Refer the servicing to the service representative.
- Do not stay in contact with the parts of the product and the AC adapter that become hot for long periods of time. Doing so may result in low-temperature burns.
- Do not fasten the AC adapter to the monitor or other equipment. Doing so may result in fire and electrical shock.
MOUNTING PRECAUTIONS
- This product is for use indoors.
- A mounting bracket compliant with VESA specifications is required.
- To install on a stand (commercially available) or on a wall, or to remove or move the monitor, consult your dealer.
- Mounting the monitor on the wall requires special expertise and the work must be performed by an authorized ASUS dealer. You should never attempt to perform any of this work yourself. Our company will bear no responsibility for accidents or injuries caused by improper mounting or mishandling.
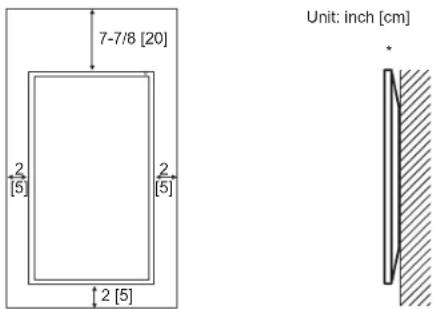
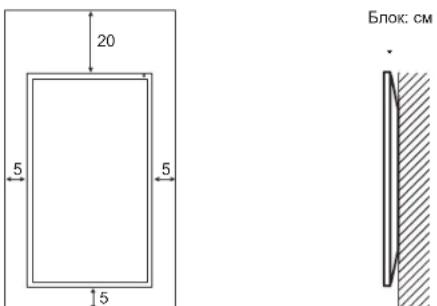
- Use the monitor with the surface perpendicular to a level surface. If necessary, the monitor may be tilted up to 25 degrees upward or 5 degrees downward.
- This monitor should be used at an ambient temperature between 32^ (0^) and 104^ (40^) . Provide enough space around the monitor to prevent heat from accumulating inside.

For the monitor in landscape orientation
For the monitor in portrait orientation
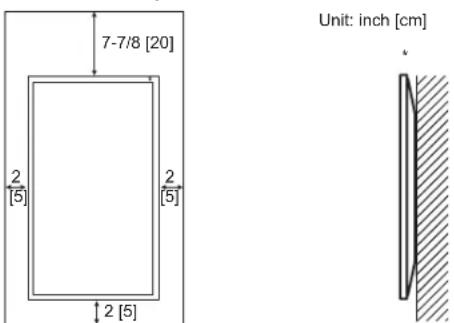
-
When you install this monitor on a wall, the monitor emits heat during operation, please be aware that this heat may discolor or alter the wall.
-
If it is difficult to provide sufficient space for any reason such as the installation of the monitor inside a housing, or if the ambient temperature may be outside of the range of 32^ (0^) to 104^ (40^) , install a fan or take other measures to keep the ambient temperature within the required range.
-
Do not block any ventilation openings. If the temperature inside the monitor rises, this could lead to a malfunction.
-
Do not place the monitor on a device which generates heat.
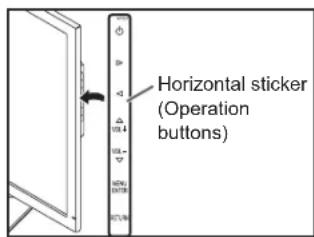
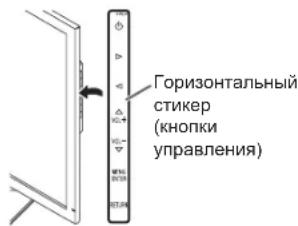
- When installing the monitor in landscape orientation, you
can attach the supplied horizontal sticker (Operation buttons) to the right side.
Supplied Components
If any component should be missing, please contact your dealer.
- Liquid Crystal Display Monitor: 1 * Power cord: 1 * AC adapter: 1
- Setup Manual (this manual): 1 * DisplayPort cable: 1 * RS-232C conversion cable (Ø3.5 mini-jack): 1
- Pedestal (for stand): 1 * Strut (for stand): 1 * Attachment plate (for stand): 1 (preinstalled on monitor)
- Countersunk screws (M4 x 6 without washers): 5 * Screws (M4 x 10 with washers): 4 * Hex wrench: 1
- Cable clamp: 2 * Cable clamp (small): 1 * Cable clamp (large): 2 * Horizontal Sticker (operation buttons): 1
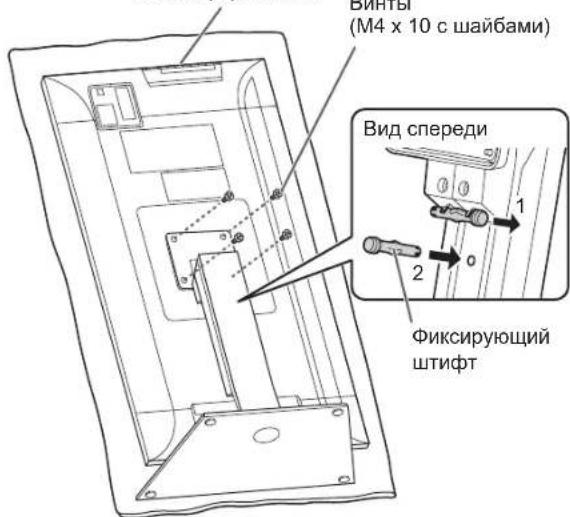
Installing the stand (supplied)
CAUTION!
- Disconnect all cables from the monitor.
- Firmly tighten the installation screws (supplied) with the hex wrench (supplied).
- Ensure that you have sufficient space to work.
Attaching the stand
Remove all packaging materials before starting work.
To prevent the table (etc.) from being damaged by the stand pedestal, spread a thick, soft cloth (blanket, etc.) and work on the cloth.
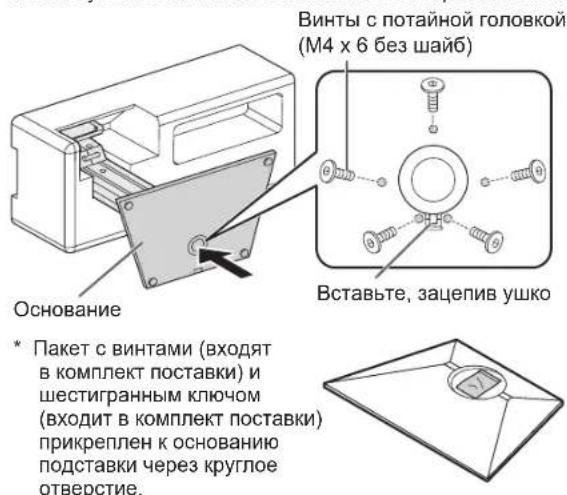
- Insert the stand strut into the packaging material (upper left) as shown.

- While supporting the stand pedestal with your hand, fasten to the stand strut with the supplied countersunk screws (M4 x 6 without washers) (x5).
Use the supplied hex wrench.
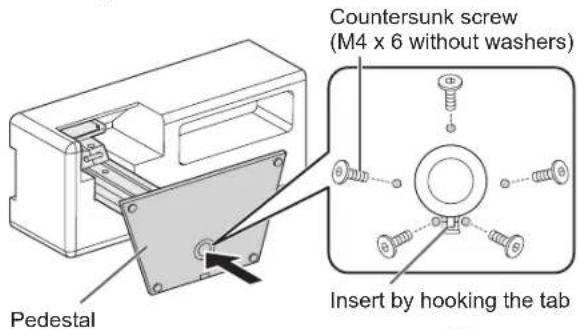
- A bag containing the screws (supplied) and hex wrench (supplied) is attached to the round hole in the stand pedestal.
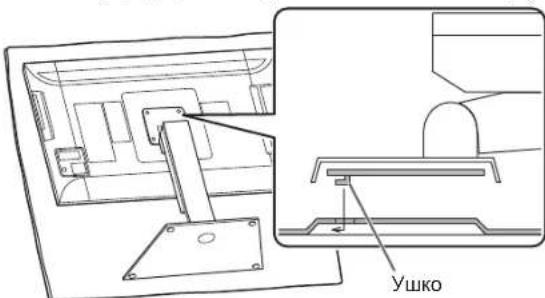
- Spread a thick, soft cloth (blanket, etc.) that will prevent damage to the LCD panel on a stable flat surface where the entire monitor can be placed, and place the monitor with the LCD panel face down on the cloth.
- Place the stand on the monitor.
Hook the tab on the stand under the mounting plate (preinstalled on monitor).

- Fasten the stand to the monitor with the supplied screws (M4 x 10 with washers) (x4).
Use the supplied hex wrench.
- Landscape

- Portrait

- If the monitor will be used in the portrait orientation, pull out the fixing pin (1), and insert it into the hole (2) as shown above.
- To remove the stand, place the monitor and stand as shown above and remove the screws.
CAUTION!
- Adhere to the following when installing the monitor in its portrait orientation. Failing to adhere to the following may cause malfunctions.
- Install the monitor such that the operation buttons are located on the top side.
- Set the MONITOR on the MONITOR menu to PORTrait. (See USER MANUAL.)
Connections
CAUTION!
- Be sure to turn off the main power switch and disconnect the plug from the power outlet before connecting/disconnecting cables. Also, read the manual of the equipment to be connected.
- Be careful not to confuse the input terminal with the output terminal when connecting cables. Accidentally reversing cables connected to the input and output terminals may cause malfunctions and the other problems.
- Do not use any cable that has a damaged or deformed terminal. Using such a cable may cause malfunctions.
Images may not be displayed properly depending on the computer (video cards), cables, or peripheral devices to be connected.

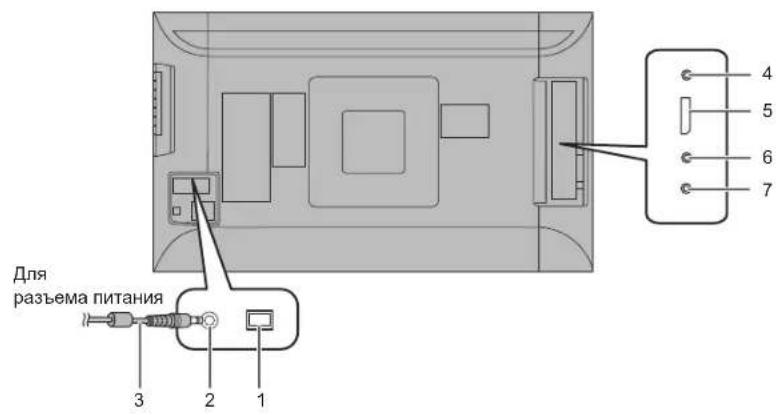
- Main power switch
- AC input terminal
- Power cord (Supplied)
- RS-232C input terminal
- DisplayPort input terminal
- Audio input terminal
- Headphone terminal
NOTE:
- Set the audio input terminal used for each input mode in AUDIO SELECT on the SETUP menu. The factory settings are shown below.
Input mode Audio input terminal (Factory setting)
DisplayPort DisplayPort input terminal
- The cables connected to the terminals on the rear of the monitor can be fastened with the cable clamp.
Attach the cable clamps to the attachment parts on the back of the monitor and the stand, and bind the cables.

- DisplayPort is a registered trademark of Video Electronics Standards Association.
Turning Power On/Off
CAUTION!
- Turn on the monitor first before turning on the PC or playback device.
Turning on the main power

CAUTION!
- The main power must be turned on/off with the main power switch. Do not connect/disconnect the power cord or turn the breaker on/off while the main power switch is on.
- When switching the main power switch or the power button (off and back on, always wait for at least 5 seconds.
- For a complete electrical disconnection, pull out the main plug.
Turning power on/off
Press the power button (1) to turn the power ON/OFF.

| Power lamp status Status | of the monitor |
| Green lit Power on | |
| Off Power off (Standby mode) | |
| Orange lit Input signal waiting mode | |
CAUTION!
- When switching the main power switch or the power button (off and back on, always wait for at least 5 seconds. A short interval may result in a malfunction.
NOTE:
- When the main power switch is off, the monitor cannot be turned on.
- If the monitor is in the input signal standby mode and you press the power button (D) the monitor enters standby mode.
Specifications
| Model PQ321QE | |
| Power requirement AC 100 V - 240 V, 50/60 Hz (when using the supplied AC adapter) | |
| Operating temperature 32°F to 104°F (0°C to 40°C) | |
| Operating humidity 20% to 80% (no condensation) | |
| Power consumption 99 W * (when using the supplied AC adapter) | |
| Dimensions Phys. Dimension with Stand (WxHxD) 750 x 489 x 256 mm Phys. Dimension without Stand (WxHxD) 750 x 441 x 35 mm Box Dimension (WxHxD) 990 x 558 x 230 mm | |
| Weight Net Weight (Esti.) 13 Kg | Gross Weight (Esti.) 17 Kg |
- When using the monitor in DC19 V:88 W
As a part of our policy of continuous improvement, ASUS reserves the right to make design and specification changes for product improvement without prior notice. The performance specification figures indicated are nominal values of production units. There may be some deviations from these values in individual units.
Mounting Precautions
- When installing, removing or moving the monitor, ensure that this is carried out by at least 2 people.
- Be sure to use a wall-mount bracket designed or designated for mounting the monitor.
This monitor is designed to be installed on a concrete wall or pillar. Reinforced work might be necessary for some materials such as plaster / thin plastic board / wood before starting installation.
This monitor and bracket must be installed on a wall which can endure at least 4 times or more the weight of the monitor. Install by the most suitable method for the material and the structure.
To attach a VESA-compliant mounting bracket, use M6 screws that are 5/16 inch (8 mm) to 3/8 inch (10 mm) longer than the thickness of the mounting bracket.
- Do not use an impact driver.
- When moving the monitor, be sure to hold it with the unit bottom and the side of unit. Do not hold the LCD panel or corners. This may cause product damage, failure, or injury.
- Do not use any screw holes other than VESA holes for installation.
Table des matieres
[FRANÇAIS]
INFORMATION IMPORTANTE 1
CHER CLIENT 1
PRECAUTIONS DE SECURITE 2
MESURES DE SECURITE 3
PRECAUTIONS POUR LE MONTAGE 4
Composants fournis 4
![ASUS PQ321QE - [FRANÇAIS] - 1](/content/2026/03/487735/images/b4598cdc9f1183291ae3c4a398ee4ae4ab0ed7be929a7ba873bfae5b172b6892.jpg)
For the monitor in landscape orientation
For the monitor in portrait orientation
![ASUS PQ321QE - [FRANÇAIS] - 2](/content/2026/03/487735/images/c228f262ae7b2296ce56eec5b20db3f9102462c34febc7fe820c08ebc6e744ae.jpg)
MEPbI INPEIOCTOPOXHOCTN PNI KPNJIENHIN ....4
KomnneKthie npHaJnxHocTn. 4
YcTaHOBka NocTaBKn (BXoNt B KOMnJIeK T NoCTaBKn)...5
CoeHHHeHn 6
BkJIOueHHe/ByIKNIOueHne nTahn7
Cneunfkaa.. 8
MepbI npedocTopoxHocTn npkpenen.. 8
BAKHAR NHΦOPMALI
IPEIOCTEPEXEHNE: IJY MEmHbSeHnOJACHOCTN BO3HNKHOBEHnIOXKAPNINIOPAKHeN3JEKTPUHECKIM TOKOM HE IOBEBPRAITE DAHHOE N3DEENIE BO3DJI ECTBNI DOJKN ININ BNAI.
BHIMAHNE
ONACHOCTb IOPAXEHHN 3JIKTPNUEC TOKOM
HEOTKpBIBATb

BHIMAHINE!
HE YDAJIAIITE KPBILKUY, YTOBCHN3NTb ONACHOCTb IOPAXEHHJ3JIeKTPnueCKIM TOKOM.BHYTPN INPISOBPA HET DETALEH,
KOTOPbIE MOYT O5CJIyXINBATbCJ IOJIb3OBATEIeM. IJIaO6CIyXINBAHNI O6PAUAITEcB K KBALIΦNIIPOBAHHOMY INPECOHAJIY CEPBNCbIX LHTPOB.
3HaK MoHnC oCTpeJIKo HA KOHcE BHyTpN TpeYroBbHnKa IpeDynpExJaET NOb3OBaTeIe O HAnuHn BHyTpN KopnyCa HEN3OJIPOBaHnHO
"Onachoro HnpanjKeHnra TaKoBENINHbI, OTO OHO npeDCTaBnreT yrpo3y npaxeHHa 3NEKTPNueckm TOKOM Dnna IIOdei.

BocknuaTeIbHb3 3HaK BHyTpN TpeyroIbHnKa npEynpexkdaET NpIb3ObaTeIaO HAnuHn Baxhbx INCTpykUIN NO KcNpyTaUIN nCNoJIb3ObaHnIO (cepBcy) B JInTepaType, KOtopa NoCTabIReTcB KOMPNeKTe C n3dneHem.
ПРавILA TEXHиКи БE3ОпАСHOCTN
3NeKtpuueCTBO nCnONb3yETc DnBbINONHeHmHOx NIOe3hBix FyHKU, H0 OHO TaKKe MoKet npuHHTb TpaBMbl nepcoHany 6bIt npuHNO nobpeXdEHHN MMyEcTBA B CNYae HnnpaBnBHOO oBaueHH C HIM. DaHHeo n3deJIne cnpoekTtropoHBO nPon3BeDEHO C ObecneueHMe MAkCMaHbHO B63OnaHcOe. Ondako HnnpaBnBHa 3KnIpyaTaJnM oKet npuBect N KopaxHeHIO 3NeKtpuueCKm TKOM N/nn Bo3HKnHOeHHo NoXapa. B CEJnx npDeoTbPaueHH NOTeHuaJIbHO yrpo3b co6nDaaTe cNeDyUeMHn HCtpyKUnNo yCTaHOBKe, 3KnIpyaTuauu N uCtKe daHORo n3deJIna. DnObecneueHH Baawie 63OnaHcOte N yBvJIeuHc EPOKA 3KnIpyaTaAUu BAweo KK MOHmTeBHO npOHTte cNeDyUeMHne npaBnA, npexJeemnpctynatB K 3KnIpyaTaAUu DaHORo n3deJIna.
- IpoHTne IHCTpyKcnn - IpeXeJe Yem Hauatb 3KcnIyatauio N3deNna, Heo6xoJIMo IpOueCTb N NOHrTb BCE IHCTpyKcnn No erO 3KcnNyatau.
- XpaHHTe DaHHoe pyKOBOCTBO B HaDEKHom MecTe - DaHHbe IHCTpyKuIN No 6e3OJaCHOCtN IN 3KcJIyTaUIN CneJyET XpaHHTb B HaDEKHom MecTe, YTO6bl MoXHO 6blIO o6paTNTbc K HIM BNOCEdCTBUN.
- POnHHaTecb npOocTepeKeHnM - Bce npoocperaIOUne HaIINcN 3NaK, IMeIOUncEra Ha I3deJIIN N B INCTpyKUn, donXhbl cTporo coBIOdaTbcra.
4.CneyTe HnctpyKnmaH - Heo6xOIMO CneObaTb Bcem HnctpyKnmaH No 3Kcnnyatau. - UcTka -Ppckde Qem npctynaB K UcTke n3dennr, Heo6xOIMO DoCTaB BuNKy n3 po3eTKN nepEMEHOR TOKA. DnA uCtkn n3dennr Heo6xOIMO nCOnb3oBaTb cyxyIO TpIky. 3anpeaaetc NcONb3oBaTb dnn 3TNX CEJEN JIKDKE INN a3PO3ONHbIe YUcTAAuNE CpeCTBA.
- PnHaJnxKHOCTN - 3anpeaetc NcnoJb3ObaTb PnHaJnxKHOCTN, He peKOMeHDoBaHHbIe npOn3BOUTeJIem DaHHoro n3dennr. IcNoJb3OBAHne dpyrNX pInHaJnxKHOCTe MoXeT CTaTb pInuHoi HeCuaCTbIX CNYaEB.
- Boda n Bnara - 3anpeaetcra nclonb3oabt n3deHnBaO3ne nctouHnKOB BObl. He pa3meuaite MOHToP B MeTe, rHe Ho MoKeT nonacTB oDa. Pn pa3MeueHNn 6paTHe BnHaMaHHe Ha oOpdyobAHHe, nCnoB3yUoiEe B pa60Te BoY, HapnpMep, KOHduuHOep.
- BeHTnIaIyra - BeHTnIaIyauHbIe OTBepCTnI a pyrue OTBepCTnI B Kopnyce npi6opa npedHa3Hauehbl nra BeHTnIaIyum.
3aIpeaaeTc8aKpbBaTbNII6bOKnpoBaTbETBHTnlaOnHbteOTBepCTnNINpytneOTBepCTn,NOckOBky HeIOCTATOCHABEHTnlaCmOKeTnpBeCTN Kpeperpebyu/InnCOkpaueHnIO cPoka Cnykbu Ndenn. 3aIpeuaeTc8 yCTaHaBnBaTbN3deJIne HaCoFy, KObe INI dpytne anahIoUHbte NOBepxHOctN, NOCKOBky OHN MOrY 3abNoKpOBaTB BENTnlaOnHbteOTBepCTN. 3aPeaaetc8yTaHaBnBaTbN3deJIne B 3akpbTbx npoctpaHCTbax, TAKNX KaK KNHXhBn WkaΦ INI NONKa, eCNi TAM He o6ecneHe HADNeKaAaB EHTnlaCn, 3a NCKIOUeHem CNYaeB, KOrDa 3TO PpeDycmOTpeHO B INHCTpyKUn npo3BODtTeJ.
-
3aunita hynpa nntanra -Hyp nntanra doJnkeh pa3MeaaTbca TaKIM o6pa3OM, yTo6bl Ha Hero He HacTypann IIOIN HcYctaHaBnBaJIncb KaKe-Imo PpeMTebl.
-
XX naHEnb, kOTopar nCnONb3yTcB DaHHOM n3dennu, n3OTABnBaTcN 3CTeKnA. CneDobatehNo, OHa MoKet pa36ntbc B cnyae, ecnn n3dennue ypoHant nu Haecyt no Hemy uap. PpOaBnTe octOpoxHoctb, UTo6b BaC he nobpeDun ockoKn pa36ntoro CTeKnB cnyae, ecnn XX naHEnb 6yDet pa36nta.
-
Nperpy3ka - 3anpeaaetcnaeppykaTb po3eKny nepemehoro ToKa n/nnn ydinnHteNbhe Ka6eN. Nperpy3ka MoKeT npBecNTK NOkapy nnnpaKeHHIO 3neKtpnueckm TOKOM.
-
NonaadaHne BHTpb KOpnyca npedMeTob HxndKocTe - Kateropnueckn 3anpeuaaTcBCTaBnTB KaKe-No6 npedMeTbBHTpb M3dIeNn BEye3 BeHTnIauoHhBe IIN DpyrVe OTBepTnB. BHTpb N3dIeNn Noaetc BblCokoe HanPaxHe, NO3OMy PnocOBbHaHne B Eero Kopnyc Ype3 OTBepCTa KaOro-No6o npedMa MoKet PtNBecTa K nopaxHeHIO 3NEKTPNeCKIM TOKOM HIN NKOPOTKOMY 3AmbKaHInHO HeKOTOpBIX DeTaeJIe.
Ito ToJKe npuHHe 3anpeaetcDonyckaTb nonaHaHe BHyTpB n3deJeB ODbI nn Dpynx KjNkOcTei.
-
06cnykbaHHe - 3aepuaetcAahimaTboc6cnyKbAHnemN3deJnra camoToTeJIbHO.Ecnbl bI dyTe cHMMtB KpbIuK, To MOKeTe NoBeprHyTbCBo3eCTBNIO BICcOKO HapraKeHHaDpyHX onaChbix qakTopoB. OpaTNTecb K KBaHINpOBAHOMy 06cnykbaoUeMy nepcoHany dnn BbINOHNHe6cnyKbAHnir.
-
PeMOHT -EcHn PpO3OJET QTo-Im6 Io 3N pepeuCHeHORo HIXe, I3BNeKeIte I3 Po3EtKn pepeMeHHOrO ToKa BUNKy shHypa nTahn H o6paTITecb K KBaIIuΦuIpuBaHOMy o6cnykBaUoIeMy nepcoHaIy 3a BBInOnHeHHeM Heo6xOdMbIX peMOHTbX paBOT.
a. NopbpeKdEh WHyp nTahnH uNn BnIka.
b. B cnyuae nonaahanB n3dene XnKocTN nn KaKnx-ln6o Dpynx npedMeTOB.
c. Korda n3dene nonano noa doxkb nnB Body.
d. Korda n3denne He pa6oTaT Tak, KaK 3TO ONnCAHO INHCTpyKuIN NO 3KcnnyatauIN.
3anpeaetcTporatb opraHbI npabneHn NOMMO Tex, YTO ONiHaBb I HNCTpyKunx No 3kCnPyatau. HenpaBnHnapeYrnpoBka oprahOB ynpaBHeN, KOTOPaHE NOpCaHa B INCTpyKunx, MOKeT npNBecTN K NOBPexDeHm, DnIy cTaPaeHn KOTopbIX 3aactyIO TpeSyeTb PnPBLeKaT KBaJIncnpoBaHHbx CNEUAnlntCB, KOtOpbIM npiXODITcBAblONHTb 60bnShoObEbm paobT no perynpoBke.
e. B cnyuae, ecnn n3dennme yponnnn nn noBpeunn.
f. B cnyae, ecnB pa6oeym n3dennn HabIIOaIOTc KaKne-1N6O oTKNOHeHry. RbHbIe oTKNOHeHry B pa6ote n3denny yka3bIbAoiT Ha To, YTO Tpe6yETcR erO 06cnykubAHne.
- 3anaChIbe DetanE CnI nIe I3dennnoTpe6yIOCTa3naChIbeTeaIINy6eNTecB TOM,TOBbINOJIHOUO cnKyaKBHHe YcNOBek NcNOb3yeT 3anaChIbe DetAIny, yKa3aHHBe Ipn03BOuTeENm INn aHaJOrMHNbIe DetAInC TaKIMn KxapAKTepNCtIKAMn INpOn3BOuNTenbHOCtBu, KaNOpRnHaNBHe.IcNoIb3oBaHne Detanei, He peKOMeHDoBAHHbIX npOn3BOuNTenEM, MoKET npNBecTn K BO3rOpaHnIO, nopaxKeHnO 3NeKTPnuCeckmTOKOM INn CO3daHnIO dpyrNX onaChbIX cTuayauin.
- PpOeBKn 63oNaChOCTn -Pocne 3aBepueHnraPbOT nO 6cIyKBaHnIO nIN peMOHTy nonPOCnTE TeXnKa nO 6cIyKBAHnIO pOn3BecTn PpOeBky 63oNaChOCTn, YTo6bI y6eDntbCyr, YTO n3dEInne HaxoDITcR B NaJIeKaeM paOoyem COCTOHmN.
- KpeIeHHe Ha cTeHy — Ipn KpeIeHn H3dJIy Ha cTeHy Heo6xOIMMo y6eIITbC8 B TOM, YTO OHO yCTaHOBJeHO C nONb3OBaHHeM MeToDa, peKOMeHNIOBaHHOro erpON3BOuTeneM.
- NcToHnKn TeNna - Depknte n3dJIe N BdaIIN OT NcToHnKOB TeNna, TaNX KaK paAnaTOpbl, HArpeBaTeIIN, IInITb IN dpyrooe 6obopyoBADAHne, rHeepnpuyooee TENNO (BKnIOyA yCnNTeIIN).
MEPbI IPEIOCTOPOXHOCTN IPN KPEJIeHIN
- MoHITOp npedHa3NaueH dIЯ 3KcIpyatauIN B nomeuEHH.
Tpe6yeTcKpeneXhBkpoHHTeH,coOTBeTCTByOuN CneunphkaUN VESA.
Диу yctahOBkn Ha noCTabKE (npON3BODITcC cepuHOn) nnn Ha CTHe NIO DEMOHTa Ka nnpeMeueHn MOHNTopa O6paTITcB K CBOemy dInepy.
KpeIJIeHne MOHITOPa KCTHe Tpe6yEt CNEuaNbHbIX HaBbIKOB, NOToM TYAKApa6Ota DOJnKaHa BbIOJIHTbcr CNEuaINCTAMN KOMNaHH ASUS.Bam He cNeayET PpEepnHmTa b NOnbTOK CcIaTb 3Ty pa6Oy CaMOCTeINbHO.HaWa KOMNaHH He Hecet KaKoi-NiBO OTBeTCTBeHHoCTu 3a HeCuaCThBiE CNYau INI TPABMbl,Bb3BaHNHbII NIOXIM MOHTaXOM UIN HENPaBbNbHbIM O6paUeHNEM. - MoHITOP DoJxKeH IcNoJIb3ObAtbCra nepNeHdIkyIpyHO no OTHoSeHHIO K NOBepXHOCTn, HA KOToPOH OH YcTaHOBJIeH. Pn Heo6XoIMOCm MOHTOP MOpKHO HaKJIOHrBa Ha yToI do 25 rpaJycOB, 06paIIaA 3kpan BBePx, INI Ha yToI do 20 rpaJycOB, 06paIIaA 3kpan BHN3.
JaHHb MOHITOP DOJIKEN 3KCIJIYATMPOBaTcBcPnI TMHePAyTObOyKaIOUeI cpeDbI O T 0^ Do 40^ 06EcnEte BOKpy MOHITOP DAocTaOHO pOcTpaHCTBa, YTO6bl IpeDToBpAaTNb HAKONNEHe TENa BHyTpN er KOpnyca.

MOnHTopaBROPn3OHTaIbHOOpneHTaUN
MOnHTopaB BepTKaJIbHOJOpNEHTaUN
KorDa Bby yctaHaBnBaAeTe 3OT MOHITOP K CTeHe. Ondako nocckIbky BO BpMa PabOtbl MoHITOp RHeepnyet TEIIIO,3TO MOKeT PnBecTrN K DeΦoMPnOBaHnIO NN ObcueYBaHnIO CTHebl.
EcnCnoKHOoecneuHbOocTaTOOHoe nOcctpaHCTBO TOI ININ HNO npNnHe, HApnpMep, I3-3a TORO, yTO MOHTOP ycTahABnBAeTCBHyPNKOxyXa, INN IN3-3a TORO, yTO Temnepatypa OKpyxauoue Cpebl BixOJNT 3a Dnana30H OT 0^ do 40^ ,ycTAHOBtBEHTNtOp INN pPmnte Dpynme Mebl dNTo, TTOb6Te Mtnepatypa OKpyxauoue Cpebl HaxOnnacB NpeDnax Tpebyemoro Dnana30Ha.
3aPpeaaetc6bokpoBaBBeHTnIaIOHHbIeOTBepTMAHHTOPa.PoCT TemnepaTybl BHyTpN KOpNyCa MOHTOPaMOKET npINBecNTKERO HENpABInbHOMy FyHKUHOHNPOBAHIO.
3aPpeaaetcpa3MeaTaMoHTopHa yCTpOiCTbax, reHeppyuOxuX TeNo.
- Pn yctaHOBKe MoHNTopa B roPn3oHTaNbHOI opMeHTaUIN Bbl MOxTe nPnKpeNtB c npaBOI CTOpOHbIO NOCTaBJIeMbI B KOMPJIeKTE roPn3oHTaNbHbI CTnKepe (KnONk ynpabLeHna).
IcnoJb3yIe BXOJaIuB KOMnJIeKT NOCTaKBn BEptKaNbHbT CTKepe npY cTaHOBKe MOHTopa B BePTKaNbHOI OPeHTaUN.
KoMnJIeKTHbIe npHa,IeJxHocTn
B cIyae oTCyTcTBn KaKOro-Ni6o KOMNoHeHTa, CBXnTeCb C CBOH dIePOM.
MOHITOP c KxIDKOKPNCaTaNuecknM DnCnneem: 1 UHyp nHTaHn: 1 Bnok nTaHn: 1
PykoBoCTBO no yctahOBke (tO pykoBoCTBO): 1 KaebIb DisplayPort: 1 KaebIb-lepexoHnK RS-232C (MmH-nKeK 03,5): 1
OchOBaHHe (noCTaBKn): 1 CToIka (noCTaBKn): 1
CoeHnntbHa nactHa (noCTabKn): 1 (npedBapntbHo yctahOBHeHHa Ha MOHTope)
BnHTbI c notaHOn roNoBkoN (M4 x 6 6e3 wai6): 5 BnHTbI (M4 x 10 c wai6amn): 4 WecTnRpaHHbKlIOU: 1
3aKIMKa6eJ:2 3aKIM Ka6eJ (MaIbI):1 3aKIM Ka6eJ (6oJIbIo):2 Fopn3OHTaIbHbI CTKeP (KHONynpabHeN) :1
YcTaHOBka IoDCTaBKN (BXOJNT B KOMNJIeKT NOCTaBKn)
BHIMAHNE!
-OTCOEINHHTO MT MOHITOPA BCE Ka6eJN.
HaDExKHO 3aTnHtE yCTAHOBOCHbIe BINHTbl (BXoJrB KOMNKeT NOCTABKN) C NMOUbI WECTIgPAnHOrO KIOHua BXoJrB KOMNKeT NOCTABKN).
- Obecneue Te Hainuue DocTaouHoro npocTpaHCTBa Ira paBoTI.
PnpkpenTe noDcTaBky
PpexJe Yem npctynatb K pa6ote, CHMnTe BCE ynakobouhhe MaepnaJIbl.
YtObIaUHTNtB cTOn (n T.D.) OT NOBpeXeHNI OCHOBAHnEM NOCTABKN, NOCTeNTHe TOnCTyIO MxRkyIO TKAHB (HaNPmep, OeJeNO) n paBoTaIte HA HeI.
1.BCTaBbTe cToKy NOcTaBKN BynakOBouHbMATEpHaN (BBepy cneBa),KaK NOKa3aHO Ha PnCyHke.

- Nopdepkmbarykoocobhne noctabkn, npnkpenenteero K ctoke noctabkn BNTAMC notaahnof noobko (M4x6e3 wae6) (x5), KOtOpBle BXoJAT B KomnKeT NOCTABKn. IcnoJIb3yIte NOCTABmB b KOMNKeT KeCTHnPAHbIK NIOU.
-
PacTeJIte TOnCTyMO MReKyo TKaHb (HaNPmep, OeJeNo), KOTOPa IpeoTbPaTNT NObpExDeHne KKNaHeNn, Ha IIOCKOINOBEPXHOCTn, Ha KOtOpoi NOMeuaeTCBeBC MOHTOp, INIOOKHTe MOHTOp HaTKaHb XX-NaHeIbBO BHN3.
-
NomeCTne NOCTaBky HA MOHITOp. BBeiHTe yIko HA NOCTaBKe B3aQENIIeHne C CoeINHTeBHO nIaCTHNO (NPEdBaPTeJbHO yCTAHOBJIeHNO HA MOHITope).
5.Пикpenite noctabky K MOHITOPY c nomoibnoCTaBnREbIX B KOMNJIeKTe BNHTbl (M4x10cwa6amn)(x4).
NcnoB3yIe NOCTABnREMbI B KOMnJIeKTe WecTnPaHHbIKNIOH.
-Topn0HTaBnaOpneHTaCn

BnHTbI
(M4×10cwaibamn)
-Вертукальная оретаця
KhoNKynpabNeHn
*EcnMOHITOP6yETNCIOB3OBAIbCBAePTNkAIBHOI OPNEHTaUN, BbIHbTe KHKcnpUoIN WNTnT (1) IN BCTaBbTeeroBOTBepCTne(2),KAK NOKa3aHO Bblwe. *YTObCHrTBCTOky, NOIOKInTE MOHITOp n CTOnKy, KaK NOKa3aHO Bblwe, IN CHMNTe BNHTbl.
BHIMAHHE!
-
Pn yctaHOBKe MOHtOpa B BePtKaNbHoN opHeTaun npndepKNaBTeCb CneDyUOxN peKOMeHdauN. HecobIIOdeHne 3TNX peKOMeHdauN MoKET npNBecT N BO3HNIKHOBeHHo HeCNpabHocTeN.
-
YCTAHOBITE MOHHTOP TAK, YTO6bl KONKN ynpabnene 6bln pacnononoKeHb Cbepy.
-3aainTeIOnMnONITORBMeHO MONITOR ycTaHOBky PORTAIT (CM.PYKOBOCTBO IOKCPIYATAUIN.)
CoeHHeHn
BHIMAHHE!
- PpOBePbTe, YTO BbY BbIKIOHINrIaBHyBbY BbIKIOUATEb NITAHN r BbHYN BnIKy I3 3JekTpuecko p03eTK, npexJeem npcoeHNHTb/OTcoEHNHTb Ka6JI. TaKke npOHTte pyKOBOCTBO NOlb3OBaTeNra TOrO o6OpyOBAHn, KOtOpoe 6yDet NoDCOEHNHTbcR.
- Bydte BHNMaTeBbHbI He nepenyTaIe npn noCoedHeHH KaBeJe BxOHO H BxOHO pa3bEmb. EcnKabenn, NOcEOHNHeHH K BxOHOMy N BxOHOmy pa3bEmam, 6ydyT cnyaHNO nepenyTaHbI, 3TO MOKeT cTaB npuHOB03NtIOHHeNCpNaBHOte n dpynx npo6nem.
He nOJb3yIe Ka6eIc NoBpeXeHHbIMN IIN DeOpMPOBaHbIMn pa3beMaM. PpIMHeHne TaKOro Ka6eIa MoKeT CTaTb npuHOn HeNCnpaBHOCTe.
Bo3MOxHOCTb OTo6paKeHn 3aBnCnT OT KOMNbHOpepa(BuDeOkaPbI),Ka6enei nIN NOkNIOvaEmbIX nepnpepnHbix yctpoNCTB.
- TnabHbI BbIKJIouaTeNb nHTAHN
- BxOJHOn pa3bEm nHTaHn nepeMeHHoro Toka
- Whyp nHTaHnB (BXOHT B KOMNJIeKT NOCTABKN)
- Bxodno pa3bem RS-232C
- Bxodno pa3bem DisplayPort
6.BxoHbIe pa3beMbI aydno - Pa3bEm dIyHayuHnKOB
ПРIMECHАНЕ:
3aadaTe nCnoIbyeMb BxOJHO ayDnOpa3bEm B pa3deJe AUDIO SELECT

For the monitor in landscape orientation
For the monitor in portrait orientation