DCM65 - Cd player/recorder DENON - Free user manual and instructions
Find the device manual for free DCM65 DENON in PDF.
| Product Type | CD Player/Recorder |
| Brand | Denon |
| Model | DCM65 |
| Dimensions (W x H x D) | 434 x 115 x 392 mm |
| Power Supply | 120 V / 60 Hz (see label), power consumption 15 W |
| Disc Player | 5 discs (carousel) |
| HDCD Decoding | Yes (DCM-65 only) |
| Digital Filter | 8x Oversampling |
| Programming | Up to 32 tracks |
| Playback Modes | Normal, program, random, repeat |
| Audio Output | Variable 0.2 ~ 2.0 V (LINE OUT jacks) |
| Digital Output | Coaxial (DCM-65 only) |
| Headphone Jack | Yes (variable level) |
| Remote Control | Infrared, RC-258, range 8 m |
| Dynamic Range | 100 dB (DCM-65) |
| S/N Ratio | 112 dB (DCM-65) |
| Distortion | 0.0025% (1 kHz) (DCM-65) |
| Separation | 98 dB (DCM-65) |
| Frequency Response | 2 Hz - 20 kHz |
| Remote Control Batteries | 2 x R6P (AA) |
| Maintenance | Clean with soft cloth, avoid chemicals |
| Safety | Do not obstruct ventilation, avoid heat and humidity |
| Included Accessories | Remote control, connection cord, batteries |
Frequently Asked Questions - DCM65 DENON
User questions about DCM65 DENON
0 question about this device. Answer the ones you know or ask your own.
Ask a new question about this device
Download the instructions for your Cd player/recorder in PDF format for free! Find your manual DCM65 - DENON and take your electronic device back in hand. On this page are published all the documents necessary for the use of your device. DCM65 by DENON.
USER MANUAL DCM65 DENON
TO PREVENT FIRE OR SHOCK HAZARD, DO NOT EXPOSE THIS APPLIANCE TO RAIN OR MOISTURE.
CAUTION:
- Handle the power supply cord carefully
Do not damage or deform the power supply cord. If it is damaged or deformed, it may cause electric shock or malfunction when used. When removing from wall outlet, be sure to remove by holding the plug attachment and not by pulling the cord.
- Do not open the top cover
In order to prevent electric shock, do not open the top cover. If problems occur, contact your DENON dealer.
- Do not place anything inside
Do not place metal objects or spill liquid inside the CD player. Electric shock or malfunction may result.
Please, record and retain the Model name and serial number of your set shown on the rating label.
Model No. DCM-65/35 Serial No.

CAUTION
RISK OF ELECTRIC SHOCK DO NOT OPEN

CAUTION: TO REDUCE THE RISK OF ELECTRIC SHOCK, DO NOT REMOVE COVER (OR BACK). NO USER-SERVICEABLE PARTS INSIDE. REFER SERVICING TO QUALIFIED SERVICE PERSONNEL.

The lightning flash with arrowhead symbol, within an equilateral triangle, is intended to alert the user to the presence of uninsulated "dangerous voltage" within the product's enclosure that may be of sufficient magnitude to constitute a risk of electric shock to persons.

The exclamation point within an equilateral triangle is intended to alert the user to the presence of important operating and maintenance (servicing) instructions in the literature accompanying the appliance.
NOTE:
This CD player uses the semiconductor laser. To allow you to enjoy music at a stable operation, it is recommended to use this in a room of 10^ (50^) ~ 35^ (95^) .
LABELS (for U.S.A. model only)
CERTIFICATION
THIS PRODUCT COMPLIES WITH DHHS RULES 21CFR SUBCHAPTER J APPLICABLE AT DATE OF MANUFACTURE.
CAUTION:
USE OF CONTROLS OR ADJUSTMENTS OR PERFORMANCE OF PROCEDURES OTHER THAN THOSE SPECIFIED HEREIN MAY RESULT IN HAZARDOUS RADIATION EXPOSURE.
THE COMPACT DISC PLAYER SHOULD NOT BE ADJUSTED OR REPAIRED BY ANYONE EXCEPT PROPERLY QUALIFIED SERVICE PERSONNEL.
This device complies with Part 15 of the FCC Rules. Operation is subject to the following two conditions: (1) This device may not cause harmful interference, and (2) this device must accept any interference received, including interference that may cause undesired operation.
This Class B digital apparatus meets all requirements of the Canadian Interference-Caising Equipment Regulations.
TO PREVENT ELECTRIC SHOCK DO NOT USE THIS (POLARIZED) PLUG WITH AN EXTENSION CORD, RECEPTACLE OR OTHER OUTLET UNLESS THE BLADES CAN BE FULLY INSERTED TO PREVENT BLADE EXPOSURE.
POUR LES MODELES AMERICAINS ET CANADIENS UNIQUEMENT
ATTENTION
POUR PREVENIR LES CHOCSE ELECTRIQUES NE PAS UTILISER CETTE FICHE POLARISEE AVEC UN PROLONGATEUR UNE PRISE DE COURANT OU UNE AUTRE SORTIE DE COURANT, SAUF SI LES LAMES PEUVENT ETRE INSEREEs A FOND SANS EN LAISSER AUCUNE PARTIE A DECOUVERT.
SAFETY INSTRUCTIONS
- Read Instructions - All the safety and operating instructions should be read before the appliance is operated.
- Retain Instructions - The safety and operating instructions should be retained for future reference.
- HeedWarnings-All warnings on the appliance and in the operating instructions should be adhered to.
- Follow Instructions - All operating and use instructions should be followed.
- Water and Moisture - The appliance should not be used near water - for example, near a bathtub, washbowl, kitchen sink, laundry tub, in a wet basement, or near a swimming pool, and the like.
- Carts and Stands - The appliance should be used only with a cart or stand that is recommended by the manufacturer.
6A. An appliance and cart combination should be moved with care. Quick stops, excessive force, and uneven surfaces may cause the appliance and cart combination to overturn.

- Wall or Ceiling Mounting - The appliance should be mounted to a wall or ceiling only as recommended by the manufacturer.
- Ventilation - The appliance should be situated so that its location or position does not interfere with its proper ventilation. For example, the appliance should not be situated on a bed, sofa, rug, or similar surface that may block the ventilation openings; or, placed in a built-in installation, such as a bookcase or cabinet that may impede the flow of air through the ventilation openings.
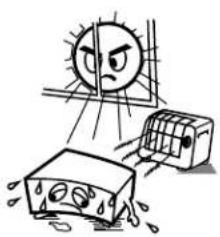
- Heat - The appliance should be situated away from heat sources such as radiators, heat registers, stoves, or other appliances (including amplifiers) that produce heat.
- Power Sources - The appliance should be connected to a power supply only of the type described in the operating instructions or as marked on the appliance.
-
Grounding or Polarization - Precautions should be taken so that the grounding or polarization means of an appliance is not defeated.
-
Power-Cord Protection - Power-supply cords should be routed so that they are not likely to be walked on or pinched by items placed upon or against them, paying particular attention to cords at plugs, convenience receptacles, and the point where they exit from the appliance.
- Cleaning - The appliance should be cleaned only as recommended by the manufacturer.
- Power Lines - An outdoor antenna should be located away from power lines.
- Outdoor Antenna Grounding - If an outside antenna is connected to the receiver, be sure the antenna system is grounded so as to provide some protection against voltage surges and built-up static charges. Article 810 of the National Electrical Code, ANSI/NFPA 70, provides information with regard to proper grounding of the mast and supporting structure, grounding of the lead-in wire to an antenna-discharge unit, size of grounding conductors, location of antenna-discharge unit, connection to grounding electrodes, and requirements for the grounding electrode. See Figure A.
- Nonuse Periods - The power cord of the appliance should be unplugged from the outlet when left unused for a long period of time.
- Object and Liquid Entry - Care should be taken so that objects do not fall and liquids are not spilled into the enclosure through openings.
- Damage Requiring Service - The appliance should be serviced by qualified service personnel when:
A. The power-supply cord or the plug has been damaged; or
B. Objects have fallen, or liquid has been spilled into the appliance; or
C. The appliance has been exposed to rain; or
D. The appliance does not appear to operate normally or exhibits a marked change in performance; or
E. The appliance has been dropped, or the enclosure damaged.
- Servicing - The user should not attempt to service the appliance beyond that described in the operating instructions. All other servicing should be referred to qualified service personnel.

NOTE ON USE / OBSERVATIONS RELATIVES A L'UTILISATION / NOTAS SOBRE EL USO
At the bottom of the player there are two red shipping screws for use when the player is transported. Before using the player, turn these screws counterclockwise and remove them.
If the shipping screws are still in place and the power is turned on, the disc tray will not open. If this happens, turn off the power, unplug the power cord from the power outlet and remove the shipping screws.
Retain these screws as they will be needed when the player is transported. Before transporting the player, take out the discs, close the disc tray, turn off the power after "0 00 00:00" is displayed and unplug the power cord from the power outlet. Then install the shipping screws by turning them clockwise. Be sure to fasten them securely.
ATTENTION:
Thank you for purchasing the DENON compact disc player. Read the Operating Instructions thoroughly, and operate this player properly.
TABLE OF CONTENTS
FEATURES 5
CAUTIONS DURING USE 5
NAMES OF PARTS AND THEIR FUNCTIONS 6,7
OPENING AND CLOSING THE DRAWER AND LOADING A DISC 8
CONNECTIONS 9
NORMAL PLAY 9
OTHER PLAY METHODS. 10-13
INSTALLATION PRECAUTIONS 14
PLAY USING THE REMOTE CONTROL UNIT 14, 15
COMPACT DISCS 16
TROUBLE? CHECK THE PLAYER TO FIND
WHAT'S WORNG 16
SPECIFICATIONS 16
In addition to the CD Player unit, please check to make sure the following items are included in the packing box.
(1) Operating Instructions 1
(2) Connection Cords 1
(3) Remote Control Unit RC-258 1
(4) R6P (AA size) Dry batteries 2
IMPORTANT
(CANADIAN MODEL ONLY)
This digital apparatus does not exceed the Class B limits for radio noise emissions from digital apparatus setout in the Radio Interference Regulations of the Canadian Department of Communication.
FEATURES
(1) HDCD (High Definition Compatible Digital) decoder (DCM-65)
HDCD is an encoding/decoding technology that greatly reduces the distortion occurring at the time of digital recording while maintaining compatibility with the conventional CD format. HDCD allows 20-bit data to be converted into the 16-bit data of current CDs with no loss in sound quality.
The use of this HDCD decoder makes it possible to achieve the high resolution and low distortion characteristic of HDCD when playing HDCD-compatible discs, and DENON's digital technology optimizes the high sound quality possibilities of HDCD technology. Furthermore, normal CDs and HDCD-compatible CDs are automatically identified, and the optimum digital signal processing for that type of disc used.
(2) High performance digital filter The DCM-65/35 uses high precision 8-times oversampling digital filters.
(3) Simple Playback of 8cm CD Singles
8cm CD singles can be played without using an adaptor.
(4) Programming of up to 32 tracks
All of the tracks on a CD can be programmed to play in any order. Programming in units of discs (all tracks on a disc) is also possible.
(5) Newly developed carousel-type changer mechanism included
This mechanism can house five discs, and while one disc is playing the remaining four discs can be changed. In addition, the carousel can be rotated either clockwise or counterclockwise, so searching between discs is fast.
(6) Wireless Remote Control Accessory
In addition to general operations such as Play, Stop and Pause, this remote control unit enables direct selection, direct programming, and other functions. Use of the remote control unit adds greatly to the operating ease of the DCM-65/35, enhancing its outstanding features.
CAUTIONS DURING USE
- This compact disc player is capable of playing discs which have the mark at right.
- During track selection, during search and when the player sustains a strong impact, the disc's rotational speed changes greatly, causing a small noise to be emitted. This is not a malfunction of the player.
- If the CD player is operated while an FM or AM broadcast is being received, there may be noise in the FM or AM reception. Please switch the power to the CD player off at such times.
- The DCM-65/35 has a broad dynamic range. Please exercise caution when turning up the volume on the amplifier in cases when the playback volume is low. If the volume is turned up too high, it could damage the speakers.
- Do not use any discs but exclusive audio discs with this CD player.

DIGITAL AUDIO
- Placing this player or its connection cords near a TV or other audio device could cause a humming sound to be emitted. If this occurs, relocate the player or reroute the connection cords.
- Be sure to remove the disc from the player before moving it. The disc could be damaged if left in the player while it is being moved.
- Do not place any object in the tray in the position where the disc is loaded, or open and close the tray with anything inside. Foreign objects in the tray could damage the play mechanism.
- Do not move the player from a cold place to a warm place suddenly. If the player is cold when brought into a warm room, condensation could form, preventing proper operation of the player. If condensation does form on the player when it is brought into a warm room, wait at least 30 minutes before use.
CAUTION:
- Always remove all discs from the trays when moving the set. Failure to do so may damage the set.
- When the power is turned off, the varied level will be cleared and be set to 0 dB.
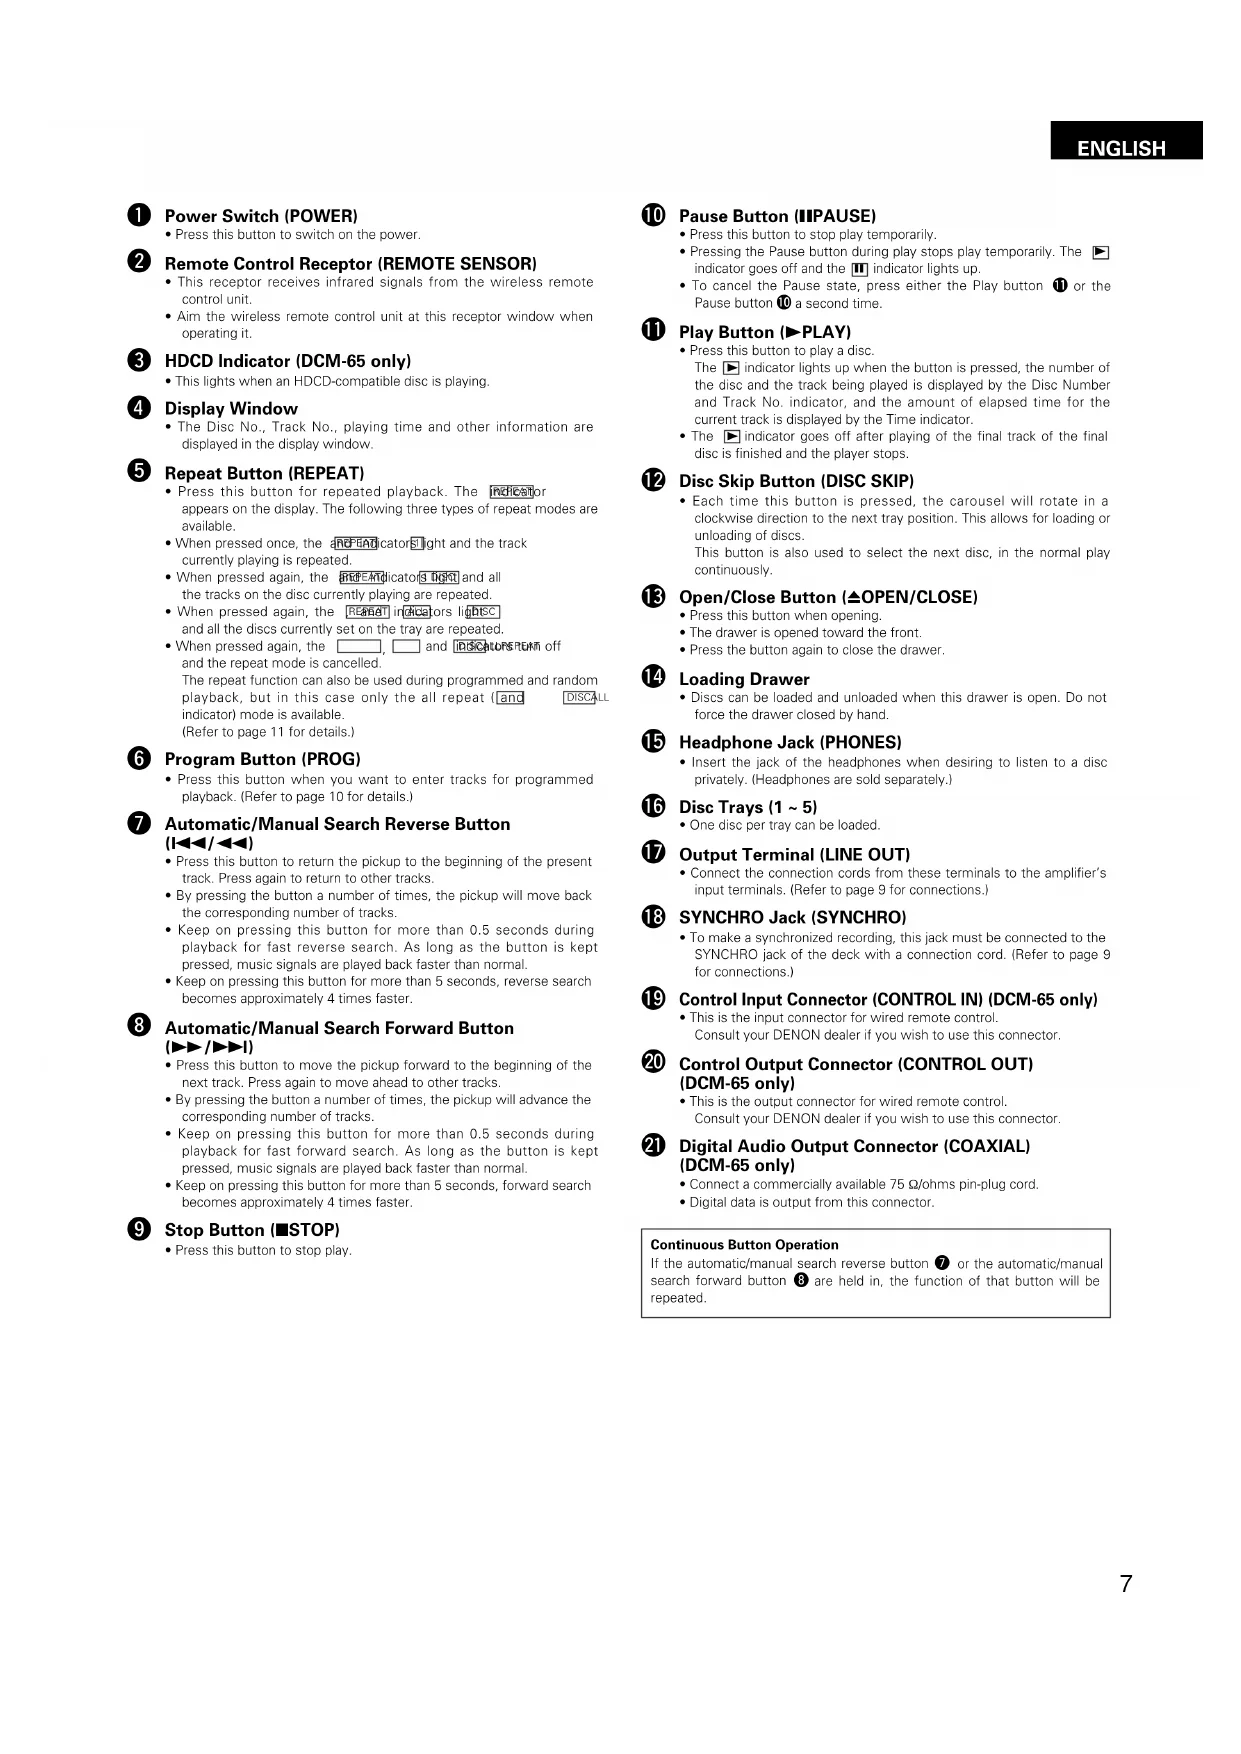
NAMES OF PARTS AND THEIR FUNCTIONS

FRONT PANEL
REAR PANEL

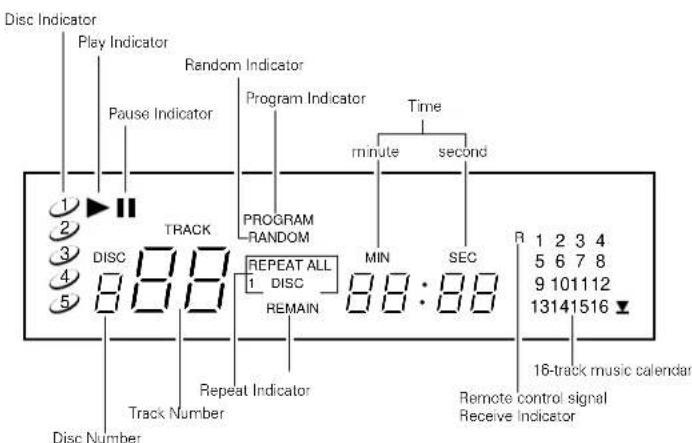
DISPLAY
Power Switch (POWER)
- Press this button to switch on the power.
Remote Control Receptor (REMOTE SENSOR)
- This receptor receives infrared signals from the wireless remote control unit.
- Aim the wireless remote control unit at this receptor window when operating it.
3 HDCD Indicator (DCM-65 only)
This lights when an HDCD-compatible disc is playing.
4 Display Window
- The Disc No., Track No., playing time and other information are displayed in the display window.
Repeat Button (REPEAT)
- Press this button for repeated playback. The PIRATE or appears on the display. The following three types of repeat modes are available.
- When pressed once, the dREFAcator light and the track currently playing is repeated.
- When pressed again, the And-Andicatodis liget and all the tracks on the disc currently playing are repeated.
- When pressed again, the REARAT in theators light and all the discs currently set on the tray are repeated.
- When pressed again, the , and indicators turn off and the repeat mode is cancelled. The repeat function can also be used during programmed and random playback, but in this case only the all repeat (and indicator) mode is available. (Refer to page 11 for details.)
Program Button (PROG)
- Press this button when you want to enter tracks for programmed playback. (Refer to page 10 for details.)
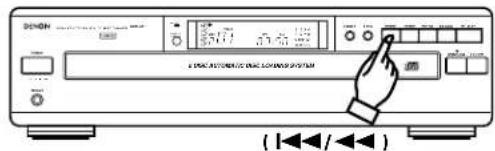
Automatic/Manual Search Reverse Button (I<1/<1>
- Press this button to return the pickup to the beginning of the present track. Press again to return to other tracks.
- By pressing the button a number of times, the pickup will move back the corresponding number of tracks.
- Keep on pressing this button for more than 0.5 seconds during playback for fast reverse search. As long as the button is kept pressed, music signals are played back faster than normal.
- Keep on pressing this button for more than 5 seconds, reverse search becomes approximately 4 times faster.
Automatic/Manual Search Forward Button ( / -1)
- Press this button to move the pickup forward to the beginning of the next track. Press again to move ahead to other tracks.
- By pressing the button a number of times, the pickup will advance the corresponding number of tracks.
- Keep on pressing this button for more than 0.5 seconds during playback for fast forward search. As long as the button is kept pressed, music signals are played back faster than normal.
- Keep on pressing this button for more than 5 seconds, forward search becomes approximately 4 times faster.
9 Stop Button (■STOP)
- Press this button to stop play.
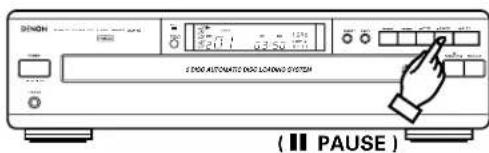
10 Pause Button (IIPAUSE)
- Press this button to stop play temporarily.
- Pressing the Pause button during play stops play temporarily. The indicator goes off and the indicator lights up.
- To cancel the Pause state, press either the Play button or the Pause button a second time.
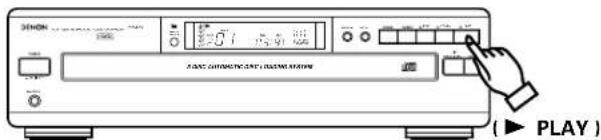
1 Play Button (▶PLAY)
- Press this button to play a disc.
The indicator lights up when the button is pressed, the number of the disc and the track being played is displayed by the Disc Number and Track No. indicator, and the amount of elapsed time for the current track is displayed by the Time indicator.
- The indicator goes off after playing of the final track of the final disc is finished and the player stops.
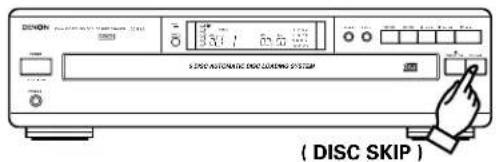
12 Disc Skip Button (DISC SKIP)
Each time this button is pressed, the carousel will rotate in a clockwise direction to the next tray position. This allows for loading or unloading of discs.
This button is also used to select the next disc, in the normal play continuously.
13 Open/Close Button (△OPEN/CLOSE)
- Press this button when opening.
The drawer is opened toward the front. - Press the button again to close the drawer.
14 Loading Printer
- Discs can be loaded and unloaded when this drawer is open. Do not force the drawer closed by hand.
15 Headphone Jack (PHONES)
- Insert the jack of the headphones when desiring to listen to a disc privately. (Headphones are sold separately.)
16 Disc Trays (1~5)
One disc per tray can be loaded.
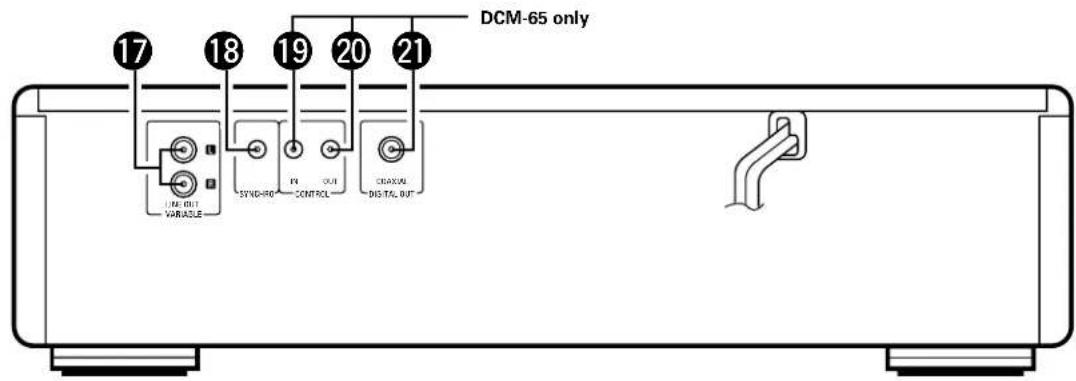
17 Output Terminal (LINE OUT)
- Connect the connection cords from these terminals to the amplifier's input terminals. (Refer to page 9 for connections.)
13 SYNCHRO Jack (SYNCHRO)
To make a synchronized recording, this jack must be connected to the SYNCHRO jack of the deck with a connection cord. (Refer to page 9 for connections.)
19 Control Input Connector (CONTROL IN) (DCM-65 only)
This is the input connector for wired remote control.
Consult your DENON dealer if you wish to use this connector.
2 Control Output Connector (CONTROL OUT) (DCM-65 only)
- This is the output connector for wired remote control.
Consult your DENON dealer if you wish to use this connector.
Digital Audio Output Connector (COAXIAL) (DCM-65 only)
- Connect a commercially available 75 Ω/ohms pin-plug cord.
Digital data is output from this connector.
Continuous Button Operation
If the automatic/manual search reverse button 7 or the automatic/manual search forward button 8 are held in, the function of that button will be repeated.
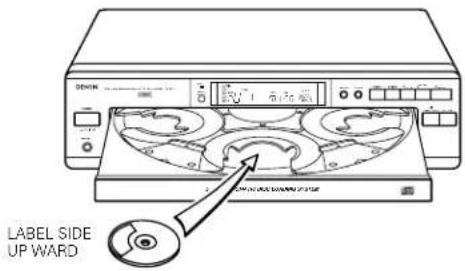
OPENING AND CLOSING THE DRAWER AND LOADING A DISC
Opening and closing the drawer (This operation only works while the power is on.)
- Press the power switch (POWER) to turn on the power.
- Press the open/close button ( OPEN/CLOSE).
How to load a disc
Make sure the drawer is completely open.
- Hold the disc by the edges and place it on the disc tray. (Do not touch the signal surface, i.e., the glossy side.)
- Set the disc properly in the tray according to its size.
Set 8 cm discs in the center hole.
Set 12 cm discs in the outer hole.
- When the drawer is opened during the stop mode, discs can be loaded in the 3 disc trays. If the DISC SKIP button is pressed, the carousel turns and a disc can be loaded in the another disc tray.
When the drawer is opened during the play mode, it is possible to load and unload discs in all of the disc trays other than the one whose disc is currently playing. 3 discs can be replaced and press the DISC SKIP button to switch the other disc tray that can be replaced.
- Press the open/close button ( OPEN/CLOSE) to close the drawer.
Caution:
The player will not operate properly and the disc may even be damaged if it is not set correctly.
- If your finger should get caught in the drawer when it closes, press the open/close button (▲OPEN/CLOSE).
- Do not place any foreign objects on the disc tray, and do not place more than one disc on the tray at a time. Otherwise malfunction may occur.
- Do not push in the disc tray manually when the power is off as this may cause malfunction and damage the CD player.
- Do not touch the carousel while it is turning. Also, do not turn the carousel by hand when it is stopped. Doing so could damage it.
- Do not insert disc where indicated by arrow. This could damage the internal mechanism in the unit.


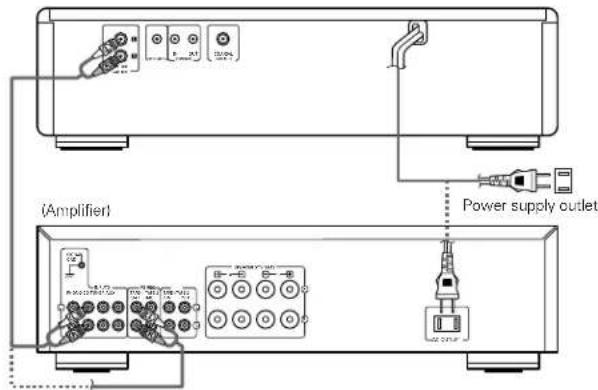
CONNECTIONS
(1) Connecting the Output Terminal
- Connect one end of the connection cord supplied with the CD Player to the output terminals, left (L) and right (R) of the CD Player, and the other end to the CD, AUX or TAPE PLAY input terminals, left (L) and right (R), of the amplifier.
DCM-65/35
(2) Connecting the Digital Output Jack (COAXIAL) (DCM-65 only)
- Use a 75 Ω/ohm pin cord to connect the digital output jack (COAXIAL) of the DCM-65 to the digital input jack (COAXIAL) on a digital processor or MD recorder, available in stores.

DCM-65/35
NORMAL PLAY
Follow the steps below to get an understanding of the disc play procedure.
(1) Starting Playback
-
Turn the power switch on and press the open/close (▲ OPEN/CLOSE) button to open the drawer.
-
Set the disc to be played in the front side tray.
- Press the play button (▶).
- The drawer closes and the disc just loaded is played.
- The disc number, track number and elapsed time, etc., for the disc currently playing appear on the display window.
- If the open/close (▲ OPEN/CLOSE) button is pressed while a disc is playing, playback continues, but the drawer opens and four discs can be replaced. The disc that can be replaced switches when the DISC SKIP button is pressed.
Press the open/close (OPEN/CLOSE) button again to close the drawer.
(3) SYNCHRO Jack Connections
- Connect the SYNCHRO jack with a DENON cassette deck which is equipped with a SYNCHRO jack, then make a synchronized recording. Use the connection cord supplied with the cassette deck.
- To make use of this function, also connect the output jacks and make the settings so that a recording can be made from the CD player to the cassette deck.

(2) Stopping Playback

- Press the stop button (STOP) to stop playback.
-
To replace discs, press the open/close ( OPEN/CLOSE) button. The disc which was playing switches over to the front side and the drawer opens.
-
Set the disc you want to played in the front side.

OTHER PLAY METHODS
In addition to normal play, the following methods can be used when playing a disc.
To Play the Desired Disc and Desired Track
Direct Selection
(Remote control only)

- Press the DISC SELECT button.
- Use the number buttons (1 to 5) to select the number of the disc to be played.
- Next, use the number buttons (1 to 10 and +10) to select the number of the track to be played.
For example, to play the 4th track on the 3rd disc: Press , To play the 12th track on the 5th disc: Press , Playback begins from the number of the disc and track selected.
To Move to the Next Disc During Playback
Disc Skip
- Press the disc skip button. The carousel in the drawer turns and the disc on the next tray is played. For example, if disc number 3 was playing, the disc switches to disc number 4, and if disc number 5 was playing, the disc switches to disc number 1.
- In addition, when the Disc Skip - button on the remote control unit is pressed, the carousel turns in the opposite direction and the previous disc is played.

To Move to the Next Track during Play
Automatic Search
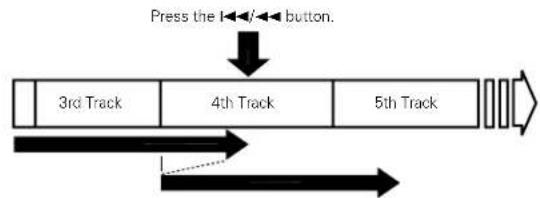
Press the Automatic/Manual search forward button (▶▶/▶) for less than 0.5 seconds during playback.
- The pickup will advance to the beginning of the next track and playback will continue. Pressing the button several times will forward the pickup the corresponding number tracks.

- During Random or Program operation, player moves to the beginning of the next random or program track selection.
To return to the beginning of the track now being played
Automatic Search
Press the Automatic/Manual search reverse button (I<)/I<) for less than 0.5 seconds during playback.
- The pickup will return to the beginning of the current track and playback will continue. Pressing the button several times will return the pickup the corresponding number tracks.
To Play the Desired Discs and the Desired Tracks in the Desired Order
Program Selection
- You can play certain tracks on the loaded discs in any order.
- Tracks on a disc not loaded can also be programmed, but if you try to play that disc, the microprocessor detects that it is not loaded and the following disc is played automatically.
- Up to 32 tracks can be set in a program.
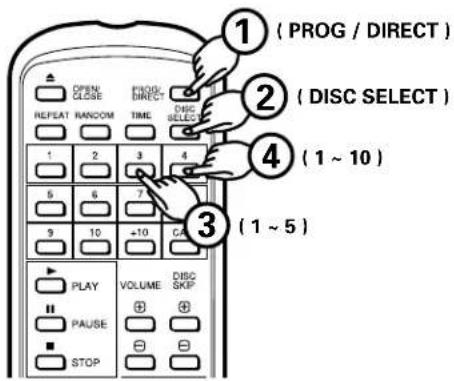
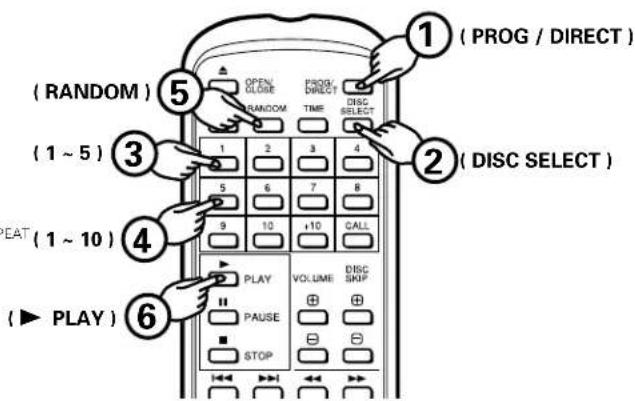
(1) Programming (when using the remote control unit)

(4) To Play a Program
Press the PROG/DIRECT button. The PROG/ direct lights. Use the DISC SELECT, number and +10 buttons to select the disc to be programmed. For example, to program the 3rd track on the 2nd disc and the 12 track on the 5th disc, press , , , , , .
- Press the Play (▶ PLAY) button to play the programmed selections in the order in which they were programmed.

(2) Programming (when using the buttons on the main unit)
- Pressing the PROG/DIRECT button once more erases the entire program. Pressing the open/close (▲ OPEN/CLOSE) button also erases the contents of a program.
- Pressing the PROG/DIRECT button while a program is being played cancels the program. Play will then be continuous to the end of the disc currently being played, after which the player will stop automatically.
Cautions
- Press the PROGRAM (PROG) button. Theashes. Use the DISC SKIP. Automatic/Manual search reverse (1 - 1 / - 1) Automatic/Manual search forward (1 - 1 / - 1) buttons to select the disc to be programmed. For example, to program the 3rd track on the 2nd disc and the 12 track on the 5th disc, press the PROGRAM (PROG) button, DISC SKIP button to select the 2nd disc, Automatic/Manual search reverse (1 - 1 / - 1) or Automatic/Manual search forward (1 - 1 / - 1) button to select the 3rd track, then press the PROGRAM (PROG) button. In the same way, select the 12th track on the 5th disc using the DISC SKIP and Automatic/Manual search buttons, then press the PROGRAM (PROG) button.

(3) To Check the Programmed Tracks (Remote control only)
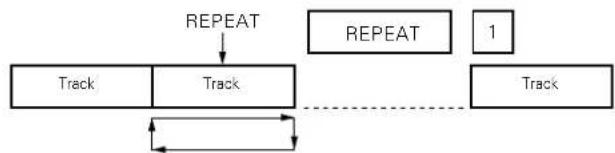
To Repeat Play of All Tracks. Repeat Play
- Press the Repeat (REPEAT) button. The REPEAT indicator will light up.
* Steps ① and ② can be done in any order, with the same results.
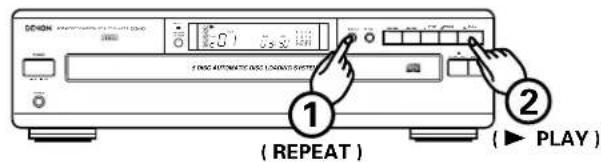
- When the repeat button is pressed once, the and indicators light. In this mode, the track currently playing is repeated.
- Press the call button on the wireless remote control unit. The contents of the program are displayed in order one item at a time each time the Call button is pressed.
If the repeat button is pressed again, the and indicators 1 DISCREPEAT light, and the disc currently playing is repeated.

If the repeat button is pressed again, the and indicators light, and all the discs currently loaded are repeated.
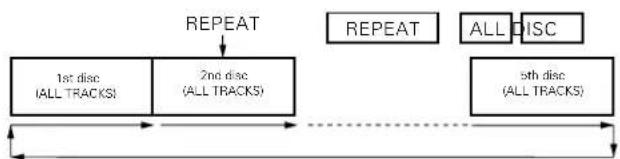
- Pressing the Repeat (REPEAT) button during play will also cause the player to repeat play (of all tracks).
To cancel repeat play, press the Repeat (REPEAT) button once more. - Pressing the Repeat (REPEAT) button while a program is being played will cause the tracks in the program to be played again in order.
- Pressing the Repeat (REPEAT) button during Random play will cause the tracks to be played again at random.
7 Letting the Player Select the Random Play Order of Play (Remote control only)
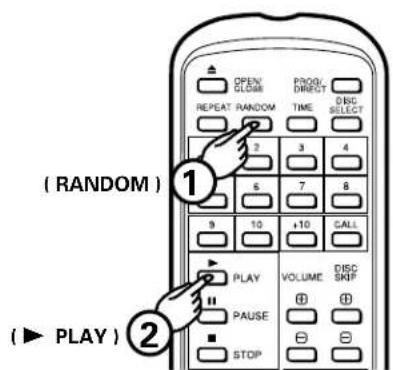
(1) Full Random Play
- Press the Random button, then press the Play button. The microcomputer will then start play of the tracks on the 5 discs at random.
(2) Program Random Play
- After pressing the PROG/DIRECT button and inputting a program (See item on page 10 and 11), press the Random button, then the Play button. The microcomputer will then select tracks from the program at random and play them.
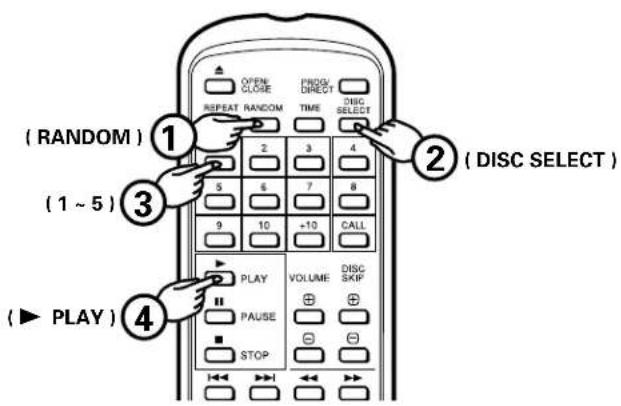
(3) Disc Sequential Random Play
- Press the RANDOM button and specify the disc numbers (1 to 5) with the DISC SELECT button and the number buttons. A press of the PLAY PLAY) button will result in the player randomly selecting and playing tracks on the disc in the order of specified discs.
Up to 5 discs can be selected, and the same disc can be selected, two or more times. Disc sequential random play is cancelled when play ends.
(4) To Cancel Random Play
- Pressing the Random button once more cancels the Random function. Play will then proceed from the track currently being played to the end of the last track on the disc, then stop. Pressing the open/close (▲ OPEN/CLOSE) button also cancels the Random function.
Cautions
- Pressing the Random button during normal play starts full random play.
- Pressing the Random button during Program play starts random play of the tracks in the program, including the tracks which have already been played.
- During random play, the player may display the number of disc which is not loaded in the tray. In such a case, the player will read the disc information, then reset automatically to correct. This is not a malfunction.
To Stop Play Temporarily
-
Pressing the Pause button during play stops play at that point.
Pressing the Pause button once more starts play again from the same point. -
Press the Pause ( PAUSE) button.
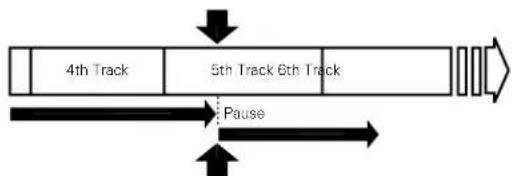
- Press the Play (▶ PLAY) button or the Pause (■ PAUSE) button to start play.
9 Audible quick search. Manual Search
- Using this function, you can cue to a desired point within a track, either in the forward or reverse direction.
- Release the Automatic/Manual search button (or or) when the desired point has been reached. Normal playback then continues.
(1) Manual Search Forward

- Keep on pressing the Automatic/Manual search forward button (▶▶▶) for more than 0.5 seconds during playback. Playback of the track is sped up.
- As a reference, the current track number and elapsed playback time within the track are displayed.
- Manual search forward is approximately 4 times faster when the Automatic/Manual search forward button (▶▶▶) is kept on pressing more than 5 seconds.
- If the Automatic/Manual search forward button (▶▶/▶) is kept pressed after the end of the final track on the disc is reached, (J) is displayed and manual search stops. To return to another point, press the Automatic/Manual search reverse button (▶▶) until (D) disappears.
- If the Automatic/Manual search forward button (▶/▶) is kept on pressing and the end of the current track is reached during random play or programmed play, the next track is searched and playback starts.
(2) Manual Search in Reverse

- Keep on pressing the Automatic/Manual search reverse button (▶/▶) for more than 0.5 seconds during playback. Reverse playback of the track is sped up.
- As a reference, the current track number and elapsed playback time within the track are displayed.
- Manual search in reverse is approximately 4 times faster when the Automatic/Manual search reverse button (▶▼) is kept on pressing more than 5 seconds.
- If the Automatic/Manual search reverse button (▶/▶) is kept pressed after the beginning of the first track on the disc is reached, (I) displayed and manual search stops. To return to another point, press the Automatic/Manual search forward button (▶/▶) until (I) disappears.
- If the Automatic/Manual search reverse button (▶/▶) is kept on pressing and the beginning of the current track is reached during random play or programmed play, the manual search in reverse is canceled and playback starts.
To Cue and Stop Play .
(Remote control only)
(1) Cuing by Direct Selection
- Cuing by direct selection, then entering the Pause state, is convenient for practicing vocals with background music.

- Press the Track Number buttons to set the number of the desired track.
- Press the Pause ( PAUSE) button.
To start play, press the Play (▶PLAY) button or the Pause (■ PAUSE) button.
(2) Cuing by Program Selection
- After setting the desired track selections in a program, press the Pause (PAUSE) button. The player will advance to the beginning of the 1st track in program memory and wait in the Pause state.
Synchronized Recording
Function
Synchronized Recording Function
Connecting the SYNCHRO jack with a DENON cassette deck which is equipped with a SYNCHRO jack will allow synchronized recordings to be made.
To use this function, be sure to connect the SYNCHRO jacks as well as the output terminal (LINE OUT). (Refer to page 9 for connections.) Then, load a disc.
- With the CD player in the stop or pause condition, starting a synchronized recording at the cassette deck side will automatically cause the CD player to start playing. (This is synchronized play.)
The remote control indicator of the display will blink during synchronized play.
NOTES:
- Synchronized play is also possible in the program mode.
The repeat mode are cancelled when synchronized play is started - Except for the Stop ( STOP), Play (▶ PLAY) and TIME buttons, the buttons will not operate during synchronized play.
- In the play condition, even if you start a synchronized recording at the cassette deck side, CD player will not synchronize with the cassette deck and the cassette deck becomes synchronized pause condition. In this case push the Stop (■ STOP) button of the cassette deck, set the CD player in the stop or pause condition and start a synchronized recording at the cassette deck side again.
- For further details, see the owner's manual for the cassette deck that has been connected.
INSTALLATION PRECAUTIONS
The CD player uses a microcomputer for controlling internal electronic circuits. In the event that the player is used while a near-by tuner or TV is turned on, although unlikely, interference could occur either in the sound from the tuner or the picture of the TV. To avoid this, please take the following precautions.
- Keep the CD player as far away from the tuner or TV set as possible.
- Keep the power cable and connecting cable of the CD player separate from the antenna wires of the tuner and TV.
Interference is particular likely to occur when an indoor antenna or a 300 Ω/ohms feeder cable is used. Thus, use of an outdoor antenna and 75 Ω/ohms coaxial cable is strongly recommended.
300 Johms feeder cable
75 Q/ohms coaxial cable
PLAY USING THE REMOTE CONTROL UNIT.
The DCM-65/35 CD Player can be controlled from across the room using the accessory Remote Control Unit.
(1) Inserting the Dry Battery
- Remove the cover on the back of the remote control unit.
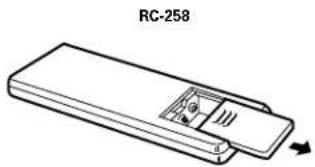
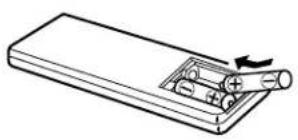
- Insert two R6P (AA size) batteries in the RC-258, following the indications on the battery compartment.
- Replace the cover on the back of the remote control unit.

Cautions Concerning Dry Batteries
-
Use R6P batteries in the RC-258 remote control unit.
-
Depending on the frequency of use, the dry batteries should be replaced approximately once per year.
-
If the remote control unit fails to control the CD Player, even before a year has passed, replace the dry batteries with new ones.
-
Be sure to follow polarity indications inside the case of the remote control unit, inserting the + end and - end of each battery in the directions indicated.
-
Batteries may become damaged or leak under the following conditions.
※ Using new batteries together with old ones.
※ Using different types of batteries together.
Do not short batteries, take them apart, subject them to heat or throw them into a fire.
- When the remote control unit is not used for a long period of time, remove the dry batteries.
- If fluid leaks from the batteries, be sure to wipe up all battery fluid inside the battery case and replace the batteries with new ones.
(2) Using the Remote Control Unit
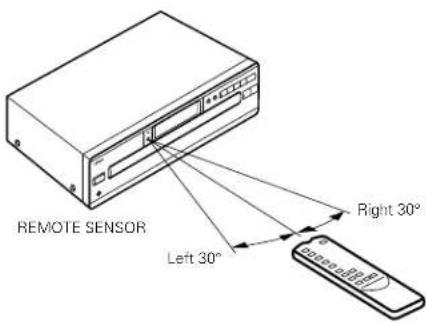
- Aim the remote control unit toward the light receptor in the front of the CD Player, as shown in the drawing below.
The remote control unit can be used up to a distance of 8 meters in a straight line from the CD Player. However, this distance will be shortened if there is some obstruction between the remote control unit and the light receptor, or if the beam of light is slanted.
- The remote control unit has the same functions as the main unit, but the following operations cannot be done.
Switching the power on and off.
Cautions During Use
- Do not press the operating buttons on the main unit and the remote control unit at the same time. This could cause a malfunction.
- Operation of the remote control unit will be hindered if a strong light from the sun or a light fixture is shining on the REMOTE SENSOR, or if there is an obstruction between the remote control unit and the CD player unit.
REMOTE CONTROL UNIT RC-258
Setting to the Program Mode
For program search, press the PROG/DIRECT button then the track number buttons (1 through 10 and +10).
The remote control unit is normally set to the direct mode.
Drawer Open / Close Button
OPEN / CLOSEI
Time Button (TIME)
Random Button (RANDOM)
Program/Direct Button (PROG/DIRECT)
Repeat Button (REPEAT)
Disc Select Button (DISC SELECT)
Track Number Button (1 - 10)
Call Button (CALL)
Play Button P PLAY
DiscSkip+Button(DISCSKIP+)
Pause Button PAUSEI
Volume + buttons (VOLUME+)
Stop Button STOPI
DiscSkip-Button(DISCSKIP-)
Automatic Search Forward Button
Manual Search Forward Button (▶)
Automatic Search Reverse Button
Use this to adjust the output level output of the VARIABLE.
The volume increases when the (+) button is pressed, decreases when the (-) button is pressed.
Disc Selection
Use the DISC SELECT and number buttons to select the number of the disc to be played.
"-" appears on the disc number section of the display for 2 seconds when the DISC SELECT button is pressed. Press the number button corresponding to the number of the disc to be played while "--" is displayed to select the disc number.
Track numbers are selected if the number buttons are pressed while - " is not displayed on the disc number section of the display.
- Direct Selection
Normally, direct search is possible simply by pressing the desired number buttons.
- Program Selection (During playback, the track which is currently playing is programmed as the 1st track.)
Press the PROG/DIRECT button, then press the number buttons.
For example, to program tracks number 3, 11, and 5, press PROG/DIRECT 3 +10 and 1 5.
To cancel the program, press the PROG/DIRECT button.
- Inputting the Track Numbers
For track numbers below 10, simply press the corresponding button. For track numbers of 11 and greater, press the +10 then the number buttons. For example, for track number 22 press +10 twice then 2.
Volume
The volume control on the unit will operate when the volume buttons are pressed. The volume can be checked by looking at the position of the control.
- Skipping Discs
The Disc Skip button (DISC SKIP +, -) will not function in the random and program modes.
During disc sequential random playback, when the Disc Skip + button is pressed, the following disc is played in random order.
Volume
The output level of the VARIABLE output terminal can be changed.
When the volume button is pressed, "-" appears in the TIME M (minutes) section of the display window and the level appears in the S (seconds) section. The volume can be charged between a maximum of "00" and a minimum of "-12" in 12 steps, by approximately 1.5 dB per step.
The Time indicator indicates the amount of elapsed time for the track currently being played, the amount of time remaining for the current track and the amount of time remaining for all tracks yet to be played.
Normally, the amount of elapsed time for the current track is displayed. Pressing this button once causes the REMAIN indicator to light up, displaying the amount of time remaining for the current track. Pressing the button once more turns the indicator off and causes the indicator to light up, displaying the number and the time remaining for all tracks yet to be played on the disc. Pressing the button once again turns the REMAIN indicator off and causes the indicator to display the elapsed time for the current track.
During playback, the total remaining time is the remaining time for the disc. For programmed playback, the remaining time for the program is only displayed when the programmed tracks are all on the same disc.
"---" is displayed when tracks on more than one disc are programmed.
In the case that the total playing time of programmed tracks becomes more than 99:59, - - - is displayed.
COMPACT DISCS
1. Cautions in Handling Compact Discs
- Do not get fingerprints, oil, dirt or other substances on the compact disc. If the disc becomes dirty, wipe it off with a dry, soft cloth.
- Do not clean compact discs with benzene, paint thinner, water, record spray, anti-static agent, silicon cloth or similar substances.
- Take particular care to prevent scratches to the back side of the compact disc when removing it from the case and when inserting it in its case.
- Do not bend compact discs.
- Do not apply to compact discs.
- Do not attempt to enlarge the center hole of the disc.
- Do not write on the label (printed) side of the disc with a ball point pen or pencil.
- Bringing a CD into a warm room from a cold place could cause moisture to condense on the disc surface. Do not attempt to dry the disc with a hair dryer, etc.
2. Storage of Compact Discs
After play, be sure to remove the disc from the player.
- To prevent dust, scratches, deformation, etc., be sure to store compact discs in their case.
- Do not store compact discs in the following locations.
1. Places where direct sunlight strikes for long periods of time.
2. Places with a high humidity or a lot of dust.
3. Places reached by heat from a heater or similar appliance.
TROUBLE? CHECK THE PLAYER TO FIND WHAT'S WRONG
Even when it appears that there is trouble, check the following points carefully.
The drawer won't open/close when the Open/Close button (△ OPEN/CLOSE) is pressed.
Is the Power switch on?
After a disc is loaded (00000_M00_S) is displayed in the display window.
Is the disc loaded correctly?
See page 8, 9, 16.
Play does not begin when the Play button (▶ PLAY) is pressed.
Is the disc dirty or scratched?
See page 16.
There is no sound, or the sound is distorted.
Is the output cord connected correctly
to the amplifier? See page 8.
- Does the sound return to normal when the
amplifier's knobs are adjusted or the proper
input device is selected?
The player won't go to the place specified in the search.
Is the disc dirty or scratched? ..See page 16.
A program cannot be played.
Is the method used to make a program and
run it correct? .See page 10.
The player won't operate correctly when the remote control unit is used.
- Are the dry batteries in the
See page 14.
Is the remote control unit located too far
from the CD Player unit? . See page 14.
SPECIFICATIONS
AUDIO
DCM-65
Number of Channels: 2 Channels
Frequency Characteristics: 2 20,000Hz
Dynamic Range: 100 dB 98 dB
SN Ratio: 112 dB 108 dB
High Frequency Distortion: 0.0025% (1kHz) 0.003%
Separation: 98 dB 96 dB
Wow and Flutter: Less than the measuring
(±0.001% W. peak)
Output Voltage: Variable 0.2 ~ 2.0 V
DISC USED Audio compact discs are used
12 cm (5 in) and 8 cm (3 in)
OVERALL
Power Supply:
60 Hz
Voltage is shown on rating label
Power Consumption: 15 W
External Dimensions:
434(W)×115(H)×392(D) mm
(17-3/32" x 4-17/32" x 15-7/16")
5.7 kg (12.6 lbs.) 5.7 kg (12.6 lbs)
FUNCTIONS AND DISPLAY
Functions:
Five discs can be used,
Direct Track Selection,
Program Selection,
Random Play, etc.
Displays:
Disc No., Track No.,
Time (min., sec.)
Play, Pause, Repeat, Random, etc.
Headphone Jack (Level Variable)
Other:
REMOTE CONTROL UNIT RC-258
Remote Control Method:
Power Supply:
External Dimensions:
Infrared Pulse system
3 V DC Two R6P (standard SIZE AA)
50(W)×175(H)×18(D)mm
(1-31/32"×6-57/64"×45/64")
Weight:
100g (approx. 3 oz)
(Includes batteries)
HDCD and High Definition Compatible Digital are registered trademarks of Pacific Microsonics, Inc.
- Design and specifications are subject to change without notice in the course of product improvement.
TO PREVENT ELECTRIC SHOCK DO NOT USE THIS (POLARIZED) PLUG WITH AN EXTENSION CORD, RECEPTACLE OR OTHER OUTLET UNLESS THE BLADES CAN BE FULLY INSERTED TO PREVENT BLADE EXPOSURE.
POUR LES MODELES AMERICAINS ET CANADIENS UNIQUEMENT
ATTENTION
POUR PREVENIR LES CHOCSELECTRIQUES NE PAS UTILISER CETTE FICHE POLARISEE AVEC UN PROLONGATEUR UNE PRISE DE COURANT OU UNE AUTRE SORTIE DE COURANT, SAUF SI LES LAMES PEUVENT ETRE INSEREES A FOND SANS EN LAISSER AUCUNE PARTIE A DECOUVERT.
PRECAUTIONS A PRENDRE PENDANT L'UTILISATION
(17-3/32" x 4-17/32" x 15-7/16")
Poids: 5,7 kg (12,6 lbs.) 5,7 kg (12,6 lbs)
FONCTIONS ET AFFICHAGES
Fonctions:
lecture, pause, repetition,
(Includes batteries)
(17-3/32" x 4-17/32" x 15-7/16")
Peso: 5,7 kg (12,6 lbs.) 5,7 kg (12,6 lbs)
FUNCIONES E INDICACION
Funciones:
Se peuté emplear cinco discos,