
RCD-M40 - Cd player/recorder DENON - Free user manual and instructions
Find the device manual for free RCD-M40 DENON in PDF.


| Product Type | CD Player/Recorder |
| Brand | Denon |
| Model | RCD-M40 |
| Dimensions (W x H x D) | Approx. 280 x 105 x 310 mm |
| Weight | Approx. 4.0 kg |
| Power Supply | AC 230 V, 50/60 Hz |
| Power Consumption | 30 W (standby <0.5 W) |
| Playback Formats | CD, CD-R, CD-RW, MP3 (CD-ROM) |
| Recording Media | CD-R, CD-RW |
| Recording Functions | CD to CD dubbing, timer recording, programmable track selection |
| Audio Output | Line out (RCA), Headphone jack (3.5 mm) |
| Audio Input | Line in (RCA), Microphone input (6.3 mm) |
| Digital Output | Optical |
| Remote Control | Included (RC-1197) |
| Display | Multi-function fluorescent display |
| Cleaning | Use a soft, dry cloth; avoid solvents |
| Safety | Do not expose to moisture; use only specified power source |
| Repairability | Contact authorized service center; laser diode replacement possible |
| Spare Parts | Available through Denon service network |
| Manual Language | EN (English) |
| Pages | 84 |
Frequently Asked Questions - RCD-M40 DENON
User questions about RCD-M40 DENON
0 question about this device. Answer the ones you know or ask your own.
Ask a new question about this device
Download the instructions for your Cd player/recorder in PDF format for free! Find your manual RCD-M40 - DENON and take your electronic device back in hand. On this page are published all the documents necessary for the use of your device. RCD-M40 by DENON.
USER MANUAL RCD-M40 DENON
Contents Connections Playback Settings Tips Appendix
DENON®
RCD-M40 / RCD-M40DAB
CD RECEIVER
Owner's Manual
You can print more than one page of a PDF onto a single sheet of paper.
Front panel D
y Rear panel
Remote
Index

Contents Connections Playback Settings Tips Appendix
Accessories 5
Inserting the batteries 6
Operating range of the remote control unit 6
Features 7
Part names and functions 8
Front panel 8
Display 10
Rear panel 11
Remote control unit 13
Connections
Speaker connection 17
Connecting the speaker cables 17
Connecting the subwoofer 18
Connecting speakers 18
Connecting an analog device 19
Connecting a digital device 19
Connecting an iPod or USB memory device to the USB port 20
Connecting a DAB/FM antenna 22
Connecting the power cord 24
Playback
Basic operation 26
Turning the power on 26
Selecting the input source 26
Adjusting the volume 27
Turning off the sound temporarily 27
Playing CDs 28
Playing CDs 28
Playing tracks in a specific order (Program playback) 29
Playing DATA CDs 30
Playing files 31
Listening to DAB/FM broadcasts 32
Listening to DAB/FM broadcasts 32
Automatically presetting FM stations (Auto Preset) 33
Presetting FM stations manually 34
Listening to preset stations 34
Setting the preset channels and changing the received frequency
on the main unit 35
RDS search 35
PTY search 36
TP search 37
Radio Text 38
CT (Clock Time) 38
Listening to DAB/DAB+ (for RCD-M40DAB only) 39
Front panel D
y Rear panel
2
Remote
Index

Contents Connections Playback Settings Tips Appendix
Playing an iPod 42
Listening to music on an iPod 43
Setting operation mode ("On-Display" mode) 44
Charging the iPod/iPhone 45
Playing a USB memory device 46
Playing files stored on USB memory devices 47
Listening to DIGITAL IN 48
Listening to ANALOG IN 48
Convenience functions 49
Adjusting the tone 50
Sleep timer function 51
Checking the current time 51
Switching the display's brightness 52
Settings
Menu map 53
Menu operation 54
CLOCK SETUP 55
ALARM SETUP 55
ALARM ON/OFF 56
CD AUTO PLAY 57
SPK OPTIMISE 57
H/P AMP GAIN 57
AUTO STANDBY 58
CLOCK MODE 58
Front panel D
y Rear panel
3
Remote
Index

Contents Connections Playback Settings Tips Appendix
Tips
| Tips | 60 |
| Troubleshooting | 61 |
| Resetting factory settings | 70 |
Appendix
| Playing back DATA CDs | 71 |
| Playing back USB memory devices | 72 |
| About Discs | 73 |
| Last function memory | 75 |
| Explanation of terms | 76 |
| Trademark information | 78 |
| Specifications | 79 |
| Index | 82 |
Front panel D
y Rear panel
4
Remote
Index

Contents Connections Playback Settings Tips Appendix
Thank you for purchasing this Denon product.
To ensure proper operation, please read this owner's manual carefully before using the product.
After reading this manual, be sure to keep it for future reference.
Accessories
Check that the following parts are supplied with the product.
 Quick Start Guide CD-ROM Quick Start Guide CD-ROM | 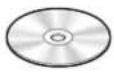 (Owner's Manual) (Owner's Manual) |  Safety Instructions Power cord(for continental model only) Safety Instructions Power cord(for continental model only) |  | 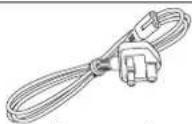 Power cord(for RCD-M40DAB only) Power cord(for RCD-M40DAB only) |
 FM indoor antenna(for continental model only) FM indoor antenna(for continental model only) | 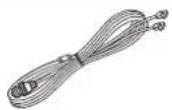 FM/DAB indoor antenna(for RCD-M40DAB only) FM/DAB indoor antenna(for RCD-M40DAB only) | 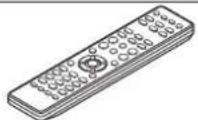 Remote control unit(RC-1204) Remote control unit(RC-1204) |  R03/AAA batteries R03/AAA batteries |
Front panel D
y Rear panel
5
Remote
Index

Inserting the batteries
① Remove the rear lid in the direction of the arrow and remove it.

natural_image
Diagram of a mechanical device with a rotating arrow indicating rotation (no text or symbols)② Insert two batteries correctly into the battery compartment as indicated.
R03/AAA batteries

natural_image
Technical line drawing of a battery pack with two terminals and internal components (no text or symbols)③ Put the rear cover back on.
NOTE
• To prevent damage or leakage of battery fluid:
- Do not use a new battery together with an old one.
- Do not use two different types of batteries.
- If the battery fluid should leak, carefully wipe the fluid off the inside of the battery compartment and insert new batteries.
Operating range of the remote control unit
Point the remote control unit at the remote sensor when operating it.

Front panel D
y Rear panel
6
Remote
Index

Contents
Connections Playback Settings Tips Appendix
Features
• High quality amplifier stressing sound quality
Equipped with a 30 W + 30 W (6 Ω/Ohms) high-quality amplifier circuits.
- Direct Play for iPod® and iPhone® via USB
Music data from an iPod can be played back if you connect the USB cable supplied with the iPod via the USB port of this unit, and also an iPod can be controlled with the Remote control unit for this unit.
• Weight and Dramatic sound
The board and circuit configuration has been redesigned to achieve lower impedance. Since stable current is supplied to the power amp and other sections, it is possible to realize as much as 30 watts of power.
- Simple & Straight circuit design for sound purity and free of coloration
Denon's popular M series gives you high sound quality based on the simple & straight concept. Circuitry is uncomplicated, signal paths are short, and all adverse influences on sound quality have been minimized. This unit also provides the Auto standby mode, where it goes into the standby state when there is no operation for 15 minutes.
- Playback of a variety of formats stored on a USB device
Supports playback of USB memory devices on which MP3, WMA, FLAC or MPEG-4 AAC files are recorded. The unit's display can display the title of the track and the name of the artist of the current track. - Low standby power consumption
Designed with the environment in mind, the unit consumes just 0.3W while in standby mode. - Remote control unit
This unit is shipped with a remote control unit that has large buttons for frequently used functions, allowing you to quickly find the desired function.
• High quality headphone Amp with Amp gain control
This unit is equipped with a high-quality headphone amplifier on which the gain can be adjusted. A variety of headphones are supported.
• 2 digital (optical) inputs for TV or digital gear
You can connect audio from a TV or a media player digitally to enjoy impressive, high-quality sound.
Front panel D
y Rear panel
7
Remote
Index

Contents
Connections Playback Settings Tips Appendix
Part names and functions
Front panel

Front panel D
Rear panel
8
Remote
Index

Contents
Connections Playback Settings Tips Appendix
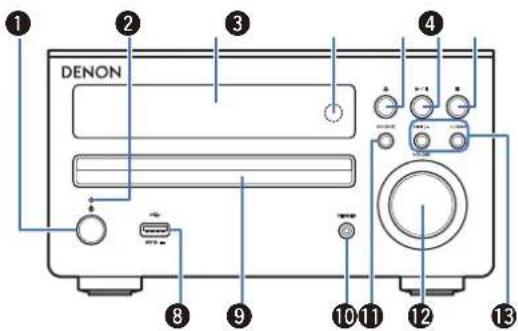
① Power operation button (⏻)
Turns power to this unit on and off (standby).

- When CLOCK MODE is turned on, this button switches between normal mode and Clock mode. (17 p. 58)
② Power indicator
The power indicator changes as shown below according to the status of the unit.
• Power on : Green
- Normal Standby : Off
- iPod charge standby: Red (p. 45)
• Alarm standby: Orange (p. 55)
③ Display
Various information is displayed here.
4 Remote control sensor
This receives signals from the remote control unit. (p. 6)
⑤ Disc tray open/close button (▲)
Used to open/close the disc tray.
⑥ Play/Pause button (▶/III)
⑦ Stop button (■) (for continental model only)
Band/Stop button (■) (for RCD-M40DAB model only)
⑧ USB port
Used to connect iPod or USB memory devices. (p. 20)
9 Disc tray
Tray used to insert a compact disc.
⑩ Headphones jack (PHONES)
When the headphones are plugged into this jack, audio will no longer be output from the connected speakers.
NOTE
To prevent hearing loss, do not raise the volume level excessively when using headphones.
⑪ SOURCE button
These select the input source.
⑫ VOLUME knob
This adjusts the volume level.
13 Reverse-skip/Forward-skip buttons
Preset/Tuning buttons (I◄◄/−, +/►►►)
Front panel D
y Rear panel
9
Remote
Index

Contents Connections Playback Settings Tips Appendix
Display

flowchart
graph TD
    A["▶"] --> B["SDB"]
    B --> C["TUNED"]
    C --> D["AUTO"]
    D --> E["MONO"]
    E --> F["TOTAL"]
    F --> G["RANDOM"]
    G --> H["1 FLD ALL"]
    H --> I["SLEEP"]
    I --> J["Sleep"]
    style A fill:#f9f,stroke:#333
    style J fill:#bbf,stroke:#333
① Playback mode indicators
▶: During Playback
■: During pause
② Tone indicators
SDB: Lights when the super dynamic bass function is set to "ON".
TONE: Lights when the tone (BASS/TREBLE) is being adjusted.
③ Tuner reception mode indicators
4 TOTAL indicator
Lights when the total number of tracks and total time of the CD are displayed.
⑤ Play mode indicator
⑥ Timer operation indicator
⑦ Information display
Various information is displayed here.
⑧ Remote control signal reception indicator
Lights when a signal is received from the remote control.
Front panel D
y Rear panel
10
Remote
Index

Contents
Connections Playback Settings Tips Appendix
Rear panel

Front panel D
Rear panel
11
Remote
Index

Contents
Connections Playback Settings Tips Appendix
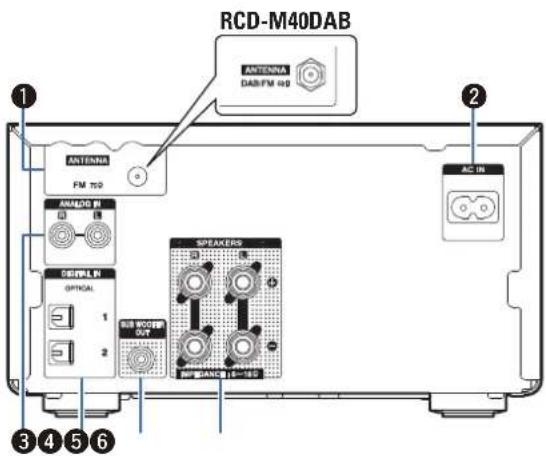
① FM antenna terminal (ANTENNA) (for continental model only)
DAB/FM antenna terminal (ANTENNA) (for RCD-M40DAB only)
Used to connect FM antenna or DAB/FM antenna. (12 p. 22)
② AC inlet (AC IN)
Used to connect the supplied power cord. (12p. 24)
③ Analog audio connectors (ANALOG IN)
Used to connect devices equipped with analog audio connectors.
(17 p. 19)
4 Digital audio connector (DIGITAL IN)
Used to connect devices equipped with digital audio connectors.
(17 p. 19)
⑤ Subwoofer connector (SUBWOOFER OUT)
Used to connect a subwoofer with a built-in amplifier. (p. 18)
⑥ Speaker terminals (SPEAKERS)
Used to connect speakers. (1 p. 17)
Front panel D
Rear panel
12
Remote
Index

Contents
Connections Playback Settings Tips Appendix
Remote control unit

① POWER button (⏻)
This turns the power on/standby. (ircuit p. 26)
② DIMMER button
Adjust the display brightness of this unit. (1 p. 52)
③ CLOCK button
The current time appear on the unit. (p. 51)
④ SLEEP button
This sets the sleep timer. (p. 51)
⑤ Input source select buttons
These select the input source. (p. 26)
⑥ System buttons
These perform playback related operations.
- Reverse-skip / Forward-skip buttons (I◀◀, ▶▶▶▶)
- Play/pause button (▶/II)
- Fast-reverse / Fast-forward buttons (◀◀, ▶▶)
- Stop button (■)
Tuning buttons (TUNE +, -)
These operate the tuner. (p. 32)
Front panel D
Rear panel
13
Remote
Index


⑦ Signal transmitter
This transmits signals from the remote control unit. (p. 6)
⑧ CHANNEL buttons (+, -)
This switches between PRESET channels.
9 FOLDER/ALL button
This switches the playback range on a USB device or data CD.
⑩ MUTE button (✗)
This mutes the output audio. (p. 27)
⑪ ENTER button
This determines the selection.
⑫ Cursor buttons (△▽◀▷)
These select items.
⑬ DAB/RDS button
This configures the DAB/RDS setting.
14 Number buttons (0 - 9, +10)
These enter letters or numbers into the unit.
Front panel D
Rear panel
14
Remote
Index

Contents
Connections Playback Settings Tips Appendix

15 RANDOM button
Switches the random playback.
⑯ REPEAT button
Switches to the repeat playback.
⑰ SDB/TONE button
Adjusting the tone.
⑱ VOLUME buttons (▲▼)
These adjust the volume level.
⑲ Information button (INFO)
This switches display items such as the elapsed time, album name and title name in the playback screen.
20 SETUP button
The setting menu is displayed on the display.
② CLEAR button
This cancels the settings.
22 MODE button
This switches the operation mode for the iPod.
23 PROGRAM button
This sets program playback.
Front panel D
Rear panel
15
Remote
Index

Contents
Connections
ettings Tips Appendix
Contents
Speaker connection 17
Connecting an analog device 19
Connecting a digital device 19
Connecting an iPod or USB memory device to the USB port 20
Connecting a DAB/FM antenna 22
Connecting the power cord 24
NOTE
- Do not plug in the power cord until all connections have been completed.
- Do not bundle power cords with connection cables. Doing so can result in noise.
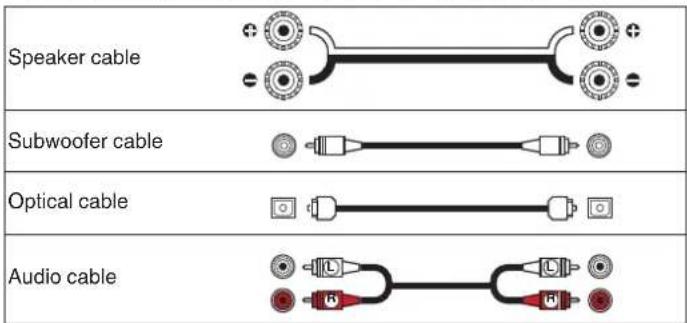
■ Cables used for connections
Provide necessary cables according to the devices you want to connect.
Front panel D
Rear panel
16
Remote
Index

Contents
Connections
Byback Settings Tips Appendix
Speaker connection
Here we connect the speakers in the room to this unit.
This section explains how to connect them using typical examples.
NOTE
- Disconnect this unit's power plug from the power outlet before connecting the speakers. Also, turn off the subwoofer.
- Connect so that the speaker cable core wires do not protrude from the speaker terminal. The protection circuit may be activated if the core wires touch the rear panel or if the + and - sides touch each other. ("Protection circuit" (p. 77))
- Never touch the speaker terminals while the power cord is connected. Doing so could result in electric shock.
- Use speakers with an impedance of 6 – 16 Ω/ohms.
Connecting the speaker cables
Carefully check the left (L) and right (R) channels and + and – polarities on the speakers being connected to this unit, and be sure to connect the channels and polarities correctly.
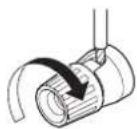
1 Peel off about 10 mm of sheathing from the tip of the speaker cable, then twist the core wire tightly.

2 Turn the speaker terminal counterclockwise to loosen it.

3 Insert the speaker cable's core wire to the hilt into the speaker terminal.

4 Turn the speaker terminal clockwise to tighten it.
Front panel D
Rear panel
17
Remote
Index

Contents
Connections
yback Settings Tips Appendix
Connecting the subwoofer
Use a subwoofer cable to connect the subwoofer.

Connecting speakers
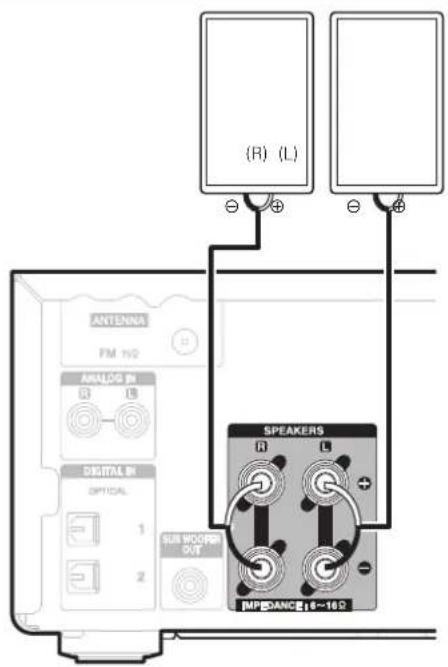
Front panel D
Rear panel
18
Remote
Index

Contents
Connections
yback Settings Tips Appendix
Connecting an analog device
You can connect this unit to various devices with analog audio output.
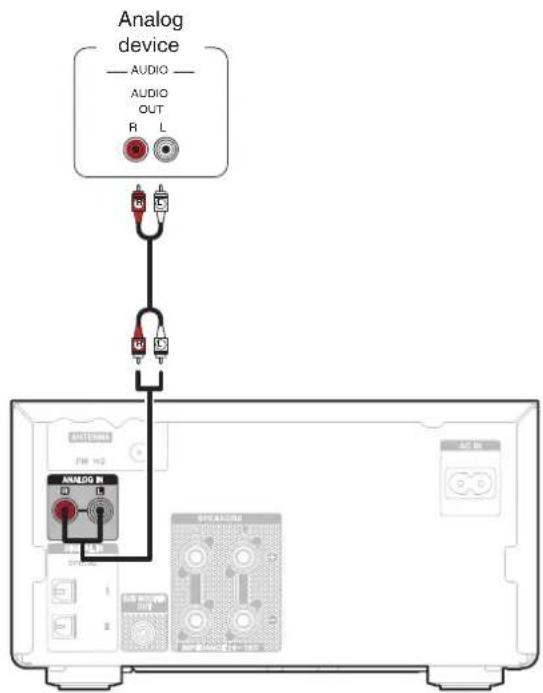
Front panel D
Rear panel
19
Remote
Index

Connecting a digital device
You can connect this unit to devices with digital audio output (TV, digital gear, etc.).

Contents
ctions
ettings Tips Appendix
Connecting an iPod or USB memory device to the USB port
• To connect an iPod/iPhone to this unit, use the USB adapter cable that was supplied with the iPod/iPhone.
- For operating instructions, see "Playing an iPod" (p. 42) or "Playing files stored on USB memory devices" (p. 47).
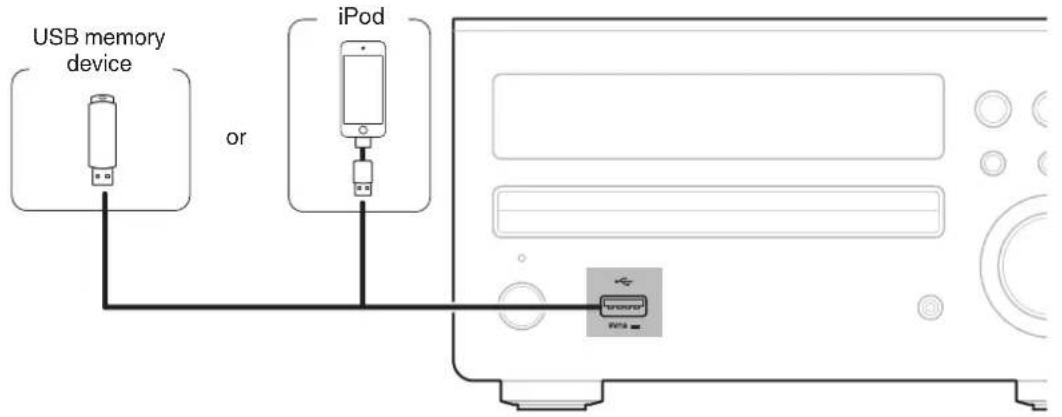

- Denon does not guarantee that all USB memory devices will operate or receive power. When using a portable USB hard disk drive (HDD) which came with an AC adapter, use that device's supplied AC adapter.
NOTE
• USB memory devices will not work via a USB hub.
- It is not possible to use this unit by connecting the unit's USB port to a PC via a USB cable.
- Do not use an extension cable when connecting a USB memory device. This may cause radio interference with other devices.
Front panel D
Rear panel
20
Remote
Index

Contents
Connections
ayback Settings Tips Appendix
Supported iPod/iPhone models
- iPod classic

iPod classic 80GB

iPod classic 160GB (2007)

iPod classic 160GB (2009)
- iPod nano

iPod nano 3rd generation (video) 4GB 8GB

iPod nano
4th generation (video)
8GB 16GB

iPod nano
5th generation (video camera)
8GB 16GB

iPod nano
6th generation
8GB 16GB

iPod nano
7th generation
16GB
- iPod touch

iPod touch 4th generation 8GB 16GB 32GB 64GB

iPod touch
5th generation
16GB 32GB 64GB
- iPhone

iPhone 3GS 8GB 16GB 32GB

iPhone 4
8GB 16GB 32GB

iPhone 4S
16GB 32GB 64GB

iPhone 5
iPhone 5c iPhone 5s
16GB 32GB 64GB

iPhone 6
16GB 64GB 128GB

iPhone 6 Plus
16GB 64GB 128GB
Front panel D
Rear panel
21
Remote
Index

Contents
Connections
ayback Settings Tips Appendix
Connecting a DAB/FM antenna
After connecting the antenna and receiving a broadcast signal, fix the antenna with tape in a position where the noise level becomes minimal. "Listening to DAB/FM broadcasts" (p. 32)

(for continental model only)

(for RCD-M40DAB only)
Front panel D
Rear panel
22
Remote
Index

Contents
ctions
ettings Tips Appendix
NOTE
- For best results with the supplied indoor antenna, orient the antenna along a wall such that it is stretched out horizontally and parallel to the floor (but above the floor), and then fasten the two end tabs to the wall. This type of antenna is directional and best results will be obtained when it is correctly oriented toward the transmitting location.
- For example, if the transmission tower is to the north, then the two ends of the antenna (with the tabs) should be stretched toward west and east.
- Do not connect two FM antennas simultaneously.
- If you are unable to receive a good broadcast signal, we recommend installing an outdoor antenna. For details, inquire at the retail store where you purchased the unit.
Front panel D
Rear panel
23
Remote
Index

Contents
Connections
Byback Settings Tips Appendix
Connecting the power cord
After completing all the connections, insert the power plug into the power outlet.

To household power outlet (AC 230 V, 50/60 Hz)
(for continental model only)

To household power outlet (AC 230 V, 50/60 Hz)
(for RCD-M40DAB only)
Front panel D
Rear panel
24
Remote
Index

Contents Connections
Setti
Playback
Contents
Basic operation
Turning the power on 26
Selecting the input source 26
Adjusting the volume 27
Turning off the sound temporarily 27
Playback a device
Playing CDs 28
Playing DATA CDs 30
Listening to DAB/FM broadcasts 32
Playing an iPod 42
Playing a USB memory device 46
Listening to DIGITAL IN 48
Listening to ANALOG IN 48
Other functions
Convenience functions 49
Front panel
Display
Rear panel
25
Remote
Index

Contents Connections
Setti
ngs Tips Appendix
Basic operation

Turning the power on
1 Press POWER ⏻ to turn on power to the unit.

- You can also switch the power to standby by pressing ⏻ on the main unit.
Selecting the input source
1 Press the input source select button to be played back. The desired input source can be selected directly.

- You can also select the input source by pressing SOURCE on the main unit.
- Press the TUNER button again while the source is set to Tuner to switch the (FM-DAB) band. (RCD-M40DAB only)
Front panel D
Rear panel
26
Remote
Index

Contents Connections
Setti
Adjusting the volume
1 Use VOLUME ▲▼ to adjust the volume.
The volume level is displayed.

- You can also adjust the volume this by turning VOLUME on the main unit.
Turning off the sound temporarily
1 Press MUTE 📄X.
"MUTE ON" is displayed.

- To cancel mute, either adjust the sound volume or press MUTE 📁X again.
Front panel D
Rear panel
27
Remote
Index

Contents
Connections
back
Appendix
Playing CDs

Playing CDs
1 Press CD to switch the input source to "DISC".
2 Insert a disc. (p. 73)
Playback starts.
- Press ▲ on the main unit to open/close the disc tray.
NOTE
- Do not place any foreign objects in the disc tray. Doing so could result in damage. - Do not push the disc tray in by hand when the power is turned off. Doing so could result in damage.
Front panel D
Rear panel
28
Remote
Index

Contents Connections
Setti
ngs Tips Appendix
Operation buttons Function
| ▶/II | Playback / Pause |
| ■ | Stop |
| |◀◀▶▶| | Skip to previous track / Skip to next track |
| ◀◀▶▶ | (Press and hold)Fast-reverse / Fast-forward |
| 0 – 9, +10 Select the track | |
| RANDOM | Random playback• Can be set during stop. |
| REPEAT | Repeat playback• Switching between Single-track repeat and All-track repeat. |
INFO Switching the elapsed time display.
Playing tracks in a specific order (Program playback)
1 In the stop mode, press PROGRAM. "PGM" is displayed.
2 Use 0 - 9, +10 to select the tracks.
[Example]
To program tracks 3, 12, 7 to play in that order: Press PROGRAM, 3, +10, 2, 7.
3 Press ▶/II.

- The program is cleared when the disc tray is opened or the power is turned off.
- In the stop mode, press CLEAR, the last track programmed is cleared. Press ▶▶▶I to select the track you want to delete.
- In the stop mode, press PROGRAM, clear the all programmed track.
- Up to 25 tracks can be programmed.
- When RANDOM is pressed during program playback, the programmed tracks are played in random order.
- When REPEAT is pressed during program playback, the tracks are played repeatedly in the programmed order.
Front panel D
y Rear panel
29
Remote
Index

Contents Connections
Setti
ngs Tips Appendix
Playing DATA CDs
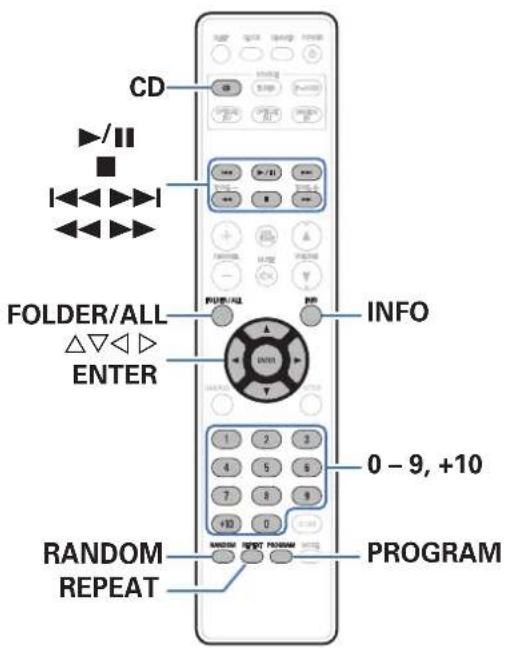
- This section explains how to playback MP3 and WMA files that are recorded onto a CD-R or CD-RW.
- There are many music distribution sites on the Internet allowing you to download music files in MP3 or WMA (Windows Media® Audio) format. The music (files) downloaded from such sites can be stored on CD-R or CD-RW discs and played on this unit.
"Windows Media" and "Windows" are the trademarks or registered trademarks of "Microsoft Corporation" in the United States and other countries.
Front panel D
y Rear panel
30
Remote
Index

Contents
Connections
back
Appendix
Playing files
1 Press CD to switch the input source to "DISC".
2 Load a CD-R or CD-RW containing music files in the MP3 or WMA format into the disc tray. (p. 73)
Playback starts.
| Operation buttons Function | |
| ▶/II | Playback / Pause |
| ■ | Stop |
| |◀◀▶▶| | Skip to previous track / Skip to next track |
| ◀◀▶▶ | (Press and hold) Fast-reverse / Fast-forward |
| △ ▽ | Folder select |
| ◀▷ | File select |
| 0 – 9, +10 Select the track | |
| FOLDER/ALL | Switch playback mode• Switching between playing back all files within the selected folder or all tracks on the disc. |
| RANDOM | Random playback• Can be set during stop. |
| REPEAT | Repeat playback• Switching between Single-track repeat and All-track repeat. |
| INFO | Switching the File name, Title name/Artist name and Title name/Album name. |
| ENTER Enter the selected item | |
■ Files that can be played back
See "Playing back DATA CDs" (p. 71).
Front panel D
Rear panel
31
Remote
Index

Contents
Connections
back
Appendix
Listening to DAB/FM broadcasts

For details about how to connect the antenna, see "Connecting a DAB/FM antenna" (1 p. 22).
Listening to DAB/FM broadcasts
1 Press TUNER to select the reception band.
| DAB: | When listening to a DAB broadcast.*RCD-M40DAB only |
| FM AUTO: When listening to an FM broadcast. | |
| FM MONO: | If the signal is weak and stable stereo reception is not possible, select “FM MONO” to receive in monaural. |
- When "FM AUTO" is selected: "AUTO" is displayed.
- When the reception band mode is set to "FM AUTO", the "ST" indicator lights when a stereo broadcast is tuned in.
2 Press TUNE + or TUNE – to select the station you want listen to.
When a station is received, the "TUNED" indication will light.
- When "FM AUTO" is selected: Automatically search for and tune to a receivable radio station.
- When "FM MONO" is selected: Manually change the frequency one step at a time each time the button is pressed.
Front panel D
Rear panel
32
Remote
Index

Contents
Connections
back
Appendix
Automatically presetting FM stations (Auto Preset)
This unit can be preset with a total of 40 FM broadcast stations.
1 Press SETUP during FM reception.
2 Use △▽ to select "TUNER SETUP", then press ENTER.
3 Use to select “FM AUTO PRESET”, then press ENTER.
4 Press ENTER while "PRESS ENTER" is flashing.
Broadcast stations are preset automatically.

• To stop auto tuning, press ■.
- Broadcast stations whose antenna signals are weak cannot be preset automatically. If you wish to preset such stations, tune them in manually.
NOTE
When FM auto preset is performed, the channel currently registered as the FM preset is deleted, and the newly preset FM broadcast station is registered to the same number as the deleted channel.
■ Giving station names to preset channels
Names of up to 8 characters can be input.
1 Tune in the preset channel you want to name.
2 Press ENTER twice.
The display switches to the station name input display.
3 Input the station name.
Names of up to 8 characters can be input.
| Δ∇: | Selects the character. |
| ◀▷: | Moves the cursor to the right. |
| CLEAR : Deletes the currently selected character. | |
• Characters that can be input.
$$ [ A \sim Z, 0 \sim 9, ^ {\wedge^ {\prime}} () z +, -. / = (\text { space }) ] $$
4 Press ENTER.
The characters you have input are entered.
- To give names to other stations, repeat steps 1 to 4.
Front panel D
y Rear panel
33
Remote
Index

Contents Connections
Setti
ngs Tips Appendix
Presetting FM stations manually
1 Tune in the station you want to preset.
2 Press ENTER.
The minimum number display "P--" for the unregistered preset flashes.
3 Use 0 - 9, +10 or CHANNEL -, + to select the number to be preset, then press ENTER.
The reception frequency and reception mode are preset and the display switches to the station name input display.
NOTE
- When the registered preset number is selected, "A" is displayed. To overwrite this preset number, press ENTER.
4 Input the station name.
Names of up to 8 characters can be input.
| Δ∇: | Selects the character. |
| ◀▷: | Moves the cursor to the right. |
| CLEAR: | Deletes the currently selected character. |
• Characters that can be input.
[A\~Z, 0\~9,^'( )z+,-./=(space)]
Listening to preset stations
1 Use 0 - 9, +10 or CHANNEL -, + to select the preset number.
Front panel D
y Rear panel
34
Remote
Index

Setting the preset channels and changing the received frequency on the main unit
|◀◀/−, +/▶▶| on the main unit can be used both for switching the preset channel and for tuning.
Before operating them, switch the main unit to the "PRESET MODE" or "TUNING MODE" using the procedure below.
1 Press SETUP.
2 Use to select “TUNER SETUP”, then press ENTER.
3 Use to select “MODE SELECT”, then press ENTER.
4 Use to select “PRESET MODE” or “TUNING MODE”, then press ENTER.
| PRESET MODE: | Press I /-, +/ I on the main unit to switch preset channels. This is the same operation as CHANNEL -, + on the remote control unit. |
| TUNING MODE: | Press I /-, +/ I on the main unit to changethe received frequency. This is the same operation as TUNE -, + on the remote control unit. |
RDS search
RDS is a broadcasting service which allows a station to send additional information along with the regular radio program signal.
Use this function to automatically tune to FM stations that provide the RDS service.
Note that the RDS function only works when receiving RDS compatible stations.
1 Press TUNER to select "FM".
2 Press DAB/RDS.
3 Use △▽ to select "RDS SEARCH", then press ENTER.
4 Press ◀ ▷.
Automatically begin the RDS search operation.
- If no RDS station is found, "NO STATION" is displayed.
Front panel D
Rear panel
Remote
Index

Contents Connections
Setti
ngs Tips Appendix
■ Viewing information during reception
Press INFO while receiving a RDS to display the information currently being broadcast.
Freq. Frequency
PS Program service name
PTY Program type
CT Clock time
RT Radio text
PTY search
Use this function to find RDS stations broadcasting a designated program type (PTY).
PTY identifies the type of RDS program.
The program types and their displays are as follows:
| NEWS | News | WEATHER | Weather |
| AFFAIRS | Current Affairs | FINANCE | Finance |
| INFO | Information | CHILDREN | Children's program |
| SPORT | Sports | SOCIAL | Social Affairs |
| EDUCATE | Education | RELIGION | Religion |
| DRAMA | Drama | PHONE IN | Phone In |
| CULTURE | Culture | TRAVEL | Travel |
| SCIENCE | Science | LEISURE | Leisure |
| VARIED | Varied | JAZZ | Jazz Music |
| POP M | Pop Music | COUNTRY | Country Music |
| ROCK M | Rock Music | NATION M | National Music |
| EASY M | Easy Listening Music | OLDIES | Oldies Music |
| LIGHT M | Light Classical | FOLK M | Folk Music |
| CLASSICS | Serious Classical | DOCUMENT | Documentary |
Front panel D
Rear panel
36
Remote
Index

Contents Connections
Setti
Use this function to find RDS stations broadcasting a designated program type (PTY).
For a description of each program type, refer to "Program Type (PTY)".
1 Press TUNER to select "FM".
2 Press DAB/RDS.
3 Use to select “PTY SEARCH”, then press ENTER.
4 Use to call out the desired program type.
5 Press ◀ ▷.
Automatically begin the PTY search operation.
- If no program of the specified type is found, "NO STATION" is displayed.
TP search
TP identifies programs that carry traffic announcements.
This allows you to easily find out the latest traffic conditions in your area before leaving home.
Use this function to find RDS stations broadcasting traffic programs (TP stations).
1 Press TUNER to select "FM".
2 Press DAB/RDS.
3 Use to select "TP SEARCH", then press ENTER.
4 Press ◀ ▷.
Automatically begin the TP search operation.
- "NO STATION" is displayed when there is no traffic information broadcast station.
Front panel D
y Rear panel
37
Remote
Index

Contents Connections
Setti
ngs Tips Appendix
Radio Text
RT allows RDS stations to send text messages that appear on the display.

- When the RT mode is turned on while an RDS broadcast station not offering an RT service is tuned in, "NO RT" is displayed on the display.
- The operations described below selecting "RDS SEARCH" will not function in areas in which there are no RDS broadcasts.
- The RT mode cannot be set in the FM stations not offering RDS broadcasts.
CT (Clock Time)
Use this to correct the time of the clock on this unit.
1 During CT reception, press SETUP.
The "AUTO Adj mm:ss" is displayed.
2 Press ENTER to set.
The "RDS mm:ss" is displayed.
- The time on the set's internal clock is updated to the currently displayed "CT" time.
NOTE
- Do not operate any buttons while the time is being updated. If buttons are operated, CT reception is not possible and the time is not updated.
Front panel D
Rear panel
38
Remote
Index

Listening to DAB/DAB+ (for RCD-M40DAB only)
☐ About DAB (Digital Audio Broadcasting)
- Since the DAB system is broadcasted in digital format, DAB system can supply crystal-clear audio and stable reception even in mobile objects. DAB is a new generation radio which can provide data service and supplementary multi-media services.
- DAB broadcasts multiple services under one Ensemble that are called service components.
• Each component contains inherent programmes; news, music, sports, and many more. - Each Ensemble and service component has its label, and users can recognize a current broadcasting station and service contents by using the label.
- The main service component is broadcast as Primary while the others are broadcast as Secondary.
- Also rich character information is serviced through Dynamic Labels; song title, artist composer etc.
About DAB+
- The main difference between DAB and DAB+ is the type of audio codec used.
DAB: MPEG2
DAB+: MAEG4 (AAC) - This unit can receive both DAB and DAB+ broadcasts.
■ Tuning in DAB stations
1 Press TUNER to select "DAB".
- When a DAB operation is performed for the first time after purchase, auto scanning is performed automatically.
2 Press TUNE +, - to select the desired broadcast station.
- The broadcast stations are displayed in the order in which they were scanned.
NOTE
DAB stations can be stored in the preset memory and played in the same way as FM stations.
- "Presetting FM stations manually" (1 p. 34)
• "Listening to preset stations" (1 p. 34) - A maximum of 30 DAB broadcast stations can be preset.
Front panel D
y Rear panel
39
Remote
Index

Contents Connections
Setti
ngs Tips Appendix
■ Auto scanning broadcast stations
Connect the antenna beforehand.
1 Press SETUP during DAB reception.
2 Use to select “TUNER SETUP”, then press ENTER.
3 Use to select “DAB AUTO SCAN”, then press ENTER.
4 Press ENTER.
This unit searches for receivable DAB stations.
■ Switching the reception information for the currently tuned in DAB station
1 Press INFO during DAB reception.
| Dynamic Label Segment: | Text data included in the broadcast is scrolled. |
| Station Name: The service station name is displayed. | |
| Program Type: | The category of the tuned in station is displayed. |
| Ensemble Name: The ensemble name is displayed. | |
| Frequency: The frequency is displayed. | |
| Signal Quality: | The reception signal intensity is displayed (0 to 8).If the reception signal intensity is 5 or greater, the program can be received without noise. |
| Audio Information: | The mode of the currently tuned in station and its bit rate are displayed. |
Front panel D
y Rear panel
40
Remote
Index

Contents Connections
Setti
ngs Tips Appendix
■ Making the DAB settings
1 Press DAB/RDS during DAB reception.
2 Use to select “item”, then press ENTER.
| TUNING AID: | The reception intensity of the currently tuned in frequency is displayed. Use this if your preferred station cannot be received.1 Use the ◀ and ▷ buttons to select a frequency to tune into. It takes around 4-5 seconds to correctly display the reception intensity (→l) after selecting a frequency.2 If necessary, adjust the position of the antenna so that the reception intensity (→l) passes to the right of the ■ mark.The station can now be received.3 Press the ENTER button to select the station and exit TUNING AID. |
| STATION ORDER: | The service list is created with the auto scan function.MULTIPLEX: In order of frequencyALPHANUMERIC: In alphabetical order |
| DRC (Dynamic Range Control): | Off / 1/2 / 1 |
| DAB VERSION: The DAB module’s version is displayed. | |
Front panel D
y Rear panel
41
Remote
Index

■ DAB initialize
When the "DAB Initialize" procedure is performed, all the preset memory settings for the stations and DABs are reset.
1 Press SETUP during DAB reception.
2 Use to select “TUNER SETUP”, then press ENTER.
3 Use to select “DAB INITIALIZE”, then press ENTER.
4 Press ENTER.
- Once initialization is completed, auto scanning is performed automatically.
Contents Connections
Setti
ngs Tips Appendix
Playing an iPod

- You can use the USB cable provided with the iPod to connect the iPod with the unit's USB port and enjoy music stored on the iPod.
- For information on the iPod models that can be played back with this unit, see "Supported iPod/iPhone models" (p. 21).
Front panel D
Rear panel
42
Remote
Index

Contents
Connections
back
Appendix
Listening to music on an iPod
1 Connect the iPod to the USB port. (p. 20)
When you connect iPod to the USB port, the input source automatically switches to "iPod/USB".
2 Press iPod/USB to switch the input source to "iPod/USB".
"From iPod" is displayed on the display of this unit.
3 Operate iPod itself directly while seeing the iPod screen to play back music.

- The iPod display modes include "From iPod" and "On-Display". By default, "From iPod", where you directly operate the iPod itself while looking at the iPod screen, is set.
- To change to "On-Display" where operations are performed while the iPod information is displayed on this unit, see "Setting operation mode ("On-Display" mode)" (tT p. 44).
NOTE
- Depending on the type of iPod and the software version, some functions may not operate.
- Note that Denon will accept no responsibility whatsoever for any problems arising with the data on an iPod when using this unit in conjunction with the iPod.
Front panel D
Rear panel
43
Remote
Index

Contents
Connections
back
Appendix
Setting operation mode ("On-Display" mode)
In this mode, various lists and screens during playback on the iPod are displayed on the body.
This section describes the steps up to playing back tracks on the iPod in "On-Display".
1 Press MODE and display "On-Display".
2 Use to select the file to be played, then press ENTER.
Playback starts.
| Display mode From iPod On-Display | |||
| Playable files | Music file | √ | √ |
| Video file | * | ||
| Active buttons | Remote control unit (This unit) | √ | √ |
| iPod | √ | ||
* Only the sound is played.
| Operation buttons Function | |
| ▶/II | Playback / Pause |
| ■ | Stop |
| |◀◀▶▶| | Skip to previous track / Skip to next track |
| ◀◀▶▶ | (Press and hold)Fast-reverse / Fast-forward |
| RANDOM Random playback | |
| REPEAT | Repeat playback• Switching between Single-track repeat and All-track repeat. |
| MODE | Switching between On-Display or From iPod mode |
| △ ∇ ◀ ▷ | Select the item |
| ENTER Enter the selected item | |
| INFO | Switching the Title name/Artist name and Title name/Album name. |
NOTE
- Denon will accept no responsibility whatsoever for any loss of iPod data.
- Depending on the type of iPod and the software version, some functions may not operate.
Front panel D
y Rear panel
44
Remote
Index

Contents Connections
Setti
ngs Tips Appendix
Charging the iPod/iPhone
You can charge your iPod/iPhone by connecting it to USB port.
■ Standby charging
If the unit enters power standby mode while the iPod/iPhone is charging, the unit will switch to standby charging mode, and the iPod/iPhone will continue to be charged. When in standby charging mode, the power indicator lights turns red.
When the iPod/iPhone is fully charged, the unit automatically stops supplying power for charging and enters normal power standby mode, and the power indicator lights turns off.
Front panel D
y Rear panel
45
Remote
Index

Contents Connections
Setti
ngs Tips Appendix
Playing a USB memory device

- Playing back music files stored on a USB memory device.
- Only USB memory devices conforming to mass storage class and MTP (Media Transfer Protocol) standards can be played on this unit.
- This unit is compatible with USB memory devices in "FAT16" or "FAT32" format.
• This unit can play back the following files.
• MP3
• WMA
• FLAC
• WAV
- MPEG-4 AAC
Front panel D
Rear panel
46
Remote
Index

Contents
Connections
back
Appendix
Playing files stored on USB memory devices
1 Connect the USB memory device to the USB port. (p. 20)
When you connect USB memory device to the USB port, the input source automatically switches to "iPod/USB".
2 Use to select the file to be played, then press ENTER.
Playback starts.
| Operation buttons Function | |
| ▶/II | Playback / Pause |
| ■ | Stop |
| |◀◀▶▶| | Skip to previous track / Skip to next track |
| ◀◀▶▶ | (Press and hold)Fast-reverse / Fast-forward |
| RANDOM | Random playback• Can be set during stop. |
| REPEAT | Repeat playback• Switching between Single-track repeat and All-track repeat. |
| △ ∇ ◀ ▷ | Select the item |
| ENTER Enter the selected item | |
| INFO | Switching the File name, Title name/Artist name and Title name/Album name.While a WAV file is being played back, only the file name is displayed. |
NOTE
- Note that Denon will accept no responsibility whatsoever for any problems arising with the data on a USB memory device when using this unit in conjunction with the USB memory device.
■ Files that can be played back
See "Playing back USB memory devices" (p. 72).
Front panel D
y Rear panel
47
Remote
Index

Contents Connections
Setti
OPTICAL IN1 OPTICAL IN2

Listening to DIGITAL IN
1 Prepare for playback.
Check the connection, then turn on this units.
2 Press "OPTICAL IN1" or "OPTICAL IN2" to select DIGITAL IN.
3 Play the component connected to this unit.

- Only 2-channel linear PCM digital audio signals can be inputted through the DIGITAL IN connector of this unit.
Listening to ANALOG IN
1 Prepare for playback.
Check the connection, then turn on this units.
2 Press ANALOG IN to select "ANALOG IN".
3 Play the component connected to this unit.
Front panel D
Rear panel
48
Remote
Index

Contents Connections
Setti
ngs Tips Appendix
Convenience functions

Adjusting the tone 50
Sleep timer function 51
Checking the current time 51
Switching the display's brightness 52
Front panel D
Rear panel
49
Remote
Index

Contents Connections
Setti
ngs Tips Appendix
Adjusting the tone
1 Press SDB/TONE to select the tone parameter to be adjusted.
2 Use ◀ to adjust the "SDB", "BASS", "TREBLE", "BALANCE" or "S.DIRECT".
□ SDB (Super Dynamic Bass)
Emphasizes the bass sound when the Super Dynamic Bass (SDB) function is set to ON (maximum +8 dB).
ON / OFF (Default: OFF)
□ Bass
Adjusts the bass sound.
-10dB - +10dB (Default : 0dB)
Treble
Adjusts the treble sound.
-10dB - +10dB (Default : 0dB)
Balance
Use ◀▷ to adjust the left/right volume balance.
S.DIRECT (Source Direct)
The tone is not adjusted.
ON / OFF (Default: OFF)
Front panel D
y Rear panel
50
Remote
Index

Sleep timer function
You can have the power automatically switched to standby once a set time has elapsed. This is convenient for listening while going to sleep.
1 Press SLEEP during playback and select the setting time.
- The "SLEEP" indicator on the display lights.
- You can set the sleep timer in the range from 10 to 90 minutes in steps of 10 minutes.
■ To cancel the sleep timer
Press SLEEP to set "SLEEP OFF".
The "SLEEP" indicator on the display turns off.

- The sleep timer setting is canceled when the unit switches to standby mode.
- To check the time remaining until the sleep timer is activated, press SLEEP.
Checking the current time
- Checking the current time when the power is on
Press CLOCK.
- Press once more and the display returns to its original condition.
- Checking the current time when the power is set to standby
Press CLOCK.
- The current time is displayed for 10 seconds.

- The time cannot be set when in the standby mode. Turn on the power first.
Front panel D
y Rear panel
51
Remote
Index

Contents Connections
Setti
ngs Tips Appendix
Switching the display's brightness
1 Press DIMMER.
- The brightness of the display switches each time the button is pressed (4 levels).

- If the buttons are operated when the display is turned off, information is displayed temporarily at a low brightness level.
Front panel D
y Rear panel
52
Remote
Index

| Contents | Connections | Playback | Settings | Tips | Appendix |
Menu map
For menu operations, see the following page.
By default, this unit has recommended settings defined. You can customize this unit based on your existing system and your preferences.
| Setting items Description Page | ||
| CLOCK SETUP Sets the current time. 55 | — | |
| ALARM SETUP Sets the timer playback. 55 | — | |
| ALARM ON/OFF Set the alarm to on or off. 56 | — | |
| TUNER SETUP The following items are displayed when TUNER SETUP is selected. – | ||
| FM AUTO PRESET Automatically presets FM channels. 33 | — | |
| MODE SELECT Select the Tuner operation to assign to the button. 35 | — | |
| DAB AUTO SCAN This unit searches for receivable DAB stations.*RCD-M40DAB only. | 40 | |
| DAB INITIALIZE All the preset memory settings for the DAB stations are reset.*RCD-M40DAB only. | 41 | |
| CD AUTO PLAY Set whether or not to automatically play a disc when the disc is inserted. | 57 | |
| SPK OPTIMISE Sets the optimum playback properties of the speakers SC-M40, sold separately. | 57 | |
| H/P AMP GAIN | Set the gain of the headphone amplifier. | 57 |
| AUTO STANDBY | Sets the unit power to standby when the unit is not in use. | 58 |
| CLOCK MODE | The clock is constantly displayed. | 58 |
Front panel
Display Real
el
53
Remote
Index

Contents Connections Playback
Tips Appendix

Menu operation
1 Press SETUP.
The menu is displayed on the display.
2 Use to select the menu to be set or operated, then press ENTER.
3 Use to change to desired setting.
4 Press ENTER to enter the setting.
- Exiting the Menu, press SETUP while the menu is displayed. The display returns to the normal display.
Front panel D
Rear panel
54
Remote
Index

Contents
Connections Playback
Tips Appendix
CLOCK SETUP
1 Use to set the “hours”.
2 Press ENTER.
The "minutes" display flashes.
3 Use to set the “minutes”.
4 Press ENTER.
The current time is set, and the normal display reappears.
☐ Checking the current time when the power is on
Press CLOCK.
Press once more and the display returns to its original condition.
☐ Checking the current time when the power is set to standby
Press CLOCK.
The current time is displayed for 10 seconds.

- The time cannot be set when in the standby mode. Turn on the power first.
ALARM SETUP
① MODE SELECT
Use to select the alarm mode, then press ENTER.
| ONCE ALARM: | Playback starts and stops (the power turns off) once only at the set times. |
| EVERYDAY ALARM: | Playback starts and stops (the power turns off) at the set times each day. |
② SOURCE SELECT
Use to select the source, then press ENTER.
DISC / iPod/USB / TUNER / ANALOG IN / OPTICAL IN 1 / OPTICAL IN 2

- If you have selected TUNER in "SOURCE SELECT", select the Preset Number. - When no name has been registered for the selected preset number, the frequency appears after the preset number is displayed.
③ START TIME
Use to select “hours” for the alarm start time, then press ENTER. Use to select “minutes” for the alarm start time, then press ENTER.
Front panel D
Rear panel
55
Remote
Index

Contents Connections Playback
Tips Appendix
④ STOP TIME
Use to select “hours” for the alarm stop time, then press ENTER. Use to select “minutes” for the alarm stop time, then press ENTER.
⑤ ALARM ON/OFF
Use ◀▷ to select "ON" or "OFF" for the alarm, then press ENTER.

- The Ⓛ indicator lights and the alarm setting is entered.
- The alarm settings are displayed for 3 seconds.
⑥ Press POWER ⏻ to set the power to standby.
Alarm standby mode is set, and the power indicator lights orange.
ALARM ON/OFF
1 Use to select "ONCE" or "EVERYDAY".
2 Use ◀▷ to select "ON" or "OFF" for the alarm, then press ENTER. The alarm settings are displayed after this.
- When set to "OFF", time operation is disabled, but the alarm settings remain unchanged.
Front panel D
y Rear panel
56
Remote
Index

Contents Connections Playback
Tips Appendix
CD AUTO PLAY
When the CD tray is closed, the unit can detect the DISC, automatically switch the input source to DISC and start playback of the disc.
ON
Performs automatic playback.
(Default):
OFF: Does not perform automatic playback.
SPK OPTIMISE
An optimizing filter suited for the properties of the speakers (SC-M40) can be used.
ON
The response is optimized for the speakers (SC-M40, sold separately).
(Default):
OFF: The response is flat.
H/P AMP GAIN
Set the gain of the headphone amplifier. Set this according to the impedance of the connected headphones. It is recommended that this is set on the "Low" side if the headphones have low impedance and on the "High" side if they have high impedance.
| LOW(Default): | Set the gain of the headphone amplifier to “Low”. |
| MID: | Set the gain of the headphone amplifier to “Mid”. |
| HIGH: | Set the gain of the headphone amplifier to “High”. |

- The headphone volume varies depending on the "H/P AMP GAIN" setting. Decrease the volume or mute the audio first if changing this setting while listening to audio.
Front panel D
y Rear panel
57
Remote
Index

Contents Connections Playback
Tips Appendix
AUTO STANDBY
When there is no input signal and operation for 15 minutes, this unit automatically enters the standby mode.
ON (Default): The unit goes into standby after 15 minutes.
OFF:
The unit does not go into standby automatically.

- For the input source "ANALOG IN" only, when no operation is performed for eight hours, this unit automatically enters the standby mode.
- In the following situations, the Auto standby function does not operate.
- When an iPod (From iPod) is connected to the USB port on the unit.
- When the source is "TUNER".
- The default setting for the Auto Standby mode is "ON".
CLOCK MODE
The clock is constantly displayed.
| ON: | Display the clock.Press the POWER ⏻ button to switch between the clock display and the normal display. |
| OFF(Default): | Does not display the clock. |
NOTE
- When CLOCK MODE is set to ON, this unit consumes the same amount of power as when it is turned on.
Front panel D
y Rear panel
58
Remote
Index

Contents
Connections
Playback
Settings
Tips
Appendix
Contents
Tips
I want to play back music with a single operation from the standby state 60
I want to play back music immediately after connecting an iPod or USB memory device 60
I only want to recharge my iPod 60
I want to specify an iPod track as the alarm 60
I want to display the clock constantly 60
I want to make the volume of the headphones the same as that of the speakers 60
Troubleshooting
Power does not turn on / Power is turned off 61
LED is flashing 61
Operations cannot be performed through the remote control unit 62
Display on this unit shows nothing 62
No sound comes out 63
Desired sound does not come out 64
Sound is interrupted or noise occurs 65
Cannot playback CDs 66
iPod cannot be played back 67
USB memory devices cannot be played back 68
File names on the iPod/USB memory device are not displayed properly
Front panel
Display
Rear panel
59
Remote
Index

Contents
Connections Playback Settings
Appendix
Tips
I want to play back music with a single operation from the standby state
- When a input source select buttons, ▶/■ button or ▲ button is pressed, the operation is performed at the same time as the unit switches on. (17 p. 28)
I want to play back music immediately after connecting an iPod or USB memory device
- When connected to the USB port, the Input Source automatically changes and playback begins. (p. 43, 46)
I only want to recharge my iPod
- Connect the iPod to this unit when the unit power is on. Then turn the unit power off, and the iPod will continue to charge until fully charged. (p. 45)
I want to specify an iPod track as the alarm
- Change the playback mode of this unit to From iPod in order to use the alarm playback on an iPod touch or iPhone. After pausing the track that you want to play back, set the iPod touch or iPhone to sleep state. Alarm playback cannot be used if the power of the iPod touch or iPhone is turned off. (12p. 55)
I want to display the clock constantly
- The clock can be constantly displayed by turning the CLOCK MODE button On. (P. 58)
I want to make the volume of the headphones the same as that of the speakers
- You can increase the sound from the headphones at the same volume setting by changing the H/P AMP GAIN settings. (p. 57)
Front panel D
y Rear panel
60
Remote
Index

Contents Connections Playback Settings
Appendix
Troubleshooting
- Are the connections correct?
- Is the set being operated as described in the owner's manual?
- Are the other devices operating properly?
If this unit does not operate properly, check the items listed in the table below.
Should the problem persist, there may be a malfunction. In this case, disconnect the power immediately and contact your store of purchase.
Power does not turn on / Power is turned off
| Symptom Cause / | Solution Page | |
| Power does not turn on. | Check whether the power plug is correctly inserted into the power outlet. 24 | — |
| Power automatically turns off. | The sleep timer is set. Turn on the power again. 51 | — |
| “AUTO STANDBY” is set. “AUTO STANDBY” is triggered when there is no operation for a set amount of time. To disable “AUTO STANDBY”, set “AUTO STANDBY” on the menu to “OFF”. | 58 |
LED is flashing
| Symptom Cause / | Solution Page | |
| Flashing red. (Flashes at 0.25 second intervals) | The amplifier circuit in the unit has malfunctioned. Disconnect the power and contact the repair center. | — |
| Flashing red. (Flashes at 0.5 second intervals) | Protection circuit activated due to a rise in internal temperature. Turn off the power, wait for the set to fully cool down, then turn the power back on. | 77 |
| Core wires of two speakers are touching each other or a core wire is sticking out of the terminal and touching the set's rear panel, activating the protection circuit. First unplug the power cord, then twist the core wires tightly or terminate the speaker cables, then reconnect. | 77 |
Front panel D
y Rear panel
61
Remote
Index

Contents Connections Playback Settings
Appendix
Operations cannot be performed through the remote control unit
| Symptom Cause / | Solution Page | |
| Operations cannot be performed through the remote control unit. | Batteries are worn out. Replace with new batteries. 6 | - |
| Operate the remote control unit within a distance of about 7 m from this unit and at an angle of within 30°. 6 | - | |
| Remove any obstacle between this unit and the remote control unit. - | ||
| Insert the batteries in the proper direction, checking the ⊕ and ⊖ marks. | 6 | |
| The set's remote control sensor is exposed to strong light (direct sunlight, inverter type fluorescent bulb light, etc.). Move the set to a place in which the remote control sensor will not be exposed to strong light. | - | |
| When using a 3D video device, the remote control unit of this unit may not function due to effects of infrared communications between units (such as TV and glasses for 3D viewing). In this case, adjust the direction of units with the 3D communications function and their distance to ensure they do not affect operations from the remote control unit of this unit. | - |
Display on this unit shows nothing
| Symptom Cause / | Solution Page | |
| Display is off. | Press the DIMMER button on the remote control to set any setting other than OFF. 52 | — |
Front panel D
Rear panel
62
Remote
Index

Contents Connections Playback Settings
Appendix
No sound comes out
| Symptom Cause / | Solution Page | |
| No sound comes out of speakers. | Check the connections for all devices. 17 | — |
| Insert connection cables all the way in. — | ||
| Check that input connectors and output connectors are not reversely connected. — | ||
| Check cables for damage. — | ||
| Check that speaker cables are properly connected. Check that cable core wires come in contact with the metal part on speaker terminals. Also, securely tighten speaker terminals. Check speaker terminals for looseness. | 17 | |
| Check that a proper input source is selected. 26 | — | |
| Adjust the volume. 27 | — | |
| Cancel the mute mode. 27 | — | |
| Check that the correct input source is selected when audio is being input to this unit from an external device. | 48 | |
| Check the digital audio output setting on the connected device. The initial settings may be off depending on the device. | 48 | |
| Only 2-channel linear PCM can be input as the digital audio signal to the DIGITAL IN connector of this unit. | 48 | |
| No sound is output from the speakers when headphones are connected. 8 | — |
Front panel D
y Rear panel
63
Remote
Index

Contents Connections Playback Settings
Appendix
■ Desired sound does not come out
| Symptom Cause / | Solution Page | |
| Left/right volume balance is unbalanced. | Press the SDB/TONE button on the remote control to adjust the balance. 50 | — |
| No sound from the sub woofer. | Check the subwoofer connections. 18 | — |
| Switch the subwoofer power on. — | ||
| Set values are not reflected in “SDB (Super Dynamic Bass)”, “BASS” and “TREBLE”. | “SDB (Super Dynamic Bass)”, “BASS” and “TREBLE” setting values are not reflected in subwoofer out. 50 | — |
Front panel D
Rear panel
64
Remote
Index

Contents Connections Playback Settings
Appendix
Sound is interrupted or noise occurs
| Symptom Cause / | Solution Page | |
| During playback from the USB memory device, sound is occasionally interrupted. | When the transfer speed of the USB memory device is slow, sound may occasionally be interrupted. | — |
| When making a call on iPhone, noise occurs in audio output on this unit. | When making a call, keep a distance of 20 cm or longer between iPhone and this unit. — | |
| Noise often occurs in DAB/FM broadcasting. | Change the antenna orientation or position. 22 | — |
| Use an outdoor antenna. 22 | — | |
| Separate the antenna from other connection cables. 22 | — |
Front panel D
Rear panel
65
Remote
Index

Contents Connections Playback Settings
Appendix
■ Cannot playback CDs
| Symptom Cause / | Solution Page | |
| Cannot playback when the ▶/□ button is pressed, or cannot correctly play back a specific part of the disc. | The disc is dirty or scratched. Either clean the disc, or insert a different disc. 73 | — |
| Cannot playback CD-R/CD-RW. | CDs cannot be played back unless they have been finalized. Use a finalized disc. 73 | — |
| This may be caused by poor recording conditions, or the disc itself may be of poor quality. Use a correctly recorded disc. | — | |
| The DATA CD playback function of this unit only supports playback of MP3 and WMA files. 71 | — | |
| “Unsupported” is displayed. | “Unsupported” is displayed if a disc that cannot be played is loaded. 73 | — |
| “NO DISC” is displayed. | “NO DISC” is displayed if the disc is loaded upside-down or if no disc is loaded. 73 | — |
Front panel D
y Rear panel
66
Remote
Index

Contents Connections Playback Settings
Appendix
■ iPod cannot be played back
| Symptom Cause / | Solution Page | |
| iPod cannot be connected. | When using iPod by connecting it to the USB port, some iPod variations are not supported. 21 | — |
| When iPod is connected by using a USB cable other than the genuine cable, iPod may not be recognized. Use a genuine USB cable. | — |
Front panel D
y Rear panel
67
Remote
Index

Contents Connections Playback Settings
Appendix
USB memory devices cannot be played back
| Symptom Cause / | Solution Page | |
| “NO DEVICE” is displayed. | The set cannot recognize a USB memory device. Disconnect and reconnect the USB memory device. 20 | — |
| USB memory devices of a mass storage class or those compatible with MTP are supported. — | ||
| This unit does not support a connection through a USB hub. Connect the USB memory device directly to the USB port. | — | |
| The USB memory device must be formatted to FAT16 or FAT32. — | ||
| Not all USB memory devices are guaranteed to work. Some USB memory devices are not recognized. When using a type of portable hard disc drive compatible with the USB connection that requires power from an AC adapter, use the AC adapter that came with the drive. | — | |
| Files on the USB memory device are not displayed. | Files of a type not supported by this unit are not displayed. 46 | — |
| The maximum file configuration that can be displayed on this unit is 255 folders, with a maximum of 255 files in each folder. | — | |
| When multiple partitions exist on the USB memory device, only files on the first partition are displayed. | — | |
| Files on a USB memory device cannot be played. | Files are created in a format that is not supported by this unit. Check the formats supported by this unit. 46 | — |
| You are attempting to play a file that is copyright protected. Files that are copyright protected cannot be played on this unit. | — | |
| An unsupported format was played back. Select a supported format. 72 | — |
Front panel D
Rear panel
68
Remote
Index

Contents Connections Playback Settings
Appendix
■ File names on the iPod/USB memory device are not displayed properly
| Symptom Cause / | Solution Page | |
| The file names are not displayed properly (“...”, etc.). | • Characters that cannot be displayed are used. This is not a malfunction. On this unit, characters that cannot be displayed are replaced with a “.” (period). | — |
Front panel D
y Rear panel
69
Remote
Index

Contents Connections Playback Settings
Appendix
Resetting factory settings
Perform this procedure if the display is abnormal or if operations cannot be performed.
Various settings are reset to the factory default values. Make settings again.

1 Place this unit in Standby mode. Next, while pressing and holding the SOURCE button, press and hold the ⏻ button for 3 seconds.
"INITIALIZE" is displayed.

- Repeat this process if "INITIALIZE" is not displayed.
Front panel D
Rear panel
70
Remote
Index

Playing back DATA CDs
■ DATA CDs formats
CD-R and CD-RW discs created in the format described below can be played.
Writing software format
ISO9660 level 1
When written in other formats, it may not be possible to play the disc properly.
Maximum number of playable files and folders
Number of files : 255
Number of folders : 255
File format
MPEG-1 Audio Layer-3
WMA (Windows Media Audio)
Tag data
ID3-Tag (Ver. 1.x and 2.x)
META-Tag (Compatible with title, artist and album names)
■ Compatible formats
| Sampling frequency | Bit rate Extension | |
| MP3 32/44 | 4.1/48 kHz 32 – 320 kbps .mp3 | |
| WMA 32/44 | 4.1/48 kHz 64 – 192 kbps .wma |

- Be sure to give files the extension ".MP3" or ".WMA". Files with any other extensions or files with no extensions cannot be played.
- Mac OS X files assigned with filenames that begin with “._” are not music data and cannot be played back.
- In accordance with copyright laws, recordings you have made should only be used for your personal enjoyment and may not be used in other ways without permission of the copyright holder.
Front panel D
Rear panel
71
Remote
Index

Playing back USB memory devices
■ USB memory formats
Files stored on USB memory devices created in the formats below can be played.
USB-compatible file systems
"FAT16" or "FAT32"
- If the USB memory device is divided into multiple partitions, only the top drive can be selected.
Maximum number of playable files and folders
Maximum number of files in a folder: 255
Maximum number of folders: 255
Tag data
MP3 ID3-Tag (Ver. 2) standard
WMA META tags
■ Compatible formats
| Sampling frequency | Bit rate | Extension | |
| WMA 32/44.1/48 kHz | 48 – 192kbps *1 | .wma | |
| MP3 32/44.1/48 kHz | 32 – 320kbps | .mp3 | |
| WAV 32/44.1/48 kHz – .wav | |||
| MPEG-4 AAC*2 | 32/44.1/48 kHz | 48 – 320kbps | .aac/.m4a |
| FLAC 32/44.1/48 kHz – .flac |
*1 Fixed bit rate (CBR) format is recommended.
*2 Only files that are not protected by copyright can be played on this unit. Content downloaded from pay sites on the Internet are copyright protected. Also, files encoded in WMA format when ripped from a CD, etc. on a computer may be copyright protected, depending on the computer's settings.

- If the image size of an album artwork exceeds 600 kB, then music may not be played back properly.
Front panel D
y Rear panel
72
Remote
Index

About Discs
■ Discs playable on this unit
① Music CDs
Discs marked with the logo below can be played in this unit.

② CD-R/CD-RW
NOTE
- Discs in special shapes (heart-shaped discs, octagonal discs, etc.) cannot be played. Do not attempt to play them, as doing so can damage the unit.
- Some discs and some recording formats cannot be played.
• Non-finalized discs cannot be played. - If the unit is left in a room full of smoke from cigarettes, etc., for long periods of time, the surface of the optical pickup may get dirty, preventing it from receiving signals properly.


■ Loading discs
- Place the disc in the tray, label side up.
- Make sure the disc tray is fully open when inserting the disc.
- Place the discs flat, 12 cm discs in the outer tray guide, 8 cm discs in the inner tray guide.
- Place 8 cm discs in the inner tray guide without using an adapter.
- Place the disc in the tray, label side up.
- Make sure the disc tray is fully open when inserting the disc.
- Place the discs flat, 12cm discs in the outer tray guide, 8cm discs in the inner tray guide.
- Place 8cm discs in the inner tray guide without using an adapter.

- "Unsupported" is displayed if a disc that cannot be played is loaded.
- "No Disc" is displayed if the disc is loaded upside-down or if no disc is loaded.
NOTE
- Do not push the disc tray in by hand when the power is turned off. Doing so could damage the set.
- Do not place any foreign objects in the disc tray. Doing so could damage the set.
- If the unit is left in a room full of smoke from cigarettes, etc., for long periods of time, the surface of the optical pickup may get dirty, preventing it from receiving signals properly.
Front panel D
y Rear panel
73
Remote
Index

Contents Connections Playback Settings Tips
■ Cautions on loading discs
- Only load one disc at a time. Loading two or more discs can damage the unit or scratch the discs.
- Do not use cracked or warped discs or discs that have been repaired with adhesive, etc.
- Do not use discs on which the sticky part of cellophane tape or labels is exposed or on which there are traces of where labels have been removed. Such discs can get caught inside the player and damage it.
■ Cautions on handling
- Do not get fingerprints, oil or dirt on discs.
• Take special care not to scratch discs when removing them from their cases. - Do not bend or heat discs.
- Do not enlarge the hole in the center.
- Do not write on the labeled (printed) surface with ball-point pens, pencils, etc., or stick new labels on discs.
- Water droplets may form on discs if they are moved suddenly from a cold place (outdoors for example) to a warm place, but do not try to dry them off using a hairdryer, etc.
■ Cautions on storing discs
- Be sure to remove discs after using them.
- Be sure to store discs in their cases to protect them from dust, scratches, warping, etc.
- Do not store discs in the following places:
- Places exposed to direct sunlight for long periods of time
- Dusty or humid places
- Places exposed to heat from heaters, etc.
■ Cleaning discs
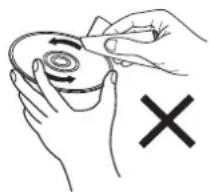
- If there are fingerprints or dirt on a disc, wipe them off before using the disc. Fingerprints and dirt can impair sound quality and cause interruptions in playback.
- Use a commercially available disc cleaning set or a soft cloth to clean discs.

natural_image
Line drawing of hands holding a circular object with a ring, no text or symbols presentGently wipe the disc from the inside towards the outside.
natural_image
Illustration of hands holding a circular object with a spiral arrow and a cross mark (no text or symbols)Do not wipe with a circular motion.
NOTE
- Do not use record spray, antistatic agents, benzene, thinner or other solvents.
Front panel D
y Rear panel
74
Remote
Index

Contents Connections Playback Settings Tips
Last function memory
This stores the settings as they were immediately before going into the standby mode.
When the power is turned back on, the settings are restored to as they were immediately before going into the standby mode.
Front panel D
y Rear panel
75
Remote
Index

Contents
Connections Playback Settings Tips
Explanation of terms
Audio
MP3 (MPEG Audio Layer-3)
This is an internationally standardized audio data compression scheme, using the "MPEG-1" video compression standard. It compresses the data volume to about one eleventh its original size while maintaining sound quality equivalent to a music CD.
WMA (Windows Media Audio)
This is audio compression technology developed by Microsoft Corporation.
WMA data can be encoded using Windows Media® Player. To encode WMA files, only use applications authorized by Microsoft Corporation. If you use an unauthorized application, the file may not work properly.
Sampling frequency
Sampling involves taking a reading of a sound wave (analog signal) at regular intervals and expressing the height of the wave at each reading in digitized format (producing a digital signal).
The number of readings taken in one second is called the “sampling frequency”. The larger the value, the closer the reproduced sound is to the original.
Speaker impedance
This is an AC resistance value, indicated in (ohms). Greater power can be obtained when this value is smaller.
Bit rate
This expresses the read amount per 1 second of video/audio data recorded. A larger number means higher sound quality, but also means a larger file size.
Front panel D
Rear panel
76
Remote
Index

Contents Connections Playback Settings Tips
■ Media player
Windows Media Player
This is a media player distributed free of charge by Microsoft Corporation. It can play playlists created with Ver.11 or later of Windows Media Player, as well as WMA, DRM WMA, WAV, and other files.
Others
Finalizing
Finalization is the process that makes recorded CD-R/CD-RW discs playable on compatible players
Protection circuit
This is a function to prevent damage to devices within the power supply when an abnormality such as an overload, excess voltage occurs or over temperature for any reason.
Front panel D
y Rear panel
77
Remote
Index

Trademark information
Made for

iPod

iPhone
"Made for iPod" and "Made for iPhone" mean that an electronic accessory has been designed to connect specifically to iPod, or iPhone, respectively, and has been certified by the developer to meet Apple performance standards.
Apple is not responsible for the operation of this device or its compliance with safety and regulatory standards. Please note that the use of this accessory with iPod, or iPhone, may affect wireless performance. iPhone, iPod, iPod classic, iPod nano, iPod touch, and Retina are trademarks of Apple Inc., registered in the U.S. and other countries. Lightning is a trademarks of Apple Inc.
- Individual users are permitted to use iPhone, iPod, iPod classic, iPod nano, and iPod touch for private copy and playback of non-copyrighted contents and contents whose copy and playback is permitted by law. Copyright infringement is prohibited by law.

Adobe, the Adobe logo and Reader are either registered trademarks or trademarks of Adobe Systems Incorporated in the United States and/or other countries.
Front panel D
y Rear panel
78
Remote
Index

Specifications
■ Audio section
- CD player
Playable frequency response: 2 Hz - 20 kHz
Wow & flutter: Below measurable limits (± 0.001 %)
Sampling frequency: 44.1 kHz
- Audio amplifier
Rated output: 2-channel
30 W + 30 W (6 Ω/ohms, 1 kHz, T.H.D 10 %)
■ Tuner section
[FM] [DAB]
Receiving Range: 87.50 MHz – 108.00 MHz BAND3 170 MHz – 240 MHz
Effective sensitivity: 1.2 μV / 75 Ω/ohms -93 dBm/50 Ω/ohms
FM STEREO separation: 35 dB (1 kHz) –
FM S/N ratio: Monaural : 70 dB
Stereo : 70 dB
FM THD+N (1 kHz): Monaural : 0.4 %
Stereo : 0.4 %
Front panel
Display
Rear panel
79
Remote
Index
![DENON RCD-M40 - [FM] [DAB] - 1](/content/2026/06/1270408/images/dcb3ba465434fea4f8dcc3b7b5868a5329b086895ed79ca8a53f7e3c4e1a2ab5.jpg)
Contents
Connections Playback Settings Tips
■ Clock/Alarm/Sleep
Clock type: Crystal oscillator (Within 1 – 2 minutes per month)
Alarm: Once alarm/Everyday alarm: One system each
Sleep: Sleep timer: Max. 90 minutes
General
Power supply: AC 230 V, 50/60 Hz
Power consumption: 70 W
Power consumption in clock mode : 14 W
Power consumption in standby mode : 0.3 W
- For purposes of improvement, specifications and design are subject to change without notice.
Front panel D
y Rear panel
80
Remote
Index

Contents Connections Playback Settings Tips
Dimensions
Unit: mm


■ Weight : 4.0 kg
Front panel D
Rear panel
81
Remote
Index

Contents Connections Playback Settings Tips
Index
A
Accessories 5
Adjusting the tone 50
Alarm 55
Auto-Standby 58
C
Cables 16
Charging the iPod 45
Connecting a DAB/FM antenna 22
Connecting an iPod 20
Connecting a USB memory device 20
Connecting a power cord 24
D
Display's brightness 52
F
Front panel 8
1
Inserting the batteries 6
L
Listening to DAB/FM broadcasts 39
M
Menu map 53
Muting 27
P
Playing back an iPod 42
Playing a USB memory device 46
Playing CDs 28
Playing DATA CDs 30
R
Random playback 47
Rear panel 11
Remote control unit 13
Repeat playback 47
Resetting factory settings 70
S
Selecting the input source 26
Sleep timer 51
Supported iPod/iPhone models 21
T
Turning the power on 26
V
Volume 27
Front panel D
Rear panel
82
Remote
Index


DENON®
www.denon.com
3520 10380 10AD
Copyright ©2015 D&M Holdings Inc. All Rights Reserved.


- DENON®
- RCD-M40 / RCD-M40DAB
- Owner's Manual
- Contents Connections Playback Settings Tips Appendix
- Accessories 5
- Features 7
- Part names and functions 8
- Connections
- Speaker connection 17
- Connecting an analog device 19
- Connecting a digital device 19
- Connecting an iPod or USB memory device to the USB port 20
- Connecting a DAB/FM antenna 22
- Connecting the power cord 24
- Playback
- Basic operation 26
- Playing CDs 28
- Playing DATA CDs 30
- Listening to DAB/FM broadcasts 32
- Settings
- Accessories
- Inserting the batteries
- NOTE
- Operating range of the remote control unit
- Features
- Part names and functions
- Contents
- Connections Playback Settings Tips Appendix
- ① Power operation button (⏻)
- ② Power indicator
- Front panel D
- y Rear panel
- Remote
- Index
- Display
- Rear panel
- Remote control unit
- ■ Cables used for connections
- Speaker connection
- Connecting the speaker cables
- Connecting the subwoofer
- Connecting speakers
- Connecting an analog device
- Connecting a digital device
- Connecting an iPod or USB memory device to the USB port
- Supported iPod/iPhone models
- Connecting a DAB/FM antenna
- ctions
- ettings Tips Appendix
- Connecting the power cord
- Basic operation
- Playback a device
- Other functions
- Turning the power on
- Selecting the input source
- Adjusting the volume
- Use VOLUME ▲▼ to adjust the volume.
- Turning off the sound temporarily
- Press MUTE 📄X.
- Playing CDs
- Playing tracks in a specific order (Program playback)
- Playing DATA CDs
- Playing files
- ■ Files that can be played back
- Listening to DAB/FM broadcasts
- Press TUNER to select the reception band.
- Press TUNE + or TUNE – to select the station you want listen to.
- Automatically presetting FM stations (Auto Preset)
- ■ Giving station names to preset channels
- Press ENTER.
- Presetting FM stations manually
- Listening to preset stations
- Setting the preset channels and changing the received frequency on the main unit
- RDS search
- ■ Viewing information during reception
- PTY search
- Contents Connections
- Setti
- TP search
- Radio Text
- CT (Clock Time)
- Listening to DAB/DAB+ (for RCD-M40DAB only)
- ☐ About DAB (Digital Audio Broadcasting)
- About DAB+
- ■ Tuning in DAB stations
- Press TUNER to select "DAB".
- Press TUNE +, - to select the desired broadcast station.
- ■ Auto scanning broadcast stations
- ■ Switching the reception information for the currently tuned in DAB station
- ■ Making the DAB settings
- ■ DAB initialize
- Playing an iPod
- Listening to music on an iPod
- Setting operation mode ("On-Display" mode)
- Charging the iPod/iPhone
- ■ Standby charging
- Playing a USB memory device
- Playing files stored on USB memory devices
- Connect the USB memory device to the USB port. (p. 20)
- Use to select the file to be played, then press ENTER.
- Listening to DIGITAL IN
- Listening to ANALOG IN
- Convenience functions
- Adjusting the tone
- Sleep timer function
- Press SLEEP during playback and select the setting time.
- ■ To cancel the sleep timer
- Checking the current time
- - Checking the current time when the power is on
- - Checking the current time when the power is set to standby
- Switching the display's brightness
- Press DIMMER.
- Menu map
- Menu operation
- CLOCK SETUP
- ALARM SETUP
- Contents Connections Playback
- Tips Appendix
- ALARM ON/OFF
- CD AUTO PLAY
- SPK OPTIMISE
- H/P AMP GAIN
- AUTO STANDBY
- CLOCK MODE
- Tips
- Troubleshooting
- Resetting factory settings
- Playing back DATA CDs
- ■ DATA CDs formats
- Writing software format
- Maximum number of playable files and folders
- File format
- Tag data
- Playing back USB memory devices
- ■ USB memory formats
- USB-compatible file systems
- About Discs
- ■ Discs playable on this unit
- ① Music CDs
- ② CD-R/CD-RW
- ■ Loading discs
- Contents Connections Playback Settings Tips
- ■ Cautions on loading discs
- ■ Cautions on handling
- ■ Cautions on storing discs
- ■ Cleaning discs
- Last function memory
- Explanation of terms
- Audio
- MP3 (MPEG Audio Layer-3)
- WMA (Windows Media Audio)
- Sampling frequency
- Speaker impedance
- Bit rate
- ■ Media player
- Windows Media Player
- Others
- Finalizing
- Protection circuit
- Trademark information
- Specifications
- ■ Audio section
- ■ Tuner section
- [FM] [DAB]
- ■ Clock/Alarm/Sleep
- General
- Dimensions
- ■ Weight : 4.0 kg
- A
- C
- D
- F
- 1
- L
- M
- P
- R
- S
- T
- V
Brand : DENON
Model : RCD-M40
Category : Cd player/recorder