
FX650 - Food Processor BLACK & DECKER - Free user manual and instructions
Find the device manual for free FX650 BLACK & DECKER in PDF.
| Product Type | Multifunction food processor |
| Brand | Black & Decker |
| Model | FX650 |
| Power Supply | 220-240 V, 50-60 Hz |
| Power | 600 W |
| Control Type | Rotary knob with positions Off (0), 1 (slow), 2 (fast) and Pulse (P) |
| Main Functions | Chop, mix, slice, grate, knead, whisk, juice citrus, blend |
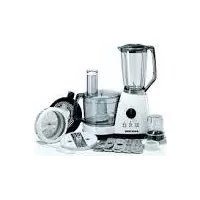
| Included Accessories | Multifunction bowl, lid with pusher, chopping/mixing blade, slicing/grating disc, kneading blade, emulsifying disc, citrus juicer (large and small cone), blender jug with lid and measuring cap, grinder, spatula |
| Safety | Bowl and lid safety lock, thermal protection (automatic shut-off in case of overheating), double insulation |
| Cleaning and Maintenance | Removable parts dishwasher safe (except multifunction bowl, blender jug and grinder bowl). Quick cleaning with soapy water. Wipe motor base with a damp cloth. |
| Warranty | 24 months, covers material and workmanship defects |
| Usage | Household use only, indoors |
| Environmental Protection | Recyclable product, do not discard with household waste. Separate collection system available through authorized repair centers. |
| Certifications | Double insulation, compliance with European standards |
| Distributor | Black & Decker (Foreign) GmbH, PO Box 17164, Dubai, United Arab Emirates |
Frequently Asked Questions - FX650 BLACK & DECKER
User questions about FX650 BLACK & DECKER
0 question about this device. Answer the ones you know or ask your own.
Ask a new question about this device
Download the instructions for your Food Processor in PDF format for free! Find your manual FX650 - BLACK & DECKER and take your electronic device back in hand. On this page are published all the documents necessary for the use of your device. FX650 by BLACK & DECKER.
USER MANUAL FX650 BLACK & DECKER
natural_image
Line drawing of a modern kitchen appliance with handle and side panel (no text or symbols)FX650-B5
FX649-B5
FX648-B5

natural_image
Diagram of a mechanical component with a numbered circle highlighting part 10 (no text or symbols present)
natural_image
Simple line drawing of a helmet with a pin, connected to a circle containing the number 11 (no text or symbols on the helmet itself)

natural_image
Simple line drawing of a conical container with internal components and a numbered label (15) on the side, no text or symbols present.

Safety instructions
- Warning! When using mains-powered appliances, basic safety precautions, including the following, should always be followed to reduce the risk of fire, electric shock and personal injury.
- Read all of this manual carefully before using the appliance.
- The intended use is described in this manual. The use of any accessory or attachment or the performance of any operation with this appliance other than those recommended in this instruction manual may present a risk of personal injury.
- Retain this manual for future reference.
Safety of others
- This appliance is not intended for use by persons (including children) with reduced physical, sensory or mental capabilities, or lack of experience and knowledge, unless they have been given supervision or instruction concerning use of the appliance by a person responsible for their safety.
- Children should be supervised to ensure that they do not play with the appliance.
- Cleaning and user maintenance shall not be made by children without supervision.
WARNING! Plastic bags can be dangerous. To avoid suffocation keep this bag away from babies and small children.
Inspection and repairs
- Before use, check the appliance for damaged or defective parts. Check for breakage of parts, damage to switches and any other conditions that may affect its operation.
- Do not use the appliance if the rotating sieve or the protecting cover is damaged or has visible cracks.
- Have any damaged or defective parts repaired or replaced by an authorised repair agent.
- Before use, check the power supply cord for signs of damage, ageing and wear.
- Do not use the appliance if the power supply cord or mains plug is damaged or defective.
- If the power supply cord or mains plug is damaged or defective it must be repaired by an authorised repair agent in order to avoid a hazard. Do not cut the power supply cord and do not attempt to repair it yourself.
- Never attempt to remove or replace any parts other than those specified in this manual.
Additional safety instructions for food processors
Warning! Do not place near a hot Gas or electric oven.
- Do not Immerse Food Processor, Cord or Plug in any liquid.
- Allow all moving parts of the appliance to come to a stop before approaching.
- Always use on a clean work surface and clean the surface thoroughly after use.
- Allow the appliance to cool before storing.
- Keep hands, long hair and loose clothing away from the beaters.
• Always take care when handling the sharp cutting blades when emptying the bowl and during cleaning.
Important safeguards
When using electrical appliances, basic safety precautions should always be followed, including the following:
- Read and save all instructions.
- To protect against risk of electrical shock, do not immerse base, motor, cord, or plug in water or other liquid.
- Close supervision is necessary when any appliance is used by or near children.
- This appliance should not be used by children.
- Unplug cord from outlet when not in use, before putting on or taking off parts, and before cleaning.
- Avoid contacting moving parts.
- Do not operate any appliance with a damaged cord or plug or after the appliance malfunctions or is dropped or damaged in any manner. Call our toll-free customer service number for information on examination, repair or electrical or mechanical adjustment.
- The use of attachments not recommended or sold by the appliance manufacturer, may cause fire, electric shock, or injury.
- Do not use your food processor if any part is broken.
- Do not use appliance outdoors.
- Do not let cord hang over edge of table or counter, or touch hot surfaces.
- Keep hands and utensils away from moving blade and disc while processing food to reduce the risk of severe personal injury and/or damage to the food processor. A rubber scraper may be used but ONLY when the food processor is not running.
- The blade and disc are sharp. Handle carefully. Store out of reach of children.
- To reduce the risk of injury, never place cutting blade or disc on base without first putting bowl properly in place.
- Be certain lid is securely locked in place before operating appliance..
- Never feed food into food chute by hand. Always use food pusher.
-
Do not attempt to defeat the lid interlock mechanism.
-
Make sure the blade or disc has come to a full stop before removing lid.
- To reduce the risk of injury, be sure to insert or remove blade and disc using hubs provided for this purpose. Use caution when removing blade and disc from the bowl, when emptying the bowl, and when cleaning.
- Be sure to turn switch to OFF (O) position after each use. Always use the pusher to clear the food chute. When this method is not possible, turn the motor off and disassemble unit to remove the remaining food.
- The appliance is not intended for commercial, professional or industrial use. It is designed and built exclusively for household use only.
- Never use appliance for a longer period or with a larger amount of ingredients other than that recommended by appliance manufacturer.
- The maximum rating of this unit is based on using the Chopping/Mixing Blade. Using the Slicing/Shredding Disc may draw significantly less power.
- Do not place on or near a hot gas or electric burner or in a heated oven.
- Do not use appliance for other than intended use.
Electrical safety

This appliance is double insulated; therefore no earth wire is required. Always check that the power supply corresponds to the voltage on the rating plate.
- If the supply cord is damaged, it must be replaced by the manufacturer or an authorised BLACK+DECKER Service Centre in order to avoid a hazard.
- This appliance includes a safety switch which prevents operation unless the accessories are securely installed.
- This appliance incorporates a protective device against high temperatures. If the temperature becomes too high, the unit will turn off automatically and will resume operation when the motor has cooled sufficiently (after about 15 minutes).
- Do not operate the appliance for more than a minute at a stretch.
- If operation is not finished within 1 minute, turn off the machine and let it cool for 10 minutes before the next round of operation. If more than 5 rounds of operation are required, cool the machine for 90 minutes to room temperature before the next 5 rounds. This can lengthen lifespan of the machine.
Intended use
Your BLACK+DECKER™ FX650-B5, FX649-B5 & FX648-B5 food processor has been designed for use in slicing and chopping etc. of various ingredients This appliance is intended for indoor household use only.
This appliance is not intended to be used in:
- Staff kitchen areas in shops;
• Offices and other working environments; - Farm houses;
- By clients in hotels, motels and other residential type environments;
- Bed and breakfast type environments or any other non-household environments
In order to avoid a hazard due to inadvertent resetting of the thermal cut-out, this appliance must not be supplied through an external switching device, such as a timer, or connected to a circuit that is regularly switched on and off by the utility
Using your appliance
• Always take care when using the appliance.
- Misuse could cause injury.
- Do not use the appliance outdoors.
- Do not operate the appliance if your hands are wet. Do not operate the appliance if you are barefoot.
- Guide the power supply cord neatly so it does not hang over the edge of a work top and cannot be caught accidentally or tripped over.
- Be careful if hot liquid is poured into the food processor or blender as it can be ejected out of the appliance due to a sudden steaming.
- Keep loose clothing, hair, etc. away from moving parts.
- Never pull the power supply cord to disconnect the plug from the socket. Keep the power supply cord away from heat, oil and sharp edges.
- If the power supply cord is damaged during use, disconnect the appliance from the power supply immediately. Do not touch the power supply cord before disconnecting from the power supply.
- Switch off the appliance and disconnect from the supply before changing accessories or approaching parts that move in use
- Disconnect the appliance from the power supply when not in use and before changing accessories, cleaning, etc.
- Do not immerse the appliance, cord set or plug in water or any other liquids.
Note: Do not run the appliance for more than 2 minutes, and wait for one minute or wait until the unit is cooled to room temperature before performing next operation cycle.
After use
- Switch off, remove the plug from the socket and let the appliance cool down before leaving it unattended and before changing, cleaning or inspecting any parts of the appliance.
- When not in use, the appliance should be stored in a dry place. Children should not have access to stored appliances.
Labels on appliance
The following pictograms are shown on the appliance:

Caution! Never push food with hands through chute

Caution! Do not operate without this cover in place
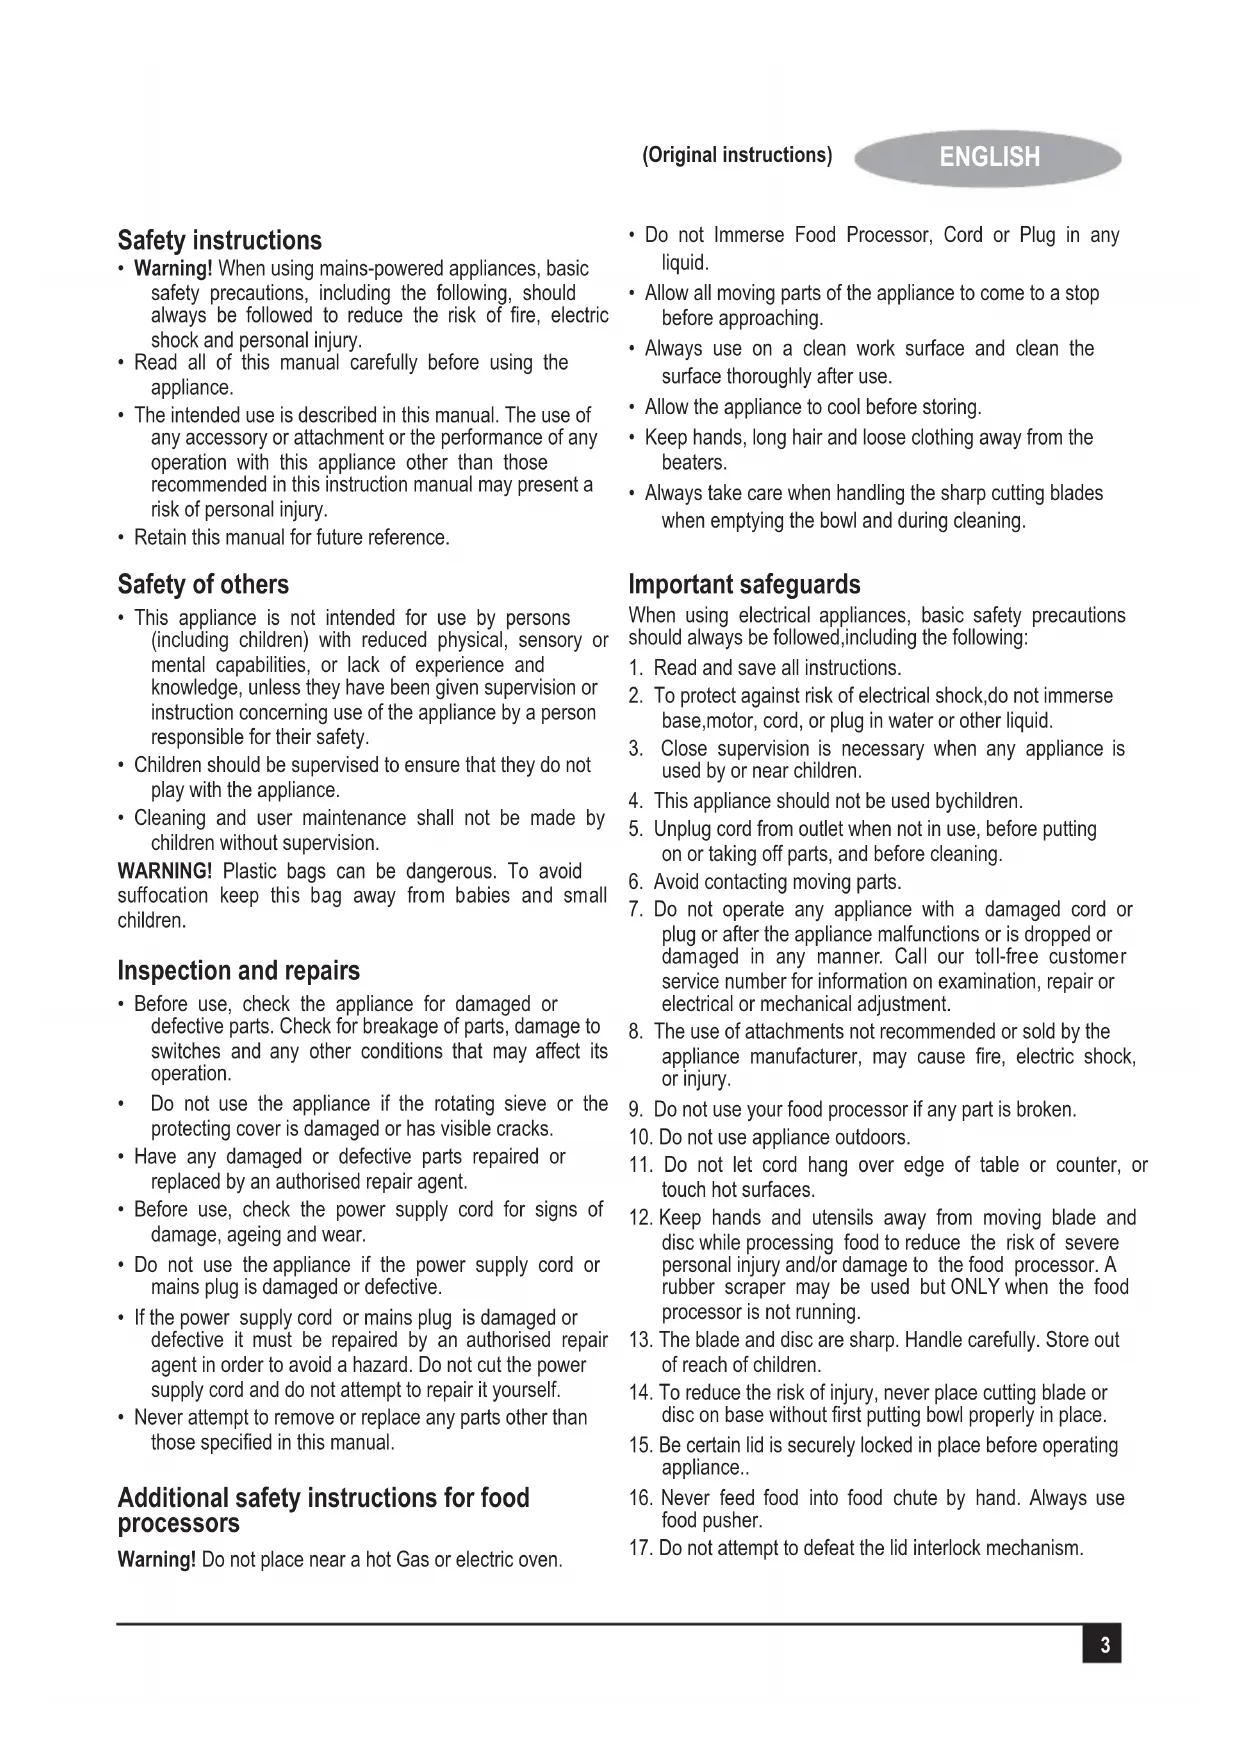
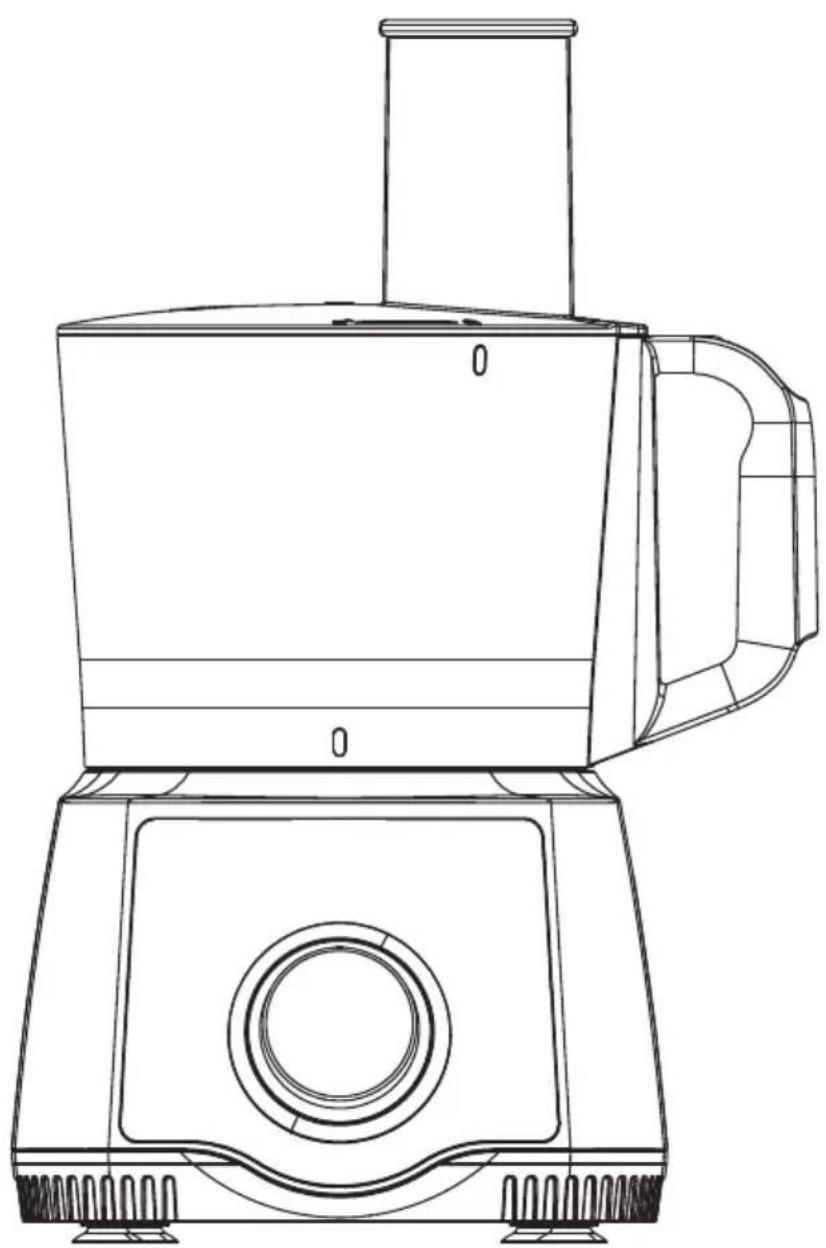
Features
- Pusher
- Food processor bowl cover
- Whisker
- Drive shaft
- Food processor bowl
- Coupler
- Base unit
- Kneading blade
- Chopping/Mixing blade
- Slicing/Shredding disc
- Big citrus juicing cone
- Small citrus juicing cone
- Citrus juice filter
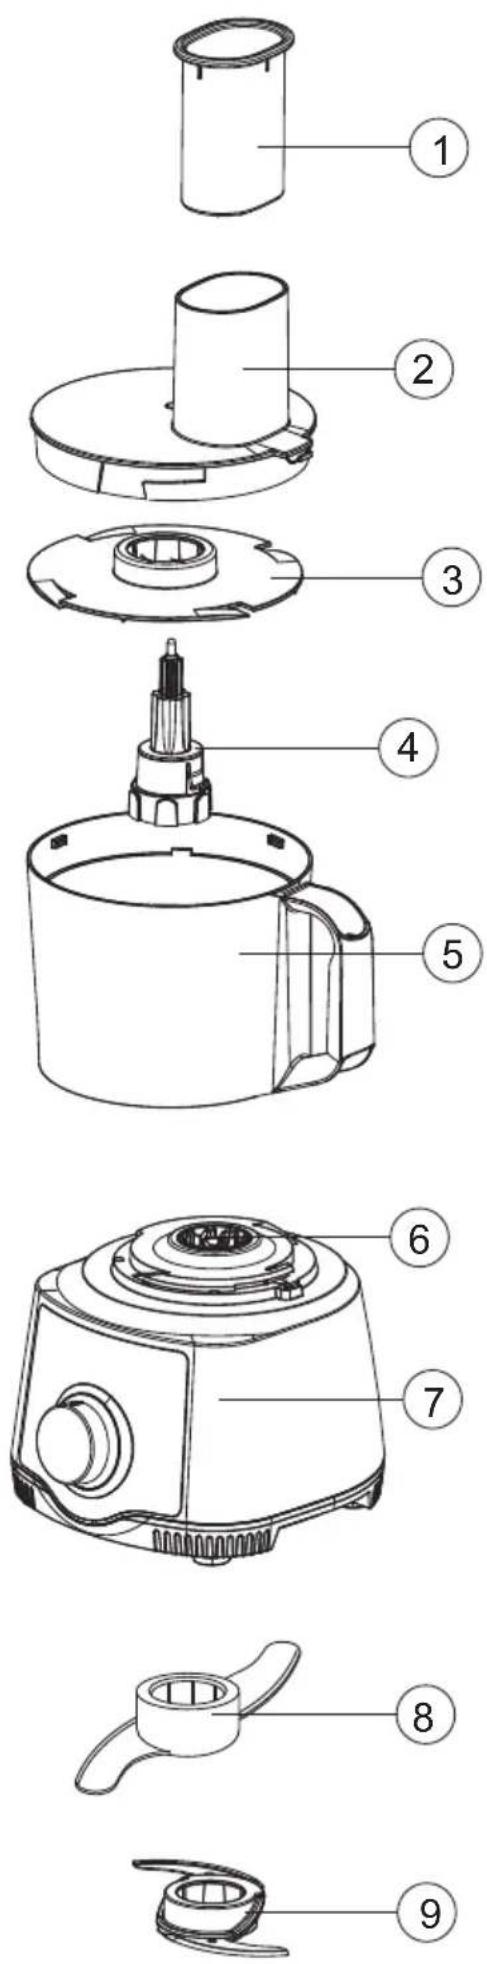
- Grinder cup
- Grinder base
- Measuring cup
- Blender jar cover
- Blender jar
- Blender jar base
Before first use
Thoroughly clean the parts that come into contact with food before you use the appliance for the first time. (see chapter 'Cleaning and maintenance').
Using the appliance
General
The appliance is equipped with a built-in safety lock that prevents it from functioning if the blender jar or food processor bowl and its lid are not assembled properly. Refer "Model guide" under "Technical Data" section to know the exact details of your model.
Using your food processor
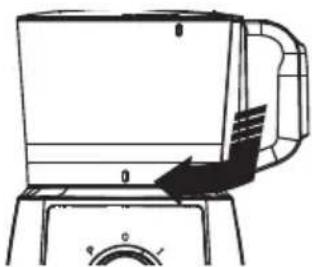
How to Lock the Bowl
natural_image
Line drawing of a kitchen appliance with handle and control knob (no text or symbols)Align base and bowl as illustrated. Turn bowl clockwise until it locks into place. The bowl will lock onto the base in 3 different positions for user convenience.
NOTE: The food processor will not work unless the bowl is locked into position.
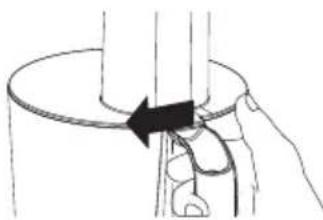
How to Assemble and Lock the Lid
natural_image
Diagram showing a hand pressing down on a cylindrical object with an arrow indicating motion (no text or symbols present)Align lid as illustrated by placing thumbon lid tab and twisting lid clockwise. Four visual alignment markers are provided (see illustration), one on bowl, one onhandle and two on bowl lid.
NOTE: The food processor will not work unless the lid is locked into position.
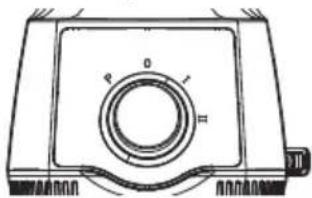
How to Operate the Controls
natural_image
Technical line drawing of a mechanical component with labeled parts (P, O, I, II) and no readable text or symbols.The control dial is conveniently located on the front of the base. Rotate the knob clockwise to select a speed:
1 for Low
2 for High
The processor will run continuously. For instant on and off control, use the PULSE (P) button by rotating knob counterclockwise.
Processing Tips and Techniques
This food processor is excellent to chop, mix, slice, or shred most foods. However, to maintain peak performance, do not use your food processor for the following: grinding grain, coffee beans or spices; slicing frozen meat; or crushing ice.
*To achieve maximum capacity, use Chopping/Mixing blade and add food no higher than the maximum fill line on food processor. See Food Processing Charts for more information.
*Operating time will depend on quantity of food being processed. Most foods can be sliced, chopped, or shredded in seconds. If unit is operated for 30 seconds continuously, let the processor rest about 3 minutes before continuing.
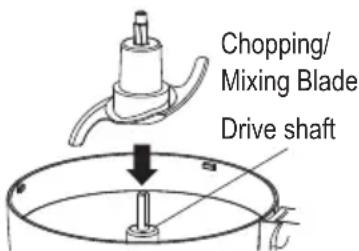
Processing Using Chopping/Mixing Blade
For a more uniform consistency, start with pieces of food that are similar in size. Carrots, for example, should all be cut in 1-inch (2.5 cm) chunks. Do not process 4-inch (10cm) pieces with 1/2-inch (1 cm) pieces.
Processing Using Chopping/Mixing Blade
The Chopping/Mixing Blade (9) can be used to coarsely chop, finely mince, mix, or puree food to a smooth consistency.
- Make sure the Control Switch is turned to OFF (O) and the unit is unplugged.
- Lock the bowl onto base.(See "How to Lock the Bowl")
- Place the Chopping/Mixing Blade (9) onto drive shaft of food processor in center of bowl. Turn slowly until blade drops into place. Handle carefully; the blade is sharp.
-
Lock lid onto bowl. Insert food pusher into feeding chute. *Do not puree or mash starchy vegetables like potatoes. They will be over-processed in a second and turn gummy.
-
Plug in unit and process food. The processing speed and time will determine the finished consistency of the food. The Pulse button can
help you avoid overprocessing. Refer the food processing chart for recommended processing times and speeds.
- When finished processing, select OFF (O) or release from PULSE position. Wait until blade has stopped rotating before removing lid. Unplug the unit.
Processing using slicing/shredding disc
To slice or shred cheese, select firmcheese like Cheddar, Monterey Jack, or Swiss. Place cheese in freezer for 30 minutes before processing.
The Reversible Slicer/Shredder Disc (10) has a slicing blade on one side and shredding teeth on the other. The name engraved on the blade, facing up, is the function selected. Place on drive shaft with desired cutting edge facing up.
-
Make sure the Control Switch is turned to OFF(O) and the unit is unplugged.
-
Lock the bowl onto base.(See "How to Lock the Bowl")
-
Place the drive shaft and sleeve on the bowl. Put the slicer/shredder disc (10) on to the drive shaft with the desired side facing up for either slicing or shredding. Lock the
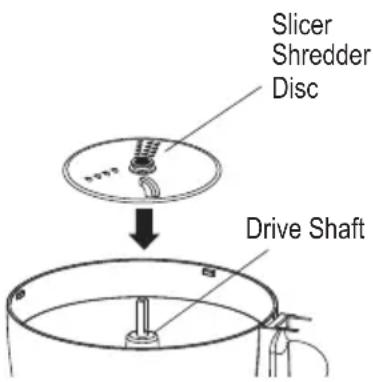
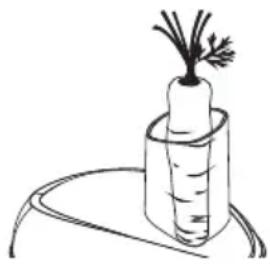
- Insert food pusher in chute. Always use the food pusher to feed food into the chute. NEVER PUSH FOOD THROUGH CHUTE WITH HANDS.
natural_image
Simple line drawing of a carrot with a stem, placed on a curved surface (no text or symbols)-
Plug in unit.
-
Select speed. While pressing on food pusher, select 1 or 2 for optimum slicing and shredding performance or PULSE to process food. Reference the food processing chart for recommended processing times and speeds.
NOTE: The food chute lid is designed to pivot towards the right when processing food that fills the whole food chute capacity.
- When food chute is empty, select OFF(O) or release from PULSE position. Wait until blade has stopped rotating before removing lid. Unplug the unit.
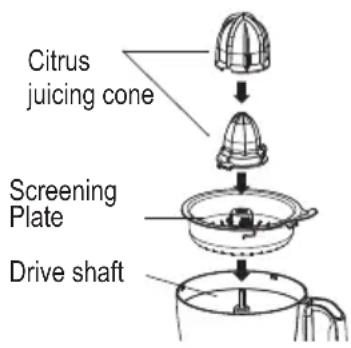
Processing Using Citrus Juicer
- Make sure the Control Switch is turned to OFF(O) and the unit is unplugged.
- Lock the bowl onto base.(See "How to Lock the Bowl") In case of any juice effusing due to high speed rotation, please choose the low speed before juicing.
-
Put screening plate on motor shaft.
-
Fit the appropriate cone onto the drive shaft. (The large cone is suitable for juicing big citrus fruit, such as grapefruit, oranges etc. The small cone is suitable for juicing small citrus fruit, such as lemons, limes etc.)
-
Cut a citrus fruit in half and press the cut end of one fruit half onto the cone. Turn on the machine and choose the speed. The cone scrapes the pulp out and squeezes the juice from the fruit.
-
To maximize the quantity of juice extracted from a fruit, press a fruit onto the cone several times.
Processing using blender jar
-
First check the position switch in stop state.
-
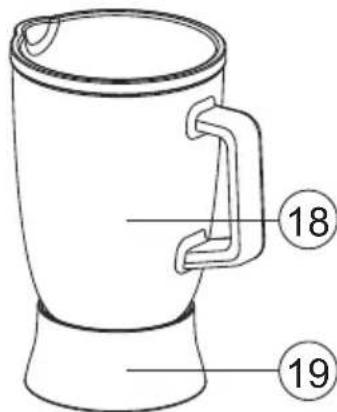
Put sealing ring into blender jar base slot, screw and fasten blender jar (18) into blender jar base (19) (clockwise for fastening, and
Blender jar cover
Blender jar
Blender base
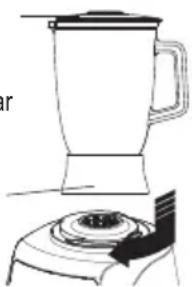
natural_image
Line drawing of a blender with a handle and base, no text or symbols presentcounterclockwise for loosening), put the blender jar cover and the measuring cup on.
- Clockwise screw the cutter seat into the main machine with your hand (counterclockwise for loosening), do not hold the blender jar with your hand for disassembling, else the jar will leave the blade seat making the food to leak out of the blender jar.
Egg mixing
Put egg without eggshell into the blender jar (18), pour appropriate cool boiled water, add some flour.
Put and fasten the cover, press the button of weak grading for 1 min.
Vegetable or fruit mixing
For vegetable or fruit to be mixed, after peeling or shelling, and pitting, cut it into blocks or sections, every time put 600g, pour appropriate cool boiled water, perform assembly according to assembling specification for use turn on for mixing for 1min by 5 grading.
Processing using grinding mill
-
Grinding mill (14&15) is applicable to dried food to be ground into powder.
-
During using, every time put 150g into the grinding mill, cover with the grinding cutter
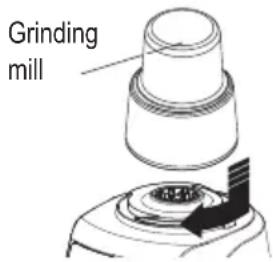
seat, fasten tight clockwise; mount them on the main machine according to the position shown in the diagram, fasten tight clockwise, press tight the grinding mill with your hand, turn on the button switch for grinding.
- When grinding sesame, walnut and other oily food, adding a spoon of granulated sugar into the grinding cup for grinding together will produce better results.
Note: In case of idling during grinding, i.e., when the blade does not contact food, immediately stop, cut off power supply. Mix the food more softly, then turn on for grinding again.
Kneading blade
You can use the kneading blade (8) to knead yeast dough for bread and pizzas.
- Put the drive shaft in the bowl.
- Put the kneading blade on the drive shaft.
Note: Always put the drive shaft with the kneading blade in the bowl before you add the ingredients.
- Put the ingredients in the bowl.
- Put the lid on the bowl. Turn the lid clockwise to fix it ('click').
- Put the pusher in the feeding chute.
- Select the speed that corresponds with the accessory.
- When you have finished processing, turn the speed selector to 0 and unplug the appliance
Emulsifying disc
You can use the emulsifying disc (3) to whip cream and to whisk eggs, egg whites, instant pudding, mayonnaise and sponge cake mixtures.
- Put the drive shaft in the bowl.
- Place the emulsifying disc on the drive shaft.
- Put the ingredients in the bowl.
- Put the lid on the bowl. Turn the lid clockwise to fix it ('click')
- Put the pusher in the feeding chute.
- Select the speed that corresponds the accessory
- When you have finished processing, turn the speed selector to 0 and unplug the appliance
Tips
- Do not use the emulsifying disc to prepare cake mixtures with butter or margarine or to knead dough. Use the kneading blade for these jobs.
- Make sure the bowl and the emulsifying disc are dry and free from grease when you whisk egg whites. Make sure the egg whites are at room temperature
Cleaning and maintenance
Warning! Before performing any maintenance:
- Switch off and disconnect from the mains supply.
• Wait for the appliance to completely cool down.
• If necessary scrape excess food particles from the tools.
Warning! The motor base must not be immersed in water or other liquid.
- Wipe over the outside surface of the base with a damp cloth and polish with a soft dry cloth.
- Wipe any excess food particles from the power cord.
- Immerse the processing bowl, bowl cover, pusher, blade holder, cutting blades, chopper, kneading blade, emulsifying disc, citrus juicing head and plate and blender assembly in warm soapy water for complete cleaning. Then rinse under running water and wipe dry.
Dishwasher Safe
All removable parts are dishwasher safe excluding food processing bowl, blender jar and grinder mill.
Quick-cleaning the food processor bowl and blender jar
- Pour lukewarm water (not more than 0.5 litres) and some washing-up liquid into the food processor bowl or blender jar.
- Place the lid on the food processor bowl or blender jar and turn it clockwise to fix it.
- Select the speed setting that corresponds with the accessory.
- Let the appliance run until the food processor bowl or blender jar is clean or for 30 seconds.
- Detach the blender jar or food processor bowl and rinse it with clean water.
Storage
You can wind the cord around the bottom of the appliance.
Mains plug replacement
If a new mains plug needs to be fitted:
- Safely dispose of the old plug.
- Connect the brown lead to the live terminal in the new plug.
- Connect the blue lead to the neutral terminal.
- If the product is class I (earthed), connect the green/yellow lead to the earth terminal
Note! If your product is class II double insulated (only 2 wires in the cord set), no connection is to be made to the earth terminal.
Follow the fitting instructions supplied with good quality plugs. Any replacement fuse must be of the same rating as the original fuse supplied with the product.
Warning! The above section on mains plug replacement is for authorized service centre persons.
Troubleshooting
Before calling the Customer Service Number, carefully check the list below for a possible solution to your question.
| Potential problem Probable cause/solution | |
| Unit does not operate on• Is the unit plugged in? Does the outlet work?any speed or Pulse. | Are the bowl, bowl lid, and food chute lid all locked in place? See “How to Assemble.” |
| Food is not chopped,sliced or shredded uniformly. | • Packing too much food in the food chute, or pushing too hard on the food pusher maycause the processed food to be irregularly sliced or shredded. Refer to the foodprocessing charts for recommended sizes and quantities. |
| Unit stops and will notcome back on. | • Are the bowl, bowl lid, and food chute lid all locked in place? They may have movedslightly during processing. See “How to Assemble.”• Is the outlet still working? Check it by plugging in a working lamp or other appliance.You may have overloaded the circuit and blown a fuse or tripped the circuit breaker.• Turn unit OFF, allow to stand for 3 to 4 minutes, then turn back ON. If none of these suggestions correct the problem,DO NOT attempt to repair the unit. Call the Customer Service number to get the name of your nearest Authorized Service Center. |
| Unit has a burning smell. | • There may be a residue left on the motor from the manufacturing process, causing aslight odor during initial use. This will go away. If a strong odor or any visible smokeappears, unplug the unit IMMEDIATELY and call the Customer Service number. |
| Motor seems weak. | • Are you using the recommended speed for the item you are processing?• Are you using the recommended food size and quantity to be processed? Refer to thefood processing charts for recommended food sizes and speeds. |
Protecting the environment

Separate collection. This product must not be disposed of with normal household waste.
Should you find one day that your BLACK+DECKER product needs replacement, or if it is of no further use to you, do not dispose of it with other household waste. Make this product available for separate collection.
- BLACK+DECKER provides a facility for recycling BLACK+DECKER products once they have reached the end of their working life. This service is provided free of charge. To take advantage of this service please return your product to any authorised repair agent who will collect them on our behalf.
- You can check the location of your nearest authorised repair agent by contacting your local BLACK+DECKER office at the address indicated in this manual. Alternatively, a list of authorized BLACK+DECKER repair agents and full details of our after-sales service and contact are available on the Internet at: www.2helpU.com.
Technical data
| FX650-B5, FX649-B5 & FX648-B5 | |
| Voltage 220-240V | |
| Frequency 50-60 Hz | |
| Power 600W | |
Model guide
| Accessories FX650-B5 FX649-B5 FX648-B5 | |||
| 1.5L Food Processor Bowl √ | √ | √ | |
| 1.5L Blender Jar √ X X | |||
| Grinder √ √ X | |||
| Chopping blade | √ | √ | √ |
| Slicing & Shredding disc √ | √ √ | ||
| Kneading blade | √ | √ | √ |
| Whisking disc | √ √ | √ | |
| Citrus juicer | √ | X | X |
| Spatula | √ | √ | X |
Warranty
BLACK+DECKER is confident of the quality of its products and offers an outstanding warranty.
This warranty statement is in addition to and in no way prejudices your statutory rights.
If a BLACK+DECKER product becomes defective due to faulty materials, workmanship or lack of conformity, within 24 months from the date of purchase, BLACK+DECKER warranty to replace defective parts, repair products subjected to fair wear and tear or replace such products to ensure minimum inconvenience to the customer unless:
The product has been used for trade, professional or hire purposes;
The product has been subjected to misuse or neglect;
The product has sustained damage through foreign objects, substances or accidents;
Repairs have been attempted by persons other than authorised repair agents or BLACK+DECKER service staff.
To claim on the warranty, you will need to submit proof of purchase to the seller or an authorised repair agent. You can check the location of your nearest authorised repair agent by contacting your local BLACK+DECKER office at the address indicated in this manual.
Alternatively, a list of authorised BLACK+DECKER repair agents and full details of our after-sales service and contacts are available on the Internet at: www.2helpU.com.
Black and Decker (Overseas) GmbH
PO Box 17164, Dubai, United Arab Emirates
natural_image
Line drawing of a kitchen appliance with handle and control knob (no text or symbols)natural_image
Diagram of a hand holding a cylindrical object with an arrow indicating direction (no text or symbols)natural_image
Technical line drawing of a mechanical component with no visible text or symbolsnatural_image
Simple line drawing of a carrot in a cylindrical container with a leafy top (no text or symbols)natural_image
Line drawing of a kitchen appliance with handle and control knob (no text or symbols)natural_image
Diagram of a hand holding a cylindrical object with a black arrow indicating direction (no text or symbols)natural_image
Technical line drawing of a mechanical component with no visible text or symbolsNames & Addresses for BLACK+DECKER Service Concessionaries
| COUNTRY NAME ADDRESS TELEPHONE NO. EMAIL | ||||
| BAHRAIN | Alfouz Services Co. WLL | P.O. Box 26562, Tubli, Manama | (00973) 17783562 / 17879987 | alfouz@batelco.com.bh |
| BAHRAIN | Kewalram & Sons Co. WLL | P.O. Box 84, Manama,Kingdom of Bahrain | (00973) 1721311017210617 | kewalram02@batelco.com.bhkewalram@batelco.com.bh |
| EGYPT | Anasia Egypt for TradingS.A.E. (Mentrade) | P.O. Box 2443, 9, Mostafa Refaat Street,Sheraton Heliopolis 11361, Cairo | (00202) 22684159Hotline19311 | wael.salah@anasia.comnevien.elbeshbishy@anasia.com |
| JORDAN | Mega Hardware -(Sami Bashiti & Partners Co.) | 93 King Abdullah II St.,P.O.BOX 3005 AMMAN 11953 | (009626) 5349098 | info@mega-hardware.comwww.mega-hardware.com |
| KSA | Fawaz Ebrahim Al ZayaniTrading Est. | P.O. Box 76026, Al Raka : 31952 | (009663) 8140914 | dewaltdammam@hotmail.comwww.fawazalzayanigroup.com |
| KSA(U-MARK)and Ghunaim Market | United Trading & Marketing Co;Military city road – Near City max | #15, Khamis Mushait 62411, Abha, | (00966) 172500378 | serviceabha@u-mark.net |
| KSA(U-MARK) | United Trading & Marketing Co;Al Saud Street - Near Nawan Hotel | #116, Prince Fahad Ibn Ibrahim | (00966) 11473-3258 | malazservice@u-mark.net |
| KSA(U-MARK)Al Umran & Khub Ath Thinayan | United Trading & Marketing Co;52371 Al Hamr Road near Jaryat | Ash Shiqah, Al Hamr, Buraydah | (00966) 16-3694969 | serviceqaseem@u-mark.net |
| KSA(Sihha Medical Center) | United Trading & Marketing Co;(U-MARK) | King Abdulaziz St, Al AziziyahDammam 32424 near Dat AS | (00966) 138179319138172654 | servicedammam@u-mark.net |
| KSA(U-MARK)New Jeddah National Hospital | United Trading & Marketing Co;Jeddah 23331 Falastin Road Near | Jabal Ar-Rubabah, Misrifah, | (00966) 126612552 | servicejeddah@u-mark.net |
| KSA | United Trading & Marketing Co; (U-MARK) | #356, Al Talah Medina 42322 | (00966) 148423339 | servicemadina@u-mark.net |
| KUWAIT | Al Omar Technical Co. | P.O. Box 4062, Safat 13041, Kuwait | (00965) 24848595 / 24840039 | alexotc@usa.net |
| LEBANONBuilding, Beirut | Aces Service Centre(Est. F.A.Ketaneh SA) | P.O. Box 90-102, Nahr El Mot,Seaside Highway, Pharaon | (009611) 898989 / 262626 | nissrine.hajj@aces.com.Ibnassim.aziz@Aces.com.lb |
| LIBYA(Benghazi, Libya (P.O. Box 18182 Salmany) | Homeworld Co. | Senidal St. Amr Ibn Elaas Road,ext. 103 | (0021861) 9094183 | nissrine.hajj@aces.com.lb |
| LIBYA(El Ghoul Brothers) | North Africa TradingStreet 11, Benghazi | P.O. Box 348, 7 October | (00218061) 3383994 | nissrine.hajj@aces.com.lb |
| LIBYA | North Africa Trading(El Ghoul Brothers) | AlBarniq Dewalt Center,Mokhazin-elsukar St. Elfallah, Tripoli | (00218021) 3606430 | nagte.ly@gmail.comnagle.dpt@gmail.com |
| MAURITIUS | The Brandhouse Ltd. | Rogers Industrial Park 1, RicheTerre, Mauritius | (00230) 20694502071700 | claims(service.centre@goupille.mustephanie.bijoui@gmail.com |
| OMAN | Oman Marketing & Service Co.(Omasco) | P.O. Box 2734,Behind HondaShowroom,Wattayah,Oman | (00968) 2456023224560255 | npservice@omasco.com.omashok.balan@omasco.com.om |
| OMAN | Oman Marketing & Service Co. (Omasco) | Al Ohi, Sohar,Oman | (00968) 26846379 | sooraj.neeran@omasco.com.om |
| OMAN | Oman Marketing & Service Co. (Omasco) | Sanaya, Salalah,Oman | (00968) 23212290 | rajagopal.pr@omasco.com.om |
| PAKISTANPlaza Behind Gul Plaza MarstonRoad,KARACHI | Ammar Service & Spares | Office No 6068 6th Floor Central | (009221) 32775252 | babji93@yahoo.com |
| QATAR | Al Muftah Service Centre | Al Wakrah Road, P.O. Box 875,Doha,Qatar | (00974) 4465088044650110 | service@almuftah.comalmuftah@almuftah.com |
| TUNISIAMaintenance(STM)2013 BEN AROUS, TUNISIA. | Societe Tunisienne DeZONE INDUSTRIELLE BENA ROUS. | RUE DE LA PHYSIQUE, NOUVELLE | (0021679) 389687 | importa@stqu.com |
| UAE | Light House Electrical | P.O. Box 120, Abu Dhabi | (009712) 6726131 | dewalt_lhe@hotmail.com |
| UAE | Light House Electrical | P.O. Box 120, Abu Dhabi | (009712) 5548315 | dewalt_lhe@hotmail.com |
| UAE | BLACK+DECKER (Overseas) GmbH | P.O. Box 5420, Dubai | (009714) 8127400 / 8127406 | service.mea@sbdinc.com |
| UAE | Zillion Equipment and | P.O. Box 10584, Ras Al Khaimah | (009717) 2277095 | zillionrak@gmail.com |
| UAETrading LLC | Zillion Equipment and Spare PartsTrimix Redymix Sanaiya, Al Ain | P.O. Box 19740, Opp. Bin Sadal / | (009713) 7216690 | zilliontrdg@gmail.com |
| YEMEN | Middle East Trading Co. (METCO) | 5th Flr.Hayel Saeed AnamBldg. Al-Mugamma St. Taiz, Yemen | (009674) 213455 | metco@metcotrading.comsami@metcotrading.com |
| YEMEN | Middle East Trading Co. (METCO) | Mualla Dakka, Aden | (009672) 222670sami@metcotrading.com | metco@metcotrading.com |
| YEMEN | Middle East Trading Co. (METCO) | Hayel st.,Sana'a,Yemen | (009671) 204201sami@metcotrading.com | metco@metcotrading.com |
WARRANTY REGISTRATION CARD
YOUR NAME/ VOTRE NOM/الإسم
YOUR ADDRESS/ VOTRE ADRESSE/ العنوان


- Safety instructions
- Safety of others
- Inspection and repairs
- Additional safety instructions for food processors
- Important safeguards
- Electrical safety
- Intended use
- Using your appliance
- After use
- Labels on appliance
- Features
- Before first use
- Using the appliance
- General
- Using your food processor
- How to Lock the Bowl
- How to Assemble and Lock the Lid
- How to Operate the Controls
- Processing Tips and Techniques
- Processing Using Chopping/Mixing Blade
- Processing using slicing/shredding disc
- Processing Using Citrus Juicer
- Processing using blender jar
- Egg mixing
- Vegetable or fruit mixing
- Processing using grinding mill
- Kneading blade
- Emulsifying disc
- Tips
- Cleaning and maintenance
- Dishwasher Safe
- Quick-cleaning the food processor bowl and blender jar
- Storage
- Mains plug replacement
- Troubleshooting
- Protecting the environment
- Warranty
- WARRANTY REGISTRATION CARD
Brand : BLACK & DECKER
Model : FX650
Category : Food Processor