
Highway - Mp3 player PURE - Free user manual and instructions
Find the device manual for free Highway PURE in PDF.
| Product Type | MP3 Player / DAB+ Digital Radio Receiver with FM Transmitter and AUX Input |
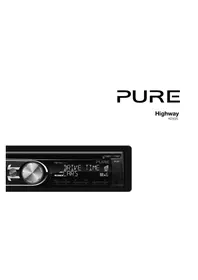
| Brand and Model | Pure Highway |
| Power Supply | 12 V DC via cigarette lighter adapter (USB Type A, 1 A max) |
| Connectivity | 3.5 mm AUX input, FM transmitter (87.6 – 107.9 MHz), USB port for power |
| Main Functions | DAB/DAB+ digital radio, FM radio, AUX input for MP3 playback, 20 DAB presets, 9 FM channels, traffic announcements, programmable sleep timer, software update |
| Display | OLED display with status icons, manual or automatic brightness adjustment |
| Controls | Physical buttons: Power/Standby, Presets, Select, Previous, Next, Home, FM Channel, Back |
| Installation | Dashboard mounting with adhesive mount, DAB film antenna on windshield, antenna and power cable |
| Operating Temperature | -20 °C to +60 °C |
| Storage Temperature | -40 °C to +85 °C |
| Care and Cleaning | Clean with a dry cloth only; keep dry |
| Safety | Do not install near airbags, do not expose to heat, use only the provided adapter, disconnect before modifying vehicle wiring |
| Spare Parts and Repairability | Repairs only by authorized personnel; contact Pure after-sales service |
| General Information | Product complies with CE and R&TTE/RED directives, recycling compliant with WEEE standards |
Frequently Asked Questions - Highway PURE
User questions about Highway PURE
0 question about this device. Answer the ones you know or ask your own.
Ask a new question about this device
Download the instructions for your Mp3 player in PDF format for free! Find your manual Highway - PURE and take your electronic device back in hand. On this page are published all the documents necessary for the use of your device. Highway by PURE.
USER MANUAL Highway PURE
Before you use your Highway, read the following safety instructions.
- Follow the operating Instructions provided and take note of any warnings.
- If you do not follow the operating instructions provided, it may compromise the safety of your product and this may invalidate the warranty.
- Only use the supplied 12V power adapter with your product.
- Do not install your product in a way that may interfere with the safe operation of the vehicle, or affect the deployment of air bags or other safety items. Do not install cables and wires near the steering wheel.
- Do not place your product on or near sources of your vehicle's heat or ventilation.
- Do not use your product in a way that may cause careless driving or improper control of your vehicle.
- Keep your product dry and only clean with a dry cloth.
- Do not expose your product to naked flames.
- Do not use your product in extremely hot or cold temperature.
- If you need to connect your product to the rear of your vehicle's head unit, remove any power before you start to install your product. When you have safely installed your product, you can reconnect the power. See your vehicle's owner's manual for more information.
- Do not use the product if it is damaged.
- Product repairs should only be carried out by authorised personnel.
Symbols on the product and in the user manual

Potentially serious risk to your personal safety. To avoid possible injury 1A_br USB socket rated at 1amp maximum. death, obey all safety notices with this symbol.

12V DC

Where to switch on or off the product, or put it in
standby
Contents
Safety 1
Contents 2
Overview 3
What's in the box 3
Display icons 4
Controls 5
Getting started 6
Installing your Highway 6
Where to install your Highway 7
Positioning the antenna 8
Positioning the controller 10
Connecting the antenna to the controller
Connecting the controller to your vehicle
Switching your Highway on for the first time
Switching your Highway on and off
Digital radio 14
Listening to digital radio 14
Digital radio presets 14
FM transmission frequencies 15
Auxiliary input 16
Listening to music on a mobile device 16
Settings 17
Changing between the Line Out cable and FM
transmission 17
Setting your Highway to enter standby automatically 17
Switching phantom power to the aerial on and off 18
11 Radio settings 18
12 Display settings 19
13Updating the software 21
13 Troubleshooting 22
Overview
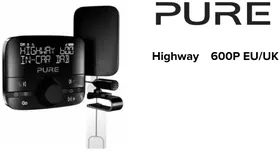
What's in the box
Before you get started, check you have everything below.


1 Antenna, with magnetic grounding tail attached
5 Cleaning cloth
2 DAB film aerial
6 12V power adapter (dual USB port)
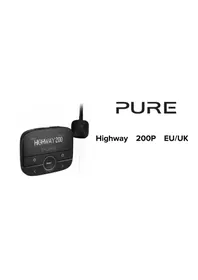
3 Controller with USB power and audio connectors
7 Self-adhesive cable clips
4 Controller bracket
Restrictions for use - to be used only with items shown on this page and configured/installed/used according to this manual.
Display icons
The icons below appear on the screen of the controller.
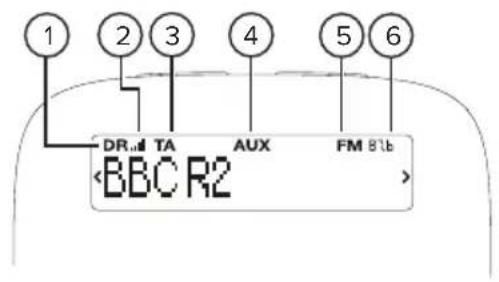
1 Digital radio mode 4 Auxiliary input mode
2 Digital radio signal strength 5 FM transmit enabled
3 Traffic announcements enabled 6 FM transmit frequency
Controls
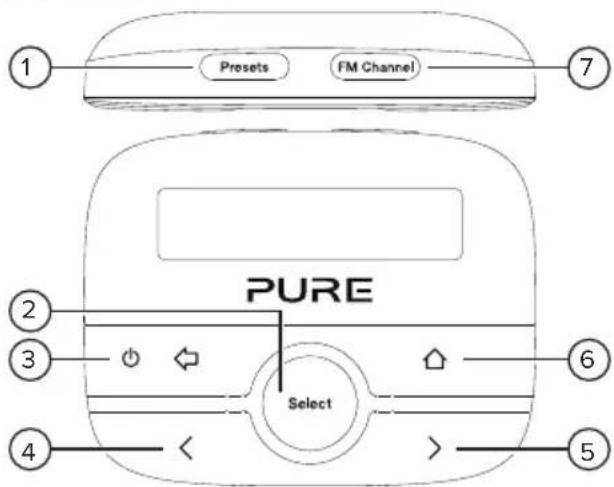
1 Presets Press to view your digital radio presets. When in menu, press and hold to save the current station to preset number.
2 Select Press to select a radio station or menu option.
3 Power / Press to switch your Highway on. Press and hold Back put your Highway in standby. Press to go back to previous screen or cancel an action.
4 Previous Press to choose the previous radio station or menu option.
5 Next Press to choose the next radio station or menu option.
6 Home Press to open the main menu.
7 FM Channel Press to view stored FM transmission frequencies. When in this menu, press and hold to store the cu FM frequency to an FM channel.
Getting started
Installing your Highway
Before you can start using your Highway, you need to do the following:
- Position the antenna in your vehicle.
- Position the controller in your vehicle.
- Connect the antenna to the controller.
- Connect the controller's power and audio cables to your vehicle.
- Switch your Highway on for the first time.
To watch a video showing how to install your Highway, search for 'Highway 200 installation' on YouTube
Vehicle requirements
Fitted audio system with auxiliary (3.5mm) port or FM receiver.
- Standard 12V negative earth power supply. Your Highway is not suitable for use with a 24V power supply.
Getting the best DAB signal
As with FM radio, DAB signal coverage changes depending on your location. As you use the Highway in your vehicle, you may travel through areas where DAB signal coverage is poor.
To help get the best DAB signal when coverage is poor or there is a weak signal:
- Follow the installation instructions carefully.
- Use the supplied 12V power adapter, as other third-party adapters can cause interference.
- Switch off other devices in your vehicle that aren't in use. Devices such as satellite navigation systems and dashboard cameras can cause interference.
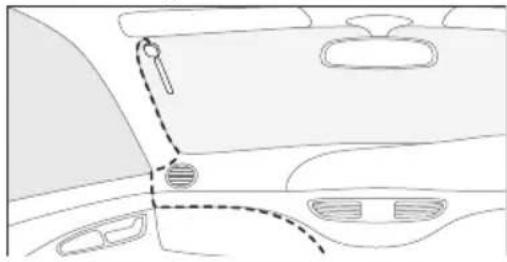
Where to install your Highway

It's important to install your Highway in a safe location in your vehicle. Do not fit any components in locations that may interfere with safe operation of the vehicle, or affect the deployment of air bags or other Keep cables and wires away from the steering wheel.
Where to installthe antenna
We recommend you install the antenna for your Highway in the top corner of the windscreen, on the passenger's side of your vehicle.
Install the antenna so that it is not within the swept area of the windscreen. Make sure the antenna and wireless controller do not obstruct the view of the driver.

If you have a heated windscreen in your vehicle, or the windscreen contains metallic UV filters, it can cause interference for
the DAB signal . Install the antenna on a part of the windscreen that does not contain heating elements c
For more information on where to safely and legally install your Highway in your vehicle, contact your office. To find local fitters that can install your Highway professionally, visit pure.com/store-locator.
Positioning the antenna
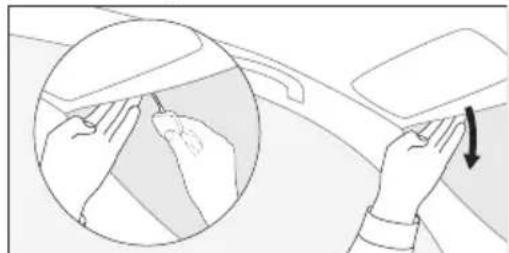
- Choose a position for the antenna, so that it's as high as pos the windscreen and at least 4cm from the side of the screen.
Make sure the antenna does not obstruct the view of the
- Gently pull down the front of the roof liner in your vehicle, under a small gap.
- Push the magnetic grounding tail through the gap, with the silver-coloured magnet facing upwards. Make sure the magnet touches your vehicle's metal bodywork.

- Clean the chosen area of the windscreen with a cleaning wait for it to dry.
-
Unpeel the backing from the antenna and stick the antenna on windscreen.
-
Insert the DAB film aerial into the slot in the antenna.
-
Gently unpeel the backing from the DAB film aerial and stick aerial onto your windscreen. Take care not to fold or twist t
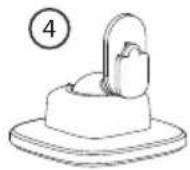
Positioning the controller

- Choose an area on your vehicle's dashboard where you want to the controller. Clean the surface with a cleaning cloth and wait dry.
Make sure the controller does not obstruct the view of the
- Peel off the backing from the controller bracket and gently stick onto your dashboard. Gently press the bracket to ensure it's att securely.
- Slide the controller onto the bracket, until it clicks into place.
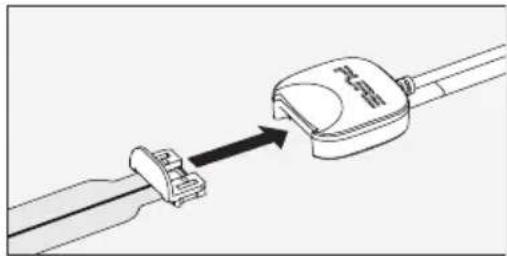
Connecting the antenna to
the controller
- Place the antenna cable so that it follows a path to th your vehicle's dashboard.
Note: To prevent interference to the DAB signal, keep cables from display units such as LCD screens.
-
If possible, tuck the cable behind the trim down the side of windscreen. Alternatively, secure the cable to your windscreen a dashboard with self-adhesive clips.
-
Insert the antenna cable into the connector on the rear of the controller.
Note: Push the antenna cable in firmly, to ensure it's fully in
EN
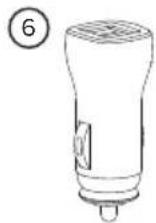
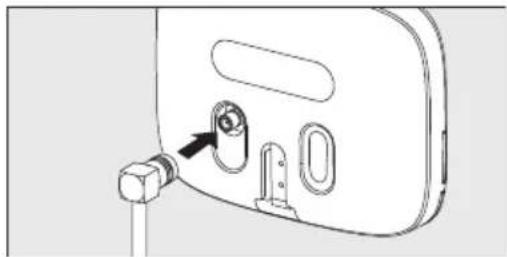
Connecting the controller to your vehicle

- If required, gently pull apart the controller's power and audio case separate them.
Note: To prevent interference to the DAB signal, keep cables a from display units such as LCD screens.
-
Insert the USB power cable into the supplied 12V power adapter insert the power adapter into your vehicle's power socket.
-
If you're connecting your Highway with the Line Out cable, insert the cable into your vehicle's auxiliary socket. If you're connecting you Highway by FM radio, you can store the Line Out cable so it's out of the way.
We recommend you connect your Highway with the Line Out cable to get the best audio quality.
Switching your Highway on for the first time
After you've installed your Highway, switch it on to finish setting it up.
- Turn on your vehicle's ignition to make sure your Highway is switched on.
- Press
to change the display language, then press Select to choose it. - Press and Select to choose how to connect your Highway to your vehicle.
If you've connected your Highway with the Line Out cable, choose 'Line out'. Then press<> and Select to choose 'Normal gain'. If you later find that audio is distorted, you can change the gain setting. Read more on page 17.
- If you're connecting your Highway by FM radio, choose 'FM transmit' and then choose an FM radio station isn't using the frequency you choose.
Tune your vehicle's audio system to the same FM frequency as your Highway. To easily find frequency in the future, save it as a preset on your vehicle's audio system.
After you've chosen how to connect your Highway, it starts tuning to digital radio stations. When the autotune is complete, you can start listening to digital radio.
Switching your Highway on and off
To switch on your Highway press
To put your Highway in standby and use less power, press and hold
Note: By default, the controller automatically enters standby after 4 hours. To change the delay, see page 17.
Digital radio
Listening to digital radio
- Press.
- Press<and Select to choose 'Digital radio'.
- To change to another radio station, press to choose a station and then press Select.
Digital radio presets
You can save up to 20 of your favourite digital radio stations in the presets list.
Storing a radio station as a preset
- When listening to a digital radio station, press Presets.
- Press<to choose a preset number. You can overwrite previous radio stations.
- Press and hold Select or Presets to save the current digital radio station to the preset number.
Listening to a preset
- Press Presets.
- Press to choose the preset you want to listen to, then press Select.
You can also listen to a preset using only the Presets button. Press Presets multiple times, until the preset you want to listen to is displayed. After 3 seconds, your Highway tunes to that radio station.
FM transmission frequencies
If you connect your Highway to your vehicle's audio system using FM radio, local radio stations may broadcast at the same FM frequency as your Highway. To quickly change the FM transmission frequency on your Highway, you can frequencies as FM channels.
The FM transmission frequency is displayed in the top-right of the screen. If you're using the 'Line out' setting, the
FM transmission frequency is not displayed and the FM Channel button is disabled.
Storing an FM transmission frequency
- Press FM Channel.
- Press to choose an FM channel. You can overwrite previous FM frequencies.
- Press and hold Select or FM Channel to save the current FM radio frequency to the FM channel.
- If required, you can press to edit the FM frequency, then press Select to update the FM channel.
Changing the FM transmission frequency
- Press FM Channel.
- Press to choose a stored FM transmission frequency, then press Select.
You can also change the FM transmission frequency using only the FM Channel button. Press FM Channel multiple times, until the FM transmission frequency you want to use is displayed. After 3 seconds, your H that FM transmission frequency.
Auxiliary input
Listening to music on a mobile device
You can use the controller's Aux In cable to listen to music on a mobile device through your vehicle's audio system.
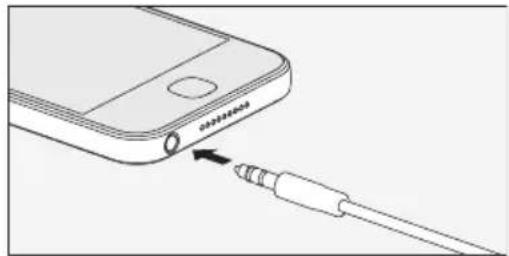
- Connect a mobile device to your Highway using the Aux In ca
- Press.
- Press<> and Select to choose 'Auxiliary input'. Your Highway is now ready to play music from the connected device.
Settings
Changing between the Line Out cable and FM transmission
You can choose how your Highway is connected to your vehicle's audio system.
- Press
- Press and Select to choose 'Settings' > 'Audio out'.
-
Press and Select to choose how to connect your Highway to your vehicle.
-
If you've connected your Highway with the Line Out cable, choose 'Line out'. Then press<> and Select to choose a gain setting of 'Low gain' or 'Normal gain'. If the audio sounds distorted, choose 'Low gain'.
- If you're connecting your Highway over FM radio, choose 'FM transmit' and then choose an FM Ensure a radio station isn't using the frequency you choose.
Setting your Highway to enter standby automatically
By default, your Highway enters standby after 4 hours, but you can change the delay.
- Press.
- Press and Select to choose 'Settings' > 'Auto standby'.
- Press and Select to choose a delay between 1 and 8 hours.
Switching phantom power to the aerial on and off
By default, your Highway powers the DAB film aerial through the antenna's cable. If you're using the DAB film aerial that came with your Highway, keep this setting on. If you're using an aerial from a different manufacturer, check the aerial's user manual to see whether you need to change this setting.
- Press
- Press and Select to choose 'Settings' > 'Digital radio' > 'Phantom power'.
- Press and Select to choose 'On' or 'Off'.
Radio settings
Performing an autotune
If you can't find any digital radio stations, try retuning your Highway.
- To perform an autotune, press and hold Select when you are in digital radio mode.
Listening to alternative stations when the signal is weak
If the current radio station has a weak signal, your Highway automatically tries to find a stronger signal. If your Highway can't find a stronger signal for the current radio station, it can automatically tune to a similar radio station when supported by the broadcaster.
- Press.
- Press and Select to choose 'Settings' > 'Digital radio' > 'Alt stations'.
- Press and Select to choose 'On' or 'Off'.
Switching traffic announcements on and off
You can set your Highway to automatically play traffic announcements when you are listening to dig Highway plays traffic announcements, it displays 'Traffic'.
- Press.
- Press and Select to choose 'Settings' > 'Digital radio' > 'Traffic messages'.
- Press and Select to choose 'On' or 'Off'.
To cancel a traffic announcement when it plays, press
Display settings
Changing the language
- Press
- Press and Select to choose 'Settings' > 'Display' > 'Language'.
- Press<and Select to choose a language.
Changing the information displayed on the screen
Your Highway can display different information while you are listening to a radio station.
- Press.
- Press and Select to choose 'Settings' > 'Display' > 'Information'.
- Press<>and Select to choose a setting.
To display the names of radio stations, choose 'Station name'.
- To display text that the radio station broadcasts, choose 'Scrolling text'. This setting is not recommended while driving.
To display the signal quality of radio stations, choose 'Signal quality'.
To display the signal strength of radio stations, choose 'Signal strength'. The signal strength is displayed on a scale
from 0 to 15 bars. A marker on the scale shows the minimum number of bars required for good
Changing the screen brightness
A light sensor on the controller automatically sets the screen brightness, but you can manually change it.
- Press.
- Press and Select to choose 'Settings' > 'Display' > 'Brightness' > 'Manual'.
- Press and Select to choose a brightness level.
You can set the screen on the controller to dim after a certain length of time. To change the 'Display' > 'Timeout'.
Updating the software
We may provide software updates to improve your Highway. To find out more about updating the visit pure.com/highway-update.
Troubleshooting
| Problem Possible cause | Solution | |
| I can't hear any sound. Your Highway is not connected vehicle. | Esuses the Line Out cable is firmly connected to your vehicle's audio system, or ensure you are tuned to the correct FM frequency. | |
| Your vehicle's audio system is not correct input source. | Changme the input source on your vehicle's audio system or auxiliary input. | |
| Your Highway is not in the correct mode. | Change the mode to digital radio or a auxiliary input. Read more on pages 14 and 16. | |
| The volume is too low on your or connected mobile device. | Vehicleup the volume on your vehicle and on the connected mobile device. | |
| The controller is not responding. | The controller isn't connected properly to a power supply. | Ensure the controller is fully connected to the 12V power adapter, and that the a dapter is fully inserted into your vehicle's power socket. Then turn on your vehicle's ignition. If there's still a problem remove the 12V power adapter from the socket, then reinsert the adapter and wait for your Highway to restart. |
| Sound is distorted when my Highway is connected with the Line Out cable. | The ga in setting isn't correct. Set the ga in setting to 'Low gain' or change to FM transmission. Read more on page 17. | |
| My Highway keeps lost digital radio signal. | You are travelling through areas weak DAB signal. | Check DAB coverage in your area. |
| Your Highway is not installed correct. | Check the Installation Instructions on page 6. | |
| Something is causing interference. | Switch off satellite navigation systems, dashboard cameras or other devices to see if the signal improves. Use the supplied 12V power adapter, as other adapters cause interference. | |
| My Highway keeps switching off by itself. | Auto standby mode is switched on. If this is happening too often, change the auto standby setting | |
If you need more help, visit support.pure.com.
Correct disposal of this product
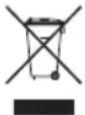
This markind that this product should not be disposed with other household waste throughout the EU. To prevent possible harm to the environment or human health from uncontrolled waste disposal, recycle it responsibly to promote the sustainable reuse of material resources. To return your used device, please use the return and collection system or contact the retailer where the product was purchased. They can take this product for environmental safe recycling.
Copyright
Copyright 2017 by Pure International Limited. All rights reserved. No part of this publication may be copied or distributed, transmitted, transcribed, stored in a retrieval system, or translated into any human or computer language, in any form or by any means, electronic, mechanical, magnetic, manual or otherwise, or disclosed to third parties without the express written permission of Pure International Limited. For warranty and disclaimer information, visit pure.com.
Trademarks
Highway, Pure and the Pure logo are trademarks or registered trademarks of Pure International Limited. All other product names are trademarks of their respective companies. Version 1 February 2016.
Approvals

CE marked. Hereby, Pure declares that this Band II LPD device is in compliance with the essential requirements and other provisions of the R&TTE Directive 1999/5/EC or RED 2014/53/EU from 12th June 2017. Compliant with UNECE Regulation 10 (E-Mark) and RF exposure requirements EN 62479: 2010. You can view the Declaration of Conformity at http://www.pure.com/about/rtte-doc.
Specifications
For the full list of technical specifications, visit pure.com. Operational temperature: -20°C to +60°C. Storage temperature: -40°C to +85°C. FM frequency range: 87.6 - 107.9 MHz. FM max power: 51.78 db (uV/m).
Software Version: v1.1
Restrictions of use: None (configure and install as per this manual)
Sicherheit

12 V DC stromforsyning.
Innhold
Sikkerhet 1
Innhold 2
Oversikt 3
Innholdet i esken 3
Ikoner pà displayet 4
Kontroller 5
Kom igang 6
Installere Highway 6
Sla pa Highway for feste gang 13
Sla Highway p ag av
Digitalradio
15
Forvalg for digital radio
15
Frekvenser pà FM-sendinger
16
AUX inngang
17


- Contents
- Overview
- What's in the box
- Display icons
- Controls
- Getting started
- Installing your Highway
- Vehicle requirements
- Getting the best DAB signal
- Where to install your Highway
- Where to installthe antenna
- Positioning the antenna
- Positioning the controller
- Connecting the antenna to
- the controller
- Connecting the controller to your vehicle
- Switching your Highway on for the first time
- Switching your Highway on and off
- Digital radio
- Listening to digital radio
- Digital radio presets
- Storing a radio station as a preset
- Listening to a preset
- FM transmission frequencies
- Storing an FM transmission frequency
- Changing the FM transmission frequency
- Auxiliary input
- Listening to music on a mobile device
- Settings
- Changing between the Line Out cable and FM transmission
- Setting your Highway to enter standby automatically
- Switching phantom power to the aerial on and off
- Radio settings
- Performing an autotune
- Listening to alternative stations when the signal is weak
- Switching traffic announcements on and off
- Display settings
- Changing the language
- Changing the information displayed on the screen
- Changing the screen brightness
- Updating the software
- Correct disposal of this product
- Copyright
- Trademarks
- Approvals
- Specifications
- Sicherheit
- Innhold
Brand : PURE
Model : Highway
Category : Mp3 player