Bread Bakery SD206B - Bread maker PANASONIC - Free user manual and instructions
Find the device manual for free Bread Bakery SD206B PANASONIC in PDF.
| Product type | Automatic bread maker |
| Brand | Panasonic |
| Model | SD-206 / Bread Bakery SD206B |
| Dimensions (H × W × D) | Approx. 35.5 × 34 × 23.2 cm |
| Weight | Approx. 7.1 kg |
| Power supply | 230 V (230–240 V in the UK) AC, 50 Hz |
| Consumption | 550 W |
| Flour capacity | 300 g (min) to 500 g (max) |
| Programmable timer | Up to 13 hours in advance |
| Baking programs | Basic, Whole Wheat, Multigrain, French, Pizza, Bake Only |
| Baking modes | Bake (standard), Bake Rapid, Bake Sandwich, Bake Raisin, Dough, Dough Raisin |
| Bread size | L (large), M (medium), S (small) depending on program |
| Crust color | Dark, Medium, Light |
| Keep warm | 60 minutes after baking |
| Dough function | Dough preparation for pizza, rolls, etc. |
| Audible beep | 8 beeps at end of cycle and for ingredient addition (raisin mode) |
| Control panel | Digital display, Menu, Select, Size, Crust, Timer, Start/Stop buttons |
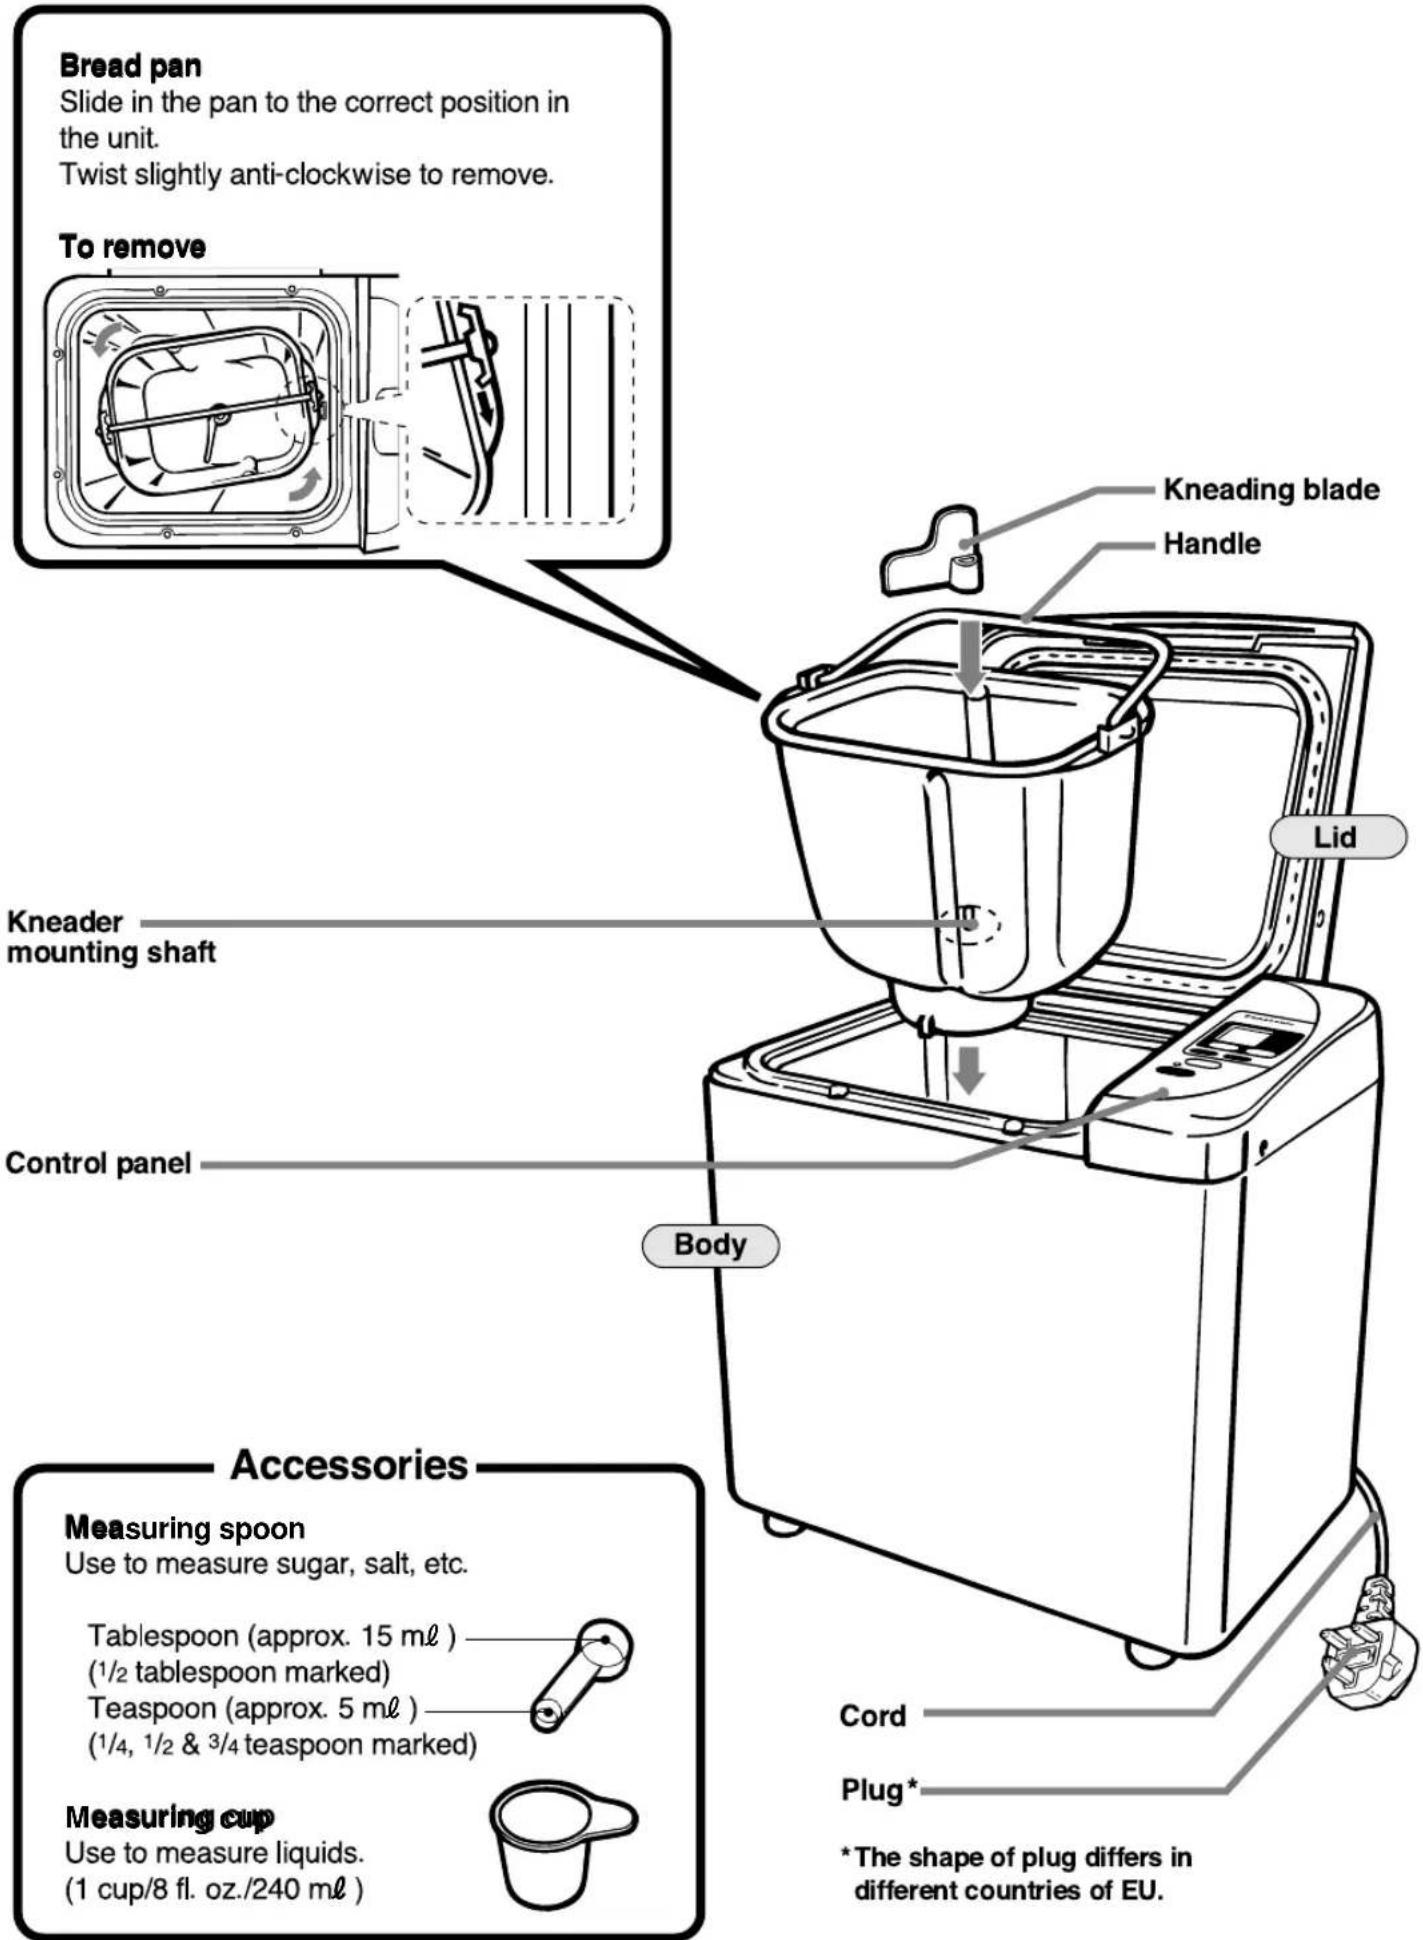
| Included accessories | Graduated cup (240 ml), measuring spoon (tablespoon and teaspoon) |
| Cleaning | Body and lid: damp cloth; pan and kneading blade: hand wash, not dishwasher-safe |
| Safety | Motor protection device, automatic stop, do not immerse |
| Spare parts available | Kneading blade shaft fixing block (ref. ADA 29A115), pan, kneading blade |
| Repairability | Have serviced by an authorized Panasonic service center |
Frequently Asked Questions - Bread Bakery SD206B PANASONIC
User questions about Bread Bakery SD206B PANASONIC
0 question about this device. Answer the ones you know or ask your own.
Ask a new question about this device
Download the instructions for your Bread maker in PDF format for free! Find your manual Bread Bakery SD206B - PANASONIC and take your electronic device back in hand. On this page are published all the documents necessary for the use of your device. Bread Bakery SD206B by PANASONIC.
USER MANUAL Bread Bakery SD206B PANASONIC
natural_image
Line drawing of a standard organic bread machine (no text or symbols)Panasonic
Before operating this unit, please read these instructions completely.
Thank you for purchasing a Panasonic Bread Bakery®, SD-206.
For your own safety and convenience, please read these instructions carefully before operating.
Installation of the Bread Bakery®.
IMPORTANT: THIS UNIT HAS TO BE EARTHED FOR PERSONAL SAFETY!
If your AC outlet is not grounded, it is the personal responsibility of the customer to have it replaced with a properly ground wall socket of 230V 50Hz (230-240V 50Hz for U. K.).
The Bread Bakery® has to be installed to a minimum 10-ampere (T) fuse.
Placement
- Do not use the appliance outdoors. This appliance was manufactured for Domestic Use only.
- Place the appliance on a firm, dry, flat worktop and avoid putting it on textiles (e.g. tablecloths, carpets, etc.) or unstable bases.
- In order to guarantee satisfactory baking, the appliance should not be used in the immediate vicinity of heat sources or in rooms where humidity is high.
- During the baking process, the casing heats up. A distance of at least 5 cm (2 inches) from walls and other objects should therefore be maintained.
IMPORTANT TIPS
- Never operate this appliance if it has a damaged cord or plug, if it is not working properly or if it has been damaged or dropped.
- Never try to repair the appliance by yourself. If it requires checking, adjusting or repairing, take the appliance to your Panasonic dealer and have it serviced by an authorised, trained technician.
- Do not immerse the appliance, the supply cord or the plug in water or other liquids.
- Do not let the supply cord hang over the edge of table or counter or touch hot surfaces.
- Never remove the bread pan or unplug the appliance when it is in use. If you do, the program sequence stops and cannot be continued unless it is restarted within 10 minutes. The appliance has a 10 minute memory. If the power is returned within 10 minutes, the program will resume.
- When in use, do not block the air vents of the appliance. Do not place any covers or cloths on the appliance.
- Do not open the appliance after the kneading process. The rising and baking results may be affected.
- When removing the hot bread pan with the baked bread, use an ovencloth or oven gloves, as the body and the bread pan are very hot.
- Make sure that the interior of the appliance and the bread pan are always clean in order to guarantee a satisfactory program sequence.
- Keep the appliance out of the reach of children. Only allow children to use the appliance under close supervision of adults and only after adequate instructions have been given so that the child is able to use the appliance safely and understands the hazards of improper use.
- This appliance is to be used for the making of bread, dough and teabreads as explained in the following instructions.
CLASS I FOR BS415/BS3456
FOR YOUR SAFETY PLEASE READ THE FOLLOWING TEXT CAREFULLY.
This appliance is supplied with a moulded three pin mains plug for your safety and convenience.
A 13 amp fuse is fitted in this plug.
Should the fuse need to be replaced please ensure that the replacement fuse has a rating of 13 amps and that it is approved by ASTA or BSI to BS1362.
Check for the ASTA mark A\$A or the BSI mark 🌐 on the body of the fuse.
If the plug contains a removable fuse cover you must ensure that it is refitted when the fuse is replaced. If you lose the fuse cover the plug must not be used until a replacement cover is obtained.
A replacement fuse cover can be purchased from your local Panasonic Dealer.
IF THE FITTED MOULDED PLUG IS UNSUITABLE FOR THE SOCKET OUTLET IN YOUR HOME, THEN THE FUSE SHOULD BE REMOVED AND THE PLUG CUT OFF AND DISPOSED OF SAFELY. THERE IS A DANGER OF SEVERE ELECTRICAL SHOCK IF THE CUT OFF PLUG IS INSERTED INTO ANY 13 AMP SOCKET.
If a new plug is to be fitted please observe the wiring code as shown below. If in any doubt please consult a qualified electrician.
WARNING...THIS APPLIANCE MUST BE EARTHED.
IMPORTANT
The wires in this mains lead are coloured in accordance with the following code;
Green-and-yellow: Earth
Blue: Neutral
Brown: Live
As the colours of the wire in the mains lead of this appliance may not correspond with the coloured markings identifying the terminals in your plug, proceed as follows:
The wire which is coloured GREEN-and-YELLOW must be connected to the terminal in the plug which is
marked with the letter E or by the Earth symbol ≡ or coloured GREEN or GREEN-and-YELLOW.
The wire which is coloured BLUE must be connected to the terminal in the plug which is
marked with the letter N or coloured BLACK.
The wire which is coloured BROWN must be connected to the terminal in the plug which is
marked with the letter L or coloured RED.
How to replace the fuse.
Open the fuse compartment with a screwdriver and replace the fuse.
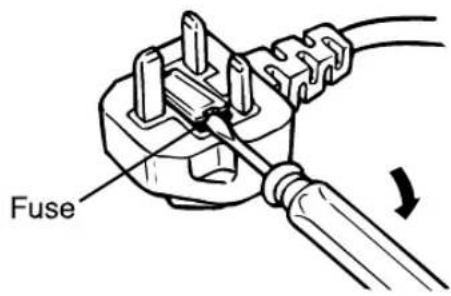
• This appliance requires a 13 AMP fuse.
• This apparatus was produced to BS 800 (1983).
Table of Contents
Basic Principles when Baking with Bread Bakery® .....7
-Basic Features....7
Baking Programs......8
Parts identification....9
Control panel-display/functions....10
How to use....11–16
-To use the timer for baking loaves only with the BAKE mode....14
-Using the BAKE RAPID mode 14
-Using the DOUGH mode 15
-Using the BAKE ONLY mode 15–16
How to clean....16
Slicing and storing the bread....17
Leakage of bread ingredients from the bread pan......17
Specifications....17
Display Indications for Abnormal Conditions......18
Before calling for service 19–20
Inhaltsübersicht
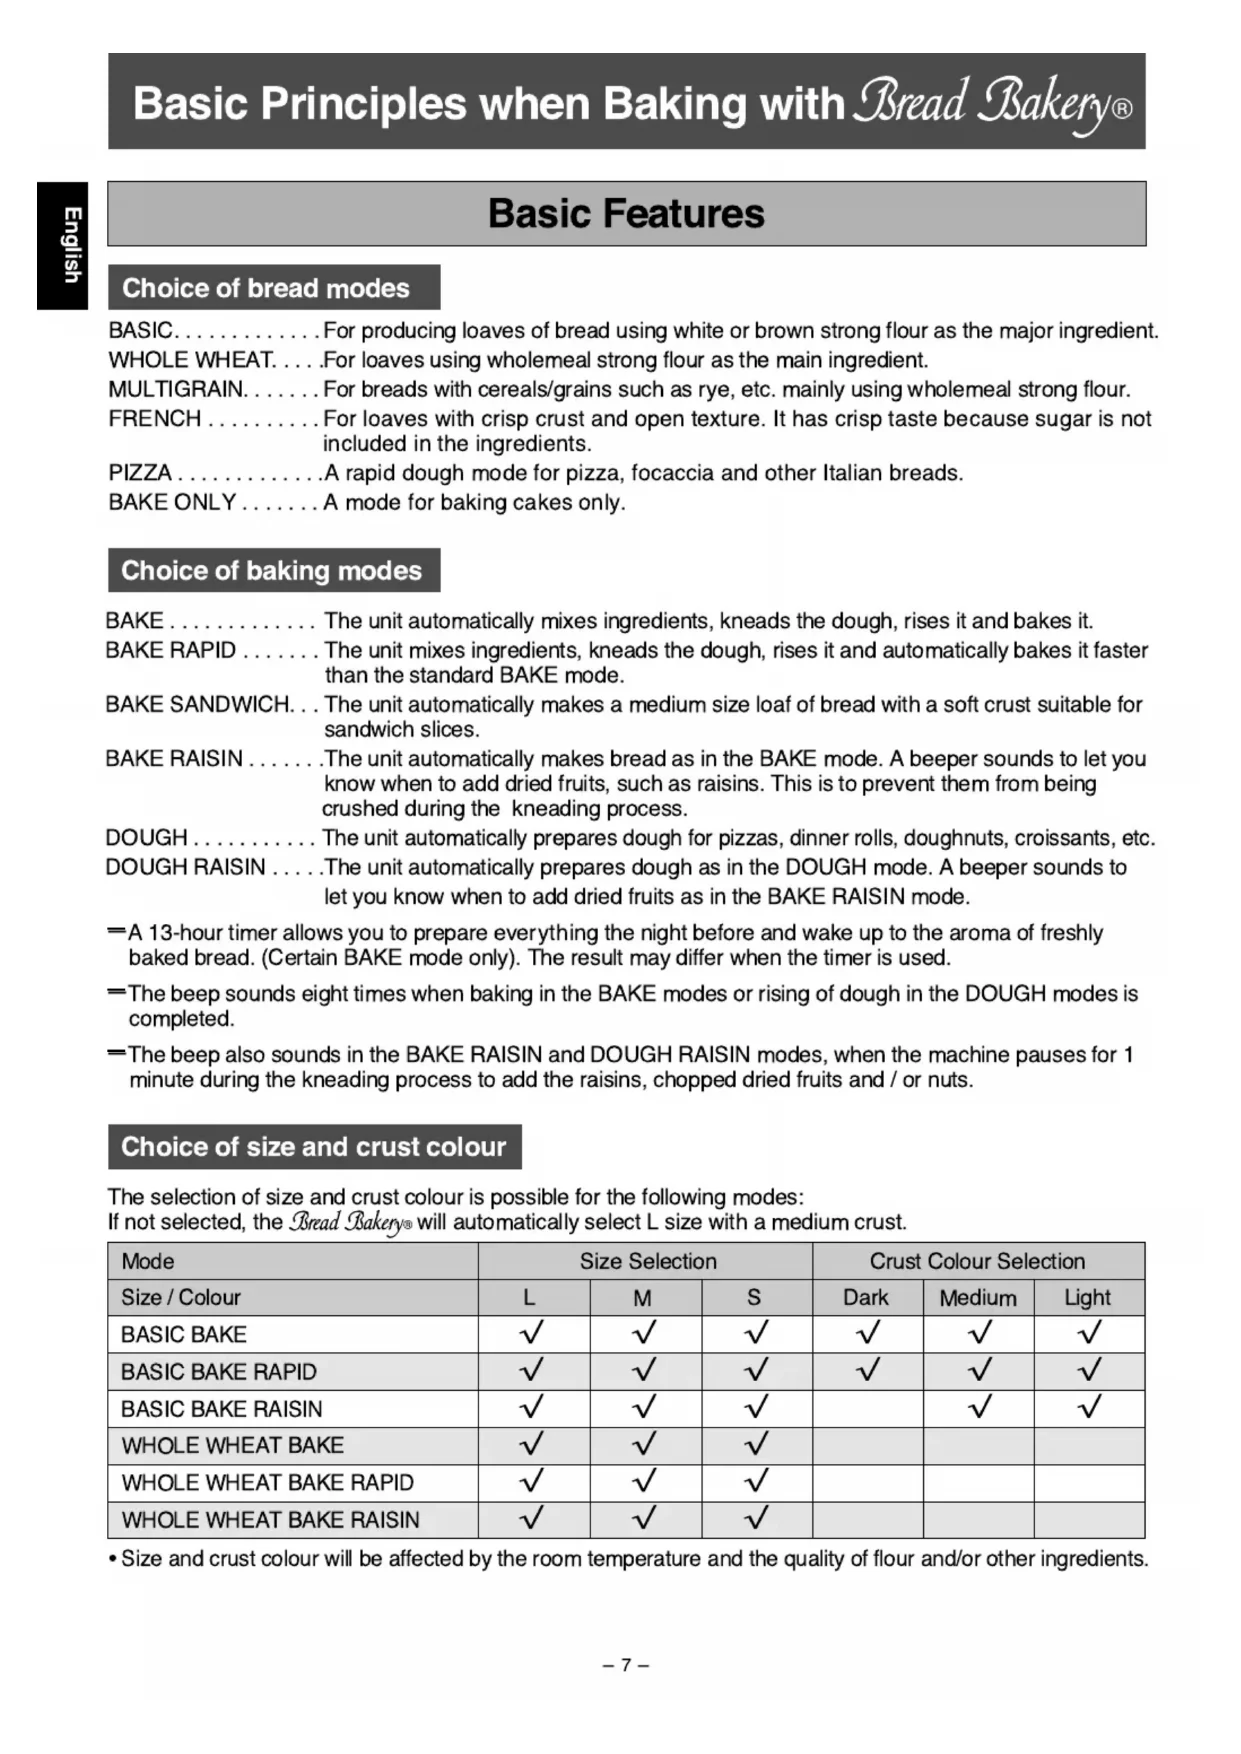
Basic Principles when Baking with Bread Bakery®
Basic Features
Choice of bread modes
BASIC....For producing loaves of bread using white or brown strong flour as the major ingredient.
WHOLE WHEAT. . . . For loaves using wholemeal strong flour as the main ingredient.
MULTIGRAIN. . . . . . For breads with cereals/grains such as rye, etc. mainly using wholemeal strong flour.
FRENCH .... For loaves with crisp crust and open texture. It has crisp taste because sugar is not included in the ingredients.
PIZZA....A rapid dough mode for pizza, focaccia and other Italian breads.
BAKE ONLY ..... A mode for baking cakes only.
Choice of baking modes
BAKE.... The unit automatically mixes ingredients, kneads the dough, rises it and bakes it.
BAKE RAPID .... The unit mixes ingredients, kneads the dough, rises it and automatically bakes it faster than the standard BAKE mode.
BAKE SANDWICH. . . The unit automatically makes a medium size loaf of bread with a soft crust suitable for sandwich slices.
BAKE RAISIN . . . . . . The unit automatically makes bread as in the BAKE mode. A beeper sounds to let you know when to add dried fruits, such as raisins. This is to prevent them from being crushed during the kneading process.
DOUGH.... The unit automatically prepares dough for pizzas, dinner rolls, doughnuts, croissants, etc.
DOUGH RAISIN ....The unit automatically prepares dough as in the DOUGH mode. A beeper sounds to let you know when to add dried fruits as in the BAKE RAISIN mode.
=A 13-hour timer allows you to prepare everything the night before and wake up to the aroma of freshly baked bread. (Certain BAKE mode only). The result may differ when the timer is used.
=The beep sounds eight times when baking in the BAKE modes or rising of dough in the DOUGH modes is completed.
=The beep also sounds in the BAKE RAISIN and DOUGH RAISIN modes, when the machine pauses for 1 minute during the kneading process to add the raisins, chopped dried fruits and / or nuts.
Choice of size and crust colour
The selection of size and crust colour is possible for the following modes:
If not selected, the Bread Bakery® will automatically select L size with a medium crust.
| Mode | Size Selection | Crust Colour Selection | ||||
| Size / Colour | L | M | S | Dark | Medium | Light |
| BASIC BAKE | √ | √ | √ | √ | √ | √ |
| BASIC BAKE RAPID | √ | √ | √ | √ | √ | √ |
| BASIC BAKE RAISIN | √ | √ | √ | √ | √ | |
| WHOLE WHEAT BAKE | √ | √ | √ | |||
| WHOLE WHEAT BAKE RAPID | √ | √ | √ | |||
| WHOLE WHEAT BAKE RAISIN | √ | √ | √ | |||
- Size and crust colour will be affected by the room temperature and the quality of flour and/or other ingredients.
Baking Programs
NOTE: • The duration of each process is only approximate and will vary according to the ambient temperature.
- The following time is when the timer is not used. (The availability of the timer for the mode is indicated with a tick (√) in the "timer" column.)
- There will be keep-warm of up to 60 minutes after the baking is complete until the STOP pad is pressed, for all BAKE (loaf) modes. The keep-warm is not available for the DOUGH modes and the BAKE ONLY mode.
- For Bake Raisin & Dough Raisin modes, there will be a break of 1 minute during the kneading process to add dried fruits and nuts.
BAKE (loaf) modes
| Mode | Basic Bake Basic Bake Sandwich | Basic Bake Rapid | Basic Bake Raisin | Whole Wheat Bake Whole Wheat Bake Sandwich Multigrain Bake | Whole Wheat Bake Rapid | Whole Wheat Bake Raisin | French Bake Bake Only | Bake Only | |
| Processes | Rest | 30 ~ 60 min | — | 30 ~ 60 min | 60 ~ 90 min | 15 min | 60 ~ 90 min | 40 min ~ 1 hr 55 min | — |
| Knead | 15 ~ 25 min | 15 ~ 20 min | 15 ~ 25 min | 10 ~ 20 min | 10 ~ 20 min | 10 ~ 20 min | 10 ~ 20 min | — | |
| Rise | 1 hr 55 min ~ 2 hr 25 min | approx. 1 hour | 1 hr 55 min ~ 2 hr 25 min | 2 hr 25 min ~ 2 hr 55 min | approx. 1 hr 40 min | 2 hr 25 min ~ 2 hr 55 min | 2 hr 55 min ~ 4 hr 10 min | — | |
| Bake | 50 min | 35 min | 50 min | 50 min | 45 min | 50 min | 55 min | 15 ~ 70 min | |
| Total | 4 hours | 1 hr 55min | 4 hours | 5 hours | 3 hours | 5 hours | 6 hours | 15 ~ 70 min | |
| Timer | √ | √ | √ | ||||||
DOUGH modes
| Mode | Basic Dough Basic Dough Raisin | Whole Wheat Dough Whole Wheat Dough Raisin Multigrain Dough | French Dough | Pizz Dough | |
| Processes | Rest | 30 ~ 50 min | 55 ~ 75 min | 40 ~ 75 min | — |
| Knead | 15 ~ 25 min | 10 ~ 20 min | 10 ~ 20 min | 10 ~ 15 min | |
| Rise | 1 hr 15 min ~ 1 hr 35 min | 1 hr 45 min ~ 2 hr 5 min | 1 hr 45 min ~ 2 hr 40 min | 10 ~ 15 min | |
| Knead | — | — | — | Approx. 10 min | |
| Rise | — | — | — | Approx. 10 min | |
| Total | 2 hr 20 min | 3 hr 15 min | 3 hr 35 min | 45 min | |
| Timer | |||||
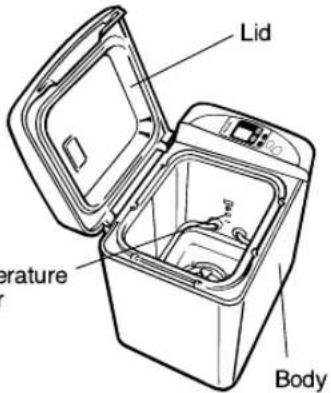
Parts identification
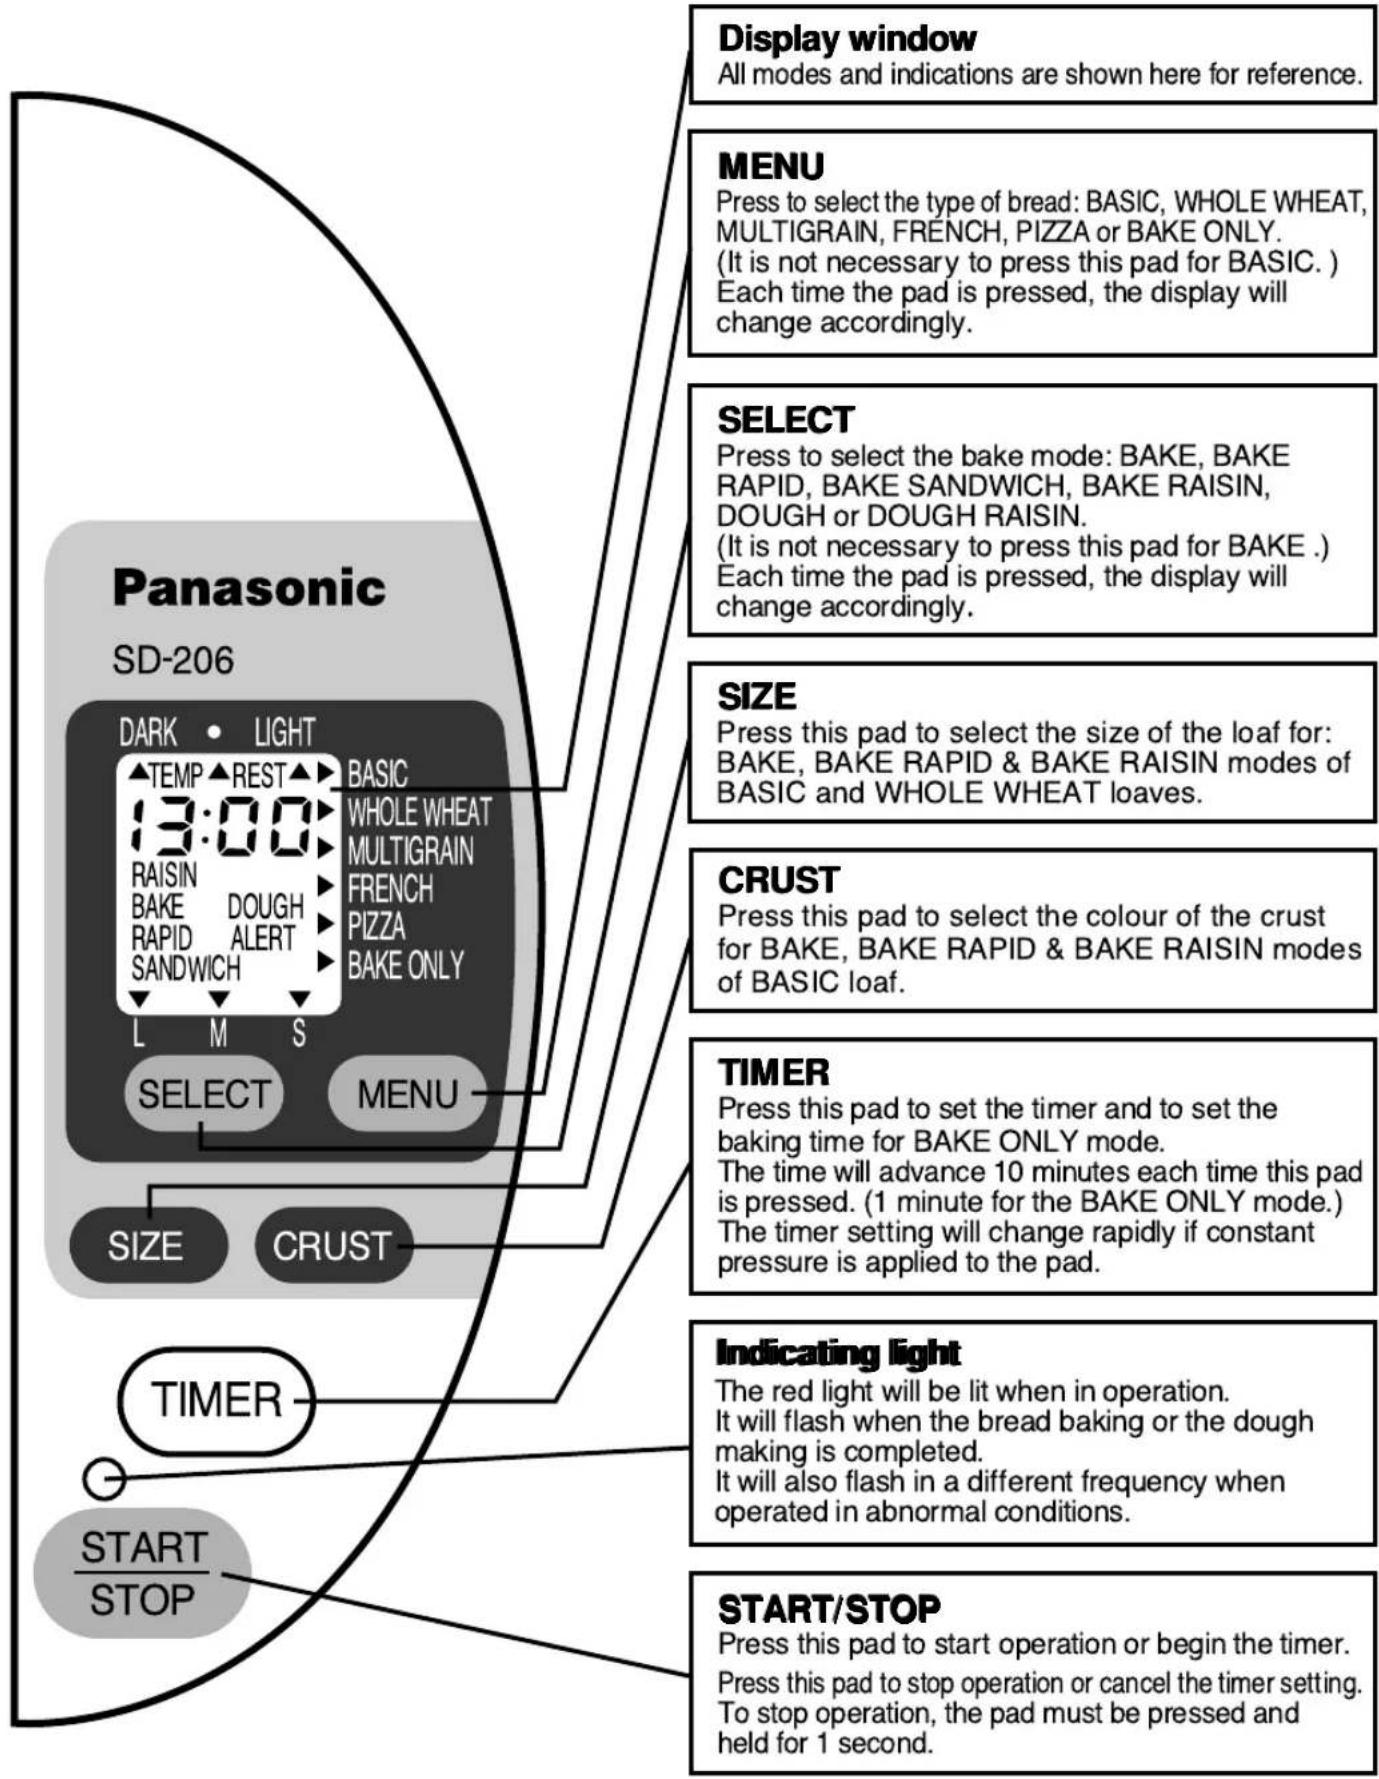
Control panel-display/functions
Be sure you understand the function of each pad before using the Bread Bakery®.
NOTE: The unit has a protective film overlay on the control panel to prevent scratching or marring during shipping.
You may peel this film off and discard it.
1
natural_image
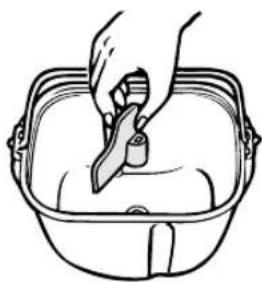
Line drawing of a hand holding a tool inside a basin (no text or symbols)Steps
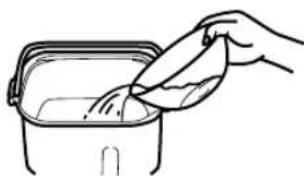
Remove the bread pan from the unit.
Twist slightly anti-clockwise and pull up, using the handle.
Mount the kneading blade on the shaft.
Make sure that the kneading blade and the kneading shaft are free of bread crumbs.
Notes
The kneading blade is designed to fit loosely on the shaft with some loose turning.
2

natural_image
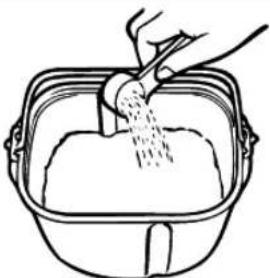
Illustration of a hand pouring grain into a container with a handle (no text or symbols)Place Easy Blend yeast inside the bread pan.
For best results, place the yeast first, so that it is at the bottom of all other ingredients.
3
natural_image
Line drawing of a hand pouring liquid into a container (no text or symbols)Place flour and all dry ingredients inside the bread pan.
RAISIN modes only
You may place dried fruits (e.g. raisins) later when the beeper sounds to prevent them from being crushed (see step 10.)
Flour, dry milk, salt, sugar, butter, etc., first.
4
natural_image
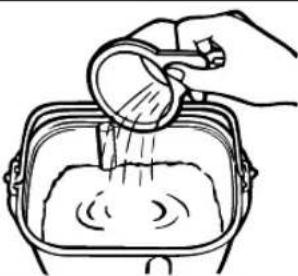
Line drawing of a hand pouring liquid into a container with steam rising (no text or symbols)Pour water and other liquids, if any, into the bread pan.
5
natural_image
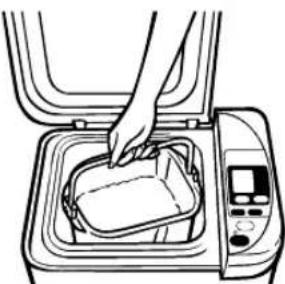
Line drawing of a hand placing food into a microwave oven (no text or symbols)Place the bread pan inside the body.
Be sure the bread pan contacts the bottom of the unit.
Fold the handle down.
Wipe off any moisture or foreign matter from the outside of the bread pan before placing it in the unit.
If the bread pan is not placed correctly, the dough will not be kneaded properly.
6
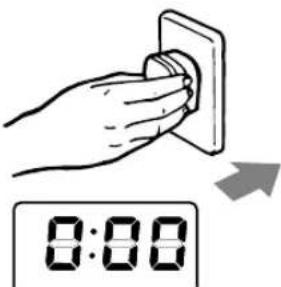
Close the top lid.
Plug into a 230 (230 \~ 240 for U. K.) volt outlet.
0:00 will light up.
Position the unit away from edge of the table or counter-top.
The unit may vibrate or move during the kneading process.
Place the unit where it will not fall off should the unit move during the kneading process.
| Steps | Notes | ||
| 7 | 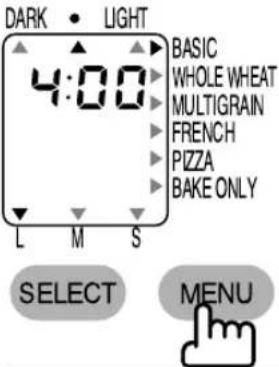 | Press MENU to choose the type of bread indicated on the right of display. | See “Choice of bread modes” on P. 7. |
| For BASIC, it is not necessary to press this pad. | |||
| For BAKE ONLY program, refer to P.15 – 16 for instructions. | |||
| 8 | 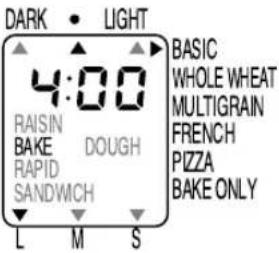 | Press SELECT to choose BAKE RAPID, BAKE SANDWICH, BAKE RAISIN, DOUGH or DOUGH RAISIN. | See “Choice of baking modes” on P. 7. |
 | The mode you require will flash. | ||
| For BAKE, it is not necessary to press this pad. | |||
 | Select size.  | See availability of size and colour selection on P. 7. | |
| 9 |  | Press START/STOP. | There will be no mixing action during resting. |
| “Rest” begins. The resting settles the temperature of the bread pan and ingredients. | A clicking noise may be heard during operation. This is not a malfunction. | ||
| After rest, the process will proceed to knead, then to rise and finally, bake. | For information of the process of each mode, see P. 8. | ||
| The time remaining until the bread is finished is displayed in hours and minutes. (3:59, 3:58 · · ·) | The time required for each of the steps will vary according to factors such as voltage fluctuation and room temperature. | ||
| The above display is for BASIC=BAKE, L size, medium colour. | |||
| 10 | RAISIN modes only | In the last part of kneading, there will be two sessions of beep sound. RAISIN on display will blink and kneading will stop for 1 minute. | For BASIC: 42~72 minutes from START. |
| Add the dried fruits (e.g. raisins) during this period to prevent them from being crushed. | For WHOLE WHEAT: 72~102 minutes from START. | ||
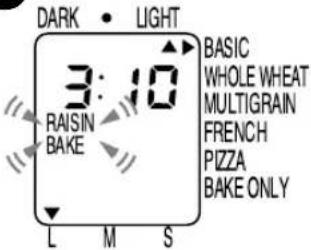 | Close the lid and leave the unit. When 1 minute has passed, kneading will begin again and the RAISIN will stop blinking. | Do not put your finger in the dough, or touch the bread pan while adding the dried fruits. During operation, do not remove the pan, nor unplug the power cord. | |
| The above display is for BASIC-BAKE RAISIN, L size, light colour. | The timer cannot be used for this mode. | ||
10
| Steps | Notes | ||
| 11 |  | The beeper will sound eight times and the indicating light will flash when the bread is baked, or the dough is completed. | |
| 12 | 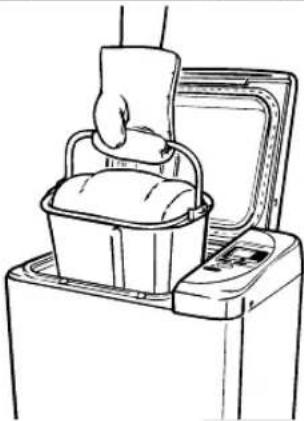 | Promptly open the lid and remove the bread pan using oven gloves.Press START/STOP.The unit keeps the bread warm for 1 hour or until START/STOP is pressed to prevent condensation of the steam.For DOUGH modes, follow each recipe directions for further steps instructed in the cook book. | The bread pan will be very hot.Do not place it on any plastic surfaces. Handle carefully.If the bread is left in the unit, further browning of crust colour may occur. |
| 13 |  | Turn the pan upside down.Shake the pan several times to release the bread.If the kneading blade comes out with the bread, use a heat-resistant plastic utensil to remove it.For DOUGH modes, when baking is completed, remove from the oven, using oven gloves. | The bread and the kneading blade will be very hot.A metal utensil may scratch the finish of the kneading blade. |
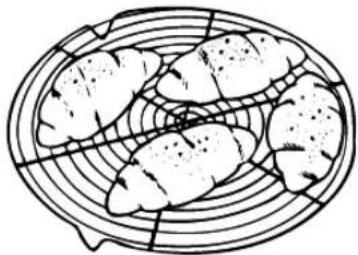
| 14 | 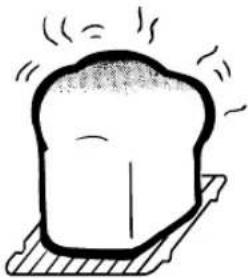 | Place the bread on a wire rack to cool and allow the steam to escape. | See “Slicing and storing the bread” on P. 17. |
 | |||
| 15 |  | Unplug after use.-Allow at least 1 hour for the unit to cool down before the next use. | |
To use the timer (BAKE mode only)
Follow the same steps as in pages 11–12 except step 9. For step 9, follow the instructions below.
| Steps | Notes | |
 | Press TIMER to set the amount of time in which you want the bread to be ready.Time may be set for any length of time from 4 hours to 13 hours for BASIC, from 5 hours to 13 hours for WHOLE WHEAT and MULTIGRAIN, from 6 hours to 13 hours for FRENCH. | See P. 10 for further explanation of the timer pads. |

Example: If the present time is 9:00 pm, and you want the bread to be finished at 6:30 am tomorrow morning, set the timer to 9:30 (9 hours and 30 minutes), the time required until the completion of the bread.
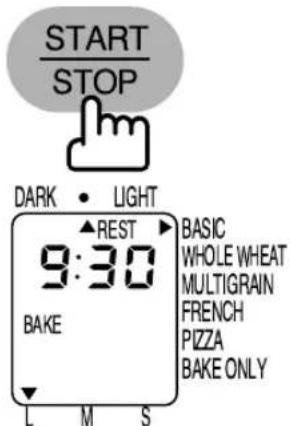
The above display is for BASIC-BAKE, L size, medium colour.
Press START/STOP.
The time remaining before the bread is finished is displayed in hours and minutes.
There will be no action while the timer is working.
Using the BAKE RAPID mode
"Follow the previous steps 1-6. For step 7, choose either BASIC or WHOLEWHEAT (there is no BAKE RAPID mode for the MULTIGRAIN or FRENCH). For steps 8 & 9, follow the instructions below."

MENU
Press SELECT pad to choose BAKE RAPID.
Then select size and crust colour.
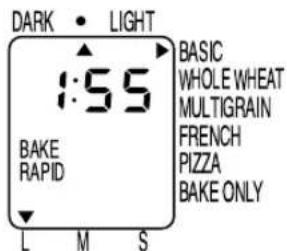
The remaining time is displayed in hours and minutes.

Press START pad.
The above display is for BASIC-BAKE (RAPID) mode, L size, medium colour.
The timer cannot be used for this mode.
Using the DOUGH mode
Follow the previous steps 1–7.
| Steps | Notes | ||
| 8 |  | Press to select DOUGH. | Dough will flash.Operation begins after the rest condition to settle the temperature of the bread pan and ingredients. |
 | Press START pad.DOUGH will stop flashing. | ||
| The remaining time is displayed in hours and minutes.* There will be no mixing action after the START pad is pressed.(Time will be longer in hot temperatures). | |||
| 9 | The beeper will sound eight times and the indicating light will flash when the dough is completed. Press STOP pad when the beeper stops. Remove the bread pan. Close the lid. Unplug after use. | ||
 | The display will go out when the beeper stops, but the indicating light will flash until the STOP pad is pressed. | ||
| 10 | Shape and give dough final rising before baking in a conventional oven as per the recipes given. | ||
| 11 | When baking is completed, remove from the oven, using your oven gloves and cool on a wire rack. | The timer cannot be used for this mode. | |
Using the BAKE ONLY mode
| Steps | Notes | ||
| 1 |  | Prepare cake in a separate mixing bowl. | Follow instructions in the Cookbook for details. |
| 2 | 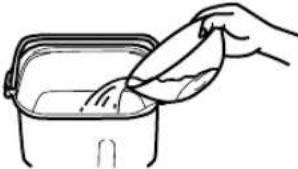 | Pour the mixture into the bread pan.(The kneading blade must be removed.) | |
| 3 |  | Press MENU to choose BAKE ONLY. | |
| 456 |  | Press TIMER to set the required time. (Between 15 to 70 minutes.)The TIMER cannot be used to delay the start of baking. | Time indication starts from 30 minutes and moves up to 1 hour 10 minutes in 1 minute increment. |
 | Press START / STOP. | ||
| Follow the same steps 11-15 on P. 13 to complete baking.Note: Upon completion of baking, you may check the consistency of the baked product by piercing the centre with a skewer.If the baking is still insufficient, you may additionally bake by repeating above steps 3 & 4.The additional baking time may be set as long as the accumulated baking time does not exceed 70 minutes. | When checking with a skewer, take utmost care not to burn yourself as the oven cavity will be extremely hot. | ||
How to clean
Before cleaning the unit, unplug and allow the unit to cool.
 Tempesensor Tempesensor | Body and LidBody and lid should be wiped clean with a damp cloth.Use only mild liquid detergent. For baked-on materials, use Scotch Brite nylon felt pads and detergent on the interior.Do not use cleansers, steel wool pads, or other abrasive materials.Do not use benzine, thinner, alcohol, etc.Temperature sensorWipe gently and avoid deforming the temperature sensor. |
 | Bread pan and kneading bladeIf the kneading blade cannot be easily removed from the pan by twisting the mounting shaft, pour lukewarm water into the cooled pan and allow to soak for 5–10 minutes. Remove the blade.Always remove the blade and wash the pan with mild, liquid detergent after each use.Do not use other abrasive materials or otherwise, the pan may be scratched.These parts are not dishwasher safe. |
  | Measuring cup and spoonRinse and wipe dry.These parts are not dishwasher safe. |
- Be sure that the unit and the bread pan have dried completely before storing.
- On the interior of the body some discolouration may occur with use.
Slicing and storing the bread
Cool the bread on a wire rack before slicing or storing the bread.
Slicing homemade bread
Homemade bread can be cut with a bread knife.

natural_image
Illustration of hands performing a massage or pressure technique on a curved object (no text or symbols)Place the loaf on its side and cut with a sawing motion.
Storing homemade bread
After cooling the bread completely at room temperature, wrap it in a foil or a plastic bag to preserve freshness.
To enjoy the taste of freshly baked homemade bread, try to consume your bread as soon as possible.
For longer storage, wrap well and store in the freezer.
It is better to slice the loaf before freezing.
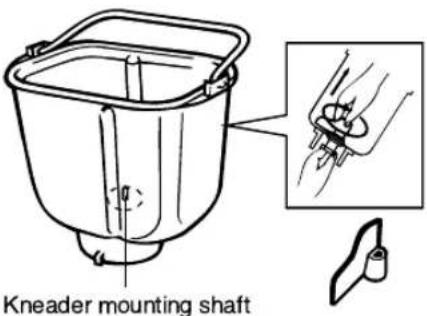
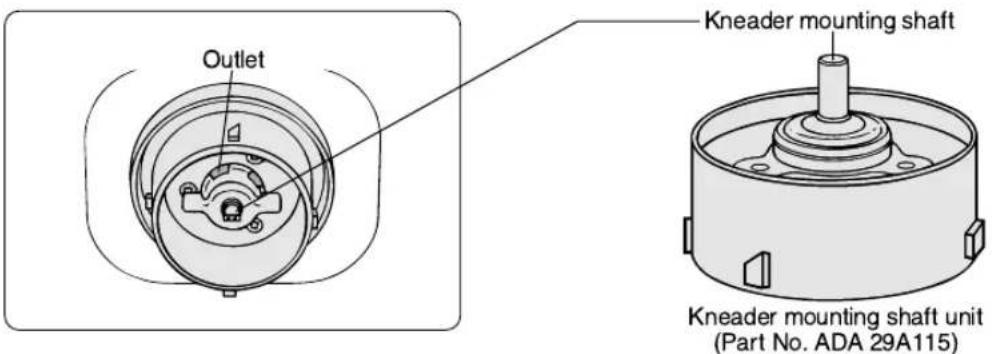
Leakage of bread ingredients from the bread pan
With extended use, a small quantity of ingredients may leak out from the outlet of the bread pan. This is normal. The bread pan is designed so that the ingredients in the kneader mounting shaft unit may be discharged to prevent rotation stoppage.
When the kneader mounting shaft does not rotate, it is necessary to replace the kneader mounting shaft unit with a new one.
Consult with your authorised Panasonic Service Centre for servicing or for purchase of replacement parts.
Specifications
| Power supply | 230V (230–240V for U. K.) AC 50 Hz |
| Power consumed | 550 W |
| Capacity | max. 500 g of strong flourmin. 300 g of strong flour |
| Timer | Digital timer (up to 13 hours) |
| Protective device | Self-resetting motor protector |
| Dimensions (H×W×D) | approx. 35.5×34.0 ×23.2 cm |
| Weight | approx. 7.1 kg. |
| Accessories | Measuring cup, Measuring spoon |
Display Indications for Abnormal Conditions
| Condition | Reason/Cause | How to reset/restart | |
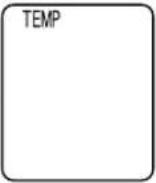 | TEMPappears on display. | The unit is hot (above 40°C/105°F). This may occur during repetitive use. You must allow the unit to cool down before reusing. | Leave the unit as it is.When the unit has cooled to below 40°C/105°F,TEMPwill disappear from the display window and the red indicating light will go out.This indicates that the unit is now ready to use. |
 | ALERTis on display. | There has been a 10-minute or less power cut. (The power plug has been inadvertently pulled out or the breaker has activated.) | If the interruption in the power supply is momentary, the operation will not be affected.If the power is restored within 10 minutes, the bread maker will operate again. However, the bread may not turn out well. |
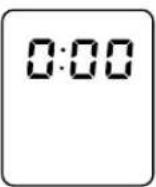 | 0:00is on display. | There has been more than 10 minutes power cut. (power failure, unplugging of the power cord, or a malfunctioning of household fuse or breaker). | Remove the dough and start again using all new ingredients. |
| Not baked at all, although the operation appears to have proceeded. | Motor protection device has activated. This only happens when the unit is overloaded and an excessive force is applied to the motor.After about 30 minutes, the motor automatically starts running again. | Check to see if the kneader mounting shaft can rotate. Make sure you did not use too much or too hard/heavy ingredients, then start again using all new ingredients. Make sure you did not use too much or too hard/heavy ingredients, then start again using all new ingredients.  Service will be required. Service will be required. | |
Motor protection device
If the unit is overloaded and an excessive force is applied to the motor, the protection device will stop the motor. After approximately 30 minutes, the motor will automatically start running again. It is recommended to restart with fresh ingredients.
Remedy 1
If the kneading blade is restricted by hard dough, take out the dough. The unit will restart 30 minutes later.
Remedy 2
Check to see if the kneader mounting shaft of the bread pan can rotate. If it can rotate, restart the bread maker after 30 minutes. If it cannot rotate, service will be required.
Before calling for service
English
| BAKING RESULTS:Please check the following: | Neither the indicating light nor the display light up. | Smoke emitted from steam vent. Burning smell. | Sides of bread collapse and bottom is damp. | Bread rises too much. | ||||
| OPERATIONAL ERRORS | Unplugged. | ○ | ||||||
| Ingredient spilled on heater element. | ○ | |||||||
| Power interruption (display 0:00). | ||||||||
| START/STOP pad was pressed after starting. | ||||||||
| Top lid was open during operation. | ||||||||
| Mode selection was wrong (DOUGH mode was chosen). | ||||||||
| Bread left in bread pan too long after baking. | ○ | |||||||
| Bread sliced just after baking (Steam was not allowed to escape). | ||||||||
| Water added after kneading flour. | ||||||||
| Kneading blade not installed properly in pan. | ||||||||
| INGREDIENT PROBLEMS | MEASUREMENT ERRORS | Flour | Not enough | |||||
| Too much | ○ | |||||||
| Yeast | Not enough | |||||||
| Too much | ○ | |||||||
| No yeast | ||||||||
| Water | Not enough | |||||||
| Too much | ○ | |||||||
| No sweetening agents | ||||||||
| Ingredients used other than prescribed. | ○ | |||||||
| Flour | Old flour used. | |||||||
| Wrong type of flour used. | ○ | |||||||
| Yeast | Yeast not placed in pan first, or liquids touched yeast before kneading. | ○ | ||||||
| Old yeast used. | ||||||||
| Wrong type of yeast used. | ||||||||
| Temperature of water was either too hot or too cold.(Not within optimum temperature range of 20±5°C.) | ||||||||
| Collapsed after over-rising. | Bread doesn't rise enough. | Unleavened or not leavened enough | Not baked. | Slices unevenly and is sticky. | ||||
| Top of bread floured. | Under-browned and sticky. | Browned and floured sides, center sticky and raw. | Sides brown but flour coated bottom. | |||||
| ○ | ○ | |||||||
| ○ | ○ | |||||||
| ○ | ||||||||
| ○ | ||||||||
| ○ | ||||||||
| ○ | ||||||||
| ○ | ||||||||
| ○ | ||||||||
| ○ | ○ | |||||||
| ○ | ||||||||
| ○ | ||||||||
| ○ | ○ | |||||||
| ○ | ||||||||
| ○ | ||||||||
| ○ | ||||||||
| ○ | ||||||||
| ○ | ||||||||
| ○ | ||||||||
| ○ | ||||||||
| ○ | ||||||||
natural_image
Line drawing of a hand holding a tool inside a basin (no text or symbols)Bedienschritte
natural_image
Illustration of a hand pouring grain into a container with a handle (no text or symbols)natural_image
Line drawing of a hand pouring granular material into a container (no text or symbols)natural_image
Illustration of a hand pouring liquid into a container with steam rising (no text or symbols)natural_image
Line drawing of a hand placing food into a microwave oven (no text or symbols)

Gehäuse und Deckel:
natural_image
Illustration of hands performing a gentle manual press or massage technique on a piece of bread (no text or symbols present)Aufbewahrung
natural_image
Illustration of hands performing a gentle massage or pressure technique on a bag (no text or symbols)natural_image
Simple line drawing of a hand pouring liquid into a bowl (no text or symbols)2
natural_image
Line drawing of a hand pouring liquid into a container (no text or symbols)3

Étapes Commentaires
natural_image
Illustration of hands performing a physical maneuver on a curved surface (no text or symbols)Matsushita Electric Industrial Co., Ltd.
Osaka 542-8588, Japan