SW8D2 - Subwoofer ALPINE - Free user manual and instructions
Find the device manual for free SW8D2 ALPINE in PDF.
| Product type | Subwoofer (subwoofer) |
| Brand | Alpine |
| Model | SW8D2 |
| Speaker diameter | 20.3 cm (8 inches) |
| Impedance | Dual 2-ohm voice coil |
| Recommended RMS power | 300 W |
| Peak power | 1200 W |
| Frequency response | 30 Hz – 200 Hz |
| Sensitivity | 84 dB (1 W / 1 m) |
| Mounting depth | 11.4 cm (4.5 inches) |
| Cone material | Reinforced polypropylene |
| Suspension | Rubber |
| Protective grille | Included (front cover) |
| Included accessories | Mounting brackets, screws, hex keys, adjustable feet |
| Compatible amplifier | Alpine R-A75M or S-A60M (sold separately) |
| Recommended use | Vented enclosure for trucks |
| Installation | Requires specialized skills – recommended by an Alpine dealer |
| Maintenance | Clean with a dry cloth; avoid moisture and dust |
| Safety | Secure attachment to vehicle; do not drill near fuel tank or wiring |
| Repairability | Replacement parts available from authorized dealers |
Frequently Asked Questions - SW8D2 ALPINE
User questions about SW8D2 ALPINE
0 question about this device. Answer the ones you know or ask your own.
Ask a new question about this device
Download the instructions for your Subwoofer in PDF format for free! Find your manual SW8D2 - ALPINE and take your electronic device back in hand. On this page are published all the documents necessary for the use of your device. SW8D2 by ALPINE.
USER MANUAL SW8D2 ALPINE
R/S-DB8V-TRK Truck Enclosure Installation Manual Compatible with the following models:
R2-W8D2
S-W8D2

natural_image
Technical line drawing of a mechanical component with mounting holes and internal channels (no text or symbols)Introduction
Congratulations on purchasing this truck enclosure. This installation manual is designed to take you through the step-by-step installation of the 'R' or 'S' Series Dual 8" Subwoofer Vented Enclosure for Trucks. Please familiarize yourself with the owners manual and if you still have additional questions please contact our support team at 1-800-TECH-101.
Note: To ensure safe use, Always follow these precautions.
The installation of this product requires specialized skills and experience. We recommend that you have the product installed by an Alpine authorized dealer.
Before you use this product, be sure to carefully read this installation manual so that you can use the product correctly. Failing to do so could lead to damaged equipment or an accident. Alpine Electronics bears no responsibility for problems that arise as a result of failure to follow the instructions in the manual.
● Make sure enclosure is secured to the vehicle. Failing to do so can lead to electric shock, injury or damage to equipment.
- When making a hole in the vehicle body, be careful to avoid damaging pipes, the fuel tank, electrical wiring, and the like. This kind of damage could lead to an accident or fire.
- Do not install the product where it may be exposed to water or in a place with high levels of humidity or dust. Doing so could lead to fire or damaged equipment.
- Start all screw threads by hand and avoid overtourqing screws, failure to do so may damage your equipment.
● Matching Alpine mono amplifiers are sold separately - check with an Alpine authorized dealer.
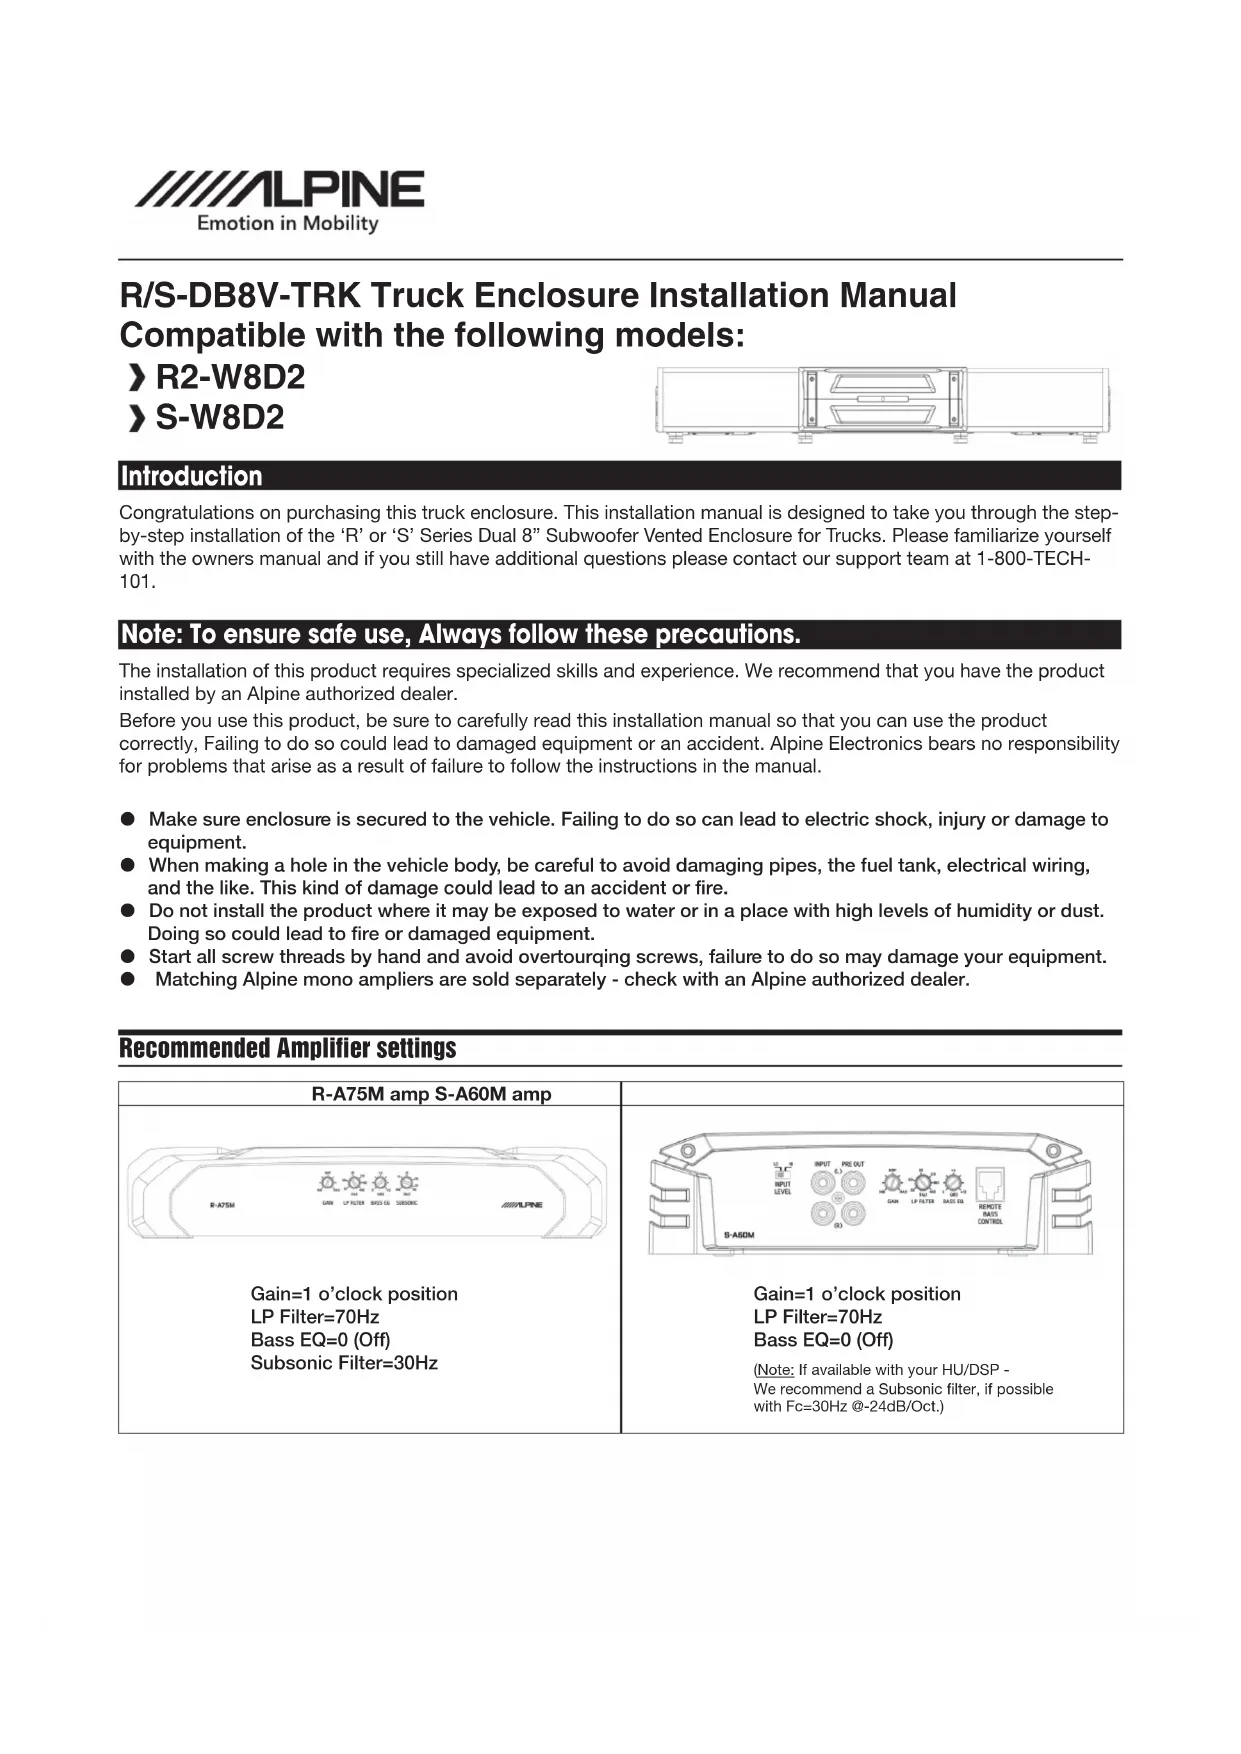
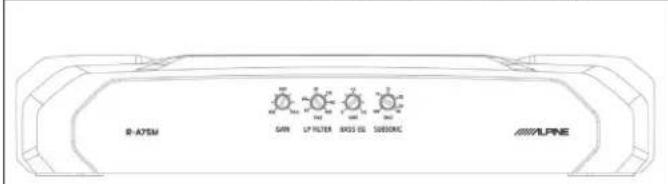
Recommended Amplifier settings
R-A75M amp S-A60M amp
text_image
R-ATSM SAIN LP FILTER BIOS UL SUBSTONE ASLINEGain=1 o'clock position
LP Filter=70Hz
Bass EQ=0 (Off)
Subsonic Filter=30Hz

text_image
S-ASDM INPUT LEVEL INPUT PRE OUT (0) GAM LP ACTM MAX 10 REMOTE RASS CONTROLGain=1 o'clock position
LP Filter=70Hz
Bass EQ=0 (Off)
(Note: If available with your HU/DSP -
We recommend a Subsonic filter, if possible with Fc=30Hz @-24dB/Oct.)
Tools Required
Hex Key Driver (2pcs. included) Power Drill with a Low Torque Setting (Optional)
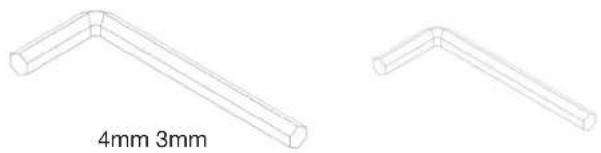
natural_image
Two isometric line drawings of L-shaped pipes with labeled dimensions (4mm and 3mm), no other text or symbols present.Note:
Use Hex Key Drivers for Enclosure feet, Front/Rear brackets and amp tray: Failure do so could result in damage to the enclosure.
natural_image
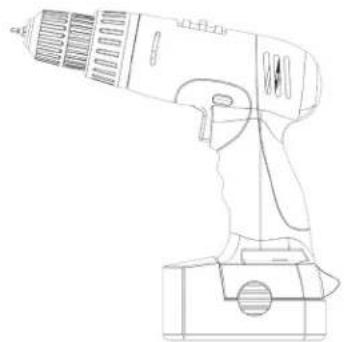
Line drawing of a handheld electric shaver with cooling fins and a handle (no text or symbols)Note:
Power Drill for Subwoofer and Amplifier installation only.
Accessory List
Driver Side Enclosure Passenger Side Enclosure
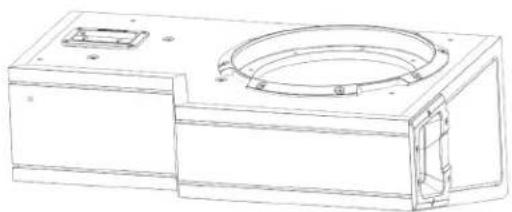
natural_image
Technical line drawing of a mechanical housing or enclosure component (no text or symbols)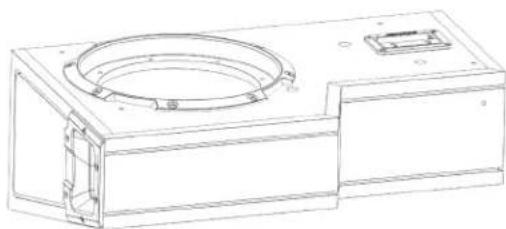
natural_image
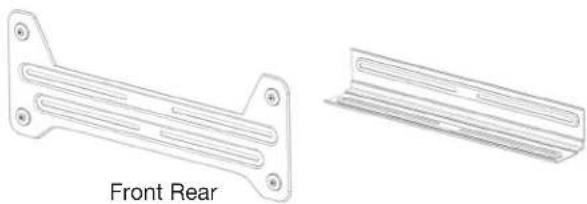
Technical line drawing of a mechanical housing or enclosure with circular and rectangular components (no text or symbols)Front/Rear Link Bracket Front Cover/Trim Bars
natural_image
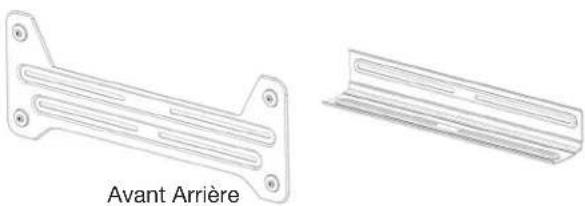
Technical line drawing of two bracket components labeled 'Front Rear' (no other text or symbols)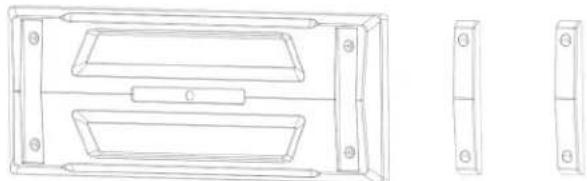
natural_image
Technical line drawing of a rectangular electronic component with mounting holes and internal channels (no text or symbols)Left/Right Amp Tray Bracket Stacking Feet for Enclosure

natural_image
Two identical line drawings of a structural frame or support structure, showing internal supports and mounting points (no text or symbols)
natural_image
Simple line drawing of stacked cylindrical objects (no text or symbols)6 Standard Stacking Feet (Rubber/Washer/Rubber)
2 Pair Extra Parts (Rubber/Washer)
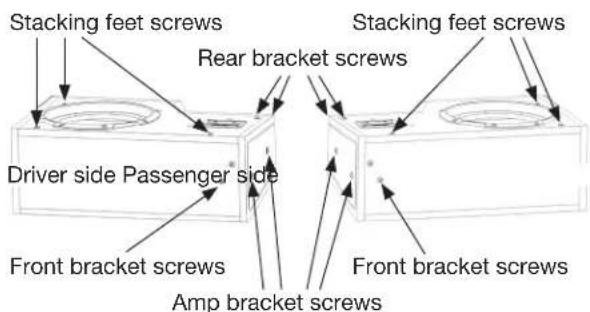
1 Installation screws are temporarily installed in both driver and passenger side enclosures. Remove all screws to prepare for assembly.
text_image
Stacking feet screws Rear bracket screws Stacking feet screws Driver side Passenger side Front bracket screws Front bracket screws Amp bracket screws3 Place enclosures upside down on a flat surface and set to required width. Align rear link bracket with threaded inserts and secure bracket using supplied M5x20mm screws (4pcs.) and M5x12mm washers (4pcs.).
Caution: To avoid damage to the enclosure use supplied Hex Key driver for when installing the rear bracket.
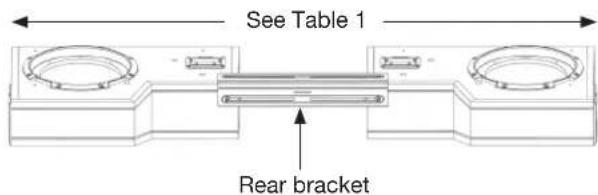
text_image
See Table 1 Rear bracket5 Using the supplied M5x60mm screws (6pcs.) and M5x20mm washers (6pcs.) install feet as shown. Additional feet spacers are included to accommodate vehicles with uneven floors, floor mats etc. - see fitment chart.
Caution: To avoid damage to the enclosure use supplied Hex Key driver for when installing the enclosure feet.
natural_image
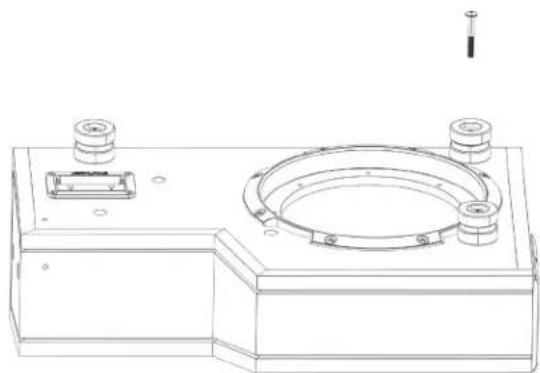
Technical line drawing of a mechanical housing or enclosure with mounting holes and a central circular component (no text or symbols)2 If applicable, attach inner amp tray brackets using supplied M5x20mm screws (4pcs.) and M5x20mm washers (4pcs.).
Note: Amp tray brackets can be trimmed for narrow applications. Amp tray will not be used in some applications - See fitment chart. If Amp brackets are not installed, the 4 mount screws should be left snugly tightened in both enclosures.
Caution: To avoid damage to the enclosure use supplied Hex Key driver for when installing the amp brackets.
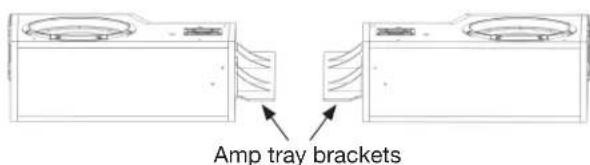
text_image
Amp tray brackets4 Rotate assembly rightside up and attach front link bracket using supplied M5x20mm screws (4pcs.) and M5x20mm washers (4pcs.) as shown.
Caution: To avoid damage to the enclosure use supplied Hex Key driver for when installing the front bracket.
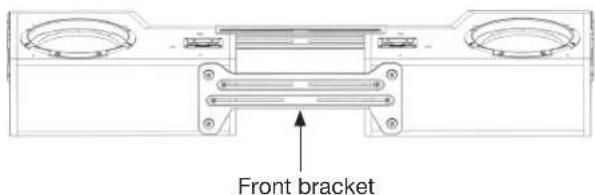
text_image
Front bracket6 Place mono amplifier on amp tray and mark the mount holes. Then drill and mount with appropriate size screws (not included).
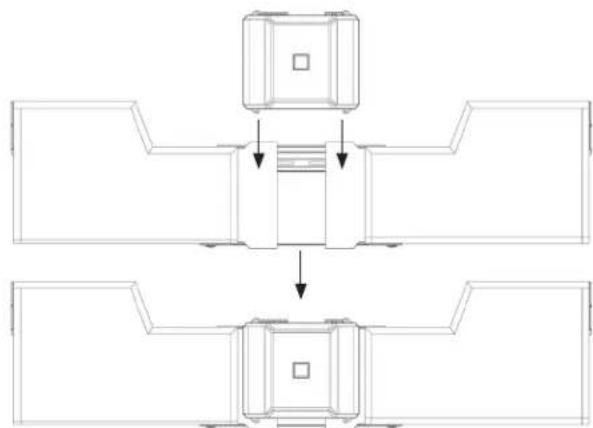
flowchart
graph TD
    A["Top Box"] --> B["Central Box"]
    B --> C["Bottom Box"]
    style A fill:#f9f,stroke:#333
    style B fill:#ccf,stroke:#333
    style C fill:#cfc,stroke:#333
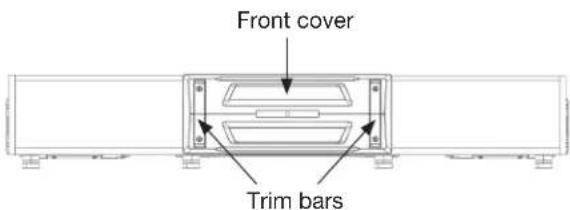
7 Align front cover and trim bars, then install with supplied M5x20mm screws (4pcs, 4mm hex drive).
text_image
Front cover Trim barsRecommended configuration for specific vehicles
Table 1: Recommended vehicle settings
| Vehicle Width | Inner Foot | Outer Foot (front) | Outer Foot (rear) | Amp Tray Notes | |
| 2015+ F-150 51” (max) | yes yes yes | yes | |||
| 2018+ Silverado/Sierra | 51” (max) | yes yes yes | |||
| 2007+ Wrangler 40” | (min) no yes | yes no | Remove inner foot and install in outer location | ||
| 2018+ RAM 51” (max) | yes yes no | yes |
natural_image
Technical line drawing of a rectangular frame with internal compartments and mounting holes (no text or symbols)Introduction
natural_image
Two isometric line drawings of L-shaped pipes with labeled dimensions (4mm x 3mm), no other text or symbols present.Remarque :
natural_image
Line drawing of a handheld electric shaver with cooling fins and a mounted base (no text or symbols)Remarque :
natural_image
Technical line drawing of a mechanical housing or enclosure with a circular component and mounting bracket (no text or symbols)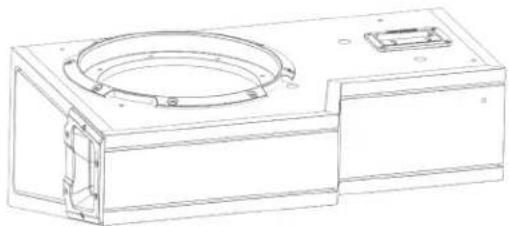
natural_image
Technical line drawing of a mechanical housing or enclosure with circular and rectangular components (no text or symbols)Supports avant/arrière Couvercle avant/barres de garniture
natural_image
Technical line drawing of two mechanical components labeled 'Avant Arrière' (no other text or symbols)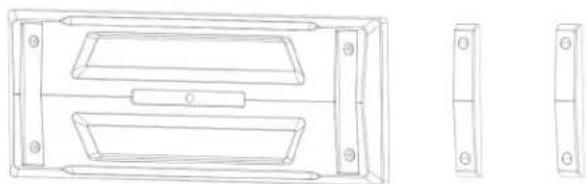
natural_image
Technical line drawing of a rectangular electronic component with mounting holes and internal compartments (no text or symbols)natural_image
Two identical line drawings of a structural frame or support structure, each with a curved base and two vertical supports (no text or symbols)
natural_image
Simple line drawing of stacked cylindrical objects (no text or symbols)6 pieds de superposition standard (caoutchouc/ondelle/caoutchouc)