
GoSafe S780 - Dashcam Papago - Free user manual and instructions
Find the device manual for free GoSafe S780 Papago in PDF.
User questions about GoSafe S780 Papago
0 question about this device. Answer the ones you know or ask your own.
Ask a new question about this device
Download the instructions for your Dashcam in PDF format for free! Find your manual GoSafe S780 - Papago and take your electronic device back in hand. On this page are published all the documents necessary for the use of your device. GoSafe S780 by Papago.
USER MANUAL GoSafe S780 Papago
- Please follow the set-up and usage instructions in the print material that came with this Dashboard Camera (dash cam) product.
- You should not set/install this dash cam at a place that would obstruct or reduce a driver's view; make sure your use complies with pertinent vehicle codes of your state, province, territory or country.
- You should post the required notices of recordation to occupants inside the vehicle, if voices or other information/signal pertaining to in-vehicle activities will be recorded.
- You should not change the dash cam's setting or mode of operation when the vehicle is in motion.
- The optional driving warning signals, including any visual or audible reminder signals, should not replace your decision-making and judgment that are needed for the proper operation of the vehicle.
- You should not leave the dash cam in a visible spot when no one is inside the vehicle, to avoid attracting break-ins to steal the unit, or other property.
- You should avoid extended exposure of the dash cam to direct sunlight or extreme temperatures (either high or low temperature) which tend to degrade or damage the unit and its normal functionality.
- You should examine, check and/or verify the dash cam at least every six (6) months, including the associated memory cards, to ensure the video reception and recording are working properly. For each use, you should verify that the dash cam unit, the visible lights and the audible sounds are working normally. If there are signs of non-operation or mal-function, you should immediately seek to replace the product and check to see if the product is covered under any applicable warranty.
- The dash cam unit may have additional functionality, such as transmission and recording of audio or GPS signal or other identification information. If you have privacy concerns about these functions, make sure you follow the instruction to disable these functions.
- You should use the dash cam unit in the way it was intended. You should not use the dash cam unit in a way that would be illegal, physically damages the unit, or tends to cause danger to the safe operation of the vehicle and/or occupants.
Attention please
【About Usage】
- If your vehicle still provides power when the vehicle is off, unplug the device when you plan to have your vehicle parked for a long period of time to avoid draining your vehicle's battery.
- The embedded supercapacitors can help to save your recorded file even if the power is off.
- To avoid file corruption, don't eject the Micro SD Card immediately after powering off.
- It is recommended to use provided adapter.
- To enable motion detection and monitor function, the unit must receive constant power.
- Please use Micro SD card with the size / memory of at least 16GB, Class 10 (up to 128GB).
- Format Micro SD card before using.
To format card press

When you get to settings ---
Format
1. Product Introduction
1.1 Package Contents
Check the items in your package with the list below. If any of the items are damaged or missing, contact your retailer.
Device
- Sticker Mount / Suction Cup Mount
Car Charger
Cable
Warranty Card
Quick Start Guide
16GB MicroSD
1.2 Driving Recorder Overview
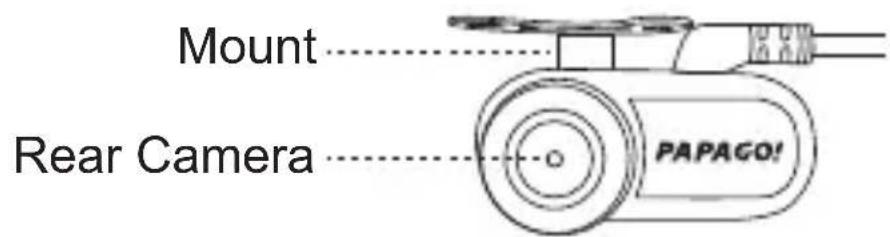

(1) Mount Bracket
(2) Lens
(3) Speaker
(4) MicroSD Slot
(5) Reset
(6) Mini USB Slot
GPS Slot
(8) Display
(9) Buttons
Rear Camera Cable Slot

2. Installation and removal
2.1 Location
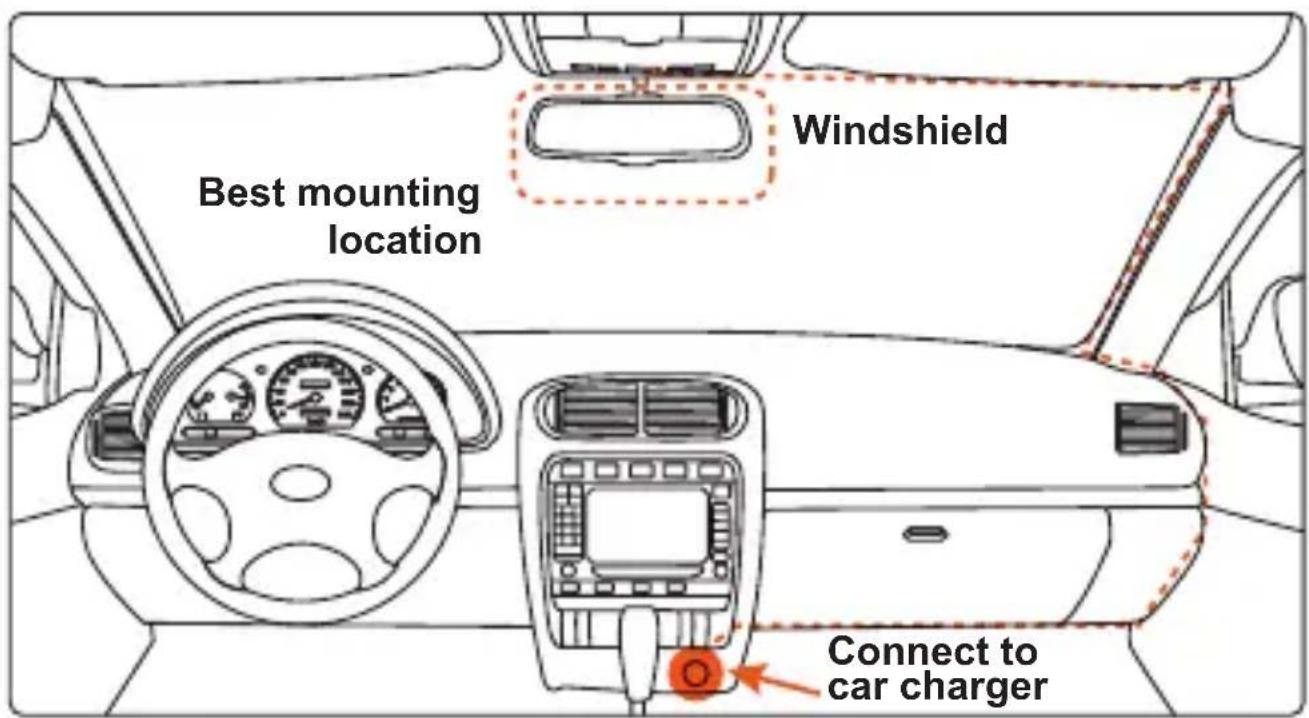

Caution: We are not responsible for any damage caused to, or caused by, the air bag due to incorrectly placing the device within the range of the safety bag area.
1 For better view, try to install in the center of the windshield.
2 To ensure view is clear, make sure the lens is located in a place where the windshield wiper wipes the window.
3 Make sure device is not installed where it will interfere with the air bag.
4 Make sure the device will not be obstructed by windshield's window tint.
5 Clean the area you wish to place the dash cam before mounting the device. DO NOT move the device for a 24-hour period.
3. Start and Go
3.1 Power On
Insert the car charger cable into the car's cigarette lighter and the other end into the mini USB port on the device. Make sure to install the Micro SD Card into the Micro SD Card slot on device. After turning on, the system will start recording automatically. The LED light will turn green when recording mode has started.
*Reminder: Please format Micro SD card before you start recording. Please refer to page 2 for instructions.
3.2 Power Off
Hold down the power button at least 5 seconds to turn off device. To avoid corrupting the last file recorded, do not eject SD Card immediately after powering off.
If you need to turn it back on simply hold the power button for at least 3 seconds.
3.3 LED
| LED Color | Behavior |
| Green ON | Power ON, Recording |
| Green OFF | Power OFF, not Recording |
3.4 Buttons
| Buttons | Behavior |
| ▲ | Recording mode: Enter Emergency mode Playlist: Back to previous menu Replay/Setting Menus: Back to camera mode |
| ▲ | Recording mode: Enter Playback Menu Playlist/Setting: Up Replay mode: Delete |
| ▼ | Recording mode: One short click leads to setting menu One long press and device will take a snapshot Playlist/Setting: Down Replay mode: Lock / Unlock |
| OK | Recording mode: One long press to turn audio recording on/off Playlist/Setting: Select Replay mode: Play/Pause/Resume |
3.5 Recording
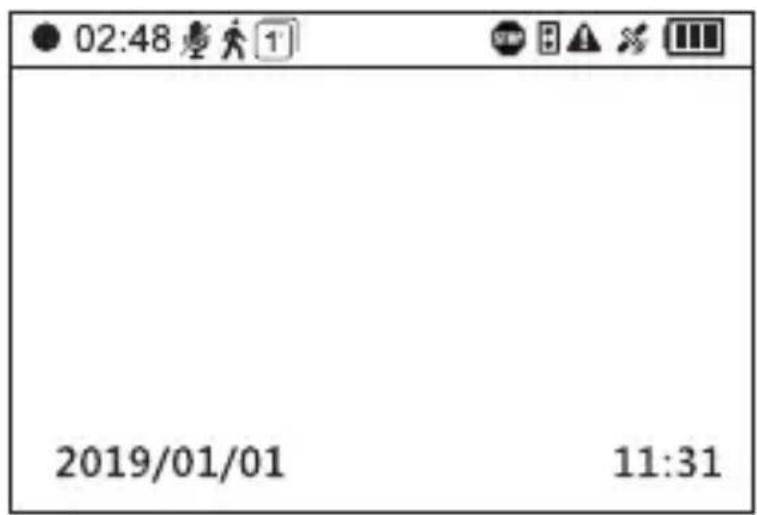
-02:48 : Video recording time
Audio record indicator
Motion Detection
Monitor Mode
Stop Sign Recognition
:Stop&Go
Emergency Recording
GPS (Option:GPS connection needed)
Battery
2019/01/01: Current Date
11:31: Time
4. Settings
Press the button to enter "Settings".
- Record Mode
a. Automatic Recording
b. Monitor Mode: When this mode is selected, your device will take snapshots every second while recording.
c. Motion Detection: When this mode is selected, recording starts when dash cam detects movement. If there is no movement for more than 60 seconds, recording will stop and be switched to detection mode.

This function only works when the device has a continual power source after the vehicle's engine is turned off.
- Driving Safety
e.Speeding Alert
a. Stop Sign Recognition: The device will recognize any Stop Sign and warn you with a beep.
b. Stop & Go: After you stop for at least 10 seconds (as for red lights), the device will detect when the car in front has proceeded and it will give an audio alert to remind you to proceed driving as well.
c.Driver Fatigue Alarm: When activated, the user can setup an alarm clock, periodically reminding you to rest. Options available are : 30 minutes/1 hour/2 hours/4 hours/off.
d.Light Reminder : When activated, if driving in a dark environment (such as tunnel or parking structure), it will have an audio alert and display the light alert icon on the screen. The alert can be turned on/off.
f .TPMS :GoSafe 780 supports the TireSafe D10E (sold separately). The TireSafe D10E is a Tire Pressure Monitoring System that allows you to view each of your tire's pressure and temperature on your device's display.
Front Left Front Right
| F.L. 18 psi 25 °C | F.R. 18 psi 25 °C | Tire Pressure Tire Temperature | |
| R.L. 18 psi 24 °C | R.R. 18 psi 24 °C |
Rear Left Rear Right
Tire Pressure & Temperature display
| White | Start the car engine, no signal. | Blue | Temperature is normal. |
| Green | Pressure is normal. | Red | Warning, please check Tire. |
Note: This device does not support both the GPS antenna and TPMS simultaneously. Please use only one of the optional accessories at a time
Volume : Set Volume.
- Microphone : Enable or disable voice recording.
- EV (Exposure Value)
Adjust EV for better effect in different lighting condition.
- Resolution : Set recording resolution.
- Back Camera Setup
- Display Mode
-
Bump Recording : Set the impact sensitivity of the G-sensor.
-
Date/Time : Set date, time, and date format.
- Time Zone : Set Time Zone.
- Daylight Saving Time: Enable or disable daylight saving time.
- Screen Saver : Set screen saver for stand-by .
- Power on/off Sound : Set power sound on or off.
Video Stamp
a. Date Stamp
Enable or disable date stamp on recordings.
b. GPS Stamp
Enable or disable coordinate stamp on recordings.
- Language: Set display language. Options include 简体中文, 繁體中文, English, Français, Espanol, Deutsch, Italiano, 日本語, Português, and P核酸检测
- Format memory Card

All data on the MicroSD will be deleted. Data is irrecoverable after formatting.

Please backup videos and photos before formatting the MicroSD.
- Format Warning: Set format prompt interval. Options include 15 days, 30 days, 60 days, or OFF.
- Default: Reset all values to factory default.
- Version : Check the current firmware version.
5. Record/Play/Delete record Snapshot function
5.1 Video Recording Circulation
1 Video recording will start looping after powering on with the Micro SD Card plugged in.
2 Each recorded file is 5 minutes long, with old footage being replaced when the MicroSD Card is full.
5.2 Emergency Recording
(1) Manual File Backup
Hold down the button, to backup file so that it will not be overwritten. You will see an icon at the top left of the LCD screen that looks like this This occurs when an emergency file is being recorded.
(2) Auto Backup
Once the G-Sensor is activated by sudden impact, the device will automatically lock the file so that it is not overwritten.
5.3 Snapshot
① Hold for 3 seconds to take a snapshot while in recording mode.
② The snapshot images are located on the Micro SD Card in the PHOTOS folder. This is also where you can find the video files that are recorded.
③ The icon will be shown after you take a snapshot. This will not disturb video recording mode.
5.4 Copying Files with USB Connection
① Connect device to your computer using a USB to mini-USB cable. It should be recognized as a removable device or show up as an icon titled "No Name" on your desktop.
② There are video recording files located in folder \PAPAGO (looping video recording files) and (emergency video recording files) on the "removable device".
(3) Copy the files to your computer. Please follow the copy and paste or drag and drop procedure for your computer model.
5.5 Copying Files from Micro SD Card
① Shut down the device and eject the Micro SD Card. (To avoid corrupting the last file recorded, do not eject SD Card immediately after powering off.)
② Insert the Micro SD Card onto adapter. Insert adapter into the MicroSD Card reader and your computer will automatically detect the SD Card.
③ There are video recording files located in folder \PAPAGO (looping video recording files) and (emergency video recording files) on the "removable device".
(4) Copy the files to your computer. Please follow the copy and paste or drag and drop procedure for your computer model.
5.6 Play/Delete Video or Photo
① Hold down to enter playback menu and to preview the recorded files.
(2) Choose Type : Videos (regular recorded videos), Emergency (videos recorded in emergency mode) or Photos (snapshots taken).
③ Press "up/down buttons" to browse the files. Click OK to choose which file you want to preview.
(4) Click to OK to play file, or delete the file.
本機使用注意事項
【使用相關】
Set Power sound on or off.
- Impresión de Fecha
a. Date Stamp