
GoSafe S37 - Dash cam Papago - Free user manual and instructions
Find the device manual for free GoSafe S37 Papago in PDF.


| Product Type | Dashboard Camera (Dash Cam) |
| Brand | Papago |
| Model | GoSafe S37 |
| Recording Resolution | 720p at 30fps |
| Display | LCD screen |
| Power Source | Car charger via mini USB; Supercapacitors for file saving on power loss |
| G-Sensor | Yes, adjustable sensitivity (Low/Medium/High/OFF) |
| Microphone | Built-in, can be enabled/disabled |
| Speaker | Built-in |
| Memory Card | Micro SD, Class 10, 16GB to 128GB |
| GPS | Compatible with optional GPS antenna (sold separately) |
| TPMS | Compatible with optional TireSafe D10E (sold separately) |
| Motion Detection | Yes, recording starts on movement, stops after 60s of no movement |
| Monitor Mode | Yes, takes one snapshot per second |
| Emergency Recording | Manual (button) and automatic (G-sensor triggered) file locking |
| Driver Safety Features | FCWS, Stop Sign Recognition, Stop & Go, Driver Fatigue Alarm, Light Reminder |
| Package Contents | Device, Car Charger, Cup Mount, Quick Start Guide, Warranty Card, 8GB MicroSD |
| Warranty | 12 months limited |
| Form Factor | Compact with mounting bracket |
Frequently Asked Questions - GoSafe S37 Papago
User questions about GoSafe S37 Papago
0 question about this device. Answer the ones you know or ask your own.
Ask a new question about this device
Download the instructions for your Dash cam in PDF format for free! Find your manual GoSafe S37 - Papago and take your electronic device back in hand. On this page are published all the documents necessary for the use of your device. GoSafe S37 by Papago.
USER MANUAL GoSafe S37 Papago
dash cam
- Please follow the set-up and usage instructions in the print material that came with this Dashboard Camera (dash cam) product.
- You should not set/install this dash cam at a place that would obstruct or reduce a driver's view; make sure your usage comply with pertinent vehicle codes of your state, province, territory or country.
- You should post the required notices of recordation to occupants inside the vehicle, if voices or other information/signal pertaining to in-vehicle activities will be recorded.
- You should not change the dash cam's setting or mode of operation when the vehicle is in motion.
- The optional driving warning signals, including any visual or audible reminder signals, should not replace your decision-making and judgment that are needed for the proper operation of the vehicle.
- You should not leave the dash cam in a visible spot when no one is inside the vehicle, to avoid attracting break-ins to steal the unit, or other property.
- You should avoid extended exposure of the dash cam to direct sunlight or extreme temperatures (either high or low temperature) which tend to degrade or damage the unit and its normal functionality.
- You should examine, check and/or verify the dash cam at least every six (6) months, including the associated memory cards, to ensure the video reception and recording are working properly. For each use, you should verify that the dash cam unit, the visible lights and the audible sounds are working normally. If there are signs of non-operation or mal-function, you should immediately seek to replace the product and check to see if the product is covered under any applicable warranty.
- The dash cam unit may have additional functionality, such as transmission and recordation of audible or GPS signal or other identification information. If you have privacy concerns about these functions, make sure you follow the instruction to disable these functions.
- You should use the dash cam unit in the way it is intended. You should not use the dash cam unit in a way that would be illegal or that tends to physically damage the unit, or tends to cause danger to the safe operation of the vehicle or the occupants.
Attention please
【About Usage】
① If your vehicle still provides power when the vehicle is off, unplug the device when you plan to have your vehicle parked for a long period of time to avoid draining you vehicle's battery.
② The embedded Supercapacitors can help to save your recorded file even if the power is off.
③ To avoid file corruption, don't eject the Micro SD Card immediately after powering off.
④ It is recommended to use adapter provided.
⑤ To enable detecting and monitoring function, the power supplier must be enabled.
① Use only Class 10 Micro SD cards with at least 16GB memory (up to 128GB).
② Format Micro SD card before using.
To format card press
When you get to settings----Format
③ The following information is the card capacity and recording time. (reference only)
| Micro SD Card 720P 30fps | |
| 16GB | 290min |
| 32GB | 590min |
| 64GB | 1180min |
| 128GB | 2360min |
*Product features may change without notice according to region in which it is purchased.
1. Product Introduction
1.1 Package Contents
To check the items in your package with the list below. If any of the below items is damaged or missing, contact your retailer.
① Device ③ Car Charge Reduction Cup Mount


④ Quick Start Guide ⑤ Warranty Card


⑥ 8GB MicroSD

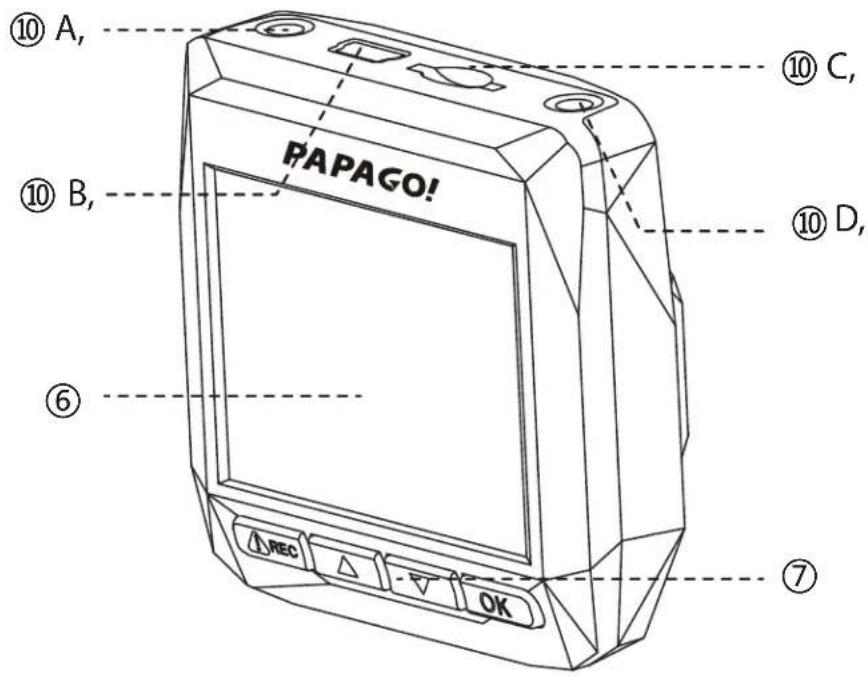
1.2 Driving Recorder Overview

① Mount Bracket
② Lens
③ LED
④ Speaker
⑤ Microphone
⑥ Display
⑦ Buttons
⑧ Power Switch
⑨ Reset
⑩ A, GPS/TPMS Slot (One at a time)
B, Mini USB Slot
C, Micro SD Slot
D, AV Out
2. Installation and removal
2.1 Location


Caution: We are not responsible for any damage caused to, or caused by, the air bag due to incorrectly placing the device within the range of the safety bag area.
① For better view, try to install in the center of the windshield.
② To ensure view is clear, make sure the lens is located in a place where the windshield wiper wipes the window.
③ Make sure device is not installed where it will interfere with the air bag.
④ Make sure the device will not be obstructed by windshield's window tint.
⑤ Clean the area you wish to place the dash cam before mounting the device. DO NOT move the device for a 24-hour period.
3. Start and Go
3.1 Power On
Insert the car charger cable into the car's cigarette lighter and the other end into the mini USB port on the device. Make sure to install the Micro SD Card into the Micro SD Card slot on device. After turning on, the system will start recording automatically. The LED light will turn green when recording mode has started.
*Reminder: Please format Micro SD card before you start recording. Please refer to page 2 for instructions.
3.2 Power Off
To turn off device, hold the power button for at least 5 seconds. To avoid corrupting the last file recorded, do not eject SD Card immediately after powering off.
| 3 LED Color | Behavior |
| Green ON | Power ON, Recording |
| Green Off | Power Off, Not Recording |
3.4 Buttons
| Buttons | Behavior |
 | Recording mode : Enter Emergency modePlaylist : Back to previous menuReplay/Setting : Back to camera mode |
 | Recording mode : Enter Playback MenuPlaylist/Setting : UpReplay mode : Delete |
 | Recording mode: One short click leads to settings menuOne long press and device will take a snapshotPlaylist/Setting : DownReplay mode : Lock / Unlock |
 | Recording mode : One long press toturn on/off audio recordingPlaylist/Setting : ConfirmReplay mode : Play/Pause/Resume |
 | Power button: To turn on/off device |
3.5 Recording
![graph TD A["02:48"] --> B["Recording Time"] B --> C["Audio Recording Indicator"] C --> D["Motion Detection"] D --> E["Monitor Mode"] E --> F["Stop Sign Recognition"] F --> G["Current date/time"] G --> H["Battery (Option: GPS connection needed)"] H --> I["Stop & Go"] I --> J["Emergency Recording"]](/content/2026/05/927833/images/ffe8c852cd0dcd0ceb34a720163d02c769ce73229560871cc5a06367daf5a2ef.jpg)
4. Settings
Press the ▼ button to enter "Settings".
- Record Mode
a. Automatic Recording
b. Monitor Mode: When this mode is selected, your device will take one snapshot per second.
c. Motion Detection: When this mode is selected, recording starts when dash cam detects movement. If there is no movement for more than 60 seconds, recording will stop and be switched to detection mode.

This function only works when the device has a continual power source after the vehicle's engine is turned off.
- Driving Safety
a. Calibrate: This helps the device use all features optimally. Caution: Do not calibrate device while driving.
b. FCWS: The device activates this feature with speeds over 60 km/h. It detects the distance of the car in front of you and will give a warning when you are driving too close.
c. Stop Sign Recognition: The device will recognize any Stop Sign and warn you with a beep.
d. Stop & Go: After you stop for at least 10 seconds (as for red lights), the device will detect when the car in front has proceeded and it will give an audio alert to remind you to proceed driving as well.
e. Driver Fatigue Alarm: When activated, the user can setup an alarm clock, periodically reminding you to rest. Options available are : 30 minutes/1 hour/2 hours/4 hours/off.
f. Light Reminder : When activated, if driving in a dark environment (such as tunnel or parking structure), it will have an audio alert and display the light alert icon on the screen. The alert can be turned on/off.
g. TPMS :GoSafe S37 supports the TireSafe D10E (sold separately). The TireSafe D10E is a Tire Pressure Monitoring System that allows you to view each of your tire's pressure and temperature on your device's display.
Note: This device does not support both the GPS antenna and TPMS simultaneously. Please use only one of the optional accessories at a time.
Front Left Front Right
| F.L.18 psi25 °C |  | F.R.18 psi25 °C | Tire PressureTire Temperature |
| R.L.18 psi24 °C | R.R.18 psi24 °C |
Rear Left Rear Right
Tire Pressure & Temperature display
| White | Start the car engine, no signal on white word. | Blue | Temperature is normal. |
| Green | Pressure is normal. | Red | Warning, please check Tire. |
- Microphone
Enable or disable voice recording.
• EV (Exposure Value)
Adjust EV for better effect in different lighting condition. Options include: -1.0, -2/3, -1/3, +0.0, +1/3, +2/3, and +1.0.
- Resolution
Set recording resolution.
- Bump Recording
Set the impact sensitivity of the G-sensor. Options include: Low, Medium, High, and OFF.
- Date/Time Set date, time, and date format.
- Time Zone Set Time Zone.
- Daylight Saving Time Enable or disable daylight saving time.
- Screen Saver Set screen saver for stand-by. .
- Power on/off Sound Set Power sound on or off.
- Video Stamp
a. Date Stamp Enable or disable date stamp on recordings.
b. GPS Stamp Enable or disable coordinate stamp on recordings.
- Language Set display language. Options include 简体中文, 繁體中文, English, Français, Español, Deutsch, Italiano, 日本語, Português, and Русский.
- Format memory Card

All data on the MicroSD will be deleted.
Data is irrecoverable after formatting.

Please backup videos and photos before formatting the MicroSD.
- Format Warning Set format prompt interval. Options include 15 days, 30 days, 60 days, or OFF.
- Default Reset all values to factory default.
- Version Check the current firmware version.
5. Record/Play/Delete record Snapshot function
5.1 Video Recording Circulation
① Device will automatically start recording a new video file after powering on if the Micro SD Card is inserted.
② Each recorded file is 5 minutes long, with the old footage being replaced when the Micro SD Card is full.
5.2 Emergency Recording
① Manual File Backup
Hold the button 📄 to backup file so that it will not be overwritten. You will see an icon at the top left of the LCD screen that looks like this 🔒 . This occurs when an emergency file is being recorded.
② Auto Backup
Once the G-Sensor is activated by a sudden impact the device will automatically lock the file so that it is not overwritten.
③ Saved File Backup
In Recording Mode, press UP button to enter the Playback menu. Press OK to enter Videos. Press UP/DOWN to browse files, then press OK to select the file. Press DOWN button to lock/unlock the file.
5.3 Snapshot
① Hold ▼ for 3 seconds to take a snapshot while in recording mode.
② The snapshot images are located on the Micro SD Card in the PHOTOS folder. This is also where you can find the video files that are recorded.
③ The icon 📄 will be shown after you take a snapshot. This will not disturb video recording mode.
5.4 Copying Files with USB Connection
① Connect device to your computer using a USB to mini-USB cable. It should be recognized as a removable device or show up as an icon titled “No Name” on your desktop.
② There are video recording files located in folder \PAPAGO (circulating video recording files and emergency video recording files) on the “Removable Device”.
③ Copy the files to your computer. Please follow the copy and paste or drag and drop procedure for your computer model.
5.5 Copying Files from Micro SD Card
① Shut down the device and eject the Micro SD Card. (To avoid corrupting the last file recorded, do not eject SD Card immediately after powering off.)
② Insert the Micro SD Card onto adapter. Insert adapter into the Micro SD Card reader and your computer will automatically detect the SD Card.
③ There are video recording files located in folder \PAPAGO (circulating video recording files and emergency video recording files) on the "removable device".
④ Copy the files to your computer. Please follow the copy and paste or drag and drop procedure for your computer model.
5.6 Play/Delete Video or Photo
① Hold down ▲ to enter playback menu and preview the recorded files.
② Choose Type: Videos (regular recorded videos), Emergency (videos recorded in emergency mode) or Photos (snapshots taken).
③ Press up/down button to browse the files. Click "OK" to choose which file you want to preview.
④ Click to OK button to play file, or up button to delete the file.
Limited Warranty Statement
- This limited warranty is given only to the original purchaser of the product.
- The limited warranty shall be restricted to the country/region of product purchase.
- The limited warranty is only valid and enforceable in countries where the product is sold.
- The limited warranty shall last for 12 months from the date of original purchase. The invoice will be required as the proof of purchase.
- The limited warranty covers the expenses for inspecting and repairing the product during the warranty period.
- The defective product shall be delivered by the purchaser to the reseller store or our authorized dealer together with the warranty card and the invoice (proof of purchase).
- We will return the repaired product with a swap unit in good working condition. All replaced faulty products or components will not return to the purchaser.
- The repaired or replaced product, shall continue to be warranted for the remaining time of the original warranty period.
- The limited warranty shall not apply for the defect which is resulting from the use of the product in a manner other than the normal and customary manner.
- The limited warranty shall not apply for the defect which is resulting from the operating with components or accessories that is not come with the original package.
- We reserve the right to add, delete or amend the terms and conditions at any time without prior notice.


- ATTENTION PLEASE
- 【ABOUT USAGE】
- PRODUCT INTRODUCTION
- 1.1 PACKAGE CONTENTS
- 1.2 DRIVING RECORDER OVERVIEW
- INSTALLATION AND REMOVAL
- 2.1 LOCATION
- START AND GO
- 3.1 POWER ON
- 3.2 POWER OFF
- 3.4 BUTTONS
- 3.5 RECORDING
- SETTINGS
- THIS FUNCTION ONLY WORKS WHEN THE DEVICE HAS A CONTINUAL POWER SOURCE AFTER THE VEHICLE'S ENGINE IS TURNED OFF
- RECORD/PLAY/DELETE RECORD SNAPSHOT FUNCTION
- 5.1 VIDEO RECORDING CIRCULATION
- 5.2 EMERGENCY RECORDING
- 5.3 SNAPSHOT
- 5.4 COPYING FILES WITH USB CONNECTION
- 5.5 COPYING FILES FROM MICRO SD CARD
- 5.6 PLAY/DELETE VIDEO OR PHOTO
- LIMITED WARRANTY STATEMENT
Brand : Papago
Model : GoSafe S37
Category : Dash cam