LWS3063BD - Built-in oven LG - Free user manual and instructions
Find the device manual for free LWS3063BD LG in PDF.

| Product Type | Electric Built-in Convection Oven |
| Brand | LG |
| Model | LWS3063BD |
| Dimensions (W x H x D) | 76.2 x 122.9 x 68.6 cm (30 x 48.4 x 27 in) |
| Weight | 68 kg (150 lb) |
| Power Supply | 240 V, 40 A, 60 Hz |
| Oven Capacity | 142 L (5.0 ft³) |
| Number of Racks | 5 positions, 2 standard racks included |
| Cooking Functions | Bake, Broil, Roast, Convection Bake, Convection Roast, Crisp Convection, Warm, Proof |
| Timed and Delayed Cooking | Yes, timer up to 11 h 59 min, delayed start up to 24 h |
| Display and Controls | Touch digital display, numeric keys, programmable clock |
| Interior Light | 25 W halogen bulb, automatic on door opening |
| Cleaning | Pyrolytic self-cleaning (3, 4 or 5 h cycles) and EasyClean® (steam cleaning, 10 min) |
| Safety | Automatic door lock during self-cleaning, control lockout, child lock |
| Smart Features | LG ThinQ (Wi-Fi), Smart Diagnosis™, Tag On (NFC) |
| Included Accessories | 2 standard racks, broil pan, lower decorative trim, mounting screws, user and installation manual |
| Cavity Material | EasyClean enamel (easy to clean) |
| Warranty | 1 year parts and labor, extended warranty on certain parts |
Frequently Asked Questions - LWS3063BD LG
User questions about LWS3063BD LG
0 question about this device. Answer the ones you know or ask your own.
Ask a new question about this device
Download the instructions for your Built-in oven in PDF format for free! Find your manual LWS3063BD - LG and take your electronic device back in hand. On this page are published all the documents necessary for the use of your device. LWS3063BD by LG.
USER MANUAL LWS3063BD LG
Please read this guide thoroughly before operating and keep it handy for reference at all times.
LWS3063ST
LWS3063BD
TABLE OF CONTENTS
3 IMPORTANT SAFETY INFORMATION
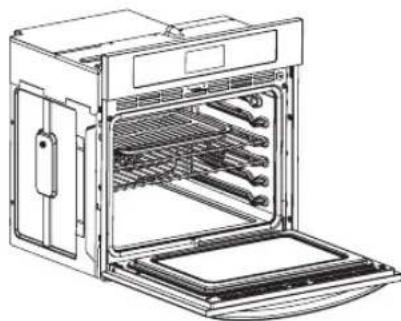
7 PRODUCT OVERVIEW
7 Accessories
8 Oven Overview
9 Control Panel Overview
11 FEATURES
11Clock
12 Timer On/Off
13 Special Oven Control Settings
13 Setting Convection Auto Conversion
13 Adjusting the Oven Temperature
14 Selecting the Display Language
14 Adjusting the Preheat Alarm
14 Adjusting the Beeper Volume
14 Selecting Fahrenheit or Celsius
15 USING THE OVEN
15 Bake
16 Multi-Rack Baking
17 Timed Cook
18 Delayed Timed Cook
19 Broil
19 Recommended Broiling Guide
21 Roast
21 Convection Bake
22 Crisp Convection
23 Convection Roast
24 Warm
24 Proof
25 Turning On/Off the Oven Light
25 Control Lock Feature
25 Favorite
25 Oven Light
26 SMART FUNCTIONS
26 LG ThinQ Application
27 Smart Diagnosis™ Feature
28 MAINTENANCE
28 Self-Clean
31 EasyClean
31 Cleaning Tips
32 EasyClean Instruction Guide
33 Changing the Oven Light
33 Cleaning the Exterior
35 Removing and Replacing the Lift-Off Oven Door
35 Door Care Instructions
36 TROUBLESHOOTING
36 FAQs
38 Before Calling for Service
40 LIMITED WARRANTY
IMPORTANT SAFETY INFORMATION
Read and follow all instructions before using your oven to prevent the risk of fire, electric shock, personal injury, or damage when using the oven. This guide does not cover all possible conditions that may occur. Always contact your service agent or manufacturer about problems that you do not understand.
Download this owner's manual at http://www.lg.com.

This is the safety alert symbol. This symbol alerts you to potential hazards that can kill or hurt you and others. All safety messages will follow the safety alert symbol and either the word WARNING or CAUTION. These words mean:

WARNING
This symbol will alert you to hazards or unsafe practices which could cause serious bodily harm or death.

CAUTION
This symbol will alert you to hazards or unsafe practices which could cause bodily injury or property damage.
SAFETY PRECAUTIONS
- Be certain your appliance is properly installed and grounded by a qualified technician.
- Do not repair or replace any part of the appliance unless specifically recommended in the manual.
- All other servicing should be referred to a qualified technician.
- Always disconnect power to appliance before servicing by unplugging, removing the fuse or switching off the circuit breaker.
DO NOT TOUCH HEATING ELEMENTS OR INTERIOR SURFACES OF OVEN.
Heating elements may be hot even though they are dark in color. Interior surfaces of an oven become hot enough to cause burns. During and after use, do not touch or let clothing or other flammable materials contact heating elements or interior surfaces of oven until they have had sufficient time to cool. Other surfaces of the appliance may become hot enough to cause burns. Among these surfaces are oven vent openings and surfaces near these openings, oven doors, and windows of oven doors.
- Use Care When Opening Door.
Let hot air or steam escape before you remove or replace food in the oven
- Do Not Heat Unopened Food Containers.
Build-up of pressure may cause container to burst and result in injury.
SAFETY PRECAUTIONS (CONT.)
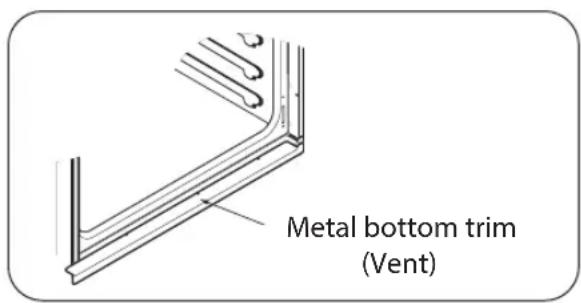
- Keep Oven Vent Ducts Unobstructed.
The oven vent could become hot during oven use. Never block this vent and never place plastic or heat-sensitive items on or near the vent.
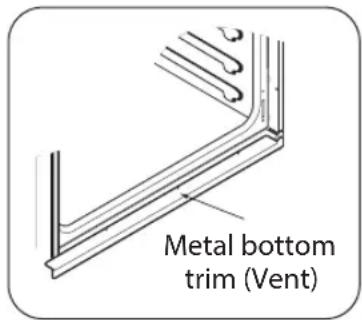
NOTE:
For proper operation vent trim must be installed.

WARNING
- NEVER use your appliance for warming or heating the room.
DO NOT use water on grease fires.
Should an oven fire occur, leave the oven door closed and turn the oven off. If the fire continues, throw baking soda on the fire or use a fire extinguisher.
- Use dry pot holders only.
Moist or damp pot holders on hot surfaces may result in burns from steam. Do not let the pot holder touch hot heating elements. Do not use a towel or other bulky cloth.
Storage in or on appliance.
Flammable materials should not be stored in an oven or near surface elements.
- Wear proper apparel.
Loose-fitting or hanging garments should never be worn while using the appliance.
- Be certain all packing materials are removed from the appliance before operating. Keep plastics, clothes, and paper away from parts of the appliance that may become hot.
- DO NOT force the door open. This can damage the automatic door locking system. Use care when opening the oven door after the self-cleaning cycle. Stand to the side of the oven when opening the door to allow hot air or steam to escape. The oven may still be VERY HOT.
- DO NOT use a steel-wool pad. It will SCRATCH the surface.
- DO NOT use harsh etching, abrasive cleaners or sharp metal scrapers to clean the oven door glass since they can scratch the surface. This may result in the glass shattering.
- Be careful when removing and lifting the door.
- DO NOT lift the door by the handle. The door is very heavy.
- DO NOT step or sit on oven door. Be sure to follow proper installation instructions.
ELECTRICAL SAFETY
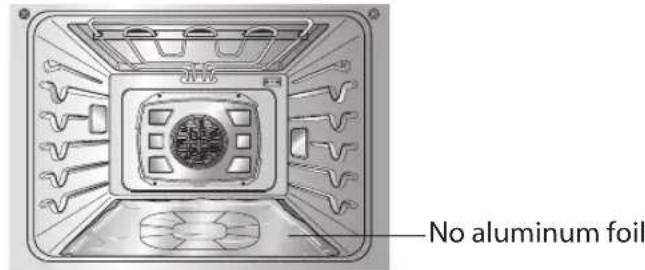
- Protective Liners. Do not use aluminum foil or any other material to line the oven bottom. Improper installation of these liners may result in a risk of electric shock or fire.
- Do Not allow aluminum foil or the meat probe to contact heating elements.

WARNING
-
DO NOT place aluminum foil directly on the oven bottom.
-
DO NOT line the oven walls, racks, bottom, or any other part of the oven with aluminum foil or any other material. Doing so will disrupt heat distribution, produce poor baking results and cause permanent damage to the oven interior (aluminum foil will melt to the interior surface of the oven.)
- Before replacing your oven light bulb, switch off the electrical power to the oven at the main fuse or circuit breaker panel. Failure to do so can result in severe personal injury, death, or electrical shock.
SAFETY DURING USE
- Oven Racks. Always place oven racks in desired position while oven is cool.
- Always use pot holders or oven mitts when removing food from the oven. Hot cookware or plates can cause burns.
- Use caution with the TIMED BAKE or DELAYED TIMED BAKE features. Use the automatic timer when cooking cured or frozen meats and most fruits and vegetables. Foods that can easily spoil, such as milk, eggs, fish, meat or poultry, should be chilled in the refrigerator first. Even when chilled, they should not stand in the oven for more than 1 hour before cooking begins, and should be removed promptly when cooking is completed. Eating spoiled food can result in sickness from food poisoning.
- Should an oven fire occur, leave the oven door closed and turn the oven off. If the fire continues, throw baking soda on the fire or use a fire extinguisher.
- DO NOT put water or flour on the fire. Flour may be explosive and water can cause a grease fire to spread and cause personal injury.
DO NOT use the broiler pan without the grid. DO NOT cover the grid with aluminum foil.
CHILD SAFETY

WARNING
Children should be kept away from the oven.
- Accessory parts will become hot when the broiler is in use.

CAUTION
- Children should not be left alone or unattended in the area where the appliance is in use. Children should never be allowed to sit or stand on any part of the appliance.
- DO NOT leave small children unattended near the appliance. During the self-cleaning cycle, the outside of the oven can become very hot to the touch.
SAFETY WHEN CLEANING
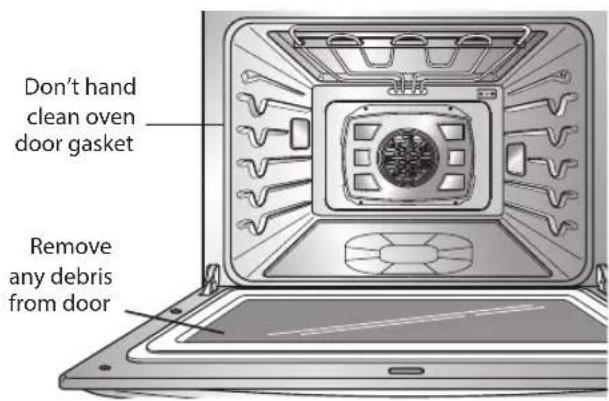
- Do Not Clean Door Gasket. The door gasket is essential for a good seal. Care should be taken not to rub, damage, or move the gasket.
- Do Not Use Oven Cleaners. No commercial oven cleaner or oven liner protective coating of any kind should be used in or around any part of the oven.
- Before self cleaning the oven. Remove broiler pan, all oven racks, meat probe and any other utensils from the oven cavity.
- Never keep pet birds in the kitchen. The health of birds is extremely sensitive to the fumes released during an oven self-clean cycle. Fumes may be harmful or fatal to birds. Move birds to well-ventilated room.
- Important Instruction. In the event the self clean error code F is displayed, and error melody sounds, the oven is malfunctioning in the self clean mode. Switch off the electrical power to the main fuse or breaker and have serviced by a qualified technician.
- Make sure oven lights are cool before cleaning.
- DO NOT block the oven vent during operation. This can damage the electric parts of the oven. Air must be able to move freely. The metal bottom trim (vent) should be properly assembled on the front bottom of oven before installing the oven door.
PRODUCT OVERVIEW
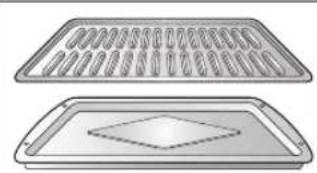
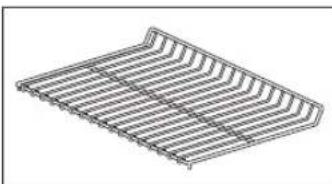
ACCESSIONS
Make sure that all parts are included after purchasing this product.
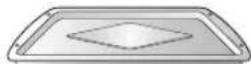
Accessories for Cooking
electric convection built-in oven

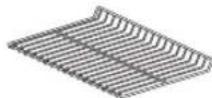
Grid Standard racks (2 ea) Broiler pan
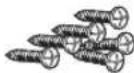
Accessories for Installation
6 Wood Screws
For Mounting
(4 needed for installation
and 2 extras)

4X10 Screws (2 ea)
For bottom decorative trim
Bottom decorative trim
(1ea)

Manuals
Owner's manual Installation manual
NOTE
- Contact LG Customer Service if any accessories are missing.
- For your safety and for extended product life, only use authorized components.
- The manufacturer is not responsible for product malfunction or accidents caused by the use of separately purchased, unauthorized components.
- The images in this guide may be different from the actual components and accessories, which are subject to change by the manufacturer without prior notice for product improvement purposes.
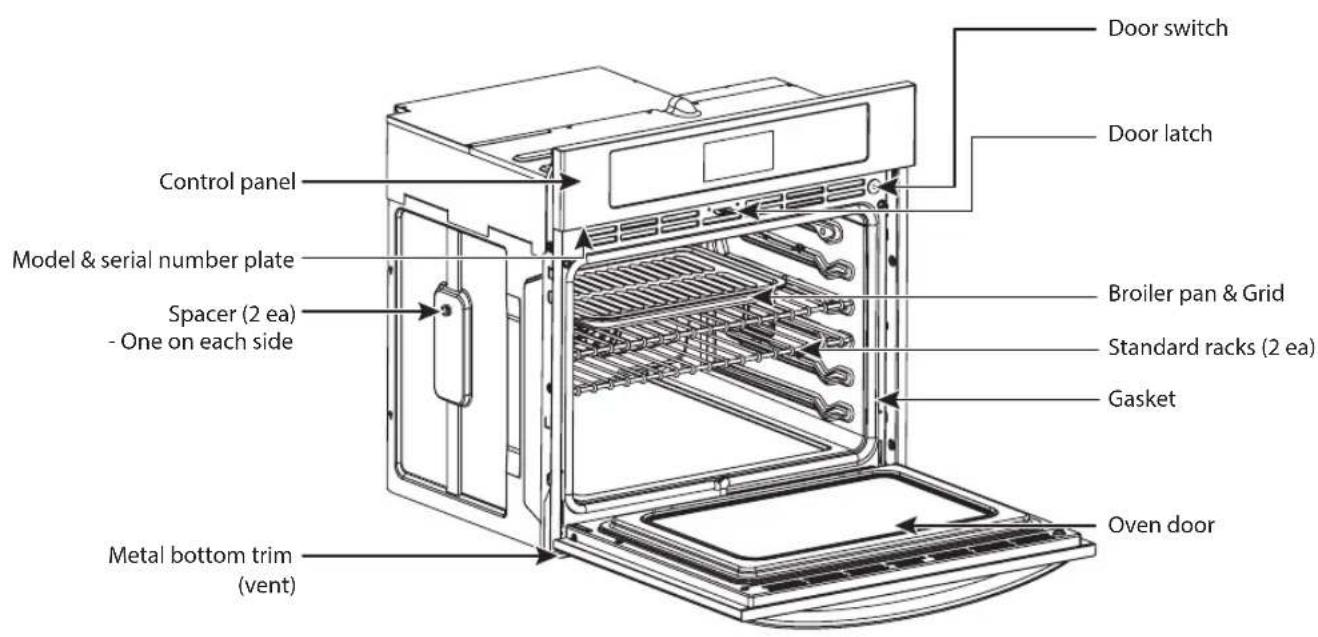
OVEN OVERVIEW
Make sure to understand the name and function of each part.
- Throughout this manual, the features and appearance may vary depending on your model.
CONTROL PANEL OVERVIEW
READ THE INSTRUCTIONS CAREFULLY BEFORE USING THE OVEN. For satisfactory use of the oven, become familiar with the various features and functions of the oven as described below. Detailed instructions for each feature and function are listed in this owner's manual.
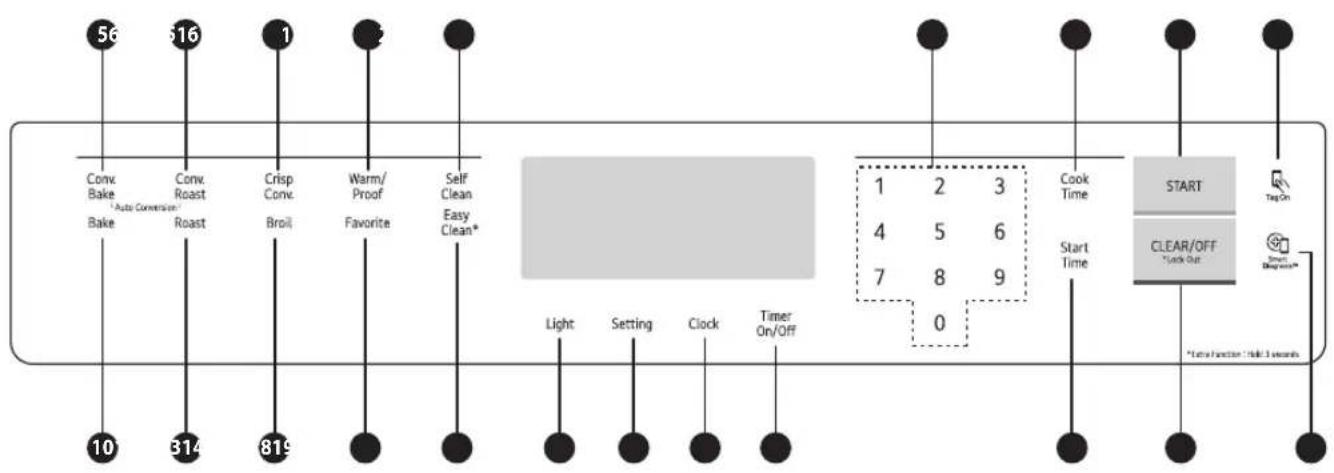
| Name | Description |
| ① OVEN LIGHT | Use to turn the Oven lights of the oven on and off. |
| ② SETTING | See page 13 and 14. |
| ③ CLOCK | Use to set the time of day. |
| ④ TIMER ON/OFF | Use to set or cancel the timer of the oven. |
| ⑤ CONV. BAKE | Use to select the Convection Bake function of the oven. |
| ⑥ CONV. ROAST | Use to select the Convection Roast function of the oven. |
| ⑦ CRISP CONV. | Use to select the Crisp Convection function of the oven. |
| ⑧ WARM/PROOF | Use to select the Warm/Proof function of the oven. |
| ⑨ SELF CLEAN | Use to select the Self Clean function of the oven. |
| ⑩ BAKE | Use to select the Bake function of the oven. |
| ⑪ ROAST | Use to select the Roast function of the oven. |
| ⑫ BROIL | Use to select the Broil function of the oven. |
| ⑬ FAVORITE | Use to select the Favorite function of the oven. |
| ⑭ EasyClean® | Use to select the Easy Clean function of the oven. |
| ⑮ NUMBER PADS | Use to enter a temperature and all times. |
| ⑯ COOK TIME | Use to set the length of the cook time. |
| ⑰ START | Use to START all functions in the oven. |
| Name Description | |
| 18 START TIME Use to set delay time. | |
| 19 CLEAR OFF Use to stop cooking, cancel settings of the oven. To activate OVEN LOCK press and hold for 3 seconds. | |
| 20 SMART FEATURES The Tag On icon, for use with Smart Features. | |
| 21 SMART DIAGNOSISTM Use with the Smart Diagnosis feature. |

NOTE
If F- and a number appear in the display and the oven control signals, this indicates a function error code.
See page 36.
- Touch the CLEAR OFF pad. Allow the oven to cool for one hour. Put the oven back into operation.
- If the function error code repeats, disconnect the power to the oven and call for service.
- If your oven was set for a timed oven operation and a power outage occurred, the clock and all programmed functions must be reset.
- The time of day will flash in the display when there has been a power outage.
FEATURES
CLOCK
The clock must be set to the correct time of day for the automatic oven timing functions to work properly. The time of day cannot be changed during a timed baking or Self Clean cycle.
Setting the Clock
- Press CLOCK once.
- Press the numbers to enter the correct time of day. For example, to set 12:34, press the numbers 1, 2, 3 and 4.
If the numbers are not pressed within 25 seconds of pressing CLOCK, the display reverts to the original setting.
- Press START. This enters the time and starts the clock.

NOTE
To check the time of day when the display is showing other information, simply press CLOCK.
Changing the Hour Mode (12HR or 24HR)
The control is set to use a 24-hour clock. Follow these steps to change to a 12-hour clock.
- Press SETTING once.
- Press 1 to select 12-hour and 2 to select 24-hour.
- Press START to accept the desired change.
Power Outage
If the colon in the time is flashing in the display, you have experienced a power failure.
Resetting the Clock
- Press CLOCK.
- Press the numbers to enter the correct time of day.
- Press START.
Minimum & Maximum Default Settings
All of the features listed have minimum and maximum time or temperature settings that may be entered into the control. A beep sounds each time a button is pressed.
Two short beeps sound if the entry of the temperature or time is below the minimum or above the maximum settings for the feature.
| FEATURE MIN. TEM | P./TIME MAX. TEM. | / TIME |
| BAKE / ROAST 170°F | (80°C) 550°F (288°C) | |
| BROIL [Full / Center] | LO (350°F) HI (550°F) | |
| CONVECTION BAKE/CONVECTION ROAST/CRISP CONVECTION | 170°F (80°C) 550°F (288°C) | |
| PROOF 100°F | ||
| WARM | LO (140°F) /3 hours | HI (200°F) /3 hours |
| SELF CLEAN 3 hours 5 hours | ||
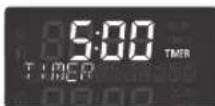
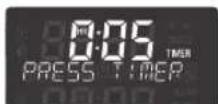
TIMER ON/OFF
The TIMER ON/OFF serves as an extra timer in the kitchen that will beep when the set time has run out. It does not start or stop cooking.
The TIMER ON/OFF feature can be used during any of the other oven control functions.
Setting the Timer
example to set 5 minutes):
- Press TIMER ON/OFF once.
0:00 with HR inside appears and TIMER flashes in the display.
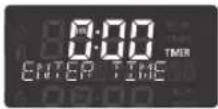
- Press number 5.
0:05 appears in the display.
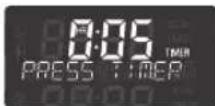
- Press TIMER to start the Timer.
The display shows the set time counting down.

NOTE
If TIMER ON/OFF is not pressed, the timer returns to the time of day.
- When the set time has run out, End shows in the display. The indicator tones sound every 15 seconds until TIMER ON/OFF is pressed.

NOTE
If the remaining time is not in the display, recall the remaining time by pressing the TIMER ON/OFF.
- Set the time in seconds by pressing TIMER ON/ OFF twice. (For example, press 5 and 0 to set 50 seconds.)
- Set the time in minutes by pressing TIMER ON/OFF once. (For example, press 5 to set 5 minutes.)
Cancelling the Timer
- Press TIMER ON/OFF once.
The display returns to the time of day.
The oven has additional settings which can be accessed and adjusted using the Setting button.
These additional settings can only be activated while the display is showing the time of day.
They remain in the control's memory until changed.
The settings also remain in memory after a power failure.
The setting of function
| Function Touch | |
| Clock 1 time | |
| Convection auto conversion 2 times | |
| Oven temperature 3 times | |
| Select language 4 times | |
| Preheat alarm 5 times | |
| Beeper volume 6 times | |
| Select Fahrenheit or Celsius temperature | 7 times |
Setting Convection Auto Conversion
When using convection bake and roast, the Convection Auto Conversion feature will automatically convert entered regular baking temperatures to convection baking temperatures.
This feature is activated so that the display will show the actual converted (reduced) temperature. For example, if you enter a regular recipe temperature of 350^ and press the START function, the display will show the converted temperature of 325^ .
- Press SETTING twice. AUTO appears in the display.

- Press 1 to enable or 2 to disable.
- Press START.
Adjusting the Oven Temperature
This oven may cook differently than the one it replaced. Use the oven for a few weeks to become more familiar with it before adjusting the thermostat settings.
Do not use thermometers, such as those found in grocery stores, to check the temperature setting of your oven.
These thermometers may vary 20-40 degrees.

NOTE
- This adjustment will not affect the broiling or the Self Clean temperatures. The adjustment will be retained in memory after a power failure. The oven temperature can be increased (+) or decreased (-) as much as 35^ or 19^ .
- Once the temperature is increased or decreased, the display will show the adjusted temperature until it is readjusted.
-
The thermostat adjustment for Bake will also affect Convection Bake, Convection Roast, Roast or Crisp Convection.
-
Press SETTING three times or until AdJU appears in the display.
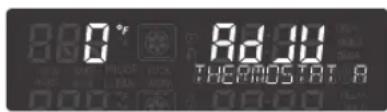
- Enter the desired temperature adjustment. For example, to adjust the oven temperature UP 15 degrees, press 15.
- Press START to accept the change.
- To lower the oven temperature enter 15 then press SETTING to DECREASE the temperature, (add a minus sign).
- Press START to accept the change.
Selecting the Display Language
The oven control is set to display in English but can be changed to display in Spanish or French.
- Press SETTING four times or until Lng appears in the display.

- Press 1 for English, 2 for Spanish, or 3 for French.
- Press START to accept the change.
Adjusting the Preheat Alarm
When the oven reaches the set temperature, the preheat alarm light flashes until the door is opened. The alarm can be deactivated or activated.
- Press SETTING five times or until PrE appears in the display.
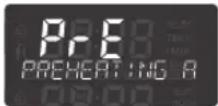
- Press 1 to turn on and 2 to turn off the alarm.
- Press START to accept the change.
Adjusting the Beeper Volume
The beeper volume can be adjusted to three possible volume levels, loud, low, and mute.
- Press SETTING six times or until BEEP appears in the display.
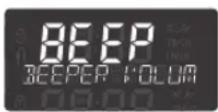
- Press 1 for LOUD, 2 for LOW, and 3 for MUTE.
- Press START to accept the change.
Selecting Fahrenheit or Celsius
The oven is set to display the Fahrenheit temperature scale. Follow these instructions to set the display to the Celsius scale.
- Press SETTING seven times or until UNIT appears in the display.

- Press 1 for ^ F (Fahrenheit) or 2 for ^ C (Celsius).
- Press START to accept the change.
USING THE OVEN
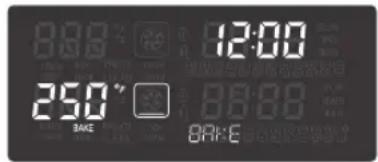
BAKE
The oven can be programmed to bake at any temperature from 170^ (80^) to 550^ (288^) . Default temperature is 350^ (177^) .
Setting the Oven to Bake at 375^
- Press BAKE.
- Set the oven temperature. (Press 3, 7, and 5.)
- Press START.
The word PREHEATING and 100^ appear in the display. As the oven preheats the temperature is displayed in 5 degree increments. Once the oven reaches the desired temperature, a tone sounds.
PREHEATING
Place the food in the oven after preheating. Preheating is necessary for better cooking results.
- When cooking is finished, press CLEAR OFF.
- Remove the food from the oven.
Changing Bake Temperature while Cooking (example changing from 375^ to 425^ ):
- Press BAKE.
- Set the oven temperature. (Press 4, 2, and 5.)
- Press START.
Tips for Baking
Follow the recipe or convection food directions for baking temperature, time and rack position. Baking time and temperature will vary depending on the ingredients, size, and shape of the baking pan used.
- For best results, food should be placed on a single rack with at least 1^ to 1 1/2^ of air space between the pans and oven walls.
- Check for doneness at the minimum time.
- Use metal bakeware (with or without a nonstick finish), heatproof glass-ceramic, ceramic or other bakware recommended for oven use.
- Dark metal pans or nonstick coatings will cook faster with more browning. Insulated bakeware will slightly lengthen the cooking time for most foods.
Displays for the BAKE mode
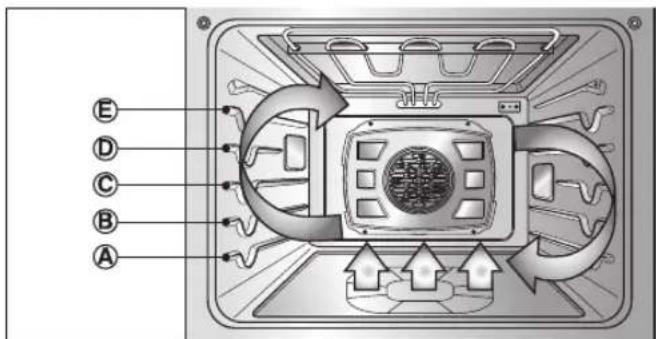
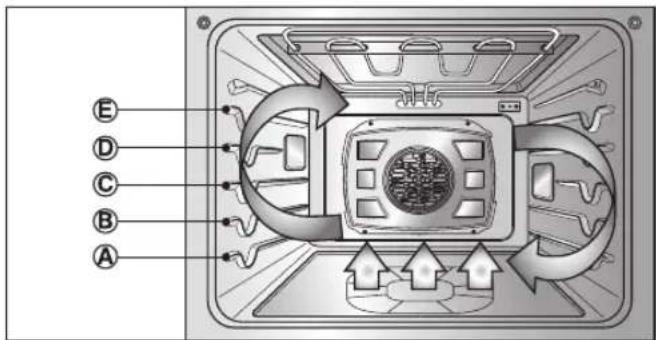
MULTI-RACK BAKING
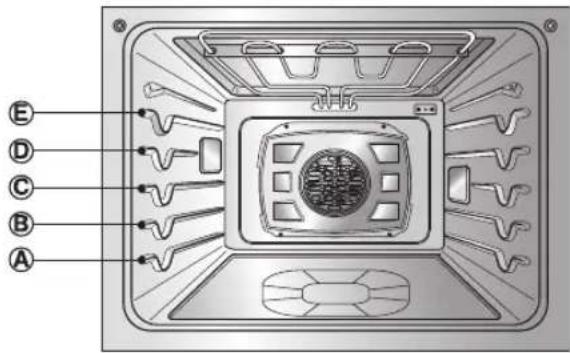
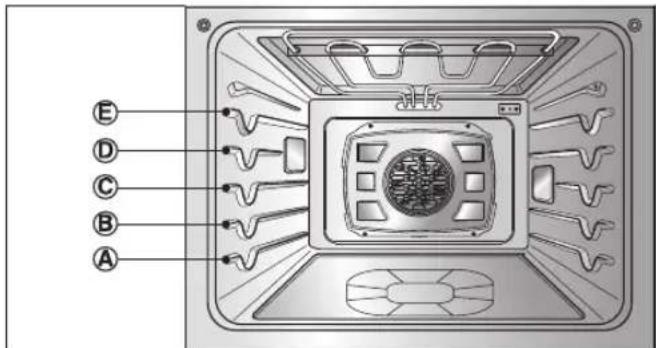
The oven has 5 rack positions.
Baking results will be better if baking pans are centered in the oven as much as possible. If baking with more than one pan, place the pans so each has at least 2^ to 2 - 1 / 2^ of air space around it.
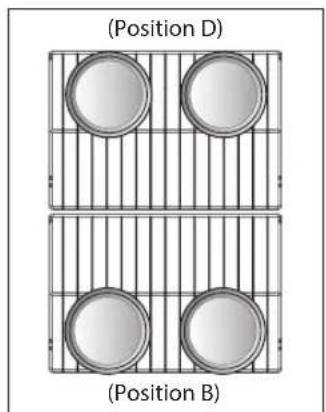
If cooking on multiple racks, place the oven racks in positions B and D (for two racks). Place the cookware as shown.
multiple racks single rack
NOTE
- Preheating is necessary for good results when baking cakes, cookies, pastries and breads. After the oven has reached the desired temperature, the preheat melody sounds once.
- The heating elements and fan turn off if the door is opened. They turn on again if the door is closed. If the oven door is left open for more than 30 minutes, all settings are canceled.
- Press CLEAR OFF to cancel BAKE at any time.
| Type of Food Rack Position | |
| Angel food cake, frozen pies A | |
| Bundt or pound cakes B | |
| Biscuits, muffins, brownies, cookies, cupcakes, layer cakes, pies | C |
| Casseroles C | |
| Turkey, roasts, or ham A | |
| Frozen pizza C | |
| Roast chicken B | |
TIMED COOK
The oven turns on immediately and cooks for a selected length of time. At the end of the cooking time, the oven turns off automatically.
Setting Immediate Cook and Automatic Shutoff (example to set bake at 300^ for 30 minutes.)
- Set the clock for the correct time of day.
- Press BAKE, 350^ appears in the display.
- Set the oven temperature. (Press 3, 0, and 0.)
- Press COOK TIME. TIMED flashes. BAKE, 0:00 and 300^ appear in the display.
- Set the desired baking time. (Press 3 and 0.)

NOTE
Baking time can be set for any amount of time between 1 minute and 11 hours and 59 minutes.
- Press START. The oven turns on, and the display shows the cooking time countdown. The oven continues to cook for the set amount of time, then turns off automatically, unless the WARM feature was set. Refer to the Setting the WARM feature section on page 24.
- Press CLEAR OFF to cancel this function at any time.
Changing the Cook Time During Cooking (example to change the cook time from 30 minutes to 1 hour 30 minutes.)
- Press COOKTIME.
- Set the new baking time. (Press 1, 3, and 0.)
- Press START to accept the change or press CLEAR OFF to reset the time.
When Timed Cook Finishes
- END OF CYCLE and the time of day show in the display. The oven will shut off automatically.
- The cook end melody repeats every minute until CLEAR OFF is pressed.

NOTE
- During the preheating mode, the convection fan operates constantly to circulate the hot air. The convection fan turns off automatically after the preset temperature is attained.
After any cooking cycle has been completed cooling fans operate to protect the control panel. This is normal.
DELAYED TIMED COOK
The automatic timer of the Delayed Timed Cook function turns the oven ON and OFF at the time selected.
Setting the Oven for Delayed Start (for example, to Bake at 300^ for 30 minutes starting at 4:30 p.m.)
- Set the clock for the correct time of day.
- Arrange interior oven rack(s) and place the food in the oven.
- Press BAKE. 350^ appears in the display.
- Set the oven temperature. (Press 3, 0, and 0.)
- Press COOKTIME.
- Set the desired baking time. (Press 3 and 0.)

NOTE
Baking time can be set for any amount of time from 1 minute to 11 hours and 59 minutes.
- Press START TIME.
- Set the desired start time. (Press 1, 6, 3, and 0.)
- Press START. At the set time, a short beep sounds.. The oven begins to Bake.
- Press CLEAR OFF to cancel Delayed Timed Bake at any time.
When the Delayed Timed Cook Finishes
- END OF CYCLE and the time of day show in the display. The oven shuts off automatically.
- The cook end melody repeats every minute until CLEAR OFF is pressed.

NOTE
- If the clock is set to 24-hour mode, cooking can be delayed up to 24 hours.
- During the preheating mode, the convection fan operates constantly to circulate the hot air. The convection fan turns off automatically after the preset temperature is attained.
After any cooking cycle has been completed cooling fans operate to protect the control panel. This is normal.

CAUTION
- Use caution with the TIMED BAKE or DELAYED TIMED BAKE features. Use the automatic timer when cooking cured or frozen meats and most fruits and vegetables. Foods that can easily spoil, such as milk, eggs, fish, meat or poultry, should be chilled in the refrigerator first. Even when chilled, they should not stand in the oven for more than 1 hour before cooking begins, and should be removed promptly when cooking is completed.
Eating spoiled food can result in sickness from food poisoning.
BROIL
Broiling uses an intense, radiant heat to cook food. Both the inner and outer broil elements heat during full broiling. Only the inner broil element heats during center broiling. The element(s) cycle on and off at intervals to maintain the oven temperature. The meat probe cannot be used with this mode.

NOTE
The oven is designed for CLOSED DOOR broiling.
Setting the Oven to Broil
- Place the food on the broiler pan grid.
- Press Broil.
- Press 1 for full broiling or 2 for center broiling.
- Press 1 for High, 2 for Medium or 3 for Low broil.
- Press START. The oven begins to broil.
- Broil on one side until food is browned; turn and cook on the other side.

NOTE
Always pull the rack out to the stop position before turning or removing food.
- When broiling is finished, press CLEAR OFF. Press CLEAR OFF to cancel this function at any time.

NOTE
The heating element(s) turn off if the door is opened. They turn on again if the door is closed. Press CLEAR OFF to cancel Broil at any time.

NOTE
After any cooking cycle has been completed cooling fans operate to protect the control panel. This is normal.
RECOMMENDED BROILING GUIDE
The size, weight, thickness, starting temperature, and your preference of doneness will affect broiling times. This guide is based on meats at refrigerator temperature. It is recommended to preheat the oven for about 5 minutes before placing food in the oven.
For best results when broiling, use a pan designed for broiling.
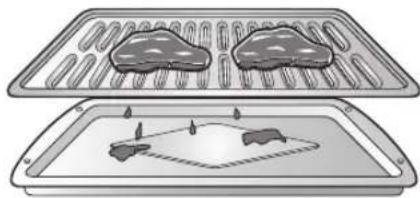
broiler pan and grid
Broiling Chart
| Food | Quantity and/ or Thickness | Shelf Position | First Side Time (min.) | Second Side Time (min.) | Comments |
| Ground Beef 1 lb. | 4 patties)1/2 to 3/4" thick | E 4-6 3 | -4 Space evenly. | Up to 8 patties may bebroiled at once. | |
| Beef SteaksRareMediumWell DoneRareMediumWell Done | 1" thick1 to 1-1/2 lbs.1-1/2" thick2 to 2-1/2 lbs. | D D D D | 6 7 8 10 12 14 | 2-3 2-3 3-4 4-6 6-8 8-10 | Steaks less than 1" thick cook throughbefore browning.Pan frying is recommended. Remove fat. |
| Chicken 1 whole cut up2 to 2-1/2 lbs., split lengthwise2 Breasts | C C | 20 20 | 6-8 6-10 | Broil skin-side-down first. | |
| Lobster Tails 2-4 | 10 to 12 oz. each | C 12-14 | Do not turn | over. | Cut through back of shell. Spread open.Brush with melted butter before broilingand after half of broiling time. |
| Fish Fillets 1/4 to /2" thick D or E 5-6 3-4 Handle and turn very carefully. Brush with lemon butter before and during cooking, if desired. | |||||
| Ham Slices(precooked) | 1/2" thick | D | 5 | 3-5 | Increase time 5 to 10 minutes per sidefor 1-1/2" thick or home-cured ham. |
| Pork ChopsWell Done | 2 (1/2" thick)2 (1" thick) about 1 lb. | D or E D or E | 7 9-10 | 6-8 7-9 | Remove fat. |
| Lamb ChopsMediumWell DoneMediumWell Done | 2 (1" thick) about 10to 12 oz.2 (1-1/2" thick) about1 lb. | D D D | 6 8 11 13 | 4-6 7-9 9 9-11 | Remove fat. |
| Salmon Steaks | 2 (1" thick)4 (1" thick) about 1 lb. | D or E D or E | 8 9 | 3-4 4-6 | Grease pan. Brush steaks with meltedbutter. |

CAUTION
- Should an oven fire occur, leave the oven door closed and turn the oven off. If the fire continues, throw baking soda on the fire or use a fire extinguisher.
DO NOT put water or flour on the fire.
Flour may be explosive and water can cause a grease fire to spread and cause personal injury.

CAUTION
- DO NOT use the broiler pan without the grid.
- DO NOT cover the grid with aluminum foil.
ROAST
Use the Roast feature to cook large cuts of meat.
Setting the Oven to Roast (for example, to cook meat at 375^
- Press ROAST.
- Set the oven temperature. (Press 3, 7 and 5.)
- Press START.

NOTE
After any cooking cycle has been completed cooling fans operate to protect the control panel. This is normal.
Changing Temperature while Cooking (example changing from 375^ to 425^
- Press ROAST.
- Set the oven temperature. (Press 4, 2 and 5.)
- Press START.

NOTE
The heating elements and fan turn off if the door is opened. They turn on again if the door is closed. When preparing meats for roasting, use the broiler pan and grid. The broiler pan catches grease spills and the grid helps prevent grease splatters.
Press CLEAR OFF to cancel Roast at any time.
CONVECTION BAKE
Benefits of Convection Bake
Some foods cook up to 25 to 30% faster, saving time and energy.
- Multiple rack baking.
- No special pans or bakeware needed.
Convection baking uses a fan to circulate the oven's heat evenly and continuously within the oven. This improved heat distribution allows for even cooking and excellent results using multiple racks at the same time. Foods cooked on a single oven rack will generally cook faster and more evenly with Convection Bake. Multiple oven rack cooking may slightly increase cook times for some foods, but the overall result is time saved. Breads and pastries brown more evenly.
Tips for Convection Bake
- Time reductions will vary depending on the amount and type of food to be cooked. Cookies and biscuits should be baked on pans with no sides or very low sides to allow heated air to circulate around the food. Food baked on pans with a dark finish will cook faster.
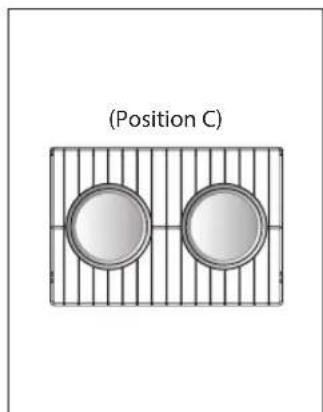
- When using Convection Bake with a single rack, place oven rack in position C. If cooking on multiple racks, place the oven racks in positions B and D.
- Cookies, muffins, biscuits and other quickbreads give very good results when using multiple racks.

NOTE
After any cooking cycle has been completed cooling fans operate to protect the control panel. This is normal.
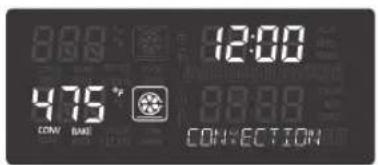
Setting the Oven to Convection Bake
- Press CONV.BAKE.The display flashes 350^
- Set the oven temperature. (Press 3, 7 and 5.)
- Press START. The display shows CONV BAKE and the converted temperature starting at 100^ . As the oven preheats, the display shows increasing temperatures in 5 degree increments. Once the oven reaches the desired adjusted temperature, a tone sounds. The display shows the auto converted oven temperature 350^ , CONV BAKE and the fan icon.
- Press CLEAR OFF to cancel Convection Bake at any time.

NOTE
The heating elements and fan turn off if the door is opened. They turn on again if the door is closed.
Press CLEAR OFF to cancel Convection Bake at any time.
Displays for the CONV. BAKE mode
CRISP CONVECTION
Benefits of Crisp Convection
The Crisp Convection feature is best for light colored and delicate baked goods like cakes, tarts, cookies, puff pastries, scones, muffins, biscuits, yeast-free breads, etc. The hot air continually circulated by the fan distributes heat more evenly than the natural movement of air in a standard thermal oven. This movement of hot air cooks foods more evenly, crisping surfaces while sealing in moisture and yielding crustier breads. The crisp convection heating element heats up faster, reducing cooking time by as much as 30 percent.
Tips for Crisp Convection
- Time saved will vary depending on the amount and type of food to be cooked. Choose cookie sheets without sides and roasting pans with very low sides to allow heated air to circulate around the food. Food baked on pans with a dark finish will cook faster.
- When using Crisp Convection with a single rack, place oven rack in position C. If cooking on multiple racks, place the oven racks in positions B and D.
It is important to uncover foods so that surfaces of food remain exposed to the circulating air, allowing browning and crisping. - Keep heat loss to a minimum by only opening the oven door when necessary.
Setting the Oven to Crisp Convection
- Press CRISP CONV.The display flashes 350^
- Set the oven temperature. (Press 3, 7 and 5.)
- Press START. The display shows CONV and the converted temperature starting at 100^ . As the oven preheats, the display shows increasing temperatures in 5 degree increments. Once the oven reaches the desired adjusted temperature, a tone sounds. The display shows the auto converted oven temperature 350^ , CONV and the fan icon.
- Press CLEAR OFF to cancel Crisp Convection at any time.

NOTE
The heating elements and fan turn off if the door is opened. They turn on again if the door is closed. Press CLEAR OFF to cancel Crisp Convection at any time.

NOTE
After any cooking cycle has been completed cooling fans operate to protect the control panel. This is normal.
CONVECTION ROAST
The Convection Roast feature is designed to give optimum cooking performance for roasting meats and poultry. Preheating is not necessary for meats and poultry. Heated air circulates around the food from all sides, sealing in juices and flavors. Foods are crispy brown on the outside while staying moist on the inside. Convection Roast is especially good for large tender cuts of meat. The meat probe may be used with this feature.
Setting the Oven to Convection Roast
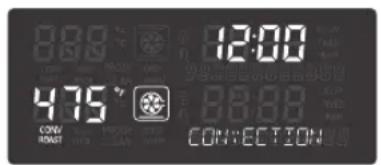
- Arrange oven racks and place food in oven.
- Press CONV. ROAST. The display flashes 350^ .
- Set the oven temperature. (Press 3, 7 and 5.)
- Press START. The display shows CONV ROAST and the changing temperature starting at 100^ . As the oven preheats, the display shows increasing temperatures in 5 degree increments. Once the oven reaches the desired adjusted temperature, a tone sounds. The display shows the auto converted oven temperature 350^ , CONV ROAST and the fan icon.
- Press CLEAR OFF to cancel the function at any time.

NOTE
The heating elements and fan turn off if the door is opened. They turn on again if the door is closed. When preparing meats for roasting, use the broiler pan and grid. The broiler pan catches grease spills and the grid helps prevent grease splatters. Press CLEAR OFF to cancel the Convection Roast feature at any time.

NOTE
After any cooking cycle has been completed cooling fans operate to protect the control panel. This is normal.
Displays for the CONV. ROAST mode
WARM
The WARM function maintains an oven temperature of less than 200^ . This function should not be used to reheat cold food. The Warm function keeps cooked food warm for serving up to 3 hours after cooking has finished. After 3 hours the WARM function shuts the oven OFF automatically. The Warm feature can be used alone or after the Timed Cook or Delayed Timed Cook modes.
Setting the Oven to Warm
- Press WARM/PROOF once.
- Press 1 for High, 2 for Medium, or 3 for Low temperature setting.
- Press START.
- Press CLEAR OFF to cancel Warm at any time.

NOTE
The Warm feature has three temperature levels:
High=200°F, Med=170°F, Low=140°F
(High=93.3°C, Med=76.7°C, Low=60°C)
Setting Warm after Timed Cooking
- Set the desired cooking feature: Timed or Delayed Timed modes of Bake,Conv.Bake,Roast,Conv. Roast,or Crisp Conv.For instructions, refer to previous pages in this section.
- Press START.
- Press WARM/PROOF once. COOK & WARM mode is set to turn on automatically after completing the TIMED COOKING or DELAYED TIMED COOKING.
- Press CLEAR OFF to cancel Cook & Warm mode at any time.
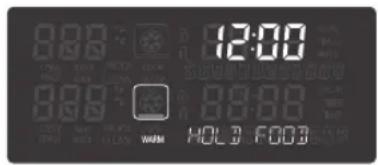
Displays for the WARM mode
PROOF
The Proof feature maintains a warm environment for rising yeast leavened products before baking. To avoid lowering the oven temperature and lengthening proofing time, do not open the oven door unnecessarily. Check bread products early to avoid over-proofing.

NOTE
For best results, cover the dough with a cloth or with plastic wrap (the plastic may need to be anchored underneath the container so the oven fan does not blow it off).
Setting the Oven to Proof (for example, to proof for an hour)
- Press WARM/PROOF twice or until Proof appears in the display.
- Press 1, 0 and 0.
- Press START. The proof feature automatically provides the optimum temperature for the proof process, and therefore does not have a temperature adjustment.
- When proofing is finished, press CLEAR OFF.

NOTE
- Do not use the PROOF mode for warming food or keeping food hot. The proofing oven temperature is not hot enough to hold foods at safe temperatures. Use the WARM feature to keep food warm.
Proofing will not operate when oven is above 125^ . Oven is Hot shows in the display.
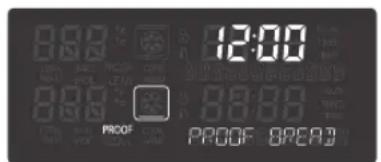
Displays for the PROOF mode
The oven light automatically turns ON when the door is opened. The oven light may also be manually turned ON or OFF by pressing LIGHT.

NOTE
The oven light cannot be turned on if the self clean feature is active.
CONTROL LOCK FEATURE
The Control Lock feature automatically locks most oven controls and prevents them from being turned ON. The feature is applied to the upper and lower ovens simultaneously. It does not disable the clock, timer, or interior oven lights.
Activating Control Lock
- Press and hold CLEAR OFF for 3 seconds.
- Lock melody sounds, CONTROL LOCKOUT appears in the display.
Deactivating Control Lock
- Press and hold CLEAR OFF for 3 seconds. Unlock melody sounds. CONTROL LOCKOUT disappears.
- The oven is fully operational again.

NOTE
- During Control Lock mode, the clock, timer, and oven lights continue to function.
FAVORITE
The FAVORITE feature is used to record and recall favorite recipe settings. This feature can store and recall up to 3 different settings. The Favorite feature can be used with the Cook Time mode. It will not work with any other function including the Start Time (delayed cook) mode.
- Place the food in the oven.
- Press FAVORITE once for Bread, twice for Meat, and 3 times for Chicken. The default temperature appears and COOK flashes.
| Category How to Select | Default Temp.(may be changed and recalled) | Operating Feature |
| 1. Bread Press FAVORITE once. | 375°F BAKE | |
| 2. Meat Press FAVORITewice. | 325°F Convection Roast | |
| 3. Beef Press FAVORITE 3 times. | 350°F Convection Roast |
- Press the numbers to set the desired oven temperature. This temperature is stored and recalled when next used.
- Press START.Once the oven reaches the desired temperature, a tone sounds.

NOTE
- Only the selected temperature is stored, not the cooking time.
- If the oven temperature is changed, the changed temperature is stored.
OVEN LIGHT
The interior oven light automatically turns on when the door is opened. Press Light to manually turn the oven light on. The lamp of the oven will turn off after 2 minutes and 30 seconds to save power.

NOTE
- The Oven light cannot be turned on if the Self Clean function is active.
SMART FUNCTIONS
LG THINQ APPLICATION
This feature is only available on models with the logo. The LG ThinQ application allows you to communicate with the appliance using a smartphone.
Tag On Features
The Tag On function can only be used with most smart phones equipped with the NFC (Near Field Communication) function and based on the Android OS (operating system).
Smart DiagnosisTM
Allows the user to diagnose and troubleshoot problems with the oven.
EasyClean
Allows the user to set EasyClean, read the instruction guide, and simulate and compare energy consumption when using EasyClean versus the self-clean function.
Oven Settings
Allows the user to change oven settings, including the hour mode, preheating alarm light, beeper volume, temperature units, convection auto conversion, and thermostat adjustment.

NOTE
- This information is current at the time of publication. The application is subject to change for product improvement purposes without notice to users.
- This feature is only available on some models.
- When using the Tag On function, position the smart phone so that the NFC antenna inside the back of the smart phone matches the position of the Tag On icon on the appliance.
- Press? in the LG ThinQ application for a more detailed guide on how to use the Tag On function.
- The location of the smartphone's NFC module may vary depending on the phone, and NFC use may be restricted on some smartphones due to differences in transmission methods. Because of the characteristics of NFC, if the transmission distance is too far, or if there is a metal sticker or a protective case on the phone, transmission will not be good. In some cases, NFC-equipped phones may be unable to transmit successfully.
- NFC function would vary depending on smart phones.
Installing the LG ThinQ Application
Search for the LG ThinQ application from the Google Play Store or Apple App Store on a smartphone. Follow instructions to download and install the application.
SMART DIAGNOSISTM FEATURE
This feature is only available on models with the
icon.
Use this feature to help you diagnose and solve problems with your appliance.

NOTE
- For reasons not attributable to LGE's negligence, the service may not operate due to external factors such as, but not limited to, Wi-Fi unavailability, Wi-Fi disconnection, local app store policy, or app unavailability.
- The feature may be subject to change without prior notice and may have a different form depending on where you are located.
Using LG ThinQ to Diagnose Issues
Launch the LG ThinQ application and select the Smart Diagnosis feature in the menu. Follow the instructions provided in the LG ThinQ application.
Using Audible Diagnosis to Diagnose Issues
Follow the instructions below to use the audible diagnosis method.
- Launch the LG ThinQ application and select the Smart Diagnosis feature in the menu. Follow the instructions for audible diagnosis provided in the LG ThinQ application.
- Open the LG ThinQ application on the smart phone.
- In the application, select the appliance from your list of connected appliances and then press the dots at the upper right of the screen.
- Select Smart Diagnosis, then press the Start Smart Diagnosis button.

NOTE
-
If the diagnosis fails several times, use the following instructions.
-
Select the Audible Diagnosis.
- Follow the instructions on the smart phone.
- Keep the phone in place until the tone transmission has finished. View the diagnosis on the phone.


NOTE
- For best results, do not move the phone while the tones are being transmitted.
MAINTENANCE
SELF-CLEAN
The self-clean cycle uses above normal cooking temperatures to clean the oven's interior automatically. It is normal for smoking to occur during cleaning if the oven is heavily soiled. It is better to clean the oven regularly rather than to wait until there is a heavy buildup of soil in the oven.
During the cleaning process, the kitchen should be well ventilated to get rid of normal odors associated with cleaning.
Self Clean can only be run in one oven at a time. While Self Clean is running the other oven cannot be used for any function.

CAUTION
DO NOT leave small children unattended near the appliance.
During the self-cleaning cycle, the outside of the oven can become very hot to touch.
-
Move birds to another well-ventilated room.
-
The health of some birds is extremely sensitive to the fumes given off during the self-cleaning cycle of any oven.
-
DO NOT line the oven walls, racks, bottom or any other part of the oven with aluminum foil or any other material.
-
Doing so will destroy heat distribution, produce poor baking results and cause permanent damage to the oven interior (aluminum foil will melt to the interior surface of the oven.)
DO NOT force the door open.
-
This can damage the automatic door locking system. Use care when opening the oven door after the self-cleaning cycle. Stand to the side of the oven when opening the door to allow hot air or steam to escape. The oven may still be VERY HOT.
-
DO NOT block the oven vent(s) during the self-cleaning cycle.
-
This can damage the electric parts of the oven. Air must be able to move freely.
Before a Self-Clean Cycle
Open a window or use a fan or ventilation hood to keep the kitchen ventilated during the first self-clean cycle. Remove the oven racks, broiler pan, broiler grid, all cookware, and aluminum foil or any other material from the oven.


NOTE
Remove all racks including the telescoping rack before you begin a self clean cycle.
- Remove all racks before starting the self-clean cycle. Silver-colored oven racks can be self-cleaned, but they will darken, lose their luster, and become hard to slide.
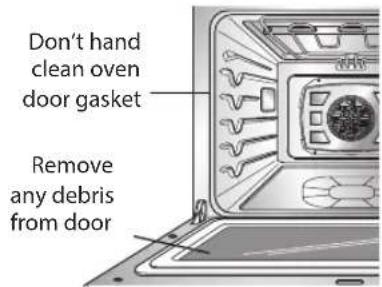
- Soil on the front frame of the range and outside the gasket on the door will need to be cleaned by hand. Clean these areas with hot water, soap-filled steel-wool pads, or cleansers such as Soft Scrub; Rinse well with clean water and dry.
- Do not clean the gasket. The fiberglass material of the oven door gasket cannot withstand abrasion. It is essential for the gasket to remain intact. If you notice it becoming worn or frayed, replace it.
- Wipe up any heavy spillovers on the oven bottom.
- Make sure the oven light bulb cover is in place and the oven light is off.
- Do not leave baking/pizza stone in the oven during the self-clean cycle.
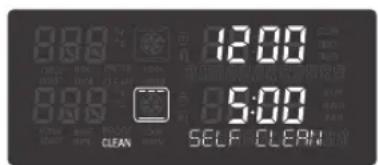
Press SELF CLEAN to start a self-clean cycle. Use with the START TIME button to program a delayed self-clean cycle. The Self- Clean function has cycle times of 3, 4, or 5 hours.

NOTE
Before running a self-clean cycle be sure to remove all racks and accessories.
- Set the clock to the correct time of day, remove everything from both ovens, and close the oven door.
- Press SELF CLEAN once for a 4-hour clean time, twice for a 5-hour clean time, or 3 times for 3-hour clean time. A 3-hour self-clean time is recommended for use when cleaning small, contained spills. A self-clean time of 5 hours is recommended for heavily soiled ovens.
- Press START. The DOOR LOCKED icon flashes.
- Once the SELF CLEAN is set, the oven door locks automatically. You will not be able to open the oven door until the oven has cooled. The lock releases automatically.
During the Self-Clean Cycle
- You may see some smoke and smell an odor the first few times the oven is cleaned. This is normal and will lessen in time. Smoke may also occur if the oven is heavily soiled or if a broiler pan was left in the oven.
- As the oven heats, you may hear sounds of metal parts expanding and contracting. This is normal and will not damage the oven.
- Do not force the oven door open when LOCK is displayed. The oven door will remained locked until the oven temperature has cooled. Forcing the door open will damage the door.
Setting a Delayed Self-Clean
- Press SELF CLEAN. Select the desired self clean time by pressing SELF CLEAN.
- Press START TIME DELAY flashes.
- Set the desired start time.
- Press START. DELAY and CLEAN remain on.
- Self Cleaning cycle turns on automatically at the set time.
Displays for the SELF CLEAN mode
If it becomes necessary to stop or interrupt a selfcleaning cycle due to excessive smoke or fire in the oven:
- Press CLEAR OFF.
- The door lock automatically releases once the oven has cooled down.

NOTE
When using the self-clean feature:
- A self-clean cycle cannot be started if Control Lock feature is active.
- Once the SELF CLEAN is set, the oven door will lock automatically. You will not be able to open the oven door until the oven has cooled. The lock releases automatically.
- Once the door has been locked the DOOR LOCKED indicator light will stop flashing and remain on. Allow about 15 seconds for the oven door lock to engage.
After the Self-Clean Cycle
- It will not be possible to open the oven door until oven temperature has cooled.
- You may notice some white ash in the oven. Wipe it off with a damp cloth after the oven cools.
These deposits are usually a salt residue that cannot be removed by the clean cycle.
If the oven is not clean after one clean cycle, repeat the cycle.
- If oven racks were left in the oven and do not slide smoothly after a clean cycle, wipe racks and rack supports with a small amount of vegetable oil to make them glide more easily.
- Fine lines may appear in the porcelain because it went through heating and cooling. This is normal and will not affect performance.
EasyClean
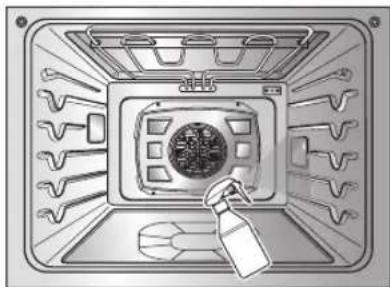
LG's new oven with EasyClean® enamel technology provides two cleaning options for the oven interior. The EasyClean® feature takes advantage of LG's new enamel to help lift soils without harsh chemicals, and it runs using ONLY WATER for just 10 minutes in low temperatures to help loosen LIGHT soils before hand-cleaning.
While EasyClean is quick and effective for small and LIGHT soils, the Self Clean feature can be used to remove HEAVY built up soils. The intensity and high heat of the Self Clean cycle may result in smoke which will require the opening up of windows to provide ventilation. Compared to the more intense Self Clean process, your LG oven gives you the option of cleaning with LESS HEAT, LESS TIME, and virtually NO SMOKE OR FUMES.
When needed, your oven still provides the Self Clean option for longer, more thorough cleaning for heavier, built up soils.
BENEFITS OF EasyClean
- Helps loosen light soils before hand-cleaning
- EasyClean® only uses water; no chemical cleaners
-
Makes for a better Self Clean experience
-
Delays the need for a Self Clean cycle
- Minimizes smoke and odors
- Can allow shorter Self Clean time
WHEN TO USE EasyClean
| Suggested Cleaning Method | Example of Oven Soiling | Soil Pattern Types of Soils | Common Food Items That Can Soil Your Oven | |
| EasyClean® | Small drops or spots | Cheese or other ingredients | Pizza | |
| Light splatter Fat/grease | Steaks, broiled | |||
| Fish, broiled | ||||
| Meat roasted at low temperatures | ||||
| Self Clean* | Medium to heavy splatter | Fat/grease | Meat roasted at high temperatures | |
| Drops or spots | Filling or Sugar based soils | Pies | ||
| Cream or tomato sauce | Casseroles | |||
- The Self Clean cycle can be used for soil that has been built up over time.
CLEANING TIPS
- Allow the oven to cool to room temperature before using the EasyClean® cycle. If your oven cavity is above 150^ (65^) , "OVEN IS HOT--PLEASE WAIT" will appear in the display, and the EasyClean® cycle will not be activated until the oven cavity cools down.
- A plastic spatula can be used as a scraper to scrape off any chunks or debris before and during oven cleaning.
- Using the rough side of a non-scratch scouring pad may help to take off burnt-on stains better than a soft sponge or towel.
-
Certain non-scratch scrubbing sponges, such as those made of melamine foam, available at your local stores, can also help improve cleaning.
-
The oven should be level to ensure that the bottom surface of the oven cavity is entirely covered by water at the beginning of the EasyClean® cycle.
- For best results, use distilled or filtered water. Tap water may leave mineral deposits on the oven bottom.
- Soil baked on through several cooking cycles will be more difficult to remove with the EasyClean® cycle.
- Do not open the oven door during the EasyClean® cycle. Water will not get hot enough if the door is opened during the cycle.
- For hard to reach areas such as the back surface of the lower oven, it is better to use the Self Clean cycle.
EasyClean® INSTRUCTION GUIDE
- Remove oven racks and accessories from the oven.
- Scrape off and remove any burnt-on debris with a plastic scraper.

Suggested plastic scrapers:
- Hard plastic spatula
- Plastic pan scraper
-
Plastic paint scraper
Old credit card -
Fill a spray bottle (10 oz or 300 ml) with water and use the spray bottle to thoroughly spray the inside surfaces of the oven.
4.Useatleast 1 / 5 (2 oz or 60ml of the water in the bottle to completely saturate the soil on both the walls and in the corners of the oven.
5. Spray or pour the remaining water (8 oz or 240 ml) onto the bottom center of the oven cavity. The indentation on the oven bottom should be fully covered to submerge all soils. Add water if necessary.

NOTE
If cleaning multiple ovens, use an entire bottle of water to clean each oven. Do not spray water directly on the door. Doing so will result in water dripping to the floor.
6. Close the oven door.
Press the button to select the EasyClean mode. Press START.

CAUTION
- Some surfaces may be hot after the EasyClean® cycle. Wear rubber gloves while cleaning to prevent burns.
- During the EasyClean® cycle, the oven bottom becomes hot enough to cause burns. Wait until the cycle is over before wiping the inside surface of the oven. Failure to do so may result in burns.
-
Avoid leaning or resting on the oven door glass while cleaning the oven cavity.
-
A tone will sound at the end of the 10-minute cycle. Press CLEAR/OFF to clear the display and end the tone.
- After the cleaning cycle and during hand-cleaning, enough water should remain on the oven bottom to completely submerge all soils. Add water if necessary. Place a towel on the floor in front of the oven to capture any water that may spill out during hand-cleaning. If you are cleaning the upper oven on a double oven, it is also best to cover the holes in the top of the lower oven door with a towel to capture any water that may drip into the door during hand-cleaning.
- Clean the oven cavity immediately after the EasyClean® cycle by scrubbing with a wet, non-scratch scouring sponge or pad. (The scouring side will not scratch the finish.) Some water may spill into the bottom vents while cleaning, but it will be captured in a pan under the oven cavity and will not hurt the burner.

NOTE
DO NOT use any steel scouring pads, abrasive pads or cleaners as these materials can permanently damage the oven surface.
- Once the oven cavity is cleaned, wipe any excess water with a clean dry towel. Replace racks and any other accessories.
- If some light soils remain, repeat the above steps, making sure to thoroughly soak the soiled areas. If stubborn soils remain after multiple EasyClean cycles, run the Self Clean cycle. Be sure that the oven cavity is empty of oven racks and other accessories, and that the oven cavity surface is dry before running the Self Clean cycle. Consult the Self Clean section of your owner's manual for further details.

NOTE
- If you forget to saturate the inside of the oven with water before starting EasyClean, press CLEAR/OFF to end the cycle. Wait for the oven to cool to room temperature and then spray or pour water into the oven and start another EasyClean cycle.
The cavity gasket may be wet when the EasyClean cycle finishes. This is normal. Do not clean the gasket. - If mineral deposits remain on the oven bottom after cleaning, use a cloth or sponge soaked in vinegar to remove them.
- Using commercial oven cleaners or bleach to clean the oven is not recommended. Instead, use a mild liquid cleanser with a pH value below 12.7 to avoid discoloring the enamel.
The oven light is a standard 25-watt halogen bulb for ovens.
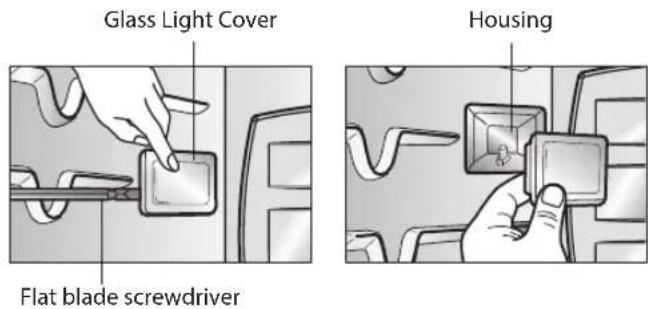
Replacing Lamp on Side Wall
-
Make sure oven and bulb are cool.
-
Unplug oven or disconnect power.
-
Remove oven racks.
-
Slide a flat blade screwdriver between the housing and the glass light cover.
-
Support the glass light cover with two fingers to prevent the cover from falling to the bottom of the oven.
-
Gently twist the screwdriver blade to loosen the glass light cover.
-
Remove bulb from socket.
-
Replace bulb, replace light cover by snapping back into place.
-
Plug in oven or reconnect power.

WARNING
- Before replacing the oven light bulb, DISCONNECT the electrical power to the oven at the main fuse or circuit breaker panel. - Failure to do so can result in severe personal injury, death, or electrical shock.
- Make sure oven and bulb are cool.
- Wear gloves while changing the oven light. Glass fragments from broken bulbs can cause risk of injury.
CLEANING THE EXTERIOR
Painted Parts and Trim
For general cleaning, use a cloth with hot and soapy water. For more difficult soils and built-up grease, apply a liquid detergent directly onto the soil. Leave on soil for 30 to 60 minutes. Rinse with a damp cloth and dry. DO NOT use abrasive cleaners on any of these materials; they can scratch the parts and trim.
Stainless Steel Surfaces
Do not use a steel-wool pad, it will scratch the surface.
- Place a small amount of Stainless Steel Appliance Cleaner or polish on a damp cloth or damp paper towel.
- Clean a small area, rubbing with the grain of the stainless steel if applicable.
- Dry and buff with a clean, dry paper towel or soft cloth.
- Repeat as necessary.

NOTE
If a mineral oil-based stainless steel appliance cleaner has been used before to clean the appliance, wash the surface with a mild soap and water prior to using the Stainless Steel Appliance Cleaner or polish.
Broiler Pan and Grid
Do not clean the broiler pan or grid in a self-cleaning mode.
After broiling, remove the broiler pan from the oven. Remove the grid from the pan. Carefully pour out the grease from the pan into a proper container.
Do not store a soiled broiler pan and grid anywhere in the oven.
Wash and rinse the broiler pan and grid in hot water with a soap-filled or plastic scouring pad.
If food has burned on, sprinkle the grid with cleaner while hot and cover with wet paper towels or a dishcloth. Soaking the pan will remove burned-on foods.
Oven Racks
Remove the oven racks before operating the self-clean cycle. Leaving the racks in place could cause discoloration.
If the racks are cleaned in
the self-clean cycle, their color will turn slightly blue and finish will be dull. After the self-clean cycle is complete and the oven has cooled, rub the sides of the racks with wax paper or a cloth containing a small amount of oil. This will make the racks glide more easily into the rack tracks.
Oven Cavity
DO NOT use oven cleaners.
NEVER wipe a warm or hot porcelain surface with a damp sponge; it may cause chipping or crazing (tiny hairlike cracks). Food spills should be cleaned when the oven cools. At high temperature, foods react with porcelain and a permanent dull spot can result. When cleaning a spot, use only non-abrasive cleaners or scrubbers.
Oven Door
Use soap and water to thoroughly clean the top, sides, and front of the oven door. Rinse well. You may use a glass cleaner on the outside glass of the oven door. DO NOT immerse the door in water. DO NOT spray or allow water or the glass cleaner to enter the door vents. DO NOT use oven cleaners, cleaning powders, or any harsh abrasive cleaning materials on the outside of the oven door.
DO NOT clean the oven door gasket. The oven door gasket is made of a woven material which is essential for a good seal. Care should be taken not to rub, damage, or remove this gasket.
CAUTION
DO NOT use harsh abrasive cleaners or sharp metal scrapers to clean the oven door glass since they can scratch the surface.
- Doing so may result in the glass shattering.
REMOVING AND REPLACING THE LIFT-OFF OVEN DOOR

CAUTION
- Be careful when removing and lifting the door.
-
DO NOT lift the door by the handle.
-
The door is very heavy.
Removing the Door
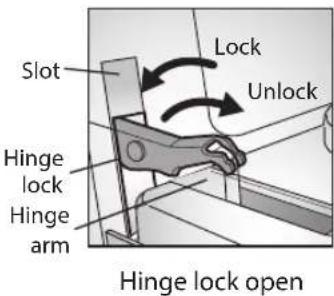
- Open the door fully.
- Pull the hinge locks down toward the door frame to the unlocked position.
- Firmly grasp both sides of the door at the top.
- Close door to the door removal position, which is approximately 5 degrees.
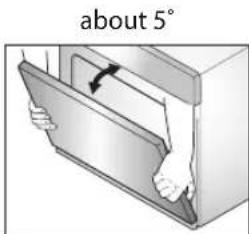
- Lift door up and out until the hinge arm is clear of the slot.
Replacing the Door
- Firmly grasp both sides of the door at the top.
- With the door at the same angle as the removal position, seat the indentation of the hinge arm into the bottom edge of the hinge slot. The notch in the hinge arm must be fully seated into the bottom of the slot.
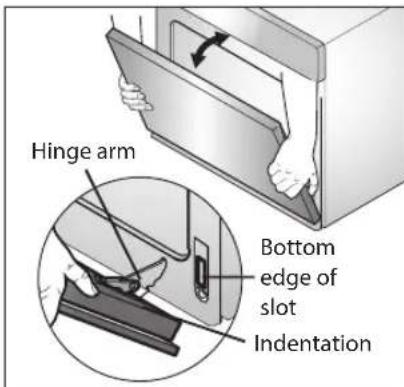
- Open the door fully. If the door will not open fully, the indentation is not seated correctly in the bottom edge of the slot.
- Push the hinge locks up against the front frame of the oven cavity to the locked position.
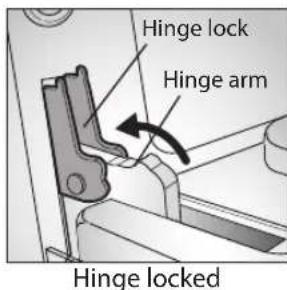
- Close the oven door.
DOOR CARE INSTRUCTIONS
-
Most oven doors contain glass that can break.
-
Do not close the oven door until all the oven racks are fully in place.
- Do not hit the glass with pots, pans, or any other object.
- Scratching, hitting, jarring, or stressing the glass may weaken its structure causing an increased risk of breakage at a later time.
TROUBLESHOOTING
FAQs
My new oven doesn't cook like my old one. Is there something wrong with the temperature settings?
No, Your oven has been factory tested and calibrated. For the first few uses, follow your recipe times and temperatures carefully. If you still think your new oven is too hot or too cold, you can adjust the oven temperature yourself to meet your specific cooking needs. Refer to the Oven Temperature Adjustment section, page 12, for easy instructions on how to adjust your thermostat.
During convection cooking the fan stops when I open the door. Is that normal?
Yes, this is normal. When the door is opened, the convection fan will stop until the door is closed.
Can I use aluminum foil to catch drippings in my oven cavity?
Never use aluminum foil to line the bottom or sides of the oven. The foil will melt and stick to the bottom surface of the oven, and will not be removable. Use a sheet pan placed on a lower oven rack to catch drippings instead. (If foil has already melted onto the bottom of the oven, it will not interfere with the oven's performance.)
Can I use aluminum foil on the racks?
Do not cover racks with aluminum foil. Covering entire racks with foil restricts air flow, leading to poor cooking results. Use a sheet pan lined with foil under fruit pies or other acidic or sugary foods to prevent spillovers from damaging the oven finish.

CAUTION
Foil may be used to wrap food in the oven, but do not allow the foil to come into contact with the exposed heating/broiling elements in the oven. The foil could melt or ignite, causing smoke, fire, or injury.
Can I leave my racks in the oven when running a Self Clean cycle?
No. Although it will not damage the racks, it will discolor them and may make them hard to slide in and out during use. Remove all items from the oven before starting a Self Clean cycle.
What should I do if my racks are sticky and have become hard to slide in and out?
Over time, the racks may become hard to slide in and out. Apply a small amount of olive oil to the ends of the racks. This will work as a lubricant for easier gliding.
Should I broil with the door open or closed? Your electric oven isn't designed for open door broiling. If you broil with the oven door open, it can damage the oven knobs and display.
Why aren't the function buttons working?
Make sure that the oven is not in Lockout mode. CONTROL LOCKOUT appears in the display if Lockout is activated. To deactivate Lockout, press and hold the START button for three seconds. The unlock melody will sound and CONTROL LOCKOUT will disappear from the display when controls are unlocked.
My oven is still dirty after running the EasyClean® cycle. What else should I do?
The EasyClean® cycle only helps to loosen light soils in your oven to assist in hand-cleaning of your oven.
It does not automatically remove all soils after the cycle. Some scrubbing of your oven is required after running the EasyClean® cycle.
I tried scrubbing my oven after running EasyClean, but some soils still remain. What can I do?
The EasyClean® feature works best when the soils are fully soaked and submerged in water before running the cycle and during hand-cleaning. If soils are not sufficiently soaked in water, it can negatively affect the cleaning performance. Repeat the EasyClean® process using sufficient water. Sugar-based and certain greasy soils are especially hard to clean. If some stubborn soils remain, use the Self Clean feature to thoroughly clean your oven.
Soils on my oven walls are not coming off. How can I get my walls clean?
Soils on the side and rear walls of your oven may be more difficult to fully soak with water. Try repeating the EasyClean® process with more than the 1/5 cup (2 oz or 60 ml) spray recommended.
Will EasyClean get all of the soils and stains out completely?
It depends on the soil type. Sugar-based and certain grease stains are especially hard to clean. Also, if stains are not sufficiently soaked in water, this can negatively affect cleaning performance. If stubborn or built-up stains remain, use the Self Clean feature. Refer to the Self Clean section of your owner's manual.
Are there any tricks to getting some of the stubborn soils out?
Scraping the soils with a plastic scraper before and during hand-cleaning is recommended. Fully saturating soils with water is also recommended.
However, certain types of soils are harder to clean than others. For these stubborn soils, the Self Clean cycle is recommended. Consult the Self Clean section of your owner's manual for details.
Is it safe for my convection fan, broil burner or heater element to get wet during EasyClean?
Yes. The convection fan, broiler burner or heater element may get a little wet during cleaning. However, direct spray onto the broil burner and heater elements is not necessary because these are self-cleaning during regular use.
Do I need to use all 1 cups (10 oz or 300 ml) of water for EasyClean?
Yes. It is highly recommended that 4/5 cup (8 oz or 240 ml) of water be sprayed or poured on the bottom and an additional 1/5 cup (2 oz or 60 ml) of water be sprayed on walls and other soiled areas to fully saturate the soils for better cleaning performance.
I see "smoke" coming out of my oven's vents during EasyClean.
Is this normal?
This is normal. This is not smoke. It is actually water vapor (steam) from the water in the oven cavity. As the oven heats briefly during EasyClean, the water in the cavity evaporates and escapes through the oven vents.
How often should I use EasyClean?
EasyClean can be performed as often as you wish.
EasyClean works best when your oven is LIGHTLY soiled from such things as LIGHT grease splatter and small drops of cheese. Please refer to the EasyClean section in your owner's manual for more information.
What is required for EasyClean?
A spray bottle filled with 1 cups (10 oz or 300 ml) of water, a plastic scraper, a nonscratch scrubbing pad and a towel. You should not use abrasive scrubbers such as heavy-duty scouring pads or steel wool.
BEFORE CALLING FOR SERVICE
Before you call for service, review this list. It may save you time and expense. The list includes common occurrences that are not the result of defective workmanship or materials in this appliance.
| Problem Possible Causes / Solutions | |
| Oven control beeps and displays any F code error. | ·Electronic control has detected a fault condition. Press CLEAR OFF to clear the display and stop beeping. Reprogram oven. If fault reoccurs, record fault number. Press CLEAR OFF and contact a qualified service technician. |
| Oven will not work | ·Plug on oven is not completely inserted in the electrical outlet. - Make sure electrical plug is plugged into a live, properly grounded outlet. ·A fuse in your home may be blown or the circuit breaker tripped. - Replace the fuse or reset the circuit breaker. ·Oven controls improperly set. - See the Using the Oven section. ·Oven too hot. - Allow the oven to cool to below locking temperature. |
| Appliance does not operate. | ·Make sure cord is plugged correctly into outlet. Check circuit breakers. ·Service wiring is not complete. Contact your appliance Servicer for assistance. ·Power outage. Check house lights to be sure. Call your local electric company for service. |
| Oven light does not work. | ·Replace or tighten lamp. See Changing the Oven Light section, page 33. |
| Oven smokes excessively during broiling. | ·Control not set properly. Follow instructions under Setting Oven Controls. ·Meat too close to the element. Reposition the rack to provide proper clearance between the meat and the element. Preheat broil element for searing. ·Meat not properly prepared. Remove excess fat from meat. Cut remaining fatty edges to prevent curling, but do not cut into lean. ·Insert on broiler pan wrong side up and grease not draining. Always place grid on the broiler pan with ribs up and slots down to allow grease to drip into pan. ·Grease has built up on oven surfaces. Regular cleaning is necessary when broiling frequently. Old grease or food spatters cause excessive smoking. |
| Food does not bake or roast properly | ·Oven controls improperly set. - See the Using the Oven section. ·Rack position is incorrect or the rack is not level. - See the Using the Oven section. ·Incorrect cookware or cookware of improper size being used. - See the Using the Oven section. ·Oven sensor needs to be adjusted. - See Adjusting the Oven Temperature. |
| Problem Possible | Causes / Solutions |
| Food does not broil properly | ·Oven controls improperly set. -Make sure you press the BROIL pad. ·Improper rack position being used. -See the Broiling Guide, page 19. ·Cookware not suited for broiling. -Use the broiling pan and grid that came with your oven. ·Aluminum foil used on the broiling pan and grid has not been fitted properly and slit as recommended. -See the Using the Oven section. ·In some areas the power (voltage) may be low. -Preheat the broil element for 10 minutes. -See the Broiling Guide, page 19. |
| Oven temperature too hot or too cold | ·Oven Sensor needs to be adjusted. -See Adjusting the Oven Temperature. |
| Oven will not self-clean | ·Oven controls improperly set. -See Using Self-Clean. ·A self-clean cycle cannot be started if oven door is opened. |
| Crackling or popping sound | ·This is the sound of the metal heating and cooling during both the cooking and cleaning functions. -This is normal. |
| Excessive smoking during a self clean cycle | ·Excessive soil. -Press the CLEAR/OFF pad. Open the windows to rid the room of smoke. Wait until the self-clean mode is cancelled. Wipe up the excess soil and reset the self-clean. |
| Oven door do not open after a self clean cycle | ·Oven is too hot. -Allow the oven to cool below locking temperature. |
| Oven not clean after a self clean cycle | ·Oven controls not properly set. -See the self-clean section, page 28-30. ·Oven was heavily soiled. -Clean up heavy spillovers before starting the clean cycle. Heavily soiled ovens may need to self-clean again or for a longer period of time. |
| DOOR LOCKED icon are on when you want to cook | ·The oven door is locked because the temperature inside the oven has not dropped below the locking temperature after Self. |
| Burning or oily odor emitting from the vent | ·This is normal in a new oven and will disappear in time. -To speed the process, set a self-clean cycle for a minimum of 3 hours. See the self-clean section, page 28-30. |
| Cooling fan continues to run after oven is turned off | ·The fan turns off automatically when the electronic components have cooled sufficiently. -This is normal. |
| Warm air venting into kitchen after oven has been turned off. | ·Warm air exhaust is needed to maintain and cool down oven temperatures. It turns off automatically when the heat cools to a safe temperature. -This is normal. |
LIMITED WARRANTY (CANADA)
ARBITRATION NOTICE: THIS LIMITED WARRANTY CONTAINS AN ARBITRATION PROVISION THAT REQUIRES YOU AND LG TO RESOLVE DISPUTES BY BINDING ARBITRATION INSTEAD OF IN COURT, UNLESS THE LAWS OF YOUR PROVINCE OR TERRITORY DO NOT PERMIT THAT, OR, IN OTHER JURISDICTIONS, IF YOU CHOOSE TO OPT OUT. IN ARBITRATION, CLASS ACTIONS AND JURY TRIALS ARE NOT PERMITTED. PLEASE SEE THE SECTION Titled "PROCEDURE FOR RESOLVING DISPUTES" BELOW.
Should your LG Electric Oven ("Product") fail due to a defect in materials or workmanship under normal and proper use, during the warranty period set forth below, LG Electronics Canada, Inc. ("LGECI") will, at its option, repair or replace the Product upon receipt of proof of the original retail purchase. This limited warranty is valid only to the original retail purchaser of the Product and applies only to a Product distributed, purchased and used within Canada, as determined at the sole discretion of LGECI.
| WARRANTY PERIOD: (Note: If the original date of purchase can not be verified, the warranty will begin sixty (60) days from the date of manufacture). | |
| Electric Oven | Extended Component Warranty (Parts Only) (Consumer will be charged for Labor after One (1) year from the date of purchase) |
| One (1) year from the date of original retail purchase | Ninety (90) days from the date of original retail purchase |
| Parts and Labor (internal/functional parts only) | Cosmetic warranty (Scratches and dents) |
- Replacement products and parts are warranted for the remaining portion of the original warranty period or ninety (90) days, whichever is greater.
Replacement products and parts may be new, reconditioned, refurbished, or otherwise factory remanufactured, all at the sole discretion of LGECI.
Proof of original retail purchase specifying the Product model and date of purchase is required to obtain warranty service under this Limited Warranty.
LGECI'S SOLE LIABILITY IS LIMITED TO THE LIMITED WARRANTY SET OUT ABOVE. EXCEPT AS EXPRESSLY PROVIDED ABOVE, LGECI MAKES NO, AND HEREBY DISCLAIMS, ALL OTHER WARRANTY AND CONDITIONS RESPECTING THE PRODUCT, WHETHER EXPRESS OR IMPLIED, INCLUDING BUT NOT LIMITED TO, ANY IMPLIED WARRANTY OR CONDITION OF MERCHANTABILITY OR FITNESS FOR A PARTICULAR PURPOSE, AND NO REPRESENTATIONS SHALL BE BINDING ON LGECI. LGECI DOES NOT AUTHORIZE ANY PERSON TO CREATE OR ASSUME FOR IT ANY OTHER WARRANTY OBLIGATION OR LIABILITY IN CONNECTION WITH THE PRODUCT. TO THE EXTENT THAT ANY WARRANTY OR CONDITION IS IMPLIED BY LAW, IT IS LIMITED TO THE WARRANTY PERIOD SET OUT ABOVE. UNDER NO CIRCUMSTANCES SHALL LGECI, THE MANUFACTURER OR DISTRIBUTOR OF THE PRODUCT, BE LIABLE FOR ANY INCIDENTAL, CONSEQUENTIAL, SPECIAL, DIRECT, INDIRECT, PUNITIVE OR EXEMPLARY DAMAGES, INCLUDING, WITHOUT LIMITATION, LOSS OF GOODWILL, LOST PROFITS, LOSS OF ANTICIPATED PROFITS, LOST REVENUE, LOSS OF USE, OR ANY OTHER DAMAGE, WHETHER ARISING DIRECTLY OR INDIRECTLY FROM ANY CONTRACTUAL BREACH, FUNDAMENTAL BREACH, TORT OR OTHERWISE, OR FROM ANY ACTS OR OMISSIONS. LGECI'S TOTAL LIABILITY, IF ANY, SHALL NOT EXCEED THE PURCHASE PRICE PAID BY YOU FOR THE PRODUCT.
This Limited Warranty gives you specific legal rights. You may also have other rights that vary from province to province depending on applicable provincial laws. Any term of this Limited Warranty that negates or varies any implied condition or warranty under provincial law is severable where it conflicts with such provincial law without affecting the remainder of this warranty's terms.
THIS LIMITED WARRANTY DOES NOT COVER:
Service trips to i) deliver, pick up, or install or; educate on how to operate the Product; ii) correct wiring or plumbing; or iii) correct unauthorized repairs or installations of the Product;
- Damage or failure of the Product to perform during power failures and interrupted or inadequate electrical service;
- Damage or failure resulting from operating the Product in a corrosive atmosphere or contrary to the instructions outlined in the Product's owner's manual;
- Damage or failure to the Product caused by accidents, pests and vermin, lightning, wind, fire, floods, acts of God, or any other causes beyond the control of LGECI or the manufacturer;
- Damage or failure resulting from misuse, abuse, improper installation, repair, or maintenance of the Product. Improper repair includes use of parts not authorized or specified by LGECI. Improper installation or maintenance includes installation or maintenance contrary to the Product's owner's manual;
- Damage or failure caused by unauthorized modification or alteration of the Product, or if used for other than the intended household purpose/use of the Product, or damage or failure resulting from any water leakage due to improper installation of the Product;
- Damage or failure caused by incorrect electrical current, voltage or plumbing codes;
- Damage or failure caused by use that is other than normal household use, including, without limitation, commercial or industrial use, including use in commercial offices or recreational facilities, or as otherwise outlined in the Product's owner's manual;
- Damage or failure caused by transportation and handling, including scratches, dents, chips and/or other damage to the finish of the Product, unless such damage results from defects in materials or workmanship and is reported to LGECI within one (1) week of delivery of the Products;
- Damage or missing items to any display, open box, refurbished or discounted Product;
- Refurbished Product or any Product sold "As Is", "Where Is", "With all Faults", or any similar disclaimer;
- Products with original serial numbers that have been removed, altered or cannot be readily determined at the discretion of LGECI;
- Increases in utility costs and additional utility expenses in any way associated with the Product;
- Any noises associated with normal operation of the Product;
- Replacement of light bulbs, filters, fuses or any other consumable parts;
- Replacement of any part that was not originally included with the Product;
Costs associated with removal and/or reinstallation of the Product for repairs; and
Shelves, drawers, handle and accessories to the Product, except for internal/functional parts covered under this Limited Warranty.
Coverage for "in Home" repairs, for products in-warranty, will be provided if the Product is within a 150 km radius from the nearest authorized service center (ASC), as determined by LG Canada. If your Product is located outside a 150 km radius from a ASC, as determined by LG Canada, it will be your responsibility to bring the Product, at your sole expense, to the ASC for in-warranty repair.
All costs and expenses associated with the above excluded circumstances, listed under the heading, This Limited Warranty Does Not Cover, shall be borne by the consumer.
TO OBTAIN WARRANTY SERVICE AND ADDITIONAL INFORMATION, PLEASE CALL OR VISIT OUR WEBSITE:
Call 1-888-542-2623 (7 A.M. to 12 A.M., 365 days a year) and select the appropriate option from the menu, or visit our website at http://www.lg.com
PROCEDURE FOR RESOLVING DISPUTES:
EXCEPTWHERE PROHIBITED AT LAW, ALL DISPUTES BETWEEN YOU AND LG ARISING OUT OF OR RELATING IN ANYWAY TO THIS LIMITED WARRANTY OR THE PRODUCT SHALL BE RESOLVED EXCLUSIVELY THROUGH BINDING ARBITRATION, AND NOT IN A COURT OF GENERAL JURISDICTION. EXCEPT WHERE PROHIBITED AT LAW, YOU AND LG BOTH IRREVOCABLY AGREE TO WAIVE THE RIGHT TO A JURY TRIAL AND TO BRING OR PARTICIPATE IN A CLASS ACTION.
Definition. For the purposes of this section, references to "LG" mean LG Electronics Canada, Inc., its parents, subsidiaries and affiliates, and each of their officers, directors, employees, agents, beneficiaries, predecessors in interest, successors, assigns and suppliers; references to "dispute" or "claim" shall include any dispute, claim or controversy of any kind whatsoever (whether based in contract, tort, statute, regulation, ordinance, fraud, misrepresentation or any other legal or equitable theory) arising out of or relating in any way to the sale, condition or performance of the product or this Limited Warranty.
Notice of Dispute. In the event you intend to commence an arbitration proceeding, you must first notify LG in writing at least 30 days in advance of initiating the arbitration by sending a letter to LGECI Legal Team at 20 Norelco Drive, North York, Ontario, Canada M9L 2X6 (the "Notice of Dispute"). You and LG agree to engage in good faith discussions in an attempt to amicably resolve your claim. The notice must provide your name, address, and telephone number; identify the product that is the subject of the claim; and describe the nature of the claim and the relief being sought. If you and LG are unable to resolve the dispute within 30 days of LG's receipt of the Notice of Dispute, the dispute shall be resolved by binding arbitration in accordance with the procedure set out herein. You and LG both agree that, during the arbitration proceeding, the terms (including any amount) of any settlement offer made by either you or LG will not be disclosed to the arbitrator until the arbitrator determines the dispute.
Agreement to Binding Arbitration and Class Action Waiver. Upon failure to resolve the dispute during the 30 day period after LG's receipt of the Notice of Dispute, you and LG agree to resolve any claims between you and LG only by binding arbitration on an individual basis, unless you opt out as provided below, or you reside in a jurisdiction that prevents full application of this clause in the circumstances of the claims at issue (in which case if you are a consumer, this clause will only apply if you expressly agree to the arbitration). To the extent permitted by applicable law, any dispute between you and LG shall not be combined or consolidated with a dispute involving any other person's or entity's product or claim. More specifically, without limitation of the foregoing, except to the extent such a prohibition is not permitted at law, any dispute between you and LG shall not under any circumstances proceed as part of a class or representative action. Instead of arbitration, either party may bring an individual action in small claims court, but that small claims court action may not be brought on a class or representative basis except to the extent this prohibition is not permitted at law in your province or territory of jurisdiction as it relates to the claims at issue between you and LG.
Arbitration Rules and Procedures. To begin arbitration of a claim, either you or LG must make a written demand for arbitration. The arbitration will be private and confidential, and conducted on a simplified and expedited basis before a single arbitrator chosen by the parties under the provincial or territorial commercial arbitration law and rules of the province or territory of your residence. You must also send a copy of your written demand to LG at LG Electronics, Canada, Inc., Attn: Legal Department- Arbitration, 20 Norelco Drive, North York, Ontario M9L 2X6. This arbitration provision is governed by your applicable provincial or territorial commercial arbitration legislation. Judgment may be entered on the arbitrator's award in any court of competent jurisdiction. All issues are for the arbitrator to decide, except that, issues relating to the scope and enforceability of the arbitration provision and to the arbitrarily of the dispute are for the court to decide. The arbitrator is bound by the terms of this provision.
Govering Law. The law of the province or territory of your purchase shall govern this Limited Warranty and any disputes between you and LG except to the extent that such law is preempted by or inconsistent with applicable federal or provincial/territorial law. Should arbitration not be permitted for any claim, action, dispute or controversy between you and LG, you and LG attend to the exclusive jurisdiction of the courts of the province or territory of your purchase for the resolution of the claim, action, dispute or controversy between you and LG.
Fees/Costs. You do not need to pay any fee to begin an arbitration. Upon receipt of your written demand for arbitration, LG will promptly pay all arbitration filing fees unless you seek more than $25,000 in damages, in which case the payment of these fees will be governed by the applicable arbitration rules. Except as otherwise provided for herein, LG will pay all filing, administration and arbitrator fees for any arbitration initiated in accordance with the applicable arbitration rules and this arbitration provision. If you prevail in the arbitration, LG will pay your attorneys' fees and expenses as long as they are reasonable, by considering factors including, but not limited to, the purchase amount and claim amount. Notwithstanding the foregoing, if applicable law allows for an award of reasonable attorneys' fees and expenses, an arbitrator can award them to the same extent that a court would. If the arbitrator finds either the substance of your claim or the relief sought in the demand is frivolous or brought for an improper purpose (as measured by the applicable laws), then the payment of all arbitration fees will be governed by the applicable arbitration rules. In such a situation, you agree to reimburse LG for all monies previously disbursed by it that are otherwise your obligation to pay under the applicable arbitration rules. Except as otherwise provided for, LG waives any rights it may have to seek attorneys' fees and expenses from you if LG prevails in the arbitration.
Hearings and Location. If your claim is for 25,000 or less, you may choose to have the arbitration conducted solely (1) on the basis of documents submitted to the arbitrator, (2) through a telephonic hearing, or (3) by an in-person hearing as established by the applicable arbitration rules. If your claim exceeds 25,000, the right to a hearing will be determined by the applicable arbitration rules. Any in-person arbitration hearings will be held at the nearest, most mutually-convenient arbitration location available within the province or territory in which you reside unless you and LG both agree to another location or agree to a telephonic arbitration.
Severability and Waiver. If any portion of this Limited Warranty (including these arbitration procedures) is unenforceable, the remaining provisions will continue in full force and effect to the maximum extent permitted by applicable law. Should LG fail to enforce strict performance of any provision of this Limited Warranty (including these arbitration procedures), it does not mean that LG intends to waive or has waived any provision or part of this Limited Warranty.
Opt Out. You may opt out of this dispute resolution procedure. If you opt out, neither you nor LG can require the other to participate in an arbitration proceeding. To opt out, you must send notice to LG no later than 30 calendar days from the date of the first consumer purchaser's purchase of the product by either (i) sending an e-mail to optout@lge.com, with the subject line: "Arbitration Opt Out;" or (ii) calling 1-800-980-2973. You must include in the opt out e-mail or provide by telephone: (a) your name and address; (b) the date on which the product was purchased; (c) the product model name or model number; and
(d) the serial number (the serial number can be found (i) on the product; or (ii) online by accessing https://www.lg.com/ca_en/support/repair-service/schedule-repair and clicking on "Find My Model & Serial Number").
In the event that you "Opt Out", the law of the province or territory of your residence shall govern this Limited Warranty and any disputes between you and LG except to the extent that such law is preempted by or inconsistent with applicable federal or provincial/territorial law. Should arbitration not be permitted for any claim, action, dispute or controversy between you and LG, you and LG agree to attend to the exclusive jurisdiction of the courts of the province or territory of your residence for the resolution of the claim, action, dispute or controversy between you and LG.
You may only opt out of the dispute resolution procedure in the manner described above (that is, by e-mail or telephone); no other form of notice will be effective to opt out of this dispute resolution procedure. Opting out of this dispute resolution procedure will not affect the coverage of the Limited Warranty in any way, and you will continue to enjoy the full benefits of the Limited Warranty. If you keep this product and do not opt out, then you accept all terms and conditions of the arbitration provision described above.
Conflict of Terms. In the event of a conflict or inconsistency between the terms of this Limited Warranty and the End User License Agreement ("EULA") in regards to dispute resolution, the terms of this Limited Warranty shall control and govern the rights and obligations of the parties and shall take precedence over the EULA.
NOTE
MANUEL DU PROPRIÉTAIRE
FOUR ENCASTRÉ À CONVECTION ÉLECTRIQUE
CONVECTION BAKE (CUISSON A CONVECTION)
APPLICATION LG THINQ
REEMPLACER LA LUMIÈRE DU FOUR
Register your product Online!
www.lg.com