MD 16192 - Vacuum Cleaner MEDION - Free user manual and instructions
Find the device manual for free MD 16192 MEDION in PDF.

| Product type | Robot vacuum cleaner |
| Brand | Medion |
| Model | MD 16192 |
| Dimensions (diameter x height) | 300 × 75 mm |
| Weight | Approx. 1.9 kg |
| Suction power | Approx. 20 W |
| Noise level | Approx. 65 dB |
| Dustbin capacity | 0.3 L |
| Runtime | Approx. 80 min |
| Charging time | Approx. 3.5 hours |
| Battery type | Lithium-Ion 11.1 V / 28.9 Wh |
| Power adapter | Model GSCV0600S019V12E, input 100-240 V~ 50/60 Hz, output 19 V 600 mA |
| Remote control | With 2 x 1.5 V AAA batteries |
| Light barrier (virtual wall) | With 2 x 1.5 V AA batteries |
| Cleaning modes | Automatic, spot, edge, return to base |
| Programming | Adjustable start timer via remote control |
| Sensors | Front, right, left, bumper, drop detection |
| Maintenance | Empty dustbin after each use, clean filters and brushes regularly |
| Included spare parts | 2 side brushes, 1 HEPA filter, 1 cleaning brush |
| Warranty | 24 months (excluding consumables) |
| Intended use | Dry, smooth, flat floors and short-pile carpets indoors |
Frequently Asked Questions - MD 16192 MEDION
User questions about MD 16192 MEDION
0 question about this device. Answer the ones you know or ask your own.
Ask a new question about this device
Download the instructions for your Vacuum Cleaner in PDF format for free! Find your manual MD 16192 - MEDION and take your electronic device back in hand. On this page are published all the documents necessary for the use of your device. MD 16192 by MEDION.
USER MANUAL MD 16192 MEDION
Robot vacuum cleaner
MEDION®
(MD 16192)
Inhaltsverzeichnis
DE
www.medion.com/conformity.
14. Colofon
Copyright © 2015
Modello GSCV0600S019V12E
Produttore GSP,Cina
Ingresso 100-240 V\~,50/60 Hz,0,5 A
1. About these instructions 135
1.1. Warning symbols and signal words used in these instructions 135
2. Package contents
3. Proper use
4. Safety information
4.1. People not permitted to use this appliance 138
4.2. Mains adapter 138
4.3. Ensuring access to the mains power socket 139
4.4. Thunderstorms / non-use 139
4.5. Handling the rechargeable batteries/batteries safely 139
4.6. Safe operation 140
4.7. Cleaning and maintenance 141
5. Appliance overview
5.1. Bottom 142
5.2.Dust container with filter 143
5.3. Charging station 143
5.4. Remote control 144
5.5.Light barrier (virtual wall) 145
5.6.Sensors on the robot vacuum cleaner 145
6. Using the appliance for the first time 146
6.1. Attaching the cleaning brushes 146
6.2. Charging the battery block 146
6.3. Inserting batteries into the remote control 147
6.4. Inserting batteries into the light barrier (virtual wall) 147
6.5. Setting the time 147
7. Vacuum cleaner operation 147
7.1. Setting the start time 148
7.2. Selecting the modes 149
7.3. Using the light barrier (virtual wall) 149
8. Cleaning and care 149
8.1. Cleaning the dust container 150
8.2. Cleaning the suction opening 150
8.3. Cleaning the brushes 151
9. Problem solving
10. Removing the battery block 152
11. Disposal 152
12. Technical data 153
EN
- Conformity information 154
- Legal notice 154
- General Warranty Conditions 19
15.1. General information 155
15.2. Special warranty conditions for repair on site or replacement on site 156
- Service Address 157
1. About these instructions

Please be sure to read these operating instructions carefully and follow all instructions given. The instructions will help you to operate the product reliably and help increase its service life. Always store these instructions near the appliance. Keep these operating instructions so that you can pass them on with the appliance if you sell it.
1.1. Warning symbols and signal words used in these instructions

DANGER!
Warning of immediate risk of fatal injury
WARNING!
Warning of possible risk of fatal injury and/or serious irreversible injuries
WARNING!
Warning of risk of electric shock

ATTENTION!
Please follow the instructions to avoid property damage!

PLEASE NOTE!
Additional information on using the appliance.

PLEASE NOTE!
Please follow the guidelines in the operating instructions!
- Bullet point/information on steps during operation
Instructions to be carried out
2. Package contents
Ensure that the following parts are included:
- Robot vacuum cleaner with integrated lithium-ion battery block
-Charging station
-Mains adapter, model GSCV0600S019V12E
Light barrier (virtual wall)
-Remote control
-2 replacement side brushes
-1 replacement filter
-Cleaning brush
-Operating instructions and warranty documents
3. Proper use
The robot vacuum cleaner is designed to automatically vacuum dry indoor surfaces such as smooth, level floors and low pile carpets.
Do not use the appliance outdoors. This appliance is intended to be used in private households and similar household applications, such as:
-in kitchens for employees in shops, offices and other commercial areas;
-on agricultural estates;
-by customers in hotels, motels and other residential facilities;
-in bed & breakfast accommodation.
The appliance is not suitable for commercial or industrial use.
Please note that we shall not be liable in cases of improper use:
- Do not modify the appliance without our consent and do not use any auxiliary equipment which we have not approved or supplied.
-
Use only spare parts and accessories that we have supplied or approved.
Heed all the information in these operating instructions, especially the safety information. Any other use is deemed improper and can cause personal injury or property damage.
Do not expose the product to extreme conditions. The following should be avoided: -
High levels of humidity or moisture
-Extremely high or low temperatures
-Direct sunlight
-Naked flames
4. Safety information

WARNING! There is a risk of suffocation!
- Keep plastic packaging out of the reach of children.

DANGER! There is a risk of injury due to electric shock.
Please note the following advice:
- Check the robot vacuum cleaner and the mains cable for damage before using the appliance for the first time and after every use.
Do not use the appliance if the robot vacuum cleaner, charging station or mains cable are visibly damaged.
If you find transport damage, contact the Medion Service Centre at once.
4.1. People not permitted to use this appliance
- Keep the appliance and its accessories out of the reach of children.
This appliance may be used by children over the age of 8 and by persons with reduced physical, sensory or mental abilities or by those without experience and/or knowledge, if they are supervised or have been instructed in the safe use of the appliance and have understood the dangers that result from it. Children must not play with the appliance. Cleaning and user maintenance may not be carried out by children, unless they are aged 8 or over and are supervised.
Children younger than 8 should be kept away from the appliance and the mains cable.
4.2. Mains adapter
- Use the supplied mains adapter GSCV0600S019V12E and the charging station to charge the batteries.
The mains adapter may only be used in dry rooms.
4.3. Ensuring access to the mains power socket
- Connect the mains adapter only to a power socket (AC 100–240 V ~ 50/60 Hz) that is easy to reach and close to the place where you have set up the appliance. Keep the power socket free of obstructions so that the plug can be pulled out easily.
-
When disconnecting the appliance from the mains supply, always pull on the plug rather than on the cable. Do not kink or crush the mains cable.
-
If the plug, mains cable, charging station or appliance are damaged or if liquids or foreign bodies enter the appliance, disconnect the plug immediately from the mains socket.
To avoid the risk of tripping, please avoid using extension cables.
4.4. Thunderstorms / non-use
Disconnect the mains adapter from the mains socket if you are going to be away for a long period or if there is a thunderstorm.
4.5. Handling the rechargeable batteries/batteries safely
This appliance contains a lithium-ion battery block. The remote control is operated with two 1.5 V batteries of type AAA, while the light barrier is operated with two 1.5 V batteries of type AA. Please note the following:
-
Keep rechargeable batteries/batteries away from children.
Do not throw rechargeable batteries/batteries into a fire, do not short-circuit them and do not dismantle them. -
Please pay attention to the polarity (+/-) when inserting the batteries.
- Remove the batteries if the appliance is not going be used for long periods.
-
Remove defective batteries immediately from the appliance! There is an increased risk of leakage!
-
Never expose the rechargeable batteries/batteries to excessive heat such as direct sunlight, fire or similar. There is an increased risk of leakage.
In the event of leakage, remove the rechargeable batteries/ batteries from the appliance immediately. Clean the contacts before inserting new rechargeable batteries/batteries. There is a risk of skin irritations from battery acid!
If battery acid has leaked out, under no circumstances allow it to come into contact with the skin, eyes and mucous membranes! Leaked battery fluid can cause skin irritations. If the acid does come into contact with skin, immediately rinse the affected areas with plenty of clear water and consult a doctor immediately. - Only operate the battery block at a room temperature of 10 - 40^ C .
4.6. Safe operation
- Never use the appliance near flammable materials. Do not use it to vacuum sharp-edged or flammable objects or liquids, e.g. matches or hot ashes. Do not use the appliance to gather up small objects.
- Use the appliance only to vacuum small amounts of dust, dirt and crumbs. Empty the dust container after every use.
- Do not use the appliance to vacuum up liquids or damp dirt. Allow steam cleaned carpets to dry out thoroughly before vacuuming them.
In order to avoid the risk of tripping, inform any persons present about the operation of the robot vacuum cleaner.
- Remove all sensitive items (e.g. glass, lamps, vases) and objects that could become trapped in the brushes or vacuumed up (e.g. cords, clothing, newspapers, curtains) from the working area before operating the appliance. If required, set the light barrier to limit the working area.
Do not cover the sensors and ventilation slits on the robot
vacuum cleaner.
4.7. Cleaning and maintenance
WARNING!
Live components. Risk of fatal electrical shock!
Therefore, please follow the instructions below and Chapter "8. Cleaning and care" on page 149:
- Never immerse the robot vacuum cleaner, charging station or mains adapter in water or other liquids! Only clean the appliance and all accessories with a dry or slightly damp cloth.
Always disconnect the mains adapter from the mains socket before cleaning or servicing the appliance and before fitting or removing accessories.
5. Appliance overview
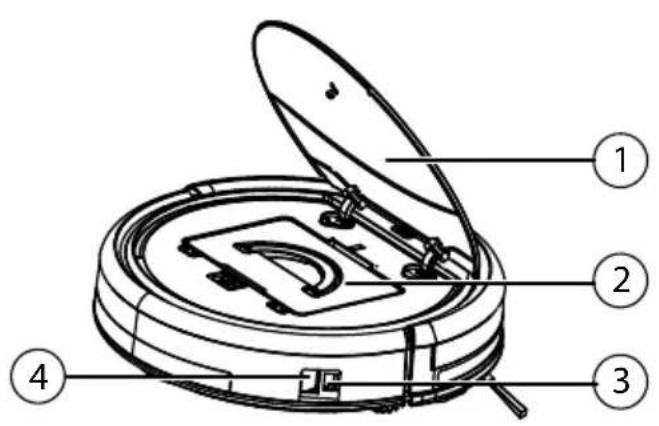
1) Dust container lid
2) Dust container with filter
3) Mains connection
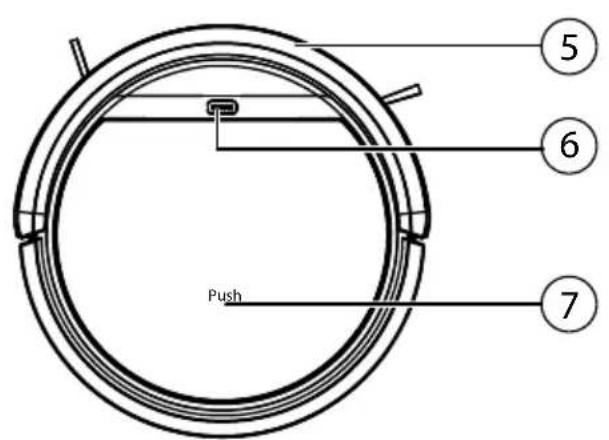
4) On/Off switch
5) Bumpers
6) Indicator light
7) Markings for opening the cover
5.1. Bottom
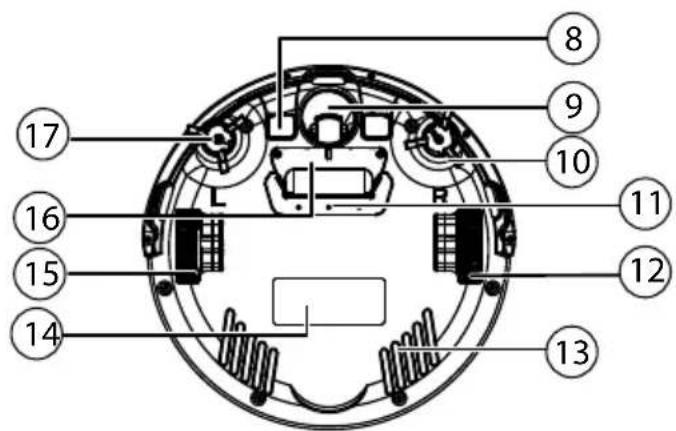
8) Charging contacts
9) Running wheel: for supporting the direction of travel
10) Right cleaning brush
11) Suction opening
12) Running wheel: for propelling the appliance
13) Ventilation slots
14) Type plate
15) Running wheel: for propelling the appliance
16) Battery compartment
17) Left cleaning brush
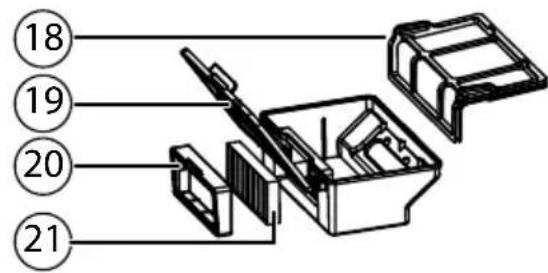
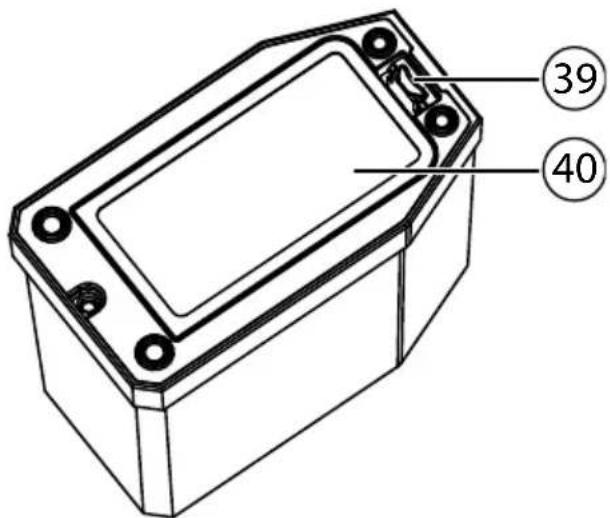
5.2. Dust container with fi lter
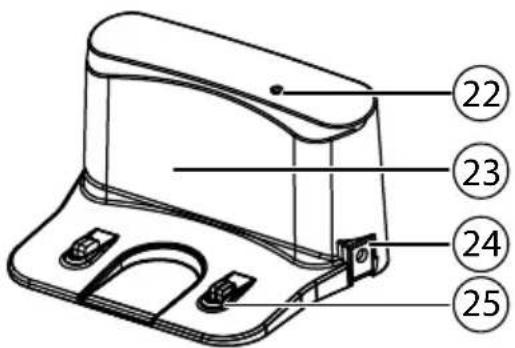
5.3. Charging station
26) Start time display
27) Time display
28) Operating mode: move forwards; Start time/time mode: increase the numeric value
29) Operating mode: move right; Start time/time mode: switch from hour display to minute display
30) Operating mode: move backwards; Start time/time mode: decrease the numeric value
31) Set the time; confirm the selected time
32) Vacuum along walls
33) Return to the charging station
34) Vacuum in a circle
35) Set the start time; confirm the selected start time
5.5. Light barrier (virtual wall)
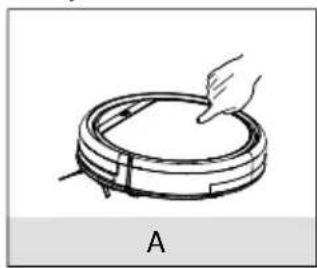
5.6. Sensors on the robot vacuum cleaner
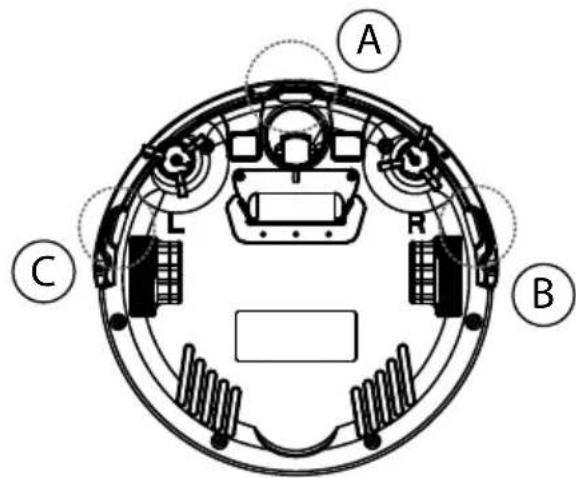
A Front sensor
B Right sensor
C Left sensor
6. Using the appliance for the first time
6.1. Attaching the cleaning brushes
Before using the appliance for the first time, it is necessary to attach the supplied brushes.
The brushes can be installed and removed using a Philips screwdriver.
Press both of the brushes marked with L and R onto the brackets until they click into place. Make sure during this process that they match the L and R markings on the appliance.
6.2. Charging the battery block
The robot vacuum cleaner is fitted with a lithium-ion battery block. After unpacking the appliance, firstly charge the battery block for approx. 3.5 hours. This benefits battery performance in the long run.
You can use the supplied mains adapter GSCV0600S019V12E to directly recharge your robot vacuum cleaner or recharge it via the charging station; simply follow the procedure described below:
- Switch the On/Off switch on the robot vacuum cleaner to the ON position because otherwise the battery block will not be charged.
Directly charging the appliance
Attach the mains adapter GSCV0600S019V12E to the mains connection on the side of the robot vacuum cleaner.
Charging via the charging station
Attach the mains adapter to the mains connection on the charging station. Place the robot vacuum cleaner on the charging station so that the charging contacts are located on top of each other.
Insert the mains plug into the mains socket.
The appliance starts to charge, all LEDs for the indicator light flash.
As soon as the battery block has been fully charged, the diodes will be permanently lit.
The battery block should be charged as soon as the centre LED for the indicator light is flashing.
Either charge the battery block before the next cleaning process by connecting the mains adapter to the appliance or, if the charging station is connected, the robot vacuum cleaner will automatically return to the charging station when the battery charge is too low. The cleaning process will be interrupted when the appliance returns to the charging station.

NOTICE!
If the performance of the rechargeable batteries drops significantly, please contact the Medion Service Centre.
6.3. Inserting batteries into the remote control
Slide down the battery compartment cover on the back of the remote control.
Insert two 1.5 V batteries of type AAA and observe the polarity shown in the battery compartment.
- Place the battery cover back on the battery compartment and slide it shut.
6.4. Inserting batteries into the light barrier (virtual wall)
-
Remove the battery compartment cover by pressing the opening tab backwards and simultaneously lifting the battery compartment cover.
Insert two 1.5 V batteries of type AA and observe the polarity shown in the battery compartment. -
Close the battery compartment cover.
6.5. Setting the time
In order to be able to use the start time function, it is firstly necessary to set the time on the remote control. Proceed as follows:
Press the CLOCK button to set the current time.
The hour display flashes.
Use the arrow buttons or to set the hour. Then press the button to set the minutes display.
The minute display flashes.
Use the arrow buttons or to set the minutes.
Confirm your selection by pressing the CLOCK button.
The time is now set.
7. Vacuum cleaner operation
To achieve the best cleaning performance, ensure that all loose objects (curtains, clothing, paper, loose cables and extension cables) are removed from the floor.

ATTENTION!
Risk of property damage.
Loose cabling can get caught around your robot vacuum cleaner during vacuuming and be pulled by the appliance. This can lead to appliances being pulled from a table and damaged.
Lay cables out of the reach of the appliance.

NOTICE!
Before vacuuming on a carpet, please remove the brushes. This robot vacuum cleaner is not suitable for use on deep pile carpets. Every time a button is pressed you will hear a beep to confirm.
Before switching on, disconnect the mains adapter plug from the appliance.
Ensure that the dust container is clean and the filter is correctly inserted.
Place the robot vacuum cleaner in an open area within the room.
- Switch the On/Off switch to the ON position and the appliance is now ready for operation.
Press the CLEAN button on the appliance or on the remote control in order to start the cleaning process.
The LEDs for the indicator light will now be permanently lit.
Press the CLEAN button again to interrupt the cleaning process. Press the CLEAN button once more if you want to resume the cleaning process.

NOTICE!
However, if you do not press a button within 15 seconds, the robot vacuum cleaner will return to sleep mode. You can switch the robot vacuum cleaner directly into sleep mode while in operation by pressing and holding down the CLEAN button for approx. three seconds. The indicator light is switched off in sleep mode.

NOTICE!
The robot vacuum cleaner will automatically return to the charging station when the battery level is low. The cleaning process will be interrupted when the appliance returns to the charging station.
Regularly clean the suction opening when the appliance is switched off (On/Off switch in the OFF position) and empty the dust container after every use.
7.1. Setting the start time
In order to start a cleaning process in your absence, set a start time for the cleaning process. Proceed as follows:
- Switch the On/Off switch to the ON position and the appliance is now ready for operation.
Press the PLAN button to set the start time.
The hour display flashes.
- Use the arrow buttons or to set the hour. Then press the > button to set the minutes display.
The minute display flashes.
Use the arrow buttons or to set the minutes.
Confirm your selection by pressing the PLAN button.
The start time is now set. The LEDs for the indicator light will flash. The cleaning process will start at the preset time.
In order to deactivate the start time, set the start time to 00:00.
7.2. Selecting the modes
The robot vacuum cleaner is automatically guided through the room using the sensors, the bumpers on the appliance and the special light barrier. You can select how the robot vacuum cleaner should operate:
| Cleaning mode Button to press Type of cleaning | ||
| Automatic | CLEAN | Standard cleaning dependent on obstacles |
| Spot cleaning | For the targeted cleaning of an area around the starting location of the robot vacuum cleaner | |
| Cleaning along a wall | For cleaning along walls/obstacles. If no obstacles are available for orientation, the robot vacuum cleaner will stop the cleaning process. | |
| Return to the charging station | The robot vacuum cleaner returns to the charging station and charges the battery block. | |
7.3. Using the light barrier (virtual wall)
In order to limit the operating range of the robot vacuum cleaner e.g. to exclude certain areas from the cleaning process or to protect the appliance from falling down stairs, you can set up the light barrier.
Position the light barrier in front of obstacles or the forbidden cleaning zone.
Set the On/Off switch on the light barrier to the ON position.
During operation, the robot vacuum cleaner will immediately turn around after passing the light barrier.
8. Cleaning and care

DANGER!
Live components. Risk of electric shock.
- Never immerse the robot vacuum cleaner, charging station or mains adapter in water or other liquids! Only clean the appliance and all accessories with a dry or slightly damp cloth.
- Set the On/Off switch to tOFF position and always disconnect the mains plug from the mains socket before cleaning or servicing the appliance and before fitting or removing accessories.
Your robot vacuum cleaner is easy to clean and maintain. Empty the dust container and clean the filter after every use. Clean the suction opening as required.
- Do not use any solvents or caustic/gaseous cleaning agents to clean the appliance's surfaces. Wipe the surface of the robot vacuum cleaner and the charging station with a damp cloth.
- Clean the surfaces of the sensors and charging contacts with a clean, dry cloth.
8.1. Cleaning the dust container
We recommend emptying the dust container and cleaning the filter after every use. Carry out the following steps:

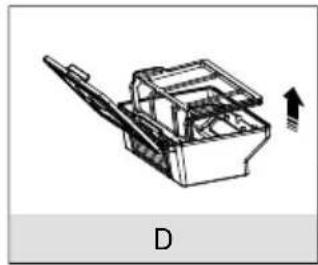
A) Press down on the pressure point marked PUSH on the appliance cover. The cover will open.
B) Fold up the handle for the dust container and remove the dust container from the robot vacuum cleaner.
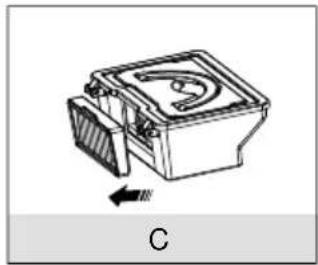
C) Remove the HEPA filter with the HEPA filter frame.
D) Fold up the dust container lid and remove the dust filter.
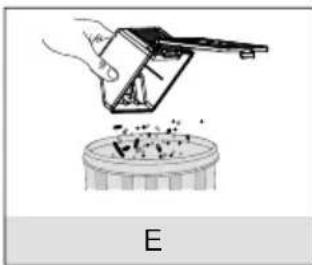
E) Empty the dust container over a dustbin.
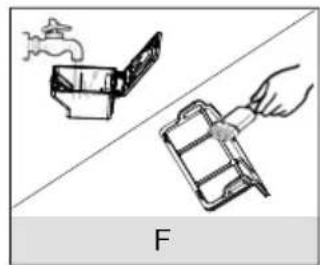
F) Rinse out the dust container with water. Rinsing is not necessary every time. Never put the dust container in the dishwasher! Regularly clean the dust filter and the HEPA filter with the supplied brush.
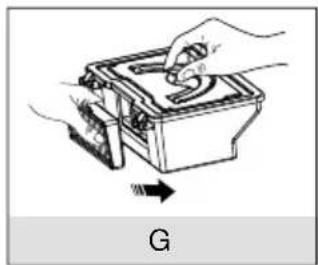
G) As soon as the dust container is dry, replace the filter. After cleaning, replace the dust container and close the robot vacuum cleaner cover.
Before using the appliance for the first time, please ensure that the filter in the dust container has been inserted correctly.
8.2. Cleaning the suction opening
After a while, dirt and dust can collect around the suction opening and can reduce the suction power. To avoid this, the suction opening should be cleaned regularly.
Switch off the appliance.
Remove dirt and dust from around and inside the suction opening.
8.3. Cleaning the brushes
We recommend cleaning the brushes regularly. Carry out the following steps:
- Switch off the appliance and lay it on its back on a flat surface.
Loosen the screw of each brush with a Phillips screwdriver. Hold the brushes firmly and pull them directly upwards and out of the appliance.
Remove dirt and hair that has collected on the brushes.
After cleaning, reattach the brushes.
After a certain time, the brushes should be replaced to ensure efficient cleaning performance. Please contact our Service Centre for replacement accessories.

PLEASE NOTE
If the bristles become bent, immerse the brushes in hot water until they resume their original form.
9. Problem solving
If the appliance malfunctions, please check first if you can eliminate the error yourself with the help of the following overview.
Never try to repair the product yourself. Please contact our Service Centre or another professional repair shop if a repair is necessary.
| Problem Possible cause Solution | ||
| The appliance cannot be switched on. | The battery block is flat. | Recharge the battery block fully for approx. 3.5 hours. |
| The indicator light flashes when the appliance is switched on. | The battery block is flat. | Recharge the battery block fully for approx. 3.5 hours. Remove all blockages |
| The robot vacuum cleaner does not move. A single tone sounds. | The wheels are blocked. | Remedy the problem with the wheels. |
| Sensor fault A dual tone sounds. | The robot vacuum cleaner is located on a dark floor. The sensor is covered. | Place the robot vacuum cleaner on a light coloured floor. Clean the sensor. |
| The appliance is blocked A triple tone sounds. | The robot vacuum cleaner is stuck. | Place the robot vacuum cleaner in a different location. |
| The side brushes do not move. | Blocked by dirt. | Remove the brushes, clean them thoroughly and replace them. |
10. Removing the battery block

CAUTION! Risk of injury.
- Keep removed batteries away from children; do not throw them into a fire, short-circuit or dismantle them.
Do not expose removed batteries to extreme conditions, e.g. radiators, direct sunlight! There is an increased risk of leakage! -
Avoid contact with skin, eyes and mucous membranes. If any of these areas come into contact with battery acid, rinse them immediately with plenty of clean water and consult a doctor as soon as possible.
-
Remove the battery block before disposing of the robot vacuum cleaner or if the battery block is faulty.
Before removal, ensure that the battery block is completely discharged. - Switch off the appliance and disconnect the mains plug from the socket and the mains cable from the appliance if necessary.
Release both screws from the bottom of the robot vacuum cleaner with a Phillips screwdriver and open the battery compartment.
Remove the battery block by pulling on the flap.
Disconnect the plug for the battery block from the socket on the appliance.
- Dispose of the battery block in an environmentally friendly manner (see "11. Disposal" on page 152).
- When replacing the battery block, connect the plug on the battery block with the socket on the appliance. Insert a new battery block. Only use a battery block of the same type.
- Close the battery compartment using the two screws.
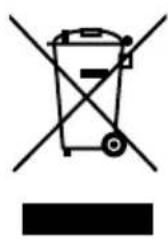
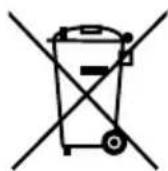
11. Disposal

Packaging
The product has been packaged to protect it from damage in transit. Packaging is raw material and can be re-used or added to the recycling system.
Appliance
Old appliances should not be disposed of with the normal household rubbish.
In accordance with Directive 2012/19/EU, the appliance must be properly disposed of at the end of its service life.
This involves separating the materials in the appliance for the purpose of recycling and avoiding any impact on the environment.
Take old appliances to a collection point for electrical scrap or a recycling centre.
Contact your local waste disposal company or your local authority for more information on this subject.
Batteries
Do not dispose of used batteries/rechargeable batteries in the household rubbish. Batteries must be properly disposed of. Retailers who stock batteries and local authority collection points have appropriate disposal containers for this purpose. You can contact your local waste disposal company or municipal authorities for further information.
12. Technical data
Suction power approx. 20 W
Volume
approx.
65 dB
Capacity of dust container: 0.3 l
Operating time approx. 80 min.
Weight approx. 1.9kg
Dimensions approx. 300 × 75 ~mm
Battery block
Lithium-ion battery block
Model: UR18650ZT-3S1P-S
Manufacturer:
BYD,
China
Battery capacity 11.1 V 2600 mAh
Output
28.9
Wh
Charging time:
approx. 3.5 hours
Operating temperature
10^ - 40^
Mains adapter
Model
GSCV0600S019V12E
Manufacturer
GSP, China
Input
100-240 V ~ 50/60 Hz, 0.5 A
Output
19V-600mA
Remote control
Battery operation 2x1.5 V batteries, type AAA
Light barrier (virtual wall)
Battery operation 2x1.5 V batteries, type AA
13. Conformity information
C E Medion AG hereby declares that the product MD 16192 conforms to the following European requirements:
EMC Directive 2014/30/EC
Low Voltage Directive 2014/35/EC
- Ecodesign Directive 2009/125/EC
RoHS Directive 2011/65/EU
Full declarations of conformity are available at www.medion.com/conformity.
14. Legal notice
Copyright © 2016
Status: 2016-05-30
All rights reserved.
This operating manual is protected by copyright.
Mechanical, electronic and any other form of reproduction is prohibited without the written permission of the manufacturer
Copyright is owned by the company:
Medion AG
Am Zehnhof 77
45307 Essen
Germany

The operating manual can be reordered via the service hotline and is available for download via the service portal at www.medion.com/gb/service/start/.
You can also scan the QR code above and download the operating manual onto your mobile device via the service portal.
15. General Warranty Conditions
15.1. General information
The warranty period is 24 months and begins on the day the product is purchased. The warranty covers all types of material and product damage that could occur during normal use.
Please keep your original proof of purchase in a safe place. The warranty provider reserves the right to refuse to confirm the status of the warranty or to carry out a repair under warranty if a valid proof of purchase cannot be produced.
If it is necessary to return your device for repair, please ensure that it is suitably packaged for transportation. Unless otherwise specified, you shall bear the costs for sending the device and the transport risk. The warranty provider does not assume any liability for additional materials sent with the product that do not belong to the original package contents supplied with the product.
Please enclose as much information as possible about the fault when sending the device to the warranty provider. In order to make a valid claim under warranty and before returning the device, please contact the Service Hotline operated by the warranty provider or the Service Portal. They will provide you with information on how to proceed further.
This warranty has no effect on your statutory warranty rights and is subject to the laws of the country in which the first purchase of the product was made by the end customer.
15.1.1. Scope
In the event of a fault on your product that is covered by this warranty, the warranty provider guarantees to repair or replace the product. The decision about whether to repair or replace the device is taken by the warranty provider. Therefore, the warranty provider can at its own discretion decide to replace a device submitted for repair under warranty with a refurbished device of the same quality.
No warranty is provided for batteries or rechargeable batteries or for consumable materials i.e. parts which have to be replaced at regular intervals during the normal use of the product e.g. video projector lamps.
A pixel error (permanently coloured, light or dark point in an image) is not generally considered a fault. Please refer to the information provided in the manual for this product for the precise number of permissible defects in the image.
The warranty provider gives no warranty for burnt-in images on plasma or LCD devices that result from the improper use of the device. Please refer to the information provided in the manual for this product for precise instructions on operating your plasma or LCD device.
The warranty does not cover errors relating to the playback of data media that have been created in an incompatible format or as a result of using unsuitable software. If it is discovered during the repair that the fault concerned is not covered under warranty, the warranty provider reserves the right to invoice the customer for the
costs already incurred in the form of a flat-rate handling charge, as well as to charge the customer for the materials and labour required for the repair after submitting a cost estimate. You will be informed in advance as the customer about these repair charges; you are responsible for accepting or rejecting the repair process.
15.1.2. Exclusions
Malfunctions and damage to the device caused by external influences, accidental damage, improper use, changes made to the product, modifications, upgrades, the use of third-party parts, neglect, viruses or software faults, improper transport, improper packaging or loss during the return of the product are not covered by the warranty issued by the warranty provider.
The warranty will be invalidated if the fault to the device is caused by maintenance or repair carried out by someone other than a service partner authorized by the warranty provider. The warranty will also be invalidated if labels or serial numbers on the device or a component of the device have been modified or made illegible.
15.1.3. Service Hotline
Before sending the device to the warranty provider, you must contact us via the Service Hotline or the Service Portal. This ensures that you receive further information on how to make a valid claim under warranty.
The use of the hotline may be subject to a charge.
The Service Hotline should under no circumstances be considered a substitute for user training for software and hardware or reading the manual, nor does it provide support for third-party products.
15.2. Special warranty conditions for repair on site or replacement on site
If there is an entitlement to on-site repair or replacement, the specific warranty terms and conditions for on-site repair or replacement shall apply to your product. The following provisions must be ensured by you for carrying out repairs or replacements on site:
- Personnel from the warranty provider who arrive at your premises for the above-mentioned purpose must have unrestricted, safe and immediate access to the devices.
- Telecommunication facilities required by these personnel for the proper execution of your order, for testing and diagnostic purposes or for remedying faults must be provided by you at your own expense.
- You shall be personally responsible for restoring your own application software after completion of the service by the warranty provider.
- You shall be personally responsible for configuring and connecting any existing external devices after completion of the service by the warranty provider.
- The free cancellation period for repairs or replacements on site is at least 48 hours, thereafter we shall invoice you for any costs resulting from a late or missing cancellation.
16. Service Address

0333
3213106

01793
715716
(costs:
local)
Mo-Fr:08:00-20:00
Sa - Su: 10:00 - 16:00

www.medion.co.uk
@ Please use the contact form at www.medion.com/contact