
HP101 - Frying Pan Bimar - Free user manual and instructions
Find the device manual for free HP101 Bimar in PDF.
| Brand | Bimar |
| Model | HP101 |
| Product type | Ceramic fan heater |
| Electrical class | Class II |
| Power supply | 220-240 V ~ 50/60 Hz |
| Power | 2000 W (standard estimate for this type) |
| Installation | Wall-mounted or floor-standing; minimum clearance 100 cm in front, 40 cm on sides |
| Main functions | Fan only, low heat, high heat, oscillation (front-down), ambient thermostat (10-49°C), timer up to 7.5 h |
| Remote control | Yes, with included CR2025 battery |
| Display | LED display |
| Minimum distance from floor | 200 cm (wall-mounted installation) |
| Protection | Automatic shut-off in case of overheating (built-in safety system) |
| Material | Plastic and metal (ceramic element) |
| Dimensions (approx.) | Width ~45 cm, height ~25 cm, depth ~15 cm |
| Weight (approx.) | 2.5 kg |
| Maintenance and cleaning | Clean the intake grille with a vacuum cleaner or damp cloth; do not immerse |
| Spare parts | CR2025 battery for remote control |
| Repairability | Contact a qualified professional; do not open yourself |
| General information | Household use only; do not use outdoors |
Frequently Asked Questions - HP101 Bimar
User questions about HP101 Bimar
0 question about this device. Answer the ones you know or ask your own.
Ask a new question about this device
Download the instructions for your Frying Pan in PDF format for free! Find your manual HP101 - Bimar and take your electronic device back in hand. On this page are published all the documents necessary for the use of your device. HP101 by Bimar.
USER MANUAL HP101 Bimar
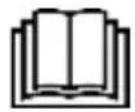
This symbol invites you to read these instructions carefully before using the appliance, and also inform third parties them, if necessary. Store this booklet in future reference and for the entire life the device. If any parts of these instruct prove difficult to understand or if in doing contact the company at the address with on the last page before using the protocol warning!
This symbol highlights instructions and warnings for safe use.
This symbol: indicates that the appli
GENERAL ADVISE
- This appliance is destined only to the heating of inter domestic or similar environments and in compliance with these instructions. It can be considered only a supplementary source of heating and not as a central heating element.
This appliance is intended to be used in household an. similar applications such as:
-
staff kitchen in shops, offices and other working environments;
-
farm houses
- by clients in hotels, motels and other residential type environments
- bed and breakfast type environments
The appliance must not be used in dusty environment or in the presence of extremely volatile materials which could obstruct grids or heat exchanger, nor in very damp environments, in the presence of inflammable products, or out of doors in the open.
Any other use is to be considered inappropriate and therefore dangerous. The manufacturer cannot be held responsible for eventual damage caused by inappropriate, improper or irresponsible use and/or for repairs made to the product by un authorised personnel.
- The fan heater gets hot when working; so only touch the control panel. Avoid contact with front grid and the heating element.
- Ensure that the heating fan does not come into contact with water or other liquids. If this should happen, never immerse hands in the liquid but remove the plug from the socket first of all. Dry the appliance carefully and check that all the electric parts are dry. in doubt, call a qualified expert.
- If the appliance should fall over or shows signs of fault operation, disconnect the electrical cable immediately.
Check that no part is damaged and switch it on after the appliance has been thoroughly checked: in case of doubt, contact qualified professional personnel.
- Children of less than 3 years should be kept away unless continuously supervised. Children aged from 3 years and less than 8 years shall only switch on/off the appliance provided that it has been placed or installed in its intended normal operating position and they have been given supervision or instruction concerning use the appliance in a safe way and understand the hazard involved. Children aged from 3 years and less than 8 years shall not plug in, regulate and clean the appliance or perform user maintenance.
CAUTION: Some parts of this product can become very hot and cause burns. Particular attention has to be given where children and vulnerable people are present.
-
This appliance can be used by children aged from 8 years and above and persons with reduced physical, sensory or mental capabilities or lack of experience are knowledge if they have been given supervision or instruction concerning use of the appliance in a safe way and if they understand the hazards involved. Children shall not play with the appliance. Cleaning ar user maintenance shall not be made by children without supervision.
-
Attention: when using electric appliances, the basic safety precautions must always be observed to avoid risks of fire, electric shocks and physical injury.
- Unplug the appliance when not in use.
- The fireguard of this heater is intended to prevent direct access to heating elements and must be in place when the heater is in use, but the fireguard does not give full protection for young children and for infirm person.
- That the user must not leave the appliance unattended while it is connected to the supply.
- Do not touch the heater with wet hands or feet.
- Never use the radiator to dry damp garments.
- Do not expose the heater to the weather (sun, rain, etc.).
- To avoid all risk of electric shock, never immerse the power cable, plug or appliance itself in water.
- Do not pull on the power cord or the appliance to unplug the appliance from the wall socket. Never move the appliance by pulling the cord.
- If the electric cord is damaged, it has to be replaced by the supplier or an authorized service center or a professionally qualified, to avoid any risks.
- Do not use the appliance with a timer or a programmator with a system that can switch on the appliance automatically, to avoid risk of fire, since a fire risk exists
if the heater is covered or positioned incorrectly. Che that no other high absorption appliances are connected to the same power source.
- This device should not be used in any type of vehicle in confined spaces (elevators, campers, cars, cabs, etc..).
- WARNING: this heater is not equipped with a device to control the room temperature. Do not use this heater in small rooms when they are occupied by person not capable of leaving the room on their own, unless constant supervision is provided.
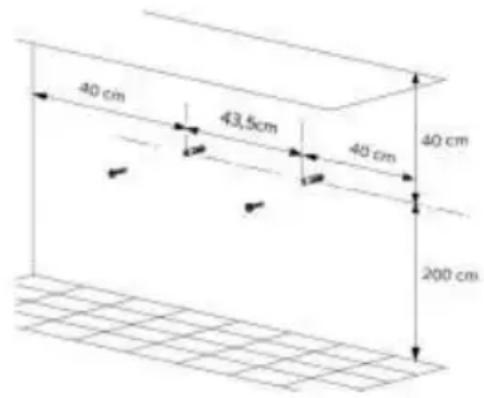
- The heater must be installed at least 1,8 ~m above the floor.
INSTALLATION
- After removing the packing materials, check the integrity of the heater; if you are unsure, do not use it and ask for qualified professional help. The packing materials (plastic bags, polystyrene foam, nails, etc.) must be kept out the reach of children because they are potential sources of danger.
-
Before connecting the appliance, check that the voltage shown on the data plate matches that of your electricity. In the event of incompatibility between the electric outlet and the plug of the heater, have the outlet replaced with another more suitable type by professionally qualified personnel, who will make sure that the section of the wires of the outlet is appropriate for the absorbed power of the heater. Check that the mains are not connected equipment; high absorption to prevent overloading and fire risks. Check that the mains are not connected equipment; high absorption to prevent overloading and fire risks. In general, the use of adapters or extension cords is not recommended; if their use is indispensable, they must conform to existing safety standards and their current capacity (amperes) must not be less than the maximum of the heater. Attention: before use the appliance remove the detachable coupon to stick the handle.
-
The heater must only be used if secured to a wall: the wall must be flat, smooth, very stable (as the appliance could tip over) and heat resistant. The heater must be positioned in a way that: -The air exit grill has a minimum of free space of 100~cm , while to the sides, the free space must be at least 40~cm ; -The intake part beneath the cover "A" must be free from obstacles (covers, curtains, etc.) which could limit the air inflow causing appliance overheating or damage; -It is well-removed from other sources of heat; -Far away from baths or showers to prevent water droplets or steam from affecting it.
- Position the fan heater far from other sources of heat, inflammable materials (curtains, carpets, etc.), inflammable gases or explosive materials (spray cans) and from materials that can deform on exposure to heat.
-
If the appliance is fitted to a wall, the same must be made of masonry and/ or of heat-resistant material (not of wood or synthetic material which rapidly heats up), care should be taken not to fit panels where water pipes or electrical wiring might be embedded in the walls; follow the indications below for installation:
-
The heater must be installed at least 1,8m above the floor; fit using the two "lock hole slots" in the rear panel: make two holes in wall 43,5cm . Apart, at a height of at least 200cm . from the floor and perfectly horizontal; insert expansion wall anchors into the same and screw in round-head 8mm . diameter screws suitable for the slots (see fig. 1)
- If fixed in a bathroom shall state that the heater is to be installed so that switches and other controls cannot be touched by a person in the bath or shower.
- Warning: don't use wet hand touch the working machine and don't cover the wind outlet and inlet.
- Before each use, verify that the heater is in good condition and that the electrical cord is not damaged: in the case of doubt, ask for professionally qualified help.
-
Make sure that the cable is correctly positioned and that it is not in contact with hot parts or sharp edges, nor wrapped around the device or twisted.
-
The power socket must be easy to reach so the plug can be removed quickly in case of emergency.
- Make sure that the fan heater is working correctly: if not, turn the heater off and have it checked by professionally qualified personnel.
- Make sure that the air-intake grid is not obstructed by objects, fabrics or anything else to avoid the heater overheating or breaking.
- In the case of a breakdown or fault, switch off the appliance and have it checked by a professionally qualified technician; repairs made by unqualified persons can be dangerous and render void the warranty.
DESCRIPTION OF THE APPLIANCE
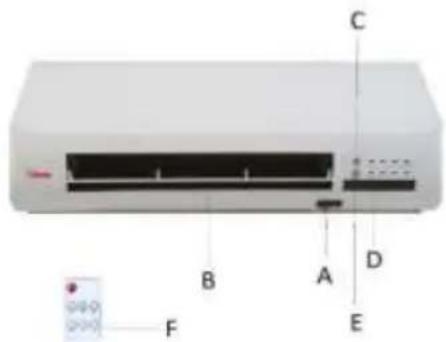
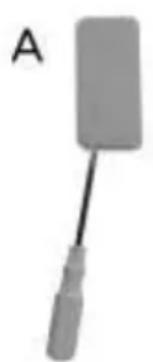
A. Main (1/0) switch
B. Grille outair
C. Selection button
D. Display
E. Timer button
F. Remote control
USE
It is equipped with the following regulation elements, used by pressing the buttons located below the control panel or the ones on the remote control. The remote control must be aimed in the direction of the display next to the switches; for the first use you have to remove the clear plastic tab on the battery housing (1 battery CR2025).
In detail, the settings are:
- main (1/0) switch. Every time you finish using the fan heater, switch it off with this switch (pos. "0").
ventilation/hot air/very hot air: selected by pressing the “O” button on the panel or remote control, 1 time for ventilation, 2 times for hot air or 3 times for very hot air. - oscillation for alternative "front-low" air direction: function is active, by pressing the " key 4 times on the panel. When using the remote control, press "swing" then "mode"1 time: the display will show the function with the lighted sign "SWING".
- timer: switches off fan heater when set time has elapsed. Maximum time is 7,5 hours. Selected by pressing the "TIMER" key on the panel or remote control: 1 time for 0,5 hour, 2 times for 1 hours, and so
forth. If you want delete the function TIMER you must press the "Timer" key until on the panel will show NOT light function.
- room temperature: keeps room temperature constantly at the set value. Temperature range between 10 and 49^ is selected using only the remote control, press "Mode" key, if pressing either the "+" or "-" key to increase or reduce the temperature shown on the display at the time
- Example: if we want temperature at 30^ , you must select the "+" key until on the LCD show 30^ , then the 30^ flash for some seconds, and then the LCD show the effective temperature of the room temperature, then some time the temperature will increase and on the LCD will show the room temperature updated until at 30^ . When on the LCD will show 30^ , the appliance always function, but will decrease the out power. The appliance will start automatically to function when the temperature decrese on the room temperature.
- For delete the function room temperature you must press the "cancel" key on the remote control.
The control panel has a series of luminous LEDs, each to indicate the functions selected and on the LCD show the room temperature.
To use the heater, act as follows:
1) Insert the plug into the socket.
2) Switch on the main switch (pos."l").
3) Select the function required by following the instructions given above: when the fan is switched on, the front grid opens automatically to maximum aperture.
4) To switch off the fan heater, run just the fan for around 3 minutes to cool the resistance (in this way it will have a longer life); press the “ ” key of the remote control or of the keyboard.
At the end of use, completely switch off the appliance using the main switch (pos."0") located on the side.
For long periods of inactivity, remove the plug from the power socket.
CLEANING AND MAINTENANCE
Attention: before cleaning the appliance, switch off, unplug and wait for before it has completely cooled down.
- To clean the body use a soft damp cloth; do not use abrasive products.
-
Do not submerge any part of the heater in water or other liquids; if this should happen, do not put your hands into the liquid, firstly remove the plug from the power socket. Carefully dry the appliance and check that all the electrical parts are dry: if in doubt, contact professionally qualified personnel.
-
To replace the remote control battery type "CR2025", remove the pressing cover with a tool (eg a cacciacite) the tab to the extension and then slide the tray into the battery compartment outside, replace the battery (with correct polarity) and close the drawer.

- From time to time clean the grid to remove fluff, dust or other deposits, to improve the performance. Use a vacuum cleaner or a cloth.
- If you decide not to use the appliance any more, we recommend making it inoperative by cutting the power cord (after making sure you have disconnected the plug from the socket) and make dangerous parts harmless if children are allowed to play with them.
- Used battery of the remote control must be disposed of at appropriate collection centres at your local authority or in suitable containers. In this way, local laws will be respected.
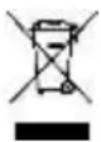
IMPORTANT INFORMATION FOR CORRECT DISPOSAL OF THE PRODUCT IN ACCORDANCE WITH EC DIRECTIVE 2011/65/EU.
At the end of its working life, the product must not be disposed of as urban waste. It must be taken to a special local authority differentiated waste collection centre or to a dealer providing this service. Disposing of a household appliance separately avoids possible negative consequences for the environment and health deriving from inappropriate disposal and enables the constituent materials to be recovered to obtain significant savings in energy and resources. As a reminder of the need to dispose of household appliances separately, the product is marked with a crossed-out wheeled dustbin.
Brand : Bimar
Model : HP101
Category : Frying Pan