
MBF004 - Bread maker Aicok - Free user manual and instructions
Find the device manual for free MBF004 Aicok in PDF.

| Product type | Bread machine |
| Brand | Aicok |
| Model | MBF004 |
| Maximum capacity | 1000 g (1 kg) |
| Number of programs | 19 (bread, dough, jam, baking) |
| Display | LCD with backlight |
| Timer | Up to 15 hours |
| Automatic keep warm | 60 minutes |
| Baking levels (crust color) | 3: light, medium, dark |
| Mixing blade | 1 removable blade |
| Dimensions (L x W x H) | 280 x 325 x 285 mm |
| Power supply | 220-240 V, 50 Hz |
| Housing material | Stainless steel |
| Viewing window | Yes, on the lid |
| Overheat protection | Yes, automatic shutdown |
| Button auto-lock | Yes, except Start/Stop |
| Power failure memory | Cycle resumes if power cut < 15 min |
| Cleaning | Damp soft cloth, do not immerse |
| Included accessories | Measuring cup and spoon, hook, non-stick barrel |
| Repairability | Contact Aicok customer service |
Frequently Asked Questions - MBF004 Aicok
User questions about MBF004 Aicok
0 question about this device. Answer the ones you know or ask your own.
Ask a new question about this device
Download the instructions for your Bread maker in PDF format for free! Find your manual MBF004 - Aicok and take your electronic device back in hand. On this page are published all the documents necessary for the use of your device. MBF004 by Aicok.
USER MANUAL MBF004 Aicok
Shenzhen Impression E-commerce Co., Ltd
NO.3H012, TradingPlaza, NO.5, Huanancity, PinghuStreet.
LonggangDistrict, Shenzhen, China
Facebook Page : https://www.facebook.com/alicoks/
Website: www.aicok.cc
Made In China

C∈RoHS
CONTENTS
English 01~19
Deutsch 20~39
Espanol 40-59
François 60-79
Italiano 80~99
Dear users,
Thank you for using Aicok Break Maker. Please read this User
Manualcarefully before use for correct operation of the machine.
Please do read carefully Chapter III "Safety Cautions" and keep the
Manual properly for future reference.
This Manual applies to AICOK Bread Maker. The User Manual
reserves the right of final interpretation. All the contents in it are only for the reference of the user in using and maintaining the product.
The pictures shown are only indicative and the actual product might differ. If you still have any question regarding the use, please
contact the AICOK customer service.
1.PRODUCT FEATURES
High technology
- Self-lock protection against accidental impact: Under the working mode, all the buttons are in self-lock protection except for the "Start/Pause" button, which will stop the work if being pressed and held for while. Other settings remain unchanged.
- Microcomputer: The inner chip controls the procedure and time for processing different types of food. Simply press the button and the whole process will be completed automatically after selection.
- LCD display: The LCD screen displays clearly the balance working time and the menu settings.
- Self-inspection of fault: The bread maker will automatically give an alarm and display the error code in the case of any fault during the working to facilitate the repair.
- Memory: In the case of sudden blackout during the working, the bread maker may return to the original working status if the power is resupplied in 10-15 minutes.
Safety
- Grounding protection: It is safer to use the product with the dual grounding and anti-leakage protection, with both the body and the electric heat tube connecting to the ground.
- Overtemperature protection: The temperature restricting device will automatically cut off power in the case of abnormal temperature in the device caused by failure of the temperature control elements.
Convenience
- Program control: The microcomputer controls the following
required for different menus: heating power, temperature range, heating time and the time required for dough kneading and fermentation.
- Automatic constant temperature: The in-built highly sensitive temperature controller maintains a stable and even heating temperature in the bread maker interior.
- Reserved delay: Reserve up to 15 hours (The bread-making will have been completed by the end of the reservation) by adjusting the "Time" button ("Time+") and "Time-".
- Automatic heat preservation: The product will automatically preserve the heat for 60 minutes upon the completion of the baking to keep the taste, sweetness and warmth of the bread, which is quite practical.
Durability
- Shell: The shell is made from high-quality stainless steel, which has high strength, is easy to clean and wear-proof.
- Heat tube: Made from high-temperature materials and treated with special techniques, with high thermal efficiency and long service life.
- High-quality motor: The motor with resistance to high temperature, low noise emission and high torque can powerfully knead dough, making it fully malleable.
Energy-efficient
- Double-layer structure: The double-layer shell structure effectively reduces the thermal loss and saves energy.
- Power saving mode: The programmed automatic optimization selects heating power and heating time, saving time and energy.
Multiple use
- It can make different types of bread and perform a number of menu functions, such as "Raise dough", "Knead dough", "Jam" and "Bake".
2.PRODUCT SPECIFICATIONS
Aicok Bread Maker
| Product model | MBF-004 |
| Rated voltage | 220-240V |
| Rated power | 50Hz |
| Rated capacity | 1000g |
| Display mode | LCD display |
| Heat mode | Electric heat tube |
| Control mode | Computer |
| Mixing blade | Single mixing blade |
| Product dimension | 280x325x285mm |
3. SAFETY CAUTIONS
Always follow basic precautions in using the product, including: Please read all the instructions
- The product is for the use by children above age 8 and adults. Those who are physically, sensorially or intelligently impaired or lack experience shall use the product in a safe way under the monitoring and instructions of an adult, and learn about the danger involved. Children are prohibited from using it. Children shall not clean or maintain the product unless they are above age 8 and monitored by an adult. Keep close watch when the product is used by children or near children.
- Keep the product and the power cord out of the reach of children.
- Please do not operate any device with a broken power cord or plug, or after failure or damage. Return the device to the nearest
authorized service organization for inspection, repair or mechanical adjustment. Damaged power cord must be replaced by the manufacturer, its servicing agent or the similar qualified personnel to prevent any danger.
- Attention: Do not touch hot surface. Use the handle or the knob. Do not hang the power cord at the table or counter edge or touch hot surface.
- The device is not to be operated through an external timer or an independent remote system.
- Clean the surface that contacts food.
- Check if the socket voltage is consistent with that displayed on the nameplate before use.
- Please do not soak the power cord, plug or shell in water or any other liquid to prevent electric shock.
- Unplug the socket when not using the product or before cleaning it. Cool it down before removing any part.
- Please do not place the product near hot gas or any electronic burner, or in a heating oven.
- Be very cautious when moving the product containing hot oil or any other hot liquid.
- Do not touch any mobile or rotating part of the device during baking.
- Please do not turn on the product if ingredients in the bread tray are not properly placed.
- Please do not throw or knock the bread tray or the mobile tray on the top or at the edge. Otherwise, it may cause damage to the bread tray.
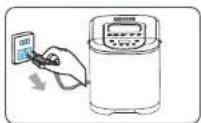
- First, connect the plug to the device; then insert the power cord in
nto the wall socket. To disconnect, please turn off all the controls and remove the plug from the socket.
- Please do not operate the device without the bread tray to prevent any damage to the device.
- Using other accessories than those recommended by the manufacturer may lead to fire, electric shock or personal injury.
- Do not use the product outdoor.
- Do not use the device for non-intended purposes.
Please properly keep the Manual
Household use
a. Short power cord is recommended to lower the risk
b. Longer extension cord may be used.
c. When a longer extension cord is used:
1) the rated voltage of the power cord or extension cord shall be at least the same with that of the device;
2) the power cord shall be placed where it will not cover the counter surface or tabletop and will prevent children from being pulled or accidentally tripped. d. If the device is connected to the ground, the extension cord should be the grounding-type 3-line power cord.
Statement:
The Company will not be liable for any danger or harm caused by violation of the above cautions.
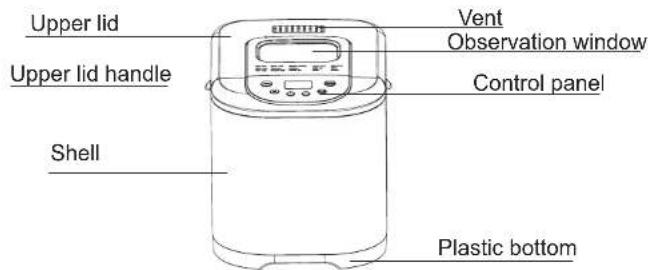
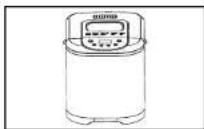
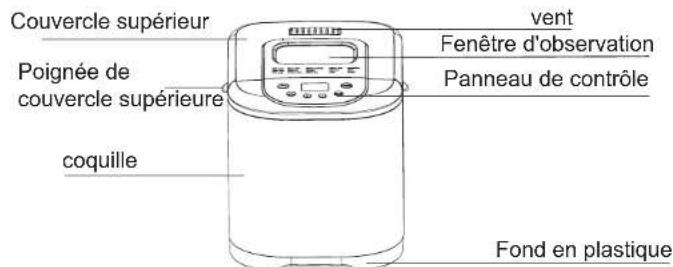
4.PRODUCT STRUCTURE AND COMPONENTS
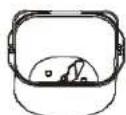
Bread barrel
Mixing blade
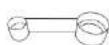
Measuring spoon
Hook
| Name | Functions |
| Control panel | For selecting functions, baking color, weight, etc. |
| Upper lid | For sealing the oven heat |
| Shell | For insulating the oven temperature |
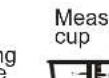
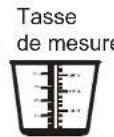
| Measuring cup | For taking big portions of ingredients, such as the measurement of water, bread flour, etc. |
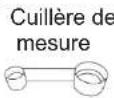
| Measuring spoon | For taking small portions of ingredients, such as the measurement of salt, oil, yeast, milk powder, etc. (one end is the small spoon and the other is the big one) |
| Hook | For hooking the mixing blade at the bread bottom or the bread barrel handle |
| Mixing blade | For mixing ingredients |
| Bread barrel | For holding bread |
| Upper lid handle | For easy opening of the upper lid |
| Observation window | For clear observation of the whole process of making bread |
| Vent | For discharging the gas produced from the bread-making |
5. CONTROL PANEL
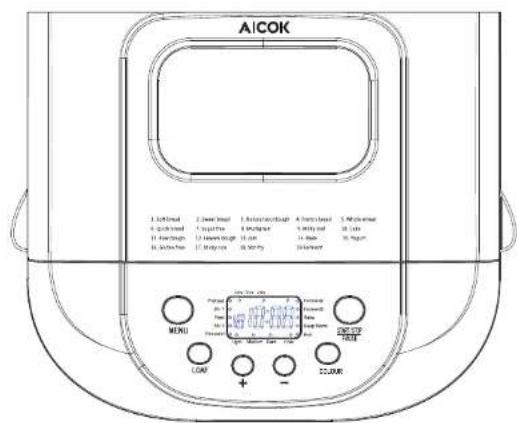
0809
Functions
- "LCD" displays "Menu No." "Time", "Weight and baking color selection indicator" and "Step instructions".
- colour button: for the selection among the light, medium and dark baking colors displayed on the LCD screen under the settings mode, applicable to the menu mode (Menu 1-9. 16).
-
- button: for the adjustment of reserved delay function menu (Menu 1-9. 11-12. 16) under the settings mode, progressively increasing or decreasing the delay time at a maximum of 15 hours; also used for the adjustment of Menu 14. 15. 18. 19, progressively increasing or decreasing the total time. Press the button and hold for a while to quickly cycle the progressive increase or decrease of the delay time.
- MENU button: for the selection from Menu 1 to Menu 19 on the LCD display under the settings mode. You may choose any menu needed and the selected menu No. matches the corresponding menu listed on the control panel. The details of the menu mode are as follows:
- LOAF button: for the selection among 500g/750g/1000g on the LCD display under the settings mode, applicable to the menu mode (Menu 1-9.16).
- START button: for starting, pausing or stopping the selected baking procedure under the settings mode. Short press: start and pause; press the button and hold for 3 seconds: stop.
6. BEFORE FIRST USE
- First, carefully take the bread maker out of the package, remove all the packing materials and check if all the accessories are complete.
- Remove the dust accumulated in the package.
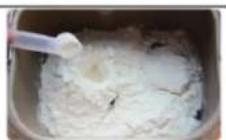
- Use clean cloth to clean the bread barrel, the mixing blade and the external surface of the bread maker. The inner wall of the bread barrel is a non-stick coating, and do not use any scouring pad or abrasive substance on any part of the bread maker, such as steel wool, etc.
- In the first use, you may use canola oil, butter or margarine to grease the bread barrel and install it by turning it clockwise. Then insert the power plug, select the baking mode and bake for approximately 10 minutes without any ingredient. The purpose is to remove any odor of the heat tube and the bread barrel.
- Unplug the power and wait until the device fully cools down. Clean the bread barrel once again and make it dry thoroughly. Note: There will be a burst of odor or smoke in the first use, which is caused by the high-temperature oxidation of the protective film on the heat tube, and it is a normal phenomenon.
7. OPERATION INSTRUCTIONS
- After referring to related recipes, you may carry out the steps as below:

- Align the mixing blade at the semicircle position of the rotating axis and insert it into the bread barrel.
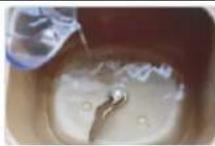
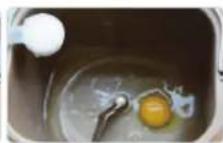
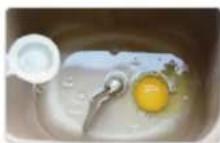
- Put water or milk first
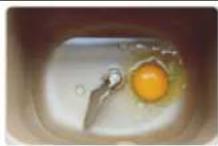
- If you need to add any egg, reduce the water or milk by the amount equivalent to the egg
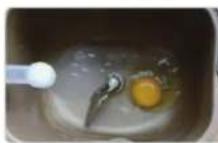
- Put salt at the corner nearer to the bread barrel
- Put sugar at the corner of the bread barrel
6.Add butter or margarine
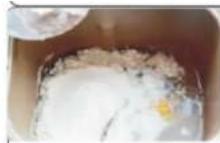
- Put in the flour and try to make it cover the whole water surface
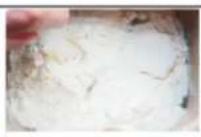
8.Use a finger to press a pit on the flour
- Put the yeast into the pit and make sure it does not contact water
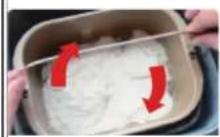
- Put in the bread barrel and turn it clockwise to lock it tight in the bread maker
-
After power on, the LCD will display "Menu 1 Time 3:11". Please press the menu button and observe the LCD display. Select the menu you want among 1-19.
-
After selecting the menu, select the baking color according to your need by pressing COLOUR; if you do not select, the default is the medium color.
- Select the weight based on your recipe by pressing LOAF; if you do not select, the default is 750g
- If you need to reserve, press + - to adjust your reserved time (if you do not need to reserve, you may skip the step and just press the start button). For example, if you prepare the ingredients at 8:30pm and need to reserve the completion at 7:30am in the next morning, namely, a gap of 11 hours, you just need to set the time to 11:00 on the LCD.
Note: When using the reservation, you are advised not to use any perishable ingredient, such as eggs, fresh milk, etc.
- Press STARTS and the bread maker will start working and the LCD displayed time will start to count down.
- When the time runs to "0:00", the buzzer will ring 8 times and the device will automatically enter the heat preservation procedure.
When the 1-hour heat preservation finishes, the buzzer will ring 3 times. If there is no need to preserve the heat, just press and you will hear the buzzer ringing 1 time. The device will then stop working and return to the original menu mode. - Open the upper lid and take out the bread barrel wearing the oven gloves. Slightly shake it and pour out the bread or cake. Then take the mixing blade out with the hook.
Note: For making bread with fruits or nuts, please place them in the in-built fruit box in advance. The program will automatically spread into the dough for mixing. The function only applies to Menu "1-9.16".
8. INTRODUCTION TOSPECIAL FUNCTIONS
-
Reservation
-
This function means that the food ingredients are mixed in advance, the function parameters are set and the bread-making is completed at a set reserved time. The maximum set time is 15 hours with 10 minutes for each level of adjustment. The function applies to 1-9.11-12.16-17.
-
The function may apply to the following scenario: Mix the ingredients in the evening and complete the making in the next morning; practical example: Mix the ingredients at 8:30pm and reserve the making at 7:30am in the next morning (i.e. a duration of 11 hours). Just set 11:00 under time settings on the LCD.
-
Buzzer reminder
-
Press any button and the buzzer will ring once. It will ring once upon each press;
- During the bread-making, the buzzer will make 3 prompts to remind you to add fruits when you knead the dough (this function only applies to 1-9.16 menu mode).
- The buzzer will ring continuously to remind you of the completion when the work is done; it will ring 3 times continuously to remind you of the end of heat preservation when it is done.
-
The buzzer will ring 4 times continuously to remind you of the failure when the heat preservation or the product does not work properly.
-
Heat preservation
- After the baking, the buzzer will ring 8 times continuously and the product will automatically enter the heat preservation mode to preserve the bread temperature for 1 hour. The LCD
will display "0:00" until after the 1 hour when the buzzer rings 3 times continuously and the preservation ends.
-
Power-off memory
-
If the power supply is accidentally cut off, the product needs to be shifted to another place or a short blackout occurs during the bread-making and the duration does not exceed 10-15 minutes, the bread maker will still return to the original working status upon the resupply of power; there is no need to press any button; if the duration exceeds 10-15 minutes, the bread maker will return to the starting status upon the resupply of power and the memory will not be saved.
- Temperature protection
- The production of yeast or lactic acid bacteria requires an appropriate temperature. Over high or low temperature will affect the production and thus, the device is equipped with a high and low temperature protection procedure to ensure successful bread-making.
- When over high temperature is detected, the device will automatically give an alarm with the display of "HHH" and the buzzer ringing 4 times continuously. The bread maker will automatically stop working. Just press the "Start/Pause/Stop" buttonto exit the alarm and reselect when the temperature lowers.
- When over low temperature is detected, the device will automatically give an alarm with the display of "LLL" and the buzzer ringing 4 times continuously. The bread maker will automatically stop working. Just press the "Start/Pause/Stop" button to exit the alarm and use the "Stir fry" function to bake for 1-3 minutes before reselecting. When abnormal heating or non-heating is detected,
the bread maker will automatically give an alarm with the display of "E03" and the buzzer ringing 4 times continuously.
- If the bread maker still does not work properly, then it is probably faulted - please contact the AICOK customer service.
- Fault alarm
- The bread maker is equipped with the automatic judgment function of machines, such as open circuit or short circuit of the temperature sensor, etc.
- When there is an open circuit of the temperature sensor, the device will automatically give an alarm with the display of "E00" and the buzzer ringing 4 times continuously;
- When there is a short circuit of the temperature sensor, the device will automatically give an alarm with the display of "E01" and the buzzer ringing 4 times continuously;
- If it occurs, it means a sensor fault - please contact the AICOK customer service.
9. MAINTENANCE AND SERVICING
- Before cleaning each time, unplug the power cord and let the bread maker cool down thoroughly.
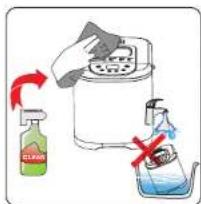
- Use soft wet cloth to clean the device surface with neutral cleansing fluid and then wipe it dry with dry cloth. Do not clean it by soaking it in water to prevent electric shock or dysfunction.
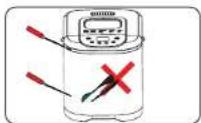
- Prevent the device shell from being impacted or scratched by any sharp object.
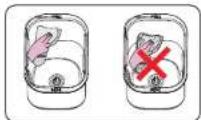
- Bread barrel: Please use soft wet cloth to clean it. Do not use any hard tool (such as steel wool) to clean it to prevent any scratch to its surface.
-
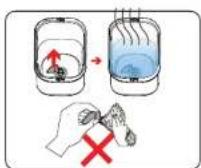
Mixing blade: If it is difficult to pull out the mixing blade, you may pour hot water into the bread barrel to soak it before cleaning. Do not use any abrasive cleaning item to clean it to prevent any damage to the non-stick coating. All the parts should be wiped clean and installed to the right position. After the cleaning, wait until the product has dried and store it in a cool and dry place.
-
TROUBLESHOOTING AND SOLUTIONS
| No. | Problem | Cause analysis | Solution |
| 1 | The bread maker does not stir the flour or work | Whether the power is on | Press "Start" so it starts |
| Whether it is under the delay mode | If the "..." on the display flashes, it means countdown to work | ||
| Component damage | Have it repaired at the servicing department | ||
| 2 | Noise | Whether there is any hard item in the bread barrel | Remove any item before starting the device |
| Whether the bread barrel is fit in the right place | Reinstall the bread barrel to the right place | ||
| 3 | Odor | Whether the power cord is damaged | Prevent the power cord from contacting any heating object |
| Whether there is any item falling on the heat tube | Remove any item on the heat tube | ||
| 4 | "LLL" on LCD display | The internal temperature is below -10°C | Move it to an environment of -10°C -40°C |
| 5 | "HHH" on LCD display | The internal temperature is higher than 50°C | Cool it with a fan or naturally to the room temperature |
| 6 | "E00" or "E01" on LCD display | The temperature sensor does not work properly and cannot start the making process. | Pull out the plug and contact the AICOK customer service. |
| 7 | Unevenly cooked bread | The bread is half cooked | Too little water or the water temperature is over high |
| Incorrect proportion of ingredients | Please mix the ingredients reasonably by referring to the recommended "recipe" | ||
| 8 | A layer of whiteness on bread top | The bread is over fermented and it is not easy to bake its top. There is a window on the top of the bread maker and thus the baking color will be slightly light. | Make sure the bread is not over fermented. If it is not completely white and the bread is cooked, it is a normal phenomenon. |
| 9 | Difficult to take out bread | The mixing blade sticks too tight to the axis in the bread barrel. | Use a soft tool such as chopsticks to take it out. Make sure the mixing blade axis hole is fully cleaned in the next making. |
| Bread barrel deformation. | Have it repaired at an authorized servicing branch. | ||
| 10 | Over fermentation of bread or sour taste of bread | Too many ingredients. | Mix the ingredients according to the recipe. |
| High room temperature summer, causing over fermentation. | Control the water temperature or moderately reduce the amount of yeast in summer. | ||
| Too much water. | Use an appropriate amount of water according to the recipe. | ||
| Too muchyeast. | Use an appropriate amount of yeast according to the recipe. |
Note:
The above table lists the diagnosis and troubleshooting for common problems. In the case of any other problem, please contact the customer service of the Company or have the product repaired at a servicing branch authorized by the Company. Do not disassemble or repair the product without authorization.
1. CARACTERISTIQUES DU PRODUIT
Haute technologie
4. STRUCTURE DU PRODUCT ET


- If you need to add any egg, reduce the water or milk by the amount equivalent to the egg
