
EKM800 - Coffee machine ETNA - Free user manual and instructions
Find the device manual for free EKM800 ETNA in PDF.

| Product type | Fully automatic coffee machine |
| Brand | ETNA |
| Model | EKM800 |
| Power supply | 220-240 V ~ 50/60 Hz |
| Power | 1450 W (estimated) |
| Water tank capacity | 1.8 L (estimated) |
| Bean container capacity | 250 g (estimated) |
| Pump pressure | 15 bar (estimated) |
| Usable coffee types | Roasted coffee beans, ground coffee |
| Preparation functions | Normal coffee, strong coffee, extra strong coffee, 1 or 2 cups, ground coffee, steam for milk, hot water |
| Grind fineness adjustment | Yes, continuous (rotary knob) |
| Water quantity adjustment | Yes, continuous rotary selector |
| Removable water tank | Yes |
| Drip tray and coffee grounds container | Removable, with level indicator (float) |
| Auto shut-off | Yes, adjustable to 3 levels (1 h, 2 h or 5 h) |
| Indicator lights | Operation, water level, strong coffee, ground coffee, rinsing, cleaning, descaling, empty grounds |
| Cleaning program | Yes (duration approx. 15 min) |
| Descaling program | Yes (duration approx. 60 min) |
| Pre-wetting system | Yes, for better aroma |
| Swivel steam wand | Yes (pivoting tube) |
| Height-adjustable spout | Yes |
| Adjustable water hardness | 5 levels (0 to 4) |
| Main spare parts | Water tank, drip tray, grid, grounds drawer, collection container, steam tube, metal filter |
Frequently Asked Questions - EKM800 ETNA
User questions about EKM800 ETNA
0 question about this device. Answer the ones you know or ask your own.
Ask a new question about this device
Download the instructions for your Coffee machine in PDF format for free! Find your manual EKM800 - ETNA and take your electronic device back in hand. On this page are published all the documents necessary for the use of your device. EKM800 by ETNA.
USER MANUAL EKM800 ETNA
11.1 WAT MOET IK DOEN WANNEER...
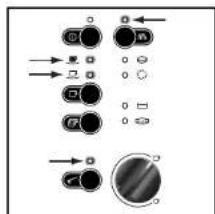
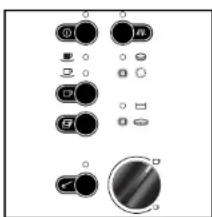
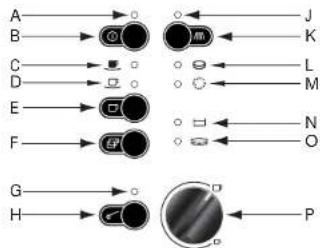
A. Power Indicator
B. On/off button
C. Indicator for 1 cup of strong coffee
D. Indicator for 1 cup of normal coffee
E. Button for 1 cup of coffee
F. Button for 2 cups of coffee
G. Indicator for ground coffee
H. Button for ground coffee
J. Indicator for "flushing"
K. Button for flushing
L. Indicator for "cleaning"
M. Indicator for "descaling"
N. Indicator for "water tank empty"
O. Indicator for emptying or refitting the drip catcher and spent coffee container
P♂elector dial for amount of water per cup
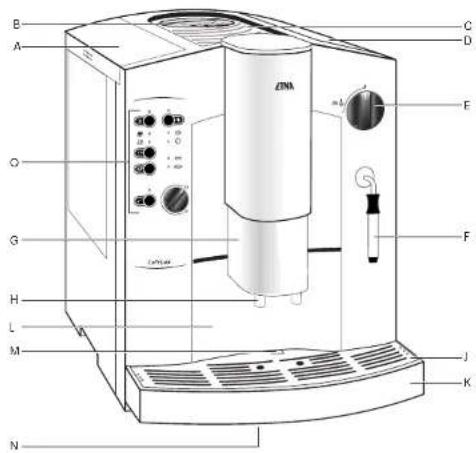
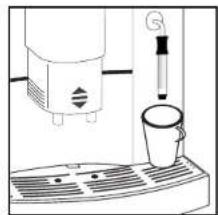
DESCRIPTION
A. Fresh water tank, lid
B. Filler opening for ground coffee with lid
C. Cup rack
D. Bean container with lid (inside: grinding texture adjustment)
E. Selector dial for steam and hot water
F.Swivelling nozzle for steam and hot water
G. Height adjustable outlet
H. Spouts
J. Drip tray
K. Drip catcher
L. Spent coffee drawer wit spent coffee container
M. Float
N. Rating plate (on the underside of the appliance)
O. Control panel
P.Measuring spoon
Please read these operating instructions through carefully. Above all, observe the safety instructions! Please keep these operating instructions for later reference, and pass them on to any subsequent owners of the appliance.
The form and function of your ETNA coffee machine guarantee you
-- straightforward operation and
excellent, individual taste
-- with the easiest of maintenance and care.
The excellent, individual taste is achieved by:
-- the pre-brewing system: prior to the actual brewing process, the ground coffee is moistened to extract its full aroma.
-- the individually adjustable quantity of water per cup that can be varied between a small.
espresso and a large "frothy" coffee,
-- the grinding texture that can be adjusted to suit the roasting of the beans.
-- the facility to choose between normal or strong coffee,
-- and last but not least, through the guaranteed crema, that small crown of froth that makes an espresso incomparable for connoisseurs.
The time that the water is in contact with the ground coffee is considerably shorter for espressos than for conventional filter coffee. As a result, less bitterness is released from the coffee, it is this that makes espresso coffee so much pleasanter!
1 SAFETY INSTRUCTIONS 4
2 BEFORE USING FOR THE FIRST TIME 6
3 PRIOR TO MAKING COFFEE 8
4 MAKING COFFEE 10
5 FROTHING MILK 12
6 PREPARING HOT WATER 13
7 SWITCHING OFF THE APPLIANCE 14
8 EMPTYING COFFEE MACHINE 15
9 MAINTENANCE 16
10 DESCALING THE APPLIANCE 19
11 WHAT TO DO IF ... 21
12 ENVIRONMENTAL ASPECTS / CUSTOMER SERVICE CENTRE 23
13 FOR USERS IN A HURRY 24
1.1 SAFETY INSTRUCTIONS
The appliance may only be connected to a mains supply on which the voltage, type of supply and frequency match the information given on the rating plate (see underside of the appliance!)
Be careful if there are children nearby. Never allow children to operate the appliance unsupervised.
Never bring the mains lead into contact with the hot parts of the appliance. Never pull the plug from the socket by means of the mains lead!
Do not use the appliance if
-- the mains lead is damaged, or
-- the housing shows visible signs of damage.
The coffe spout and the swvelling nozzle become hot during use. Keep children at a distance!
Only fill the water tank with cold water. Do not use hot water, milk or other liquids.
Do not place frozen or caramelised coffee beans in the bean container. Only use roasted coffee beans! Remove any foreign bodies from the coffee beans. Otherwise the guarantee will be void.
Only put ground coffee in the ground coffee filler opening.
NB: The fineness of the grinding varies per brand of coffee. Coffee which is too finely ground may damage the mechanism of the appliance.
Observe the cleaning and descending instructions.
Prior to maintaining or cleaning, switch off the appliance and unplug it from the mains!
Never immerse the appliance in water.
Do not allow any liquid to enter the housing via the ventilation holes on the cup rack.
Do not wash the parts of the appliance in a dishwasher.
Do not leave the appliance switched on longer than necessary.
Do not expose the appliance to the weather.
Never open the casing and change the mechanical and/or electrical set-up of the appliance. Never repair the appliance yourself. This may result in dangerous situations (touching live components) and faults arising.
Repairs may only be carried out by a qualified service engineer.
In the case that repair becomes necessary, including the replacement of the mains lead, please contact
-- the dealer from whom you purchased the appliance, or
-- the customer service.
In no circumstance should the appliance be sent by post - there is a risk of transport damage that cannot be covered under the guarantee!
The guarantee does not cover the use of the appliance for purposes other than those for which it was designed, nor does it cover damage caused by insufficient maintenance.
This appliance complies with current CE guidelines.
2.1 SETTING UP THE APPLIANCE
Install the appliance level, in a dry, well ventilated room, and on a firm foundation.
Important: If the appliance is placed in a warm room after being brought in from the cold - wait approx. 2 hours before switching on the appliance!
2.2 CABLE COMPARTMENT
Your appliance has a cable compartment on the rear. If the mains lead is too long, you can push the cable that is not needed into the cable compartment.
2.3 ADJUSTING THE WATER HARDNESS
Your appliance can be adjusted to the hardness of the water used.
The correct adjustment of the water hardness is necessary for the correct function of the automatic scaling indicator (see also section 9).
Use the Aquadur® test strips supplied to determine the hardness of the local water. Follow the instructions given on the test strip packaging. Or: Ask your water board about the hardness of your water! The appliance has 5 hardness settings. The appliance is set to the middle setting, 3, in the factory (corresponds to 16-23 degrees German hardness [dH]).
You can change this setting as follows:
-- Plug the appliance into the mains.
-- Do not switch on the appliance.
Press the button for approx. 3 seconds. The on/off indicator light is on all the time. The indicator flashes.
Pressing the button again changes the water hardness setting by one step to 4, 0, 1, 2, 3, and so on.
-- To store the water hardness setting and to end the procedure, press the on/off button.
This also completes the set-up procedure. All indicators go out.
If a button is not pressed for more than 30 sec., the procedure is automatically ended without changing the value saved previously.
The Individual water hardness settings (degrees German hardness, ^ dH ) are indicated as follows:
for setting 1 (1-7 °dH):
for setting 2 (8-15 °dH): #d;
for setting 3{16-23dH}
for setting 4 (24-30 °dH): , and
Position 0: Only the indicator flashes.
The water hardness setting is only to be adjusted prior to using the appliance for the first time, or if the quality of the water used changes.
2.4 ADJUSTING THE SAFETY CUT-OUT
If the appliance is not used for an extended period of time, it switches itself off for safety reasons and to save energy. The appliance has 3 timer settings; after the expiry of the time set, the appliance switches off automatically. The middle setting 2 (switch off after 2 hours) is set in the factory.
You can change this setting as follows:
-- Plug the appliance into the mains.
-- Do not switch on the appliance.
Press the button for approx. 3 seconds. The on/off indicator light is on all the time. The indicator flashes.
-- Pressing the button again adjusts the timer setting by one step to 3, 1, 2 and so on.
-- To save the safety cut-out setting and end the procedure, press the on/off button. This also completes the set-up procedure. All indicators go out.
If a button is not pressed for more than 30 sec., the procedure is automatically ended without changing the value saved previously.
The individual timer settings are indicated as follows:
for setting 2 (switch off after 2 hours): and
for setting 3 (switch off after 5 hours): and
for setting 1: Only the Indicator flashes.
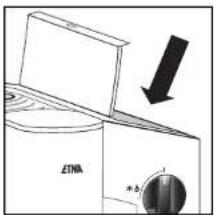
3.1 FILLING THE WATER TANK
Open the left lid. Remove the water tank by the handle. Please only use cold, clear water and do not fill beyond the MAX mark.
Then refill the water tank in the appliance and press it down until it engages so the valve on the base is opened.
For aromatic coffee, you should:
-- change the water in the tank daily;
not use mineral or distilled water and
clean the water tank at least once a week in normal washing up water (not in a dishwasher). Then rinse with clean water.
When the indicator illuminates, your appliance is signalling to you that the water tank must be refilled.
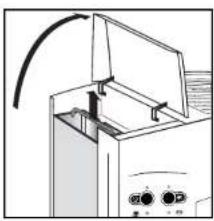
3.2 FILLING THE BEAN CONTAINER
Open the right lid. Fill the bean container with roasted coffee beans (do not use frozen beans). Ensure that no foreign bodies enter the bean container. Close the lid.
Tip: You can use both espresso and filter coffee beans! Try out different sorts of beans to find the ones that taste the best to you!
3.3 ADJUSTING THE GRINDING TEXTURE
To release the full aroma from the beans, you can adjust the grinding texture to suit the roasting of the beans. The grinding texture adjustment is on the rear right inside the bean container.
Important: the grinding texture is only to be adjusted when the grinder is in operation.
Starting from the factory medium setting, turn the adjustment knob clockwise for darker
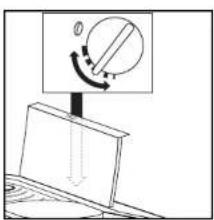
beans (coarser grinding texture), anticlockwise for lighter beans (liner grinding texture).
Tip: try different grinding textures to find the one that suits your taste the best!
3.4 SWITCHING ON THE APPLIANCE
Press the on/off button for approx. 1 second.
The appliance is now switched on. The red power indicator illuminates.
Only when using the appliance for the first time: Toshow that the system must be filled the green, and indicators flash.
-- Place an empty cup under the swivelling nozzle.
-- Turn the selector dial anticlockwise to the stop. Steam runs out of the swivelling nozzle. One indicator light flashes.
-- Press the button once.
The outflow stops automatically (do not interrupt the outflow itself).
Once the flow of water has stopped, turn the selector dial clockwise to the 0-position.
Please repeat this process until the green flashing indicators go out. This process is necessary to fill the system with water.
3.5 FLUSHING THE APPLIANCE
When the operating temperature is reached, the green indicator illuminates.
Place an empty cup under the spouts and press the button. The flushing process stops automatically. The indicator then illuminates. The appliance is now ready for brewing coffee.
Note: the water left in the appliance is removed from the system by the flushing action so that coffee is made with fresh water.
4.1 MAKING COFFEE
Although you are brewing espresso coffee with your coffee machine, the term coffee is used in the following for clarity.
The following process starts completely automatically after the air button is pressed: grinding, portioning, pressing, pre-brewing, brewing and ejection of the used ground coffee.
You can interrupt this process at any time by pressing the or button!
Store your cups upside down on the cup rack. Steam escapes through the openings in the cup rack. This warms the cups.
The outlet can be adjusted in height and can thus be adjusted to suit different sizes of cup.
To adjust the height, use the thumb and index finger to grip the ribbing on the side of the outlet and move it up or down.
Be careful! The outlet may be hot. There is a risk of burns.
4.2 ADJUSTING THE AMOUNT OF WATER
Using the selector dial, adjust the amount of water per cup. Depending on your taste, select a "small" espresso (turn selector dial anticlockwise) or a large "frothy" coffee (turn selector dial clockwise).
You can also change the amount of water during the brewing process. To adjust the required quantity during the brewing process: turn the selector dial slowly anticlockwise from the maximum setting, until coffee ceases to run out at the required quantity. When two cups of coffee are drawn, the amount of water is more or less doubled.
While the appliance is heating up, the indicator flashes.
4.3 ONE CUP OF NORMAL COFFEE FROM BEANS
The appliance is ready for use when the indicator illuminates.
Place an empty cup centrally under the spouts. By briefly pressing the button, you will obtain one cup of normal coffee. flashes.
4.4 ONE CUP OF STRONG COFFEE FROM BEANS
The appliance is ready for use when the indicator illuminates.
Place an empty cup centrally under the spouts. Now press the button until the
indicator illuminates and the indicator flashes. You will then obtain one cup of strong coffee.
4.5 ONE CUP OF EXTRA STRONG COFFEE FROM BEANS
The appliance is ready for use when the indicator illuminates.
Place an empty cup centrally under the spouts. Now press the button until the and
indicators flash. You will then obtain one cup of extra strong coffee.
4.6 TWO CUPS OF NORMAL COFFEE FROM BEANS
The appliance is ready for use when the indicator illuminates. Place a cup under each of the spouts.
The correct position for the cups is given by the two holes in the drip tray as these are directly below the spouts.
By pressing the button once, you will obtain two cups of normal coffee.
The indicator flashes.
4.7 ONE OR TWO CUPS OF COFFEE FROM GROUND COFFEE
Using this function you can, e.g., brew decaffeinated coffee.
The appliance is ready for use when the indicator illuminates.
-- Place one or two cups under the spouts.
-- Press the button until the indicator illuminates.
- Open the lid of the opening for ground coffee. Using a measuring spoon, put the desired quantity of ground coffee into the opening.
-- Close the lid.
Add a maximum of 2 portions of ground coffee. The filler opening for ground coffee is not a storage container. Do not add anything other than ground coffee!
Now press the button for one cup or the button for two cups.
You will obtain one or two cups of coffee.
5.1 FROTHING MILK
Hot steam can be used both for frothing milk for cappuccino and for heating liquids.
For one cup of cappuccino: fill a large cup up to 2/3 full with espresso and then add the frothed milk.
Frothing milk: Slide the moving tube on the swivelling nozzle all the way down.
Warming liquids: Slide the moving tube up.
-- Switch on the appliance using the on/off button and flush if necessary. The appliance is ready for use when the indicator illuminates.
-- Immense the swelling nozzle in the container with the milk to be frothed or the liquid to be heated and start the production of steam by turning the selection dial anticlockwise to the stop.
Due to the nature of the system, a little water runs out of the swivelling nozzle first. This can be run off first, however it will not affect the quality of the result, e.g., on frothing milk. The indicator flashes.
Important: Only immerse the swivelling nozzle around half way into the liquid so that air can be drawn in unhindered. The swivelling nozzle should not touch the base of the container to avoid the hindrance of the outlet of steam.
Important: The swivelling nozzle becomes very hot. Be careful you don't burn yourself.
-- You can stop the outlet of steam by turning the selector dial clockwise to the 0-position. In particular after frothing milk, it is recommended to briefly activate the outlet of steam to "blow out the swelling nozzle". Then clean the milk residues from the swelling nozzle using a damp cloth. Move the moving metal tube up and down during this process.
After steam has been drawn off, all 4 green indicators flash to indicate that the system must be refilled with water. Proceed as follows:
- Place a container under the swivelling nozzle.
- Turn the selector dial anticlockwise to the stop.
- Press the Button. Wait until the flow of water stops automatically. All 4 g r e e n indicators then flash.
- Turn the selector dial anticlockwise back to the 0-position. The appliance is now ready for use again.
6.1 PREPARED HOT WATER
You can use the hot water function for prewarming cups, for preparing instant beverages or tea.
Slide the moving tube on the swivelling nozzle at the way up.
Important: The swivelling nozzle becomes very hot. Be careful you don't burn yourself.
-- Switch on the appliance using the on/off button and flush if necessary. The appliance is ready for use when the indicator illuminates.
-- Hold a container under the swivelling nozzle and initiate the preparation of hot water by turning the selector dial anticlockwise to the stop and press the button.
-- You can stop the flow of hot water by turning the selector dial clockwise back to the 0-position.
7.1 SWITCHING OFF THE APPLIANCE
By pressing the on/off button you can switch off the appliance.
8.1 EMPTYING APPLIANCE

Carry out the following operations on a daily basis:
-- Remove the water tank and pour away the remaining water. Use fresh water each day.
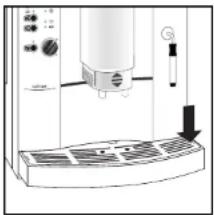
At the end of the day, however at the latest when the red float at the rear of the drip tray becomes visible, you should empty the drip catcher and the spent coffee container. Leave the appliance switched on when performing these tasks.
- Slide the outlet as far upwards as possible (see section 3).
- Lift the drip catcher slightly and remove it carefully from the appliance to the front.
-- Remove the spent coffee container and empty it.
-- Remove the drip tray by pressing on the left or right hand side. Pour away the water left in the drip catcher.
Then clean the drip catcher, drip tray, as well as the spent coffee drawer and spent coffee container.
9.1 EXTERIOR
Water tank: Clean at least once a week in normal washing up water, not in a dishwasher. Then rinse with clean water.
Drip tray, drip catcher and spent coffee drawer: Clean after use in normal washing up water. Not in a dishwasher.
Spent coffee container: This part is dishwasher-safe.
Swivelling nozzle: Wipe with a damp cloth after use.
Unscrew with a coin if blocked. Remove the lower part of the nozzle and clear the frothing duct with a needle.
On reassembly, ensure that the nozzle is correctly seated.
Outlet and spouts: Clean with a damp cloth as required.
Filler opening for ground coffee: Clean with a damp cloth as required. Dry with kitchen paper or a dry cloth.
Housing: Clean with a damp cloth as required, also the inner parts of the housing that only become accessible when the drip catcher is removed.
Bean container: Clean with a dry cloth from time to time.
Metal strainer: If you use dark, greasy coffee beans, the metal strainer in the appliance may become saturated with greasy substance (oil). In due course this may lead to blockages, thus preventing passage of the water. In that case little or no coffee will flow into the cup and the four green indicators will flash.
Switch the appliance off and remove the plug from the wall socket. Allow the appliance to cool for a few minutes. This is necessary as the metal strainer may still be hot. Remove the drip tray (including the drip grille and spent coffee drawer). Then reach with your hand into the drip tray opening until you feel a moveable flap. A little higher behind this flap you will feel a round metal plate with a screw in the middle. Clean the grease and remaining coffee powder carefully from the disc with your fingers or a paper tissue. Make sure that no paper is left behind on the disc.

If necessary, adjust the milling texture to slightly coarser, so that less oil is released (see 3.3). Install the drip tray (including drip grille and spent coffee drawer) and switch the appliance back on.
Draw off 1 or 2 cups in order to rinse the appliance. Never start a rinsing cycle immediately after setting coffee. This spreads the oil into the small openings of the metal filter.
Don't wait for a breakdown to occur. Clean the strainer once a week or depending on the intensity of use.
9.2 INTERNAL CLEANING USING THE CLEANING PROGRAM
Important: Only use original ETNA cleaning tablets.
You can order strips of 10 cleaning tablets from the service department or your supplier (ETNA- article no.: 89011473).
Your appliance has a cleaning program for the regular cleaning of the components inside the appliance (duration approx. 15 min.). It is not necessary to remove the brewing unit for cleaning on this appliance.
When the indicator illuminates, you should run the cleaning program. Cleaning can also be carried out before the indicator illuminates. You can continue to use your appliance and run the cleaning program later. However, in this way you will endanger your rights to make a claim under the guarantee, as the unit (and thus also customer service) will detect overdue cleaning!
-- Switch the appliance on using the on/off button ①
-- Press the button. for approx. 3 seconds until the following indicators illuminate: , ← and ⋅
-- Fill the water tank to the MAX mark, empty the spent coffee container and drip catcher, and refit them.
The and indicators go out.
-- Place one cleaning tablet in the filler opening for ground coffee.
-- Now press the button, the indicator goes out. The indicator flashes to show that the cleaning program has started.
The cleaning program can also be started by pressing the key for 1 cup of coffee, the key for 2 cups of coffee or the rinsing button
Water is now pumped through the system at short intervals to release, with the aid of the cleaning tablet, residues of coffee inside the machine.
-- If during the cleaning program the indicator illuminates, empty the drip catcher and the spent coffee container, refill them and press the button.
The cleaning program is then continued.
This action may need to be repeated up to four times.
-- The cleaning program is at an end when the indicator illuminates. Flush the appliance by pressing the button.
-- Then empty the spent coffee container and the drip catcher and refit them. The appliance is ready for use again when the indicator illuminates.
If the drip tray plus bean container no longer fits after the cleaning process, you should remove the bean container from the drip tray and replace only the drip tray in the appliance. The spatula, with which the compressed spent coffee tablets are broken, will then return to the correct position. Next remove the drip tray again. Replace the bean container on the drip tray and place the assembly (drip tray + bean container) back in the appliance.
If the action described above does not help, switch the appliance off using the on/off switch ①Wait a while and then switch the appliance back on. The settings will be reset and you can replace the drip tray plus bean container in the appliance.
10.1 DESCALING THE APPLIANCE
Your appliance has a descending program for the regular descending of the appliance (duration approx. 60 min.). If the indicator illuminates, you should run the descending program as described below.
Descending can also be performed before the indicator illuminates by leaving the appliance to cool down for 2 hours and pressing the button for approx. 3 seconds with the appliance switched off. You can also continue to use your appliance and run the descending program later. However, you will endanger your rights to make a claim under the guarantee, as the appliance (and thus also customer service) will detect overdue descending!
Important: Only use liquid (not powdered), environmentally friendly descaler. Only use descaler exactly as per the manufacturer's instructions (ETNA no. 89011474). Do not use any concentrated formic acid-based descaler.
-- Switch the appliance off using the on/off button ① and leave it to cool down for at least 2 hours.
-- Fill the water tank with approx. 600 ml of water, only then add 300 ml of liquid descaler (never the other way round).
Press the button for approx. 3 seconds until the following indicators illuminate: and
-- Empty the spent coffee container and the drip catcher and refill them. The indicator goes out. All 4 green indicators flash, the #indicator illuminates.
-- Place a sufficiently large container under the swivelling nozzle.
-- Start the descending program by turning the selector dial anticlockwise to the stop. The Indicator flashes.
The liquid descaler is now pumped through the interior of the appliance to the swivelling nozzle at short intervals.
-- If during the cleaning program the indicator lights up, empty the drip catcher and then replace it. All 4 green indicators flash, the indicator illuminates.
-- Turn the selector dial clockwise back to the 0-position.
You continue with the descending program. The liquid descaler is pumped through the interior of the appliance into the drip catcher at short intervals.
After a period of time the indicator flashes while the , and indicatorsilluminate.
-- Fill the water tank with fresh water and replace it in the appliance.
-- Empty the drip tray and replace it. The four green indicators will flash. The indicator lights up.
- Place a sufficiently large container under the swivelling nozzle and turn the selector dial anticlockwise to the stop. The indicators and will light up.
The descending program will continue. Clean water is pumped at short intervals through the interior of the appliance to the swelling nozzle.
After some time the indicator will flash again. At the same time the indicators and will light up.
-- Empty the drip tray and replace it
The four green indicators will flash; indicator will light up.
Turn the selector dial, clockwise, back to the 0-position.
The descending program will continue. The clean water will be pumped at brief intervals through the interior of the appliance into the drip tray.
After some time the indicator will flash again. At the same time the indicators and will light up.
-- Empty the drip tray and replace it
--Rinse the appliance: press button
-- Rinse the water tank and replace it.
When the indicator rights up the appliance is ready for use again.
If the drip tray plus bean container no longer fits after the cleaning process, you should remove the bean container from the drip tray and replace only the drip tray in the appliance. The spatula, with which the compressed spent coffee tablets are broken, will then return to the correct position.
Next remove the drip tray again. Replace the bean container on the drip tray and place the assembly (drip tray + bean container) back in the appliance.
If the action described above does not help, switch the appliance off using the on/off switch ① Walt a while and then switch the appliance back on. The settings will be reset and you can replace the drip tray plus bean container in the appliance.
11.1 WHAT TO DO IF...
No coffee runs out of the spouts.
- Check that the water tank is correctly seated.
-- Fill the water tank.
-- Check the correct seating of the drip catcher.
- Coffee only drips out of the spouts.
-- Set the grinding texture to a coarser setting. - The coffee is distributed unevenly between two cups.
Clean the outlet spouts. -
Too little froth is produced on the milk during frothing.
Always use cool, fresh (low fat) milk.
-- Use a suitable container (e.g. jug).
-- Also cool the container if necessary.
-- Dismantle the swivelling nozzle and clean. -
Low temperature.
-- The first cup of coffee from a fully automatic coffee machine always has a somewhat lower temperature than the next one. We advise you to flush the appliance through once before setting the first cup of coffee. Always pre-warm the cups. If the appliance is not equipped with a hot tray, you can best rinse the cups with hot water before use. Coffee from an espresso machine is normally drunk almost immediately after being made. Additions such as sugar, evaporated milk or cream have a negative effect on the coffee temperature. This also applies to the milk that is added to a cappuccino.
Coffee brewing is interrupted after grinding.
- Fill the bean container as the brewing unit has detected that too few beans have been ground, as a result the cycle has been interrupted.
All green indicators are flashing simultaneously.
See section 5.1, last paragraph on page 12.
See section 3.4 (only when using the appliance for the first time).
-- Switch off the appliance. Wait 1/2 hour. Switch on the appliance, see section 3.4 (only when using the appliance for the first time).
The spent coffee container is stuck in the appliance.
-- Pull out the drip catcher together with the spent coffee drawer. Carefully remove the spent coffee container from the appliance. Refit the drip catcher with the spent coffee drawer, but without the spent coffee container and wait until the process is complete and the indicator illuminates. Then insert the drip catcher with the spent coffee container and spent coffee drawer. Switch the appliance off, wait briefly and switch the appliance back on. This resets the appliance.
- Indicators flash alternately.
-- Appliance is too cold. Switch off and wait approx. 1 hour before switching on the appliance again.
The coffee is too weak.
See the tips at sections 3.2 and 3.3.
The 4 green and the 4 red indicators are flashing alternately.
-- Switch off the appliance, unplug from the mains, plug into the mains again, and switch on the appliance again. If this malfunction is no longer indicated, the appliance is again ready for use.
-- If the malfunction is still present, please call customer service.
* The grinder is making loud noises.
-- Check the grinder for foreign bodies. If necessary, have the appliance checked by customer service.
The coffee grinder works, but no water flows through the appliance.
-- Switch off the appliance. Disconnect the plug from the wall socket. Wait 30 minutes. Insert the plug in the wall socket again. Switch the appliance on again.
-
The appliance is to be transported.
-
Keep the original packaging to provide protection during transport.
-- Protect the appliance from knocks.
-- In the case a risk of frost, drain the heater system by drawing off steam prior to transport:
-- Switch off the appliance.
-- Place a container under the swivelling nozzle.
-- Turn the selector dial anticlockwise to the stop.
-- Switch on the appliance. All 4 indicators flash.
-- Press the button until only the indicator is still flashing. Steam comes out after a short delay.
-- Wait until the steam stops automatically.
-- Turn the selector dial clockwise back to the 0-position.
-- Switch off the appliance.
-- Empty the bean container, water tank and drip catcher.
12.1 ENVIRONMENTAL ASPECTS
Do not simply throw packaging material away.
-- Please keep the box and the foam packaging! They can be reused in the case of the
need for service to protect the appliance during transport.
-- Deposit plastic bags made of polythene (PE) at a collection point for recycling.
Please inquire with your local authority about your local recycling centre.
Used coffee is ideally suited to composting.
12.2 IN THE CASE OF NEED FOR SERVICE
If repairs to the appliance become necessary, including the replacement of the mains lead, please contact the ETNA customer service centre.
Under no circumstances should you send the appliance by post - risk of transport damage that cannot be covered by the guarantee!
It is imperative that the original packing including foam parts is retained.
The guarantee is for 1 year from the date of purchase. The guarantee is restricted to 6 months if the appliance is used commercially. Commercial usage is deemed to be more than 3000 brewing cycles per year.
Depending on intensity of use, we advise you to submit the appliance to customer service for additional inspection after approximately 1^1 / 2 years. A charge is made for this inspection. Please contact the ETNA customer service centre on this issue.
It occasionally occurs that the appliance will not make coffee. People often then think that the appliance is defective. However, this is not the case.
Before making coffee you may have accidentally turned the knob on the swivelling nozzle. Once that button has been set to produce steam for approximately 5 seconds, the appliance builds up pressure. In that case no coffee can be made. To allow coffee to be made you have to release this pressure as follows:
- Open the steam / hot water selector dial (the large dial above the swivelling nozzle).
-- Press button
-- Wait until the appliance is no longer blowing out steam.
-- Close the steam / hot water selector dial.
The appliance is now ready for use.
Only call customer service if the above instructions do not work.
13.1 BRING INTO OPERATION
- Fill the water reservoir (under the left lid).
- Insert the plug in the wall socket again. Switch the appliance on using the on/off button. The green, and indicator flash.
- Place an empty coffee cup under the swivelling nozzle (front right).
- Turn the selector dial (above the swivelling nozzle), anticlockwise to the ready position. If steam comes out of the swivelling nozzle, press the button once. Hot water flows out of the steam pipe. The dispensing of water stops automatically (do not interrupt the outflow itself).
- Once the flow of water has stopped, turn the selector dial clockwise to the 0-position.
- Repeat actions 4 and 5 until the green Indicators , and stop flashing.
- Press button /Water flows out of the spouts into the drip catcher. The outflow of water stops automatically.
- The indicator comes on. The appliance is ready for use.
13.2 PREPARED COFFEE
- Pour coffee beans in the bean container (under the lid on the right).
- Place one or two empty cups under the spouts.
- Set the desired quantity of water by turning the selector dial on the left (anticlockwise for less water; clockwise for more water).
- Press, as desired, the button or button.
Do you wish to stop the dispensing of water? Press the button or button again.
PANNEAU DE COMMANDE

- WAT MOET IK DOEN WANNEER...
- DESCRIPTION
- SAFETY INSTRUCTIONS
- SETTING UP THE APPLIANCE
- CABLE COMPARTMENT
- ADJUSTING THE WATER HARDNESS
- ADJUSTING THE SAFETY CUT-OUT
- FILLING THE WATER TANK
- FILLING THE BEAN CONTAINER
- ADJUSTING THE GRINDING TEXTURE
- SWITCHING ON THE APPLIANCE
- FLUSHING THE APPLIANCE
- MAKING COFFEE
- ADJUSTING THE AMOUNT OF WATER
- ONE CUP OF NORMAL COFFEE FROM BEANS
- ONE CUP OF STRONG COFFEE FROM BEANS
- ONE CUP OF EXTRA STRONG COFFEE FROM BEANS
- TWO CUPS OF NORMAL COFFEE FROM BEANS
- ONE OR TWO CUPS OF COFFEE FROM GROUND COFFEE
- FROTHING MILK
- PREPARED HOT WATER
- SWITCHING OFF THE APPLIANCE
- EMPTYING APPLIANCE
- EXTERIOR
- INTERNAL CLEANING USING THE CLEANING PROGRAM
- DESCALING THE APPLIANCE
- WHAT TO DO IF...
- ENVIRONMENTAL ASPECTS
- IN THE CASE OF NEED FOR SERVICE
- BRING INTO OPERATION
- PREPARED COFFEE
- PANNEAU DE COMMANDE
Brand : ETNA
Model : EKM800
Category : Coffee machine