OM978RVS - Oven ETNA - Free user manual and instructions
Find the device manual for free OM978RVS ETNA in PDF.

User questions about OM978RVS ETNA
0 question about this device. Answer the ones you know or ask your own.
Ask a new question about this device
Download the instructions for your Oven in PDF format for free! Find your manual OM978RVS - ETNA and take your electronic device back in hand. On this page are published all the documents necessary for the use of your device. OM978RVS by ETNA.
USER MANUAL OM978RVS ETNA
Specifications techniques
| Operation | 6 |
| Using the timer 8 |
Cleaning
| Cleaning the outside 12 |
| Cleaning the inside 12 |
| Removing the oven door 12 |
| Removing the oven windows 13 |
| Replacing the oven light bulb 13 |
Installation
| General | 14 |
| Build-in dimensions 15 | |
| Electrical connection 15 | |
| Building in 16 | |
| Technical data 16 |
Your oven and the environment
Disposing of the appliance and the packaging 17
Introduction
Congratulations on your choice of this ETNA oven. This product was designed with simple operation and optimum comfort in mind. With the extensive setting options, you can always select the right method of preparation.
This manual describes the best way to work with this oven. In addition to information on operation, you will also find background information here that may come in handy when using the appliance.

Read the separate safety instructions before using the device!
Read this manual before using the appliance and keep it in a safe place for future use.
This manual also serves as reference material for service technicians. All data required by service technicians to assist you and to answer your questions are on the appliance's identification card.
Happy cooking!
Description
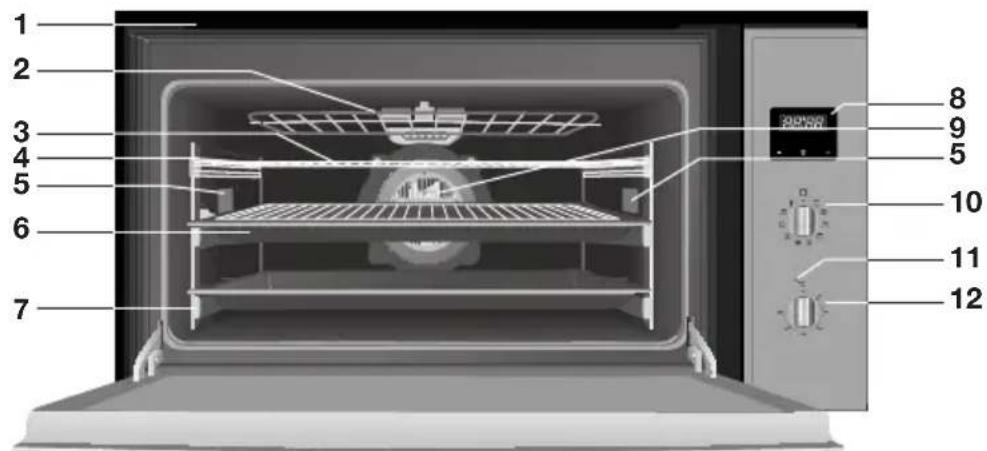
- Exhaust
- Hinged component
- Oven rack
- Guide
- Oven light
- Baking tray with rack
- Telescopic guide
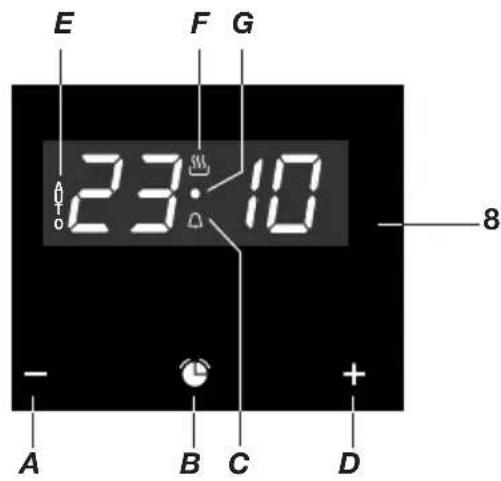
- Timer clock
A. '-' button
B. timer button
C. timer symbol
D. ‘+’ button
E. 'AUTO' symbol
F. heat symbol
G. indication pont
-
Fan
-
Oven function knob
- Temperature light
- Temperature knob
Operation

Setting the current time of day
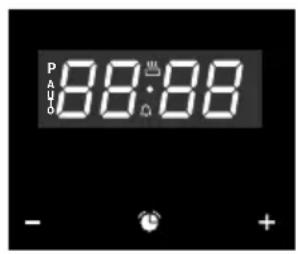
When the oven is connected to the power network, 'AUTO' and the figures on the timer will flash. Set the current time of day as follows:
- Press in the - and + buttons simultaneously till you hear a beep. A point(D) between the figures of the timer will start flashing.
- Set the correct time of day using the - and + buttons. You will hear a beep confirming the time selected. The 'heat' symbol stays lit.
The time can be changed whenever you like; follow the instructions above to do so.
Using the oven
The oven has 9 oven functions and 1 defrost function. Consult the table to select the right oven function to prepare a dish.
- Place the dish in the oven. For some dishes the oven has to be preheated first.
- Turn the 'oven function knob' to the oven setting desired.
- Set the oven to the desired temperature using the thermostat knob (between 50-250 °C). The oven will start the oven function set and heat the oven to the temperature set. A check light will go on above the thermostat knob and will go off once the temperature set is reached.
Remarks
- The temperature can be adjusted during preparation.
- If the oven is in use, operation of the hot air element and the top and bottom elements will regularly be interrupted to regulate the temperature.
Turning off the oven
- Turn the oven function knob and temperature knob to the o position.

Please note! If the oven does not work, there may be a timer function active. Cancel all timer functions by pressing the - and + buttons till 'AUTO' disappears from the display. Wait a few seconds till the change is saved.
Select the right oven setting
Consult the table to select the right oven function. Also consult the instructions for preparation on the dish packaging.
| Top and bottom heat Is used for pastry for which the heat has to be evenly distributed to get a light texture. | |
| Top and bottom heat with fan Suitable for roasted dishes and pastry. The fan distributes the heat evenly in the oven, thereby reducing the baking time and temperature. | |
| Grill Searing and roasting the surface. This can be used to roast the outer layer golden brown without roasting the inside of the food along with it. Suitable for flat dishes such as steak, cutlets, fish and toast. | |
| Large surface grill This can be used to sear dishes with larger surface areas than with the grill function. There is also higher searing capacity so the food is seared quicker. | |
| Grill + Fan You can use this setting for grilling meat, fish and vegetables. | |
| Hot air A fan distributes the hot air from the back of the oven. Because of the even heating this position is suitable for baking and roasting on several levels at once. | |
| Grill and Bottom Heat with Fan This setting can be used to bake leavened pastry and to preserve fruit and vegetables. | |
| Bottom heat The dish is only heated on the bottom. Suitable for heating up dishes or for letting dough rise. | |
| Grill with bottom heat Especially for roasting. Can be used for any piece of meat or fish, regardless of the size. | |
| Defrosting To defrost dishes. |

Note!
The oven light stays lit during every baking function.
Using the timer
The timer has different functions:
Clock timer
- This timer will give off an acoustic signal after the time period has expired. The oven does not have to be in use for this to happen.
Baking time
- When the baking time set has elapsed, the oven will switch off automatically.
End time
- When the end time set has elapsed, the oven will switch off automatically.
Baking time and end time
- When the end time set has elapsed, the oven will switch off automatically. The baking time set determines when the oven will be switched on.
This function is used to automatically switch the oven on and off. The switch-on time of the oven is calculated by inputting an end time and the baking time required.

Changing the timer pitch
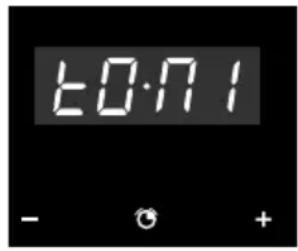
- Simultaneously press the buttons - and +' .
A point of light will flash between the figures on the timer. - Press the 'time button'.
The indicator 'ton1' will appear on the timer screen. - Repeatedly pressing the - button will change the pitch of the clock timer.
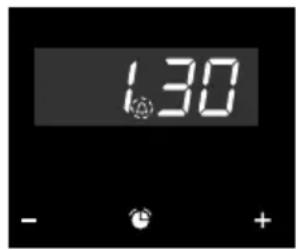
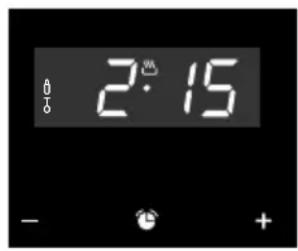
Setting the time on a clock timer
- Hold the 'time button' for a few moments till the 'timer symbol' between the figures on the timer starts flashing.
- Set the alarm time of the clock timer using the - and + buttons.
You will hear a beep and the display will show the current time.
The clock timer is programmed.
An acoustic signal will go off after the time set has elapsed and the 'timer symbol' will begin flashing.
- Press any key to switch off the acoustic signal.
The 'timer symbol' continues to flash. - Hold the 'time button' in for a few moments to end the clock timer function.

You can check the time remaining on the clock timer whenever you wish by holding the 'time button' in for a few moments till the 'clock symbol' starts flashing. You can then change the time selected by pressing the - or + buttons. You will hear a beep confirming the change.

Setting a baking time
- Hold the 'time button' in for a few moments till you hear a beep. If the 'time button' is then pressed again, the word 'time' appears in the display.
- Set the baking time using the - and + buttons. You will hear a beep, the current time appears and the AUTO symbol stays lit. When the baking time has elapsed, the oven will switch off automatically.
- Set a baking function and temperature. After the baking time has elapsed, the oven is switched off and an acoustic signal goes off.
- Press any key to switch off the acoustic signal. The oven remains switched off and the 'AUTO' symbol flashes.
- Hold the 'time button' in for a few moments till you hear a beep to end the function. Turn the oven function knob and temperature knob to the 'off position' to switch the oven off.
You can check the baking time remaining whenever you wish by holding the 'time button' in for a few moments till the 'AUTO' symbol starts flashing. You can then change the baking time by pressing - or + buttons. You will hear a beep confirming the change.

Hold the 'time button' in for a few moments to end the baking time function.
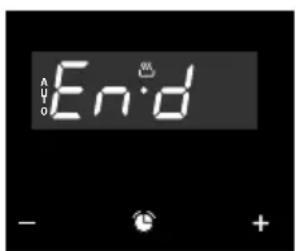
Setting an end time
- Hold the 'time button' in for a few moments till you hear a beep.
- Press the 'time button' again till the word 'End' appears in the display.
-
Set the end time using the - and + buttons. You will hear a beep, the current time appears and the AUTO symbol stays lit. When the end time is reached, the oven will switch off automatically.
-
Set a baking function and temperature. If the end time is reached, the oven is switched off and an acoustic signal goes off.
- Press any key to switch off the acoustic signal. The oven remains switched off and the 'AUTO' symbol flashes.
- Hold the 'time button' in for a few moments till you hear a beep to end the function. Turn the oven function knob and temperature knob to the 'off position' to switch the oven off.
An end time can still be set while the oven is in use. Follow the instructions above to do so (in that case the oven function and temperature do not have to be reset).

You can check the end time of the baking process whenever you wish by holding the 'time button' in for a few moments. If you want to change the end time, you should cancel the function by simultaneously pressing the - and + buttons. Then set an end time again.
Setting baking time and end time
- Hold the 'time button' in for a few moments till you hear a beep. If the 'time button' is then pressed again, the word 'time' appears in the display.
- Set the baking time using the - and + buttons.
- Press the 'time button' again till the word 'End' appears in the display.
- Set the end time with the - and + buttons. You will hear a beep, the current time appears and the AUTO symbol stays lit.
- Set a baking function and temperature. The oven remains switched off, with the 'AUTO' symbol in the display. The oven has been programmed.
The oven starts when the baking process should begin and bakes for the baking time set. The 'AUTO' symbol and the heat symbol.

Please note! The time at which the baking process starts is the end time minus the baking time. For example: the end time is set to 5:00 PM and the baking time is 2 hours. In that case the oven will switch on at 3:00 PM!
The oven will be switched off and an acoustic signal will go off once the baking time programmed has elapsed.
- Press any key to switch off the acoustic signal.
The oven remains switched off and the 'AUTO' symbol flashes.
- Hold the 'time button' in for a few moments till you hear a beep to end the function. Turn the oven function knob and temperature knob to the 'off position' to switch the oven off.
You can check the baking process whenever you wish by holding the 'time button' in for a few moments.
If you wish to change the programming, you should cancel the function by simultaneously pressing the - and + buttons. Then set the baking time and an end time again.

Please note! When the power is interrupted, the programming of the timer is deleted and the figures '00:00' appear in the display. Set the current time of day and programme the timer again.
Cleaning the outside
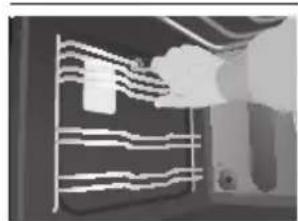
Clean the display and the oven door with a cleaning product for glass and a soft cloth. Do not use abrasive detergents or scouring powders.
Cleaning the inside
- Remove the (telescopic) guides
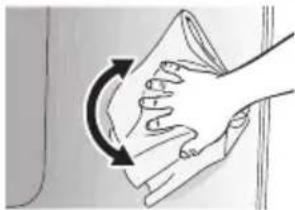
- Clean the oven while still hot with a hot, soapy solution and a cloth.
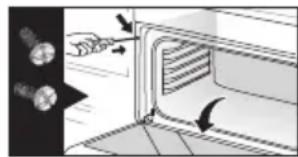
- The grill element can be folded down to clean the top. Remove the two securing screws on the front of the element and fold it down.

Warning
Switch the oven off when cleaning the inside. Allow the oven to cool before components are removed and switch off the power supply (remove plug from the outlet).
Removing the oven door
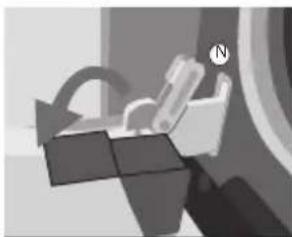
To clean the inside of the oven better you can remove the oven door.
- Open the oven door fully and turn the pawls (N) back as far as they will go.
- Then close the door slowly so the pawls end up in the holder. At approximately 15^ (relative to the closed door position) lift the door slightly upwards and lift it out of the two hinge holders.
- Use the reverse order to assemble the door. Insert the door at an angle of 15^ in the hinges on the front of the appliance and push the door forwards and downwards so that the hinges slide into their notches. Check to be sure the hinge notches are properly in place.
- Then open the door fully and turn the pawls back to their initial position. Close the door slowly and check that it closes properly. If the door does not open or close properly, make sure the hinge notches are positioned correctly in the hinge holders.
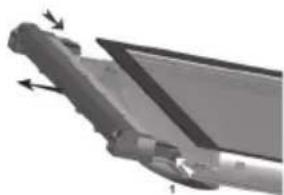
Removing the oven windows
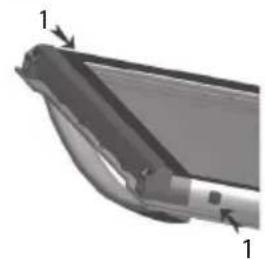
The oven windows can be removed from the oven door to clean them better.
- Push in the small pawls at the top left and right (1).
- Remove the top edge from the oven door.
- Remove the oven windows
Replacing the oven light bulb
Please note!
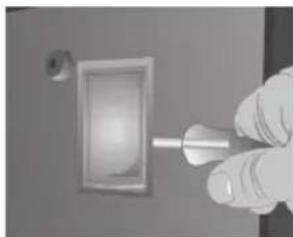
Disconnect the appliance from the mains by removing the plug from the socket before the changing the light.
- Remove the glass light cover by carefully clicking it loose with a screwdriver.
- Replace the oven light bulb.
- Put the glass cover back on. Make sure it catches properly in the holder.
Install a light bulb suitable for 300^ temperatures.
General

This appliance may only be installed by an authorised mechanic! The electrical connection must comply with national and local regulations.
Warning!
The appliance should be earthed at all times.
Installation, maintenance and repairs may only be implemented by mechanics who are authorised by the manufacturer for this purpose, as otherwise the warranty will be cancelled.
The appliance should be insulated electrically for installation, maintenance or repairs. The appliance is electrically insulated when:
- the main switch of the domestic electrical system is switched off, or
- the fuse of the relevant electrical group has been removed completely, or
- the plug of the appliance has been removed from the plug socket.
Only replace faulty parts with original ETNA parts. ETNA guarantees compliance with the safety regulations for those parts alone.
To prevent hazardous situations caused by damaging the electric lead, the lead can only be replaced by the manufacturer, the manufacturer's service organisation or a certified expert.
Unpacking
Remove all protective materials. Check the type plate to see if the appliance is compatible with your electricity network.
Build-in dimensions
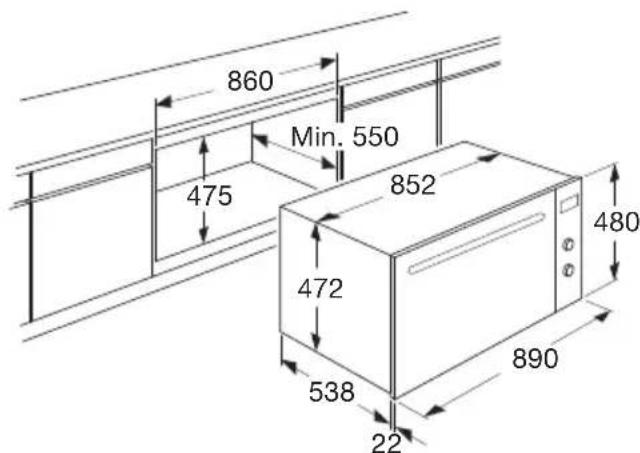
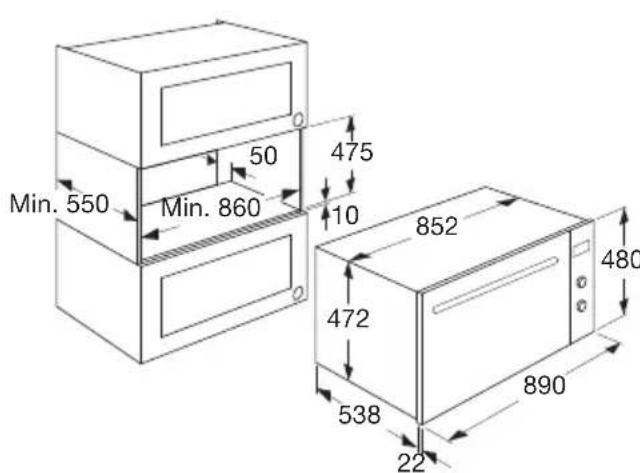
Electrical connection
230-240V\~-50/60Hz
- Plug and plug socket must always be accessible.
- Prevent the cable from coming into contact with parts of the oven that can become hot.
- If you want to make a fixed connection, make sure that an omnipolar switch with a contact separation of at least 3mm is fitted in the supply cable.
- Do not use a multiple socket or extension lead to connect the appliance to the electricity network. The safety of the appliance cannot be guaranteed if such accessories are used.
Building in
- Place the oven in the cabinet and make sure the lead does not get squeezed or come into contact with oven components that become hot.
- Secure the oven using the screws on the front of the oven. The screw holes are behind the oven door.
- Make sure that the oven walls do not come into contact with the walls of the cabinet. Keep a minimum space of 2mm between oven and cabinet.
Technical data
The connection value (W), the required voltage (V) and the frequency (Hz) are on the appliance's identification card.
This appliance complies with all relevant EU directives.
Disposing of the appliance and the packaging
This product is made from sustainable materials. However, it must be disposed of in a responsible manner at the end of its useful life. The government can provide you with information about this.
The packaging of the appliance can be recycled. The following materials have been used:
cardboard
polyethylene wrap (PE)
CFC-free polystyrene (hard PS foam)
You should dispose of these materials in a responsible manner, according to the government regulations.
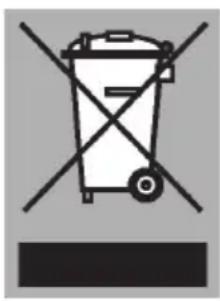
The product shows a pictogram of a crossed-out waste container to point out that domestic electrical appliances must be disposed of separately. Thus the appliance may not be processed via the regular waste flow at the end of its useful life. It must be handed in at a special municipal waste depot or at a sales outlet which does this for you.
By collecting household appliances separately, we prevent negative consequences to the environment and our health which could be the result of incorrect disposal. The materials used to make this appliance can be re-used, which means tremendous savings in energy and raw materials.
Declaration of conformity

We hereby declare that our products comply with the relevant European directives, standards and regulations as well as all requirements referred to in the standards.

The appliance identification card is located on the inside of the appliance.
When contacting the service department,
have the complete type number to hand.
You will find the addresses and phone numbers of the service organisation on the guarantee card.

688816