
UC 7SC - Battery charger HITACHI - Free user manual and instructions
Find the device manual for free UC 7SC HITACHI in PDF.
| Product type | Battery charger |
| Brand | Hitachi |
| Model | UC 7SC |
| Weight | 1.2 kg |
| Charging voltage | 7.2 V |
| Charging time | Approximately 1 hour (at 20°C) |
| Compatible batteries | Hitachi FEB7 |
| Recommended charging temperature | 20-25°C |
| Permissible charging temperature | 10-40°C |
| Power supply | Mains (standard socket) |
| Charge indicator | Pilot lamp (lights up during charging, goes out when battery is full) |
| Protection | Do not expose to rain, do not use in damp environments |
| Maintenance and cleaning | Wipe with a dry cloth or cloth moistened with soapy water. Do not use solvents |
| Replacement parts | Use only genuine HITACHI parts |
| Repair | Any repair must be carried out by an authorized service center |
| Safety | Disconnect before maintenance, do not disassemble, do not short-circuit the battery |
| Compliance | CE, VDE 5008.6-3331-1001 |
| Storage | Dry place, out of reach of children, temperature below 40°C |
Frequently Asked Questions - UC 7SC HITACHI
User questions about UC 7SC HITACHI
0 question about this device. Answer the ones you know or ask your own.
Ask a new question about this device
Download the instructions for your Battery charger in PDF format for free! Find your manual UC 7SC - HITACHI and take your electronic device back in hand. On this page are published all the documents necessary for the use of your device. UC 7SC by HITACHI.
USER MANUAL UC 7SC HITACHI
natural_image
Line drawing of a rectangular electronic device with ventilation slots and a handle (no text or symbols)Read through carefully and understand these instructions before use. Diese Anleitung vor Benutzung des Werkzeugs sorgfältig durchlesen und verstehen. Lire soigneusement et bien assimiler ces instructions avant usage. Prima dell'uso leggere attentamente e comprendere queste instruzioni. Deze gebruiksaanwijzing s.v.p. voor gebruik zorgvuldig doorlezen. Leer cuidadosamente y comprender estas instrucciones antes del uso.
Handling instructions Bedienungsanleitung Mode d'emploi Istruzioni per l'uso Gebruiksaanwijzing Instrucciones de manejo
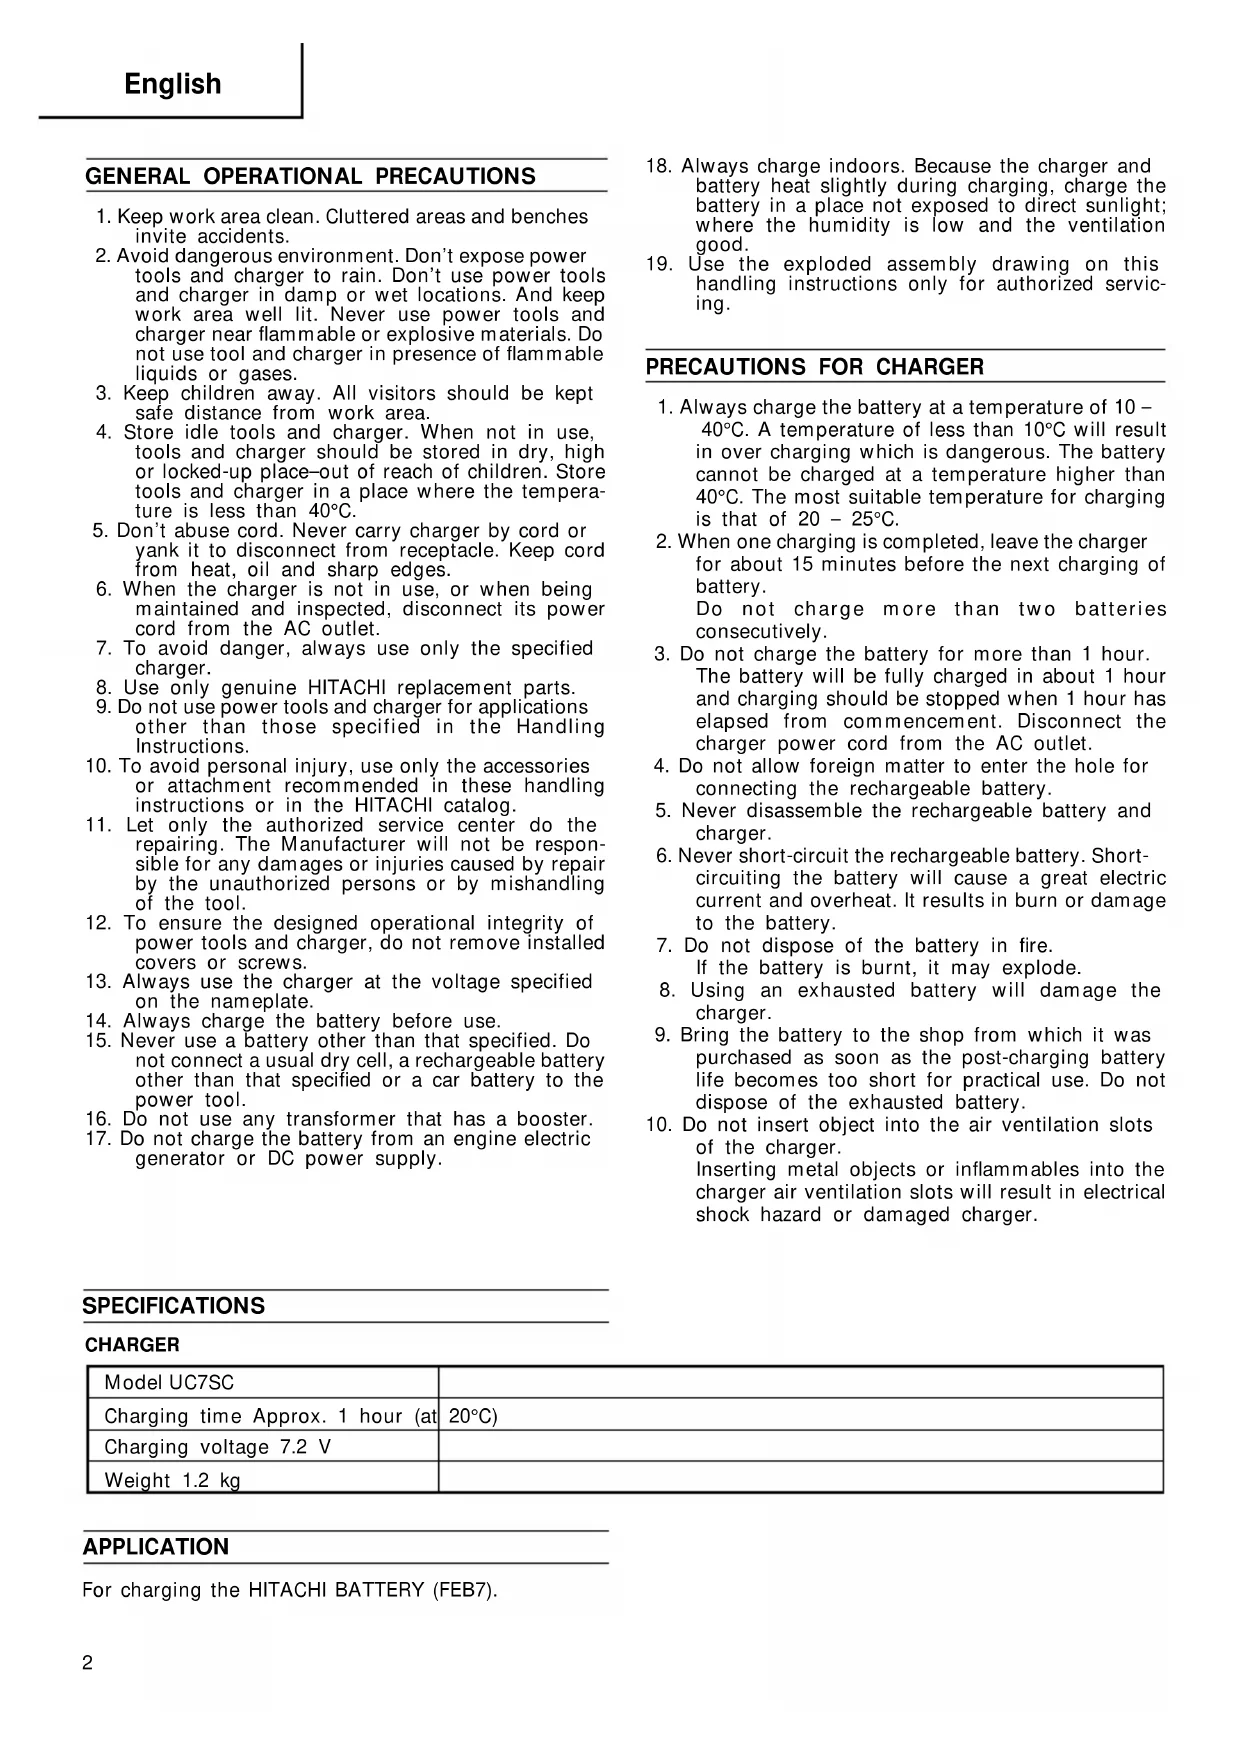
The exploded assembly drawing should be used only for authorized service center.
| Item No. | Part Name |
| 1 Housing | |
| 2 Light Bar | |
| 3 Printed Circuit Board | |
| 4 Tapping Screw D4×25 | |
| 5 Name Plate | |
| 6 HITACHI Label | |
| 7 Spong | |
| 8 Transformer | |
| 9 Cord | |
| 10 Fuse | |
Parts are subject to possible modification without notice due to improvements.
1
2
| English Deutsch Français | |||
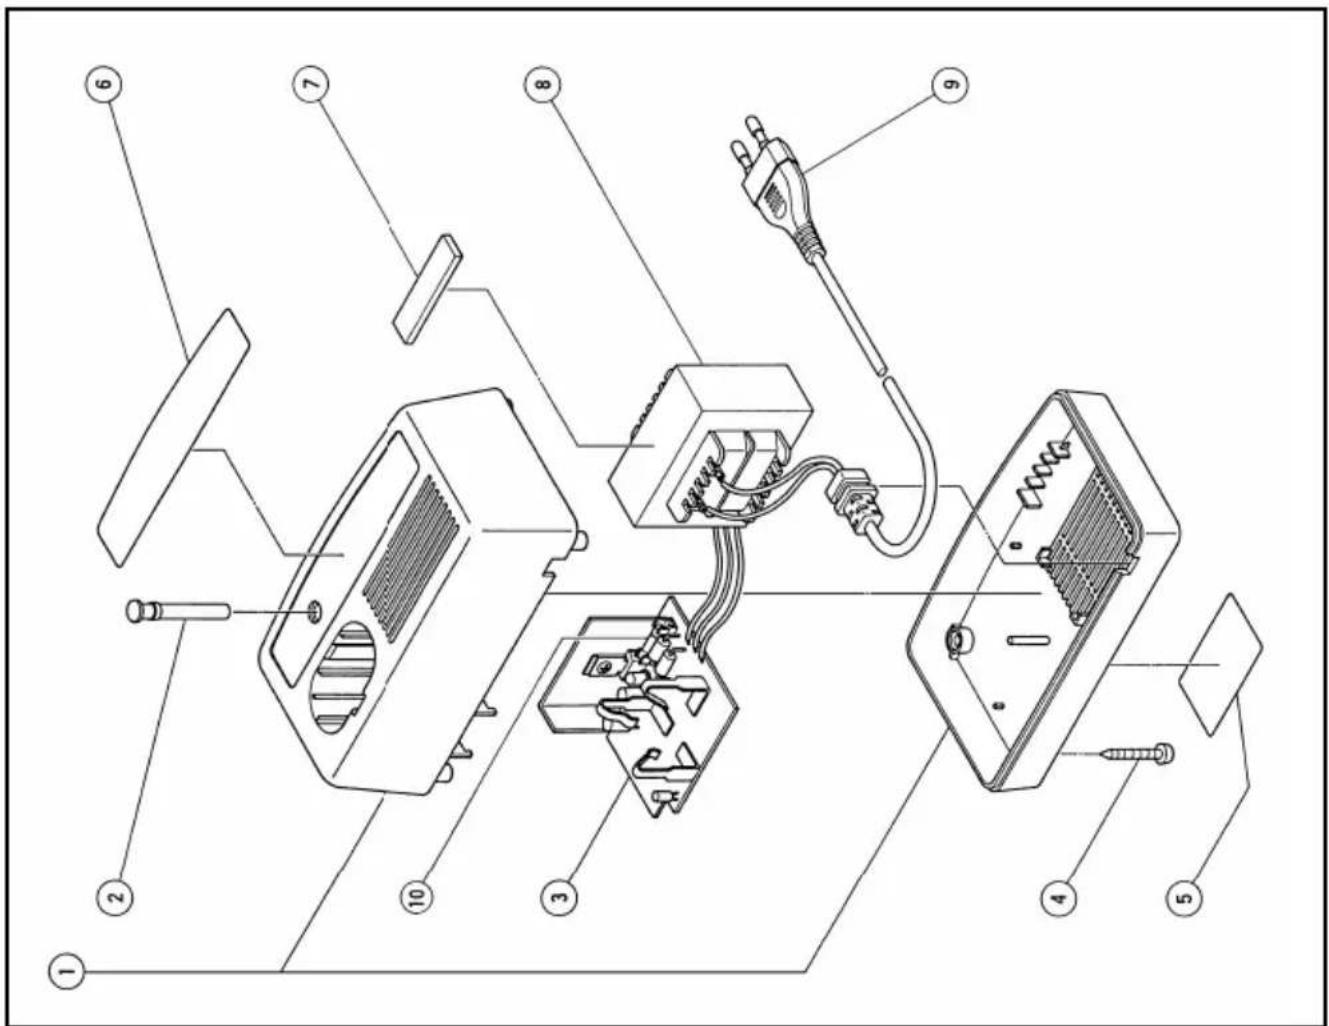
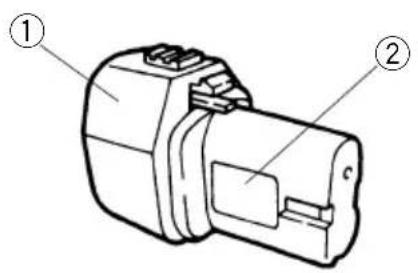
| 1 | Rechargeable battery Ladebatterie | Batterie rechargeable | |
| 2 | Name plate of battery | Typenschild der Batterie | Plaque nominale de la batterie |
| 3 | Insert | Einsetzen | Insérer |
| 4 | Pilot lamp | Kontrollampe | Lampe témoin |
| 5 | Hole for connecting the rechargeable battery | Anschlußloch für Akkumulator | Orifice de raccordement de la batterie rechargeable |
| 6 | Name plate of charger Typenschild des Ladegerätes | Plaque nominale du chargeur | |
| Italiano Nederlands Español | |||
| 1 | Batteria ricaricabile Oplaadbare batterij Batería recargable | ||
| 2 | Etichetta della batteria Naamplaatje van de batterij | Placa de características de la batería | |
| 3 | Inserire Insteken Insertar | ||
| 4 | Spia Kontrolelampje Lámpara piloto | ||
| 5 | Foro di collegamento della Aansluiting voor oplaadbare Agujero para batteria ricaricabile batterij recargable | conectar la batería | |
| 6 | Etichetta del caricatore Naamplaatje van de oplader | Placa de características del cargador |
GENERAL OPERATIONAL PRECAUTIONS
- Keep work area clean. Cluttered areas and benches invite accidents.
- Avoid dangerous environment. Don't expose power tools and charger to rain. Don't use power tools and charger in damp or wet locations. And keep work area well lit. Never use power tools and charger near flammable or explosive materials. Do not use tool and charger in presence of flammable liquids or gases.
- Keep children away. All visitors should be kept safe distance from work area.
- Store idle tools and charger. When not in use, tools and charger should be stored in dry, high or locked-up place-out of reach of children. Store tools and charger in a place where the temperature is less than 40^ C.
- Don't abuse cord. Never carry charger by cord or yank it to disconnect from receptacle. Keep cord from heat, oil and sharp edges.
- When the charger is not in use, or when being maintained and inspected, disconnect its power cord from the AC outlet.
- To avoid danger, always use only the specified charger.
- Use only genuine HITACHI replacement parts.
- Do not use power tools and charger for applications other than those specified in the Handling Instructions.
- To avoid personal injury, use only the accessories or attachment recommended in these handling instructions or in the HITACHI catalog.
- Let only the authorized service center do the repairing. The Manufacturer will not be responsible for any damages or injuries caused by repair by the unauthorized persons or by mishandling of the tool.
- To ensure the designed operational integrity of power tools and charger, do not remove installed covers or screws.
- Always use the charger at the voltage specified on the nameplate.
- Always charge the battery before use.
- Never use a battery other than that specified. Do not connect a usual dry cell, a rechargeable battery other than that specified or a car battery to the power tool.
- Do not use any transformer that has a booster.
-
Do not charge the battery from an engine electric generator or DC power supply.
-
Always charge indoors. Because the charger and battery heat slightly during charging, charge the battery in a place not exposed to direct sunlight; where the humidity is low and the ventilation good.
- Use the exploded assembly drawing on this handling instructions only for authorized servicing.
PRECAUTIONS FOR CHARGER
- Always charge the battery at a temperature of 10 – 40°C. A temperature of less than 10°C will result in over charging which is dangerous. The battery cannot be charged at a temperature higher than 40°C. The most suitable temperature for charging is that of 20 – 25°C.
- When one charging is completed, leave the charger for about 15 minutes before the next charging of battery. Do not charge more than two batteries consecutively.
- Do not charge the battery for more than 1 hour. The battery will be fully charged in about 1 hour and charging should be stopped when 1 hour has elapsed from commencement. Disconnect the charger power cord from the AC outlet.
- Do not allow foreign matter to enter the hole for connecting the rechargeable battery.
- Never disassemble the rechargeable battery and charger.
- Never short-circuit the rechargeable battery. Short-circuiting the battery will cause a great electric current and overheat. It results in burn or damage to the battery.
- Do not dispose of the battery in fire. If the battery is burnt, it may explode.
- Using an exhausted battery will damage the charger.
- Bring the battery to the shop from which it was purchased as soon as the post-charging battery life becomes too short for practical use. Do not dispose of the exhausted battery.
- Do not insert object into the air ventilation slots of the charger. Inserting metal objects or inflammables into the charger air ventilation slots will result in electrical shock hazard or damaged charger.
SPECIFICATIONS
CHARGER
| Model UC7SC | |
| Charging time Approx. 1 hour (at | 20°C) |
| Charging voltage 7.2 V | |
| Weight 1.2 kg |
APPLICATION
For charging the HITACHI BATTERY (FEB7).
CHARGING
Before using the power tool, charge the battery as follows.
- Insert the battery in the charger.
Position the battery so that the nameplate faces toward the nameplate of the charger and press in the battery until it comes into contact with the bottom plate. (See Figs. 1 and 2)
- Connect the charger power cord to the AC outlet.
Connecting the power cord will turn on the charger (the pilot lamp lights up).
CAUTION
If the pilot lamp does not light up, pull out the power cord from the AC outlet and check the battery mounting condition.
About 1 hour is required to fully charge the battery at a temperature of about 20^ C. The pilot lamp goes off to indicate that the battery is fully charged.
CAUTION
If the battery is heated due to direct sunlight, etc., just after operation, the charger pilot lamp may not light. At that time cool the battery first, then start charging.
-
Disconnect the charger power cord from the AC outlet.
-
Hold the charger tight and pull out the battery.
MAINTENANCE AND INSPECTION
- Inspecting the mounting screws
Regularly inspect all mounting screws and ensure that they are properly tightened. Should any of the screws be loose, retighten them immediately. Failure to do so could result in serious hazard.
- Cleaning of the charger
When the charger is stained, wipe with a soft dry cloth or a cloth moistened with soapy water. Do not use chloric solvents, gasoline or paint thinner, for they melt plastics.
- Store idle charger
When not in use, the charger should be stored in dry, high or locked-up place-out of reach of children.
NOTE
Due to HITACHI's continuing program of research and development, the specifications herein are subject to change without prior notice.
IMPORTANT
Correct connection of the plug
The wires of the mains lead are coloured in accordance with the following code:
Blue: - Neutral
Brown: - Live
As the colours of the wires in the mains lead of this tool may not correspond with the coloured markings identifying the terminals in your plug proceed as follows:
The wire coloured blue must be connected to the terminal marked with the letter N or coloured black.
The wire coloured brown must be connected to the terminal marked with the letter L or coloured red.
Neither core must be connected to the earth terminal.
NOTE
This requirement is provided according to BRITISH STANDARD 2769: 1984.
Therefore, the letter code and colour code may not be applicable to other markets except United Kingdom.
