
UC 14YF2 - Battery charger HITACHI - Free user manual and instructions
Find the device manual for free UC 14YF2 HITACHI in PDF.

| Product Type | Battery charger for power tools |
| Model Number | UC14YF2 |
| Input Voltage | 100-240 V AC (automatic voltage detection) |
| Charging Voltage Range | 7.2 - 14.4 V |
| Charging Current | Not specified (approx. 1-2 A based on charging time) |
| Charging Time | Approximately 45 - 90 minutes (depending on battery capacity) |
| Weight | 1.3 kg |
| Dimensions (Approx.) | Not specified (typical desktop charger size) |
| Compatible Batteries | Hitachi EB7, EB9, EB12, EB14 series (Ni-Cd and Ni-MH) |
| Charging Indicator | Red pilot lamp: blinks (ready), continuous (charging), blinks (complete), flickers (error); green lamp: continuous (battery too hot or malfunction) |
| Ambient Temperature for Charging | 0°C - 40°C (optimal 20°C - 25°C) |
| Battery Cooling Requirement | Allow hot battery to cool before charging |
| Overcharge Protection | Yes (microcomputer control) |
| Polarity Protection | Reverse polarity insertion prevented (caution in manual) |
| Storage Temperature | Less than 40°C |
| Certifications | CE marked, conforms to EN60335, EN55014, EN60555, EN50082-1 |
| Maintenance | Wipe with dry or soapy cloth; do not use solvents |
| Safety Features | Do not expose to rain; keep away from flammable materials; use specified charger only |
| Spare Parts Availability | Parts available through authorized service centers (see exploded diagram) |
| Repair Service | Only authorized Hitachi service centers |
Frequently Asked Questions - UC 14YF2 HITACHI
User questions about UC 14YF2 HITACHI
0 question about this device. Answer the ones you know or ask your own.
Ask a new question about this device
Download the instructions for your Battery charger in PDF format for free! Find your manual UC 14YF2 - HITACHI and take your electronic device back in hand. On this page are published all the documents necessary for the use of your device. UC 14YF2 by HITACHI.
USER MANUAL UC 14YF2 HITACHI
natural_image
Line drawing of a rectangular electronic device with heat sinks and a central port (no text or symbols)Read through carefully and understand these instructions before use.
Bruksanvisning
Brugsanvisning
Bruksanvisning
Käyttöohjeet
Handling Instructions
1
text_image
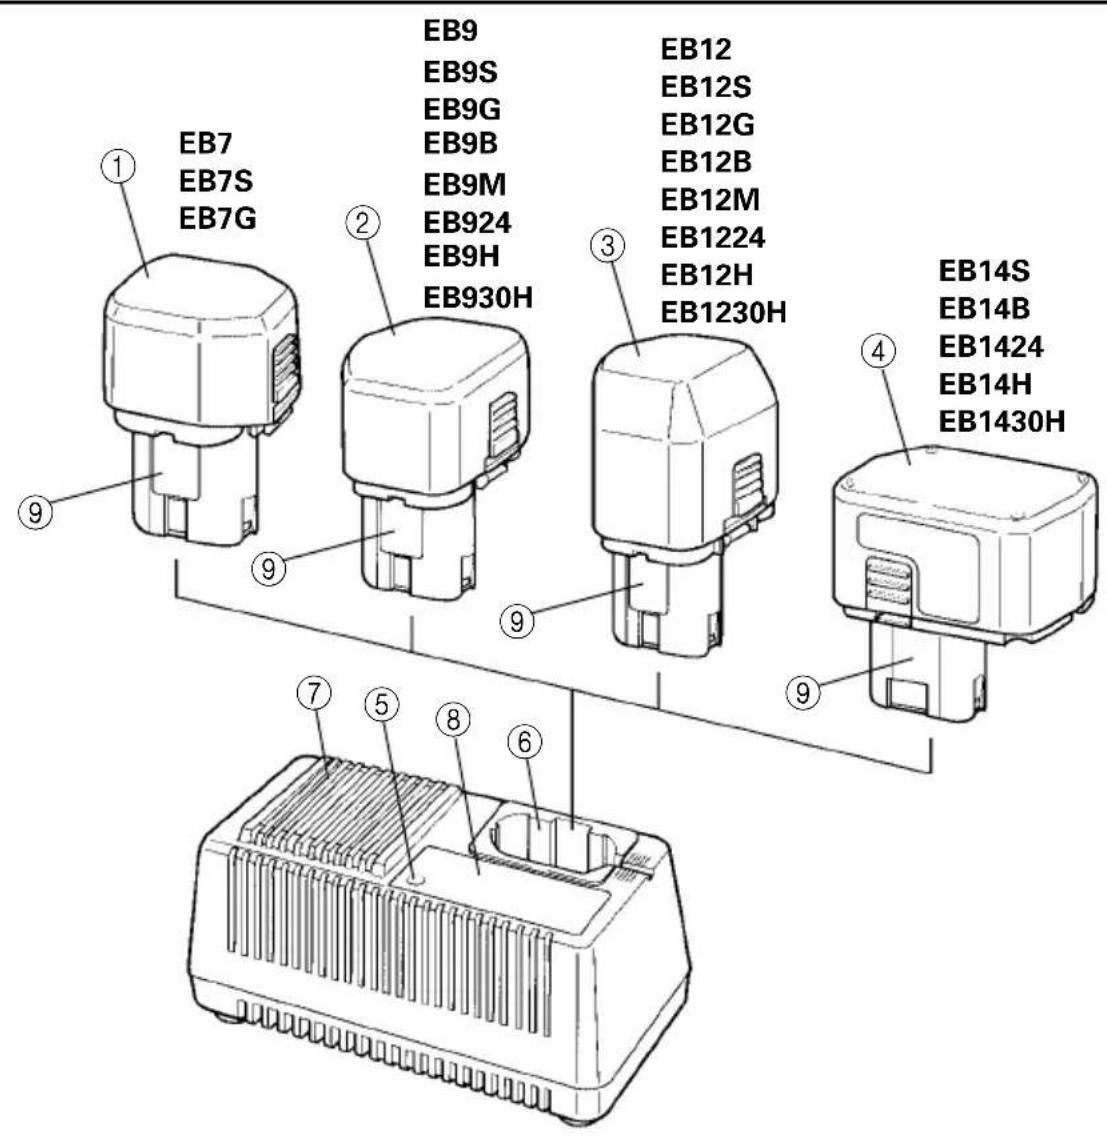
EB7 EB7S EB7G EB9 EB9S EB9G EB9B EB9M EB924 EB9H EB930H EB12 EB12S EB12G EB12B EB12M EB1224 EB12H EB1230H EB14S EB14B EB1424 EB14H EB1430H| Svenska Dansk Norsk | |||
| 1 | Uppladdningsbart batteri Genopladeligt batteri Oppladbart batteri (EB7, EB7S, EB7G) (EB7, EB7S, EB7G) (EB7, EB7S, EB7G) | ||
| 2 | Uppladdningsbart batteri Genopladeligt batteri Oppladbart batteri (EB9, EB9S, EB9G, EB9B, (EB9, EB9S, EB9G, EB9B, EB9M, (EB9, EB9S, EB9G, EB9B, EB9M, EB9M, EB924, EB9H, EB930H) EB924, EB9H, EB930H) EB924, EB9H, EB930H) | ||
| 3 | Uppladdningsbart batteri Genopladeligt batteri Oppladbart batteri (EB12, EB12S, EB12G, EB12B, (EB12, EB12S, EB12G, EB12B, (EB12, EB12S, EB12G, EB12B, EB12M, EB1224, EB12H, EB1230H) EB12M, EB1224, EB12H, EB1230H) EB12M, EB1224, EB12H, EB1230H) | ||
| 4 | Uppladdningsbart batteri Genopladeligt batteri Oppladbart batteri (EB14S, EB14B, EB1424, EB14H, (EB14S, EB14B, EB1424, EB14H, (EB14S, EB14B, EB1424, EB14H, EB1430H) EB1430H) EB1430H) | ||
| 5 | Signallampe Kontrollampe Pilot-lys | ||
| 6 | Hål för iläggning av det uppladd- Hul til tilslutning af det opladelige Hull for tilkopling av det opplad- ningsbara batteriet batteri | ||
| 7 | Ventilationsöppning | Ventilationsåbning | Ventilasjonshull |
| 8 | Varningsplåt | Advarselsplade | Varselplate |
| 9 | Namnplåt | Mærkeplade | Navneplate |
| Soumalaionen | English | |
| 1 | Ladattava paristo(EB7, EB7S, EB7G) (EB7, EB7S, EB7G) | Rechargeable battery |
| 2 | Ladattava paristo(EB9, EB9S, EB9G, EB9B, (EB9, EB9S, EB9G, EB9B, EB9M, EB924, EB9H, EB930H) EB9M, EB924, EB9H, EB930H) | Rechargeable battery |
| 3 | Ladattava paristo(EB12, EB12S, EB12G, EB12B, (EB12, EB12S, EB12G, EB12B, EB12M, EB1224, EB12H, EB1230H) | Rechargeable battery |
| 4 | Ladattava paristo(EB14S, EB14B, EB1424, EB14H, (EB14S, EB14B, EB1424, EB14H, EB1430H) EB1430H) | Rechargeable battery |
| 5 | Merkkivalo | Pilot lamp |
| 6 | Ladattavan pariston liitäntäukko | Hole for connecting the rechargeable battery |
| 7 | Tuuletusaukko | Ventilation slot |
| 8 | Varoituslaatta | Caution plate |
| 9 | Nimilaata Nameplate |
SÄKERHETSFÖRESKRIFTER
EB9, EB9S, EB9G, EB9B, EB9M, EB924, EB9H, EB930H
EB12, EB12S, EB12G, EB12B, EB12M, EB1224, EB12H, EB1230H
EB14S, EB14B, EB1424, EB14H, EB1430H
BATTERILADDNING
EB9, EB9S, EB9G, EB9B, EB9M, EB924, EB9H, EB930H
EB12, EB12S, EB12G, EB12B, EB12M, EB1224, EB12H, EB1230H
EB14S, EB14B, EB1424, EB14H, EB1430H
OPLADNING
EB9, EB9S, EB9G, EB9B, EB9M, EB924, EB9H, EB930H EB12, EB12S, EB12G, EB12B, EB12M, EB1224, EB12H, EB1230H EB14S, EB14B, EB1424, EB14H, EB1430H
LADING
VEDLIKEHOLD OG INSPEKSJON
EB9, EB9S, EB9G, EB9B, EB9M, EB924, EB9H, EB930H
EB12, EB12S, EB12G, EB12B, EB12M, EB1224, EB12H, EB1230H
EB14S, EB14B, EB1424, EB14H, EB1430H
- Keep work area clean. Cluttered areas and benches invite accidents.
-
Avoid dangerous environment. Don't expose power tools and charger to rain. Don't use power tools and charger in damp or wet locations. And keep work area well lit. Never use power tools and charger near flammable or explosive materials. Do not use tool and charger in presence of flammable liquids or gases.
-
Keep children away. All visitors should be kept safe distance from work area.
-
Store idle tools and charger. When not in use, tools and charger should be stored in dry, high or locked-up place — out of reach or children. Store tools and charger in a place in which the temperature is less than 40^ C.
-
Don't abuse cord. Never carry charger by cord or yank it to disconnect from receptacle. Keep cord from heat, oil and sharp edges.
-
When the charger is not in use or when being maintained and inspected, disconnect the power cord of the charger from the receptacle.
-
To avoid danger, always use only the specified charger.
-
Use only genuine HITACHI replacement parts.
-
Do not use power tools and charge for applications other than those specified in the Handling Instructions.
-
To avoid personal injury, use only the accessories or attachment recommended in these handling instructions or in the HITACHI catalog.
-
Let only the authorized service center do the repairing. The Manufacture will not be responsible for any damages or injuries caused by repair by the unauthorized persons or by mishandling of the tool.
-
To ensure the designed operational integrity of power tools and charger, do not remove installed covers or screws.
-
Always use the charger at the voltage specified on the nameplate.
-
Always charge the battery before use.
-
Never use a battery other than that specified. Do not connect a usual dry cell, a rechargeable battery other than that specified or a car battery to the power tool.
-
Do not use a transformer containing a booster.
-
Do not charge the battery from an engine electric generator or DC power supply.
-
Always charge indoors. Because the charger and battery heat slightly during charging, charge the battery in a place not exposed to direct sunlight; where the humidity is low and the ventilation good.
-
Use the exploded assembly drawing on this handling instructions only for authorized servicing.
PRECAUTIONS FOR CHARGER
- Always charge the battery at an ambient temperature of 0–40°C. A temperature of less than 0°C will result in over charging which is dangerous. The battery cannot be charged at a temperature greater than 40°C.
The most suitable temperature for charging is that of 20–25°C. - Do not use the charger continuously.
When one charging is completed, leave the charger for about 15 minutes before the next charging of battery. - Do not allow foreign matter to enter the hole for connecting the rechargeable battery.
- Never disassemble the rechargeable battery or charger.
- Never short-circuit the rechargeable battery.
Short-circuiting the battery will cause a great electric current and overheat. It results in burn or damage to the battery. - Do not dispose of the battery in fire.
If the battery is burnt, it may explode. - Using an exhausted battery will damage the charger.
- Bring the battery to the shop from which it was purchased as soon as the post-charging battery life becomes too short for practical use. Do not dispose of the exhausted battery.
- Do not insert objects into the air ventilation slots of the charger.
Inserting metal objects or flammable into the charger air ventilation slots will result in an electrical shock hazard or damage to the charger.
SPECIFICATION
CHARGER
| Model UC14YF2 | |
| Charging time Approx. 45 – 90 minutes | |
| Charging voltage 7.2 – 14.4 V | |
| Weight 1.3 kg | |
APPLICATION
For charging the HITACHI BATTERY
○EB7, EB7S, EB7G
EB9, EB9S, EB9G, EB9B, EB9M, EB924, EB9H, EB930H
EB12, EB12S, EB12G, EB12B, EB12M, EB1224, EB12H, EB1230H
EB14S, EB14B, EB1424, EB14H, EB1430H
CHARGING
Before using the power tool, charge the battery as follows.
- Connect the charger's power cord to the receptacle. When connecting the plug of the charger to a receptacle, the pilot lamp will blink in red. (At 1-second intervals).
- Insert the battery into the charger. Firmly insert the battery into the charger till it contacts the bottom of the charger and checking the polarities as shown in Fig. 1.
CAUTION:
○If the batteries are inserted in the reverse direction, not only recharging will become impossible, but it may also cause problems in the charger such as a deformed recharging terminal.
3. Charging
When inserting a battery in the charger, the pilot lamp will light up continuously in red.
When the battery becomes fully recharged, the pilot lamp will blink in red. (At 1-second intervals.) (See Table 1)
(1) Pilot lamp indication
The indications of the pilot lamp will be as shown in Table 1, according to the condition of the charger or the rechargeable battery.
Table 1
| Indications of the pilot lamp | |||
| The pilot lamp lights or blinks in red. | Before Blinks charging for 0.5 seconds. Does not light continuously (off for 0.5 seconds) | ||
| While charging | Lights Lights continuously | ||
| Charging complete | Blinks Lights for 0.5 seconds. Does not light for 0.5 seconds. (off for 0.5 seconds) | ||
| Charging impossible | Flickers Lights for 0.1 seconds. Does not light for 0.1 seconds. (off for 0.1 seconds) | Malfunction in the battery or the charger | |
| The pilot lamp lights in green. | Charging impossible | Lights Lights continuously | The battery temperature is high, making recharging impossible. |
(2) Regarding the temperature of the rechargeable battery.
The temperatures for rechargeable batteries are as shown in the table below, and batteries that have become hot should be cooled for a while before being recharged.
Table 2 Recharging of batteries that have become hot
| Rechargeable batteries Temperatures at which the | battery can be recharged |
| EB7, EB9EB12 | -5°C - 40°C |
| EB7S, EB7GEB9S, EB9G, EB9B, EB9M, EB924EB12S, EB12G, EB12B, EB12M, EB1224EB14S, EB14B, EB1424 | -5°C - 60°C |
| EB9H, EB12H, EB14H, EB930H, EB1230H, EB1430H | 0°C - 45°C |
(3) Regarding recharging time
Table 3 shows the recharging time required according to the type of battery.
Table 3 Recharging time (approx. min.) at 20°C
| Battery voltage (V) | Battery capacity (Ah) | |||||||||||
| 1.3 Ah | 1.7 Ah | 2.0 Ah | 2.2 Ah | 2.4 Ah | 3.0 Ah | |||||||
| 7.2 V | EB7, EB7S | 45 min. | EB7G 55 | min. | — | — | — | — | — | — | — | — |
| 9.6 V | EB9EB9S | 45 min. | EB9G 55 | min . | EB9BEB9M | 60 min. | EB9H 70 | min. EB9 | 24 75 min. | EB930H | 90 min | |
| 12 V | EB12EB12S | 45 min. | EB12G | 55 min. | EB12BEB12M | 60 min. | EB12H | 70 min. | EB1224 75 min. | EB1230H | 90 min. | |
| 14.4 V | EB14S | 45 min. | — | — | EB14B | 60 min. | EB14H | 70 min. | EB1424 75 min. | EB1430H | 90 min. | |
■: Ni-MH batteries
NOTE: The recharging time may vary according to the ambient temperature and the power supply voltage.
- Disconnect the charger's power cord from the receptacle.
- Hold the charger firmly and pull out the battery. NOTE
Be sure to pull out the battery from the charger after use, and then keep it.
Regarding electric discharge in case of new batteries, etc.
As the internal chemical substance of new batteries and batteries that have not been used for an extended period is not activated, the electric discharge might be low when using them the first and second time. This is a temporary phenomenon, and normal time required for recharging will be restored by recharging the batteries 2-3 times.
How to make the batteries perform longer.
(1) Recharge the batteries before they become completely exhausted.
When you feel that the power of the tool becomes weaker, stop using the tool and recharge its battery. If you continue to use the tool and exhaust the electric current, the battery may be damaged and its life will become shorter.
(2) Avoid recharging at high temperatures.
A rechargeable battery will be hot immediately after use. If such a battery is recharged immediately after use, its internal chemical substance will deteriorate, and the battery life will be shortened. Leave the battery and recharge it after it has cooled for a while.
CAUTION
○If the battery is charged while it is heated because it has been left for a long time in a location subject to direct sunlight or because the battery has just been used, the pilot lamp of the charger lights up green. In such a case, first let the battery cool, then start charging.
When the pilot lamp flickers in red (at 0.2-seconds intervals), check for and take out any foreign objects in the charger's battery installation hole. If there are no foreign objects, it is probable that the battery or charger is malfunctioning. Take it to your authorized Service Center.
○Since the built-in micro computer takes about 3 seconds to confirm that the battery being charged with UC14YF2 is taken out, wait for a minimum of 3 seconds before reinserting it to continue charging. If the battery is reinserted within 3 seconds, the battery may not be properly charged.
MAINTENANCE AND INSPECTION
- Inspecting the mounting screws:
Regularly inspect all mounting screws and ensure that they are properly tightened. Should any of the screws be loose, retighten them immediately. Failure to do so could result in serious hazard.
- Cleaning of the charger
When the charger is stained, wipe with a soft dry cloth or a cloth moistened with soapy water. Do not use chloric solvents, gasoline or paint thinner, for they melt plastics.
- Store idle charger
When not in use, the charger should be stored in dry, high or locked-up place — out of reach of children.
NOTE
Due to HITACHI's continuing program of research and development, the specifications herein are subject to change without prior notice.
natural_image
Simple line drawing of a quill pen in an inkwell (no text or symbols)
natural_image
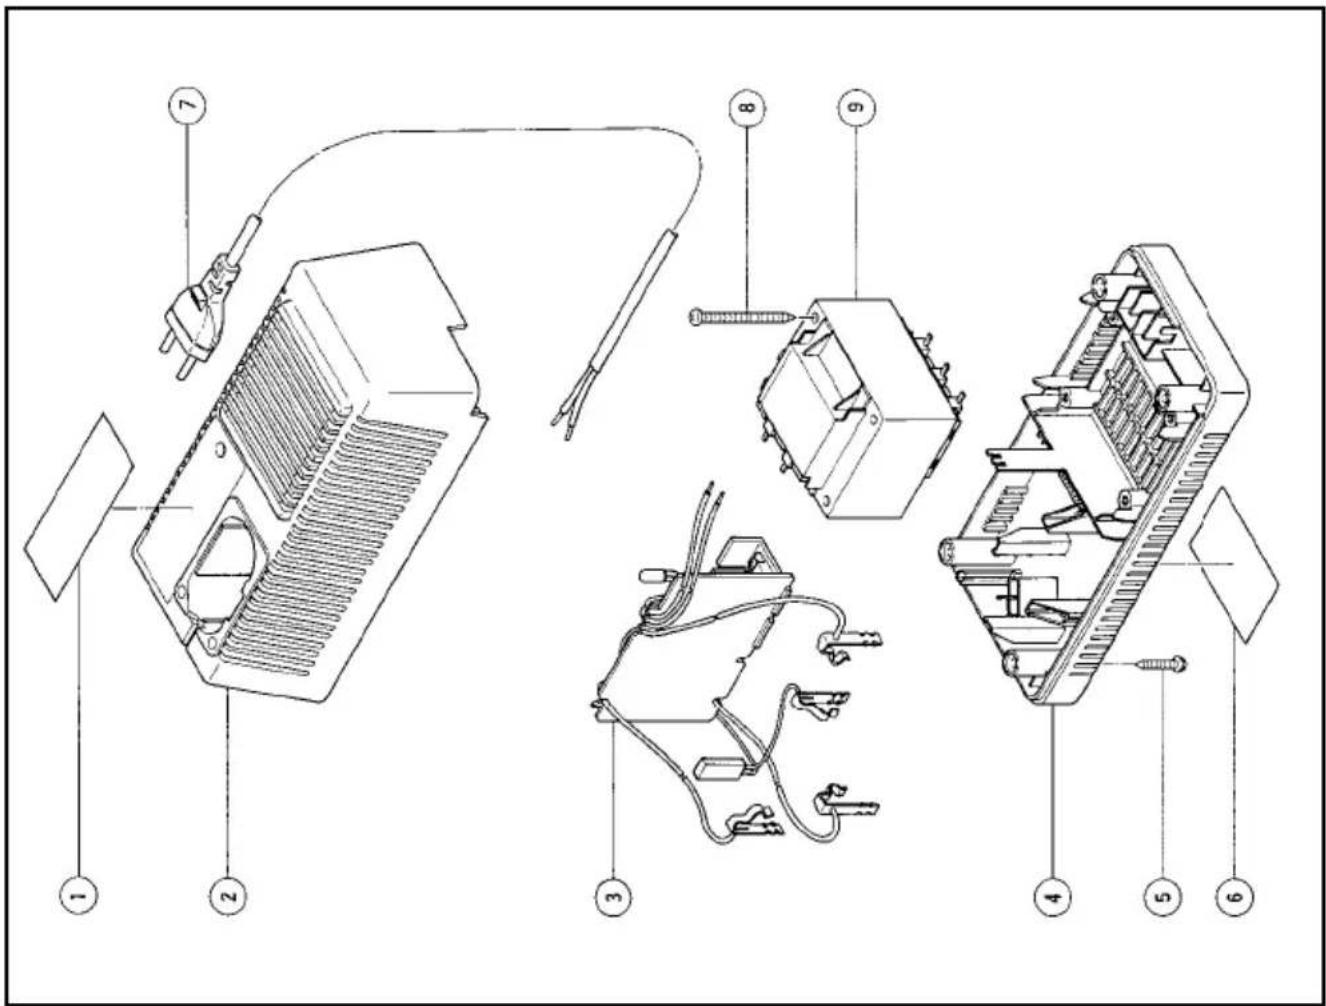
Line drawing of a quill pen with inkwell (no text or symbols)| Item No. | Part Name |
| 1 HITACHI Label | |
| 2 Case (A) | |
| 3 Print Circuit Board | |
| 4 Case (B) | |
| 5 Tapping Screw D3×12 | |
| 6 Name Plate | |
| 7 Cord | |
| 8 Tapping Screw D4×45 | |
| 9 Transformer | |
Parts are subject to possible modification without notice due to improvements.
text_image
Exploded view diagram of an electrical component with numbered parts for identification| Svenska | Suomi | ||
| EF-DEKLARATION BETRÄFFANDE LIKFORMIGHETVi tillkännagivr med eget ansvar att denna produkt överensstämmer med standard eller standardiserat dokument EN60335, EN55014, EN60555 och EN50082-1 i enlighet med råddirektiven 73/23/E∅S och 89/336/E∅S.* Denna deklaration gäller för CE-märkningen på produkten. | EY-ILMOITUS YHDENMUKAISUUDESTAYksinomaisella vastuudella vakuutamme, ettäätmätuote vastaa normeja tai normitettuja dokumentteja EN60335, EN55014, EN60555 ja EN50082-1 yhteisön ohjeiden 73/23/ETY ja 89/336/ETY mukaisesti.* Tämä ilmoitus sovelletaan tuotekohtaiseen CE-merkintään. | ||
| Dansk | English | ||
| EF-DEKLARATION OM ENSARTETHEDVi erklærer os fuldstændige ansvarlige for, at dette produkt modsvarer gældende standard eller de standardiserede dokumenter EN60335, EN55014, EN60555 og EN50082-1 i overensstemmelse med EF-direktiver 73/23/E∅F og 89/336/E∅F.* Denne erklæring qælder produkter, der er mærket med CE. | EC DECLARATION OF CONFORMITYWe declare under our sole responsibility that this product is in conformity with standards or standardized documents EN60335, EN55014, EN60555 and EN50082-1 in accordance with Council Directives 73/23/EEC and 89/336/EEC.* This declaration is applicable to the product affixed CE marking. | ||
| Norsk | |||
| EF's ERKLÆRING OM OVERENSSTEMMELSEVi erklærer herved at vi påtar oss eneansvaret for at dette produktet er i overensstemmelse med normer eller standardiserte dokumenter EN60335, EN55014, EN60555 og EN50082-1 i samsvar med Rådsdirektiver 73/23/E∅S og 89/336/E∅S.* Denne erklæringen gjelder produktets påklistrede CE-merking. | |||
| Hitachi Power Tools Europe GmbHSiemensring 34, 47877 Willich, F. R. GermanyHitachi Koki Co., Ltd.Sinagawa Intercity Tower A, 15-1, Konan 2-chomeMinato-ku, Tokyo, Japan | CE 98J. HiranoY. Hirano | ||