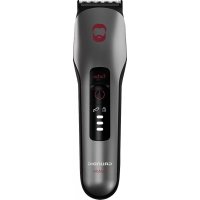
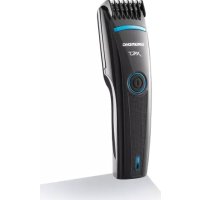
MC 6840 - Electric mower GRUNDIG - Free user manual and instructions
Find the device manual for free MC 6840 GRUNDIG in PDF.
User questions about MC 6840 GRUNDIG
0 question about this device. Answer the ones you know or ask your own.
Ask a new question about this device
Download the instructions for your Electric mower in PDF format for free! Find your manual MC 6840 - GRUNDIG and take your electronic device back in hand. On this page are published all the documents necessary for the use of your device. MC 6840 by GRUNDIG.
USER MANUAL MC 6840 GRUNDIG
Hair and Beard Clipper
User Manual
natural_image
Simple black silhouette icon of a human head (no text or symbols)MC 6840
text_image
Prohibition sign showing a shower stroke over water with no text or symbolsnatural_image
Line drawing of a hairpin being cut with a magnified inset showing the blade (no text or symbols)natural_image
Line drawing of a hand holding a tool with a black arrow indicating motion (no text or symbols)natural_image
Illustration showing two hand positions: one with a curved arrow indicating rotation, the other with a tool inserted into a clip (no text or symbols)natural_image
Line drawing of hands using a tool to adjust or install a mechanical component, no text or symbols presentHinweise
natural_image
Symbol of a trash bin with crossed lines indicating no waste or discharge (no text or labels)Manufactory CO., LTD
Modellidentifikator:
ZDJ045100EU
Eingangsspannung:
100-240 V\~
Please note the following instructions when using the appliance:
The appliance is designed for domestic use only.
This appliance is designed solely for trimming human hair and beards. Any other use is expressly prohibited.
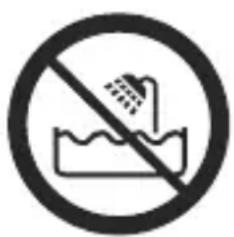
Never use or charge the appliance in the bathtub, shower or over a wash basin filled with water; nor should it be operated with wet hands.
text_image
Prohibition sign showing a showerhead spraying water, with no text or symbols beyond the prohibition symbol.- Never use the appliance if it, the cutting head or the power adapter show any signs of damage.
WARNING: Always keep the appliance and power adaptor dry.
When the appliance is being charged, on no account should it come into contact with water or any other liquid.
Do not immerse the appliance in water.
After charging, always unplug the cable from the socket and disconnect the power adapter from the wall socket.
Do not drop the appliance.
Charging adaptor and power cable cannot be repaired once damaged. Please make sure that you dispose the charging adaptor in accordance with environmental directions. You can get your new charger from the manufacturer or authorised service provider.
Never place the appliance, accessories or power adapter on or near hot surfaces.
Check that the mains voltage on the rating label corresponds to your local mains supply.
- Keep the appliance out of the reach of children.
Before cleaning or user maintenance operation first plug out.
This appliance can be used by children aged from 8 years and above and persons with reduced physical, sensory or mental capabilities or lack of experience and knowledge if they have been given supervision or instruction concerning use of the appliance in a safe way and understand the hazards involved.
Children shall not play with the appliance.
Cleaning and user maintenance shall not be made by children without supervision.
Do not open the appliance under any circumstances. No warranty claims are accepted for damage caused by improper handling.
This appliance contains batteries that are non-replaceable.
WARNING: For the purposes of recharging the battery, only use the detachable supply unit provided with this appliance.
Dear Customer,
congratulations on the purchase of your GRUNDIG MC 6840 hair and beard clipper.
Please read the following user notes carefully to ensure you can enjoy your quality GRUNDIG product for many years to come.
Meanings of the symbols
Following symbols are used in various sections of this manual:

Important information and useful hints about usage.

WARNING: Warnings against dangerous situations concerning the security of life and property.

Electrical insulation class.
Controls
See the illustrations on page 3.
A Adjustable comb (x2)
B Cutting head
c Thinning plate button
D Charge indicator LED
E On/Off switch
F Body
Accessories
Power adapter
Charging plug
Cleaning brush
Oil

RECYCLED & RECYCLABLE PAPER
This product has been produced in environmentally-friendly state-of-the-art facilities.
Operating with the power adapter
Check that the voltage indicated on the rating plate of the power adapter corresponds to your local power supply.
The only way to disconnect the appliance from the power supply is to unplug the power adapter.
1 Plug the charging plug into the appliance socket and the power adapter into the wall socket.
Note
The groove on the charging plug must match the notch in the appliance socket.
- LED ring D will start flashing, when the batteries are changed. Once the clipper is completely charged, LED ring D will illuminate continually.
2 LED ring D will start flashing when the unit reaches low battery capacity during operation.
- When the batteries are discharged: LED ring D will not display.
Notes
Discharge the appliance through normal use. Then recharge to full capacity. Maximum battery capacity will only be reached after several charging/discharging cycles.
When charging the unit, it can be used to cut the hair, LED ring will illuminate continually.
The adapter and unit F may become warm while charging; this is normal operation.
Caution
Please do not operate the unit connected to the power adapter for a long time or it may burn out the adapter.
3 Unplug the adapter from the wall and the base when not in use.
Caution
When in the bathroom or beside a water connection, only use the appliance in battery mode; never run it from the mains.
Notes
The trimming length without combing system is 1.5 mm.
■ Trimming without a comb is perfect for designer stubble.
Width of cutting head is 40 mm.
Setting the trimming length
The adjustable comb A allows the appliance to adjust in 12 different lengths:
Adjustable comb A
| Comb 1 3 mm | |
| Comb 1 6 mm | |
| Comb 1 9 mm | |
| Comb 1 12 mm | |
| Comb 1 15 mm | |
| Comb 1 18 mm | |
| Comb 2 18 mm | |
| Comb 2 21 mm | |
| Comb 2 24 mm | |
| Comb 2 27 mm | |
| Comb 2 30 mm | |
| Comb 2 33 mm |
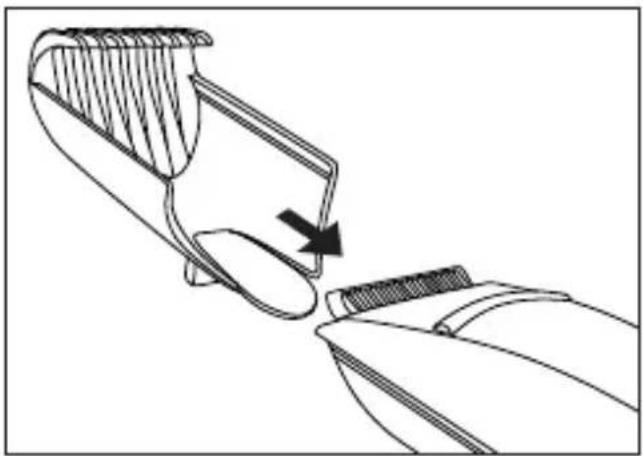
1 Slide the adjustable comb A over the cutting head B. Make sure that the notches on the adjustable combs are properly inserted into the grooves on the sides of the appliance.
natural_image
Line drawing of a hairpin being cut with a magnified inset showing the blade (no text or symbols)2 Adjust the trimming length by pressing it forwards or backwards into the required position. Make sure that the adjustable comb clicks into its place.

natural_image
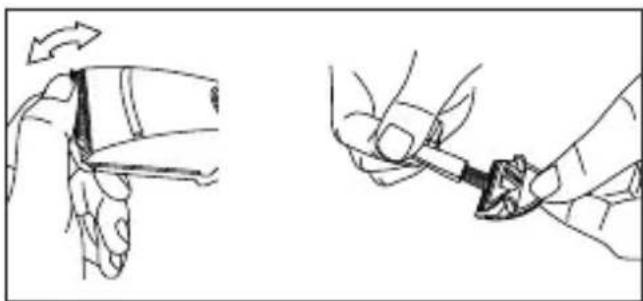
Line drawing of a hand holding a tool with a black arrow indicating motion (no text or symbols)3 After use, remove the adjustable comb A from the appliance.
Thinning plate button C
In order to push out or insert thin comb, you can choose to move the button for thinning plate from back to front or from front to back.
OPERATION
Hair trimming
Make sure that the hair is clean and completely dry.
Place a towel around the neck and shoulders of the person whose hair you are trimming. Make sure that the person is seated so that their head is roughly at your eye level. Before trimming, comb the hair so that it falls naturally and you can see the direction in which it grows.
1 Adjust the trimming length by referring to the "Preparation" section.
2 Press the On/Off switch E to switch on the appliance.
3 Place the cutting head ☐ on the person's hair.
4 Move the cutting head B against the direction of hair growth. Apply only a slight pressure when cutting with slow, gentle movements.
5 After use, switch off the appliance with the On/Off switch E.
Useful tips
^7 Always cut against the natural direction of the hair.
^7 As you cut, take a break at regular intervals. You can always make a correction, but not once the hair has been cut.
^7 Only cut a small amount the first time you use it. This is the only way to get used to the variable positions.
7 Keep combing the hair. Only look for hair which is too long and comb out clippings.
Beard trimming
1 Adjust the trimming length by referring to the "Preparation" section.
2 Press the On/Off switch E to switch on the appliance.
3 Place the cutting head ☐ on the beard.
4 Move the cutting head B against the direction of hair growth. Apply only a slight pressure when cutting with slow, gentle movements.
5 After use, switch off the appliance with the On/Off switch E.
Notes
If the appliance is blocked by thick hair while you are using it, switch it off. If running it from the mains, unplug the socket. Remove the adjustable comb A and clean the cutting head B with the brush supplied. Clean the appliance as described in the "Cleaning and Care" section.
For trimming contours, remove the adjustable comb A. Use the appliance without the combs (cutting length is 1.5 mm).
General information
The appliance must be cleaned regularly so that you can continue to enjoy its top performance and optimum results.
Cleaning
1 Press the On/Off switch E to switch off the appliance and unplug the power adapter if you are running it from the mains.
2 Remove the adjustable comb A from the appliance. Clean the cutting head B with the cleaning brush provided.
3 Remove the cutting head B by pushing the blade outwards. Clean the cutting head B and the cavity in the appliance with the cleaning brush provided.
natural_image
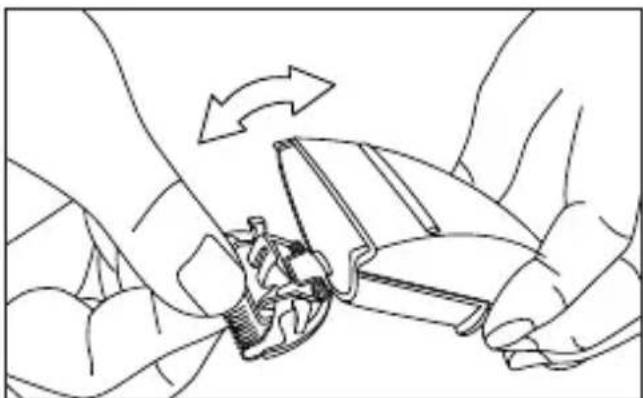
Line drawings showing a hand holding a small object with an arrow indicating rotation (no text or symbols)4 Insert the cutting head ☐ by first placing the claw into the cavity and pressing on the cutting head until it clicks on its place.
natural_image
Line drawing of hands using a tool to adjust or install a mechanical component, no text or symbols presentNotes
Never use water or any other liquids to clean the appliance. Only use the cleaning brush provided.
You can rinse the cutting head and the adjustable combs with water, but you must remove them from the appliance first.
Remove any clippings after each use.
The cutting head of your appli-ance does not normally need to be oiled. If you want to maintain the original condition of the cutting head for as long as possible, it is worth oiling it at regular intervals (with the oil provided).
Storage
If you do not plan to use the appliance for a long period of time, please store it carefully.
Make sure that it is unplugged and is completely dry.
Store the appliance in a cool, dry place.
Make sure that the appliance is kept out of the reach of children.
Compliance with the WEEE Directive and Disposing of the Waste Product:
This product complies with EU WEEE Directive (2012/19/EU). This product bears a classification symbol for waste electrical and electronic equipment (WEEE).

text_image
Warning symbol for a trash bin with crossed lines indicating no waste or discharge, and a solid black rectangle below.This symbol indicates that this product shall not be disposed with other household wastes at the end of its service life. Used device must be returned to off- fical collection point for recycling of electrical and electronic devices. To find these collection systems please contact to your local authorities or retailer where the product was pu- chased.
Each household performs important role in recovering and recycling of old appliance. Appropriate disposal of used appliance helps prevent potential negative consequences for the environment and human health.
Compliance with RoHS Directive
The product you have purchased complies with EU RoHS Directive (2011/65/EU). It does not contain harmful and prohibited materials specified in the Directive.
Package information
Packaging materials of the product are manufactured from recyclable materials in accordance with our National Environment Regulations. Do not dispose of the packaging materials together with the domestic or other wastes. Take them to the packaging material collection points designated by the local authorities.
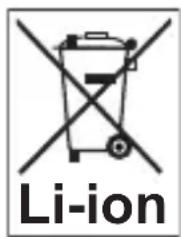
Information on Waste Batteries
text_image
Li-ionThis symbol on rechargeable batteries/batteries or on the packaging indicates that the rechargeable battery/battery may not be disposed of with regular household waste. Always dispose of used rechargeable batteries/batteries in accordance with local environmental regulations. Make enquiries about the applicable disposal regulations where you live.
Technical data
Operating temperature:
$$ + 5 ^ {\circ} \mathrm{C} - + 4 0 ^ {\circ} \mathrm{C} $$
Storage temperature:
$$ 0 ^ {\circ} \mathrm{C} - + 4 0 ^ {\circ} \mathrm{C} $$
Electrical insulation class: II
Design and specifications subject to change without notice.
Parameter of External Power Supply
Manufacturer: E-TEK Electronics Manufactory CO., LTD
Model Identifier: ZDJ045100EU
Input Voltage: 100-240V\~
Input Frequency: 50/60Hz
Input Current: 0.2A
Output Voltage: 4.5V
Output Current: 1.0A
Output Power: 4.5W
Average active efficiency: 76.23%
Efficiency at low load(10%): N/A
No-load power consumption: 0.07W
text_image
Prohibition sign showing a showerhead spraying water, indicating no pollution or leakagenatural_image
Line drawing of a hairpin being cut with a black arrow indicating the process (no text or symbols present)natural_image
Line drawing of a mechanical component with an arrow indicating rotation (no text or symbols)natural_image
Line drawing showing two hand positions: one with a curved arrow indicating rotation, the other with a tool inserted into a mechanical component (no text or symbols)natural_image
Line drawing of hands using a tool to adjust or install a mechanical component, no text or symbols presentNotlar
text_image
Warning symbol for a trash bin with crossed lines indicating no waste, and a solid black rectangle below.Manufactory CO., LTD
Model Tanımlayıcı:
ZDJ045100EU
natural_image
Prohibition sign showing a showerhead spraying water in a circular border (no text)PAPEL RECICLADO Y RECIBLABLE
natural_image
Line drawing of a hairbrush cutting into a flat blade, showing the blade being cut with an arrow indicating the process (no text or symbols present)natural_image
Line drawing of a hand holding a tool with a directional arrow indicating movement (no text or symbols)natural_image
Line drawing showing two hand positions: one with a curved arrow indicating rotation, the other with a tool inserted into a small object (no text or symbols)natural_image
Line drawing of hands assembling a mechanical component with an arrow indicating rotation (no text or symbols)Notas
text_image
Warning symbol for a trash bin with crossed lines indicating no waste, and a solid black bar below.Fabricante: E-TEK Electronics Manufactory CO., LTD
text_image
Prohibition sign showing a showerhead spraying water, with no text or symbols beyond the prohibition symbol.Cher client, chère cliente,
natural_image
Line drawing of a hairbrush cutting into a flat blade, showing the blade being cut with an arrow indicating the process (no text or symbols present)natural_image
Line drawing of a hand holding a tool with a black arrow indicating rotation (no text or symbols)natural_image
Illustration of two hand-painted diagrams showing a hand holding a small object and a tool interacting with it (no text or symbols present)natural_image
Line drawing of hands using a tool to adjust or install a mechanical component (no text or symbols present)Remarques
text_image
Warning symbol for a trash bin with crossed lines indicating no waste or discharge, and a solid black rectangle below.Fabricant : E-TEK Electronics Manufactory CO., LTD
text_image
Prohibition sign showing a showerhead spraying water, indicating no pollution or leakagenatural_image
Line drawing of a hairpin being cut with a black arrow indicating the process (no text or symbols present)natural_image
Line drawing of a hand holding a device with a directional arrow indicating motion (no text or symbols)3 Nakon upotrebe uklonite podesivi češalj A s uređaja.
Gumb nastavka za stanjivanje C
natural_image
Illustration of two hand-painted diagrams showing a finger being inserted into a clip (no text or symbols)natural_image
Line drawing of hands fastening a car seatbelt with a gear shift (no text or symbols)Napomene
Nikada ne koristite vodu ili bilo koju drugu tekućinu za čišćenje uređaja. Koristite samo dostavljenu četku za čišćenje.
Možete isprati glavu za rezanje i dva podesiva češlja vodom, ali prvo ih morate izvaditi iz uređaja.
Uklonite odrezane dlake nakon svake uporabe.
Glava za rezanje se obično ne treba podmazivati. Ako želite očuvati izvorni stanje glave za rezanje što je dulje moguće, dobro je podmazivati je u redovitim intervalima (dostavljenim uljem).
Čuvanje
text_image
Warning symbol for a trash bin with crossed lines indicating no waste, and a solid black rectangle below.Ovaj simbol označava da se ovaj proizvod ne smije odlagati zajedno s ostalim kućanskim otpadom na kraju njegovog radnog vijeka. Rabljeni uređaj mora se vratiti na službeno sabirno mjesto za recikliranje električnih i elektroničkih uređaja. Da biste pronašli te sustave za prikupljanje, obratite se lokalnim vlastima ili prodavaču gdje je proizvod kupljen.
Proizvodač: E-TEK Electronics Manufactory CO., LTD
Identifikator modela: ZDJ045100EU
Ulazni napon: 100-240V\~
text_image
Prohibition sign showing a shower stroke over water with no text or symbolsnatural_image
Line drawing of a mechanical device with an arrow indicating motion or assembly (no text or symbols)natural_image
Line drawing of a hand holding a tool with a curved handle and arrow indicating rotation (no text or symbols)natural_image
Line drawings showing two hand positions: one with a curved arrow indicating rotation, the other with a pointed tool inserted (no text or symbols)natural_image
Line drawing of hands assembling a mechanical component with an arrow indicating rotation (no text or symbols)Uwaga
Producent: E-TEK Electronics Manufactory CO., LTD