
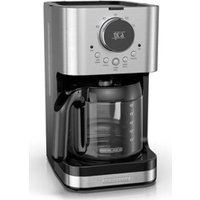
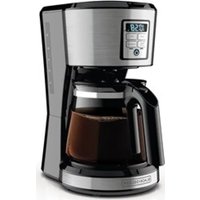
DCM575 - Coffee machine BLACK & DECKER - Free user manual and instructions
Find the device manual for free DCM575 BLACK & DECKER in PDF.
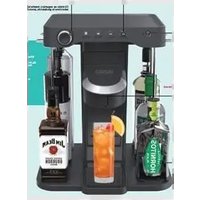
| Product type | Drip coffee maker |
| Brand | Black & Decker |
| Model | DCM575 |
| Capacity | 5 cups (740 ml / 25 oz) |
| Coffee type | Ground coffee |
| Filter | Paper filter or permanent filter (model DCM580) |
| Programmable timer | Yes, with clock and timer |
| Automatic shut-off | Yes, after 2 hours |
| Warming plate | Yes, keeps warm |
| Carafe | Glass with lid, 5 cups |
| Water level indicator | Yes, on the carafe |
| Automatic brew function | Yes, programmable |
| Power | Approximately 800 W (estimated) |
| Voltage | 120 V |
| Frequency | 60 Hz |
| Weight | Approximately 1.5 kg (estimated) |
| Dimensions (L x W x H) | Approximately 25 x 20 x 30 cm (estimated) |
| Main material | Plastic, glass |
| Color | Black |
| Care and cleaning | Filter basket, carafe and lid are dishwasher safe (top rack) |
| Descaling | Recommended every 3 months with white vinegar |
| Safety | Polarized plug, tamper-resistant screw, automatic shut-off |
| Replacement parts | Carafe (part # 177548-01), filter basket (part # 177547-00), permanent filter (part # 177549-00 for DCM580) |
| Warranty | 1 year limited |
Frequently Asked Questions - DCM575 BLACK & DECKER
User questions about DCM575 BLACK & DECKER
0 question about this device. Answer the ones you know or ask your own.
Ask a new question about this device
Download the instructions for your Coffee machine in PDF format for free! Find your manual DCM575 - BLACK & DECKER and take your electronic device back in hand. On this page are published all the documents necessary for the use of your device. DCM575 by BLACK & DECKER.
USER MANUAL DCM575 BLACK & DECKER
DCM580BPub1000002860R1 5/12/06 8:05 AM Page 1
Please Read and Save this Use and Care Book
Accessories/Parts (USA/Canada)
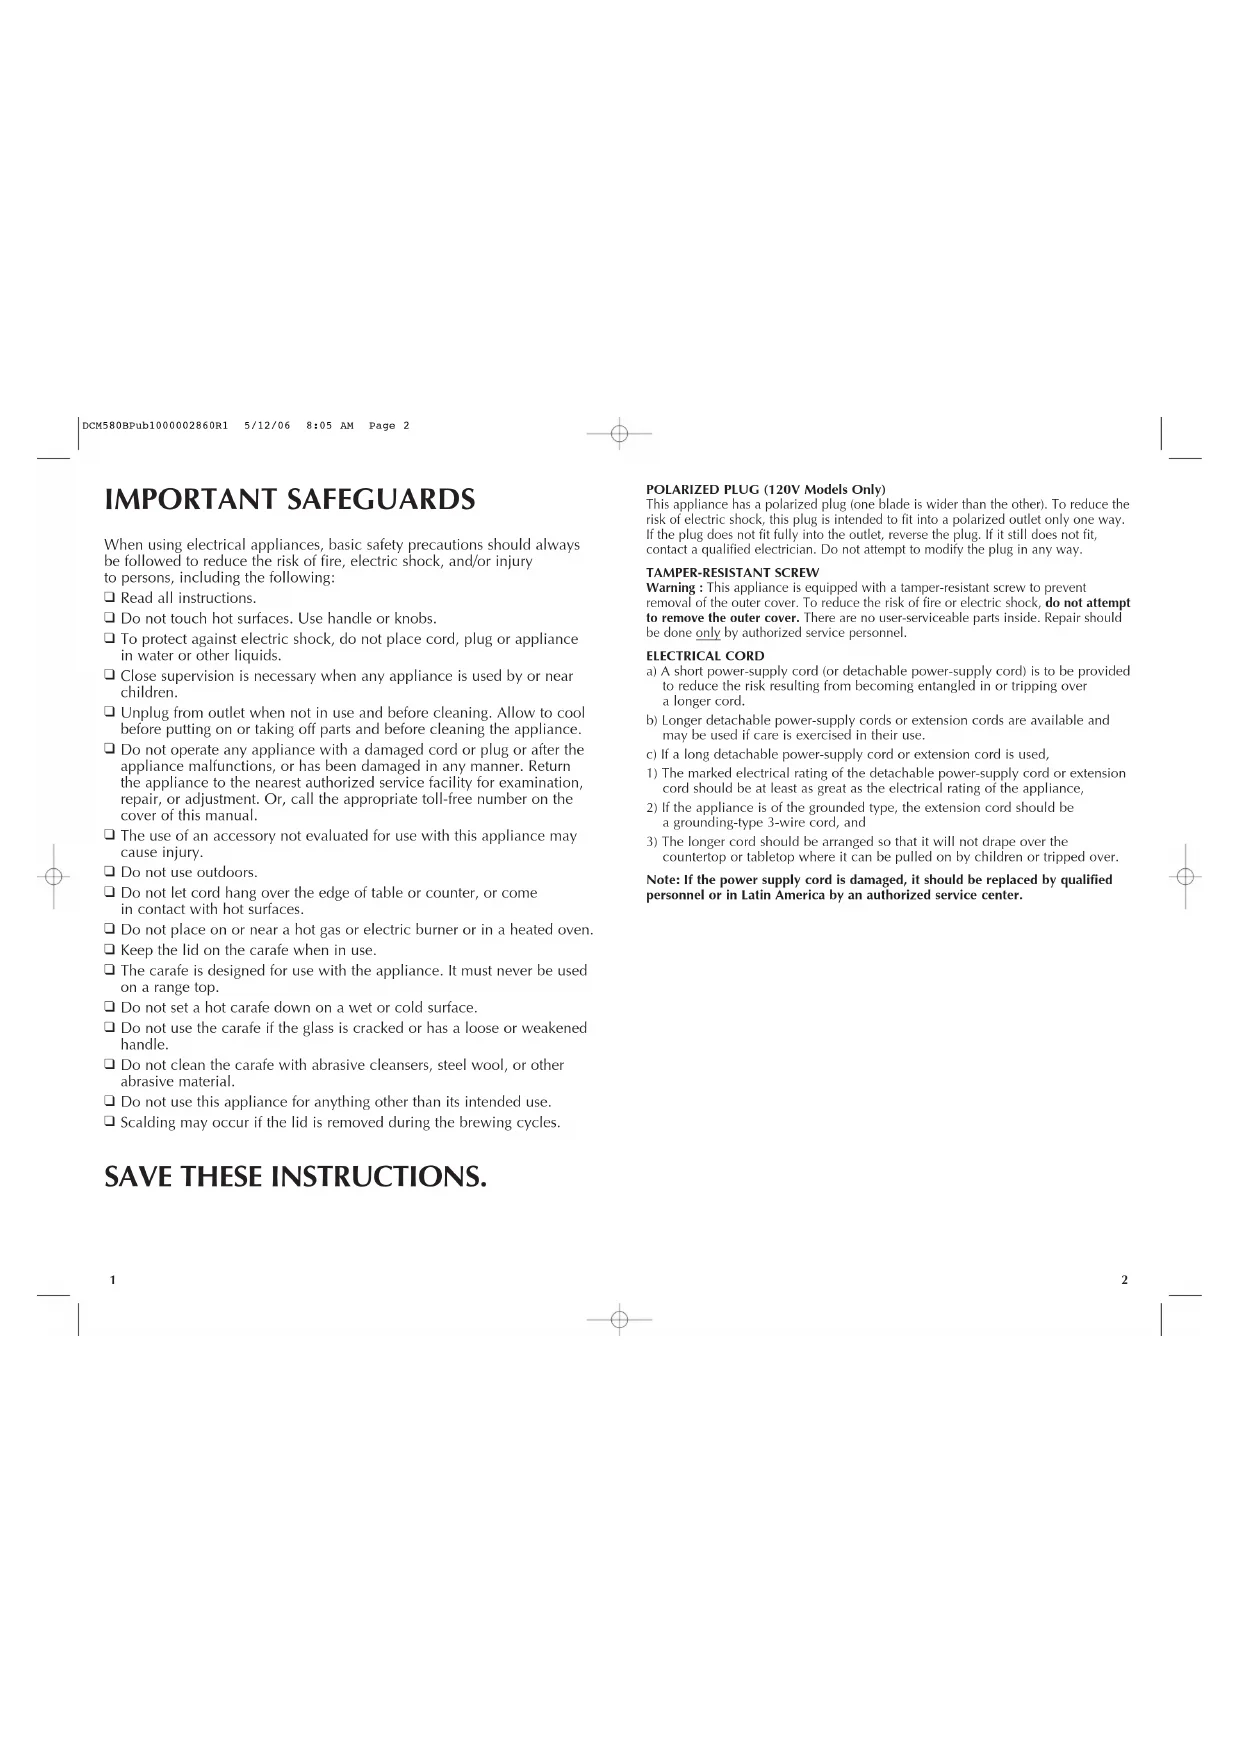
When using electrical appliances, basic safety precautions should always be followed to reduce the risk of fire, electric shock, and/or injury to persons, including the following:
Read all instructions.
Do not touch hot surfaces. Use handle or knobs.
To protect against electric shock, do not place cord, plug or appliance in water or other liquids.
- Close supervision is necessary when any appliance is used by or near children.
Unplug from outlet when not in use and before cleaning. Allow to cool before putting on or taking off parts and before cleaning the appliance.
- Do not operate any appliance with a damaged cord or plug or after the appliance malfunctions, or has been damaged in any manner. Return the appliance to the nearest authorized service facility for examination, repair, or adjustment. Or, call the appropriate toll-free number on the cover of this manual.
The use of an accessory not evaluated for use with this appliance may cause injury.
Do not use outdoors.
Do not let cord hang over the edge of table or counter, or come in contact with hot surfaces.
Do not place on or near a hot gas or electric burner or in a heated oven.
- Keep the lid on the carafe when in use.
The carafe is designed for use with the appliance. It must never be used on a range top.
Do not set a hot carafe down on a wet or cold surface.
Do not use the carafe if the glass is cracked or has a loose or weakened handle.
Do not clean the carafe with abrasive cleansers, steel wool, or other abrasive material.
Do not use this appliance for anything other than its intended use.
Scalding may occur if the lid is removed during the brewing cycles.
SAVE THESE INSTRUCTIONS.
POLARIZED PLUG (120V Models Only)
This appliance has a polarized plug (one blade is wider than the other). To reduce the risk of electric shock, this plug is intended to fit into a polarized outlet only one way. If the plug does not fit fully into the outlet, reverse the plug. If it still does not fit, contact a qualified electrician. Do not attempt to modify the plug in any way.
TAMPER-RESISTANT SCREW
Warning : This appliance is equipped with a tamper-resistant screw to prevent removal of the outer cover. To reduce the risk of fire or electric shock, do not attempt to remove the outer cover. There are no user-serviceable parts inside. Repair should be done only by authorized service personnel.
ELECTRICAL CORD
a) A short power-supply cord (or detachable power-supply cord) is to be provided to reduce the risk resulting from becoming entangled in or tripping over a longer cord.
b) Longer detachable power-supply cords or extension cords are available and may be used if care is exercised in their use.
c) If a long detachable power-supply cord or extension cord is used,
1) The marked electrical rating of the detachable power-supply cord or extension cord should be at least as great as the electrical rating of the appliance,
2) If the appliance is of the grounded type, the extension cord should be a grounding-type 3-wire cord, and
3) The longer cord should be arranged so that it will not drape over the countertop or tabletop where it can be pulled on by children or tripped over.
Note: If the power supply cord is damaged, it should be replaced by qualified personnel or in Latin America by an authorized service center.
DCM580Bpub1000002860R1 5/12/06 8:05 AM Page 4
Product may vary slightly from what is illustrated.
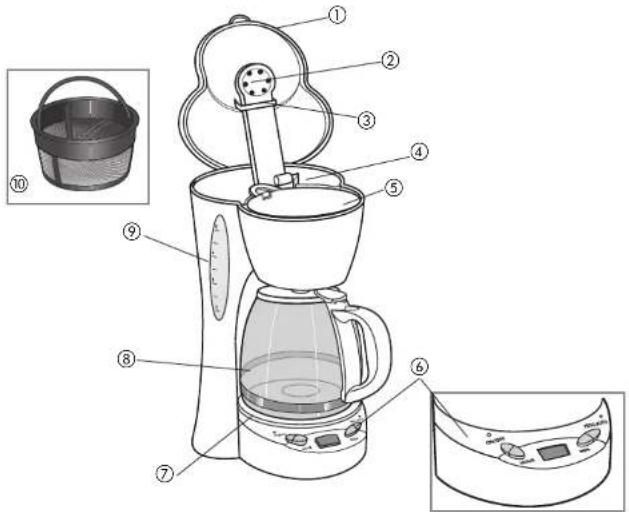
- Water reservoir and brew basket lid
- Water showerhead
- Guide
- Water reservoir
† 5. Removable brew basket (Part #177547-00) - Control panel
- "Keep Hot" plate
+8.5-cup/25 oz.(740 ml) carafe (Part #177548-01) w/lid (Part #GC500B) - Water level window
- Permanent gold tone filter (Models DCM580 and DCM580B) (Part #177549-00)
†Consumer replaceable/removable parts
How to Use
This appliance is intended for household use only.
GETTING STARTED
- Remove all stickers, packing material, and literature.
- Wash all parts as instructed in the Care and Cleaning section.
- Pour cold water up to 5-cup level mark in the water reservoir (A). Brew it through as instructed in "BREWING," but do not add coffee grounds to the paper filter. When done, turn off the coffeemaker and discard the water from the carafe.
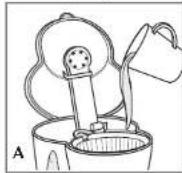
BREWING
- Lift water reservoir and brew basket lid (B). Use water markings on carafe to fill water reservoir with cold water to desired level.
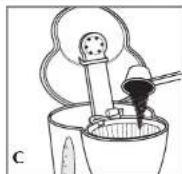
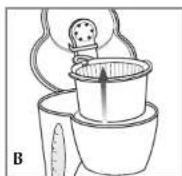
- Place a paper filter or permanent gold tone filter into the brew basket. Add ground coffee, (we recommend one heaping tazblespoon for every cup) (C). Close the cover.
- Place carafe on the "Keep I lot" plate and plug in the unit.
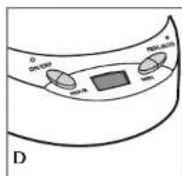
- Press "ON/OFF" and the indicator light comes on, or for delayed brewing, see "SETTING THE CLOCK/TIMER & AUTO-BREW" (D). You don't have to set the clock if you want to brew coffee right away.
-
Replace the carafe on the "Keep Hot" plate when not serving to keep coffee hot.
-
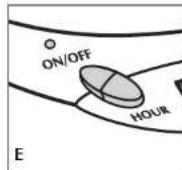
Press "ON/OFF" to turn off unit (E).
The coffeemaker will keep coffee warm for 2 hours before it automatically shuts off.
DCM580BPub1000002860Rl 5/12/06 8:05 AM Page 6
SETTING THE CLOCK/TIMER & AUTO BREW
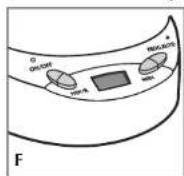
Plug in unit, clock flashes 12:00 a.m. until correct time is set. The coffecmaker works without setting the clock.
-
To set current time of day: Press the HOUR button, little dot in the top left corner of the display indicates the "p.m." time. Press the MIN button. Once set, clock continues to keep time unless coffeemaker is unplugged or a power failure occurs. Clock can only be reset when in the flashing mode (F).
-
To set the Auto-Brew time: Press the PROG/AUTO button and the light near the PROG/AUTO button starts flashing indicating it is being programmed. Press the
HOUR, then MIN buttons to set the time you'd like coffee to automatically begin brewing (for example 7:15 a.m.). Press the HOUR and MIN buttons to 7:15 a.m. Make sure the PM indicator light is not lit. When finished, press the PROG/AUTO button a second time (hold the button down a few seconds) until the PROG/AUTO light stops flashing and slays on to show the timer is activated.
-
Prepare the coffeemaker for brewing as instructed in "BREWING" but don't turn on the unit.
-
To check your preset auto time, press PROG/AUTO and it will display. When the clock returns to the current time of day, press PROG/AUTO to reactivate the timer.
To automatically brew coffee again at the same preset auto-on time, prepare coffeemaker for brewing again and press the PROG/AUTO button.
Note: The Auto-Brew function can be canceled at any time by pressing the PROG/AUTO button a second time or by pressing the OFF button twice. The PROG/AUTO light goes out.
Care and Cleaning
This product contains no user serviceable parts. Refer service to qualified service personnel.
-
Be sure the unit is off and cooled. Open the water reservoir and brew basket lid, remove the brew basket (lift straight up), and discard the paper filter/grounds. Clean as follows: brew basket, carafe, permanent gold tone filter and carafe lid are all top rack dishwasher-safe; or they may be hand washed in warm, sudsy water. See below for carafe care. The coffecmaker's exterior, control panel area and "Keep Hot" plate may be cleaned with a soft damp cloth. Do not use abrasive cleansers or scouring pads. Never immerse the coffecmaker in water.
-
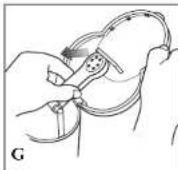
To clean inside of water reservoir and brew basket lid, open the lid allowing it to rest in the open position. Pull water showerhead out from under the guide, wipe surfaces with a damp cloth, then place water showerhead under guide and close the cover (G).
Carafe Care
A damaged carafe may result in possible burns from a hot liquid. To avoid breaking:
- Do not allow all liquid to evaporate from the carafe while on the "Keep I lot" plate or heat the carafe when empty.
Discard the carafe if chipped, cracked, or damaged in any manner. - Never use abrasive scouring pads or cleansers; they will scratch and weaken the glass.
- Do not place the carafe on or near a gas or electric burner, in a heated oven, or in a microwave oven.
- Avoid rough handling and sharp blows.
Mineral Deposits and Clogging
Mineral deposits left by hard water can clog your coffecmaker. Cleaning is recommended every 3 months. Excessive steaming or a prolonged brewing cycle is a sign that a cleaning is needed. The frequency of flushing out deposits is affected by your usage and water hardness. During cleaning, more steaming occurs than when brewing coffee and steam emissions are possible.
- Pour white vinegar into water reservoir up to 2-cup level on water window. Add cold water up to 5-cup line.
- Put a paper filter in the brew basket and close the lid. Set empty carafe on the "Keep I Hot" plate.
- Turn on coffecemaker and let half the cleaning solution brew into carafe (till water level goes down to around "2"). Turn off coffecemaker and let it soak for at least 15 minutes to soften the deposits.
- Turn on coffecmaker and brew remaining cleaning solution into carafe.
- Turn off caffeemaker, empty carafe and discard soiled filter.
- Fill reservoir with cold water to 5-cup line, replace empty carafe, then turn on coffeemaker for a complete brew cycle to flush out remaining cleaning solution. You may have to repeat this to eliminate the vinegar smell/laste.
- Wash the brew basket and carafe as instructed in "CLEANING."
DCM580BPub1000002860R1 5/12/06 8:05 AM Page 10
IMPORTANT MISES EN GARDE
DCM580BPub1000002860R1 5/12/06 8:05 AM Page 16
For service, repair or any questions regarding your appliance, call the appropriate "800" number on the cover of this book. Do not return the product to the place of purchase. Do not mail the product back to the manufacturer nor bring it to a service center. You may also want to consult the website listed on the cover of this manual.
One-Year Limited Warranty
(Appplies only in the United States and Canada)
What does it cover?
- Any defect in material or workmanship; provided; however, Applica's liability will not exceed the purchase price of the product.
For how long?
One year after the date of original purchase.
What will we do to help you?
- Provide you with a reasonably similar replacement product that is either new or factory refurbished.
How do you get service?
-
Save your receipt as proof of the date of sale.
-
Check our on-line service site at www.prodprotect.com/applica, or call our toll-free number, 1-800-231-9786, for general warranty service.
If you need parts or accessories, please call 1-800-738-0245.
What does your warranty not cover?
- Damage from commercial use
- Damage from misuse, abuse or neglect
- Products that have been modified in any way
- Products used or serviced outside the country of purchase
Glass parts and other accessory items that are packed with the unit - Shipping and handling costs associated with the replacement of the unit
- Consequential or incidental damages (Please note, however, that some states do not allow the exclusion or limitation of consequential or incidental damages, so this limitation may not apply to you.)
How does state law relate to this warranty?
- This warranty gives you specific legal rights, and you may also have other rights that vary from state to state or province to province.
NECESITA AYUDA?
DCM580BPub100002860R1 5/12/06 8:05 AM Page 22
Póliza de Garantía
28-D Centro. Mexico D.F.
Tel.:01 (800)714-2503
(55)1106-1400
Nicaragua
H & L Electronic Zumen 3, C. Aribya 15 Varas al Sur Managua, Nicaragua Tel.: (505) 260-3262
Panamá
Authorized Service Center
Hectrodomesticos, 5.A.
Boulevand El Dorado, al lado del Parque de las Mercedes
Panama, Panama
Tel.: (507) 236-5404
Perú
AV. REPUBLICA DE PANAMA 3535
Ofic 1303
San Isidro
Lima, Peru
Tel.:224414
Fax:224404
Puerto Rico
Buckcay Service
Jusps P. Piferto #1013
Puerto Nueva, SJPR 00920
Tel.: (787) 282 6175
Republica Dominicana Plaza Lama, S.A.
Av, Ondae #94 Santo Domingo, Republica Dominicana Tel.: (810) 687-9171
Trinidad and Tobago A.S. Bryden & Sons C Limited
33 Independence Square, Port of Spain
Trinidad, W.I.
Tel.: (868) 623-4696
Venezuela
Tecn Servicio IS2002
Av. Casanova
Centro Comercial del Este
Local 27
Caracas, Venezuela
Tel.: (58-212) 324-0969
RISQUES D'INCENDIE OU DE SECOUSSES ELECTRIQUES. NE PAS OUVRIR.
The lightning symbol refers to "dangerous voltage"; the exclamation symbol refers to maintenance instructions. See below.
WARNING: To reduce the risk of fire or electric shock, do not remove the cover of the coffeemaker. There are no user-serviceable parts inside. Repair should be done by authorized service personnel only.
Copyright © 2006 Applica Consumer Products, Inc.
Pub.No.1000002860-00-RV01
Made in People's Republic of China
Printed in People's Republic of China
Importado por:
Applica de Mexico S. de R.L. de C.V.
Blvd. Manuel Avila Carnacho 2900-902, Fracc Los Pirules
Tlalnepantla, Edo. de Mexico, C.P. 54040
TelEfon:551106-1400
Del interior marque sin costo
01(800)714-2503
Fabrication en La Republica Popular de China

- SAVE THESE INSTRUCTIONS.
- POLARIZED PLUG (120V Models Only)
- TAMPER-RESISTANT SCREW
- ELECTRICAL CORD
- Product may vary slightly from what is illustrated.
- How to Use
- GETTING STARTED
- BREWING
- SETTING THE CLOCK/TIMER & AUTO BREW
- Care and Cleaning
- Carafe Care
- Mineral Deposits and Clogging
- IMPORTANT MISES EN GARDE
- One-Year Limited Warranty
- (Appplies only in the United States and Canada)
- What does it cover?
- For how long?
- What will we do to help you?
- How do you get service?
- What does your warranty not cover?
- How does state law relate to this warranty?
- NECESITA AYUDA?
- Póliza de Garantía
- 28-D Centro. Mexico D.F.
- Nicaragua
- Panamá
- Perú
- Puerto Rico
- RISQUES D'INCENDIE OU DE SECOUSSES ELECTRIQUES. NE PAS OUVRIR.
Brand : BLACK & DECKER
Model : DCM575
Category : Coffee machine