
ME665B65 - Meat Grinder MOULINEX - Free user manual and instructions
Find the device manual for free ME665B65 MOULINEX in PDF.
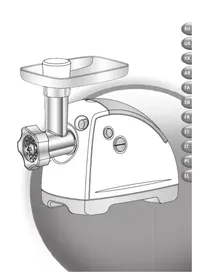


| Product type | Meat grinder |
| Brand | Moulinex |
| Model | ME665B65 |
| Power supply | 220-240 V, 50 Hz |
| Power | 800 W |
| Net weight | 2.5 kg |
| Dimensions (L x W x H) | 30 x 15 x 25 cm |
| Grinding capacity | 1.5 kg/min |
| Main functions | Meat grinding, sausage making, kibbeh preparation, cookie making, vegetable grating and slicing |
| Included accessories | Grinding head, plate, knife, kibbeh accessory, cookie accessory, 3 grating/slicing cones |
| Safety | Safety instructions booklet LS-123456 included, Reverse function, on/off button |
| Care and cleaning | Wash with soapy water, rinse and dry thoroughly. Grease the plate and knife after cleaning. |
| Usage advice | Do not grind bones, cartilage or very hard foods. Cut the meat into pieces of 2 cm x 2 cm. |
| Tip | At the end of operation, pass a few pieces of bread to clear the minced meat. |
| Warranty | 2 years |
| Manufacturer | Groupe SEB, France |
Frequently Asked Questions - ME665B65 MOULINEX
User questions about ME665B65 MOULINEX
0 question about this device. Answer the ones you know or ask your own.
Ask a new question about this device
Download the instructions for your Meat Grinder in PDF format for free! Find your manual ME665B65 - MOULINEX and take your electronic device back in hand. On this page are published all the documents necessary for the use of your device. ME665B65 by MOULINEX.
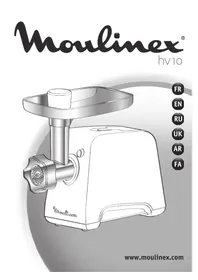
USER MANUAL ME665B65 MOULINEX
Run the appliance empty, without pre-lubricating the grid.
WARNING: The blades are very sharp, handle them with care.
USE: TOP PART OF THE MEAT GRINDER
1-2-3-4-5
Prepare the required amount of products, remove bones, and keep the meat dry.
Cut the meat into pieces (approximately 2 cm x 2 cm).

Useful tip:
At the end of the work, you can pass a few pieces of bread through to remove the remaining minced meat.
Run the appliance empty, without pre-lubricating the grid.
WARNING: Since the blades are very sharp, handle them with care.
USE: TOP PART OF THE MEAT GRINDER
1-2-3-4-5
Prepare the required amount of products, remove bones, and keep the meat dry.
Cut the meat into pieces (approximately 2 cm x 2 cm).

Useful tip:
You can skip about 7 slices of bread to make room for the minced meat.
How to make cutlets?
Turn on the meat grinder by pressing the start/stop button to position 0.
Then hold the "Reverse" button for a few seconds to release the stuck product.
Press the start/stop button to continue working.
ACCESSORIES FOR SAUSAGES
6-7-8-9-10-11
The centering pin must be in the required position for using the device.
To prevent the sausage casing from being too tight, make sausages of a smaller size.
Note: This operation is easier to do with two people: one fills the casing, the other holds the casing when it is full.
To give the sausage the required length, twist and turn the casing at the required place.
To ensure the best quality, try to fill the sausage casing evenly, and also make sure that the sausage does not exceed 10-15 cm (divide the sausages by tying knots between them).
UK
KEBAB ACCESSORY
12-13-14
To obtain a homogeneous mass, pass the meat through a meat grinder 2-3 times until you get a smooth consistency.
NOZZLE FOR COOKIES
15-16-17
Clean the dough. You will get excellent results if the dough is slightly sticky.
To choose the shape of the cookie, insert the strip opposite the desired shape.
Press the dough until you get the desired amount of cookies.
VEGETABLE CUTTER
Do you have any questions about the device?
To start the device, press and hold the «0» button for a few seconds. Then, to stop the device, press the «Reverse» button for a few seconds.
To stop the device, press the «I» button.
ADDITIONAL ACCESSORIES
6-7-8-9-10-11
The blender is designed for chopping vegetables and preparing purees.
To clean the accessories, disassemble them and wash them.
If the device is used for more than a minute, let it cool down before using it again.
The cake batter is poured into the mold, and the surface is smoothed with a spatula.
To prepare the batter for pouring, the mold is greased with butter and floured.
Do not recommend baking the sponge cake at a height of 10-15 cm (for baking, the mold is filled to 2/3 of its height, and the sponge cake is baked).
NECESSARY TOOLS
12-13-14
To remove the cake from the mold, run a knife around the edges, then turn it over onto a plate and tap it 2-3 times.
SPONGE CAKE PREPARATION
15-16-17
Remove from the mold. The cake is easily removed from the mold. Turn it over, and gently press the sides of the corset. Remove the sponge cake from the mold.
COCONUT CREAM

18-19-20-21-22-23-24-25
1

26-27-28-29-30-31
FA
. 1000 (LS-123456) 100000000000000000000000000000000000000000000000000
oL
J 1 J 1 J 1 J 1 J 1 J 1 J 1 J 1 J 1 J 1 J 1 J 1 J 1 J 1 J 1 J 1 J 1 J 1 J 1 J 1 J 1 J 1 J 1 J 1 J 1 J 1 J 1 J 1 J 1 J 1 J 1 J 1 J 1 J 1 J
26-27-28-29-30-31
Caution: safety instruction booklet LS-123456 is supplied with the appliance.
Before using your appliance for the first time, read the booklet carefully and keep it in a safe place.
BEFORE USING THE APPLIANCE FOR THE FIRST TIME
Wash all accessories in warm water and washing up liquid. Rinse and dry carefully. Do not put these parts into the dishwasher.
The screen and blades must be kept lubricated. Apply a little culinary oil to them.
Do not run the appliance empty if the screen has not been oiled.
WARNING! Handle the drums carefully as the blades are extremely sharp.
USE: MINCER HEAD
1-2-3-4-5
Prepare all the food you wish to mince, removing any bones, cartilage or nerves. Thaw frozen food completely before mincing.
Cut the meat into pieces (approximately 2 cm x 2 cm).

Tip: When you have finished mincing, put a few pieces of bread through the mincer to push out all the meat.
What should you do in the event of a blockage?
Stop the mincer by pressing the "0" position on the start/stop button A.
Then press the "Reverse" button B for a few seconds in order to clear the blocked food.
Press position "I" on the start/stop button A to continue mincing.
SAUSAGE NOZZLE
6-7-8-9-10-11
The centring plate keeps the screw feeder in position while the appliance is being used.
Ease the casing along as it fills. Do not overfill the sausages as this will stretch the casing.
NB: this operation is easier if two people do it together, one feeding the mince into the mincer and the other holding the casing in position as it fills.
Make sausages of the desired length by pinching the casing and twisting it where appropriate.
For the best results, take care to prevent air becoming trapped in the casing during filling and make sausages 10 cm to 15 cm in length (separate the sausages by tying a knot round the casing).
EN
Purchasing sausage skin casings (for UK only)
If your local butcher is unable to sell you some sausage skins suitable for thick sausages, we suggest contacting some of the following companies (information correct at March 2012)
Ascott Smallholding Supplies Ltd
Units 21/22
Whitewalls - Easton Grey - Malmesbury
Wiltshire SN16 ORD
United Kingdom
Tel: 0845 130 6285 - Fax: 01666 826931
e-mail: sales@ascott.biz
www.ascott.biz
Scobie & Junor (Estd. 1919) Ltd,
1 Singer Road,
East Kilbride,
Glasgow G75 0XS
Scotland
Tel: 0800 783 7331 (free phone)
Tel: 01355 237041
Fax: 01355 576343
e-mail: info@scobiesdirect.com
www.scobiesdirect.com
W Weschenfelder and Sons Ltd,
2-4 North Road
Middlesborough
TS2 1DD
United Kingdom
Tel: 01642 247524
e-mail: via contact us section on website
HYPERLINK
"Http://www.weschenfelder.co.uk"www.
weschenfelder.co.uk
Designa Sausage
15 Buxton Road - Disley - Stockport
Cheshire
SK12 2DZ
United Kingdom
Tel: 01663 733499
e-mail: via contact us section on website
HYPERLINK
"Http://www/designasausage.com"www.de
signasausage.com
KEBBE ACCESSORY
12-13-14
To make extra fine Kebbe or Kefta mince, pass the meat through the mincer 2 or 3 times until it has the right consistency.
BISCUIT MAKER
15-16-17
Prepare the dough. Results will be better if the dough is not too stiff. Choose the design by pointing the arrow to the shape you want. Keep adding dough until you have made the desired number of biscuits.
VEGETABLE CUTTER
18-19-20-21-22-23-24-25
For best results the ingredients you use should be firm. Do not allow food remains to build up inside the unit. Do not use the appliance to grate or mince substances which are too hard, such as sugar or large pieces of meat. Cut food into small pieces so that it can be fed easily into the hopper.
CLEANING
26-27-28-29-30-31
FR
SAUSAGE ACCESSORIES
6-7-8-9-10-11
BISCUIT MAKING ACCESSORY
15-16-17
BEFORE FIRST USE
Wash the parts in warm water and dry them. Remove the parts and dry them carefully.
The blade and the shaft are sharp. Handle them with care.
Do not leave the appliance running unattended if the ingredients are not inserted.
PRODUCT: Meat grinder, whose parts in contact with food are made of more durable materials.
USE: MEAT GRINDER
1-2-3-4-5
Prepare all the quantity of products that are to be processed: wash, peel, cut into pieces.
Cut the meat into pieces (2 cm x 2 cm approx.).

Idea:
COMPLIANCE
- TR CU 004/2011 "On safety of low-voltage equipment", approved by Decision of the Customs Union Commission dated 16.08.2011 No. 768.
- TR CU 020/2011 "Electromagnetic compatibility of technical means", approved by Decision of the Customs Union Commission dated 09.12.2011 No. 879.
Service life: 2 years from the date of sale.
EAC
2507366

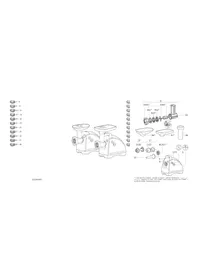
- USE: TOP PART OF THE MEAT GRINDER
- USEFUL TIP
- HOW TO MAKE CUTLETS
- ACCESSORIES FOR SAUSAGES
- UK
- KEBAB ACCESSORY
- NOZZLE FOR COOKIES
- VEGETABLE CUTTER
- DO YOU HAVE ANY QUESTIONS ABOUT THE DEVICE
- ADDITIONAL ACCESSORIES
- NECESSARY TOOLS
- SPONGE CAKE PREPARATION
- COCONUT CREAM
- OL
- BEFORE USING THE APPLIANCE FOR THE FIRST TIME
- USE: MINCER HEAD
- WHAT SHOULD YOU DO IN THE EVENT OF A BLOCKAGE
- SAUSAGE NOZZLE
- EN
- PURCHASING SAUSAGE SKIN CASINGS (FOR UK ONLY)
- ASCOTT SMALLHOLDING SUPPLIES LTD
- SCOBIE & JUNOR (ESTD. 1919) LTD
- W WESCHENFELDER AND SONS LTD
- DESIGNA SAUSAGE
- KEBBE ACCESSORY
- BISCUIT MAKER
- CLEANING
- FR
- SAUSAGE ACCESSORIES
- BISCUIT MAKING ACCESSORY
- BEFORE FIRST USE
- USE: MEAT GRINDER
Brand : MOULINEX
Model : ME665B65
Category : Meat Grinder