Instax Mini 11 - Camera FUJIFILM - Free user manual and instructions
Find the device manual for free Instax Mini 11 FUJIFILM in PDF.
User questions about Instax Mini 11 FUJIFILM
0 question about this device. Answer the ones you know or ask your own.
Ask a new question about this device
Download the instructions for your Camera in PDF format for free! Find your manual Instax Mini 11 - FUJIFILM and take your electronic device back in hand. On this page are published all the documents necessary for the use of your device. Instax Mini 11 by FUJIFILM.
USER MANUAL Instax Mini 11 FUJIFILM
natural_image
Line drawing of a digital camera with lens, buttons, and lens (no text or symbols)User's Guide/Safety Precautions
natural_image
Diagram of a device with a cylindrical component inserted, showing internal components and a battery outlet (no text or symbols)1
natural_image
Line drawing of a hand inserting a device into a device casing (no text or symbols)2
text_image
AA (LR6) 5号电池3
natural_image
Line drawing of a handheld device with a button inserted (no text or symbols)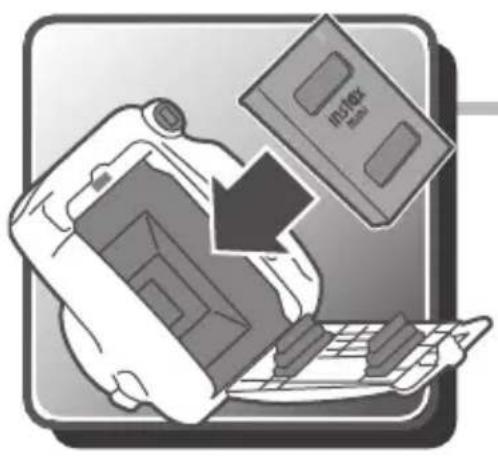
natural_image
Illustration of a hand holding a device next to an open book labeled 'Motor', with no visible text or symbols on the device itself.1
natural_image
Illustration of hands using a handheld device to adjust or install a device (no text or symbols visible)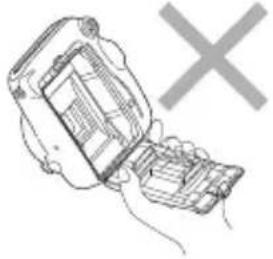
natural_image
Line drawing of a device with a handle and internal components, no text or symbols present2
text_image
Diagram showing a hand holding a mobile phone with a magnified inset highlighting the screen area and internal components.3
natural_image
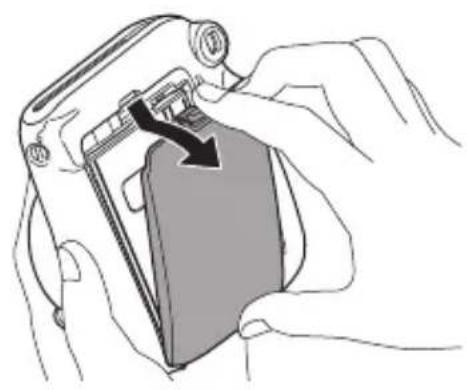
Diagram of a hand holding a camera case with an arrow indicating the right side (no text or symbols present)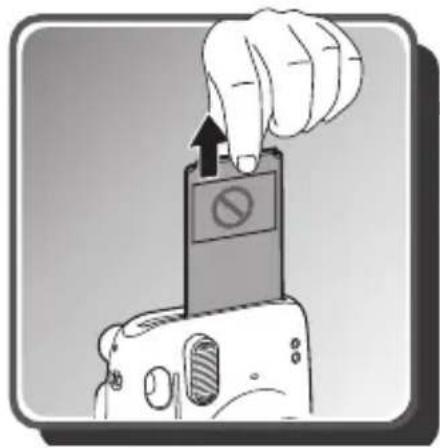
text_image
Diagram showing a hand pressing a device with a prohibition symbol, indicating no movement or disassembly.1
natural_image
Line drawing of a digital camera with an arrow pointing to the lens (no text or symbols present)2
natural_image
Line drawing of a digital camera with a circular button and arrow pointing to the lens (no text or symbols present)3
text_image
S→10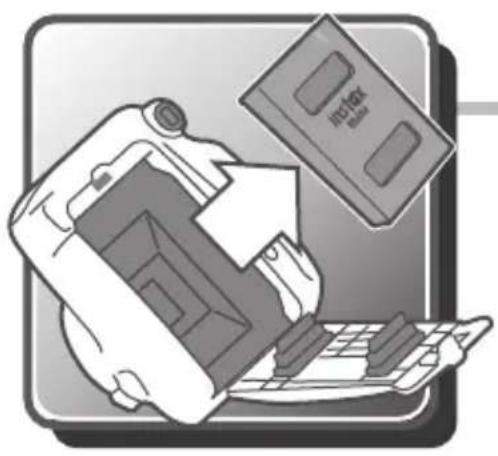
natural_image
Illustration of a hand holding a device next to a laptop with an upward arrow, next to a card labeled 'Index' (no text or symbols on the devices themselves)1
natural_image
Line drawing of a camera with a circular inset showing the number 9 (no text or symbols present)2
natural_image
Illustration of hands holding a smartphone with a black arrow pointing to the screen (no text or symbols)3
natural_image
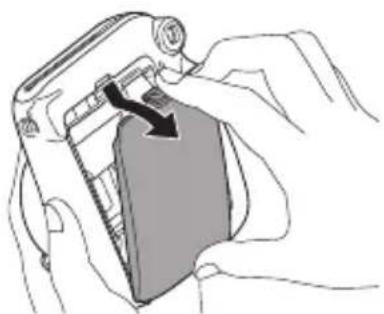
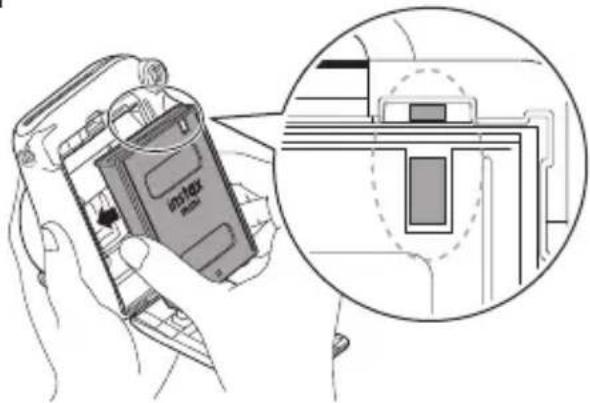
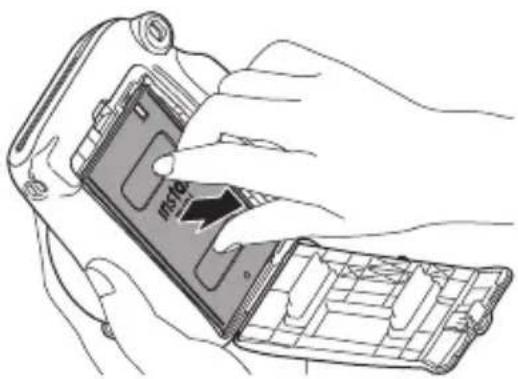
Illustration of hands holding a mobile phone with a partially open screen (no text or symbols visible)For how to insert batteries and how to insert and remove an instax mini film pack, see pages 3 to 6.
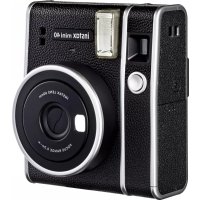
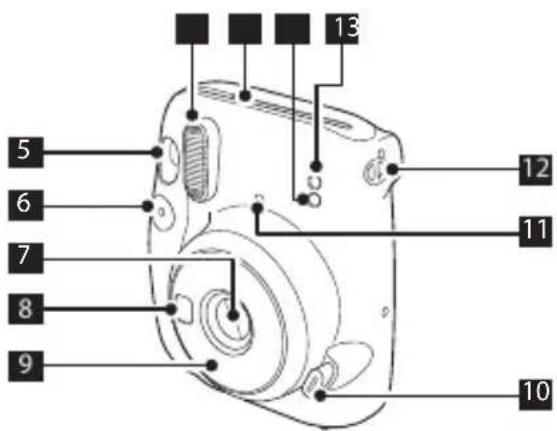
Names of Parts
Front
text_image
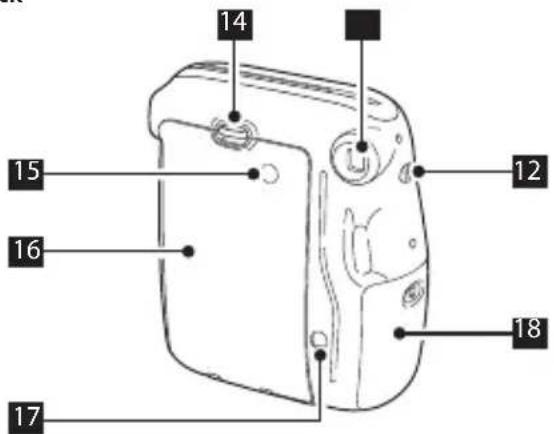
5 6 7 8 9 10 11 12 13Back
text_image
14 15 16 17 12 181 AE light sensor
2 Flash light sensor
3 Film ejection slot
4 Flash lampface
5 Viewfinder
6 Shutter button
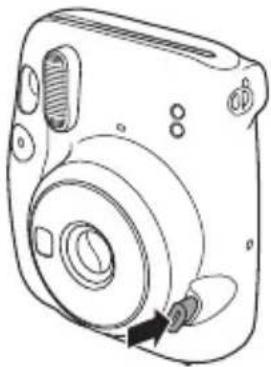
7 Lens cover / Lens
8 Selfie mirror
9 Lens barrel
10 Power button
11 Flash charging lamp
12 Strap eyelet
13 Viewfinder eyepiece
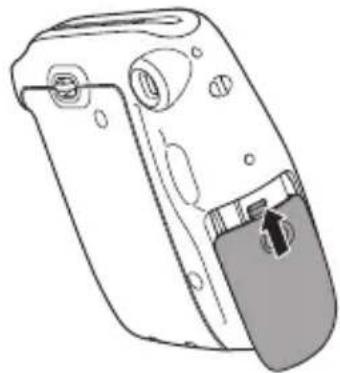
14 Back cover lock
15 Film confirmation window
16 Back cover
17 Film counter
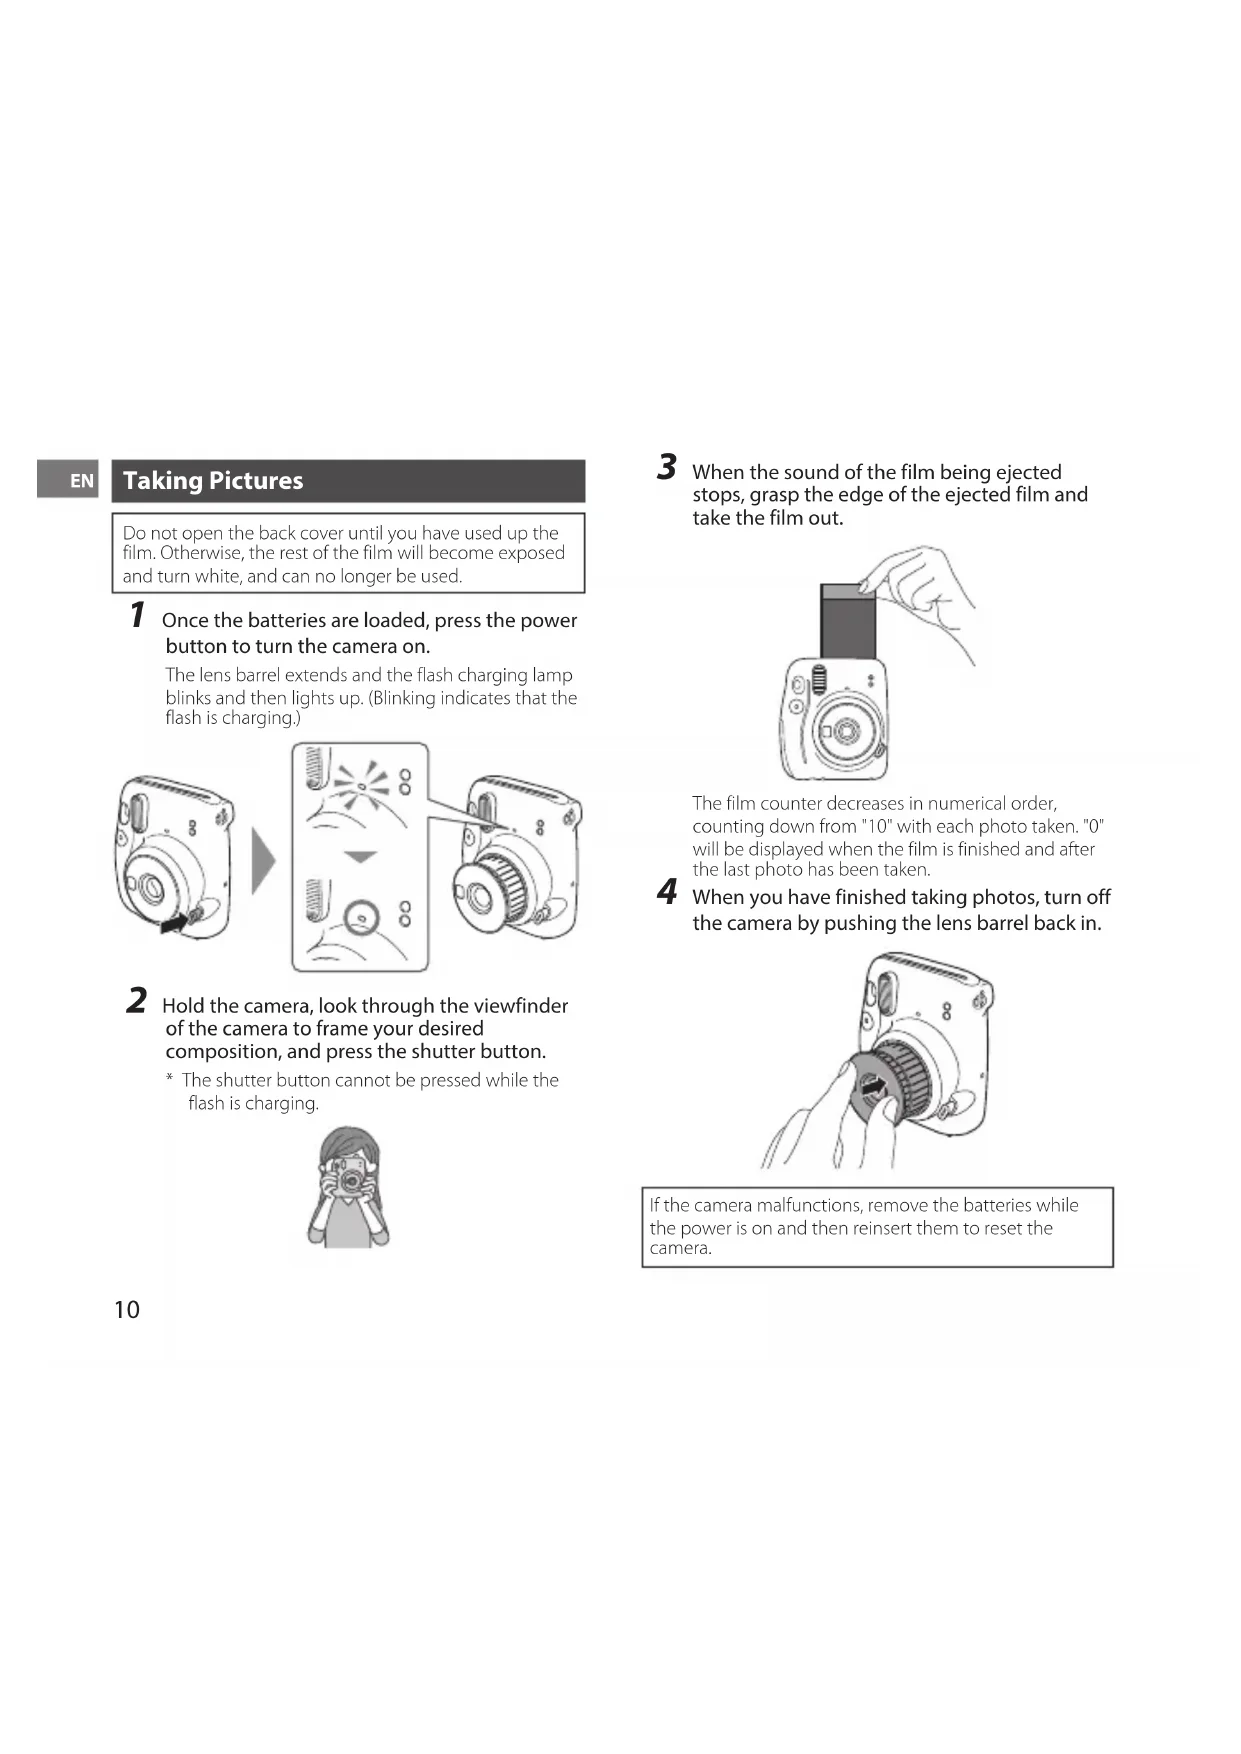
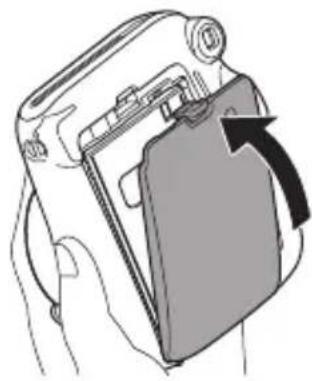
18 Battery lid
EN
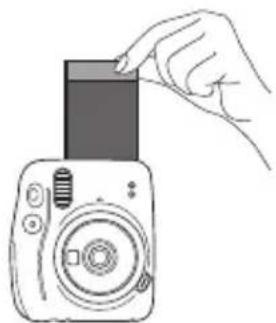
Taking Pictures
Do not open the back cover until you have used up the film. Otherwise, the rest of the film will become exposed and turn white, and can no longer be used.
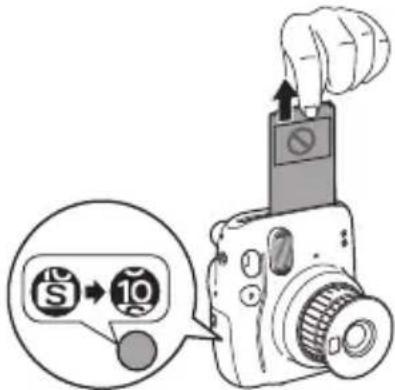
1 Once the batteries are loaded, press the power button to turn the camera on.
The lens barrel extends and the flash charging lamp blinks and then lights up. (Blinking indicates that the flash is charging.)
text_image
Diagram illustrating the process of digital camera usage, showing transformation from a camera to a device with visible components and signal patterns.2 Hold the camera, look through the viewfinder of the camera to frame your desired composition, and press the shutter button.
* The shutter button cannot be pressed while the flash is charging.

3 When the sound of the film being ejected stops, grasp the edge of the ejected film and take the film out.
natural_image
Line drawing of a hand inserting a card into a digital camera (no text or symbols)The film counter decreases in numerical order, counting down from "10" with each photo taken. "0" will be displayed when the film is finished and after the last photo has been taken.
4 When you have finished taking photos, turn off the camera by pushing the lens barrel back in.
natural_image
Hand inserting a camera into a circular button (no text or symbols visible)If the camera malfunctions, remove the batteries while the power is on and then reinsert them to reset the camera.
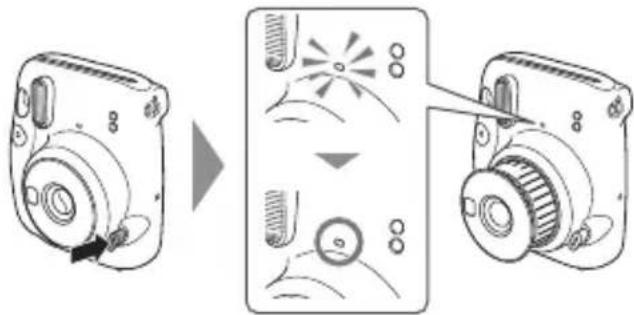
Taking a Photo in Selfie Mode
To switch from the selfie mode to normal shooting mode, turn off the camera by pushing the lens barrel back in and then turn it on again.
Taking a picture of yourself
If you shoot in selfie mode, you can take a picture of yourself using the selfie mirror on the front of the camera to confirm your exposure.
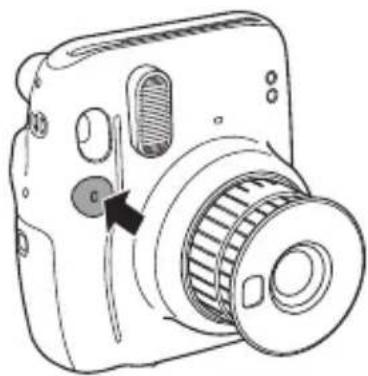
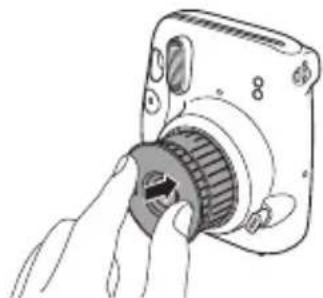
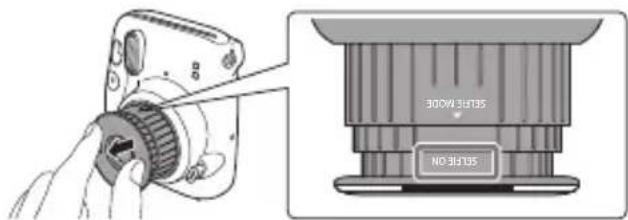
1 Pull out the lens barrel until the SELFIE ON mark appears.
text_image
300W 3H135 NO 3H135Pull out the lens barrel until the SELFIE ON mark appears.
2 Hold the camera securely with both hands so that your face is 30 to 50 cm away from the end of the lens.
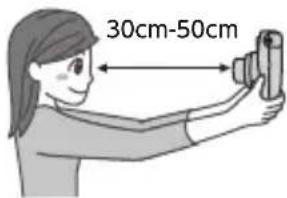
text_image
30cm-50cm3 Confirm the composition using the selfie mirror, then push the shutter to take the photo.
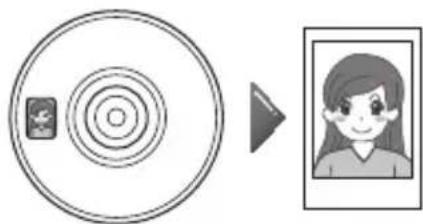
natural_image
Simple line drawing of a circular object with concentric rings and a separate photo frame (no text or symbols)Taking a closeup
If you shoot in selfie mode, you can move the camera close to the subject and take a closeup.
1 Pull out the lens barrel until the SELFIE ON mark appears.
2 Hold the camera so that the mark in the viewfinder sits slightly to the upper right of the center of the subject, then press the shutter button to take a photo.
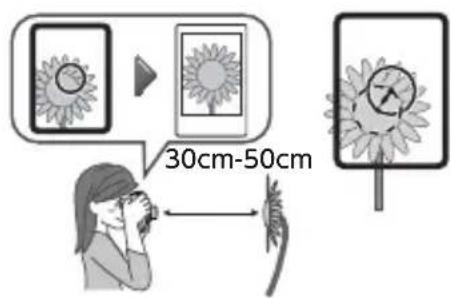
text_image
30cm-50cmPrecautions for Taking Photos
Precautions for Holding the Camera

Correct way to hold

Do not cover the flash lampface with a finger

Do not cover the flash light sensor and AE light sensor with a finger
- Take care that a finger or the strap does not cover the flash light sensor, AE light sensor, flash lampface, lens, or film ejection slot.
- Hold the camera so that the flash lampface is at the top when taking a horizontal picture.
- Do not take pictures in locations where flash photography is forbidden.
- Do not grasp the lens barrel when holding the camera. The finished photos may be adversely affected.
- Look into the viewfinder so that the mark in the viewfinder appears in the center.
- Be careful not to touch the lens when you press the shutter button.
Distances for Normal Mode and Selfie Mode
- In normal mode, take a picture at a distance of at least 0.5 m from the subject. The effective flash range is up to approximately 2.7 m.
- When holding the camera closer than 0.5 ~m from the subject, use the selfie mode. Use the selfie mode to capture a closeup within the range of 30 to 50 ~cm .
Flash charging lamp states and error solutions
| Flash charging lamp state | Description |
| Lit Ready to take a photo. | |
| Flashing slowly | Charging the flash. Please wait until the flash charging lamp lights. Charging normally takes 3 to 10 seconds to complete. |
| Flashing quickly | An error has occurred. |
| Main errors | Cause and solution |
| Battery check failed | The flash cannot be charged because the battery voltage is insufficient. Replace the batteries with new ones. |
| Film jammed | Do not forcibly pull out the film. Removing and reinserting the batteries while the power is on may enable the film to be ejected. |
Safety Precautions
- o not use this product and its accessories for a purpose other than taking photos.
●his product has been designed with safety in mind, but please read the following safety precautions carefully and then use the product correctly.
After reading this User's Guide, be sure to keep it in an easy-to-access place where you can refer to it whenever necessary.

WARNING
This indicates a matter that may lead to death or serious injury if ignored or incorrectly handled.
Do not disassemble this product. Electric shock may occur.
Do not touch this product if the inside of it becomes exposed due to dropping, etc. This product has high-voltage circuitry that may cause electric shock.
If you notice anything abnormal, such as the camera (batteries) becoming hot, emitting smoke, or making a burning smell, remove the batteries immediately. Fire or burns may occur (be careful not to burn yourself when removing the batteries).
Never take flash photographs of people riding bicycles, driving cars, skateboarding, riding a horse and the like. The flash can be startling, distract, frighten animals, and otherwise cause an accident.
If you drop the camera in water or if water or a piece of metal or other foreign object gets inside, remove the batteries immediately. Heat generation or fire may occur.
Do not use this camera in places where there is flammable gas or near open gasoline, benzine, paint thinner or other unstable substances which can give
off dangerous vapors. Failure to do this could result in explosion or fire.
Keep the product out of the reach of infants and small children. Injury may occur.
Do not disassemble, heat the batteries, throw them in a fire, or put them in an electrical short circuit. The batteries may rupture.
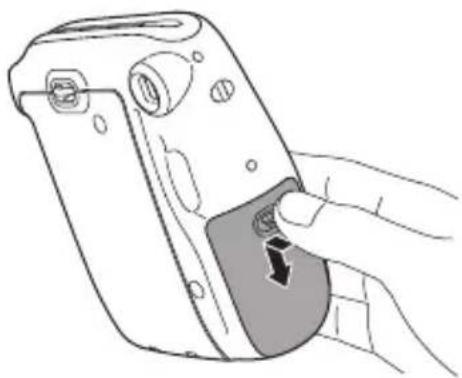
⚠ Use only AA (LR6) batteries. Heat generation or fire may occur if other batteries are used.
⚠️ Keep batteries out of the reach of infants. An infant may accidentally swallow a battery. In the event that a battery is swallowed, seek medical attention immediately.

CAUTION
This indicates a matter that may lead to injury or physical damage if ignored or incorrectly handled.
⚠ Do not get this product wet or handle it with wet hands. Electric shock may occur.
Using a flash too close to a person's eyes may for the short term affect their eyesight. Take care when taking pictures of infants and young children.
⚠️ Take care not to make a mistake with the Ⓗ and ⏱ polarities when inserting the AA (LR6) batteries. Damages to the surroundings may occur due to the camera being damaged or its battery fluid leaking out.
Do not touch moving parts inside the camera. You may be injured.
Handling
■andling of Camera
- The camera is a precision instrument, so do not get it wet, drop it, or subject it to shock. Also, do not place the camera where it will be exposed to sand.
- Before using a commercially available strap, check the strength of the strap. Be especially careful when using a strap for mobile phones and smartphones because such straps are made for lightweight devices.
- If you are not using your camera for a long interval, unload the batteries and keep it where it will avoid heat, dust and moisture.
- Remove soil and dust from the viewfinder window, etc. with an air blower and by wiping gently with a piece of soft cloth.
- Do not use solvent such as thinner or alcohol to wipe off dirt.
- Do not leave the camera in a closed motor vehicle, another hot place, a humid place, on the beach, etc. for any period of time.
- Moth repellent gas such as naphthalene will adversely affect the camera and film. Avoid keeping the camera and film in a chest of drawers, etc. with mothballs.
- The operating temperature range of this camera is +5^ to +40^ .
- This camera may occasionally malfunction because it is controlled by a micro computer. If it malfunctions, remove and then reinsert the batteries to reset the camera.
■ Handling of instax mini Film and Photos
For details on the handling of film and photos, see the instructions of FUJIFILM instax mini instant film.
- Keep film a cool place. In particular, do not leave film in an extremely hot place, such as in a closed motor vehicle, for a long period of time.
- Use film as soon as possible after inserting it in the camera.
- If film has been kept in a place where the temperature is extremely low or high, allow it to become accustomed to a normal temperature before taking pictures.
- Use film before the film expiration date referenced on the package.
- Avoid airport checked luggage inspection and other strong X-ray exposure. Unused film is susceptible to the effect of fogging, etc. We recommend that you carry film onto aircraft in carry-on luggage (check with the relevant airport for more information).
- Avoid exposing photos to strong light, and store them in a cool and dry place.
- Do not make a hole in film or tear or cut film. Do not use film that is damaged.
- Do not cut or disassemble the film for this camera as it contains black caustic alkali paste. Be especially careful not to let infants or pets put the film into their mouths. Also take care that the paste does not come into contact with skin and clothes.
- If you accidentally touch the paste of unused film, immediately wash it off with plenty of water. If the paste comes into contact with the eyes or mouth, wash the area and then seek medical attention. The alkalinity of this film will weaken approximately 10 minutes after the photo is ejected from the camera.
■ Cautions on Handing of Film and Finished Photos
For details, see the instructions of FUJIFILM instax mini instant film.
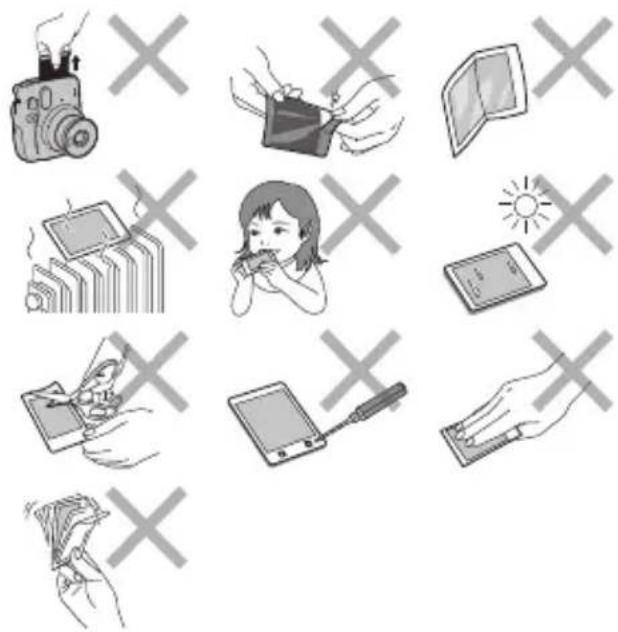
text_image
Illustration showing various household and child activities with crossed-out X marks, including a camera, photo, tablet, sun, and hands.
The "CE" mark certifies that this product satisfies the requirements of the European Union (EU) regarding safety, public health, environment, and consumer protection. ("CE" is the abbreviation of Conformité Européenne.)
Legally required regulation compliance displays are located on the inside of the back cover of the camera.

Disposal of Electric and Electronic Equipment in Private Households
Disposal of used Electrical & Electronic Equipment
(Applicable in the European Union and other European countries with separate collection systems)
This symbol on the product, or in the manual and in the warranty, and/or on its packaging indicates that this product shall not be treated as household waste. Instead it should be taken to an applicable collection point for the recycling of electrical and electronic equipment. By ensuring this product is disposed of correctly, you will help prevent potential negative consequences to the environment and human health, which could otherwise be caused by inappropriate waste handling of this product. The recycling of materials will help to conserve natural resources. For more detailed information about recycling of this product, please contact your local city office, your household waste disposal service or the shop where you have purchased the product. In Countries outside of EU: If you wish to discard this product, please contact your local authorities and ask for the correct way of disposal.

This Symbol on the batteries or accumulators indicates that those batteries shall not be treated as Household waste.
For customers in Turkey:
EEE Complies with Directive.
EN
Specifications
| Film FUJIFILM instax mini instant film | |
| Photo Picture Size | 62 mm × 46 mm |
| Lens 2 components, 2 elements, f = 60 mm, 1:12.7 | |
| Viewfinder Real image finder, 0.37×, with target spot | |
| Shooting Range | 0.3 m and beyond (use selfie mode for 0.3 m to 0.5 m) |
| Shutter Programmed electronic shutter 1/2 to 1/250 sec. Slow synchro for low light | |
| Exposure Control | Automatic, Lv 5.0 to 14.5 (ISO 800) |
| Film Ejection Automatic | |
| Film Developing Time | Approx. 90 seconds (varies depending on the ambient temperature) |
| Flash Constant firing flash (automatic light adjustment), recycle time: 6.5 seconds or less (when using new batteries), effective flash range: 0.3 to 2.7 m | |
| Power Supply Two AA-size alkaline batteries (LR6), capacity: approx. 10 instax mini film packs of 10 exposures each | |
| Auto Power Off Time | After 5 minutes |
| Other Includes film | counter and film pack confirmation window |
| Dimensions 107.6 mm × 121.2 mm × 67.3 mm | |
| Weight 293 g (without batteries, strap, and film) | |
Deutsch
text_image
Diagram illustrating the process of digital camera usage, showing before and after states with labeled components.natural_image
Line drawing of a hand holding a camera module (no text or symbols)natural_image
Hand inserting a camera into a circular button (no text or symbols visible)natural_image
Simple line drawing of a circular object with concentric rings and a separate portrait photo (no text or symbols)natural_image
Illustration of a person holding a camera, no text or symbols presentRichtige Halteweise
text_image
Illustration showing various photo editing and cleaning tools with 'X' symbols indicating exclusion or rejection.text_image
Diagram illustrating the process of digital camera mode conversion, showing before/after states with directional arrows and component illustrations.natural_image
Line drawing of a hand inserting a card into a digital camera (no text or symbols)natural_image
Hand inserting a button into a camera module (no text or symbols visible)natural_image
Simple line drawing of a circular object with concentric rings and a separate portrait photo (no text or symbols)Faire un gros plan
text_image
Illustration showing various photo editing and cleaning tools with 'X' symbols indicating exclusion or rejection.text_image
Diagram illustrating the process of digital camera usage, showing transformation from a camera to a device with fan and lens components.natural_image
Line drawing of a hand inserting a card into a digital camera (no text or symbols)natural_image
Hand inserting a camera into a circular button (no text or symbols visible)natural_image
Simple line drawing of a circular object with concentric rings and a separate portrait photo (no text or symbols)text_image
Illustration showing various household appliances and tools with 'X' symbols, including a camera, photo, laptop, sun, and hand tools.
natural_image
Illustration of a hand inserting a camera into a button (no text or symbols)natural_image
Close-up of a hand using a tool to adjust a mechanical component (no text or symbols visible)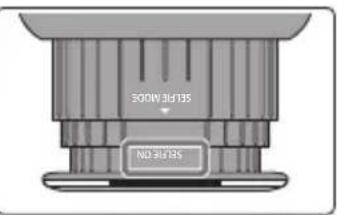
text_image
300W/34135 NO.36175natural_image
Simple line drawing of a circular object with concentric rings and a play button, next to a framed portrait (no text or symbols)微距拍摄
text_image
Illustration showing various household items with crossed-out X marks, including a camera, photo, laptop, and hand tools.natural_image
Line drawing of a hand holding a camera module, no text or symbols presentnatural_image
Illustration of a hand inserting a button into a camera lens (no text or symbols visible)natural_image
Simple line drawing of a circular object with concentric rings and a separate image showing a person (no text or symbols)拍攝特寫
text_image
Illustration showing various photo recording and device tools with X marks, including a camera, magnifying glass, screen, circuit board, child eating, sun, tablet, and power adapter.
natural_image
Line drawing of a hand inserting a card into a digital camera (no text or symbols)natural_image
Hand inserting a camera into a circular button (no text or symbols visible)natural_image
Simple diagram showing a circular object with concentric rings and a separate image of a girl's face, connected by an arrow (no text or symbols)근접 촬영하기
text_image
Illustration showing various devices and tools with 'X' symbols, including a camera, photo, screen, sun, tablet, and hand holding a pen.text_image
Diagram illustrating the process of a digital camera with labeled parts and directional arrows indicating transformation.natural_image
Line drawing of a hand inserting a card into a camera (no text or symbols)natural_image
Illustration of a hand pressing a button on a camera module (no text or symbols visible)natural_image
Simple diagram showing a circular object with concentric rings and a separate image of a girl in front (no text or symbols)接写する
text_image
Illustration showing various photo and digital devices with 'X' symbols indicating prohibition or exclusion.[en] If you have any inquiries about this product, please contact a FUJIFILM authorized distributor or dealer, or access the website below.