AS120R - Food slicer AFK - Free user manual and instructions
Find the device manual for free AS120R AFK in PDF.
| Product Type | Food Slicer |
| Brand | AFK |
| Model | AS120R |
| Power Supply | 230 V ~ 50 Hz, 150 W |
| Blade | Stainless steel serrated blade, removable |
| Thickness Adjustment | Continuous adjustment knob (thin to thick) |
| Cutting Capacity | Meats, cheeses, vegetables, fruits, bread, cakes |
| Safety | Safety button, thumb guard, shut-off if overheats |
| Maximum Continuous Operation | 5 minutes, then 30 minutes rest |
| Tray | Foldable, with catch tray |
| Food Holder | With pusher, slides on tray |
| Cleaning | Removable parts hand washable (soapy water) |
| Materials | ABS plastic, stainless steel (blade) |
| Non-slip feet | Yes |
| Dimensions (approx.) | 35 x 25 x 25 cm |
| Weight (approx.) | 3 kg |
| Cord Length | Approximately 1 meter |
| Included Accessories | Tray, food holder, pusher |
| Storage | Align thickness guide with blade, cord wrapped under base |
| Warranty | 2 years (according to legislation) |
Frequently Asked Questions - AS120R AFK
User questions about AS120R AFK
0 question about this device. Answer the ones you know or ask your own.
Ask a new question about this device
Download the instructions for your Food slicer in PDF format for free! Find your manual AS120R - AFK and take your electronic device back in hand. On this page are published all the documents necessary for the use of your device. AS120R by AFK.
USER MANUAL AS120R AFK
Yourfoodslicerissuitableforcuttingbread,allkindsofham,sausage, cheese,vegetables,etc.
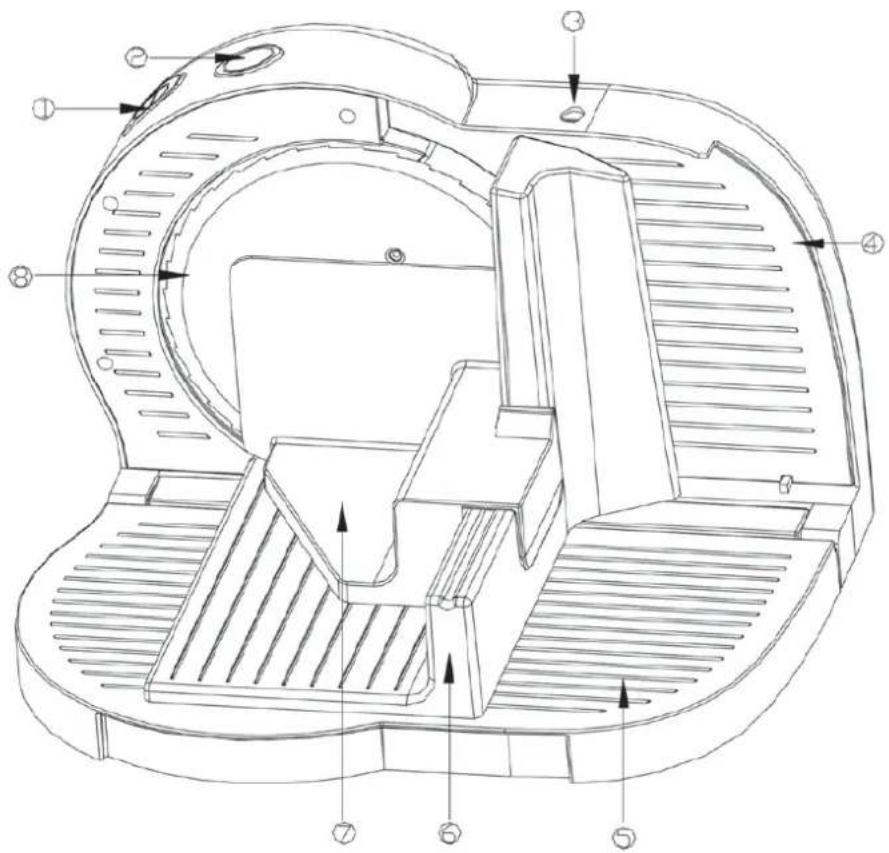
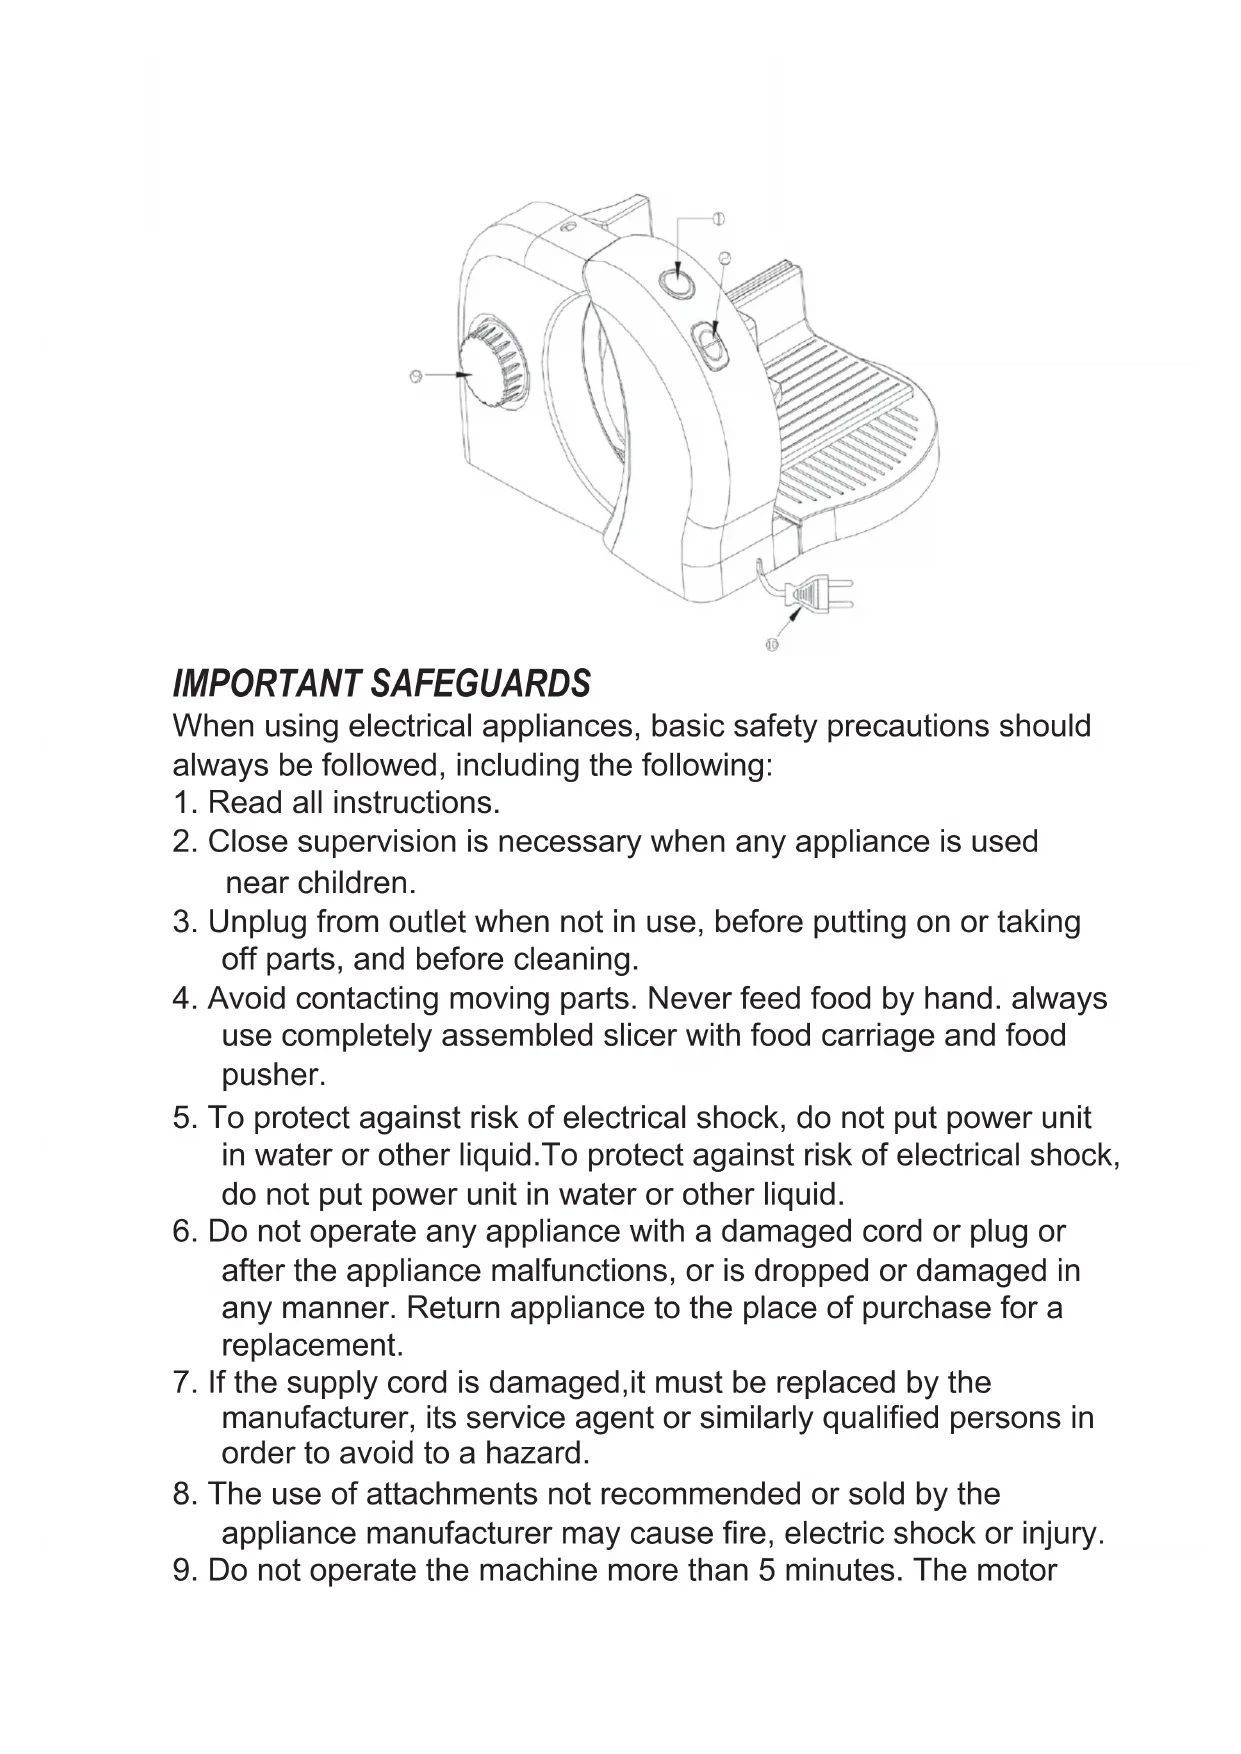
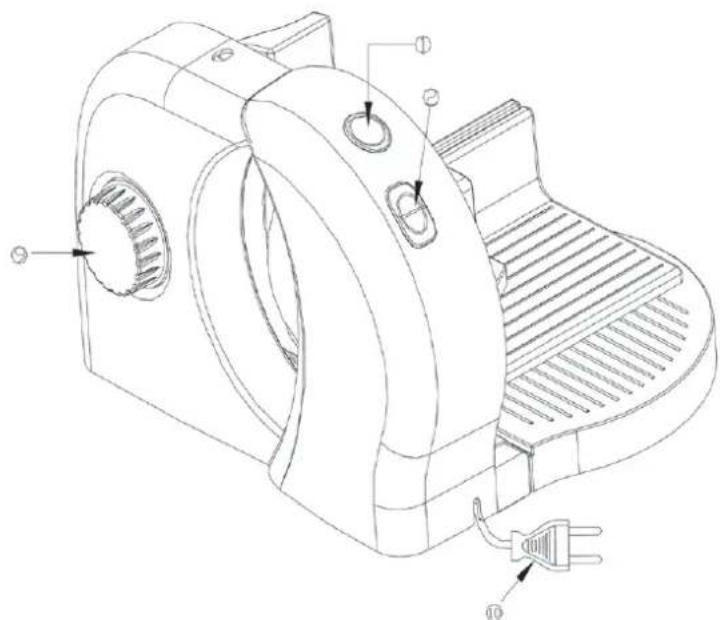
DESCRIPTION
- On/Off Button
- Safety Button
- Thickness Driection
- Thickness Guide
- Platform
- SlidingFeed Table
- Piece Holder
- Serrated Blade
- Thickness Adjusting Knob
- Power Cord
IMPORTANT SAFEGUARDS
When using electrical appliances, basic safety precautions should always be followed, including the following:
-
Read all instructions.
-
Close supervision is necessary when any appliance is used near children.
-
Unplug from outlet when not in use, before putting on or taking off parts, and before cleaning.
-
Avoid contacting moving parts. Never feed food by hand. always use completely assembled slicer with food carriage and food pusher.
-
To protect against risk of electrical shock, do not put power unit in water or other liquid. To protect against risk of electrical shock, do not put power unit in water or other liquid.
-
Do not operate any appliance with a damaged cord or plug or after the appliance malfunctions, or is dropped or damaged in any manner. Return appliance to the place of purchase for a replacement.
-
If the supply cord is damaged, it must be replaced by the manufacturer, its service agent or similarly qualified persons in order to avoid to a hazard.
-
The use of attachments not recommended or sold by the appliance manufacturer may cause fire, electric shock or injury.
-
Do not operate the machine more than 5 minutes. The motor
may be overheat. Turn offs witch & let it rest for at least 30 minutes to cool down the motor.
- Do not use the appliance outdoors.
- Do not let cord hang over edge of table or counter or touch hot surfaces.
- Blade is sharp. Hold only by blade lock. Handle carefully when cleaning.
- Do not use the appliance for other than its intended use.
- This appliance can be used by children aged from 8 years and above and persons with reduced physical, sensory or mental capabilities or lack of experience and knowledge if they have been given supervision or instruction concerning use of the appliance in a safe way and understand the hazards involved. Children shall not play with the appliance.
- Cleaning and user maintenance shall not be made by children unless they are older than 8 years and supervised.
- Keep the appliance and its cord out of reach of children less than 8 years.
- The appliance is not intended to be operated by means of an external timer or separate remote-control system.
PREPARING TO SLICE
- Unwrap cord from bottom of slicer, and slide into slot, Position slicer on a clean, dry and smooth surface. Fold down plat form, remove food collection tray from its storage position and put it under the blade at the back to the food slicer.
- Place food carriage on platform. The ridge on bottom of food carriage should fit into slot of platform properly. Move food carriage back and forth a few times to ensure movement.
- Place food pusher on back of food carriage.
- Select the required slice thickness by turning thickness adjusting knob clockwise for thicker slices and counter-clockwise for thinner slices.(fig.1)
OPERATION CAUTION: ALWAYS USE FOOD CARRIAGE AND FOOD PUSHER
- Plug into 230 volt AC outlet.
- Place food to be sliced on food carriage and press it against thickness guide. Then pull food carriage toward you by left hand.(fig.2)
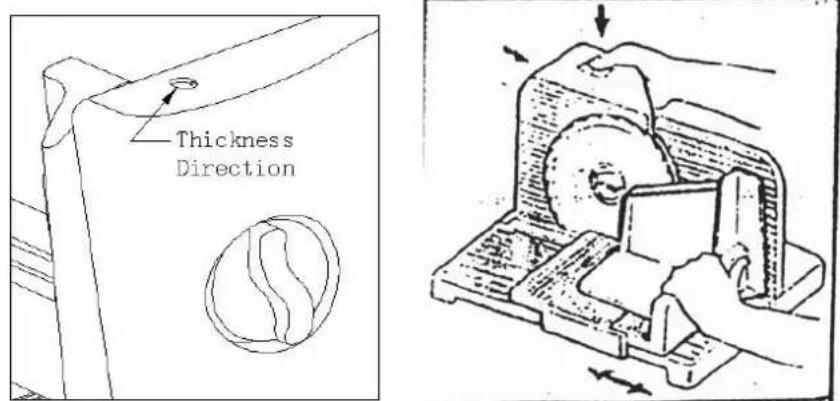
2.gif1.gif
- In order to start the appliance press safety button by left hand thumband ON/OFF-button by index finger and keep both depressed.
- When blade is rotating; keep thumb protected behind thumb guard when hold food pusher. Slice food carriage forward toward blade. Move tray back and forth steadily. Keep food gently pressed against guide for even slices.
- When finished slicing, unplug unit. For safety and blade protection when storing, turn thinness adjusting knob to align thickness guide with blade.
CLEANING
UNPLUG SLICER FROM OUTLET
All slicing parts remove for thorough cleaning. Wash with a soft cloth sponge and a mild soap or a spray cleaner. Rinse and dry.
- Never use steel wool or scouring powder on any part of slicer. Do not wash any part of slicer in dishwasher.
- Motor is concealed in housing. Newer submerge in water.
- Motor never needs oiling.
- For easier cleaning, remove all parts in order shown. Wash as directed. Replace in reverse sequence.
FOOD CARRIAGE: Slide food pusher off and lift food carriage from platform.
PLATFORM: Fold up platform. Push the hinge handle to left and pull out the platform from base.
STAINLESSBLADE: Unplug slicer. Turn blade lock counter clock wise and lift out carefully. To replace. Align both tabs of blade lock with slots of motor housing and turn clockwise to secure.
Be sure gears engage. (fig.3)
Note: Always align thickness guide with blade for safety and blade protection during storage.
NON-SLIP FEET: Clean with any grease-removing cleanser, such as alcohol or window cleaner.
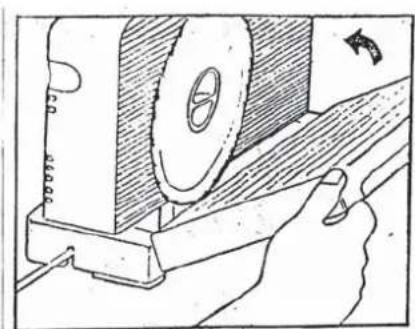
Fig.3

fig.4
STORAGE
- Align thickness guide with blade.
- Fold up platform. Wrap cord in storage area on bottom of slicer. (fig.4)
USEYOURFOODSLICER FORBESTRESULT
To slice meats wafer thin, chill thoroughly before slicing.
- Meats should be boneless. Fruits should be free of seeds.
- Foods with an uneven texture - like fish and thin steaks - are often difficult to slice. Partially freeze before slicing.
- At canning time, use the slicer to quickly cut cucumbers and onions for attractive pickles...apples for pies...vegetables for the freezer.
HOTROASTS: Beef、Pork、Lamb、Turkey、Ham
When slicing warm boneless roasts, remove from over and let set 15 to 20 minutes before slicing. They will retain more natural juices and slice evenly without crumbling. Cut the roast, if necessary, to fit on food tray. If roast is tied, turn off motor and remove strings one at a time as strings near blade.
Extra-Thin Sliced Corned Beef or Fresh Beef Brisket
Chill cooked brisket over night in cooking liquid. Before slicing, drain and reserve meat drippings from brisket. Pat dry with paper towels. Remove excess fat. Slice well-chilled brisket to desired thickness. To serve hot, place slices on heatproof platter and moisten with small amount of reserved meat drippings. Heat in 300 F oven for 30 minutes.
Cheese
Chill thoroughly before slicing. Cover with foil to keep moist. Before serving, allow cheese to reach room temperature—this enhances the natural flavor.
Cold Cuts
Cold cuts keep longer and retain flavour if sliced as needed. For best results, chill first. Remove any plastic or hard casing before slicing. Use a constant, gentle pressure for uniform slices.
VegetablesandFruits
Your slicer is "madetoorder" for slicing many vegetables and fruits including potatoes, tomatoes, carrots, cabbage (forslaw), eggplant, squash and zucchini. Potatoes may be sliced thick for casseroles or thin for chips. Fresh pineapple may be sliced neatly. Cut off top and slice to order.
Breads、Cakes and Cookies
Freshly baked bread should be cooled before slicing. Use day-old or slightly stale bread for extra-thin slices for toasting. Your slicer is ideal for all types of party breads, pound cake and fruit cake. For wafer-like ice box cookies, chill dough in refrigerator and slice as desired.
Technical Data
Voltage supply: 230V 50Hz
Power input: 150 Watt
ENVIRONMENT FRIENDLY DISPOSAL

The symbol above and on the product means that the product is classed as Electrical or Electronic equipment and should not be disposed with other household or commercial waste at the end of its useful life.
The Waste of Electrical and Electronic Equipment (WEEE) Directive (2002/96/EC) has been put in place to recycle products using best available recovery and recycling techniques to minimise the impact on the environment, treat any hazardous substances and avoid the increasing landfill. Contact local authorities for information on the correct disposal of Electrical or Electronic equipment.