USER MANUAL DC8200 AGFAPHOTO
Thanks for purchasing this digital camera, it can not only shoot high-quality photos and videos but also can be used as removable disk. Everything you need to take quality photos is included with your camera, please read this manual carefully before use.
Key features
Digital video resolutions - 1080 (30fps), 720 (30fps), VGA (30fps)
- 18-megapixel camera with choice of 12 digital resolutions - (18M) 4896x3672, (16M) 4608x3456, (14M) 4288x3216, (12M) 4000x3000, (10M) 3648x2736, (8M) 3264x2448, (7M HD) 3648x2056, (5M) 2592x1944, (3M) 2048x1536, (2M HD) 1920x1080, (VGA) 640x480
- 2.7" TFT LCD
- 8X optical zoom
- 8X digital zoom
- (AS) Anti-Shake
Macro
- Continue shot
Self-timer
- Support up to 32 GB SD memory card (certified SD card brand)
Built-in flash
Content of the box:
Digital camera
USB cable
- User manual
Lithium battery
- Strap
- Camera bag
16 GB SD card
Computer system requirements for Windows XP
If you want to transfer photos and videos to a Windows 7/XP computer, the computer must be set up as follows:
- Pentium III processor compatible with Windows XP or higher
128 MB RAM with at least 150 MB of available disk space
Available USB interface
Recommended screen resolution: 1024 x 768 pixels or more
16-bit color or higher display adapter
Computer system requirements for Windows Vista/7
If you want to transfer photos and videos to a Windows Vista/7 computer, the computer must be set up as follows:
- Windows Vista/7 processor
800 MHz processor and 512 MB RAM
20 GB hard disk with at least 15 GB of available space
Support for Super VGA graphics
Available USB interface
Computer system requirements for Macintosh
If you want to transfer photos and videos to a Macintosh computer, the computer must be set up as follows:
Macintosh G3 500 MHz processor or higher
Mac OS X or 10.5.X version or earlier versions
- 128 MB or more available system RAM (256 MB recommended) with at least 150 MB of available disk space
- 800 x 600 pixels or higher-resolution screen displaying millions of colors
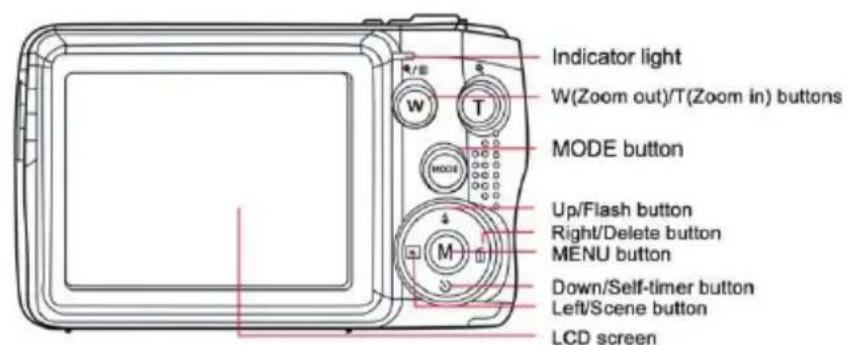
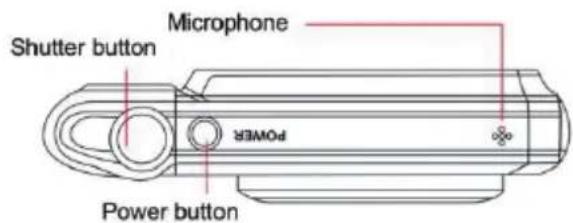
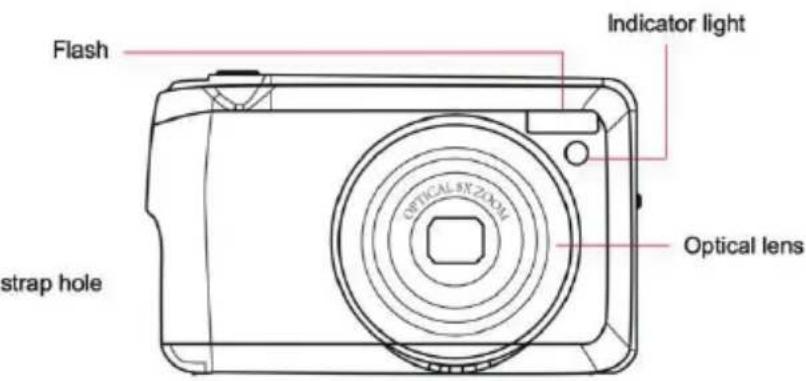
Digital camera overview

Prepare your camera for use
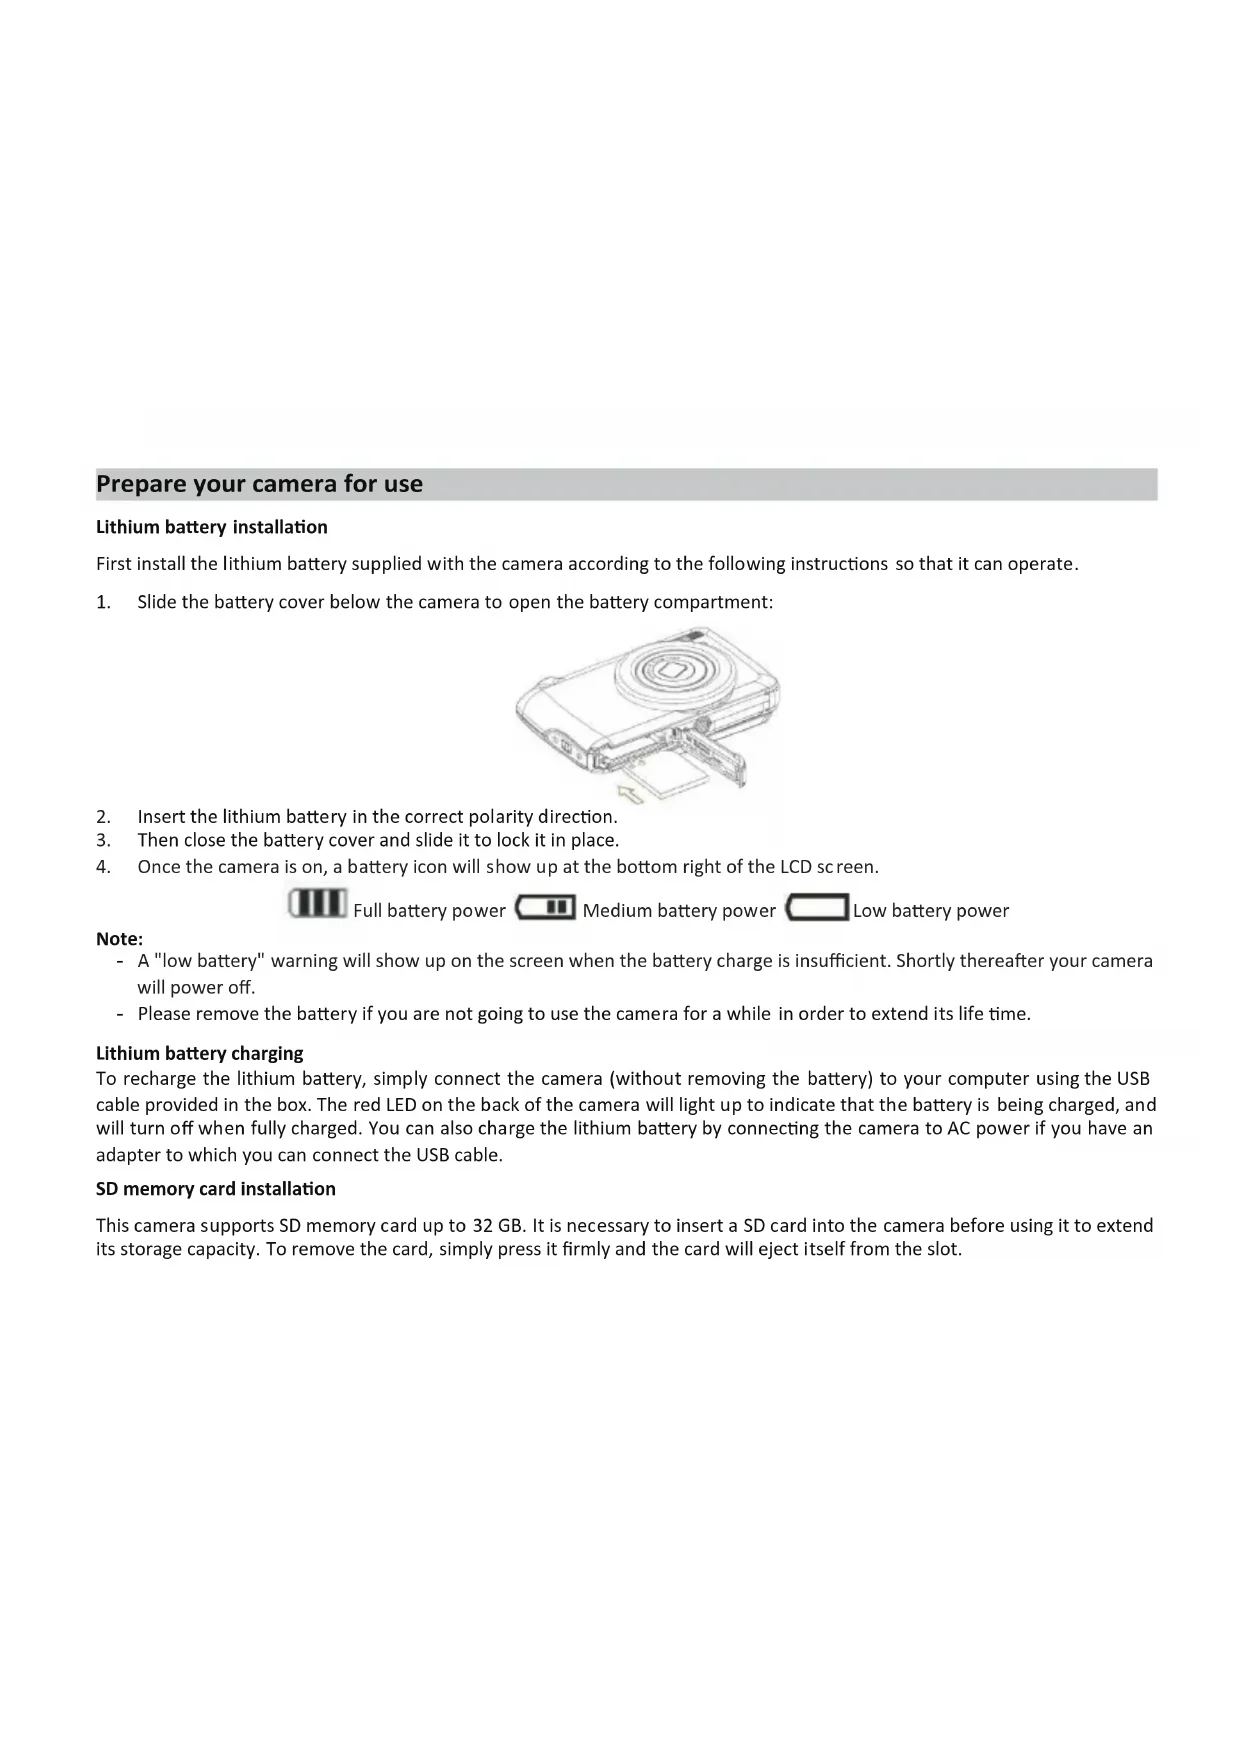
Lithium battery installation
First install the lithium battery supplied with the camera according to the following instructions so that it can operate.
- Slide the battery cover below the camera to open the battery compartment:
- Insert the lithium battery in the correct polarity direction.
- Then close the battery cover and slide it to lock it in place.
- Once the camera is on, a battery icon will show up at the bottom right of the LCD screen.

Full battery power Medium battery power Low battery power
Note:
- A "low battery" warning will show up on the screen when the battery charge is insufficient. Shortly thereafter your camera will power off.
- Please remove the battery if you are not going to use the camera for a while in order to extend its life time.
Lithium battery charging
To recharge the lithium battery, simply connect the camera (without removing the battery) to your computer using the USB cable provided in the box. The red LED on the back of the camera will light up to indicate that the battery is being charged, and will turn off when fully charged. You can also charge the lithium battery by connecting the camera to AC power if you have an adapter to which you can connect the USB cable.
SD memory card installation
This camera supports SD memory card up to 32 GB. It is necessary to insert a SD card into the camera before using it to extend its storage capacity. To remove the card, simply press it firmly and the card will eject itself from the slot.
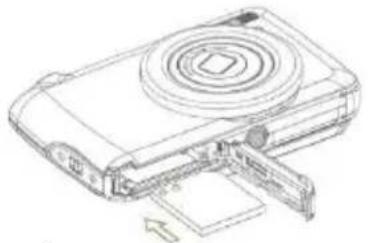
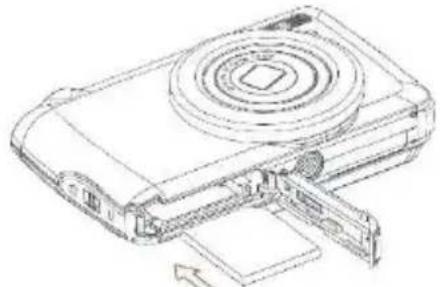
Please refer to the below diagram for correct installation:
- Slide the battery cover below the camera to open the battery compartment and access the memory card slot.
- Insert the memory card by gently sliding it in the correct polarity direction and until it clicks (the card top should be flushed with the battery one).
- An SD icon shows up then on the LCD screen when you turn the camera on indicating you that the card has been well installed and all files will be stored on it.
- Then close the battery cover and slide it to lock it in place.
- Make sure that the card is not locked, otherwise photos and videos you took will not be saved.
Note:
- The internal memory can only store a few photos for test purposes. It is recommended to download them on a computer if you want to keep it, otherwise they could be lost when the camera automatically shuts down because its charge is low or when you remove away the battery.
- If there is a photo stored in the internal memory when you insert a card into your camera, a "Copy to card" message will show up on the LCD screen with "Yes" or "No" options. By selecting "Yes", the photo will be then copied to the card.
- Formatting will delete all data stored on the memory card including those which are protected.
- Do not remove the SD card during for matting as this may damage the card and render it unusable.
- When memory is full, download the files from the SD card to your PC or directly delete some photos and videos to free up storage space.
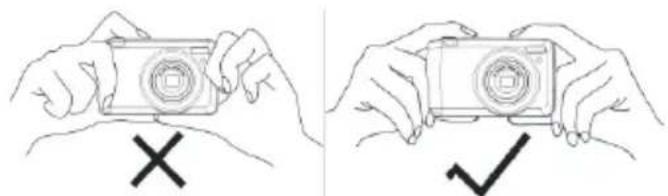
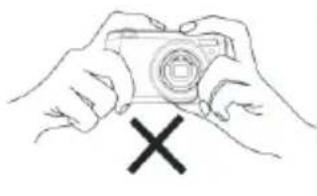
How to correctly hold your camera while taking pictures
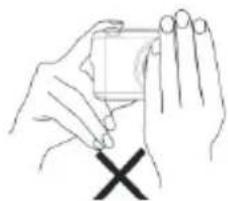
First press the Power button to turn on the camera and activate the auto-focus zoom lens for it to open out like a periscope. Then steadily hold the camera avoiding putting your fingers in front of the lens or the flash as shown on the diagram below.
Note: Do not touch or block the lens when it opens as it may damage the camera.
Start with your digital camera
Power on
Press once the Power button on the top of the camera to turn it on. Then the LCD screen will light up and the auto-focus zoom lens will open out indicating that your camera is on and ready for use.
Power off
Press once the Power button on the top of the camera to turn it off while it is on. When the battery power is insufficient, the camera will display a red icon on the LCD screen and automatically turn off after a few seconds.
Mode switching
The digital camera supports 3 modes:
- Photo mode: this mode is for you to take still photos and adjust photo shooting settings.
- Video mode: this mode is for you to record videos and adjust video shooting settings.
- Playback mode: this mode is not only for you to preview photos or videos store on the memory card but also delete, protect and rotate your photos.
In order to select a mode, ple asse follow the below steps:
- Press the MODE button to toggle between the 3 modes.
- In photo mode, the icon will show up at the top left of the LCD screen. In video mode, the icon will show up at the same place and in playback mode, this will be the icon.
Photo mode
By default, the photo mode shows up first on powering on the camera.
Taking photos
- Hold the camera steady and position your shot according to the image displayed on the screen.
- Slightly press the Shutter button and wait for the camera to focus the object.
- Place your object in the white frame showing up on the LCD screen.
- When the frame turns green, press the Shutter button harder to capture the image. It takes then a few seconds to record the photo on the memory card.
Note:
- After each photo shot, the number displayed on the top right of the LCD screen indicates how many more photos you can still take based on the current settings and the size of the memory card inserted in the camera.
- When the camera memory is full, the LCD screen will display "Memory full" if you press Shutter button to take photos. To continue photo shooting, you need to transfer all files of the memory card on your computer (as described below in the section "Download photos and videos to your PC") or delete them to get more memory. Alternatively, you can insert a new empty SD memory card.
- This camera needs a SD card up to 32 GB to operate normally.
Digital zoom
You can enlarge the object up to 8 times with the digital zoom by pressing (T) button to zoom in the object and press the (W)
button to zoom out it. The icon will show up right on the LCD screen.
Note: When using this function, the camera will automatically adjust the lens so do not touch the lens while the camera is focusing.
The camera has 4 shortcut buttons on the MENU dial made for quick access to the following settings: Flash (up button), Scene (Left button), Self-timer (Down button) and Delete (Right button). By pressing one of these buttons, you can directly access the setting options of the corresponding function.
Flash
In low light conditions it is better to use the built-in flash. You can also use the flash to compensate for backlight conditions.
To set the flash:
- Automatic flash: press the Flash button repeatedly until reaching the 5A icon. The flash should set off automatically when the shooting brightness is low.
- Forced flash: press the Flash button repeatedly until reaching the 4 icon. The flash will remain active until you turn it off. If the flash is not ready, the green LED beside the LCD screen will light up and the 4 icon will blink; you have to wait for the flash to charge.
- Red-eye reduction: press Flash button repeatedly until reaching the icon to activate the red eye reduction.
- Flash off: press Flash button repeatedly until reaching the icon to turn the flash off.
Note: A "Low battery" warning will show up on the LCD screen if the battery is too low to allow the flash to set off.
Scene
Your camera supplies scenes for you to take photos in any environment: Auto / Scenery / Backlight / Night Portrait / Night Scenery / Building / Kids / Food / Text / Snow / Fireworks / Sunset. Choose the scene in accordance with the light and environmental conditions prevailing at the photo shooting time.
- Press Scene button (or Left button) to enter the Scene menu.
- Press Up / Down buttons to select an option: Auto / Scenery / Backlight / Night Portrait / Night Scenery / Building / Kids / Food / Text / Snow / Fireworks / Sunset.
- Press MENU button to confirm your choice and return to photo mode.
- The icon corresponding to your scene choice will then show up at the top left of the LCD screen.
Delete
You can delete the last file you just captured by pressing this button.
- Press Delete button (or Right button).
- The message "Delete this file" with "Yes" or "No" option will then show up on the LCD screen at the bottom of the lat est captured file.
- Press Left / Right button to choose between "Yes" or "No" and delete the file or cancel the deletion.
- Press MENU button to confirm.
- If you chose "Yes", the Delete menu options will move to the next file of the playback mode. Just press MODE button to return to photo mode.
- If you chose "No", you will automatically return to photo mode.
Self-timer
You can include yourself in a photo by turning on this function to delay the time between you are pressing the Shutter button and when the photo is actually taken. Ideal for group shots, we recommend you to use a tripod or to place the camera on a stable surface if you want to use the self-timer.
- Press Self-timer button (or Down button) to enter the Self-timer menu.
- Press Up / Down buttons to select an option: Off / 2 sec. / 5 sec. / 10 sec. / Double.
- Press MENU button to confirm your choice and return to photo mode.
- The icon corresponding to your self-timer choice will then show up at the top of the LCD screen.
- The indicator light on the front of the camera will blink until the countdown time you chose has elapsed.
To access the photo mode settings menu and adjust your photo shooting, press the MENU button once and follow the instructions below.
Image size
The image size and quality settings determine the number of photos that can be saved and the memory required for each photo.
The higher the quality of the photo, the more memory it will take. The image size and quality will also affect the maximum size to which you can print your photo.
To set the image size:
- Press MENU button to enter the settings menu of the photo mode.
- Press Up / Down buttons to select Image Size in the settings menu and then MENU button to enter the submenu.
- Press Up / Down buttons to select an option: (18M) 4896x3672, (16) 4608x3456, (14M) 4288x3216, (12M) 4000x3000, (10M) 3648x2736, (8M) 3264x2448, (7M HD) 3648x2056, (5M) 2592x1944, (3M) 2048x1536, (2M HD) 1920x1080, (VGA) 640x480.
- Press MENU button to confirm your choice and then MODE button to return to photo mode.
- The icon corresponding to your image size choice will then shows up at the top of the LCD screen.
Note: The camera has two high definition image sizes of 2M and 7M.
Self-timer
You can include yourself in a photo by turning on this function to delay the time between you are pressing the Shutter button and when the photo is actually taken. Ideal for group shots, we recommend you to use a tripod or to place the camera on a stable surface if you want to use the self-timer.
- Press MENU button to enter the settings menu of the photo mode.
-
Press Up / Down buttons to select Self Timer in the settings menu and then MENU button to enter the submenu.
-
Press Up / Down buttons to select an option: Off / 2 sec. / 5 sec. / 10 sec. / Double.
- Press MENU button to confirm your choice and then MODE button to return to photo mode.
- The icon corresponding to your self-timer choice will then shows up at the top of the LCD screen.
- The indicator light on the front of the camera will blink until the countdown time you chose has elapsed.
Burst
This function allows you to take up to 5 pictures continuously after only pressing Shutter button once .
- Press MENU button to enter the settings menu of the photo mode.
- Press Up / Down buttons to select Burst in the settings menu and then MENU button to enter the submenu.
- Press Up / Down buttons to choose between: On / Off.
- Press MENU button to confirm your choice and then MODE button to return to photo mode.
- The corresponding icon will then show up at the top of the LCD screen indicating that the function is on.
Image quality
The quality of your photos also affects the number of photos you can take. The higher the quality is, the less you will be able to take photos, but they will be of better quality.
Note: The default quality value is "Fine".
- Press MENU button to enter the settings menu of the photo mode.
- Press Up / Down buttons to select Image Quality in the settings menu and then MENU button to enter the submenu.
- Press Up / Down buttons to select an option: Super Fine / Fine / Normal.
- Press MENU button to confirm your choice and then MODE button to return to photo mode.
- The icon corresponding to your image quality choice will then show up at the top of the LCD screen.
Date/Time stamp
This function allows you to enable or disable the display of the system date and time on your photos.
- Press MENU button to enter the settings menu of the photo mode.
- Press Up / Down buttons to select Date Stamp in the settings menu and then MENU button to enter the submenu.
- Press Up / Down buttons to select an option: Off / Date / Date & Time.
- By choosing "Off", there will be no date on photos.
- By choosing "Date", the date will be displayed on each photo once taken.
- By choosing "Date & Time", both date and time will be displayed on each photo taken.
White balance
This setting allows the camera to adjust the color of your photos according to the color of the light source.
- Press MENU button to enter the settings menu of the photo mode.
- Press Up / Down buttons to select White Balance in the settings menu and then MENU button to enter the submenu.
- Press Up / Down buttons to select an option: Auto / Daylight / Cloudy / Tungsten / Fluorescent H / Fluorescent L.
- Press MENU button to confirm your choice and then MODE button to return to photo mode.
- The icon corresponding to your white balance choice will then show up at the bottom left of the LCD screen.
ISO
This function allows you to compensate bad light conditions when flash and tripod using are not possible. Choosing the lower ISO value helps prevent spots appearing on your photo.
- Press MENU button to enter the settings menu of the photo mode.
- Press Up / Down buttons to select ISO in the settings menu and then MENU button to enter the submenu.
- Press Up / Down buttons to select an option: Auto / 50 / 100 / 200 / 400 / 800 / 1600.
- Press MENU button to confirm your choice and then MODE button to return to photo mode.
Exposure
This setting allows you to control the brightness of your photos.
- Press MENU button to enter the settings menu of the photo mode.
- Press Up / Down buttons to select Exposure in the settings menu and then MENU button to enter the submenu.
- Press Up / Down buttons to select an exposure value from -2 to +2.
- Press MENU button to confirm your choice and then MODE button to return to photo mode.
- The icon corresponding to your exposure choice will then be displayed at the bottom left of the LCD screen.
Sharpness
This setting allows you to adjust the sharpness of your images, making edges more or less distinct.
- Press MENU button to enter the settings menu of the photo mode.
- Press Up / Down buttons to select Image Sharpness in the settings menu and then MENU button to enter the submenu.
- Press Up / Down buttons to select an option: Sharp / Normal / Soft.
- Press MENU button to confirm your choice and then MODE button to return to photo mode.
Metering
This setting allows you to adjust the metering point.
- Press MENU button to enter the settings menu of the photo mode.
- Press Up / Down buttons to select Metering in the settings menu and then MENU button to enter the submenu.
- Press Up / Down buttons to select an option: Center / Multi / Spot.
- Press MENU button to confirm your choice and then MODE button to return to photo mode.
Macro
This setting allows you to adjust the photo shooting of a more or less distant (10cm 25cm) object by focusing the right hyperfocal distance.
Note: The camera is by default in Far shooting mode.
- Press MENU button to enter the settings menu of the photo mode.
- Press Up / Down buttons to select Macro in the settings menu and then MENU button to enter the submenu.
- Press Up / Down buttons to choose between: On (= Macro shooting 串 ) / Off (= Far shooting 串 ).
- Press MENU button to confirm your choice and then MODE button to return to photo mode.
General setup of the camera
The camera setup menu can be accessed in all modes by pressing MENU button once and then pressing Right button, and is mainly used to modify certain settings specific to the camera operation.
Beep sound
This setting allows you to switch the sound of the camera buttons on or off.
- Press MENU button and then Right button to enter the setup menu of the camera.
- Press Up / Down buttons to select Beep in the setup menu and then MENU button to enter the submenu.
- Press Up / Down buttons to choose between: On / Off.
- Press MENU button to confirm your choice and then MODE button to return to photo mode.
Frequency
This setting allows you to reduce flickering and avoid strips effect when photo shooting.
Note: the default frequency setting is 60Hz.
- Press MENU button and then Right button to enter the setup menu of the camera.
-
Press Up / Down buttons to select Frequency in the setup menu and then MENU button to enter the submenu.
-
Press Up / Down buttons to select an option: 50Hz / 60Hz
- Press MENU button to confirm your choice and then MODE button to return to photo mode.
Auto power off
This setting allows you to program the automatic camera shutdown if you do not use anymore for a while to save battery charge. Note: The default auto power off setting is 1 minute.
- Press MENU button and then Right button to enter the setup menu of the camera.
- Press Up / Down buttons to select Auto Power Off in the setup menu and then MENU button to enter the submenu.
- Press Up / Down buttons to select an option: Off / 1 Minute / 3 Minutes / 5 Minutes.
- Press MENU button to confirm your choice and then MODE button to return to photo mode.
Note: if you choose "Off", the camera will not switch off until the battery is completely discharged or it is manually turned off.
Date/Time setting
This setting allows you to set system date and time that will be displayed on the photos if you turn Date/Time stamp function on.
- Press MENU button and then Right button to enter the setup menu of the camera.
- Press Up / Down buttons to select Date/Time in the setup menu and then MENU button to enter the submenu.
- Press Left / Right buttons to select successively the year, month, day, time and the date layout.
- Press Up / Down buttons to set the highlighted data.
- Press MENU button to confirm your choice and then MODE button to return to photo mode.
Language
The camera supports many languages.
- Press MENU button and then Right button to enter the setup menu of the camera.
- Press Up / Down buttons to select Language in the setup menu and then MENU button to enter the submenu.
- Press Up / Down buttons to select your language.
- Press MENU button to confirm your choice and then MODE button to return to photo mode.
- The camera software then automatically switches to the chosen language.
This function allows you to format the memory card and erase all files stored on it including protected ones.
Note: Please use this function with caution. Once the memory card is formatted, all files stored on it will be permanently deleted. As this procedure is irreversible, it is highly recommended to transfer all photo, videos or other important files to a computer
- Press MENU button and then Right button to enter the setup menu of the camera.
- Press Up / Down buttons to select Format Memory Card in the setup menu and then MENU button to enter the submenu.
- Press Up / Down buttons to choose between: Yes / No.
- Press MENU button to confirm your choice.
- "Please wait" then shows up on the LCD screen if you launched a formatting. Once it is finished, "Completed" suddenly shows up and the camera automatically comes back to photo mode.
Default setting
This setting allows you to reset your camera settings back to the factory defaults values.
- Press MENU button and then Right button to enter the setup menu of the camera.
- Press Up / Down buttons to select Default Setting in the setup menu and then MENU button to enter the submenu.
- Press Up / Down buttons to choose between: Yes / No.
- Press MENU button to confirm your choice.
- Once the system reset is done, "Completed" suddenly shows up on the LCD screen and the camera automatically comes back to photo mode.
Video mode
Note: The camera has limited internal memory and does not allow video recording without a SD card (up to 32 GB) inserted.
- Press MODE button twice to select the video mode.
- The video icon will show up at the top left of the LCD screen and the elapsed recording time in the upper right corner.
- Press Shutter button to start recording.
- A flashing red dot and a red chronometer will show up at the top right of the LCD screen to indicate that the video recording is in progress.
- Press again Shutter button to stop recording and save the video file in AVI format.
Note:
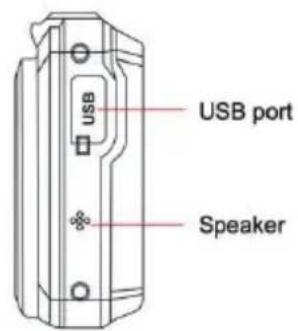
- The camera also has a microphone to record the surrounding sound of each video and speaker to reproduce it when you view this video in playback mode.
- You can play all AVI file you shot with the playback mode or to your computer with QuickTime player or Windows Media
Player.
- When the camera's memory is full, the "Card Full" message will show up on the LCD screen when you attempt shoot more videos. Transfer all files stored on SD memory card to your PC or delete them to shoot more videos. Alternatively, you can insert a new SD memory card to expand the memory and record longer videos.
In video mode, there are only two settings to setup: video size and with balance.
Video size
The camera has only three video resolutions. The larger the image size, the sharper and larger the video, so it will take up more space on the memory card.
- Press MENU button to enter the settings menu of the video mode.
- Press Up / Down buttons to select Image Size in the settings menu and then MENU button to enter the submenu.
- Press Up / Down buttons to select an option: 1080 (30fps), 720 (30fps), VGA (30fps).
- Press MENU button to confirm your choice and then MODE button to return to photo mode.
- The icon corresponding to your image size choice will then shows up at the top of the LCD screen.
White balance
This setting allows the camera to adjust the color of your video according to the color of the light source.
- Press MENU button to enter the settings menu of the video mode.
- Press Up / Down buttons to select White Balance in the settings menu and then MENU button to enter the submenu.
- Press Up / Down buttons to select an option: Auto / Daylight / Cloudy / Tungsten / Fluorescent H / Fluorescent L.
- Press MENU button to confirm your choice and then MODE button to return to photo mode.
- The icon corresponding to your white balance choice will then be displayed at the bottom left of the LCD screen.
Playback mode
With the playback mode, you cannot only view the photos and videos stored on the memory card in full screen or thumbnail but
also protect, delete, and rotate them. To switch on it, press the MODE button three times and the icon will show up on the upper left corner of the LCD screen to indicate that the playback mode is well activated.
Note: "No Existing File" will show up on the LCD screen if there are no photos/videos in the camera.
From full screen to thumbnail display
In playback mode, you can display all photo and video files stored on the memory card in thumbnails.
- Press (W) / Zoom out button to enter the thumbnail display.
- Press Up / Down / Left / Right buttons to select the thumbnail of a photo or video (these are marked with a the icon to differentiate them).
- Press MENU button to display the selected file in full screen.
Zoom in on a photo
This handling allows you to view more precisely the details of a photo.
- Press Left / Right buttons to select a photo.
- Press (T) button to zoom in on the photo.
- Press Up / Down / Left / Right buttons to move around on the photo.
- Press (W) button to zoom out until the photo is displayed in full screen again.
To access the playback mode settings menu to either protect, delete or rotate photos, press the MENU button once and follow the instructions below.
Protect
This function allows you to protect your photos/videos from accidental deletion.
- Press MENU button to enter the settings menu of the playback mode.
- Press Up / Down buttons to select Protect in the settings menu and then MENU button to enter the submenu.
- Press Up / Down buttons to select an option: Single / Lock All Images / Unlock All Images.
- Press MENU button to confirm your choice.
- A protection confirmation message will then show up with "Yes" or "No" options.
- Press Up / Down buttons to make a choice and then MENU button to definitely confirm your intention.
- The camera will automatically exit the playback mode settings menu and return to files display.
Note: If you chose to protect one or many files, a lock icon will show up on each file at the top left of the LCD screen.
Delete
You can delete unwanted photos and videos to free up more memory. You can do this file by file or delete all unprotected photos and videos stored on the memory card.
- Press MENU button to enter the settings menu of the playback mode.
- Press Up / Down buttons to select Delete in the settings menu and then MENU button to enter the submenu.
-
Press Up / Down buttons to select an option: Single / All.
-
Press MENU button to confirm your choice.
- A deletion confirmation message will then show up with "Yes" or "No" options.
- Press Up / Down buttons to make a choice and then MENU button to definitely confirm your intention.
Note:
- Locked files cannot be deleted.
- This procedure is irreversible, so all unprotected files will be definitively lost once you confirm the total deletion of files stored on the memory card.
Rotate
This function allows you to rotate photos.
- Press MENU button to enter the settings menu of the playback mode.
- Press Up / Down buttons to select Rotate in the settings menu and then MENU button to enter the submenu.
- Press Up / Down buttons to first select the "Rotate" option.
- Press MENU button until the photo has reached the desired orientation.
- Press Down button to move to "Save" option and then MENU button to confirm the rotation saving.
- The camera will automatically exit the playback mode settings menu and return to files display.
Note: Protected files cannot be rotated.
AVI video files playing
- In playback mode, press Left / Right buttons to select the AVI video file you want to playback. Alternatively, press (W) button to enter thumbnail display and select a video by pressing Left / Right buttons. Then press MENU button to display the selected video file in full screen.
- Press Up button to play the video file and press it again to pause.
- Press Down button to stop video file playing.
Note: To protect and delete videos, follow the same procedures as explained above for photos.
Download photos or video files to your PC
First, connect your camera to the computer via a USB cable that can read data and then turn it on:
"MSDC" will show up on the camera LCD screen while a window (Removable Disk (H:)) will show up on your PC.
Now you can copy files to your computer in two ways:
- Download photos directly from the windows.
- Choose "Copy pictures to a folder on my computer" on the Removable Disk (H:). After you have clicked "OK", there will be some windows on the screen for you to complete the copying step by step. You only need to select the default settings to complete the transferring.
Or you can:
- Click on the computer icon on the desktop.
- Your memory card will show up as a removable storage device.
- Click on it to view all files stored in the subfolder DCIM.
- Then you can simply copy and paste files you want on your computer.
Appendix A: technical specifications
| Image sensor | CMOS Sensor |
| Image resolution | (18M) 4896x3672, (16M) 4608x3456, (14M) 4288x3216, (12M) 4000x3000, (10M) 3648x2736, (9M) 3264x2448, (7M HD) 3648x2056, (5M) 2592x1944, (3M) 2048x1536, (2M HD) 1920x1080, (VGA) 640x480 |
| Video resolution | 1080P (30fps), 720P (30fps), VGA (30fps) |
| File Format JPEG (photo)/AVI (video) | |
| External memory SD card up to 32 GB | |
| LCD display | 2.7" TFT LCD |
| Lens Optical zoom lens | |
| Zoom | 8X optical zoom, 8X digital zoom |
| Exposure | -2.0EV × +2.0EV |
| White balance | Automatic/Daylight/Cloudy/Tungsten/Fluorescent H/Fluorescent L |
| ISO | Auto/100/200/400/800/1600 |
| Scene | Auto/Scenery/Backlight/Night Portrait/Night Scenery/Building/Kids/Food/Text/Snow/Fireworks/Sunset |
| Flash | Auto/Manual/Red-eye reduction/Off |
| Self-timer | Off/2s/5s/10s |
| Interface USB 2.0 | |
| System requirements Windows XP/VISTA/7/MAC | |
| Battery Lithium battery | |
| Working temperature 0-40°C | |
Appendix B: common problems and solution
Q: I have taken photos but my computer does not recognize my camera. What do I do?
A: First of all, make sure you took photos. Take a few photos as a test, and then try downloading them to your computer by connecting it to the camera with the USB cable. Alternatively, you can insert the memory card directly into your computer card slot if your computer has one, or use an external card slot that can be connected to your computer USB port. If you still get a "No photos in camera" message on your computer, check that it meets the minimum requirements as indicated at the beginning of this instruction manual.
Q: How to be sure that I have not lost any important photos?
A: As all files are stored on the SD card inserted in your camera, make sure there is always enough space on the card for you to take pictures. It is recomme nded that you insert a memory card up to 32 GB and regularly transfer the files stored on the memory card to your computer to free up more memory. This will also be the backup data when you have lost or damaged the SD card. The test photos are stored in the limited RAM of the SD card but if the camera has insufficient power or is out of power, all the test photos will be lost.
Q: Will the device work normally if I use a Mac computer?
A: The device can be used as a removable disk on Mac OSX (10.5.x or higher version).
FR
Introduction
Notice of compliance for the European Union:
products bearing the CE mark comply with the applicable European directives and associated harmonised European standards.
Disposal of waste equipment by users in the European Union:
this symbol means that according to local laws and regulations, it is prohibited to dispose of this product with household waste. Instead, it is your responsibility to protect the environment and human health by handing over your used device to a designated collection point for the recycling of waste electrical and electronic equipment. For more information about where you can drop off your waste equipment for recycling, please contact your local city office, your household waste disposal service or the shop where you purchased the product.
After sales service / service après vente / Kundendienst /的服务 postventa /服务于 venda / servizio post vendita /服务于 venda / serwis posprzedażowy / poprodejni servis / értekesités utani szolgáltatas / Dienst na verkoop / noclenpodażknoe obczykubahne:
@: aftersaleservice@gtcompany.fr
+33(0)1.85.49.10.26
Product manufactured for and distributed by:
GT COMPANY - 5 rue de la Galmy - 77700 Chessy - France - +33 (0) 1.61.10.09.25 - www.gtcompany.fr
AgfaPhoto is used under license of Agfa-Gevaert NV. For this product a sublicense has been granted by AgfaPhoto Holding GmbH (www.agfaphoto.com). Neither Agfa-Gevaert NV nor AgfaPhoto Holding GmbH manufacture this product or provide any product warranty or support. For service, support and warranty information, Contact the distributor or manufacturer.