DWFP12569 - Stapler DEWALT - Free user manual and instructions
Find the device manual for free DWFP12569 DEWALT in PDF.


| Product Type | Pneumatic 2-in-1 Flooring Nailer |
| Brand | DeWALT |
| Model | DWFP12569 |
| Intended Use | Professional installation of hardwood floors (tongue and groove planks 13 to 19 mm) |
| Length | 517 mm (20.35 in) |
| Height | 561 mm (22.08 in) |
| Width | 80 mm (3.15 in) |
| Weight | 4.9 kg (10.85 lb) |
| Power Supply | Compressed air, operating pressure 4.9 to 7 kg/cm² (70 to 100 psi) |
| Air Connection | 6.35 mm (1/4 in) male N.P.T. fitting |
| Fastener Types | 15-1/2 gauge crown staples, crown width 13 mm, length 38 to 50 mm (1-1/2 to 2 in); 16 gauge L-head cleat nails, length 38 to 50 mm (1-1/2 to 2 in) |
| Magazine Capacity | Not specified (estimated: one row of fasteners) |
| Air Consumption | 105 L/min (3.7 ft³/min) at 60 fasteners/min, 5.6 kg/cm² (80 psi) |
| Warranty | 7 years for nailer, 1 year for compressors and production use (U.S. and Canada) |
| Maintenance and Cleaning | Weekly cleaning with dry compressed air; lubrication with pneumatic tool lubricant (e.g., Mobil Velocite No. 10) |
| Safety | Wear PPE (ANSI Z87.1 safety glasses, hearing protection, dust mask); do not use oxygen or combustible gases; always disconnect air before adjustments or maintenance |
| Wear Parts | Driver blades, bumpers, O-rings, pistons and piston seals |
| Repairability | OEM DeWALT replacement parts recommended; piston and driver replacement procedure described in the manual |
| Included Accessories | Two additional base plates for 13 and 16 mm (1/2 and 5/8 in) flooring |
| Operating Temperature | Avoid freezing; use anti-freeze lubricant in cold weather |
Frequently Asked Questions - DWFP12569 DEWALT
User questions about DWFP12569 DEWALT
0 question about this device. Answer the ones you know or ask your own.
Ask a new question about this device
Download the instructions for your Stapler in PDF format for free! Find your manual DWFP12569 - DEWALT and take your electronic device back in hand. On this page are published all the documents necessary for the use of your device. DWFP12569 by DEWALT.
USER MANUAL DWFP12569 DEWALT
Definitions: Safety Alert Symbols and Words
This instruction manual uses the following safety alert symbols and words to alert you to hazardous situations and your risk of personal injury or property damage.
D. IGER: Indicates an imminently hazardous situation which, if not avoided, will result in death or serious injury.
WINDING: Indicates a potentially hazardous situation which, if not avoided, could result in death or serious injury.
CAITON: Indicates a potentially hazardous situation which, if not avoided, may result in minor or moderate injury.
(without word) Indicates a safety related message.
NOTICE: Indicates a practice not related to personal injury which, if not avoided, may result in property damage.
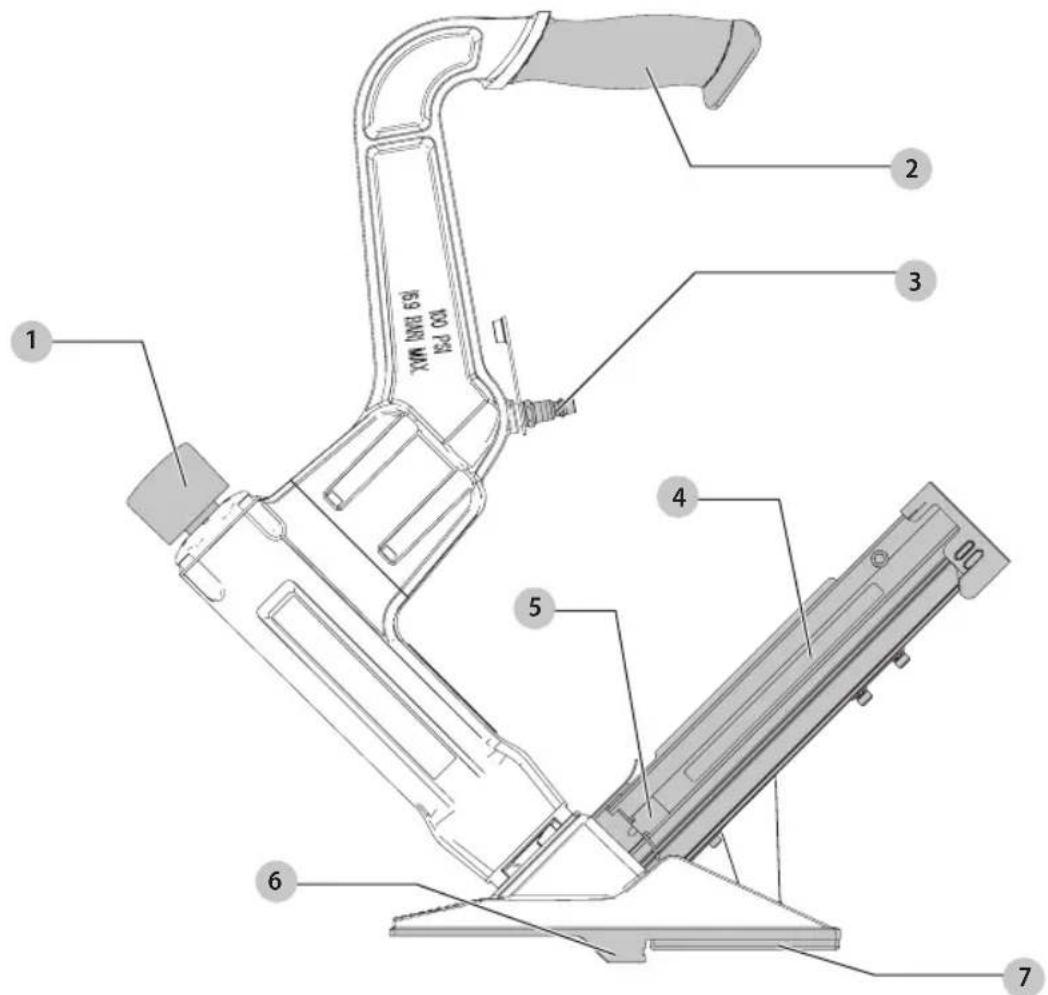
Fig. A
1 Mallet Actuator
2 Handle grip
3 1/4" Male fitting
4 Magazine
5 Magazine pusher
6 Fastener guide/nose
7 Plate
WARNING! Read all safety warnings and all
inactions. Failure to follow the warnings and instructions may result in electric shock, fire and/or serious injury.

WARNING: To reduce the risk of injury, read the
instruction manual.
If you have any questions or comments about this or
any DeWALT tool, call us toll free at:
1-800-4-DeWALT (1-800-433-9258).
ENGLISH
DeWALT tools are precision-built tools, designed for precise, high volume nailing. These tools will deliver efficient, dependable service when used correctly and with care. As with any fine power tool, for best performance the manufacturer's instructions must be followed. Please study this manual before operating the tool and understand the safety warnings and cautions. The instructions on installation, operation and maintenance should be read carefully, and the manual kept for reference.
NOTE: Additional safety measures may be required because of your particular application of the tool. Contact your DeWALT representative or distributor with any questions concerning the tool and its use.
DeWALT, 701 E. Joppa Road, Towson, Maryland 21286, U.S.& Canada Only, E.-U.et Canada圭lement
DeWALT tools have been engineered to provide excellent customer satisfaction and are designed to achieve maximum performance when used with precision DeWALT fasteners engineered to the same exacting standards.
DeWALT cannot assume responsibility for product performance if our tools are used with fasteners or accessories not meeting the specific requirements established for genuine DeWALT nails, staples and accessories.
Limited Warranty
U.S. and Canada Only
DeWALT warrants to the original retail purchaser that the product purchased is free from defects in material and workmanship, and agrees to repair or replace, at DeWALT's option, any defective DeWALT branded pneumatic stapler or nailer for a period of seven (7) years from date of purchase (one (1) year from the date of purchase for compressors
and tools used in production applications). Warranty is not transferable. Proof of purchase date required. This warranty covers only damage resulting from defects in material or workmanship; it does not cover conditions or malfunctions resulting from normal wear, neglect, abuse, accident or repairs attempted or made by other than our national repair center or authorized warranty service centers. Driver blades, bumpers, o-rings, pistons and piston rings are considered normally wearing parts. For optimal performance of your DeWALT tool always use genuine DeWALT fasteners and replacement parts.
THIS WARRANTY IS IN LIEU OF ALL OTHER WARRANTYES, EXPRESS OR IMPLIED, INCLUDING BUT NOT LIMITED TO THE IMPLIED WARRANTYES OF MERCHANTABILITY OR FITNESS FOR A PARTICULAR PURPOSE. DeWALT SHALL NOT BE LIABLE FOR ANY INCIDENTAL OR CONSEQUENTIAL DAMAGES.
Some states and countries do not allow limitations on how long an implied warranty lasts, or the exclusion or limitation of incidental or consequential damages, so the above limitations or exclusions may not apply to you. This warranty gives you specific legal rights, and you may also have other rights which vary from state to state and country to country.
To obtain warranty service in the U.S. return the product, together with proof of purchase, to the U.S. DeWALT National or Regional Independent Authorized Warranty Service Center. In the U.S. you may call us at 1-800-4-DrWALT (1-800-433-9258) or visit www.DeWALT.com for the location most convenient for you. In Canada please call us at 1-800-4-DrWALT (1-800-433-9258) or visit www.DeWALT.com
2-N-1TM FLOORING TOOL: DWFP12569
Tool Specifications
Model Length Height Width Weight
DWFP12569 20.39" (518mm) 21.95" (558mm) 3.15" (80 mm) 10.2 lbs (4.6 kg)
All dimentions in inches unless otherwise specified.
Fastener Specifications
| Model Fastener Crown | Width | Gauge Fastener Range |
| DWFP12569 DWCS15xx | 1/2" (13mm) | 15-1/2 Ga., 1/2" 1-1/2" (38mm) Crown Staples to 2" (50mm) |
| DWFP12569 DWFLN-xxx - | 16 Ga. "L" shape 1-1/2" (38mm) Cleat Nails to 2" (50mm) |
Tool Air Fitting:
This tool uses a 1/4'' N.P.T. male plug. The inside diameter should be 200'' (5 mm) or larger. The fitting must be capable of discharging tool air pressure when disconnected from the air supply.
Operating Pressure:
70 to 100 p.s.i.g. (4.9 to 7.0kg / cm2 ). Select the operating pressure within this range for best fastener performance. DO NOT EXCEED THIS RECOMMENDED OPERATING PRESSURE.
Air Consumption:
The DWFP12569 requires 3.52 cubic feet per minute (100 liters per minute) of free air to operate at the rate of 60 fasteners per minute, at 80 p.s.i. (5.6kg / cm2) .Take the actual rate at which the tool will be run to determine the amount of air required. For instance, if your fastener usage averages 30 fasteners per minute, you need 50% of the tool's c.f.m. of free air which is required to operate the tool at 60 fasteners per minute.
Safety Information
WARNING: ALWAYS use safety glasses. Everyday eyeglasses are NOT safety glasses. Also use face or dust mask if cutting operation is dusty. ALWAYS WEAR CERTIFIED SAFETY EQUIPMENT:
ANSI Z87.1 eye protection (CAN/CSA Z94.3)
ANSI S12.6 (S3.19) hearing protection,
- NIOSH/OSHA/MSHA respiratory protection.
WARNING: Some dust created by power sanding, grinding, drilling, and other construction activities contains chemicals known to the State of California to cause cancer, birth defects or other reproductive harm. Some examples of these chemicals are:
- lead from lead-based paints,
crystalline silica from bricks and cement and other masonry products, and - arsenic and chromium from chemically-treated lumber.
Your risk from these exposures varies, depending on how often you do this type of work. To reduce your exposure to these chemicals: work in a well ventilated area, and work with approved safety equipment, such as those dust masks that are specially designed to filter out microscopic particles.
- Avoid prolonged contact with dust from power sanding, sawing, grinding, drilling, and other construction activities. Wear protective clothing and wash exposed areas with soap and water. Allowing dust to get into your mouth, eyes, or lay on the skin may promote absorption of harmful chemicals.
WARNING: Always wear proper personal hearing protection that conforms to ANSI S12.6 (S3.19)
during use. Under some conditions and duration of use, noise from this product may contribute to hearing loss.
WARNING: (Air and Supply)
Do not use oxygen, combustible gases, or bottled gases as a power source for this tool as tool may explode, possibly causing injury.
- Do not use supply sources which can potentially exceed 200 P.S.I.G. (14kg/cm2) as tool may burst, possibly causing injury.
- The connector on the tool must not hold pressure when air supply is disconnected. If a wrong fitting is used, the tool can remain charged with air after disconnecting and thus will be able to drive a fastener even after the air line is disconnected possibly causing injury.
- Do not pull trigger or depress contact arm while connected to the air supply as the tool may cycle, possibly causing injury.
- Always disconnect air supply: 1.) Before making adjustments; 2.) When servicing the tool; 3.) When clearing a jam; 4.) When tool is not in use; 5.) When moving to a different work area, as accidental actuation may occur, possibly causing injury.
WARNING: When loading tool:
Never place a hand or any part of body in fastener discharge area of tool;
- Never point tool at anyone;
- Do not pull the trigger or depress the trip as accidental actuation may occur, possibly causing injury.
WARNING: When operating the tool: Always handle the tool with care.
- Never engage in horseplay;
- Never pull the trigger unless nose is directed toward the work;
-
Keep others a safe distance from the tool while tool is in operation as accidental actuation may occur, possibly causing injury.
-
The operator must not hold the trigger pulled on contact arm tools except during fastening operation as serious injury could result if the trip accidentally contacted someone or something, causing the tool to cycle.
- Keep hands and body away from the discharge area of the tool. A contact arm tool may bounce from the recoil of driving a fastener and an unwanted second fastener may be driven possibly causing injury.
- Check operation of the contact arm mechanism frequently. Do not use the tool if the arm is not working correctly as accidental driving of a fastener may result. Do not interfere with the proper operation of the contact arm mechanism.
- Do not drive fasteners on top of other fasteners or with the tool at an overly steep angle as this may cause deflection of fasteners which could cause injury.
- Do not drive fasteners close to the edge of the work piece as the wood may split, allowing the fastener to be deflected possibly causing injury.
- This nailer produces SPARKS during operation. NEVER use the nailer near flammable substances, gases or vapors including lacquer, paint, benzine, thinner, gasoline, adhesives, mastics, glues or any other material that is -- or the vapors, fumes or byproducts of which are -- flammable, combustible or explosive. Using the nailer in any such environment could cause an EXPLOSION resulting in personal injury or death to user and bystanders.
WARNING: When maintaining the tool:
men working on air tools note the warnings in this manual and use extra care when evaluating problem tools.
ENGLISH
Additional SafetyWarnings
- Use the DEWALT pneumatic tool only for the purpose for which it was designed.
- Never use this tool in a manner that could cause a fastener to be directed toward the user or others in the work area.
- Do not use the tool as a hammer.
Always carry the tool by the handle. Never carry the tool by the air hose. - Do not alter or modify this tool from the original design or function without approval from DEWALT.
- Always be aware that misuse and improper handling of this tool can cause injury to yourself and others.
- Before using the tool, verify that the actuator is in the non-actuated position. With the tool disconnected from the air supply, depress the actuator and confirm it returns to the non-actuated position.
- Never leave a tool unattended with the air hose attached.
- Do not operate this tool if it does not contain a legible WARNING LABEL.
- Do not continue to use a tool that leaks air or does not function properly. Notify your nearest DeWALT representative if your tool continues to experience functional problems.
TO PREVENT ACCIDENTAL INJURIES:
- Never place a hand or any other part of the body in nail discharge area of tool while the air supply is connected.
- Never point the tool at anyone else.
- Never engage in horseplay.
- Never actuate the tool unless nose is directed at the work.
Always handle the tool with care. - Do not actuate the tool while loading.
Components (Fig. A)
WARNING: Never modify the power tool or any part of the Damage or personal injury could result.
Refer to Figure A at the beginning of this manual for a complete list of components.
Intended Use
Your 2-N-1TM Flooring Nailer is designed for professional installation of hardwood flooring.
CAUTION: Your flooring nailer can be used to install finished flooring however caution must be used to ensure that the finish is not damaged by the tool. It is recommended that the tool be tested on a sample section to be certain that the tool and technique of use do not leave marks on the finish. This procedure should be followed before each job due to variations in flooring and tool condition.
Your nailer is a professional power tool.
DO NOT let children come into contact with the tool.
Supervision is required when inexperienced operators use this tool.
Adjustments and Usage Prep
Air Supply and Connections
WARNING: Do not use oxygen, combustible gases, or bottled gases as a power source for this tool as tool may explode, possibly causing injury.
Fittings
Install a male plug on the tool which is free flowing and which will release air pressure from the tool when disconnected from the supply source.
Hoses
Air hoses should have a minimum of 150 p.s.i. (10.6 kg/cm2) working pressure rating or 150 percent of the maximum pressure that could be produced in the air system. The supply hose should contain a fitting that will provide "quick disconnecting" from the male plug? on the tool.
Supply Source
Use only clean regulated compressed air as a power source for this tool. NEVER USE OXYGEN, COMBUSTIBLE GASES, OR BOTTLED GASES, AS A POWER SOURCE FOR THIS TOOL AS TOOL MAY EXPLODE.
Regulator
A pressure regulator with an operating pressure of 0 - 125 p.s.i. (0 - 8.79 KG/CM2) is required to control the operat iing pressure for safe operation of this tool. Do not connect this tool to air pressure which can potentially exceed 200 p.s.i. (14 KG/CM2) as tool may fracture or burst, possibly causing injury.
Operating Pressure
Do not exceed recommended maximum operating pressure as tool wear will be greatly increased. The air supply must be capable of maintaining the operating pressure at the tool. Pressure drops in the air supply can reduce the tool's driving power. Refer to Tool Specifications for setting the correct operating pressure for the tool.
Filter
Dirt and water in the air supply are major causes of wear in pneumatic tools. A filter will help to get the best performance and minimum wear from the tool. The filter must have adequate flow capacity for the specific installation. The filter has to be kept clean to be effective in providing clean compressed air to the tool. Consult the manufacturer's instructions on proper maintenance of your filter. A dirty and clogged filter will cause a pressure drop which will reduce the tool's performance.
Lubrication
Frequent, but not excessive, lubrication is required for best performance. Use Air Tool Lubricant, Mobil Velocite #10, or equivalent. Do not use detergent oil or additives as these lubricants will cause accelerated wear to the seals and bumpers in the tool, resulting in poor tool performance and frequent tool maintenance. Only a few drops of oil at a time is necessary inserted into air fitting opening. Too much oil will only collect inside the tool and will be noticeable in the exhaust cycle.
Setup (Fig. B)
Your flooring nailer was designed to install 1/2'' to 3/4'' tongue and groove hardwood flooring. The tool is factory set for 3/4'' flooring. Two additional foot plates are included with this tool to accommodate 1/2'' and 5/8'' flooring.
Flooring products will vary and the user must ensure the tool is properly adjusted each time flooring is being installed. Dimensions listed on the footplates are suggestions.Test fastener placement on scrap pieces of wood before installing floor.
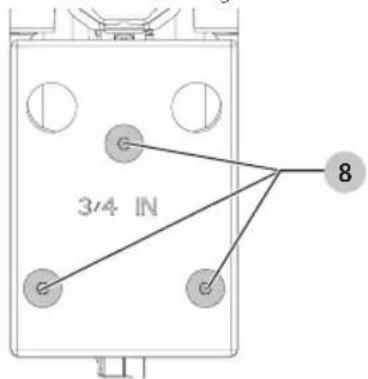
Fig.B
To change footplates:
- Remove the screws 8.
- Change to desired plate.
- Replace the screws.
Operation
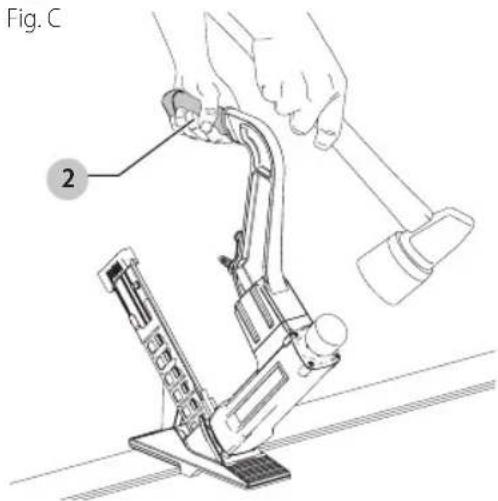
Proper Hand Position (Fig. C)
WARNING: To reduce the risk of serious personal injury, YS use proper hand position as shown.
WARNING: To reduce the risk of serious personal injury, YS hold securely in anticipation of a sudden reaction.
Proper hand position requires one hand on the grip handle 2.
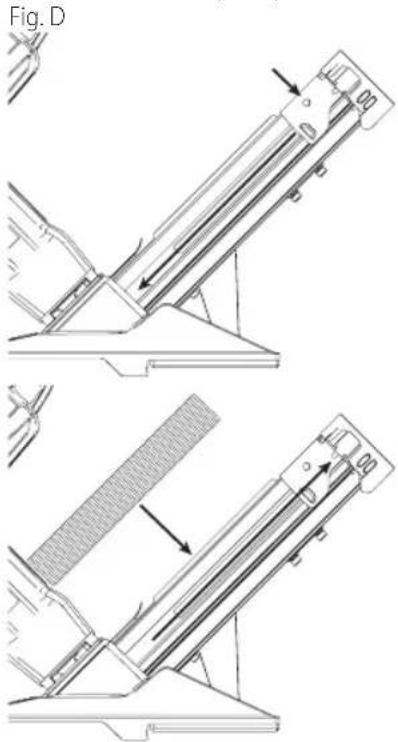
Loading the Tool (Fig. D)
NOTICE: Use only nails recommended for use in the DWFP12569 nailers or cleats which meet the DrWALT specifications. Refer to Fastener Specifications.
- Retract pusher 5 until it is in the locked position.
-
Insert a stick of cleats or staples.
-
Push the detent to unlock the pusher.
- Slide pusher to the fully forward position.
NOTE: The tool is now ready to operate.
Installing Flooring (Fig. A, B, E, F)
CAITION:NEVER HIT THE PLUNGER WITH THE METAL
NOTE: Always test on a scrap piece of flooring.
- Position the flooring per the manufacture's specifications.
- Place the tool with the fastener guide 6 above the tongue and firmly against the forward face of the flooring material.
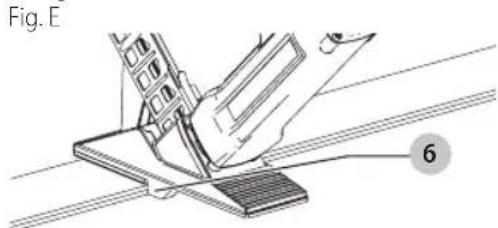
- Ensure that the composite foot is firmly held against the top surface of the flooring.
- Using the rubber face of the mallet strike the top end of the actuator 1.
NOTE: Adjust air pressure until desired fastener penetration is achieved. (Fig. F)
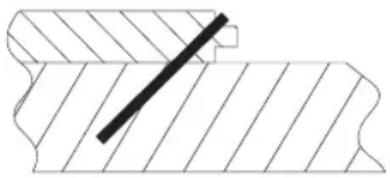
Fig. F
Under Driven Fastener
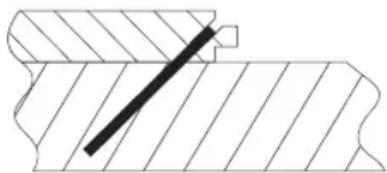
Properly Driven Fastener
Cold Weather Operation
For cold weather operation, near and below freezing, the moisture in the air line may freeze and prevent tool operation. We recommend the use of winter formula air tool lubricant or permanent antifreeze (ethylene glycol) as a cold weather lubricant.
CAUTION: Do not store tools in a cold weather environment to prevent frost or ice formation on the tools operating valves and mechanisms that could cause tool failure.
NOTE: Some commercial air line drying liquids are harmful to "O"-rings and seals - do not use these low temperature air dryers without checking compatibility.
Maintenance
Cleaning
WARNING: Blow dirt and dust out of all air vents with dry air at least once a week. To minimize the risk of eye injury, always wear ANSI Z87.1 approved eye protection when performing this.
WARNING: Never use solvents or other harsh chemicals for cleaning the non-metallic parts of the tool. These chemicals may weaken the plastic materials used in these parts. Use a cloth dampened only with water and mild soap. Never let any liquid get inside the tool; never immerse any part of the tool into a liquid.
Replacement Parts
DeWALT replacement parts are recommended. Do not use modified parts or parts which will not give equivalent performance to the original equipment.
To Replace Piston
- Insert the flats on the lower end of the driver piston stem carefully into the end of piston and plunger wrench, BC1009.
-
Using another special wrench, BC1009, or another wrench of the proper size, unscrew the plunger from the upper end of the stem. After this is done, it will be possible to lift the poppet off the stem.
-
Place the special wrench, BC1009, down over the piston stem onto the driver piston, locking the piston ears in the slots in the wrench. Unscrew the piston from the stem.
To Replace Driver
- It is not necessary to disassemble the piston-poppetdriver assembly to replace the driver. Pull the poppet up on the driver piston stem as far as it will go.
- Insert special wrench, BC1009, over the driver piston, locking the piston ears in the slots in the wrench. Unscrew the piston from threaded portion of the stem.
- To remove the driver blade from the piston stem, push the driver blade pin out of the stem. This will release the blade.
- Insert new driver blade into the slot in the end of the driver piston stem and assemble the driver blade pin. Test the side play in the driver blade by grasping the driver piston stem in one hand and the blade in the other and moving the blade sideways in alignment with the slot in the stem. There should be a small amount of side play in the blade. This is necessary to take care of any slight misalignment between the blade and guide in the nose. If there is no side play, the blade should be removed and the top (pin end) just barely dressed off with a stone. It is not necessary to do more than smooth off the top to get the necessary side play. Do not grind. Reinsert the blade and pin in the stem and test for side play once more. Repeat as necessary to get this small amount of side play. Carefully examine the large threaded portion of the piston stem. A nylon lock can be seen imbedded in a recessed hole in the stem. It is very important that this nylon lock can be replaced when its locking efficiency has been reduced through several disassemblies of the piston. It is necessary to use the sharp point of a knife, or some such instrument, to remove this nylon lock. Insert a new one by setting it into the recessed hole in the stem, and tapping it gently until firmly seated. Reverse these instructions to reassemble.
- Assemble plunger flush with end of piston stem.
Assembly Procedure For Seals
When repairing a tool, make sure the internal parts are clean and lubricated. Use Parker "O"-LUBE or equivalent on all "O"-rings. Coat each "O"-ring with "O"-LUBE before assembling. Use a small amount of oil on all moving surfaces and pivots. After reassembly add a few drops of DEWALT Air Tool Lubricant through the air line fitting before testing.
Air Supply-Pressure And Volume
Air volume is as important as air pressure. The air volume supplied to the tool may be inadequate because of undersize fittings and hoses, or from the effects of dirt and water in the system. Restricted air flow will prevent the tool from receiving an adequate volume of air, even though the pressure reading is high. The results will be slow operation, misfeeds or reduced driving power. Before evaluating tool
problems for these symptoms, trace the air supply from the tool to the supply source for restrictive connectors, swivel fittings, low points containing water and anything else that would prevent full volume flow of air to the tool.
Register Online
Thank you for your purchase. Register your product now for:
- WARRANTY SERVICE: Registering your product will help you obtain more efficient warranty service in case there is a problem with your product.
CONFIRMATION OF OWNERSHIP: In case of an insurance loss, such as fire, flood or theft, your registration of ownership will serve as your proof of purchase.
FOR YOUR SAFETY: Registering your product will allow us to contact you in the unlikely event a safety notification is required under the Federal Consumer Safety Act.
Register online at www.dewalt.com/register.
Accessories
WARNING: Since accessories, other than those used by DeWALT have not been tested with this product, use of such accessories with this tool could be hazardous. To reduce the risk of injury, only DeWALT recommended accessories should be used with this product.
Recommended accessories for use with your tool are available at extra cost from your local dealer or authorized service center. If you need assistance in locating any accessory, please contact DEWALT, call 1-800-4-D-WALT (1-800-433-9258).
TROUBLE SHOOTING
| Problem Cause Correction | ||
| Trigger valve housing leaks air | O-ring cut or cracked Replace O-ring | |
| Trigger valve stem leaks air | O-ring/seals cut or cracked Replace trigger valve assembly | |
| Frame/nose leaks air Loose nose screws Tighten and recheck | ||
| O-ring or Gasket is cut or cracked Replace O-ring or gasket | ||
| Bumper cracked/worn Replace bumper | ||
| Frame/cap leaks air Damaged gasket or seal Replace gasket or seal | ||
| Cracked/worn head valve bumper Replace bumper | ||
| Loose cap screws Tighten and recheck | ||
| Failure to cycle Air supply restriction Check air supply equipment | ||
| Tool dry, lack of lubrication Use Air Tool Lubricant | ||
| Worn head valve O-rings Replace O-rings | ||
| Broken cylinder cap spring | Replace cylinder cap spring | |
| Head valve stuck in cap | Disassemble/Check/Lubricate | |
| Lack of power; slow to cycle | Tool dry, lacks lubrication | Use Air Tool Lubricant |
| Broken cylinder cap spring | Replace cap spring | |
| O-rings/seals cut or cracked | Replace O-rings/seals | |
| Exhaust blocked | Check bumper, head valve spring, muffler | |
| Trigger assembly worn/leaks | Replace trigger assembly | |
| Dirt/tar build up on driver | Disassemble nose/driver to clean | |
| Cylinder sleeve not seated correctly on bottom bumper | Disassemble to correct | |
| Head valve dry | Disassemble/lubricate | |
| Air pressure too low | Check air supply equipment | |
| Skipping fasteners; intermittent feed | Worn bumper | Replace bumper |
| Tar/dirt in driver channel | Disassemble and clean nose and driver | |
| Air restriction/inadequate air flow through quick disconnect socket and plug | Replace quick disconnect fittings | |
| Worn piston O-ring | Replace O-ring, check driver | |
| Tool dry, lacks lubrication | Use Air Tool Lubricant | |
| Damaged pusher spring | Replace spring | |
| Low air pressure | Check air supply system to tool | |
| Loose magazine nose screws | Tighten all screws | |
| Fasteners too short for tool | Use only recommended fasteners | |
| Bent fasteners | Discontinue using these fasteners | |
| Wrong size fasteners Use only recommended fasteners | ||
| Leaking head cap gasket | Tighten screws/replace gasket | |
| Trigger valve O-ring cut/worn | Replace O-ring | |
| Broken/chipped driver Replace driver (check piston O-ring) | ||
| Dry/dirty magazine | Clean/lubricate use Air Tool Lubricant | |
| Worn magazine | Replace magazine | |
| Fasteners jam in tool | Driver channel worn | Replace nose/check door |
| Wrong size fasteners Use only recommended fasteners | ||
| Bent fasteners | Discontinue using these fasteners | |
| Loose magazine/nose screws | Tighten all screws | |
| Broken/chipped driver Replace driver | ||

- DEFINITIONS: SAFETY ALERT SYMBOLS AND WORDS
- ENGLISH
- LIMITED WARRANTY
- U.S. AND CANADA ONLY
- 2-N-1TM FLOORING TOOL: DWFP12569
- TOOL SPECIFICATIONS
- FASTENER SPECIFICATIONS
- TOOL AIR FITTING
- OPERATING PRESSURE
- AIR CONSUMPTION
- SAFETY INFORMATION
- WARNING: (AIR AND SUPPLY)
- WARNING: WHEN LOADING TOOL
- WARNING: WHEN OPERATING THE TOOL: ALWAYS HANDLE THE TOOL WITH CARE
- WARNING: WHEN MAINTAINING THE TOOL
- ADDITIONAL SAFETYWARNINGS
- TO PREVENT ACCIDENTAL INJURIES
- COMPONENTS (FIG. A)
- INTENDED USE
- ADJUSTMENTS AND USAGE PREP
- AIR SUPPLY AND CONNECTIONS
- FITTINGS
- HOSES
- SUPPLY SOURCE
- REGULATOR
- FILTER
- LUBRICATION
- SETUP (FIG. B)
- OPERATION
- PROPER HAND POSITION (FIG. C)
- LOADING THE TOOL (FIG. D)
- INSTALLING FLOORING (FIG. A, B, E, F)
- COLD WEATHER OPERATION
- MAINTENANCE
- CLEANING
- REPLACEMENT PARTS
- TO REPLACE PISTON
- TO REPLACE DRIVER
- ASSEMBLY PROCEDURE FOR SEALS
- AIR SUPPLY-PRESSURE AND VOLUME
- REGISTER ONLINE
- ACCESSORIES
Brand : DEWALT
Model : DWFP12569
Category : Stapler