JS20 - Electric saw BLACK & DECKER - Free user manual and instructions
Find the device manual for free JS20 BLACK & DECKER in PDF.

| Product type | Electric jigsaw |
| Brand | Black & Decker |
| Model | JS20 |
| Power | 400 W |
| No-load speed | 1000 - 3000 min⁻¹ (variable) |
| Stroke length | 18 mm |
| Cutting depth in wood (at 90°) | 65 mm |
| Cutting depth in steel (at 90°) | 6 mm |
| Shoe bevel | 0° - 45° (left and right) |
| Power supply | Mains 230 V ~, 50/60 Hz, double insulation |
| Weight (approx.) | Approximately 2 kg |
| Main features | Variable speed, continuous lock, dust blower/vacuum, adjustable shoe, tool-free blade change (hex key) |
| Box contents | 1 jigsaw, 1 3 mm hex key |
| Maintenance and cleaning | Clean ventilation slots with a soft brush and dry cloth; clean housing with a damp cloth; do not use solvents or immerse in water |
| Safety | Double insulation, automatic blade stop, trigger lock, eye and ear protection recommended |
| Spare parts and repairability | Replacement blades (compatible), hex key, chip deflector; repairs by authorized Black & Decker service centers only |
| Warranty | 24 months against defects in materials and workmanship |
| Intended use | Domestic, cutting wood, plastic and thin sheet metal |
| Protection class | Class II (double insulation) |
Frequently Asked Questions - JS20 BLACK & DECKER
User questions about JS20 BLACK & DECKER
0 question about this device. Answer the ones you know or ask your own.
Ask a new question about this device
Download the instructions for your Electric saw in PDF format for free! Find your manual JS20 - BLACK & DECKER and take your electronic device back in hand. On this page are published all the documents necessary for the use of your device. JS20 by BLACK & DECKER.
USER MANUAL JS20 BLACK & DECKER
Your BLACK+DECKERTM JS10 and JS20 jigsaw has been designed for sawing wood, plastics and sheet metal. This tool is intended for consumer use only.
GENERAL SAFETY RULES
Warning! Read and understand all instructions. Failure to follow all instructions listed below, may result in electric shock, fire and/or serious personal injury.
SAVE THESE INSTRUCTIONS
SAFETY INSTRUCTIONS
General power tool safety warnings.

Warning! Read all safety warnings and all instructions.
Failure to follow the warnings and
instructions listed below may result in electric shock, fire and/or serious injury.
Save all warnings and instructions for future reference. The term "power tool" in all of the warnings listed below refers to your mains operated (cored) power tool or battery operated (cordless) power tool.
1. Work Area Safety
a. Keep work area clean and well lit.
Cluttered and dark areas invite accidents.
b. Do not operate power tools in explosive atmospheres, such as in the presence of flammable liquids, gases or dust. Power tools create sparks which may ignite the dust or fumes.
c. Keep children and bystanders away while operating a power tool.
Distractions can cause you to lose control.
2. Electrical Safety
a. Power tool plugs must match the outlet. Never modify the plug in any way. Do not use any adapter plugs with earthed (grounded) power tools. Unmodified plugs and matching outlets will reduce risk of electric shock.
b. Avoid body contact with earthed or grounded surfaces such as pipes, radiators, ranges and refrigerators.
There is an increased risk of electric shock if your body is earthed or grounded.
c. Do not expose power tools to rain or wet conditions. Water entering a power tool will increase the risk of electric shock.
d. Do not abuse the cord. Never use the cord for carrying, pulling or unplugging the power tool. Keep cord away from heat, oil, sharp edges or moving parts.
Damaged or entangled cords increase the risk of electric shock.
e. When operating a power tool outdoors, use an extension cord suitable for outdoor use. Use of a cord suitable for outdoor use reduces the risk of electric shock.
f. If operating a power tool in a damp location is unavoidable, use a residual current device (RCD) protected supply. Use of an RCD reduces the risk of electric shock.
3. Personal Safety
a. Stay alert, watch what you are doing and use common sense when operating a power tool. Do not use a power tool while you are tired or under the influence of drugs, alcohol or medication. A moment of inattention while operating power tools may result in serious personal injury.
b. Use personal protective equipment. Always wear eye protection. Protective equipment such as dust mask, non-skid safety shoes, hard hat, or hearing protection used for appropriate conditions will reduce personal injuries.
c. Prevent unintentional starting. Ensure the switch is in the off-position before connecting to power source and/or battery pack, picking up or carrying the tool. Carrying power tools with your finger on the switch or energising power tools that have the switch on invites accidents.
d. Remove any adjusting key or wrench before turning the power tool on. A wrench or a key left attached to a rotating part of the power tool may result in personal injury.
e. Do not overreach. Keep proper footing and balance at all times. This enables better control of the power tool in unexpected situations.
f. Dress properly. Do not wear loose clothing or jewellery. Keep your hair, clothing and gloves away from moving parts. Loose clothes, jewellery or long hair can be caught in moving parts.
g. If devices are provided for the connection of dust extraction and collection facilities, ensure these are connected and properly used. Use of these devices can reduce dust related hazards.
4. Power Tool Use and Care
a. Do not force the power tool. Use the correct power tool for your application. The correct power tool will do the job better and safer at the rate for which it was designed.
b. Do not use the power tool if the switch does not turn it on and off. Any power tool that cannot be controlled with the switch is dangerous and must be repaired.
c. Disconnect the plug from the power source and/or the battery pack from the power tool before making any adjustments, changing accessories, or storing power tools. Such preventive safety measures reduce the risk of starting the power tool accidentally.
d. Store idle power tools out of the reach of children and do not allow persons unfamiliar with the power tool or these instructions to operate the power tool. Power tools are dangerous in the hands of untrained users.
e. Maintain power tools. Check for misalignment or binding of moving parts, breakage of parts and any other condition that may affect the power tools operation. If damaged, have the power tool repaired before use. Many accidents are caused by poorly maintained power tools.
f. Keep cutting tools sharp and clean. Properly maintained cutting tools with
sharp cutting edges are less likely to bind and are easier to control.
g. Use the power tool, accessories and tool bits etc., in accordance with these instructions, taking into account the working conditions and the work to be performed. Use of the power tool for operations different from those intended could result in a hazardous situation.
5. Service
a. Have your power tool serviced by a qualified repair person using only identical replacement parts. This will ensure that the safety of the power tool is maintained.
ADDITIONAL SAFETY WARNINGFOR JIGSAWS AND RECIPROCATING SAWS
a. Hold power tool by insulated gripping surfaces, when performing an operation where the cutting accessory may contact hidden wiring or its own cord. Cutting accessory contacting a "live" wire may make exposed metal parts of the power tool "live" and could give the operator an electric shock.
b. Use clamps or another practical way to secure and support the workpiece to a stable platform. Holding the work by hand or against your body leaves it unstable and may lead to loss of control.
c. Keep hands away from cutting area. Never reach underneath the work piece any reason. Do not insert fingers or thumb into the vicinity of the reciprocating blade and blade clamp. Do not stabilize the saw by gripping the shoe.
d. Keep blades sharp. Dull or damaged blades may cause the saw to swerve or stall under pressure. Always use the appropriate type of saw blade for the workpiece material and type of cut.
e. When cutting pipe or conduit, make sure that they are free from water, electrical wiring, etc.
f. Do not touch the workpiece or the blade immediately after operating the tool. They can become very hot.
g. Be aware of hidden hazards, before cutting into walls, floors or ceilings, check for the location of wiring and pipes.
h. The blade will continue to move after releasing the switch. Always switch the tool off and wait for the saw blade to come to a complete standstill before putting the tool down.

Warning! Contact with, or inhalation of dusts arising from cutting applications may endanger the
health of the operator and possible bystanders. Wear a dust mask specifically designed for protection against dust and fumes and ensure that persons within or entering the work area are also protected.
i. The intended use is described in this instruction manual. The use of any
accessory or attachment or performance of any operation with this tool other than those recommended in this instruction manual may present a risk of personal injury and/or damage to property.
Electrical safety

Your tool is double insulated; therefore no earth wire is required. Always check that the main voltage corresponds to the voltage on the rating plate.

Warning! If the power cord is damaged, it must be replaced by the manufacturer, authorized BLACK+DECKER Service Center or an equally qualified person in order to avoid damage or injury. If the power cord is replaced by an equally qualified person, but not authorized by BLACK+DECKER, the warranty will not be valid.
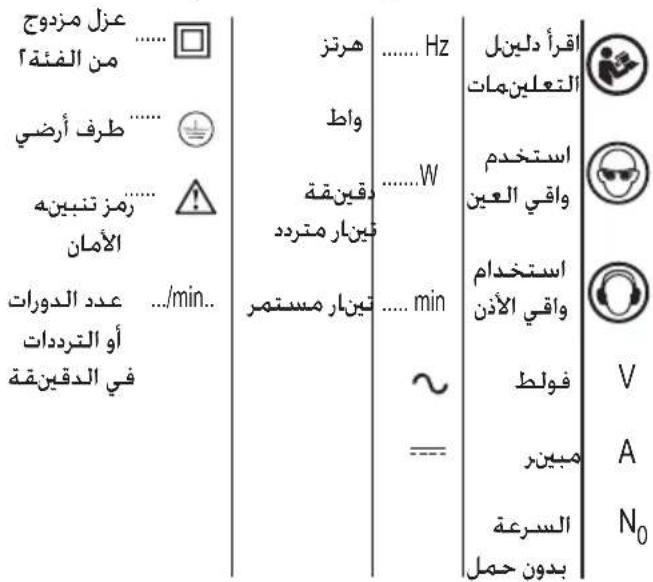
Labels on tool
The label on your tool may include the following symbols:

Read
Instructions Manual
Hz .... Hertz
W..... Watts


Use Eye
Protection
min.....minutes
.... Alternating Current


Use Ear
Protection
Direct Current
No-Load
Speed
.../min. Revolutions or Reciprocation per minute
List of Contents
1 Jigsaw
1 Hex key
Position of date barcode
The Date Code, which also includes the year of manufacture, is printed into the housing. Example:
2017 XX JN
Year of manufacturing
Safety of others
- This appliance is not intended for use by persons (including children) with reduced physical, sensory or mental capabilities, or lack of experience and knowledge, unless they have been given supervision or instruction concerning use of the appliance by a person responsible for their safety.
Children should be supervised to ensure that they do not play with the appliance.
Residual risks
Additional residual risks may arise when using the tool which may not be included in the enclosed safety warnings. These risks can arise from misuse, prolonged use etc. Even with the application of the relevant safety regulations and the implementation of safety devices, certain residual risks can not be avoided. These include:
- Injuries caused by touching any rotating/moving parts.
- Injuries caused when changing any parts, blades or accessories.
- Injuries caused by prolonged use of a tool. When using any tool for prolonged periods ensure you take regular breaks.
Impairment of hearing. - Health hazards caused by breathing dust developed when using your tool (example: working with wood, especially oak, beech and MDF.)
FEATURES (Fig. A)
- Trigger switch
- Lock-On button
- Motor vents
- 3 mm Hex key
- Hex key holder
- Dust port
- Tilting sole plate
- Blade roller
- Blade screws
- Chip guard
Warning! Before attempting any of the following operations, make sure that the tool is switched off and
unplugged and that the saw blade has
stopped. Used saw blades may be hot.

Warning! Always disconnect your jigsaw from the power source when replacing blades, tilting the sole
plate, cleaning or when the tool is not in
use. Disconnecting the jigsaw will prevent
accidental starting that could cause serious
personal injury.
Blade options
Your jigsaw is designed to permit the use of many different saw tooth configurations.
Installing blades (not included)
- Unplug your jigsaw from the power source.
Warning! Failure to unplug your jigsaw from the power source could result in accidental starting causing serious injury. - Insert the slotted screwdriver through the access hole in the chip shield (10).
Note: Use the slotted screwdriver (not supplied) to loosen screws.
- Loosen both blade clamp screws (9) and insert the saw blade (11) as far as possible into the slot in the blade clamp.
Notes:
a) Ensure the blade is nested in the groove in the support roller (8).
b) The holes in universal fitting saw blades are not designed for alignment with the screw holes in the blade clamp.
4. Tighten both blade clamp screws (9) securely against the blade.
To remove the jigsaw blade:
- Unplug your jigsaw.
- Loosen blade clamp screws (9) using the slotted screwdriver.
- Remove the blade.
On/Off trigger switch (Fig. C)
To turn your jigsaw ON, depress the trigger switch (1). To turn the saw OFF, release the trigger switch.
Lock-on button (Fig. D)
Your jigsaw is equipped with a lock-on feature, which is convenient when continuous cutting for extended periods of time is required. To lock the switch ON, depress the trigger switch (1), push in and hold the lock-on button (2), then release the trigger. Release the lock-on button and your jigsaw will continue running. Depress and release the trigger switch to release lock.
Note: The lock-on button can be accessed from left side of the handle.
Variable speed control (Fig. E) (only JS20)
Set the jigsaw speed by rotating the variable speed control wheel (12) to the appropriate speed. Rotating the variable speed control wheel toward the rear of the jigsaw will result in slower speeds. Position the speed control dial at "1" for the slowest speed, "3" for medium speed and at "6" for the highest speed.
Vacuum port switch (Fig. F)
During normal use without the vacuum connected, the vacuum port switch (13) must be slid toward the rear of the tool. This will allow the internal motor fan to continuously blow the sawdust away from the cutting mark. When the vacuum is connected, the vacuum port switch must be slid toward the front of the tool. This positions the internal baffle to divert the sawdust through the vacuum port so it can be evacuated by the workshop vacuum.
OPERATION
Warning! Never use the tool when the saw shoe plate is loose or removed.
General cutting
Warning! Keep hands and fingers away from the space between the motor housing and the blade clamp. Do not reach underneath workpiece while the saw is running.
Rest the front of the sole plate on the workpiece and align the cutting edge of the blade with the cutting line on your workpiece (Fig. G). Make sure the power cord is out of your way and not in the path the blade will follow. Start your saw and move it toward the workpiece. Apply enough downward pressure to keep the saw steady and only enough forward pressure to keep the blade cutting freely.
Warning! Do not force the saw. Forcing the saw may overheat the motor and break saw blades.
Bevel cutting
Bevel cutting angles may be adjusted from zero to 45^ either left or right. To adjust the bevel angle:
- Loosen both sole plate pivot screws (14) until the sole plate (15) can be rotated (Fig. H).
Note: Use the 3 mm hex key supplied.
-
Bevel angles (17) are marked on a scale located on the side of the sole plate (Fig. 1).
-
Slide the sole plate back. Align the edge
of the motor housing (18) with the desired angle mark (17) on the side of the base, then slide the sole plate forward to engage the notches (16) into the motor housing pin.
Note: Angle marks on the sides of the jigsaw base are for reference only. Operator should use a protractor to verify angles.
- Once the desired bevel angle is obtained, lock the sole plate by tightening the sole plate pivot screws.
- Make a test cut in a scrap piece of material and measure the bevel angle. Adjust bevel angle if necessary.
HINTS FOR OPTIMUM USE
Sawing laminates
When cutting laminates, splintering may occur which can damage the presentation surface. The most common saw blades cut on the upward stroke, therefore if the shoe plate is sitting on the presentation surface either use a saw blade that cuts on the downward stroke or:
- Use a fine-tooth saw blade.
- Saw from the back surface of the workpiece.
- To minimise splintering, clamp a piece of scrap wood or hardboard to both sides of the workpiece and saw through this sandwich.
Sawing metal
Warning! Do not use a vacuum when cutting metal. Metal filings will be hot and may cause fire. Be aware that sawing metal takes much more time than sawing wood.
- Use a saw blade suitable for sawing metal.
- When cutting thin sheet metal, clamp a piece of scrap wood to the back surface of the workpiece and cut through this sandwich.
- Spread a film of oil along the intended line of cut.
Plunge cutting
Warning! To avoid loss of control, broken blades or damage to the workpiece, always use extreme caution when making plunge cuts. It is not recommended to plunge cut any material other than wood. Wherever possible, drill a 3/8 (8 mm) or bigger pilot hole in the area to be cut out and start cutting with the blade in the pilot hole. This will avoid the need to plunge cut.
Note: Use only blades with 7 teeth per inch for plunge cutting.
- To plunge cut an inside hole, clearly mark the cutting line on the workpiece.
- Set the bevel angle at 0^ then lock the sole plate.
- Tilt the saw forward so it rests on the front edge of the sole plate and in a position so the blade will NOT touch the workpiece when the switch is turned ON (Fig. J).
Note: Make sure the saw blade is inside the area to be cut.
- Start the saw and slowly lower the blade onto the workpiece while making sure the front of the sole plate remains in contact with the workpiece. Allow the blade to cut through the wood.
- Continue lowering the blade into the workpiece until the sole plate rests flat on the workpiece. Continue sawing toward the cutting line and complete the cut as required.
Metal cutting
Many types of metal can be cut with your jigsaw. When cutting any kind of material, be careful not to twist or bend the blades. Do not force the blade. If the blade chatters or vibrates excessively, use a finer tooth blade. If the blade heats excessively, reduce speed of cutting. If the blade teeth become clogged when cutting soft metals such as aluminum, use a coarser blade with fewer teeth per inch. Clamp all work firmly and saw as close as possible to the clamping point to eliminate any vibration of the work being cut.
When cutting conduit, pipe or angle iron, clamp work in a vise if possible and saw close to the vise. To cut thin sheet materials, "sandwich" the material between hardboard or plywood and clamp the layers to eliminate material vibration and tearing. By doing this, the material will be cut smoothly. Lay out your pattern or cutting lines on top of the "sandwich".
MAINTENANCE
General
Warning! Do not at any time allow solvents such as brake fluids, gasoline, petroleum-based products, penetrating oils, etc. to come in contact with plastic parts. They contain chemicals that can damage, weaken or destroy plastic. Use a clean dry cloth to remove dirt, dust, oil, grease, etc.
Warning! Use safety goggles when using an air jet to blow dust out of the jigsaw. Using this jigsaw for cutting fiberglass, wallboard or plaster will result in accelerated wear due to the abrasive nature of these materials. It is important that you clean the jigsaw frequently when cutting these materials. DO NOT abuse power tools. Abusive practices can damage the tool as well as the workpiece.
Warning! DO NOT attempt to modify this jigsaw or create accessories not recommended for this jigsaw. Any such alteration or modification is misuse and could result in a hazardous condition leading to possible serious injury. It will also void the warranty.
Your BLACK+DECKER tool has been designed to operate over a long period of time with a minimum of maintenance. Continuous satisfactory operation depends upon proper tool care and regular cleaning.
- Regularly clean the ventilation slots in your tool using a soft brush or dry cloth.
- Regularly clean the motor housing using a damp cloth. Do not use any abrasive or solvent-based cleaner. Never let any liquid get inside the tool and never immerse any part of the tool into liquid.
Important! To assure product SAFETY and RELIABILITY, repairs, maintenance and adjustment (other than those listed in this manual) should be performed by authorized service centers or other qualified service personnel, always using identical replacement parts.
LUBRICATION
All of the bearings in this jigsaw are lubricated with a sufficient amount of high-grade lubricant for the life of the unit under normal conditions. Therefore, no further lubrication is required.
Protecting the environment

Separate collection. This product must not be disposed of with normal household waste.
Should you find one day that your BLACK+DECKER product needs replacement, or if it is of no further use to you, do not dispose of it with household waste. Make this product available for separate collection.

Separate collection of used products and packaging allows materials to be recycled and used again. Reuse of used materials helps prevent environmental pollution and reduces the demand for raw materials.
Local regulations may provide for separate collection of electrical products from the household, at municipal waste sites or by the retailer when you purchase a new product.
BLACK+DECKER provides a facility for the collection and recycling of BLACK+DECKER products once they have reached the end of their working life. To take advantage of this service please return your product to any authorised repair agent who will collect them on our behalf.
You can check the location of your nearest authorised repair agent by contacting your local BLACK+DECKER office at the address indicated in this manual. Alternatively, a list of authorised BLACK+DECKER repair agents and full details of our after-sales service and contacts are available on the Internet at: www.2helpU.com.
SERVICE INFORMATION
BLACK+DECKER offers a full network of company-owned and authorized service locations. All BLACK+DECKER Service Centers are staffed with trained personnel to provide customers with efficient and reliable power tool service. For more information about our authorized service centers and if you need technical advice, repair, or genuine factory replacement parts, contact the BLACK+DECKER location nearest you, or visit us at www.blackanddecker.com
NOTE
- BLACK+DECKER's policy is one of continuous improvement to our products and, as such, we reserve the right to change product specifications without prior notice.
- Standard equipment and accessories may vary by country.
Product specifications may differ by country. - Complete product range may not be available in all countries. Contact your local BLACK+DECKER dealers for range availability.
SPECIFICATIONS
| JS10 JS20 |
| Power 400W 400W |
| Blade speed 3000/min 1000-3000/min |
| Stroke length 18 mm 18 mm |
| Cutting depth @ 90° 65 mm in wood 65 mm in wood |
| 6 mm in steel 6 mm in steel |
| Sole plate tilt 0-45° 0-45° |
Guarantee
BLACK+DECKER is confident of the quality of its products and offers an outstanding guarantee. This guarantee statement is in addition to and in no way prejudices your statutory rights.
If a BLACK+DECKER product becomes defective due to faulty materials, workmanship or lack of conformity, within 24 months from the date of purchase, BLACK+DECKER guarantees to replace defective parts, repair products subjected to fair wear and tear or replace such products to make sure of the minimum inconvenience to the customer unless:
- The product has been used for trade, professional or hire purposes.
The product has been subjected to misuse or neglect.
The product has sustained damage through foreign objects, substances or accidents. - Repairs have been attempted by persons other than authorised repair agents or Black + Decker service staff.
To claim on the guarantee, you will need to submit proof of purchase to the seller or an authorised repair agent. You can check the location of your nearest authorised repair agent by contacting your local BLACK+DECKER office at the address indicated in this manual. Alternatively, a list of authorised BLACK+DECKER repair agents and full details of our aftersales service and contacts are available on the Internet at: www.2helpU.com
Usage prévu
Installation des lames (non incluses)
J 1 J 1 J 1 J 1 J 1 J 1 J 1 J 1 J 1 J 1 J 1 J 1 J 1 J 1 J 1 J 1 J 1 J 1 J 1 J 1 J 1 J 1 J 1 J 1 J 1 J 1 J 1 J 1 J 1 J 1 J 1 J 1 J 1 J 1 J
BLACK+DECKER slj jn J 10000000000000000000000000000000000000000000000000000000000000
aegaae aaii i 1000
aagunall gabll bs jgb: cjjj no zzr zzzg
baI 1
Lol 1000000000000000000000000000000000000000000000000000000000000000000000000000000
bll boll 7 12 12 12 12 12 12 12
aJzj0 2
y j 3
jaii jai i jai jai jai jai jai jai jai jai jai jai jai jai jai jai jai jai jai jai jai jai jai jai jai jai jai jai jai jai jai jai jai jai jai jai jai jai jai jai jai jai jai jai jai jai jai jai jai jai jai jai jali jali jali jali jali jali jali jali jali jali jali jali jali jali jali jali jali jali jali jali jali jali jali jali jali jali jali jali jali
L L 1. J a 1 1 1 1 1 1 1 1 1 1 1 1 1 1 1 1 1 1 1 1 1 1 1 1 1
1abw a jll jii w jlaal aaba g jrawl yjaiw 5
ghall JaIg bll ba oaiy juiy jaiw. Jaaa aaba 1
.
LiaoljzjI jyaiikall Jusgpoae jyalll aaiil ali iJaiIaIaIaIaIaIaIaIaIaIaIaIaIaIaIaIaIaIaIaIaIaIaIaIaIaIaIaIaIaIaIaIaIaIaIaIaIaIaIaIaIaIaIaIaIaIaIaIaIaIaIaa
aie
aJg a 2000
Pall
y. s jall aag oal 1 ynnn nn nnnn nn nnnn nn nnnn nn nnnn nn nnnn nn nnnn nn nnnn nn nnnn nn nnnn nn nnnn nn nnnn nn nnnn nn nnnn nn nnnn nn nnnn nn nnnn nn nnnn nn nnnn nn nnnn nn nnnn nn nnnn nn nnnn nn nnnn nn nnnn nn nnnn nn
bs 0s jaaal gba sla gil aal aal ae laa aal aa aal aan
Jaaall jiaiall pI Jg yLay. Jaill jiaiall pR Jy Jiai
45° 1000000000000000000000000000000000000000000000000
14 2000 2000 2000 2000 2000 2000 2000 2000 2000 2000 2000 2000 2000 2000 2000 2000 2000 2000 2000 2000 200
a 17.2 (bJ)
18 17 16 15
100000000000000000000000000000000000000000000000000000000000000000000
jz jz jz jz jz jz jz jz jz jz jz jz jz jz jz jz jz jz jz jz jz jz jz jz jz jz jz jz jz jz jz jz jz jz jz jz jz jz jz jz jz jz jz jz jz jz jz jz jz jz jz
jliai 1 aeli jiaio yao
i j 1 1 1 1 1 1 1 1 1 1 1 1 1 1 1 1 1 1 1 1
#
yill no yall plxwly cawd yolll cliaial jilio po 1aii ljiie ai
()
aalb jaae yda jolal agiaial jlaai 1
y 1 y
(10)Lulal
()
(11) 9 (9) j (j) j j j j j j j j j j j j j j j j j j j j j j j j j j j j j j j j j j j j j j j j j
:
(8) 100
a aalll yaiall 1i jiaai all i jai (b
(9)sJ 4
y
1
chall 9) jd 2
.3
()/
(1)LiJIiLiIe 5le bai, yai jiaial Jia iJiai Jiai Jiai Jiai
()
Llalll laii i 1 1 1 1 1 1 1 1 1 1 1 1 1 1 1 1 1 1 1 1 1 1 1 1 1 1 1 1 1 1 1 1 1 1 1 1 1 1 1 1 1 1 1 1 1 1 1 1 1
JS20 (JSS)
a 100000000000000000000000000000000000000000000000000000000000000000000000000000
y
a a a a a a a a a a a a a a a a a a a a a a a a a a a a a a a a a a a a a a a a a a a a
jla jiee ie jia jilab1gic jil2
aaiy jol
J 1 J 1 J 1 J 1 J 1 J 1 J 1 J 1 J 1 J 1 J 1 J 1 J 1 J 1 J 1 J 1 J 1 J 1 J 1 J 1 J 1 J 1 J 1 J 1 J 1 J 1 J 1 J 1 J 1 J 1 J 1 J 1 J 1 J 1 J
y 1
A
Llaoljoljai jolajai jai jai iL
j 1 j 1 1 1 1 1 1 1 1 1 1 1 1
1 1 1 1 1 1 1 1 1 1 1 1 1 1 1 1 1 1 1 1 1 1 1 1 1 1 1 1 1 1 1 1 1 1 1 1 1 1 1 1 1
(1)
Jie 1
jzjj 2
3
3 4
sall liooll 5
jll jao 6
aloll aoljell oel .7
8.8
9
Lb
J
1 1 1 1 1 1 1 1 1 1 1 1 1 1 1 1 1 1 1 1 1 1 1 1 1 1 1 1 1 1 1 1 1 1 1 1 1 1 1 1 1 1

J 100000000000000000000000000000000000000000000000000000

Jg j 1
I 1
1
1
1
1
SLSLJbIa JaaXlaal
1 111111111111111111111111111111
Jn Jn Jn Jn Jn Jn Jn Jn Jn Jn Jn Jn Jn Jn Jn Jn Jn Jn Jn Jn Jn Jn Jn Jn Jn Jn Jn Jn Jn Jn Jn Jn Jn Jn Jn Jn Jn Jn Jn Jn Jn Jn Jn Jn Jn Jn Jn Jn Jn Jn Jn


1y 1g gall
j 1 j 1 j 1 j 1 j 1 j 1 j 1 j 1 j 1 j 1 j 1 j 1 j 1 j 1 j 1 j 1 j 1 j 1 j 1 j 1 j 1 j 1 j 1 j 1 j 1 j 1 j 1 j 1 j 1 j 1 j 1 j 1 j 1 j 1
Lgai
1
sulwclio1
j
aillle lccgbs, clllaiw le gssis glls
XX JN 2017
eall
g Jglj g j 1 1 1 1 1 1 1 1 1 1 1 1 1 1 1 1 1 1 1 1 1 1 1 1 1 1 1 1 1 1
d
gaiiia 11111111111111111111111111111111111111
.e
aill Jai aag gol ball alg jie yol 1
jllal jai glal all alg 1g 1yol
Jai kui kui kui
g
Lag 11 Lg 111 pal 111 Lg 111 g a 111 111 111 111 111 111 111 111 11
5
a 1 a
iiaaiiaaie aagaae iiaaiaiaiaiaiaiaiaiaiaiaiaiaiaiaiaiaiaiaiaiaiaiaiaiaiaiaiaiaiaiaiaiaiaiaiaiaiaiaiaiaiaiaiaiaiaiaiaiaiaiaiaiaiaiaiaiaiaiaiaiaiaiaiaiaiaiaiaiaiaiaiaiaiaiaiaiaiaiaiaia
a 1 a 1 1 1 1 1 1 1 1 1 1 1 1 1 1 1 1 1 1 1 1 1 1 1 1 1 1 1 1 1 1 1 1 1 1 1 1 1 1 1 1 1 1 1 1 1 1
Jaaal sllp aac gnnnnaa aaiy aiaa aaiy aaiy aaiy b Jaaay aan yaae yaae yaae yaae yaae yaae yaae
Jaa Jai 2. baiia n nn aaiy C
auii jai yai i jai 2.
aiyaiy ai yai i jai 2.
g y bdoal g d 10000000000000000000000000000000000000000000000000000000000000000
alall no aill 1ai jn no sLi, ywglall glll lal .ie .
LwJgS.11 Jgssy 1 Jaae aea 2 .f
g 1 1 1 1 1 1 1 1 1 1 1 g
Jusu Jusu Jusu Jusu Jusu Jusu Jusu Jusu Jusu Jusu Jusu Jusu Jusu Jusu Jusu Jusu Jusu Jusu Jusu Jusu Jusu Jusu Jusu Jusu Jusu Jusu Jusu Jusu Jusu
y 111111111111111111111111111111
aR aBia 11 11 11 11 11 11 11 11 11 11 11 11 11 11 11 11 11 11 11 11 11 11 11 11 11 11 11 11 11 11 11 1
aaii 3
1511 1511 1511 1511 1511 1511 1511 1511 1511 1511 1511 1511 1511 1511 1511 1511 1511 1511 1511 1511 1511
.e
f
3
a
山
g 150000000000000000000000000000000000000000000000000000000000000000000000
b
g 1 g 1 g 1 g 1 g 1 g 1 g 1 g 1 g 1 g 1 g 1 g 1 g 1 g 1 g 1 g 1 g 1 g 1 g 1 g 1 g 1 g 1 g 1 g 1 g 1 g 1 g 1 g 1 g
C
a 1 a 1 1 1 1 1 1 1 1 1 1 1 1 1 1 1 1 1 1 1 1 1 1 1 1 1 1 1 1 1 1
d
e
f
.5.211
g
4
a
b
40 1
C
Jg 1yjLg yuue g y d aag aalll j 1y 1y 1y 1y 1y 1y 1y 1y 1y 1y 1y 1y 1y 1y 1y
f
1 1 1 1 1 1 1 1 1 1 1 1 1 1 1 1 1 1 1 1 1 1 1 1 1 1 1 1 1 1 1 1 1
f
S OBC = S COD + S_ BOC
g
a
b
C
a 1
b
Lg 1
4
gss ggs ggs ggs ggs ggs ggs ggs ggs ggs ggs ggs ggs ggs ggs ggs ggs ggs ggs ggs ggs ggs ggs ggs ggs ggs ggs ggs ggs ggs ggs ggs ggs ggs ggs ggs ggs ggs ggs ggs ggs ggs ggs ggs ggs
d 1 1 1 1 1 1 1 1 1 1 1 1 1 1 1 1 1 1 1 1 1 1 1 1 1 1 1 1 1 1 1 1 1 1 1 1 1 1 1
WARRANTY REGISTRATION CARD
YOUR NAME/ VOTRE NOM
YOUR ADDRESS/VOTRE ADRESSE/
DATE OF PURCHASE/JOUR D'ACHAT
DEALER'S NAME & ADDRESS/ NOM ET ADRESSE DU VENTEUR/