
Element Chromium - Microphone MACKIE - Free user manual and instructions
Find the device manual for free Element Chromium MACKIE in PDF.
| Product Type | USB Condenser Microphone (Electret) |
| Brand | Mackie |
| Model | Element Chromium |
| Selectable Polar Patterns | Stereo, Cardioid, Bidirectional (8), Omnidirectional |
| Built-in Preamplifier | Legendary Onyx Circuit (low noise, high sound quality) |
| Connection | USB-C (plug-and-play, driverless) |
| Inputs | Instrument (6.35mm Jack) + Aux (Stereo Mini Jack) |
| Headphone Output | 3.5mm Jack with dedicated volume |
| Control Functions | Gain, Mute (with indicator), Blend (USB/micro mix) |
| Sampling Rate | 24-bit / 96kHz |
| Included Software | Pro Tools | First + Musician Collection (23 plugins), Waveform OEM + DAW Essentials (16 plugins) |
| Construction | Ultra durable, chrome design |
| Power | Via USB bus (via included USB-C cable) |
| Dimensions (H × W) | 249 × 120 mm |
| Weight | Approximately 500 g (estimated) |
| Included Accessories | USB-C cable, integrated mixing console |
| Cleaning | With a dry cloth only |
| Safety Instructions | Do not expose to water, extreme heat, dust; do not disassemble; respect sound levels |
| Warranty | Limited (consult www.mackie.com for details) |
Frequently Asked Questions - Element Chromium MACKIE
User questions about Element Chromium MACKIE
0 question about this device. Answer the ones you know or ask your own.
Ask a new question about this device
Download the instructions for your Microphone in PDF format for free! Find your manual Element Chromium - MACKIE and take your electronic device back in hand. On this page are published all the documents necessary for the use of your device. Element Chromium by MACKIE.
USER MANUAL Element Chromium MACKIE
Premium USB Condenser Mic w/built-in 2-channel Mixer

OWNER'S MANUAL

www.mackie.com
IMPORTANT SAFETY INSTRUCTIONS
-
Read, follow, and keep these instructions. Heed all warnings.
-
Do not expose the microphone to extreme cold or heat.
-
Do not expose the microphone to rain, use it in water, or in damp or wet conditions.
-
Do not expose the microphone to any excessive dust and other foreign particles.
-
Keep the microphone clean by washing outside with a dry cloth.
-
Keep the microphone in the case when not in use.
-
Never attempt to disassemble the microphone.
B. Mackie cannot be held responsible for any damage caused
by improper use or modifications of the microphone.
-
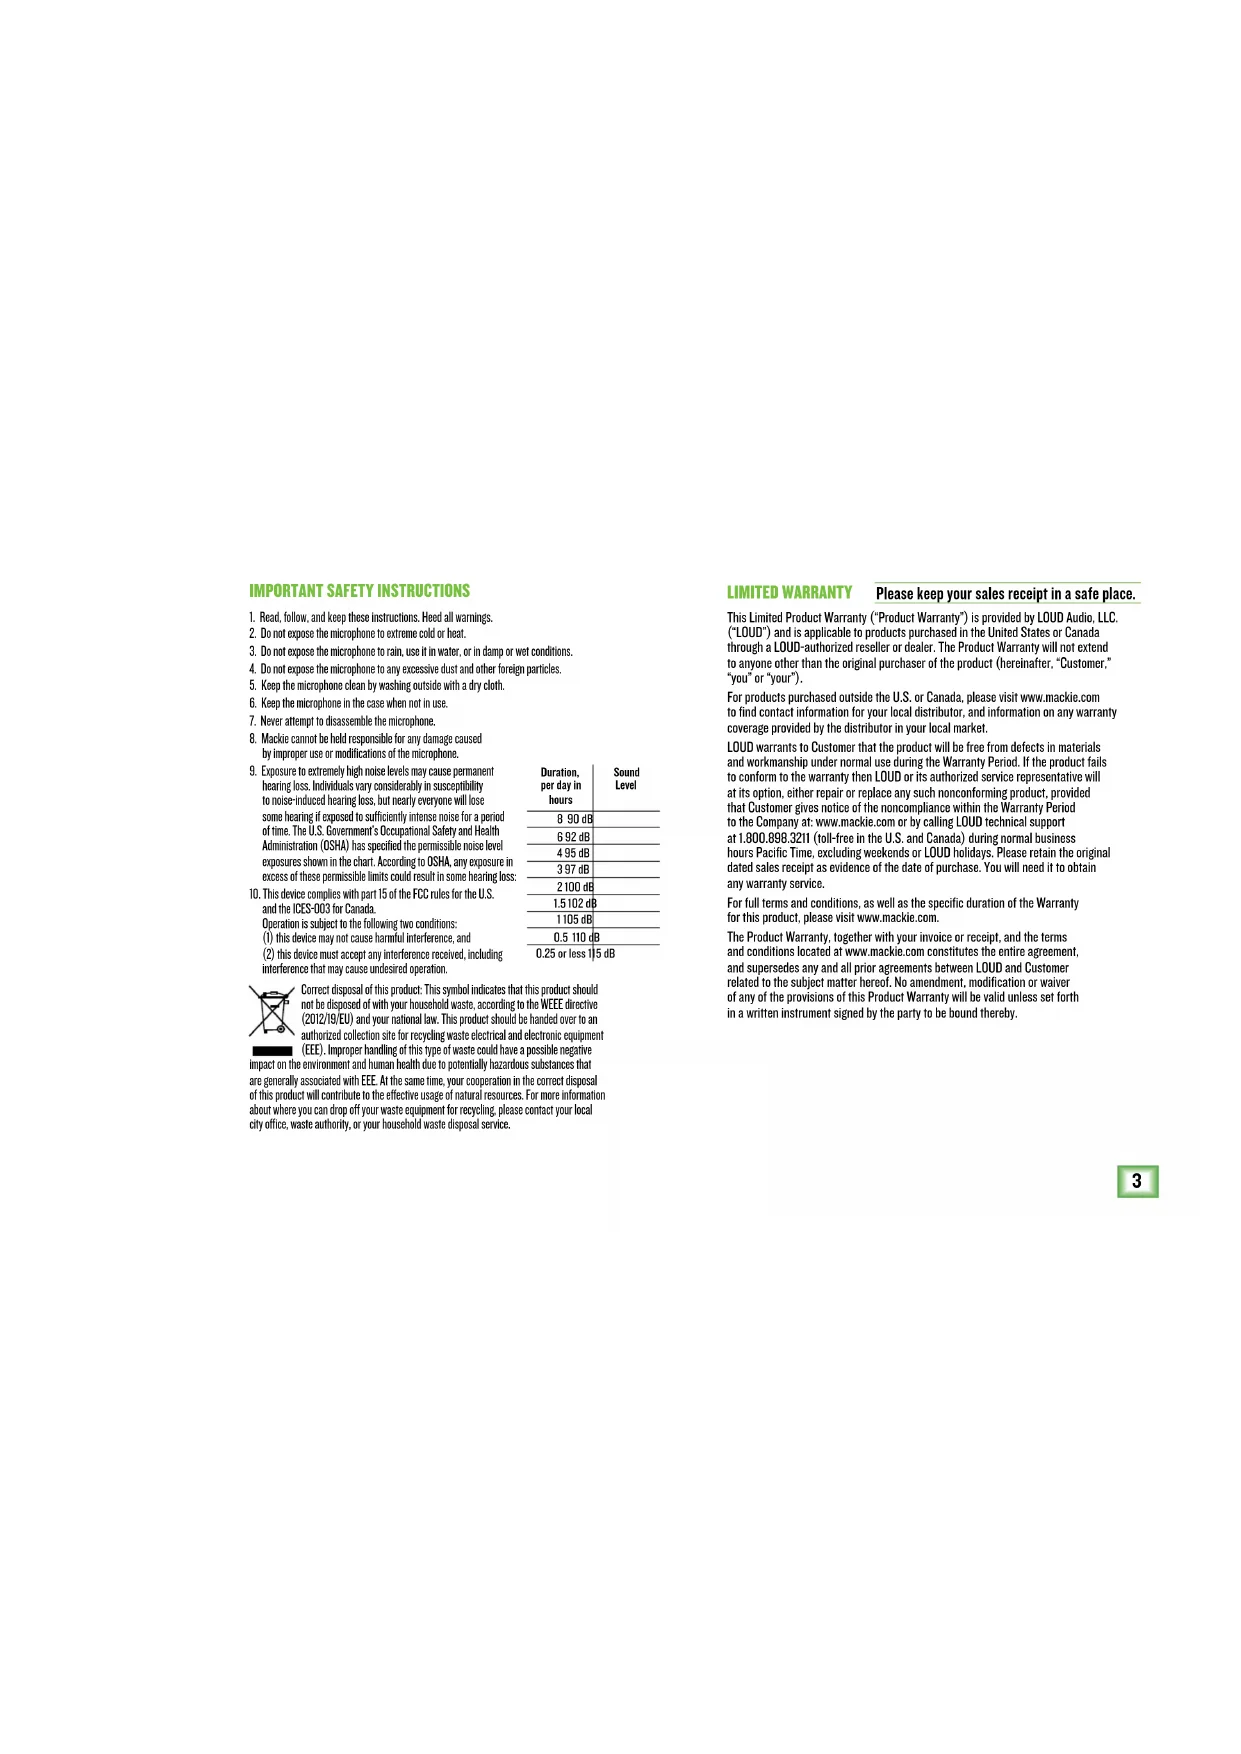
Exposure to extremely high noise levels may cause permanent hearing loss. Individuals vary considerably in susceptibility to noise-induced hearing loss, but nearly everyone will lose some hearing if exposed to sufficiently intense noise for a period of time. The U.S. Government's Occupational Safety and Health Administration (OSHA) has specified the permissible noise level exposures shown in the chart. According to OSHA, any exposure in excess of these permissible limits could result in some hearing loss
-
This device complies with part 15 of the FCC rules for the U.S.
and the ICES-003 for Canada.
Operation is subject to the following two conditions:
(1) this device may not cause harmful interference, and
(2) this device must accept any interference received, including
interference that may cause undesired operation.
| Duration, per day in hours | Sound Level |
| 8 90 dB | |
| 6 92 dB | |
| 4 95 dB | |
| 3 97 dB | |
| 2 100 dB | |
| 1.5 102 dB | |
| 1 105 dB | |
| 0.5 110 dB | |
| 0.25 or less) | 15 dB |

Correct disposal of this product: This symbol indicates that this product should not be disposed of with your household waste, according to the WEEE directive (2012/19/EU) and your national law. This product should be handed over to an authorized collection site for recycling waste electrical and electronic equipment (EEE). Improper handling of this type of waste could have a possible negative
impact on the environment and human health due to potentially hazardous substances that are generally associated with EEE. At the same time, your cooperation in the correct disposal of this product will contribute to the effective usage of natural resources. For more information about where you can drop off your waste equipment for recycling, please contact your local city office, waste authority, or your household waste disposal service.
LIMITED WARRANTY
Please keep your sales receipt in a safe place.
This Limited Product Warranty ("Product Warranty") is provided by LOUD Audio, LLC. ("LOUD") and is applicable to products purchased in the United States or Canada through a LOUD-authorized reseller or dealer. The Product Warranty will not extend to anyone other than the original purchaser of the product (hereinafter, "Customer," "you" or "your").
For products purchased outside the U.S. or Canada, please visit www.mackie.com to find contact information for your local distributor, and information on any warranty coverage provided by the distributor in your local market.
LOUD warrants to Customer that the product will be free from defects in materials and workmanship under normal use during the Warranty Period. If the product fails to conform to the warranty then LOUD or its authorized service representative will at its option, either repair or replace any such nonconforming product, provided that Customer gives notice of the noncompliance within the Warranty Period to the Company at: www.mackie.com or by calling LOUD technical support at 1,800,898,321 (toll-free in the U.S. and Canada) during normal business hours Pacific Time, excluding weekends or LOUD holidays. Please retain the original dated sales receipt as evidence of the date of purchase. You will need it to obtain any warranty service.
For full terms and conditions, as well as the specific duration of the Warranty for this product, please visit www.mackie.com.
The Product Warranty, together with your invoice or receipt, and the terms and conditions located at www.mackie.com constitutes the entire agreement, and supersedes any and all prior agreements between LOUD and Customer related to the subject matter hereof. No amendment, modification or waiver of any of the provisions of this Product Warranty will be valid unless set forth in a written instrument signed by the party to be bound thereby.
FEATURES
PROFESSIONAL QUALITY
Engineered for recording music, podcasts, live streams, and online content creation
- Legendary Onyx mic preamp circuitry provides crystal clear sound and ultra-low noise
Professional metering shows your levels at a glance
4 SELECTABLE POLAR PATTERNS
- Stereo
Cardioid
Bi-directional (Figure 8)
Omni
USB-C CONNECTIVITY
- Onboard USB interface plugs directly into your computer for fast, easy recording
Class compliant, no driver required
INSTRUMENT INPUT
- Connect a guitar directly and record along with your vocals
- Mix with your mic and Aux In signal
STEREO 1/8" INPUT
- Connect your phone directly with a stereo 1/8" cable
- Perfect for singing along with or auditioning backing tracks
ONBOARD HEADPHONE MONITORING
- Headphone output with independent volume control offers a convenient monitoring solution
- Blend between the direct signal and USB
ONBOARD GAIN CONTROL AND MUTE
- Optimize the microphone's output for your computer and/or DAW
- Mute button allows you to switch off the mic while still hearing your computer's output
RUGGED CONSTRUCTION
Built-like-a-tank reliability ensures consistent performance for years to come
INCLUDED SOFTWARE
- Pro Tools™ | First and Waveform™ OEM professional software and plugin packages included
The Musician Collection for ProTools | First includes 23 plugins like BBD Delay, Eleven Lite, 304E EQ, and 304C Compressor - The DAW Essentials™ Bundle for Waveform OEM includes 16 powerful plugins like Equaliser, Compressor, Reverber8, and Limiter
BIT DEPTH / SAMPLE RATE: 24-BIT / 96 KHZ
INCLUDED ACCESSORIES
- Mixer stand (Built-in)
- USB-C cable
INTRODUCTION
The Element Series Chromium Premium USB Condenser Microphone delivers professional quality and incredible versatility in an all-in-one design for modern musicians, content creators, singer-songwriters, and beyond.
Built right into the stand, the 2-channel mixer includes Instrument and stereo 1/8'' inputs and has controls for gain, mute, and headphone monitoring plus professional metering and Blend control.
Featuring 4 selectable polar patterns, Chromium can be optimized for vocals, rooms, stereo, two person interviews, and more.
Legendary Onyx mic preamp circuitry provides crystal clear sound and ultra-low noise.
Get recording fast with included Pro Tools ^® | First and WaveformTM professional software.
Get out there and be heard with the Chromium Premium USB Condenser Microphone.
SYSTEM REQUIREMENTS
PC
WINDOWS XP PRO, XP HOME, VISTA, 7, 8, 10 USB 1.1 / 2.0 (64 MB RAM MINIMUM)
MAC
MAC OSX (10.1.11 OR HIGHER)
USB1.1/2.0(64MBRAMMINIMUM)
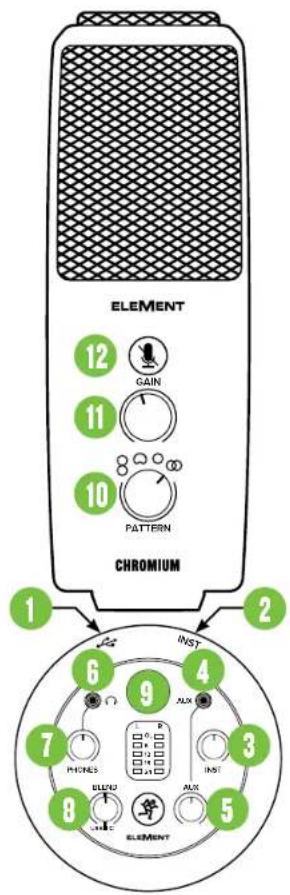
- USB-C Port Connect the USB-C side of the included USB cable to the microphone and the USB-A side to the computer's USB port.
2.Instrument/Line Input Connect a balanced or unbalanced instrument or line-level signal using a 1 / 4^ connector. - Instrument Knob This knob adjusts the input sensitivity of the instrument input, allowing the signal to be adjusted at an optimal level before it's delivered to the headphones.
- Aux Input Connect an 1/8^ line-level signal from a smartphone, MP3 player, or other signal source.
- Aux Knob This knob adjusts the input sensitivity of the aux input, allowing the signal to be adjusted at an optimal level before it's delivered to the headphones.
6. Phones Jack
This 1/8" connector supplies the output to stereo headphones.
7. Phones Knob
This knob is used to adjust the volume at the phones output from off to max. Make sure that this knob is fully off [counter-clockwise] before beginning.
- Blend Knob This knob adjusts the mix of the incoming computer (USB) level (left) and the mic level (right) to the headphones at zero-latency! Knob position (L, C, R):
Full Left USB Input = Full Volume Mic = No Volume
Center USB In and Mic = Equal Volume
Full Right USB Input = No Volume Mic = Full Volume
- Main Meters Used to gauge the input (left) and output (right) levels to ensure that the signals are not clipping.
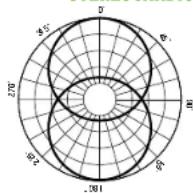
10.PatternKnob
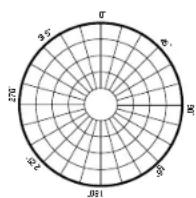
Polar patterns illustrate how sensitive a microphone is to sound received via different angles from the central axis. Rotate the knob to the desired polar pattern.
Bi-directional (figure 8):Sound is picked up from the front and rear of the microphone, but not the sides. Applications-Interviews,vocal duets, instruments.
Cardioid: The front of the microphone is the most sensitive, while sound from the surrounding area remains isolated. Applications -Podcasts,voiceovers, vocals, instruments.
Ommi-directional: Sound is picked up equally from every direction, not needing to be aimed directly at the sound source.
Applications-Conference calls / meetings, field recordings, symphonies.
Stereo:Sound is picked up from the left and right sides of the microphone.
Applications - Field recordings, filming, instruments.
11.GainKnob
The gain knob adjusts the input sensitivity of the microphone, allowing signals from the outside world to be adjusted at optimal levels.
12. MuteSwitch
The mute switch does just what it sounds like it might do. It mutes the mic signal! The button illuminates if the mute switch is engaged.
NOTE: The mute switch mutes only the mic input. Any signal coming IN from the computer will still be heard through the headphones regardless of the state of the mute switch.
GETTING STARTED
- Read and understand the Important Safety Instructions on page 3.
- Turn down all knobs. Leave the Blend knob at center (12:00).
- Disengage all switches
- Connect the USB-C side of the included USB cable to the microphone and the USB-A side to the computer's USB port.
NOTE: Do not use a USB hub, keyboard's USB port, etc. Plug directly into an open USB port on the computer.
- Connect headphones to the headphone jack.
- Computer setup instructions [plug-and-play, no drivers required]: Mac: System Preferences > Sound > Input (and Output) > USB Microphone
PC: Control Panel > Hardware and Sound > Sound > Playback (and Recording) > USB
Microphone (make default).
Make sure the input and output levels of the computer are un-muted and up.
7. While playing music from your computer, slowly rotate the phones knob clockwise. This will confirm that playback goes through the microphone's headphone jack.
NOTE: Your ears are important to us! Be careful of permanent hearing damage. Lower the volume on your device. Even intermediate levels may be painfully loud. Always turn the volume all the way down before connecting the headphones or doing anything new that may affect the headphone volume. Then turn it up slowly as you listen carefully.
-
Plug signal sources into the microphone, such as:
-
Instrument-level sources, such as an acoustic guitar w/active pickups into the instrument input.
-
A line-level signal from an MP3 player, smartphone or other signal source into the aux input.
-
Be sure that the volume of the input is the same as it would be during normal use. Slowly rotate the instrument and aux knobs clockwise until you hear the signal(s) in the headphones.
NOTE: There may have to be some experimentation until the perfect blend of sounds is established.
- Open up your favorite DAW and start a new session.
- While speaking into the mic, disengage the mute switch and slowly rotate the gain knob clockwise until the input level meters on the DAW bounce between green and yellow.
NOTE: A safety knob is located on the right side of the mic base. Loosen it to angle the mic into an ideal pickup position, then tighten to lock.
NOTE: The mute switch mutes only the mic input. Any signal coming IN from the computer will still be heard through the headphones regardless of the state of the mute switch.
NOTE: This is a side address mic and works best when speaking into the side of the mic, not the top.
- While most DAWs work (relatively) the same, the path to recording may be different. As such, refer to your DAW's manual on how to open new sessions, create tracks, select the Chromium mic, arm tracks and the best part... recording! Have fun!
| Technical Specifications CHROMIUM | |
| Element | electres capsule |
| Polar Pattern | -8, Cardiol, Omni, Stereo |
| Frequency Response | Hz - 20 kHz |
| Sensitivity | ±3 dB (0 dB = 1 V/Pa @ 1 kHz) |
| Dynamic Range | 1 |
| Max Input SPL | (±1 kHz % THD) |
| Bit Depth / Sample Rate | 4-bit/96 kHz |
| Size (H × W) | 9.8" × 4.7" |
| 249 × 120 mm | |
| Weight | 5 kg |
| All specifications subject to change | |
NEED HELP WITH THE MICROPHONE?
- Visit www.mackie.com and click Support to find: FAQs, manuals, and addendumsc.
Telephone 1-800-898-3211 to speak with one of our splendid technical support chaps (Monday through Friday, normal business hours, Pacific Time).


STEREOCARDIOIDBI-DIRECTIONA
- Stereo
Cardioide
Bidirectional (formulae 8) - Omni
CONNECTIVIDAD USB C
19820 North Creek Parkway #201 • Bothell, WA 98011 • USA
Phone: 425.487.4333 • Toll-free: 800.898.3211
Fax: 425.487.4337 • www.mackie.com
Part No. 2053138 Rev. C 10/20 ©2020 LOUD Audio, LLC. All Rights Reserved.


- OWNER'S MANUAL
- IMPORTANT SAFETY INSTRUCTIONS
- LIMITED WARRANTY
- FEATURES
- PROFESSIONAL QUALITY
- SELECTABLE POLAR PATTERNS
- USB-C CONNECTIVITY
- INSTRUMENT INPUT
- STEREO 1/8" INPUT
- ONBOARD HEADPHONE MONITORING
- ONBOARD GAIN CONTROL AND MUTE
- RUGGED CONSTRUCTION
- INCLUDED SOFTWARE
- BIT DEPTH / SAMPLE RATE: 24-BIT / 96 KHZ
- INCLUDED ACCESSORIES
- INTRODUCTION
- SYSTEM REQUIREMENTS
- Phones Jack
- Phones Knob
- 10.PatternKnob
- 11.GainKnob
- MuteSwitch
- GETTING STARTED
- NEED HELP WITH THE MICROPHONE?
- STEREOCARDIOIDBI-DIRECTIONA
- CONNECTIVIDAD USB C
Brand : MACKIE
Model : Element Chromium
Category : Microphone