CM401 - Coffee machine NINJA - Free user manual and instructions
Find the device manual for free CM401 NINJA in PDF.
Frequently Asked Questions - CM401 NINJA
User questions about CM401 NINJA
0 question about this device. Answer the ones you know or ask your own.
Ask a new question about this device
Download the instructions for your Coffee machine in PDF format for free! Find your manual CM401 - NINJA and take your electronic device back in hand. On this page are published all the documents necessary for the use of your device. CM401 by NINJA.
USER MANUAL CM401 NINJA
IMPORTANT SAFEGUARDS
READ ALL INSTRUCTIONS BEFORE USE • HOUSEHOLD USE ONLY
Read all instructions before using your NINJA'SPECIALTY COFFEE MAKER.
When using electrical appliances, basic safety precautions should always be followed, including the following:
AWARNING
To reduce the risk of fire, electric shock, serious injury, death, or damage when using this appliance, follow these basic safety precautions.
General Precautions
1 This appliance can be used by children aged from 8 years and above and persons with reduced physical, sensory or mental capabilities or lack of experience and knowledge if they have been given supervision or instruction concerning use of the appliance in a safe way and understand the hazards involved.
2 To reduce the risk of electric shock, this appliance has a polarized plug (one blade is wider than the other). As a safety feature, this plug will fit into a polarized outlet only one way. If the plug does not fit fully into the outlet, reverse the plug. If it still does not fit, contact a qualified electrician. DO NOT force into outlet or try to modify to fit.
3 Keep the appliance and its cord out of reach of children less than 8 years.
4 To eliminate a choking hazard for young children, remove and discard the protective cover fitted on the power plug of this appliance.
5 Children shall not play with the appliance.
6 To protect against fire, electric shock, and injury to persons, DO NOT immerse cord, plugs, or body of machine in water or other liquid.
7 NEVER carry the appliance by the power cord or pull it to disconnect from electrical socket; instead grasp the plug and pull to disconnect.
8 DO NOT operate any appliance with a damaged cord or plug, or after the appliance malfunctions, or has been dropped or damaged in any manner. Contact SharkNinja Operating LLC for service.
9 For household and work top use only. DO NOT let the power cord hang over the edge, or touch hot surfaces such as the stove.
10 NEVER use socket below counter.
11 To avoid risk of fire, electrical shock, or damage to the unit. DO NOT store or use unit in an appliance garage or under a wall cabinet.
12 Unplug from outlet when not in use and before cleaning.
13 Turn off and allow to cool before putting on or taking off parts, and before cleaning the appliance.
Operating Notice
14 The use of an accessory not recommended by the manufacturer may create an overflow condition and scalding hazard, or result in fire, electric shock, or personal injury.
15 ALWAYS use appliance on a clean, dry, level surface.
16 DO NOT place on or near a hot gas or electric burner or in a heated oven.
17 DO NOT use this appliance for anything other than its intended use.
18 DO NOT use outdoors.
19 DO NOT touch hot surfaces. Use handles or knobs.
20 To avoid contact with steam and hot surfaces, DO NOT reach across top of brewer to froth.
21 ALWAYS place a vessel beneath the brew basket to receive the brewed coffee.
22 Scaling may occur if brew basket is opened during a brew or clean cycle.
23 DO NOT remove the vessel while the appliance is running without the Drip Stop in the closed position. Return the vessel quickly and open the Drip Stop to continue the brew.
24 DO NOT fill water reservoir with anything other than water, as other liquids may damage your brewer.
25 DO NOT overfill the water reservoir. Fill water only to the Max Fill line.
26 DO NOT run the appliance without water.
27 Exceeding maximum crow basket capacity may cause overflow. DO NOT use fine or espresso ground coffee.
Glass Carafe
28 The carafe is designed for use with this appliance only. DO NOT place carafe on or near a hot gas or electrical burner, or in a heated oven.
29 DO NOT set a hot carafe on a wet or cold surface.
30 DO NOT use a cracked or scratched cerafe or a carafe that has a loose or weakened handle.
31 DO NOT clean carafe with abrasive cleaners, steel wool pads, or other abrasive materials.
32 DO NOT place carafe in microwave.
33 DO NOT exose carafe temperature changes.
34 DO NOT drink directly from the carafe.
Liquid from the carafe may be very hot.
35 DO NOT use the carafe to store food when not in use.
36 Ensure the carafe is completely empty before starting a clearing or brewing cycle. Starting a cycle with water, coffee, or tea in the carafe will cause an overflow.
Care & Maintenance
37 Allow the appliance to cool before removing any paris and before clearing.
38 To prevent illness from bacterial growth in the appliance, follow all cleaning instructions in the Care & Maintenance section of this Owner's Guide.
39 Clean the system on a weekly basis.
40 If the product is not operating properly, visit ninjakitchen.com or contact SharkNinja Operating LLC for examination, repair, or adjustment. Any servicing needs shall be performed by an authorized service provider.
41 Cleaning and user maintenance shall not be made by children unless they are older than 8 and supervised.
Cord Statement
42 A short power-supply cord is provided to reduce the risks resulting from becoming entangled in or tripping over a longer cord.
43 DO NOT use extension cords with this product.


WARNING: of fire or electric s st remove bottom

Indicates to read and review instructions to understand operation and use of product.

indicates the presence of a hazard that can cause personal injury, death of substantial property damage if the warning include with this symbol is ignored.

indicates risk of fire or electric shock, presence of live parts, dangerous voltage.

Tako caro to avoid contact with hot surface. Always use hand protection to avoid burns

For Indoor and household use only.
CONTENTS
Thank you for purchasing the Ninja Specialty Coffee Maker.
THIS BOOK COVERS MODEL NUMBER CM401
TECHNICAL SPECIFICATIONS Voltage:120V-60Hz. Power:1550 Watts Water Reservoir Capacity:50 Ounces
Parts 5
Control Panel 6
SCA Certification 6
Preparing Your Ninja Specialty Coffee Maker for Use .7 Setting the Clock
High-Altitude Calibration Brew
Priming Your Ninja Specialty Coffee Maker 8
Brew Volumes & Measurements 9
How Much Do You Get in Your Cup? 9
Measuring Your Coffee Grounds 9
Using the Brew Basket 10
Using the Drip Stop 11
Can't Wait for the First Cup? 11
Closing the Drip Stop After a Brew 11
Intelligent Warming Plate & Stay Warm Button 12
Intelligent Warming Plate 12
Stay Warm Button 12
Time & Temperature Adjustment 13
Custom Brews 14
Classic and Rich Brews 14
Over Ice Brew 14
Specialty Brew and Frothing Milk 15
Specialty Brew 15
Frothing Milk 15
Delay Brew 16
Care & Maintenance 16
After Each Brew 16
Cleaning the Water Reservoir 16
Cleaning the Carafe 16
Cleaning & Descaling 17
Troubleshooting 18
Warranty 19
Replacement Parts Back Cover
Product Registration Back Cover
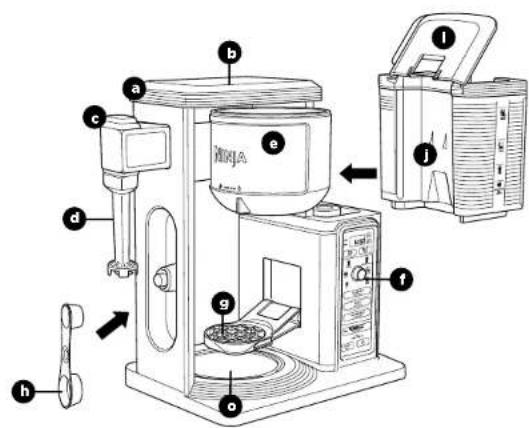
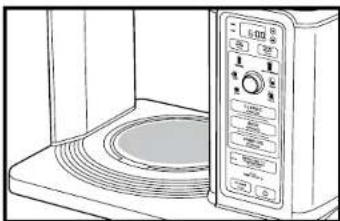
PARTS

m
aCoffeeMaker
(power cord & storage not shown)
b Showerhead
c Integrated Frother
d Frother Whisk
Swinging Brew Basket
Control Panel
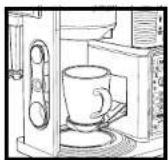
g Single-serve Cup Platform
h Ninja Smart ScoopTM
1 Flip-Top Water Reservoir Lid
Removable Water Reservoir
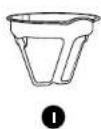
k Removable Filter Holder
Permanent Filter
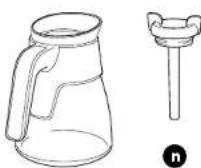
m Ninia Glass Carafe
n Brew-Through Lid
Intelligent Warming Plate
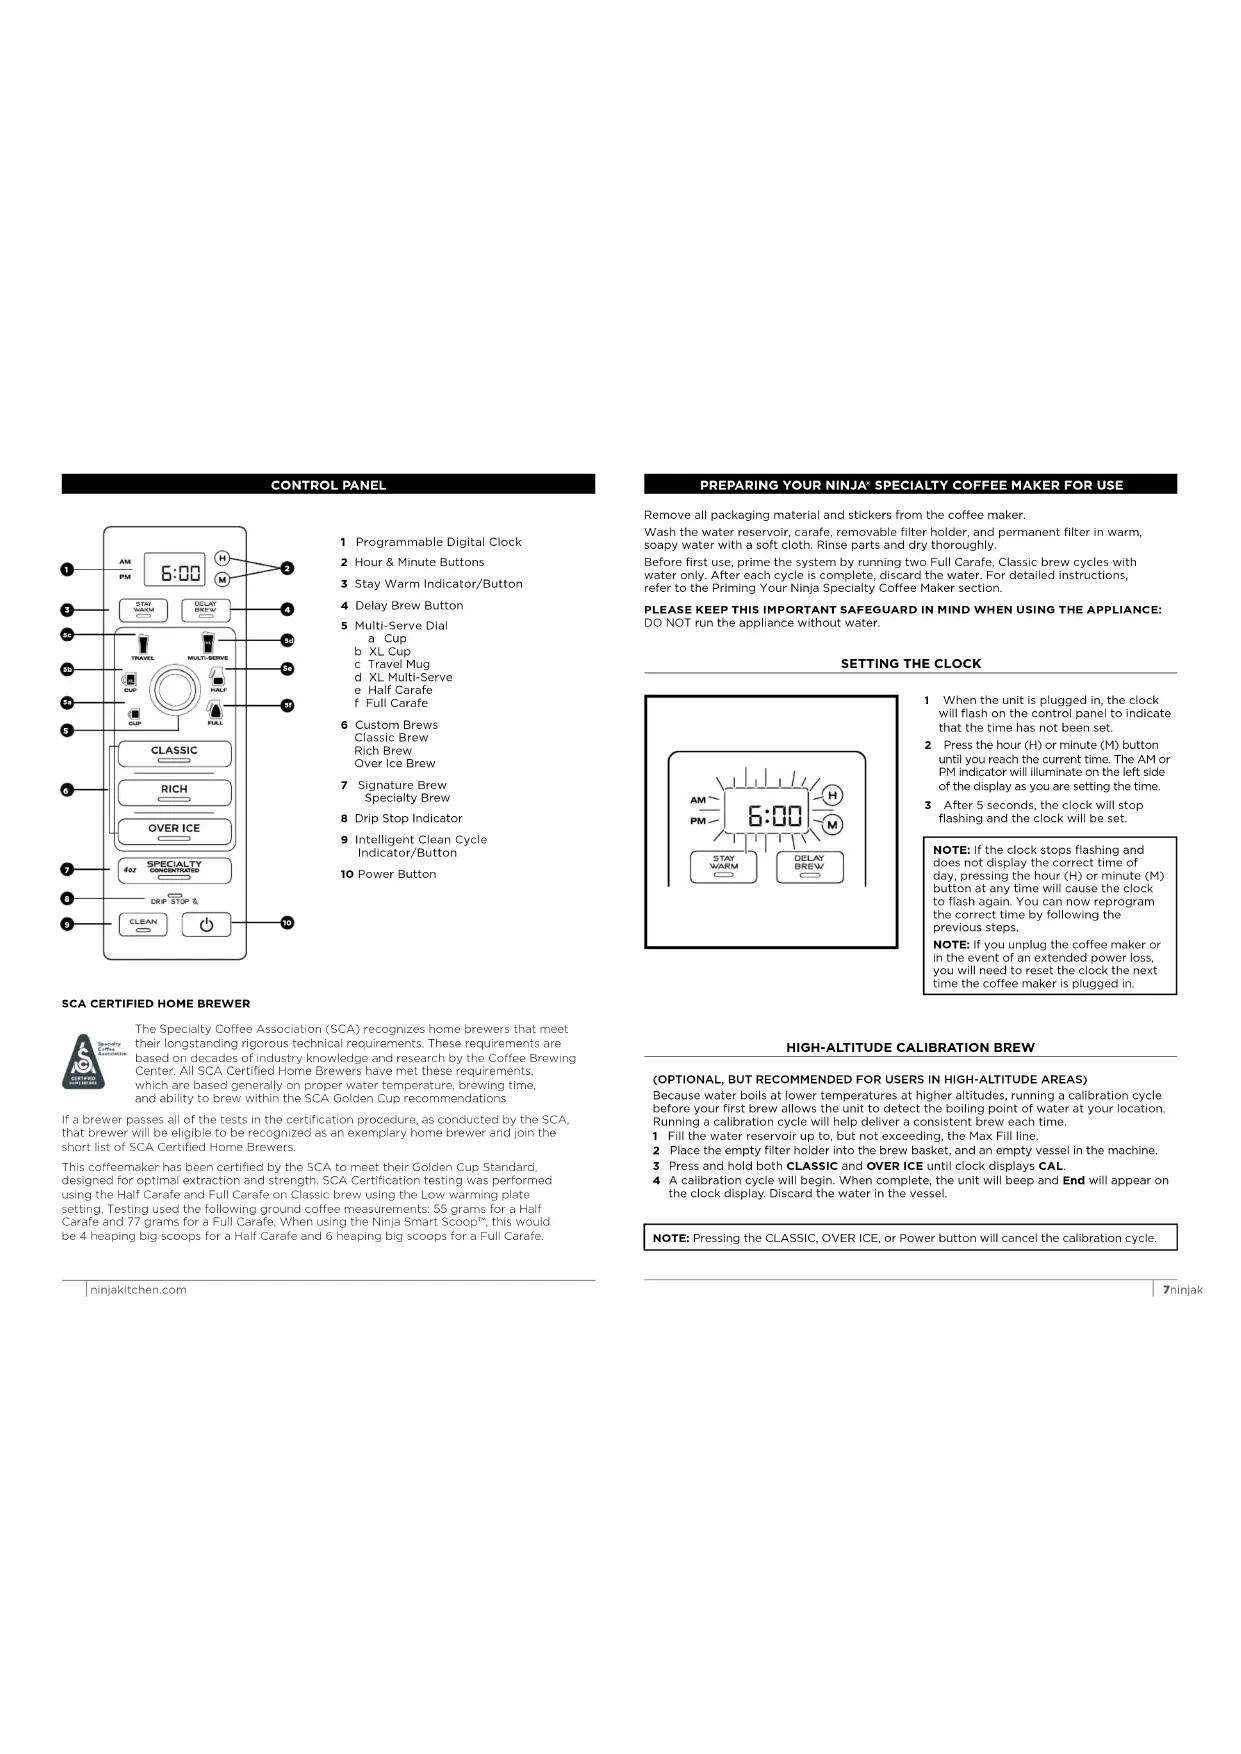
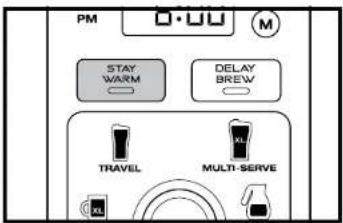
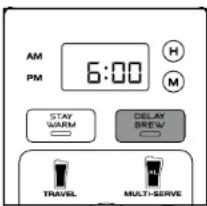
CONTROL PANEL
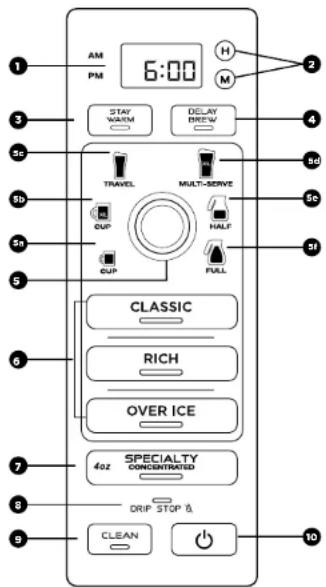
1 Programmable Digital Clock
2 Hour & Minute Buttons
3 Stay Warm Indicator/Button
4 Delay Brew Button
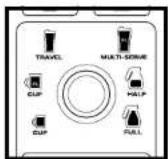
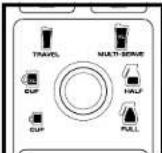
5 Multi-Server Dial
b XL Cup
cTravel Mug
d XL Multi-Serve
e Half Carat
Full Carafe
6 Custom Brews
Classic Brew
Rich Brew
Over Ice Brew
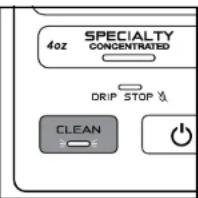
7Signature Brew
Specialty Brew
8 Drip Stop Indicator
9 Intelligent Clean Cycle
Indicator/Button
10 Power Button
SCA CERTIFIED HOME BREWER

The Specialty Coffee Association (SCA) recognizes home brewers that meet their longstanding rigorous technical requirements. These requirements are based on decades of industry knowledge and research by the Coffee Brewing Center. All SCA Certified Home Brewers have met these requirements, which are based generally on proper water temperature, brewing time, and ability to brew within the SCA Golden Cup recommendations
If a brewer passes all of the tests in the certification procedure, as conducted by the SCA, that brewer will be eligible to be recognized as an exemplary home brewer and join the short list of SCA Certified Home Brewers.
This coffeemaker has been certified by the SCA to meet their Golden Cup Standard, designed for optimal extraction and strength. SCA Certification testing was performed using the I Half Carafe and Full Carafe on Classic brew using the Low warming plate setting. Testing used the following ground coffee measurements: 55 grams for a Half Carafe and 77 grams for a Full Carafe. When using the Ninja Smart Scoop™, this would be 4 heaping big scoops for a Half Carafe and 6 heaping big scoops for a Full Carafe.
Remove all packaging material and stickers from the coffee maker.
Wash the water reservoir, carafe, removable filter holder, and permanent filter in warm, soapy water with a soft cloth. Rinse parts and dry thoroughly.
Before first use, prime the system by running two Full Carafe. Classic brew cycles with water only. After each cycle is complete, discard the water. For detailed instructions, refer to the Priming Your Ninja Specialty Coffee Maker section.
PLEASE KEEP THIS IMPORTANT SAFEGUARD IN MIND WHEN USING THE APPLIANCE: DO NOT run the appliance without water.
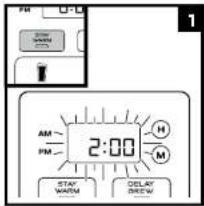
SETTING THE CLOCK
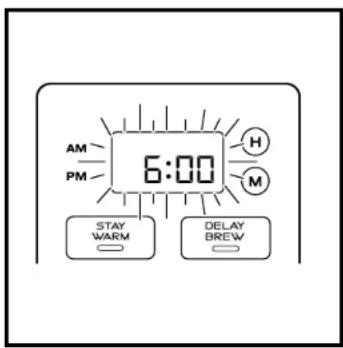
1 When the unit is plugged in, the clock will flash on the control panel to indicate that the time has not been set.
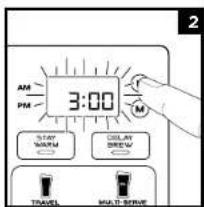
2 Press the hour (H) or minute (M) button until you reach the current time. The AM or PM indicator will illuminate on the left side of the display as you are setting the time.
3 After 5 seconds, the clock will stop flashing and the clock will be set.
NOTE: If the clock stops flashing and does not display the correct time of day, pressing the hour (H) or minute (M) button at any time will cause the clock to flash again. You can now reprogram the correct time by following the previous steps.
NOTE: If you unplug the coffee maker or in the event of an extended power loss, you will need to reset the clock the next time the coffee maker is plugged in.
HIGH-ALTITUDE CALIBRATION BREW
(OPTIONAL, BUT RECOMMENDED FOR USERS IN HIGH-ALTITUDE AREAS)
Because water boils at lower temperatures at higher altitudes, running a calibration cycle before your first brew allows the unit to detect the boiling point of water at your location. Running a calibration cycle will help deliver a consistent brew each time.
1 Fill the water reservoir up to, but not exceeding, the Max Fill line.
2 Place the empty filter holder into the brew basket, and an empty vessel in the machine.
3 Press and hold both CLASSIC and OVER ICE until clock displays CAL
4 A calibration cycle will begin. When complete, the unit will beep and End will appear on the clock display. Discard the water in the vessel.
NOTE: Pressing the CLASSIC, OVER ICE, or Power button will cancel the calibration cycle.
PREPARING YOUR NINJA SPECIALTY COFFEE MAKER FOR USE - CONT. BR
NOTE: We recommend fresh, cool, filtered water. Well water is not recommended.
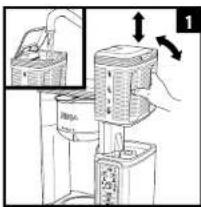
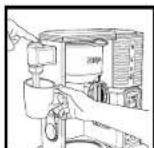
Lift the Water Reservoir to the right and up off the coffee maker. Flip the Reservoir lid open or remove the entire lid. Add water up to, but not exceeding, the Max Fill line. Return the water reservoir to the coffee maker.
DO NOT fill water reservoir with anything other than water, as other liquids may damage your coffee maker.
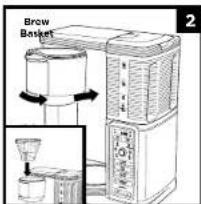
Insert the Filter Holder into the Swinging Brew Basket. Close the brew basket until you hear a slight click.
NOTE: DO NOT place any ground coffee in the brew basket for the first 2 cycles.
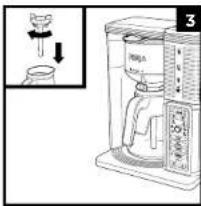
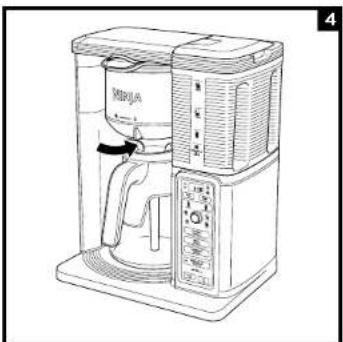
Twist the Brew-Through Lid clockwise onto the Carafe to lock into place and center the carafe below the brew basket.
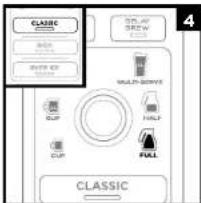
With everything securely in place and the unit powered on, select the Full Carafe size and press CLASSIC.
When the cycle is complete, discard the water in the carafe. Then repeat the cycle a second time from the beginning.
You are now ready to use your Ninja Specialty Coffee Maker.
LUMES & MEASUREMENTS
Each size and brew style produces a different amount of coffee to optimize strength and taste.
APPROXIMATE BREW VOLUMES
| Size Classic Rich | Over Ice | |||
| coffee filled with Ice | ||||
| Cup 9.5 oz. 8.7 oz 3.8 oz. 9.5 oz. | ||||
| XL Cup 11.5 oz 10.3 oz | 4.7 oz. 11.5 oz. | |||
| Travel Mug | 14 oz. | 13.2 oz. | 5.8 oz. | 14 oz. |
| XL Multi-Serve | 18 oz. | 16 oz. | 7.3 oz. | 18 oz. |
| You don't need to adjust the size for Specialty Brew-it always yields 4 oz. | ||||
NOTE: The coffee grounds will absorb some of the water that is brewed, resulting in slightly less brewed coffee than water used.
For best results, use the measurements on the Ninja Smart Scoop" or in the chart to the right to determine how much ground coffee to use for each brew size. The amount of ground coffee for each size will remain the same for any brew type you select. For example, if you select Cup and CLASSIC, you will use the same amount of coffee grounds as if you select Cup and OVER ICE.
MEASURING YOUR COFFEE GROUNDS
| Serving Size | Ninja Smart Scoop | Tablespoon |
| Cup/XL Cup | 2-3 small scoops | 2-3 Tbsp. |
| Travel Mug/ XL Multi-Serve | 3-5 small scoops | 3-5 Tbsp. |
| Half Carafe | 3-4 big scoops | 6-8 Tbsp. |
| Full Carafe | 4-6 big scoops | 8-12 Tbsp. |
| Specialty (4 oz.) | 2 big scoops | 4 Tbsp. |
NOTE: Measurements are based on level scoops-adjust to your preferred taste. Use a medium-sized grind if grinding whole beans. Exceeding the recommended medium grind size for whole beans may cause the brew basket to overflow.
USING THE BREW BASKET USING THE DRIP STOP
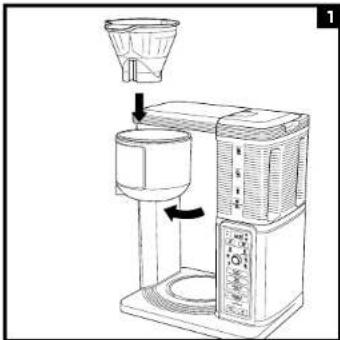
Open the brew basket by swinging it out of the coffee maker.
Insert the Filter Holder in the brew basket.
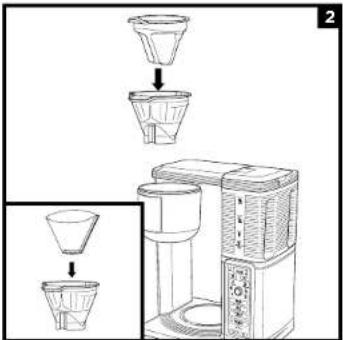
Place the Permanent Filter or a #4 paper cone filter in the filter holder.
NOTE: If using a paper filter, first ensure the permanent filter is removed from the filter holder. Then fold the paper filter along the seams, open it fully, and firmly press it into the filter holder, making sure it is fully seated.
Use the Ninja Smart Scoop™ and follow the measurements on the scoop to fill the filter.
Slide the brew basket back into the coffee maker until it clicks into place.
CAN'T WAIT FOR THE FIRST CUP?
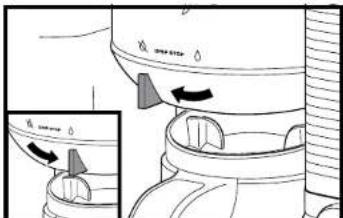
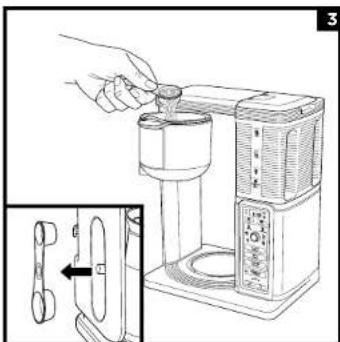
When brewing a carafe, close the Drip Stop to pause the brew cycle and pour a cup. Promptly replace the carafe and open the Drip Stop to complete the brew.
If you forget to open the Drip Stop, the coffee maker will pause the brew, and after 20 seconds it will give you a friendly audible reminder. After 6 minutes, the brew will be canceled.
NOTE: If the Drip Stop is closed before you begin a brew, the coffee maker will notify you with 5 beeps and the Drip Stop indicator will illuminate. Set the Drip Stop to the open position and select your brew type.
CLOSING THE DRIP STOP AFTER A BREW
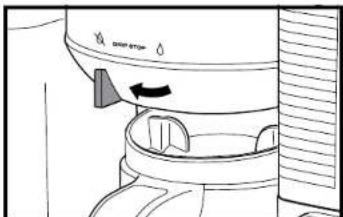
When the brew cycle is complete, set the Drip Stop to the closed position to stop dripping from the brew basket. While the Drip Stop is closed, the Drip Stop indicator will illuminate.
NOTE: Remember to open the Drip Stop when you are ready to brew again. If you forget, your coffee maker will give you a friendly audible reminder.
INTELLIGENT WARMING PLATE & STAY WARM BUTTON
INTELLIGENT WARMING PLATE
The Intelligent Warming Plate will automatically turn on during a half or Full Carafe size of Classic or Rich brew. The Intelligent Warming Plate will adjust the heat it produces to avoid burning the coffee over time.
IMPORTANT: The HOT SURFACE indicator will illuminate when the warming plate is hot.
STAY WARM BUTTON
Press STAY WARM after the brew to turn the Intelligent Warming Plate off. You can turn the Intelligent Warming Plate back on by pressing STAY WARM again.
IMPORTANT: The HOT SURFACE indicator will remain illuminated until the warming plate has cooled to a safe temperature.
TIME & TEMPERATURE ADJUSTMENT
You can adjust how long the Intelligent Warming Plate remains on (up to 4 hours) and/or set the temperature to High or Low. By default, the Intelligent Warming Plate is set to remain on for 2 hours, and is set to High to keep your coffee hot. The Low setting keeps your brew at a slightly lower temperature to preserve flavor longer.
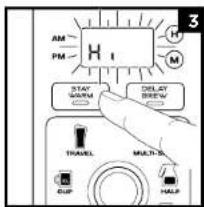
To change the time/temperature settings of your warming plate, follow these instructions:
Press and hold STAY WARM until the clock begins to flash the current warming time.
Quickly press the hour (H) and/or minute (M) buttons to increase the time up to 4 hours or decrease the time to 0 hours. Press STAY WARM to set the new time. Or wait 5 seconds, and the unit will beep, signifying the new time has been set.
Next, the clock will display the current warming plate temperature. To keep the same temperature, press STAY WARM, or wait 5 seconds for the same temperature to lock in. To change the temperature, press the hour (H) or (M) buttons, then press STAY WARM, or wait 5 seconds for the temperature to lock in.
NOTE: If you set the warming time to 0 hours, it will skip the warming temperature menu.
CUSTOM BREWS SPECIALTY BREW & FROTHING
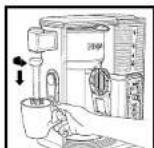
NOTE: For single cup, lower the Single-Serve Cup Platform and set your vessel in the center of it. Ensure you are using at least a 12 oz. cup for the Cup size, 14 oz. cup for the XL Cup size, 16 oz. travel mug for the Travel Mug size, and 20 oz. travel mug for the XL Multi-Service size.
CLASSIC AND RICH BREWS
NOTE: Rich brew will yield slightly less brewed coffee than Classic brew.
Use the Multi-Serve Dial to select the brew size. Place the empty vessel you would like to brew into under the brew basket.
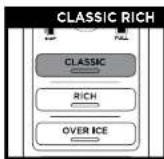
Press CLASSIC or RICH and the brew will begin. Press CLASSIC or RICH again to cancel the brew.
The brew will begin, stop, and be quiet for a short period of time before it begins again. This process is used to evenly saturate the coffee grounds.
The unit will beep to signal a completed brew.
OVER ICE BREW

Use the Multi-Serve Dial to select the brew size. Fill your desired vessel to the top with ice cubes and place the vessel below the brew basket.
NOTE: DO NOT use glassware. However, the provided Ninja* glass carafe is safe to use due to its specialized glass material.
IMPORTANT: Always fill the desired vessel to the top with ice before placing it below the brew basket. DO NOT add ice to the water reservoir.
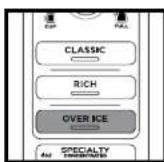
Press OVER ICE and the brew will begin. Press OVER ICE again to cancel the brew. The brew will begin, stop, and be quiet for a short period of time before it begins again. This process is used to evenly saturate the coffee grounds.
The unit will beep to signal a completed brew.
SPECIALTY BREW
NOTE: You don't need to adjust the size for Specialty Brew—it always yields 4 oz.
Place the empty vessel you would like to brew into under the brew basket.
NOTE: If brewing an iced blended drink, fill the desired vessel with the amount of ice recommended in the recipe before brewing.
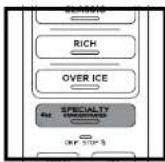
Press SPECIALTY and the brew will begin. Press SPECIALTY again to cancel the brew. The brew will begin, stop, and be quiet for a short period of time before it begins again. This process is used to evenly saturate the coffee grounds.
The unit will beep to signal a completed brew.
FROTHING MILK

Pour milk into cup, until it is about 12 full. (Use more or less milk depending on your preference.) For hot froth, microwave 45 to 60 seconds.
Move the frother into the ready position by swinging the arm toward the front.
Hold the cup under the frother and submerge the whisk just below the surface of the milk. This allows air to fold into the milk for the frothiest results.
Press and hold the frothing button for 30 to 45 seconds.
You can easily remove the frother whisk by twisting it clockwise. To avoid spills, keep your cup below the whisk and carry it to your sink or dishwasher for cleaning.
DELAY BREW CARE & MA
NOTE: The unit must remain on for the Delay Brew function to work. DO NOT power off after setting Delay Brew.
IMPORTANT: Make sure the Drip Stop is in the open position.
1 Turn the unit on by pressing the Power button.
2 After filling the water reservoir and adding ground coffee to the filter holder, be sure the reservoir and brew basket are securely in place. Place the appropriate-size vessel under brew basket.
3 Press DELAY BREW. DELAY BREW will illuminate and the clock will begin to flash "12:00" or the last Delay Brew time that was set.
Once the proper time has been set, select the size of the vessel that you would like to brew into.
5 Select the brew style that you desire from the 4 flashing buttons. The selected brew style will remain illuminated.
6 Once the time, brew size, and brew style have been set, allow DELAY BREW to stop flashing, or press DELAY BREW to activate. When activated, the unit will beep and DELAY BREW and your selected options will remain illuminated. To cancel, press DELAY BREW again.
NOTE: If you attempt to change your selections while Delay Brew is set, the unit will beep and DELAY BREW will flash. To change your selections, cancel DELAY BREW.
ENANCE
AFTER EACH BREW
NOTE: For best results, we recommend rinsing the reservoir after brewing and refilling with fresh water for the next brew.
After the unit has cooled, remove the filter holder from the brew basket. If using a paper filter, discard it. If using the permanent filter, wash it thoroughly with soap and warm water or place on top rack of dishwasher.
2 Clean the frother whisk after each use. Hand-wash thoroughly or place on top rack of dishwasher.
3 Wash the carafe and brew-through lid with soap and warm water. Use a bottle brush or a cloth to wash the inside of the carafe. DO NOT use a wire brush.
NOTE: The glass carafe, brew-through lid, permanent filter, removable filter holder, water reservoir, flip-top lid, frother whisk, and scoop are top-rack dishwasher safe.
4 After the coffee maker has cooled, wipe down the main unit, showerhead, and water reservoir shelf with a cloth and warm water. DO NOT immerse the coffee maker in water.
CLEANING THE WATER RESERVOIR
Empty the water reservoir and hand-wash or place in your dishwasher.
CLEANING THE CARAFE
We recommend cleaning your carafe with warm, soapy water.
If you want to clean the carafe more thoroughly, we recommend using a soft foam brush. DO NOT use a wire brush.
CLEANING & DESCALING
The CLEAN button will illuminate when a cleaning cycle is recommended for your unit, as calcium scale buildup could be affecting the flavor of your coffee. To clean and descale your Ninja® Specialty Coffee Maker:
NOTE: The clean cycle takes approximately 60 minutes. If you cancel the clean cycle, your machine will not be properly descaled.
1 Select the Full Carafe size and set the empty carafe beneath the brew basket.
2 Use a descending solution specifically formulated for coffee maker cleaning and follow the directions on the package. Fill the water reservoir up to, but not exceeding, the Max Fill line (50 oz.).
OR
Fill the water reservoir to the Travel Mug line (16 oz.) with white vinegar, then fill the rest of the reservoir with water up to, but not exceeding, the Max Fill line.
IMPORTANT: Use only white vinegar
3 Once the water reservoir is filled, press the CLEAN button.
4 The clock will display and count down the remaining clean cycle time, which takes approximately 60 minutes to complete. Your unit will deliver a small amount of cleaning solution to distribute it through the system. It will then pause, deliver additional cleaning solution, and continue for 60 minutes. The extended pauses allow for maximum cleaning and descaling.
IMPORTANT: DO NOT remove the carafe at any time throughout the clean cycle.
5 Upon completion, the coffee maker will beep, the clock will display End, and the CLEAN light will turn off.
6 Empty and thoroughly clean the carafe and water reservoir with warm, soapy water to remove any cleaning solution that could affect the flavor of your coffee.
7 Fill the reservoir with fresh water up to, but not exceeding, the Max Fill line and set the empty carafe beneath the brew basket.
8 Flush the system by running a Full Carafe, Classic brew cycle with water only. After the cycle is complete, discard the water and thoroughly clean the carafe.
NOTE: If the CLEAN light illuminates again, then calcium buildup is still present. Repeat the cleaning cycle instructions from the beginning, and the CLEAN light will automatically turn off when your coffee maker is clean.
TROUBLESHOOTING
THERE'S SEDIMENT IN MY COFFEE.
- If using a permanent filter, the sediment at the bottom of the brewed coffee may be due to using finely ground coffee.
To reduce the amount of sediment in the brewed coffee, use a slightly coarser grind or use a paper filter.
NOTE: We DO NOT recommend using a paper filter in conjunction with the permanent filter, as clogging and backing up of water and/or coffee in the filter basket can occur.
COFFEE IS TOO WEAK.
- For stronger coffee, use the Rich brew setting, try darker roast beans, or use the permanent filter rather than a paper filter. If you want an even bolder flavor, you can add more coffee grinds to the brew basket. Additional grinds do absorb liquid, so you will have a more concentrated, smaller cup of coffee.
COFFEE IS TOO STRONG.
- For milder coffee, use the Classic brew setting, use lighter roast beans, or use a paper filter rather than the permanent filter. If you want an even milder flavor, you can put fewer coffee grinds in the brew basket.
BREW CYCLE IS TOO SLOW.
Depending on your settings, your brew time will vary from around 4 minutes to 10 minutes.
CUP OR TRAVEL MUG OVERFLOWED
- Ensure you are using at least a 12 oz. cup for the Cup size, 14 oz. cup for the XL Cup size, 16 oz. travel mug for the Travel Mug size, and 20 oz. travel mug for the XL Multi-Serve size.
BREW BASKET OVERFLOWED.
- The bottom of the filter holder may be clogged. This can happen with finely ground coffee or too many coffee grinds in the brew basket. Medium-ground coffee is recommended
THERE'S WATER LEFT IN THE RESERVOIR.
- The water reservoir markings are minimum fill lines that indicate the amount of water needed for that brew size. However, all brew styles use different amounts of water to create the proper flavor and concentration, leaving some water to remain.
- After removing the water reservoir, there may be a small amount of water in the reservoir valve. This can be easily removed with a dry cloth.
- If the leak is coming from the brew basket, make sure all parts are assembled correctly and securely, and the drip stop is closed.
- if the leak is coming from the bottom of the coffee maker, call Customer Service at 1-877-646-5288.
CLEAN LIGHT IS ON.
- Run a clean cycle. If you have recently completed a clean cycle, you may need to run a second cycle to remove additional mineral buildup that occurs naturally over time.
CLOCK DISPLAY MESSAGES:
- "Add Wtr" The system does not have enough water in the reservoir to complete your brew. Add fresh water to the reservoir, then press your selected brew style to resume the brew.
- "CLn" The system has detected that a clean cycle needs be run immediately to remove calcium scale buildup in the boiler. See 'Cleaning & Descaling' for instructions.
ERROR MESSAGES
- "Er" If the clock displays "Er" and then a number (ex. "Er 03"),contact Customer Service at 1-877-646-5288.
SharkNinja
ONE (1) YEAR LIMITED WARRANTY
The One (1) Year Limited Warranty applies to purchases made from authorized retailers of SharkNinja Operating LLC. Warranty coverage applies to the original owner and to the original product only and is not transferable.
SharkNinja warrants that the unit shall be free from defects in material and workmanship for a period of one (1) year from the date of purchase when it is used under normal household conditions and maintained according to the requirements outlined in the Owner's Guide, subject to the following conditions and exclusions:
What is covered by this warranty?
- The original unit and/or non-wearable components deemed defective, in SharkNinja's sole discretion, will be repaired or replaced up to one (1) year from the original purchase date
- In the event a replacement unit is issued, the warranty coverage ends six (6) months following the receipt date of the replacement unit or the remainder of the existing warranty, whichever is later. SharkNinja reserves the right to replace the unit with one of equal or greater value.
What is not covered by this warranty?
- Normal wear and tear of wearable parts (including filter holder, permanent filter, frother whisk, carafe and brew-through lid, water reservoir and flip-top lid, and Ninja Smart ScoopTM), which require regular maintenance and/or replacement to ensure the proper functioning of your unit, are not covered by this warranty. Replacement parts are available for purchase at ninjaaccessories.com.
- Any unit that has been tampered with or used for commercial purposes
- Damage caused by misuse, abuse, negligence handling, failure to perform required maintenance (e.g., failure to run regular cleaning cycles), or damage due to mishandling in transit.
- Consequential and incidental damages.
- Defects caused by repair persons not authorized by SharkNinja. Those defects include damages caused in the process of shipping, altering, or repairing the SharkNinja product (or any of its parts) when the repair is performed by a repair person not authorized by SharkNinja.
- Products purchased, used, or operated outside North America
How to get service
If your appliance fails to operate properly while in use under normal household conditions within the warranty period, visit nlinjaktchen.com for product care and maintenance self-help. Our Customer Service Specialists are also available at 1-877-646-5288 to assist with product support and warranty service options, including the possibility of upgrading to our VIP warranty service options for select product categories.
SharkNinja will cover the cost for the customer to send in the unit to us for repair or replacement. A fee of $19.95 (subject to change) will be charged when SharkNinja ships the repaired or replacement unit.
How to initiate a warranty claim
You must call 1-877-646-5288 to initiate a warranty claim. You will need the receipt as proof of purchase. A Customer Service Specialist will provide you with return and packing instruction information.
How state law applies
This warranty gives you specific legal rights, and you also may have other rights that vary from state to state. Some states do not permit the exclusion or limitation of incidental or consequential damages, so the above may not apply to you.
REPLACEMENT PARTS
To order additional parts and accessories, visit ninjaaccessorles.com.
PRODUCT REGISTRATION
Please visit registryourninja.com or call 1-877-646-5288 to register your new Ninjao product within ten (10) days of purchase. You will be asked to provide the store name, date of purchase, and model number along with your name and address.
The registration will enable us to contact you in the unlikely event of a product safety notification. By registering, you acknowledge you have read and understood the instructions for use and warnings set forth in the accompanying instructions.
CONSIGNES DE SECURITE IMPORTANTES
VEUILLEZ LIRE TOUTES LES INSTRUCTIONS AVANT UTILISATION • POUR USAGE DOMESTIQUE UNIQUEMENT
Utilize le cadran a services multiples
SharkNinja Operating LLC
US: Needham, MA 02494
1-877-646-5288
ninjakitchen.com
Illustrations may differ from actual product. We are constantly striving to improve our products, therefore the specifications contained herein are subject to change without notice.
For SharkNinja U.S. Patent information, visit sharkninja.com/uspatents.
NINJA is a registered trademark of SharkNinja Operating LLC.
NINJA SMART SCOOP is a trademark of SharkNinja Operating LLC.
© 2019 SharkNinja Operating LLC
PRINTED IN CHINA · IMPRIME EN CHINE · IMPRESO EN CHINA
CM401_IB_E_F_S_MP_Mv6