
CBM210 - Coffee grinder BLACK & DECKER - Free user manual and instructions
Find the device manual for free CBM210 BLACK & DECKER in PDF.
| Product Type | Electric Coffee Grinder |
| Brand | Black & Decker |
| Model | CBM210 |
| Alternative Model Numbers | CBM210C |
| Power Supply | 80 W, 120 V ~ 60 Hz |
| Grinding Bowl Capacity | Approximately 227 g (1 cup) of coffee beans |
| Grinding Yield | Approximately 227 g (16 tbsp) of ground coffee |
| Adjustable Grind | Coarse (percolator), medium (drip coffee maker), fine (espresso, Turkish coffee) |
| Control Type | Pulse ON/OFF button (must be held down) |
| Safety Mechanism | Double safety: lid and grinding container must be in place to operate |
| Polarized Plug | Yes (one blade wider than the other) |
| Consumer Removable and Replaceable Parts | Lid (CBM200-01), grinding container (CBM200-02) and its lid (CBM200-03), cleaning brush (CBM200-04) |
| Care and Cleaning | Unplug before cleaning. Container and lid washable in warm soapy water (not dishwasher safe). Wipe bowl, lid, and base with a damp cloth. Use brush to clean the chute. Grinding assembly washable in warm soapy water. Do not immerse the appliance. |
| Warranty | 1 year (United States and Canada only) |
| Country of Manufacture | People's Republic of China |
| Intended Use | Household use only |
Frequently Asked Questions - CBM210 BLACK & DECKER
User questions about CBM210 BLACK & DECKER
0 question about this device. Answer the ones you know or ask your own.
Ask a new question about this device
Download the instructions for your Coffee grinder in PDF format for free! Find your manual CBM210 - BLACK & DECKER and take your electronic device back in hand. On this page are published all the documents necessary for the use of your device. CBM210 by BLACK & DECKER.
USER MANUAL CBM210 BLACK & DECKER
Please Read and Save this Use and Care Book
Electric Coffee Grinder
natural_image
Exterior view of a modern stainless steel coffee maker with MAX branding (no visible text or symbols on the device itself)Register your product online at www.prodprotect.com/applica,
for a chance to WIN \$100,000!
For US residents only
Accessories/Parts (USA/Canada)
When using electrical appliances, basic safety precautions should always be followed, including the following:
Read all instructions.
☐ To protect against risk of electric shock, do not immerse cord, plug or any non-removable parts in water or other liquid.
☐ Close supervision is necessary when any appliance is used by or near children.
☐ Unplug from outlet when not in use, before putting on or taking off parts and before cleaning. To unplug, grasp plug and pull from electrical outlet. Never pull cord.
☐ Avoid contacting moving parts.
☐ To reduce the risk of severe injury to persons or damage to the appliance, keep hands and utensils out of the grinding bowl while grinding, and when the appliance is plugged in.
☐ Do not operate any appliance with a damaged cord or plug or after the appliance malfunctions or is dropped or damaged in any manner. Return the appliance to the nearest authorized service facility for examination, repair, or electrical or mechanical adjustment. Or, call the appropriate toll-free number listed on the cover of this manual.
☐ The use of attachments not recommended or sold by the appliance manufacturer may cause fire, electric shock or injury.
☐ Do not use outdoors.
☐ Do not let cord hang over edge of table or counter.
□ Blades are sharp. Handle carefully.
□ Be certain cover is securely locked in place before operating appliance.
☐ Do not attempt to defeat the cover interlock mechanism.
☐ Check container for presence of foreign objects before using.
☐ Do not use appliance for other than intended use.
SAVE THESE INSTRUCTIONS.
This product is for household use only.
POLARIZED PLUG (120V Models Only)
This appliance has a polarized plug (one blade is wider than the other). To reduce the risk of electric shock, this plug is intended to fit into a polarized outlet only one way. If the plug does not fit fully into the outlet, reverse the plug. If it still does not fit, contact a qualified electrician. Do not attempt to modify the plug in any way.
ELECTRICAL CORD
The cord of this appliance was selected to reduce the possibility of tangling in or tripping over a longer cord. If more length is needed, use an extension cord rated no less than 15 amperes. (For 220 volts rated products, use an extension cord rated no less than 6 amperes.) When using an extension cord, do not let it drape over the working area or dangle where someone could accidentally trip over it. Handle cord carefully for longer life; avoid jerking or straining it at outlet and appliance connections.
Note: If the power supply cord is damaged, it should be replaced by qualified personnel or in Latin America by an authorized service center.
Product may vary slightly from what is illustrated.

+ 1. Cover (Part # CBM200-01)
- Lock and release knob (not shown)
- Grinding bowl
- Ground coffee chute
+ 5. Ground coffee container (Part # CBM200-02)
with lid (Part # CBM200-03)
- Base
- Cord and storage
+ 8. Cleaning brush (Part # CBM200-04)
- ON/OFF pulse control button
- Adjustable grind selection dial
- Grinding assembly (inside)
- Consumer replaceable/removable parts
How to Use
This appliance is for household use only.
GETTING STARTED
Wash the ground coffee container with lid in warm water, dry thoroughly. Wipe top cover and grinding bowl with a damp cloth and dry.
Warning: Do not put any parts in the dishwasher. Do not immerse the unit in water. Grinder must be level. To assure stability, be sure to thread electrical cord to one side of the cord wrap then through cord channel with cord exiting out the rear of the base.
Note: For your protection this unit has a dual safety mechanism. Do not attempt to operate the unit unless the top cover is closed and the ground coffee container with lid is in place.
GRINDING
- Open the top cover.
- Place up to 1 cup (approximately 227g ) of coffee beans into the grinding bowl. This yields about 16 tablespoons (277g) of ground coffee — enough for approximately 12 cups (approximately 2 L). Do not grind a full cup of beans on the fine setting as it may cause unit to clog.

- Turn the adjustable grind selection dial to the desired grind texture (A). A coarse grind works well for slower brewing in a percolator; a medium grind will get the best flavor extraction for faster brewing in automatic drip coffeemakers or a coffee press and a fine grind is great for espresso or Turkish coffee. Refer to the GRINDING GUIDELINES in this section. Experiment with the texture of your grind to see what works best with your coffeemaker.
- Plug in the grinder.
- Press and hold the On/Off pulse control button until beans are ground (B).

GRINDING GUIDELINES
- ¼ cup (57 g) of beans 30 to 35 seconds
• 12 cup (113 g) of beans 50 to 55 seconds
• 3/4 cup (170 g) of beans 60 to 65 seconds -
1 cup (227 g) of beans approximately 1 12 minutes
-
When grinding is done, remove the ground coffee container from the grinder by pulling it away from the unit, lift lid up and off. Scoop directly from the ground coffee container into a permanent or paper filter in the brew basket.
COFFEE BEAN CARE
Whole coffee beans should be stored in an airtight container at room temperature for up to 1 month or in the freezer for up to 3 months, for the freshest flavor. When ready to use, beans can be ground while still frozen. Extra ground coffee can be stored in an airtight container to retain flavor.
Note: Ground coffee container should not be used for any purpose other than holding ground coffee. The grinding bowl is not washable and if used for spices or nuts, there will eventually be a transference of flavors. It is recommended that you purchase a separate grinder for nuts and spices.
Care and Cleaning
This product contains no user serviceable parts. Refer service to qualified service personnel.
-
Always unplug the unit before cleaning.
-
Remove the ground coffee container with lid and wash in warm, soapy water – not in the dishwasher.

natural_image
Close-up of a mechanical component with a hand holding a tool, labeled 'C' (no visible text or symbols)- Use the cleaning brush to sweep away any excess particles left in the ground coffee chute (C). Important: The ground coffee chute must be kept clear, or the ground coffee container will not lock into position once it is replaced, and the grinder will not operate properly.
natural_image
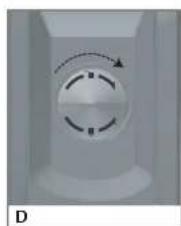
Close-up of a white cylindrical device with a circular dial and dashed arrow indicating rotation (no text or symbols)- Open the grinding bowl cover and turn the lock and release knob clockwise to unlock the grinding assembly (D). You will hear a series of clicks and the grind selection dial will rotate as you twist; you will then hear a distinct pop when the assembly is unlocked.

natural_image
Illustration of a hand using a tool to press or install a bottle onto a base (no text or symbols visible)- Remove the grinding assembly (E) and wash in warm, soapy water. Rinse and dry thoroughly.
- The cleaning brush can also be used to sweep out any excess particles gathered under grinding assembly. Once all excess particles have been removed, the cleaning brush may be washed in warm, soapy water
- Wipe the grinding bowl, cover, base and other parts with a slightly damp cloth or sponge. Dry all parts thoroughly before reassembling.

natural_image
Close-up of a circular mechanical component with dashed and solid arrows indicating rotation (no text or symbols)- To replace grinding assembly, set inside grinding bowl and twist slightly to the left until it falls into place. Grasp lock and release knob and turn counterclockwise to lock assembly (F). You will hear a series of clicks as the selection dial rotates, and then a distinct pop once the assembly is locked in place.
Important: Do not immerse grinding bowl, base or plug in liquid or under running water.
-
Never use harsh detergents or abrasive cleansers or scouring pads to clean any part.
-
Use the built-in cord wrap on the underside of the unit to store the cord (G).

natural_image
Diagram of a pendulum with pulleys and weights, labeled 'G' (no text or symbols on the diagram itself)TROUBLESHOOTING
| PROBLEM POSSIBLE CAUSE SOLUTION | ||
| Grinder stops working. The ground | d coffee container has disengaged.There are too many beans in the grinding bowl. | Make sure the discharge chute is clean and free of coffee grinds; a buildup of coffee grounds will cause the ground coffee container to slip forward.Unplug the appliance and remove some of the beans from the grinding bowl. |
| Coffee tastes rancid. Grinder has | buildup of coffee grounds. | Oil in the coffee beans will become rancid if left in the grinder. Make sure there are no beans left in the grinder. Clean the discharge chute and the ground coffee container after each use.. |
| Coffee tastes like nuts or spices. | Grinder has been used for other grinding operations. | Grinder will share flavors; purchase another grinder for spices and nuts. |
| Grinder will not start. Grinder cover is not completely closed.The ground coffee container is not properly placed. The cover is not on the ground coffee container. The outlet is not working. | Grinder cover snaps into place when completely closed.Make sure the cover on the ground coffee container is in place;push the ground coffee container securely back in the base so that the front is flush with the base of the base.Check to make sure outlet is working. | |
| The ground fineness selector is not working. | The grinding blade is not correctly positioned. | Remove the grinding blade and clean following directions in CARE AND CLEANING.Reattach grinding blade making sure it is fully integrated. |

natural_image
Diagram of a mechanical or electrical component with internal components and a base, no visible text or symbolsnatural_image
Illustration of a hand using a tool to lift a bottle onto a base, no text or symbols presentnatural_image
Close-up of a white mechanical component with a circular dial and curved arrow, labeled 'F' at bottom (no readable text or symbols)natural_image
Diagram of a mechanical pendulum or spring scale with no visible text or symbolsnatural_image
Illustration of a hand inserting a component into a device (no text or symbols visible)natural_image
Close-up of a circular mechanical component with dashed arrows indicating rotation or direction (no text or symbols)natural_image
Illustration of a hand using a tool to press or install a plastic bottle onto a base (no text or symbols visible)natural_image
Close-up of a circular mechanical component with dashed arrows indicating rotation or motion (no text or symbols)natural_image
Diagram of a mechanical pendulum or spring mechanism with labeled component G (no text or symbols on the diagram itself)For service, repair or any questions regarding your appliance, call the appropriate "800" number on the cover of this book. Do not return the product to the place of purchase. Do not mail the product back to the manufacturer nor bring it to a service center. You may also want to consult the website listed on the cover of this manual.
One-Year Limited Warranty
(Applies only in the United States and Canada)
What does it cover?
- Any defect in material or workmanship; provided; however, Applica's liability will not exceed the purchase price of the product.
For how long?
• One year after the date of original purchase.
What will we do to help you?
- Provide you with a reasonably similar replacement product that is either new or factory refurbished.
How do you get service?
- Save your receipt as proof of the date of sale.
- Check our on-line service site at www.prodprotect.com/applica, or call our toll-free number, 1-800-231-9786, for general warranty service.
- If you need parts or accessories, please call 1-800-738-0245.
What does your warranty not cover?
- Damage from commercial use
• Damage from misuse, abuse or neglect
• Products that have been modified in any way
- Products used or serviced outside the country of purchase
• Glass parts and other accessory items that are packed with the unit
- Shipping and handling costs associated with the replacement of the unit
- Consequential or incidental damages (Please note, however, that some states do not allow the exclusion or limitation of consequential or incidental damages, so this limitation may not apply to you.)
How does state law relate to this warranty?
- This warranty gives you specific legal rights, and you may also have other rights that vary from state to state or province to province.
¿NECESITA AYUDA?
BLACK&DECKER.is a trademark of The Black & Decker Corporation, Towson, Maryland, USA
Marca registrada de The Black & Decker Corporation, Towson, Maryland, E.U.
Applica Consumer Products, Inc.
R22007/9-12-37E/S/F

Printed on recycled paper. Impreso en papel reciclado. Imprimé sur du papier recyclé.
Copyright © 2007 - 2008 Applica Consumer Products, Inc.
Made in People's Republic of China Printed in People's Republic of China

- Electric Coffee Grinder
- SAVE THESE INSTRUCTIONS.
- POLARIZED PLUG (120V Models Only)
- ELECTRICAL CORD
- How to Use
- GETTING STARTED
- GRINDING
- GRINDING GUIDELINES
- COFFEE BEAN CARE
- Care and Cleaning
- One-Year Limited Warranty
- (Applies only in the United States and Canada)
- What does it cover?
- For how long?
- What will we do to help you?
- How do you get service?
- What does your warranty not cover?
- How does state law relate to this warranty?
- ¿NECESITA AYUDA?
Brand : BLACK & DECKER
Model : CBM210
Category : Coffee grinder