
Spacemaker CG700 - Coffee grinder BLACK & DECKER - Free user manual and instructions
Find the device manual for free Spacemaker CG700 BLACK & DECKER in PDF.


| Product Type | Coffee Grinder and Mini Food Processor |
| Brand | Black & Decker |
| Model | Spacemaker CG700 |
| Power Supply | 120 V AC, 60 Hz (Polarized plug) |
| Maximum Coffee Bean Capacity | 1/4 cup (70 g) |
| Maximum Food Processing Capacity | 1 1/4 cups (135 g) |
| Grind Settings | Fine, Medium, Coarse |
| Preset Cup Amounts | 4 cups (23 g), 8 cups (47 g), 12 cups (70 g) |
| Control Type | Push-button with pulse ON/OFF |
| Safety Features | Dual safety interlock; blade stops automatically when bowl removed |
| Blade Material | Stainless steel (grinding and chopping blades) |
| Bowl Material | Glass (grinding bowl) and plastic (workbowl) |
| Installation Type | Under-cabinet mount (flat or overhang molding) |
| Mounting Kit Included | Screws, washers, spacers, template |
| Cord Length | Short (with cord storage and management hook) |
| Cleaning | Hand wash recommended for bowls and blades; wipe exterior |
| Replaceable Parts | Grinding bowl (CG001), grinding blade (CG002), workbowl (CG003), storage lid (CG004), chopping blade (CG005), mounting kit (CG006) |
| Warranty | 2-year limited (US/Canada) |
| Country of Origin | People's Republic of China |
Frequently Asked Questions - Spacemaker CG700 BLACK & DECKER
User questions about Spacemaker CG700 BLACK & DECKER
0 question about this device. Answer the ones you know or ask your own.
Ask a new question about this device
Download the instructions for your Coffee grinder in PDF format for free! Find your manual Spacemaker CG700 - BLACK & DECKER and take your electronic device back in hand. On this page are published all the documents necessary for the use of your device. Spacemaker CG700 by BLACK & DECKER.
USER MANUAL Spacemaker CG700 BLACK & DECKER
Please Read and Save this Use and Care Book
MINI FOOD PROCESSOR /
GRINDER
MINI PROCESADOR / MOLINO
PARA INSTALAR DEBAJO DEL GABINETE

Register your product online at www.prodprotect.com/applica, for a chance to WIN \$100,000! For US residents only
natural_image
Black-and-white photo of a glass jar filled with granular material, no visible text or symbols
USA/Canada 1-800-231-9786
Mexico 01-800-714-2503
www.prodprotect.com/applica
Accessories/Parts (USA/Canada)
When using electrical appliances, basic safety precautions should always be followed, including the following:
Read all instructions.
☐ To protect against risk of electrical shock do not put cord, plugs or appliance in water or other liquid.
☐ Close supervision is necessary when any appliance is used by or near children.
☐ Unplug from outlet when not in use, before putting on or taking off parts, and before cleaning.
☐ Avoid contacting moving parts.
☐ Do not operate any appliance with a damaged cord or plug or after the appliance malfunctions, or is dropped or damaged in any manner. Return appliance to the nearest authorized service facility for examination, repair or electrical or mechanical adjustment. Or, call the appropriate toll-free number on the cover of this manual.
☐ The use of attachments not recommended or sold by the manufacturer may cause fire, electric shock or injury.
☐ Do not use outdoors.
☐ Do not let cord hang over edge of table or counter.
☐ Keep hands and utensils away from the cutting blade while chopping food to reduce the risk of severe injury to persons or damage to the food chopper. A scraper may be used, but only when the food chopper is not running.
☐ Blade is sharp. Handle carefully.
☐ To reduce the risk of injury, never place cutting blade on base without first putting bowl properly in place.
☐ Be certain cover is securely locked in place before operating appliance.
☐ Do not attempt to defeat the cover interlock mechanism.
☐ Do not let cord contact hot surface, including the stove.
☐ Check bowl for presence of foreign objects before using.
☐ To reduce the risk of fire or electric shock, do not operate any heating appliance beneath mounted unit.
☐ Do not mount the storage bracket/unit over or near any portion of a heating or cooking appliance or a sink or basin.
SAVE THESE INSTRUCTIONS.
This product is for household use only.
POLARIZED PLUG (120V Models Only)
This appliance has a polarized plug (one blade is wider than the other). To reduce the risk of electric shock, this plug is intended to fit into a polarized outlet only one way. If the plug does not fit fully into the outlet, reverse the plug. If it still does not fit, contact a qualified electrician. Do not attempt to modify the plug in any way.
TAMPER-RESISTANT SCREW
Warning: This appliance is equipped with a tamper-resistant screw to prevent removal of the outer cover. To reduce the risk of fire or electric shock, do not attempt to remove the outer cover. There are no user-serviceable parts inside. Repair should be done only by authorized service personnel.
ELECTRICAL CORD
a) A short power-supply cord (or detachable power-supply cord) is to be provided to reduce the risk resulting from becoming entangled in or tripping over a longer cord.
b) Longer detachable power-supply cords or extension cords are available and may be used if care is exercised in their use.
c) If a long detachable power-supply cord or extension cord is used,
1) The marked electrical rating of the detachable power-supply cord or extension cord should be at least as great as the electrical rating of the appliance,
2) If the appliance is of the grounded type, the extension cord should be a grounding-type 3-wire cord, and
3) The longer cord should be arranged so that it will not drape over the countertop or tabletop where it can be pulled on by children or tripped over.
Note: If the power supply cord is damaged, it should be replaced by qualified personnel. In Latin America, by an authorized service center.
Product may vary slightly from what is illustrated.
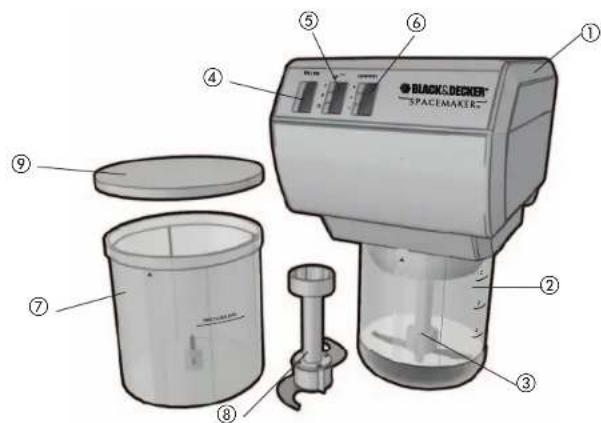
A1
1. Mounted unit
-
- Grinding bowl (Part # CG001)
† 3. Stainless steel grinding blade (Part # CG002)
- Grinding bowl (Part # CG001)
-
ON/OFF pulse control button
- Coffee grinder cup selection button
- Coffee grinder coarseness selection button
† 7. Processing workbowl (Part # CG003)
† 8. Stainless steel chopping blade (Part # CG005)
† 9. Storage lid (Part # CG004)
10. Cord storage (not shown)
11. Cord management hook (not shown)
† 12. Mounting kit (Part # CG006-01) white, (Part # CG006-02) black (not shown)
Note: † indicates consumer replaceable/removable parts

A2
† 1. Mounting Parts
(Part # SDC-MOUNTING KIT)
A. 16 Spacers
4 1/2"
4 V.
4.21.11
+716
4 1/16
B. 12 Screws
4 1
- 116-1
4 1/2 4 (21)
4 2/4
C. 4 Washers
2. Mounting Template (in box)
You will also need:
- Tape
• Ruler (or you may cut out the ruler provided on the template)
• Electric drill with a 14 " drill bit
GETTING STARTED
- Remove all packing material, labels and any stickers.
- Remove and save literature.
- Unpack mounting parts and set them aside in a safe place where they will not roll away or get lost.
Important: Do not attempt to operate appliance until it is properly installed.
CHOOSE A LOCATION
When choosing your location, consider the following:
• DO make sure to mount within reach of an electrical outlet.
- DO consider your normal work patterns in the kitchen when choosing location.
- DO NOT mount over any heating or cooking appliance such as your range or oven.
• DO NOT mount over or near a sink.
- DO NOT mount under, in front of or behind any under-cabinet light fixtures.
Note: If mounting multiple +SpaceMaker™ appliances and you are installing your appliance next to the SpaceMaker™ oven (Fig. A.3):
- Allow at least 1" between the control panel side of the oven and the appliance.
- Allow at least 4" between the side opposite the control panel of your oven and adjacent wall or other appliance. You can mount the other appliances flush to one another.
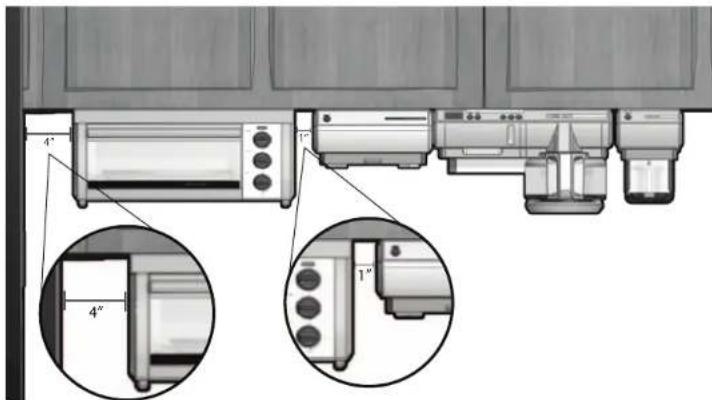
A.3
Note: If you are connecting this appliance to the receptacle of another +SpaceMaker™ appliance such as the toaster oven or coffeemaker, make sure you can easily unplug the appliance following use.
DETERMINE CABINET TYPE
Prior to installation, determine if your cabinet has a flat bottom (B) or an overhang molding (C). If your cabinet is flat, follow STANDARD INSTALLATION; if the cabinet has an overhang molding, refer to OVERHANG MOLDING INSTALLATION.


STANDARD INSTALLATION (FLAT CABINET)
Important: Always wear protective glasses or goggles to prevent injury when drilling.
- Clear countertop under installation area to avoid getting dust or debris on other appliances or items. Open cabinets and remove contents to make mounting easier.
- Clean both the underside and topside of the bottom panel of the cabinet.
- With cabinet doors open, place mounting template flush against the surface of the underside of your cabinet, making sure to align thick line on template with bottom front edge of your cabinet (D).

natural_image
3D diagram of a cabinet with ruler and door, no text or symbols presentImportant: Do not align screw holes on template directly under the partition between cabinets, as this will prevent you from installing the appliance properly. Pay close attention to where the drill holes will be set so as not to damage your cabinets during mounting. Drilling through your cabinet's partition may cause damage to cabinets and prevent proper installation.
4. Fold the template along the edge of your cabinet so the thick line is straight with bottom front edge; pull template tight and tape down to hold in place.
- Drilling from under the cabinet up, drill holes through the 4 places marked on the template, using a ¼-inch drill bit (E).

natural_image
Interior view of a cabinet with labeled door (no text or symbols beyond label)Important: Always ensure you are drilling straight up through the marked mounting holes on the template. Drilling at an angle may prevent proper installation and may damage cabinets if the drill bit pierces the partition.
- Once holes are drilled, remove tape and mounting template.
- Wipe dust and debris off the topside and underside of the cabinet surface.
- Place a washer inside the cabinet over each of the 4 holes you drilled.
- Hold appliance in place, aligning front of unit with front edge of cabinet; drilled holes on cabinet should be aligned with mounting holes on the unit.
- Drop one of your screws through each of the washers covering the holes in the cabinet, from inside the cabinet down.
Note: To determine which screws to use, you must have enough of the screw exposed underneath the cabinet to properly thread the screw into the nut.
11. Screwing from inside the cabinet down into appliance holes, tighten 4 screws in place to secure appliance to cabinet.
Note: Always tighten screws to ensure the appliance does not move or shake during operation.
- Pull out cord from cord storage behind appliance and plug into standard electrical outlet. Extra cord can be fed back into storage or hung over cord management hook behind unit (F).
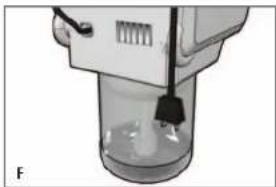
natural_image
Close-up of a mechanical device with a black clip inserted into a transparent cylindrical housing (no visible text or symbols)Note: If you are connecting this appliance to the receptacle of another
^† SpaceMaker ^™ appliance such as the toaster oven or coffeemaker, make sure you can easily unplug the appliance following use.
- Your +SpaceMaker™ appliance is now ready for use!
OVERHANG MOLDING INSTALLATION
For cabinets with an overhang molding (see Illustration C)
Important: Always wear protective glasses or goggles to prevent injury when drilling.
Note: Spacers are provided in case your cabinet has an overhang molding at the front edge. Only use spacers on the rear screws of the appliance to ensure it is level with the front.
-
Clear countertop under installation area to avoid getting dust or debris on other appliances or items. Open cabinets and remove contents to make mounting easier.
-
Clean both the underside and topside of the bottom panel of the cabinet.
-
Using a ruler, measure the thickness of the overhang molding (G), accurately noting the number for use in the following step.

natural_image
Close-up of a hand holding a ruler measuring a surface, with a hook visible (no text or symbols)Note: If you do not have a ruler, you may cut out the paper ruler provided on the edge of your mounting template.
-
After measuring the overhang molding thickness as shown in Illustration G, look at the dashed lines on the mounting template; each line has a measurement next to it that indicates the thickness of the overhang molding used with that line. For example, if your cabinet has an overhang molding thickness of 12 , you will use the 12 " dashed line on the template.
-
Fold the template along the dashed line that matches the thickness of your overhang molding.
-
Place the folded template against the back edge of the overhang molding, making sure the side with the drill hole marks is facing down (H).

natural_image
Exterior view of a modern building ceiling with visible skylights and ventilation duct (no signage or text)Important: Do not align screw holes on template directly under the partition between cabinets, as this will prevent you from installing the appliance properly. Pay close attention to where the drill holes will be set so as not to damage your cabinets during mounting. Drilling through your cabinet's partition may cause damage to cabinets and prevent proper installation.
-
Making sure to keep the fold line straight against the back edge of the overhang molding, tape the template securely in place.
-
Drilling from under the cabinet up, drill holes through the 4 places marked on the template using a 1/4-inch drill bit (J).
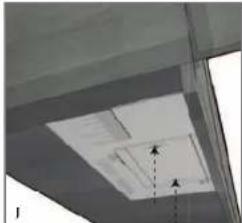
natural_image
Exterior view of a modern building ceiling with visible skylights and ventilation duct (no signage or text)Important: Always ensure you are drilling straight up through the marked mounting holes on the template. Drilling at an angle may prevent proper installation and may damage cabinets if the drill bit pierces the partition.
-
Once holes are drilled, remove tape and mounting template.
-
Wipe dust and debris off the underside and topside of the cabinet surface.
-
Place a washer inside the cabinet over each of the 4 holes you drilled.
-
Now, use your ruler or the paper ruler provided to measure the overhang molding height, placing your ruler vertically against the underside of the cabinet behind the overhang molding. This number determines the number of spacers you need, using a number of spacers equal to the overhang molding height. For example, a 1" overhang molding would use 2, ½" spacers on each of the rear holes (K).

natural_image
Close-up of a hand holding a ruler measuring a vertical measurement (no visible text or symbols)- Drop one of your screws through each of the washers covering the holes in the cabinet, from inside the cabinet down.
Note: To determine which screws to use, you must have enough of the screw exposed underneath the cabinet to properly thread the screw into the nut.
- Place the appropriate number of spacers determined in step 12 on both of the rear screws to ensure the appliance will be even (L).

natural_image
3D rendered diagram of a structural component with vertical elements and labeled 'L' (no text or symbols beyond labels)Note: If the height of your overhang molding is too tall to be accommodated by the number of spacers provided, you may call, toll-free, at 1-800-231-9786 to order additional spacers at no charge.
Note: For spacer installation, you may require assistance in mounting in order to hold spacers in place while securing the appliance at the same time. If assistance is not available, use a small clamp to hold the spacers in place while you position the appliance.
- Once spacers are set, hold appliance up and tighten screws to secure. Screw from inside the cabinet down.
Note: Always tighten screws to ensure the appliance does not move or shake during operation.
- Pull out cord from cord storage behind appliance and plug into standard electrical outlet. Extra cord can be fed back into storage or hung over cord management hook behind unit (see illustration F).
Note: If you are connecting this appliance to the receptacle of another SpaceMakerTM appliance such as the toaster oven or coffeemaker, make sure you can easily unplug the appliance following use.
- Your +SpaceMaker™ appliance is now ready for use!
How to Use
This appliance is for household use only.
GETTING STARTED
- For warranty verification, do not remove line cord tag.
- Please go to www.prodprotect.com/applica to register your warranty.
- Wash the coffee grinding bowl, mini food processor workbowl and both blades in hot soapy water; rinse and dry thoroughly as directed in the CARE AND CLEANING section of this Use & Care manual.
Important: Although these parts can be washed in the dishwasher, we recommend they be washed by hand to preserve the sharpness of the blades and the appearance of the workbowl. Do not immerse the appliance in water.
- Wipe outside of appliance with a damp cloth; dry thoroughly.
Note: For your protection this appliance has a dual safety mechanism. Do not attempt to use this appliance unless either container with the appropriate blade is in place.
GRINDING COFFEE BEANS
- Place the grinding blade on the spindle in the center of the grinding bowl, making sure the blade rests at the bottom of the stem. With your fingers on the top of the stem of the grinding blade, give it a twisting motion to make sure it is securely seated on the spindle (M).

natural_image
Illustration of a hand using a tool to lift a cylindrical object into a container (no text or symbols)Important: Handle grinding blade carefully. It is very sharp.
-
Place desired amount, up to 14 cup (70 g), of coffee beans into the grinding bowl.
-
With your fingers on the top of the stem of the grinding blade, use a twisting motion to make sure the coffee beans are evenly distributed in the grinding bowl.
-
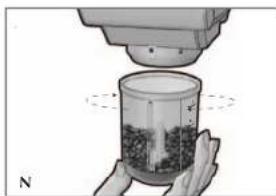
Holding the grinding bowl from the bottom, securely insert it up into the center of the bottom of the motor housing with the arrow ▲ symbol on the bowl directly under the UNLOCK Symbol on the bottom of the motor housing (N).
natural_image
Illustration of a hand holding a container with granular material, emitting a curved beam above (no text or symbols)- Turn the grinding bowl clockwise until it locks into position. The LOCK 🔒 symbol on the housing should be aligned with the arrow on the grinding bowl.
Note: There is a safety feature on this appliance that will not allow the grinder to operate unless the workbowl is securely in place.
-
Plug in the appliance.
-
Select amount of coffee to be ground by pressing the button next to one of the 3 selections offered (P).
• 4 tbsp. (¼ cup, 23 g) = 4 cups of coffee
- 8 tbsp. (½ cup, 47 g) = 8 cups of coffee
• 12 tbsp. (¾ cup, 70 g) = 12 cups of coffee
- Select the texture of ground coffee desired by pressing the button next to one of the 3 selections offered (P).
- Fine
- Medium
Coarse
Note: Selections can be changed at any time.
- Press the ON/OFF control button (P).

Note: To stop the coffee grinder at any time, press the ON/OFF button.
- When the coffee beans are ground to the desired texture, the grinder will automatically stop.
Important: Be sure grinding blade has completely stopped spinning before removing grinding bowl from appliance.
-
Hold the grinding bowl securely and turn it counterclockwise to the UNLOCK position and keeping the bowl level, lower it from the appliance.
-
With your fingers on the top of the stem of the blade, lift it up and out of the grinding bowl with a twisting motion. Spoon the coffee directly from the bowl.
-
Clean the bowl after each use as described in CARE AND CLEANING.
Note: Do not use the grinder for spices; the bowl will absorb some of the flavor of the spices and affect the flavor of your ground coffee.
- Unplug the appliance when not in use.
| GRINDING GUIDELINES | ||
| Selecting the grind setting: | ||
| Brew Method Grind Setting Appearance | ||
| Percolator or French Press Coarse Like salt particles | ||
| Drip or Vacuum Medium Like sand particles | ||
| Espresso | Fine | Like talcum powder |
The proper grind is important for the best coffee flavor. The quicker the brewing process is, the finer the grind used. Coffee that is ground too fine for a particular brewing process will result in bitter, pungent tasting coffee. Coffee that is ground too coarse will result in weak, watery coffee.
GROUND COFFEE TIPS
- For a cup of rich, full flavored coffee use 1½ rounded tablespoons of ground coffee for each 5½-oz cup of coffee.
- For optimum flavor, it is best to grind the amount of coffee needed immediately before brewing.
- Do not use the coffee grinder to grind spices or nuts; your coffee will share those flavors.
- Blending 2 or more types of beans will result in a richer, more complex brew.
- It is important to clean the grinding bowl after each use; the residual oils from the coffee will give an off flavor to the next batch of coffee ground.
USING THE MINI FOOD PROCESSOR
The mini processor is used to chop, mince, mix and puree foods to a smooth consistency. Use the workbowl to chop fresh and cooked fruits and vegetables; fresh herbs; cooked meats, fish and poultry; to make sauces, dressings and salsas; bread, cookie and cracker crumbs.
- Place the chopping blade on the spindle in the center of the workbowl. With your fingers on the top of the stem of the chopping blade, give it a twisting motion while pushing down to make sure it is securely seated on the spindle (Q).

natural_image
Illustration of a hand using a pipette to lift a cylindrical container (no text or symbols)Important: Handle grinding blade carefully. It is very sharp.
- Place up to 1¼ cups (135 g) of food to be processed into the workbowl.
- With your fingers on the top of the stem of the chopping blade, give it a twisting motion to make sure the food is evenly distributed in the workbowl.
- Holding the workbowl from the bottom, securely insert the bowl up into the center of the bottom of the motor housing with the arrow ▲ symbol on the bowl directly under the UNLOCK Symbol on the bottom of the motor housing (R).

natural_image
Illustration of a mechanical device dispensing granular material into a container (no text or symbols visible)- Turn the workbowl clockwise until it locks into position. The LOCK 🔒 symbol on the housing should be aligned with the arrow on the workbowl.
Note: There is a safety feature on this appliance that will not allow the grinder to operate unless the workbowl is securely in place.
- Plug in the appliance.
- Press and hold the ON/OFF control button. To stop the chopper at any time, remove your finger from the ON/OFF button.
Important: Process foods no more than a few seconds at a time. A pulsing action produces excellent results and offers greater control.
8. When the food is processed to the desired consistency, release the ON/OFF button. Important: Be sure chopping blade has completely stopped spinning before removing workbowl from appliance.
- Hold the workbowl securely and turn it counterclockwise to the UNLOCK position; keeping the bowl level, lower it from the appliance.
- With your fingers on the top of the stem of the chopping blade, lift it up and out of the workbowl with a twisting motion. Remove food using rubber spatula or simply invert workbowl onto plate, bowl or work surface.
- Unplug appliance when not in use.
HELPFUL TIPS FOR CHOPPING AND BLENDING
- The processor works very quickly. Watch carefully to avoid over-processing foods.
- For best results, process foods that are about the same size.
• Cool cooked foods before processing. - Do not overload the processor by adding more than 1 14 cups of food in the workbowl at one time.
- Use this processor to prepare small amounts of cooked fruits and vegetables for baby food.
- Cut hard foods, such as chocolate, whole hard spices and cheese into smaller pieces before processing to avoid damaging the blade.
Care and Cleaning
This product contains no user serviceable parts. Refer service to qualified service personnel.
- Remove the bowl from the mounted unit by twisting to the UNLOCK 🔒 position.
- Carefully remove the blade from the bowl.
Important: Blades are sharp. Handle carefully.
- The coffee grinding bowl, mini food processor workbowl and stainless steel chopping and grinding blades can be washed in hot, soapy water.
- Always rinse and dry parts thoroughly after cleaning
Important: Although these parts can be washed in the dishwasher, we recommend they be washed by hand to preserve the sharpness of the blades and the appearance of the workbowl. Do not immerse the appliance in water.
- Wipe outside of appliance with a damp cloth; dry thoroughly.
| TROUBLESHOOTING | ||
| PROBLEM POSSIBLE CAUSE SOLUTION | ||
| Grinder stops The working. has disengaged. is correctly inserted into There are too many beans the motor housing. Unplug in the grinding bowl. the appliance and remove some of the beans from the grinding bowl. | grinding bowl | |
| Coffee tastes Grinder has buildup of Oil in the coffee rancid. coffee grounds. will become rancid if left | in the grinder. Makes sure there are no beans left in the grinding bowl. Clean the grinding bowl after each use. | |
| Coffee tastes like nuts or spices. | Grinder has been used for other grinding operations. | Grinder will share flavors; purchase an additional grinding bowl for spices and nuts. |
| Appliance will not start. | Workbowl or grinding bowl is not correctly engaged in the housing.Appliance may not be plugged in.The outlet is not working. | Be sure the arrow on the bowl is correctly aligned with the LOCK symbol on the housing and the bowl is completely and flush with the base.Check to make sure appliance is plugged in and outlet is working. |
| Food is unevenly chopped. | Workbowl is over filled.Food may be cut in random sizes. | Unplug the appliance and remove some of the food from the workbowl. Smaller amounts will process more evenly. Press the ON/OFF button in 5 second or fewer increments. Allow the blades to stop completely before pressing the ON/OFF button again. Check the size of the food before continuing. Cut food in same size pieces before placing in processor. |
| PROBLEM POSSIBLE CAUSE SOLUTION | ||
| Food is unevenly chopped or is processed. wait for blades to stop watery. and check the size of the processed food. | Food may be over Use brief pulsing actions; | |
| Food catches on blade. food in the workbowl. appliance; carefully remove blade and emptyworkbowl. Replace blade as directed and reduce the amount of food in theworkbowl. | There may be too much Remove workbowl from | |
A.3
natural_image
Diagram showing a 3D object labeled 'CABINET' placed on a wall, with no visible text or symbols beyond the label.natural_image
Interior view of a cabinet with labeled entrance (no text or symbols on the cabinet itself)natural_image
Close-up of a mechanical device with a transparent cylindrical component and a black clip inserted, labeled 'F' (no text or symbols on the device itself)natural_image
Close-up of a hand holding a ruler measuring a piece of paper or metal (no visible text or symbols)natural_image
Exterior view of a modern building ceiling with visible skylights and ventilation duct (no signage or text)natural_image
Interior ceiling view showing a skylight and ventilation duct (no text or symbols visible)natural_image
Close-up of a hand holding a ruler measuring a surface (no visible text or symbols)natural_image
3D rendered architectural or engineering model with vertical lines and a small figure, no visible text or symbolsnatural_image
Illustration of a hand using a tool to press or adjust a cylindrical component, with no visible text or symbols.natural_image
Illustration of hands holding a container with granular material, no text or symbols presentnatural_image
Illustration of a hand using a pipette to lift a container (no text or symbols)natural_image
Illustration of a robotic arm handling a container with floral patterns (no text or symbols visible)For service, repair or any questions regarding your appliance, call the appropriate 800 number on the cover of this book. DO NOT return the product to the place of purchase. Also, please DO NOT mail product back to the manufacturer, nor bring it to a service center. You may also want to consult the website listed on the cover of this manual.
Two-Year Limited Warranty
(Applies only in the United States and Canada)
What does it cover?
- Any defect in material or workmanship; provided; however, Applica's liability will not exceed the purchase price of the product.
For how long?
- Two years after the date of original purchase
What will we do to help you?
- Provide you with a reasonably similar replacement product that is either new or factory refurbished
How do you get service?
- Save your receipt as proof of the date of sale.
- Check our on-line service site at www.prodprotect.com/applica, or call our toll-free number, 1-800-231-9786, for general warranty service
- If you need parts or accessories, please call 1-800-738-0245.
What does your warranty not cover?
• Damage from commercial use
• Damage from misuse, abuse or neglect
- Products that have been modified in any way
- Products used or serviced outside the country of purchase
• Glass parts and other accessory items that are packed with the unit
- Shipping and handling costs associated with the replacement of the unit
- Consequential or incidental damages (Please note, however, that some states do not allow the exclusion or limitation of consequential or incidental damages, so this limitation may not apply to you.)
How does state law relate to this warranty?
- This warranty gives you specific legal rights, and you may also have other rights that vary from state to state or province to province.
¡NECESITA AYUDA?
BLACK & DECKER is a trademark of The Black & Decker Corporation, Towson, Maryland, USA Marca registrada de The Black & Decker Corporation, Towson, Maryland, E.U.
+Spacemaker is a registered trademark of General Electric Company, USA. +Spacemaker es una marca registrada de General Electric Company, EE.UU.

R22008/2-29-78E/5
Copyright © 2008 - 2009 Applica Consumer Products, Inc.
Made in People's Republic of China
Printed in People's Republic of China

Save space and regain your counters in any kitchen with our full-line of space-saving appliances.
^† SpaceMaker™ appliances can help tackle all your kitchen tasks while keeping your counters free of clutter!
Visit www.bdspacemaker.com to learn more about †SpaceMaker™ appliances and see our latest promotional offers.
Your countertops will thank you!

- MINI FOOD PROCESSOR /
- GRINDER
- MINI PROCESADOR / MOLINO
- PARA INSTALAR DEBAJO DEL GABINETE
- SAVE THESE INSTRUCTIONS.
- POLARIZED PLUG (120V Models Only)
- TAMPER-RESISTANT SCREW
- ELECTRICAL CORD
- Mounted unit
- † 1. Mounting Parts
- Mounting Template (in box)
- GETTING STARTED
- CHOOSE A LOCATION
- DETERMINE CABINET TYPE
- STANDARD INSTALLATION (FLAT CABINET)
- OVERHANG MOLDING INSTALLATION
- For cabinets with an overhang molding (see Illustration C)
- How to Use
- GRINDING COFFEE BEANS
- GROUND COFFEE TIPS
- USING THE MINI FOOD PROCESSOR
- HELPFUL TIPS FOR CHOPPING AND BLENDING
- Care and Cleaning
- Important: Blades are sharp. Handle carefully.
- Two-Year Limited Warranty
- (Applies only in the United States and Canada)
- What does it cover?
- For how long?
- What will we do to help you?
- How do you get service?
- What does your warranty not cover?
- How does state law relate to this warranty?
- ¡NECESITA AYUDA?
Brand : BLACK & DECKER
Model : Spacemaker CG700
Category : Coffee grinder