
Mini 10032679 - Dishwasher Klarstein - Free user manual and instructions
Find the device manual for free Mini 10032679 Klarstein in PDF.
| Product type | Compact dishwasher (mini) |
| Brand | Klarstein |
| Model | Mini 10032679 |
| Power supply | 220-240 V ~ 50 Hz |
| Wash programs | ECO (P1), Standard (P2), 1 hour, Quick (P3), Fruit wash (hot/cold water), Baby bottles, Glass (with steam) |
| Special functions | Delay start (0-24 h), Extra dry, Dry and ready to store, Fruit cleaning, Baby bottles, Glass |
| Capacity | 6 place settings (approx.) |
| Dimensions (W x D x H) | Approx. 43 x 45 x 50 cm (approx.) |
| Weight | Approx. 15 kg (approx.) |
| Water consumption (ECO program) | 5 litres |
| Energy consumption (ECO program) | 0.43 kWh |
| ECO program duration | 160 minutes |
| Water supply | Permanent connection to faucet or manual top-fill (5 L tank) |
| Filtration system | Fine filter and main filter, cleaning recommended once a week |
| Wash arms | Removable for nozzle cleaning |
| Regenerating salt reservoir | Under the basket, capacity approx. 130 g |
| Water hardness setting | 6 levels (H1 to H6) selectable via control panel |
| Recommended detergent | Powder, liquid or tablet dishwasher detergent; one tablespoon is enough for a normal load |
| Safety | Automatic door lock during operation, overflow protection (code E4), child safety (supervision recommended) |
| Display | Digital screen showing time, program and error codes |
Frequently Asked Questions - Mini 10032679 Klarstein
User questions about Mini 10032679 Klarstein
0 question about this device. Answer the ones you know or ask your own.
Ask a new question about this device
Download the instructions for your Dishwasher in PDF format for free! Find your manual Mini 10032679 - Klarstein and take your electronic device back in hand. On this page are published all the documents necessary for the use of your device. Mini 10032679 by Klarstein.
USER MANUAL Mini 10032679 Klarstein
bar
| Category | Value | |---|---| | Bar 1 | 0.0 | | Bar 2 | 0.0 | | Bar 3 | 0.0 | | Bar 4 | 0.0 | | Bar 5 | 0.0 |natural_image
Line drawing of a hand pouring liquid into a device with an electrical outlet (no text or symbols)(3) Gerät befüllen
natural_image
Two line drawings of a device with arrows indicating rotation and touch function, no text or symbols present.natural_image
Line drawing of a device with a tool inserted into a tray, showing particle dispersion (no text or symbols)SPÜLPROGRAMME
flowchart
graph LR
    A["Hand washing"] --> B["Laptop with screen"]
    B --> C["Bar chart with checkmark"]
    C --> D["Computer with screen"]
    D --> E["Product inspection"]
natural_image
Diagram of a car interior showing the door, seat, and dashboard with an arrow indicating direction (no text or symbols present)natural_image
Symbol of a trash bin crossed with a diagonal line, no text or numbers presentbar
| Category | Value | |---|---| | Bar 1 | 0.0 | | Bar 2 | 0.0 | | Bar 3 | 0.0 | | Bar 4 | 0.0 | | Bar 5 | 0.0 |KLARSTEIN NIEI SRA T EIN NIEI SRA T K LARS KLARSTEIN NIEI SRA T EIN NIEI SRA T K LARS KLARSTEIN NIEI SRA T EIN NIEI SRA T K LARS KLARSTEIN NIEI SRA T
Dear customer,
Congratulations on the purchase of your device. Read the following instructions carefully and follow them to prevent possible damage. We accept no liability for damage caused by disregard of the instructions or improper use.
CONTENTS
Safety instructions 4
Quick start guide 6
Device overview 8
Control panel and button functions 9
Adding rinsing salt 10
Loading the basket 12
Detergent types 14
Adding detergents 14
Wash programs 15
Operation in detail 16
Cleaning and care 18
Troubleshooting 20
Disposal considerations 24
TECHNICAL SPECIFICATIONS
| Article number 10032678, 10032679 | |
| Power supply 220-240 V ~ 50 Hz |
DECLARATION OF CONFORMITY

Manufacturer:
Chal-Tec GmbH, Wallstraße 16, 10179 Berlin, Germany.
This product complies with the following European directives:
2014/30 / EU (EMC)
2014/35 / EU (LVD)
2011/65 / EU (RoHS)
2010/1016 / CE (ErP)
SAFETY INSTRUCTIONS

WARNING
Risk of explosion. Under certain conditions, hydrogen gas may form in a hot water system that has not been used for more than two weeks. HYDROGEN GAS IS HIGHLY EXPLOSIVE. If you have not used the dishwasher for a long time, open all hot water taps and allow the water to flow for a few minutes before using the dishwasher. This will allow any built-up hydrogen gas to escape from the system. Since gas can ignite, avoid open flames and do not smoke during this process.
- Do not tug at the door. Do not sit or stand on the door or the dish rack.
- Do not touch the heating element of the dishwasher during or shortly after use.
- Do not operate the dishwasher unless the door is tightly closed.
- Be very careful when opening the door during operation, taking care not to spout water.
- Do not place anything heavy on the open door, as this could tip the machine forward.
- Make sure that plastic objects do not come into contact with the heating element during operation.
• Make sure that the detergent chamber is empty after the wash cycle. - Only wash plastic parts that are suitable for the dishwasher and have a corresponding marking.
- Only use dishwashing liquid and rinse aid suitable for dishwashers. Do not use soap, detergent or hand detergent.
- The power supply to the building must include a main switch with a contact gap of at least 3 mm between the individual poles to allow the circuit to be disconnected in the event of a fault.
- Keep children away from detergent and rinse aid, and be careful not to spill detergent from the open door.
• Make sure that children do not play with the device.
• Children and physically restricted people should only use the device if they have been thoroughly briefed by a supervisor on its functions and safety precautions. - Dishwashing detergents are strongly alkaline. If swallowed they can cause poisoning. Avoid any skin or eye contact and keep children away from the dishwasher when the door is open.
• To ensure that nobody trips over it, do not leave the door permanently open.
- If the power cord is damaged, it must be replaced by the manufacturer or a specialist.
- Please dispose of the packaging material properly.
- When installing, make sure that the power cord is not severely bent or squeezed.
• Do not play with the controls.
- When connecting the machine, use new hoses and dispose of the old ones.
• Make sure that no carpet is blocking the openings at the bottom.
- Use the dishwasher only for the purpose for which it was designed.
• Use the dishwasher indoors only.
- The dishwasher is not intended for commercial use, but only for household use and in similar environments.

CAUTION
Risk of injury. When loading the machine, make sure that sharp parts are placed in the machine so that they do not damage the door seal. Sharp knives must be inserted with the handle up in the cutlery basket. Knives and other items with sharp points must be placed tip-down in the cutlery basket or placed horizontally.

WARNING
Risk of suffocation. Children could be injured by the packaging materials and old appliances. When disposing of the old device, make sure that you cut off the power cord and render the door lock unusable.
QUICK START GUIDE
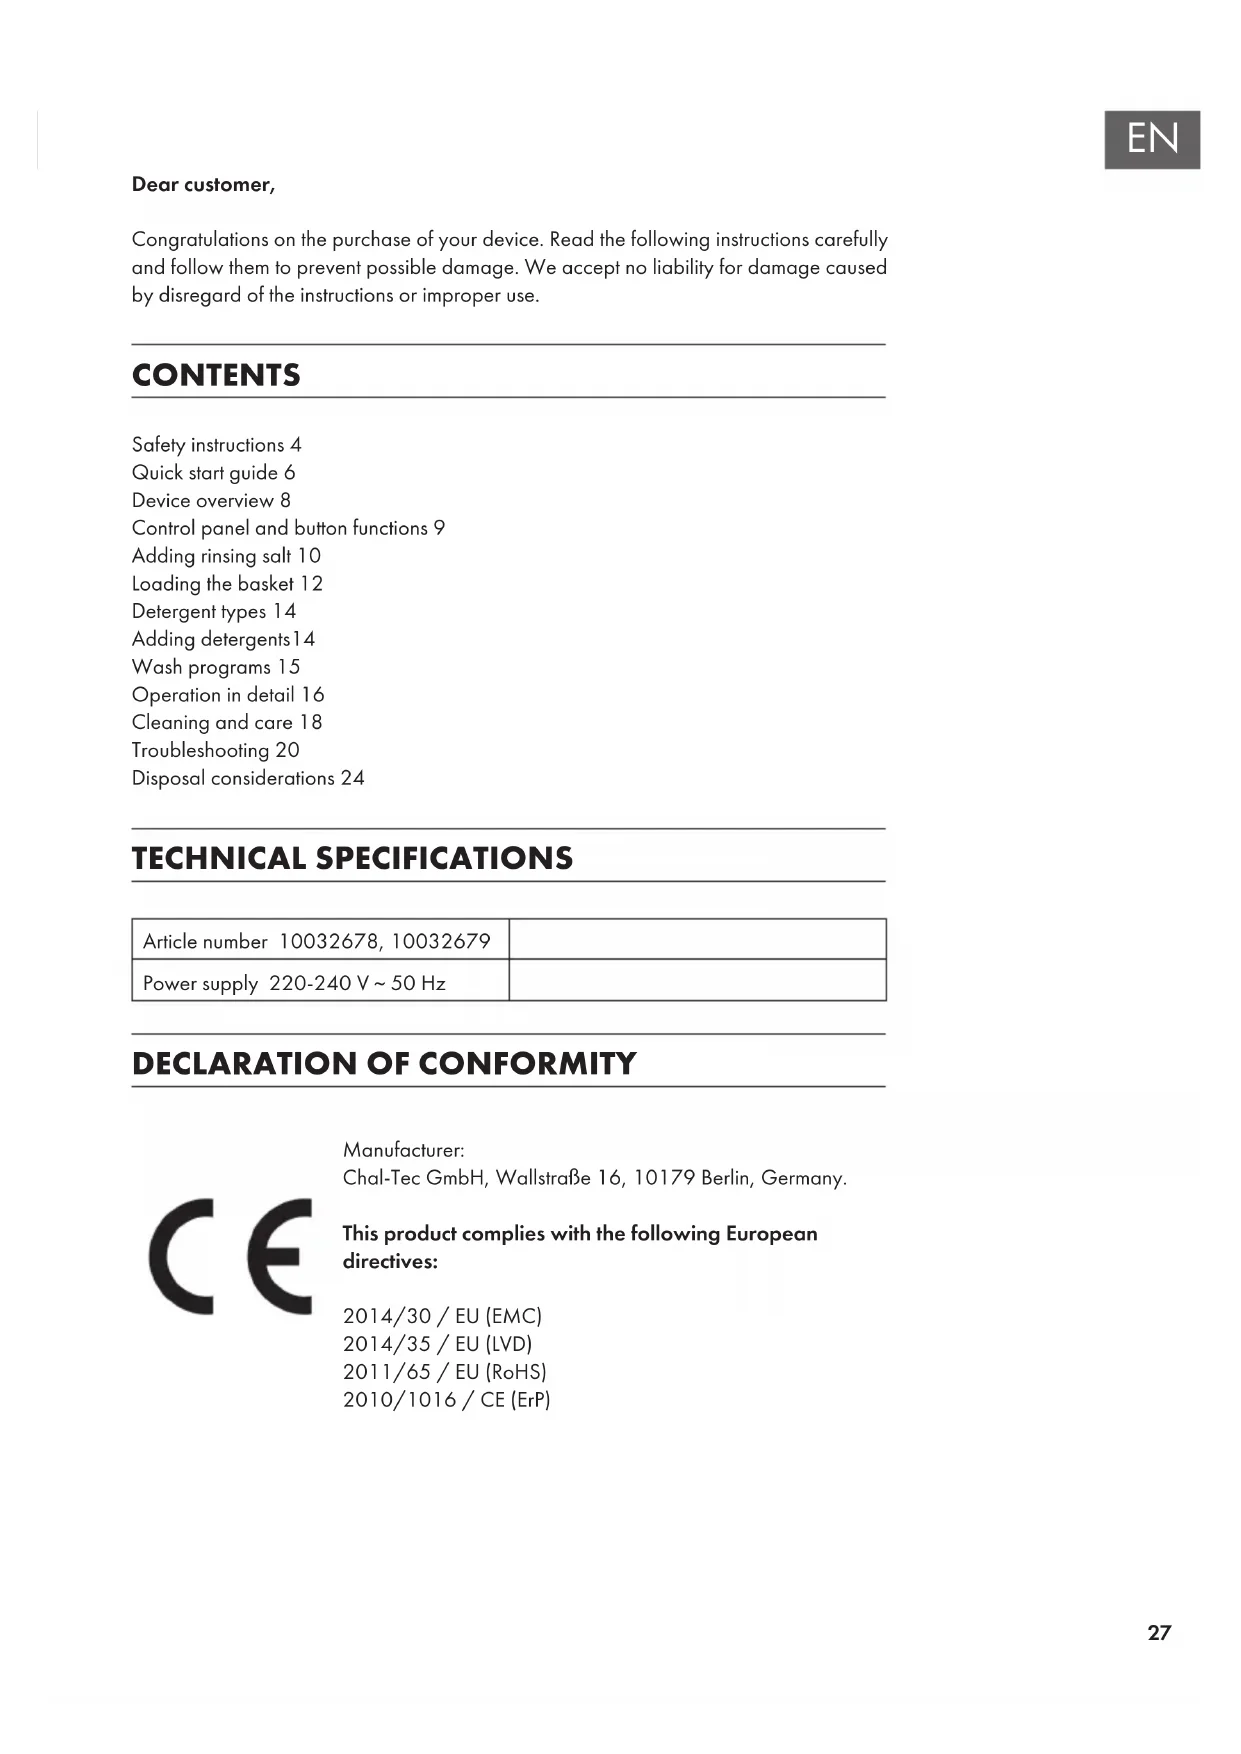
(1) Setting up water drainage
Insert the end of the drain hose into a sink or bucket. Fix the drain hose with suction cups.
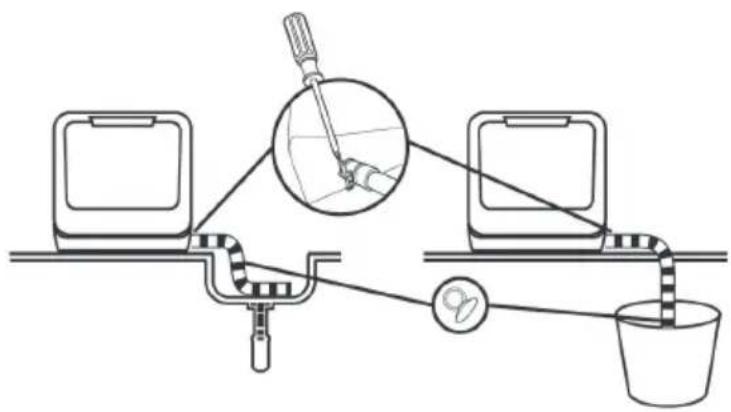
(2) Setting up the water supply
You can fill the device with water in two ways:
• Permanent connection via the tap (1)
- Manual filling via the cap at the top of the device (2)
How to tell if there is enough water in the tank:
Before starting: if the tank is filled with enough water, the device will beep several times.
After starting: if there is not enough water in the tank, the following symbol will appear:
As soon as there is enough water left in the tank, the symbol will go out and the device will beep several times.
natural_image
Line drawing of a hand pouring liquid into a device with an electrical outlet (no text or symbols)(3) Filling the device
Remove the larger food residues from the dishes. Open the door, place the dishes in the basket and add detergent.
Note: populate the device by size and from both sides to the center. All cutlery should be tilted to improve cleaning performance. The arm may be blocked by improper placement of the cutlery, in which case dishes may not be properly cleaned.
 |  |
  |  |
| Place the dishes dirty side down in the basket and tilt slightly to allow water to drain off. | The detergent is filled here. Do NOT use dishwashing liquid in the fruit and vegetable program. |
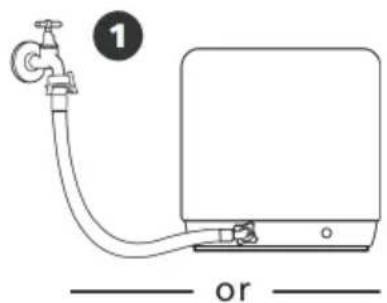
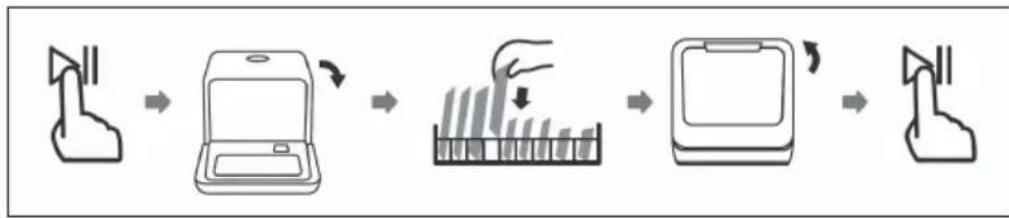
(4) Starting the device
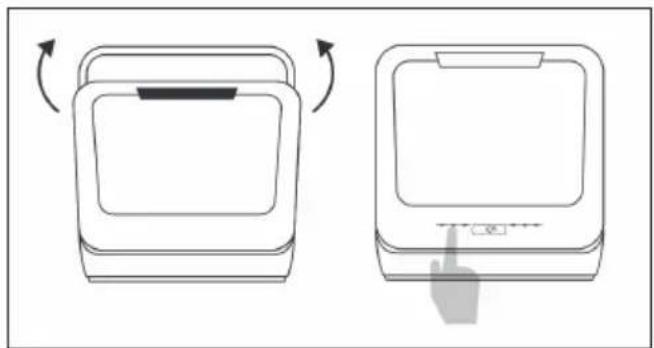
natural_image
Two line drawings of a device with arrows indicating rotation and finger pressing (no text or symbols)Close the door, select a program and start the device.
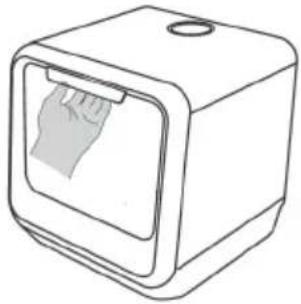
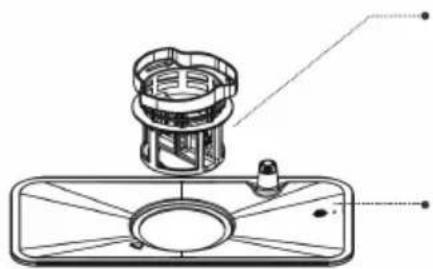
DEVICE OVERVIEW
Handle
Control panel
Base board
Upper spray arm
Tank cap
Lower spray arm
Rinsing salt container
Filter
Detergent holder
Cutlery basket
Rack
Baby bottle holder Fruit basket
CONTROL PANEL AND BUTTON FUNCTIONS
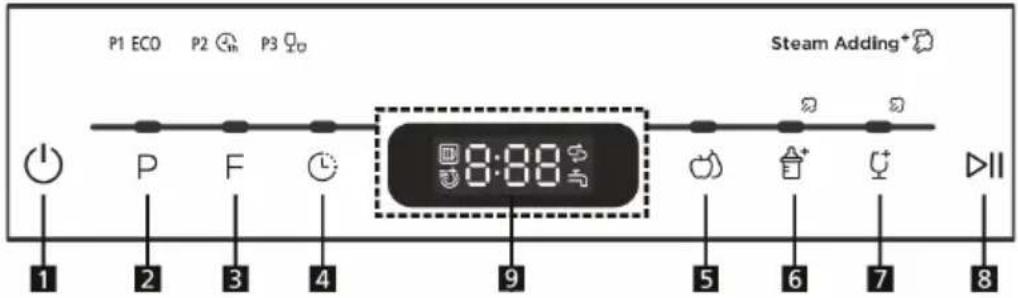
| 1 | Power | Switches device on and off. | |
| 2 | Programm | Press repeatedly to select one of the following programs: P1 (eco), P2 (hour), P3 (fast). | |
| 3 | Function | [4w36] | Cupboard dry: prevents odor, moisture and mold |
| Extra dry | |||
| 4 | Delayed start | You can program the start so that the dishwasher starts with a delay of 0-24 hours. | |
| 5 | Wash fruit | Hot water: suitable for washing fruits with a larger surface, such as: apples, pears. | |
| Kaltwasser: Geeignet für Früchten mit einer kleinen Oberfläche, wie z. B. Erdbeeren. | |||
| 6 | Baby bottles | Suitable for washing baby bottles. | |
| 7 | Glass | For lightly soiled containers such as glasses, crystal glass and fine porcelain (steam is added). | |
| 8 | Start/Pause | Press this button to start or stop the dishwasher. The warning light will flash at startup. | |
| 9 | Display | Displays the time and functions. | |
ADDING RINSING SALT
Only use rinsing salt that is intended for use in the dishwasher.
The salt container is under the basket and should be filled as follows:
- Any other type of salt that is not specifically designed for the dishwasher, especially table salt, will damage the container. In the case of damage caused by the use of unsuitable salt, the guarantee will expire and the manufacturer will not be liable for any damage caused.
- Fill the device with rinsing salt before starting a run. This avoids spilled salt grains that remain on the floor of the machine for an indefinite period, which can lead to corrosion.
How to fill in the rinsing salt
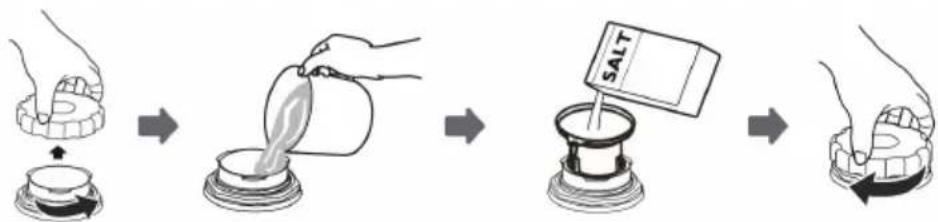 | |
| A | Remove the basket and unscrew the cap from the salt container. |
| B | Add 1 liter of water to the salt container before the first wash. |
| C | Insert the end of the funnel (supplied) into the hole and pour in about 130g of salt. It is normal for a small amount of water to come out of the salt container. |
| D | After filling, tighten the cap clockwise. |
| E | The salt warning lamp usually goes out within 2-6 days after filling the salt container. |
| F | Immediately after filling the salt into the salt container, a washing program should be started (e.g., the quick program). Otherwise, the filter system, the pump or other important parts of the machine may be damaged by salt water. |
Important instructions
- The salt container should only be refilled when the salt warning light on the control panel is lit. Depending on how well the salt dissolves, the salt warning light will still light up when the salt container is filled. If there is no salt warning light on the control panel (on some models), you can use the cycles the dishwasher has undergone to determine when to refill with salt.
- If you spill some salt, start the quick program to remove the excess salt.
How to adjust the amount of rinsing salt correctly
Step 1: Call up rinsing salt settings
Close the door within 60 seconds of powering on, press and hold the Start / Pause button for 5 seconds.
Step 2: Adjust the amount of rinsing salt according to water hardness
Press the Start / Pause button to select the correct setting according to your water hardness: H1>H2>H3>H4>H5>H.
Step 3: Leave rinsing salt settings
If you do not make another setting for 5 seconds, the unit will automatically exit the settings and enter standby mode.
Water hardness and salt quantity
| Water hardness | Softener setting | Digital display | Notes | |
| ^^1 | mmol/ I^2 | |||
| 0-5 0-0.9 | 1 | H1 | (1) German water hardness(2) millimoles, international water hardness(*) Default when first started | |
| 6-11 1.0- | 2.0 2 H2 | |||
| 12-17 | 2.1-3.0 | 3* H3 | ||
| 18-22 3.1 | -4.0 4 H4 | |||
| 23-34 4.1 | -6.1 5 H5 | |||
| 35-55 | 6.2-8.0 | 6 | H6 | |
LOADING THE BASKET
• We recommend only using dishes suitable for dishwashers.
• Use only mild detergents.
- For heat-sensitive dishes, we recommend a program with a lower temperature.
- To prevent damage, do not remove glasses and cutlery from the dishwasher immediately after the program has ended.
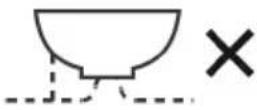
| Unsuitable dishes and cutlery Conditionally suitable dishes and cutlery | |
| Cutlery with wooden, horn or mother of pearl handlesHeat-resistant plastic dishesOlder cutlery with glued parts that are not heat resistant.Sheathed cutlery or crockery.Things made of tin and copper.Crystal glassThings made of non-stainless steelWooden dishesPlastic dishes and utensils | Certain types of glass, as they can become cloudy over time.Silver and aluminum parts, as they can change color over time.Glazed dishes, as the glaze disappears the more you wash it. |
What you should consider when loading
Remove larger food residues. Soak residues baked in pans beforehand. It is not necessary to rinse the dishes completely clean. Place the items in the dishwasher as follows:
- Place cups, glasses, pots and pans in the dishwasher with the inside facing down.
- Arched objects should be inverted standing so that the water can run off.
- Load the items into the unit so that they can not fall over.
- Make sure that the spray arms can rotate freely and are not obstructed by dishes or protruding objects.
- Do not wash small parts in the dishwasher as they could easily fall out of the basket.
• Make sure that dishes and cutlery do not overlap or cover each other.
• To prevent glass breakage, glasses should not touch. - Load large items that are difficult to clean in the basket.
- Long and sharp objects must be placed horizontally in the basket to avoid injury.
- For best results, do not overload the dishwasher.
| 1 | Dinner plates | 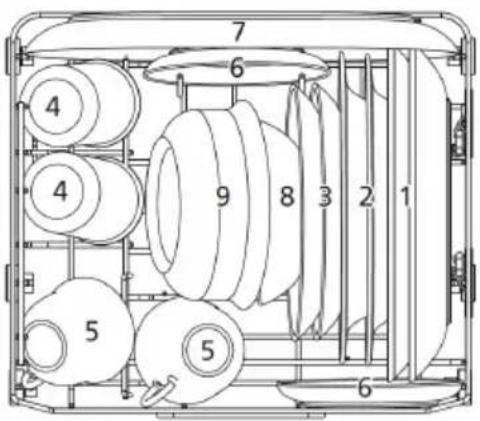 |
| 2 | Soup plates | |
| 3 | Cake plates | |
| 4 | Glasses | |
| 5 | Cups | |
| 6 | Saucers | |
| 7 | Oval plates | |
| 8 | Small serving bowls | |
| 9 | Medium serving bowls |
| 1 | Knives | 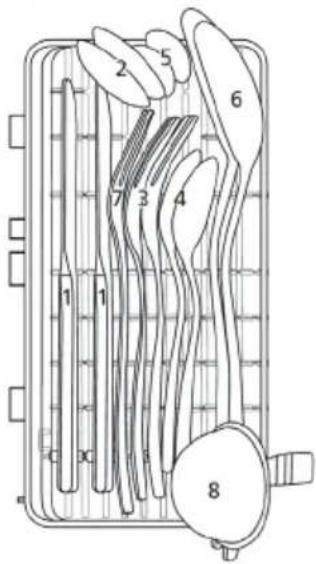 |
| 2 | Tablespoons | |
| 3 | Forks | |
| 4 | Dessert spoons | |
| 5 | Teaspoons | |
| 6 | Serving spoons | |
| 7 | Serving forks | |
| 8 | Soup ladles |
Place the cutlery individually in the cutlery tray according to the specified positions (see illustration) and make sure that the dishes do not touch or overlap to make sure they get really clean.
Note: make sure that nothing is sticking out from the bottom of the cutlery tray. Always place sharp cutlery in the basket with the cutting edge downwards and make sure that the cutlery is not too close together. Place long cutlery in the middle.
DETERGENT TYPES
Detergents
Due to their chemical composition, dishwashing detergents can be divided into two types:
• Conventional alkaline detergents with corrosive components
- Weak alkaline detergents with natural enzymes
Detergent tabs
The detergent tabs of different brands dissolve at different speeds in the machine. For this reason, they often can not develop their full cleaning power in short programs. Therefore always use the long programs in conjunction with detergent tabs to ensure that the tab dissolves completely.
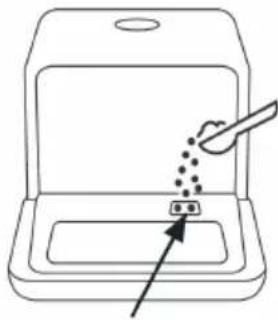
ADDING DETERGENT
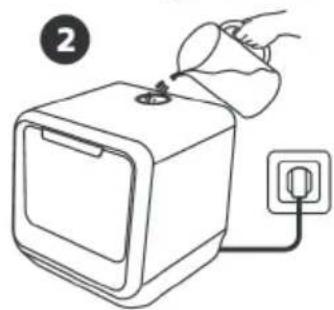
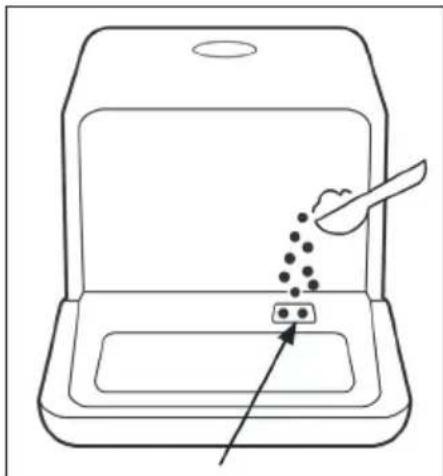
Always fill the detergent chamber immediately before starting a program and follow the instructions in the program table. Your dishwasher requires less detergent and rinse aid than standard equipment. Usually one tablespoon of detergent is enough for a normal rinse load. Heavily soiled dishes require more detergent. Put the detergent into the chamber shortly before starting, otherwise it may become damp and not dissolve as well.
natural_image
Line drawing of a device with a brush and dots being inserted into a tray (no text or symbols)WASH PROGRAMS
| Program Description | Wash cycle | Detergent Before/Main | Running Time Minutes | Consumption kWh | Consumption Liters | |
| ECO(*En5 0242) | For cleaning of normally soiled dishes. Most efficient program in terms of energy and water consumption. | Wash Rinse Rinse Dry | 6 g 1600,435 | |||
| Standard | ||||||
 | For lightly soiled dishes that do not require special drying. | Wash Rinse Rinse Dry | 6 g 600,45 | |||
| 1 hour | ||||||
 | Hot water: suitable for washing fruits with a larger surface, such as: apples, pears. | Wash Rinse Rinse | 6 g 290,355 | |||
| Quick | ||||||
 | For rinsing baby bottles. | Wash Rinse / 120,25 | ||||
| Wash fruit | ||||||
 | Cold water: suitable for washing fruits with a smaller surface, such as: strawberries. | Wash Rinse / 60,015 | ||||
| Wash fruit | ||||||
 | For rinsing baby bottles. | Wash Rinse Rinse Dry | / 1200,55 | |||
| Baby | ||||||
| [A03d] | For lightly soiled containers such as glasses, crystal glass and fine porcelain (steam is added). | Wash Rinse Rinse Dry | / 900,45 | |||
| Glas | ||||||
* EN50242 - This program was used for the test run with the following settings:
• Energy consumption (off): 0.49 W
• Energy consumption (on): 0.49 W
OPERATION IN DETAIL
Starting the washing process
1 Pull out the basket.
2 Add a suitable detergent.
3 Insert the plug into the socket.
4 Press the POWER button to turn on the unit.
5 Connect the inlet hose to the faucet and make sure that the water supply is set to full pressure OR manually add the water to the tank.
6 Select the desired program. When a program is selected, the corresponding indicator will light up.
7 Press the START / PAUSE button to start the dishwasher.
Note: If you press the Start / Pause button to pause while washing, the program light will stop flashing. The dishwasher will emit an audible alarm every minute until you press the Start / Pause button again.
Changing the program
If possible, a running program should be changed directly after the start. Otherwise, the detergent may have already dissolved and run out of the machine with the water. If this is the case, refill with detergent. Press the START / PAUSE button to stop the machine. With the door closed, hold down the button for more than three seconds to set the new program.
Display
The display shows the status of the device or the run as follows:
| Display Status | |
| -:- - | The device is in standby mode. |
| H:MM | Display is not flashing: pause |
| H:MM | Display is flashing: wash run is in progress |
| END | The wash run has ended. |
Note: If you open the door while the unit is running, the machine will stop automatically. When you close the door again and press the Start / Pause button, the unit will continue to move for 10 seconds.
Adding dishes later
Forgotten dishes can be added at any time before the detergent dispenser opens. In this case, follow these instructions:
1 Open the door a little to stop the device.
2 When the spray arms stop turning, you can open the door completely.
3 Add the forgotten dishes.
4 Close the door.
5 Press the START / PAUSE button to start the dishwasher.
flowchart
graph LR
    A["Foot"] --> B["Laptop"]
    B --> C["Measurement"]
    C --> D["Table with bar chart"]
    D --> E["Table with arrow"]
    E --> F["Leg"]
After the end of the program
At the end of the program, the buzzer will sound for 8 seconds. Press the POWER button to turn off the power. Turn off the tap and open the dishwasher door. Wait a few minutes before unloading the dishwasher as the dishes are still very hot after drying and can easily break. Empty the bottom basket first to prevent water from dripping from the top basket to the bottom.
CLEANING AND CARE
Cleaning the filter system
The filter system removes dirt and food residues, allowing the clean water to be recirculated for cleaning. In order for the device to perform at its best you should clean the filters once a week. We recommend removing coarse dirt and food residues after each wash and then washing the filter under clean water.
 | Fine filter:Filters out dirt and residues and prevents them from getting back onto the dishes during the washing process. |
| Main filter:Leftovers and dirt particles are crushed by a special nozzle on the spray arm and discharged through the drain. | |
 | Unscrew the complete filter set counterclockwise. |
 | Remove filter (B) from filter (A). When you have cleaned the filters, replace them in reverse order. |
Note: do not tap the filters when cleaning. Otherwise you may bend them, which would have a negative impact on the performance of the dishwasher.
Cleaning the dishwasher
- Clean the control panel with a slightly damp cloth and then dry it thoroughly.
- Maintain the housing with a suitable polishing wax.
- Do not use sharp objects, scouring pads or aggressive cleaning agents for cleaning.
- Clean the edge of the door with a warm, damp cloth. To prevent water from entering the locking mechanism, do not use spray cleaners.
How to protect the device from frost damage
In winter, take the following precautions to protect the machine against frost. Perform the following steps after every program run:
1 Pull the plug out of the socket.
2 Close the water supply and remove the inlet hose from the inlet valve.
3 Drain the water from the hose and valve into a vessel.
4 Reattach the inlet hose to the inlet valve.
5 Remove the filter from the bottom of the tub and use a sponge to soak up excess water.
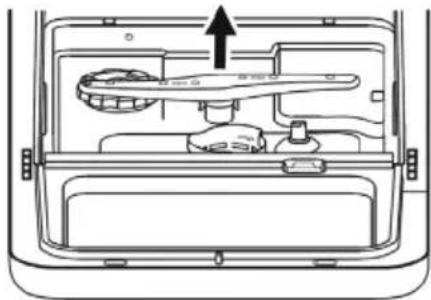
Cleaning the spray arms
The spray arms can be easily removed for regular cleaning of the nozzles to avoid clogging.
1 Grasp the center of the spray arm and pull it up to remove it.
2 Wash under running water and reinsert carefully. Make sure that their rotation is not obstructed in any way.
natural_image
Diagram of a car interior showing a door, drawer, and seat with an arrow indicating direction (no text or symbols)TROUBLESHOOTING
| Problem Possible cause Solution | ||
| The dishwasher won't start. | The fuse is out or broken. Replace the fuse or replace the switch.Remove all other devices that are connected to the self-powered circuit. | |
| No power. Make sure the unit is turned on, the door is firmly closed, and the power cord is firmly plugged into the wall outlet. | ||
| The door is not closed properly. | When closing, make sure that the door lock engages. | |
| There is no water being pumped out of the dishwasher. | The drain hose is bent. Check the hose. | |
| Ein Filter ist verstopft. Überprüfen Sie die Filter. | ||
| A filter is clogged. Check the filters. | ||
| The sink is clogged. Check your drain and clean it if necessary. If you are still having problems, contact a specialist. | ||
| Mineralische Rückstände aus hartem Wasser. | Reinigen Sie die Innenflächen mit einem feuchten Lappen und etwas Spülmittel für Geschirrspüler. Benutzen Sie dabei Handschuhe und verwenden Sie kein anderes Spülmittel. | |
| Colored spots in the tub. Colored detergent. Only use detergents without color. | ||
| White film on the inside surfaces. | Mineral residues from hard water. | Clean the inside surfaces with a damp cloth and some dishwasher detergent. Use gloves and do not use any other washing up liquid. |
| Foam in the tub. Unsuitable | dishwashing detergent. | Only use dishwashing liquid that is suitable for dishwashers. If there is any foam in the tub, open the door and allow the foam to evaporate. Put some cold water in the tub and close the door. Run any wash program to remove the residue. |
| Overflowed rinse aid. Imme | diately clean up overflowed rinse aid. | |
| Rust stains on the cutlery. The | cutlery is not stainless. Only | wash stainless cutlery. |
| No program was started after rinsing salt was refilled | After filling, start the quick program with an empty dishwasher. | |
| The lid to the rinsing salt holder is loose. | Make sure the lid is firmly closed. | |
| Knocking noises in the interior. | The spray arm is striking against an object in the basket. | Interrupt the program and rearrange the dishes so that the spray arm is not obstructed. |
| Rattling noises in the interior. | The dishes are not secure. | Interrupt the program and place the dishes in a secure position. |
| Banging noise in the water pipe. | Can be caused by crossing the water pipes. | Does not affect the performance of the dishwasher. If you are not sure, contact a specialist. |
| Dishes are not clean. Dishes | were not properly loaded. | Follow the instructions for loading the dishwasher. |
| The program was not strong enough. | Use the intensive program. | |
| Too little detergent. Use more detergent or use a different detergent. | ||
| Objects are blocking the spray arms. | Place the dishes in the appliance so that the spray arms are not obstructed. | |
| The filter system is dirty or incorrectly inserted. | Clean the filters or insert them correctly. Clean the spray arms. | |
| The glass is fogged. Kombination aus weichem Wasser und zu viel Spülmittel. | Verwenden Sie weniger Spülmittel und benutzen Sie das kürzeste Programm, um das Glas zu waschen und zu säubern. | |
| Combination of soft water and too much detergent. | Use less detergent and use the shortest program to wash and clean the glass. | |
| Black or gray stripes on dishes. | Aluminum parts have rubbed on the dishes. | Use a mild scouring agent. |
| Detergent residues in the chamber. | The dishes are hindering the dissolution of the detergent. | Carefully load the dishes into the dishwasher. |
| Problem Possible cause Solution | ||
| Dishes do not dry. Wrong lo | ading. Follow the instructions | for loading the dishwasher. |
| The dishes were removed too soon. | After cleaning, leave the dishes in the dishwasher for about 15 minutes.Open the door so that the humid air can escape. | |
| Wrong program. In short programs, the washing and drying temperatures are lower.Use a program with a longer runtime. | ||
| Cutlery with inferior coating. | Such dishes and cutlery are not suitable for the dishwasher. | |
Error codes
| Code Meaning Possible cause | ||
| E1 During the water inlet step, if the flow meter can't detect the defined water after 4 Minutes, or can't detect 30 pulse after 60s, the dishwasher will warning for E1. | check the water supplycheck the inlet valvecheck the inletcheck the flowmetercheck the pressure switchcheck the draincheck the PCB | |
| E3 Temperature has not been reached. | Problems with the heating. Contact a qualified professional. | |
| E4 Water is overflowing. There is a leak | somewhere. Contact a qualified professional. | |
| E9 The buttons are not working properly. | Display damage or material defect.Contact a qualified professional. | |
| Ed Communication problem. | Contact a qualified professional.EF Wa#e | |
| EA Generator problem. | ||
- tank problem.
| Code Meaning Possible cause | ||
| Ed Communication problem. | Contact a qualified professional. | |
| EA Generator problem. | ||
| EF Water tank problem. Please make sure that the water tank is filled with 5 litres of water. | ||
DISPOSAL CONSIDERATIONS
natural_image
Symbol of a trash bin crossed with a diagonal line, no text or numbers presentThe image at left (crossed out waste bin on wheels) appears on this product, indicating that the European waste regulation 2012/19/EU applies. These products may not be disposed of with normal household waste. Check your local regulations for the separate collection of electronics and electronic equipment. Please follow local regulations and do not dispose of old appliances via household waste. By ensuring this product is disposed of correctly, you will help prevent potential negative consequences for the environment and human health. Material recycling helps to reduce the consumption of raw materials.
Estimado cliente,
natural_image
Line drawing of a hand pouring liquid into a device with an electrical outlet (no text or symbols)(3) Llenar aparato
natural_image
Two line drawings of a device with directional arrows indicating rotation and touch function (no text or symbols)natural_image
Line drawing of a device with a hand using a tool to add particles into a tray (no text or symbols)PROGRAMAS DE LAVADO
flowchart
graph LR
    A["Hand washing"] --> B["Laptop with screen"]
    B --> C["Bar chart with checkmark"]
    C --> D["Computer with screen"]
    D --> E["Product inspection"]
natural_image
Diagram of a car interior showing the intake compartment with an upward arrow indicating direction (no text or symbols present)natural_image
Symbol of a trash bin crossed with a diagonal line, no text or numbers presentDÉCLARATION DE CONFORMITÉ

Fabricant:
Chal-Tec GmbH, Wallstraße 16, 10179 Berlin, Allemagne.
natural_image
Line drawing of a hand pouring liquid into a device with an electrical outlet (no text or symbols)natural_image
Two line drawings of a device with arrows indicating rotation and finger pressing (no text or symbols)natural_image
Line drawing of a device with a tool inserted into a tray, showing particle dispersion (no text or symbols)PROGRAMMES DE LAVAGE
flowchart
graph LR
    A["Hand gesture"] --> B["Laptop with brush"]
    B --> C["Bar chart with brush and drop"]
    C --> D["Laptop with brush and drop"]
    D --> E["Product image"]
natural_image
Interior view of a vehicle door with an upward arrow indicating a component (no text or symbols present)IDENTIFICATION ET RÉSOLUTION DES PROBLÈMES
natural_image
Symbol of a trash bin crossed with a diagonal line, no text or numbers presentnatural_image
Line drawing of a hand pouring liquid into a device with an electrical outlet (no text or symbols)(3) Caricare la lavastoviglie
natural_image
Two line drawings of a device with arrows indicating rotation and touch, no text or symbols present.natural_image
Line drawing of a laptop with a hand using a tool to add dots into the screen (no text or symbols)PROGRAMMI
- Consumo energetico (off): 0.49 W
- Consumo energetico (on): 0.49 W
flowchart
graph LR
    A["Hand washing"] --> B["Laptop with screen"]
    B --> C["Bar chart with grid"]
    C --> D["Computer with screen"]
    D --> E["Product inspection"]
natural_image
Diagram of a car interior showing the intake tray and door panel with an arrow indicating direction (no text or symbols)RICERCA E RISOLUZIONE DEI PROBLEMI
natural_image
Symbol of a trash bin crossed with a diagonal line, no text or numbers presentbar
| Category | Value | |---|---| | Category 1 | 100 | | Category 2 | 100 | | Category 3 | 100 | | Category 4 | 100 | | Category 5 | 100 | | Category 6 | 100 | | Category 7 | 100 | | Category 8 | 100 | | Category 9 | 100 | | Category 10 | 100 | | Category 11 | 100 | | Category 12 | 100 | | Category 13 | 100 | | Category 14 | 100 | | Category 15 | 100 | | Category 16 | 100 | | Category 17 | 100 | | Category 18 | 100 | | Category 19 | 100 | | Category 20 | 100 | | Category 21 | 100 | | Category 22 | 100 | | Category 23 | 100 | | Category 24 | 100 | | Category 25 | 100 | | Category 26 | 100 | | Category 27 | 100 | | Category 28 | 100 | | Category 29 | 100 | | Category 30 | 100 | | Category 31 | 100 | | Category 32 | 100 | | Category 33 | 100 | | Category 34 | 100 | | Category 35 | 100 | | Category 36 | 100 | | Category 37 | 100 | | Category 38 | 100 | | Category 39 | 100 | | Category 40 | 100 | | Category 41 | 100 | | Category 42 | 100 | | Category 43 | 100 | | Category 44 | 100 | | Category 45 | 100 | | Category 46 | 100 | | Category 47 | 100 | | Category 48 | 100 | | Category 49 | 100 | | Category 50 | 100 | | Category 51 | 100 | | Category 52 | 100 | | Category 53 | 100 | | Category 54 | 100 | | Category 55 | 100 | | Category 56 | 100 | | Category 57 | 100 | | Category 58 | 100 | | Category 59 | 100 | | Category 60 | 100 | | Category 61 | 100 | | Category 62 | 100 | | Category 63 | 100 | | Category 64 | 100 | | Category 65 | 100 | | Category 66 | 100 | | Category 67 | 100 | | Category 68 | 100 | | Category 69 | 100 | | Category 70 | 100 | | Category 71 | 100 | | Category 72 | 100 | | Category 73 | 100 | | Category 74 | 100 | | Category 75 | 100 | | Category 76 | 100 | | Category 77 | 100 | | Category 78 | 100 | | Category 79 | 100 | | Category 80 | 100 | | Category 81 | 100 | | Category 82 | 100 | | Category 83 | 100 | | Category 84 | 100 | | Category 85 | 100 | | Category 86 | 100 | | Category 87 | 100 | | Category 88 | 100 | | Category 89 | 100 | | Category 90 | 100 | | Category 91 | 100 | | Category 92 | 100 | | Category 93 | 100 | | Category 94 | 100 | | Category 95 | 100 | | Category 96 | 100 | | Category 97 | 100 | | Category 98 | 100 | | Category 99 | 100 | | Total (Total) = [sum of two separate bars] * [sum of the bars] * [values from the 'bar' in the 'box' table] * [values from the 'box' table] * [values from the 'box' table] * [values from the 'box' table] * [values from the 'box' table] * [values from the 'box' table]. The sum of the bars is calculated by subtracting the sum of the bars from the 'box' table. Note: The total bar length is based on the sum of the bars. The sum of the bars is calculated as the sum of the bars. The sum of the bars is derived from adding the sum of the bars to the total bar length. The sum of the bars is derived from adding the sum of the bars to the total bar length. The sum of the bars is derived from adding the sum of the bars to the total bar length. The sum of the bars is derived from adding the sum of the bars to the total bar length. The sum of the bars is derived from adding the sum of the bars to the total bar length. The sum of the bars is derived from adding the sum of the bars to the total bar lengths. The sum of the bars is derived from adding the sum of the bars to the total bar lengths. The sum of the bars is derived from adding the sum of the bars to the total bar lengths. The sum of the bars is derived from adding the sum of the bars to the total bar lengths. The sum of the bars is derived from adding the sum of the bars to the total bar lengths. The sum of the bars is derived from adding the sum of the bars to the total bar length. The sum of the bars is derived from adding the sum of the bars to the total bar length. The sum of the bars is derived from adding the sum of the bars to the total bar length. The sum of the bars is derived from adding the sum of the bars to the total bar length. The sum of the bars is derived from adding the sum of the bars to the total bar value. The sum of the bars is derived from adding the sum of the bars to the total bar value. The sum of the bars is derived from adding the sum of the bars to the total bar value. The sum of the bars is derived from adding the sum of the bars to the total bar value. The sum of the bars is derived from adding the sum of the bars to the total bar value. The sum of the bars is derived from adding the sum of the bars to the total bar values. The sum of the bars is derived from adding the sum of the bars to the total bar values. The sum of the bars is derived from adding the sum of the bars to the total bar values. The sum of the bars is derived from adding the sum of the bars to the total bar values. The sum of the bars is derived from adding the sum of the bars to the total bar values. The sum of the bars is derived from adding the sum of the bars to the total bar value. The sum of the bars is derived from adding the sum of the bars to the total bar value. The sum of the bars is derived from adding the sum of the bars to the total bar value.KLARSTEIN NIEI SRA T EIN NIEI SRA T K LARS KLARSTEIN NIEI SRA T EIN NIEI SRA T K LARS KLARSTEIN NIEI SRA T EIN NIEI SRA T K LARS KLARSTEIN NIEI SRA T

- Gerät befüllen
- SPÜLPROGRAMME
- Dear customer,
- CONTENTS
- TECHNICAL SPECIFICATIONS
- DECLARATION OF CONFORMITY
- SAFETY INSTRUCTIONS
- WARNING
- CAUTION
- QUICK START GUIDE
- Filling the device
- Starting the device
- DEVICE OVERVIEW
- CONTROL PANEL AND BUTTON FUNCTIONS
- ADDING RINSING SALT
- How to fill in the rinsing salt
- Important instructions
- How to adjust the amount of rinsing salt correctly
- Step 1: Call up rinsing salt settings
- Step 2: Adjust the amount of rinsing salt according to water hardness
- Step 3: Leave rinsing salt settings
- Water hardness and salt quantity
- LOADING THE BASKET
- What you should consider when loading
- DETERGENT TYPES
- Detergents
- Detergent tabs
- ADDING DETERGENT
- WASH PROGRAMS
- OPERATION IN DETAIL
- Starting the washing process
- Changing the program
- Display
- Adding dishes later
- After the end of the program
- CLEANING AND CARE
- Cleaning the filter system
- Cleaning the dishwasher
- How to protect the device from frost damage
- Cleaning the spray arms
- TROUBLESHOOTING
- DISPOSAL CONSIDERATIONS
- Estimado cliente,
- Llenar aparato
- PROGRAMAS DE LAVADO
- DÉCLARATION DE CONFORMITÉ
- Fabricant:
- PROGRAMMES DE LAVAGE
- IDENTIFICATION ET RÉSOLUTION DES PROBLÈMES
- Caricare la lavastoviglie
- PROGRAMMI
- RICERCA E RISOLUZIONE DEI PROBLEMI
Brand : Klarstein
Model : Mini 10032679
Category : Dishwasher