
OPR 100 - Projector OK - Free user manual and instructions
Find the device manual for free OPR 100 OK in PDF.

| Product Type | Projector |
| Brand | OK |
| Model | OPR 100 |
| Native Resolution | 800 x 480p |
| Brightness | 1000 lumens |
| Contrast | 600:1 |
| Native Aspect Ratio | 16:9 |
| Image Diagonal | 55 - 120 inches (162 - 304 cm) |
| Keystone Correction | 15° (vertical) |
| Connectors | 1 x HDMI, 1 x VGA, 2 x USB 2.0, 1 x AV IN, 1 x AV OUT, 1 x Micro SD, 1 x 3.5 mm audio output |
| Supported Video Formats | MP4, AVI, MKV, FLV, MOV, MPG, VOB, 3GP |
| Supported Audio Formats | MP3, WMA, WAV |
| Supported Image Formats | JPEG, BMP |
| Direct Playback From | USB (storage device), Micro SD card |
| Power Supply | AC 100-240 V, 50-60 Hz |
| Dimensions (W x D x H) | 21 x 14.5 x 7.2 mm |
| Weight | 800 g |
| Included Accessories | Remote control (AAA battery not included), AV cable, power cable |
| Maintenance | Clean the exterior and lens with a soft cloth. Dampen slightly if necessary. |
| Safety | Do not open, do not expose to moisture, do not block ventilation openings, do not look directly into the lens. |
Frequently Asked Questions - OPR 100 OK
User questions about OPR 100 OK
0 question about this device. Answer the ones you know or ask your own.
Ask a new question about this device
Download the instructions for your Projector in PDF format for free! Find your manual OPR 100 - OK and take your electronic device back in hand. On this page are published all the documents necessary for the use of your device. OPR 100 by OK.
USER MANUAL OPR 100 OK
natural_image
Black projector with visible lens and control panel (no text or symbols)EN USER MANUAL 1
NL GEBRUIKERSHANDLEIDING 8
natural_image
Illustration of a projector with attached cable, power plug, remote control, and antenna (no text or symbols)2
3
4
natural_image
Diagram of a device with an arrow indicating rotation or movement, no text or symbols present5
natural_image
3D diagram of a remote control panel with a black arrow pointing to the internal components (no text or symbols)6
natural_image
3D illustration of a computer mouse with an open lid and internal compartments, showing no text or symbols.USER MANUAL
1. INTENDED USE
The Mini Projector is intended for projecting pictures, text and videos onto a wall and for playing accompanying sound and music. The Mini Projector can be connected via HDMI, VGA and AV video to play the picture and sound from a playback device. In addition, the Mini Projector can also play media directly from a USB storage device or Micro SD card.
The Mini Projector supports the following multimedia file formats:
• Video: MP4, AVI, MKV, FLV, MOV, MPG, VOB, 3GP
• Audio: MP3, WMA, WAV
• Photo: JPEG, BMP
- Text: TXT
i Read the manual carefully before the first use.
i Do not use the appliance in a humid environment.
i Due the wide variety of products with USB ports, mobile devices and their manufacturer-specific functions we cannot guarantee that all devices will be recognized or all operating options can function.
2. SAFETY
2.1 Labels in this manual
WARNING A warning means that injury is possible if the instructions are not obeyed.
⚠️ CAUTION A caution means that damage to the equipment is possible.
i A note gives additional information, e.g. for a procedure.
2.2 General safety instructions
General
To prevent damage or malfunctions: Please take time and read the general safety instructions. This will avoid fire, explosions, electric shocks or other hazards that may result in damage to property and/or severe or fatal injuries.
The manufacturer is not liable for cases of material damage or personal injury caused by incorrect handling or non compliance with the safety instructions. In such cases, the warranty will be voided.
WARNING
Do not put force on the appliance.
Always check that the mains voltage corresponds to the voltage on the rating plate.
⚠️ Only use original accessories from the manufacturer.
Do not spill any liquid on the appliance.
Never leave children unattended with the packaging material. The packaging material represents a danger of suffocation. Children frequently underestimate the danger. Always keep children away from the packaging material.
It is not permitted to open the product yourself or to have it opened, neither is it permitted to repair the product yourself or to have it repaired. This will void the warranties. Please let any maintenance be carried out by certified maintenance personnel.
Do not block the ventilation holes.
Do not insert any objects in the ventilation holes.
Power cords should be placed so that they cannot be walked on and they cannot easily become trapped due to items resting on or against them. Pay particular attention to the power cords at plugs, sockets, and points where the cords exit the product.
Never look directly into the lens of the projector as this can result in dazzling from the LED light.
CAUTION
Improper installation of batteries can result in leaks and corrosion to the battery and damage to the device. Corrosion, oxidation, battery leaks and other gradual defects will invalidate the warranty.
⚠️ If you do not use the appliance for an extended period, remove the batteries.
⚠️ Do not put the appliance near a heat source. This could damage the appliance.
⚠️ Put the appliance on a horizontal flat surface.
⚠️ Keep minimum (50 mm) space around the appliance for optimal ventilation.
Remarks
If this appliance is equipped with rubber feet to prevent it from moving: The feet are made from non-migrating material specially formulated to avoid leaving any marks or stains on furniture. However, certain types of furniture polishes, wood preservatives or cleaning sprays cause the rubber to soften and leave marks or a residue on the furniture, and potentially risk the surface to become damaged. To prevent damage to wooden surfaces, we recommend that you apply self-adhesive pads to the bottom of the rubber feet before installation.
We recommend that you retain the original carton and packaging materials in case it ever becomes necessary to return your product for service. This is the only way to safely protect the product against damage in transit. If you do dispose of the carton and the packaging materials, please remember to recycle with due care to the environment.
3. PREPARATIONS FOR USE
3.1 Unpacking
- Unpack the appliance carefully.
- Check the package contents as described below. If any item is missing, please contact your reseller.
We recommend that you retain the original carton and packaging materials in case it ever becomes necessary to return your product for service. This is the only way to safely protect the product against damage in transit. If you do dispose of the carton and the packaging materials, please remember to recycle with due care to the environment.
3.2 Package contents
i If any item is missing, please contact your reseller.

The following items are included in the received package:
- 1x Mini Projector
- 1x Remote control
- 1x Mains cable
- 1x AV video cable
4. FUNCTIONS
Mini Projector

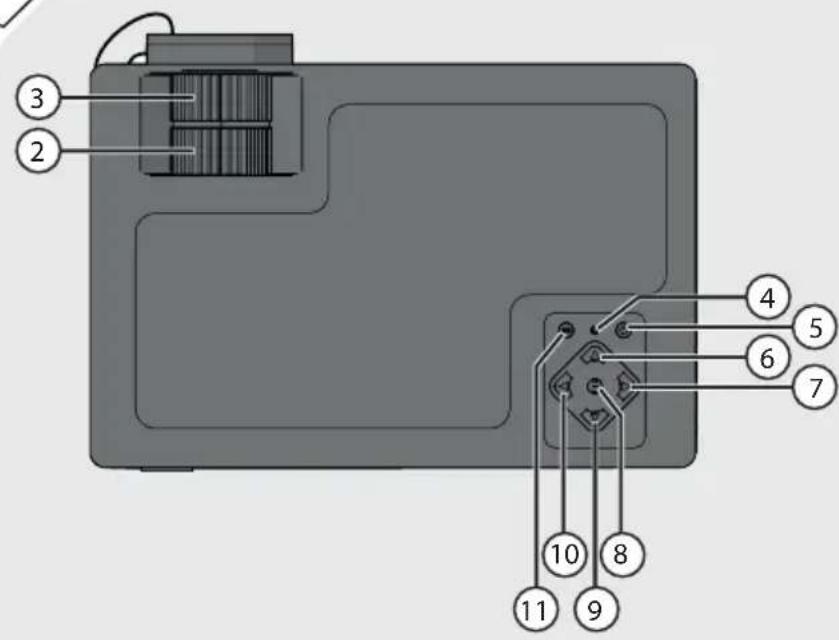
Main components
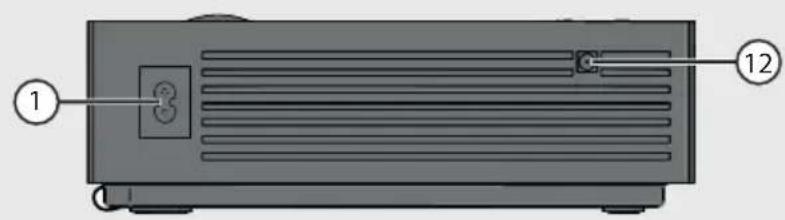
- Power input
- Keystone correction ring
- Focus ring
- Status LED
- ON/OFF button
- UP arrow button
- RIGHT arrow button
- MENU button
- DOWN arrow button
- LEFT arrow button
-
INPUT/OK/PLAY/PAUSE button
-
Remote control window
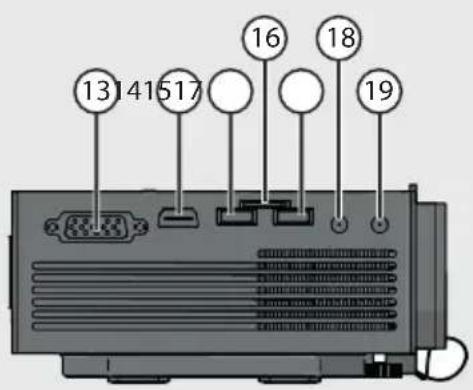
- VGA input
- HDMI input
- USB 5 V output
- Slot-in for micro SD card
- USB slot
- AV video output
- Audio output
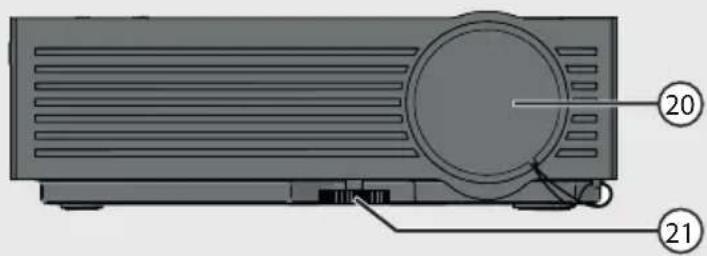
- Lens cap
- Adjusting screw
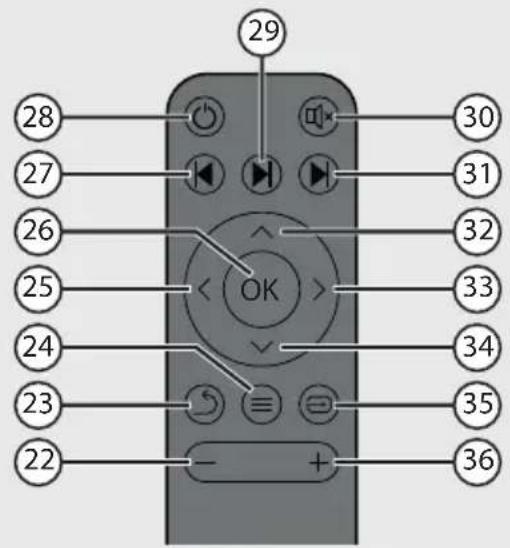
Remote control

Remote control buttons
- VOLUME DOWN button
- BACK button
- MENU button
- LEFT arrow button
- OK button
- PREVIOUS button
- ON/OFF button
-
PLAY/PAUSE button
-
MUTE button
- NEXT button
- UP arrow button
- RIGHT arrow button
- DOWN arrow button
- INPUT button
- VOLUME UP button
5. INSTALLATION
5.1 Picture size and projection distance
The following picture sizes can be achieved with the following projection distances (distance between the projector and the wall):
• 91.7 inch: 64 inch (2.33 m: 163 cm)
• 96.9 inch: 70 inch (2.46 m: 178 cm)
• 108.7 inch: 80 inch (2.76 m: 203 cm)
• 123.2 inch: 90 inch (3.13 m: 229 cm)
• 135.0 inch: 100 inch (3.43 m: 254 cm)
• 161.8 inch: 120 inch (4.11 m: 305 cm)
5.2 Positioning and adjustment
- Place the projector on a solid, horizontal surface.
- Direct the projector onto a white wall using the lens. Bear in mind the distance required to the wall in relation to the picture size that you wish to achieve, see the previous paragraph.
- Connect the plug on the mains cable to the power input (1) on the projector.
- Connect the mains plug to a wall socket.
- Remove the lens cap (20).
- Switch the projector on with the ON/OFF button (5). The projector will warm up and project the menu onto the wall.
- Turn the adjusting screw (21) on the base of the projector to increase or decrease the tilt angle.
- Use the focus ring (3) to adjust the sharpness of the picture.
• Use the keystone correction ring (2) to correct the picture if it takes on a vertical trapezium shape.
5.3 Connecting a playback device
HDMI connection
- Use an HDMI cable to connect the HDMI output of a device (e.g. a computer, DVD player or media player) to the HDMI input on the projector (14).
VGA connection
- Use a VGA cable to connect the VGA output of a computer or laptop to the VGA input on the projector (13).
AV video connection
- Use the supplied AV video cable to connect the AV video output of a video device to the AV video input on the projector (18).
5.4 Connecting headphones or speakers
- Use an audio cable with a 3.5 mm jack to connect headphones or speakers to the audio output (19) of the projector.
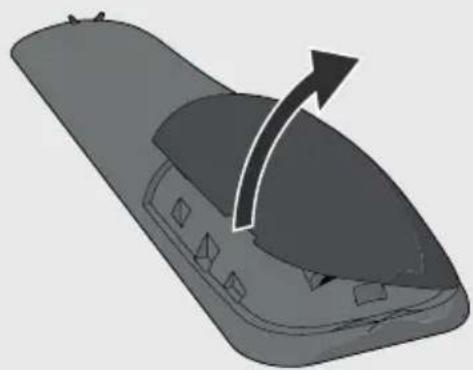
5.5 Placing the batteries in the remote control
Improper installation of batteries can result in leaks and corrosion to the battery and damage to the device. Corrosion, oxidation, battery leaks and other gradual defects will invalidate the warranty.
4 Remove the battery cover.
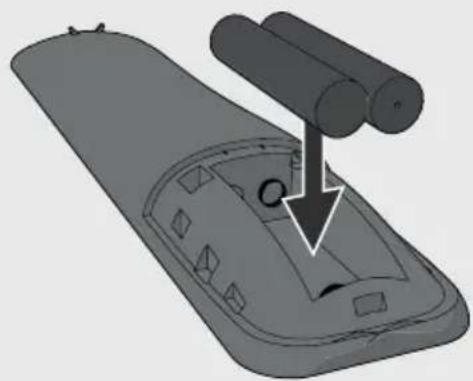
5 Insert the AAA batteries matching the (+) and (-) polarity markings.
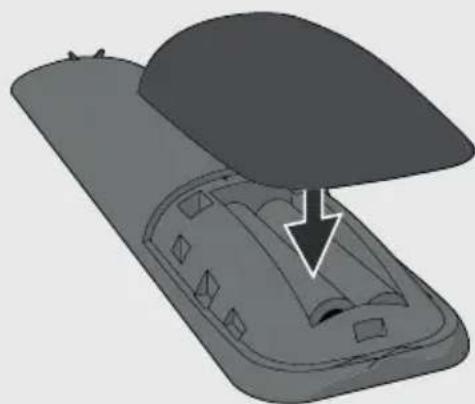
6 Re-install the battery cover.
5.6 Charging a mobile device
Use a USB cable to charge a mobile device via the USB 5 V output (15) on the projector.
6. OPERATION
Switch the projector on with the ON/OFF button (5)(28).
6.1 The main menu
The main menu has four folders: Movie, Music, Photo and Text. The current input source is indicated at the top left. The folders can be navigated as follows:
- To select a folder, use the arrow buttons on the remote control or the LEFT (10) and RIGHT (7) arrow buttons on the projector.
• To open the folder, press the OK button (26) on the remote control or the UP arrow button (6) on the projector. - Or, to go back a step, press the BACK button (23) on the remote control or the DOWN arrow button (9) on the projector.
6.2 Selecting an input source
- Go to the main menu.
- Press the INPUT button (35) on the remote control or the INPUT/OK/PLAY/PAUSE button (11) on the projector.
- Select the desired input source (AV, VGA, HDMI, USB, SD) with the UP (6) (32) and DOWN (9)(34) arrow buttons.
- Confirm with the OK button (26) on the remote control or the RIGHT arrow button (7) on the projector.
i NO SIGNAL will appear at the top left if no input source could be found. Check the input source and cables.
6.3 Opening or playing a multimedia file
- Insert a USB storage device or Micro SD card containing the multimedia file into the appropriate input (17)(16).
- Go to the main menu.
- Check at the top left of the screen to verify that the correct input source has been selected. If not, select the correct input source (USB or SD).
- Choose from Movie, Music, Photo or Text.
- Select the folder containing the multimedia file and press the OK button (26) on the remote control or the UP arrow button (6) on the projector.
- Select the multimedia file. A preview and properties of the selected file will appear after a few seconds.
- To play the file, press the PLAY/PAUSE button (29) on the remote control or the INPUT/OK/PLAY/PAUSE button (11) on the projector.
- If you have played this file previously, you will be asked "Memory Play: Yes/No?". To continue playback from where you paused it, select Yes and press the OK button (26) on the remote control or the UP arrow button (6) on the projector. To start playback from the beginning, select No and press the OK button (26) on the remote control or the UP arrow button (6) on the projector.
6.4 During playback
• To mute the sound, press the MUTE button (30) on the remote control. Press the button again to unmute the sound.
- To lower the volume, press the VOLUME DOWN button (22) on the remote control or the LEFT button (25) (10) on the projector.
- To increase the volume, press the VOLUME UP button (36) on the remote control or the RIGHT button (33) (7) on the projector.
- To pause playback, press the PLAY/PAUSE button (29) on the remote control or the INPUT/OK/PLAY/PAUSE button (11) on the projector. Press the button again to continue playback.
- To open the previous file, press the PREVIOUS button (27) on the remote control.
- To open the next file, press the NEXT button (31) on the remote control.
- To open the playback menu, press the OK button (26) on the remote control or the UP arrow button (6) on the projector. Select a playback action and press the OK button (26) on the remote control or the UP arrow button (6) on the projector to confirm. The available playback actions vary by media type.
6.5 The settings menu
To open the settings menu, press the MENU button (8)(24). You can navigate between Picture, Sound, Time and Options with the LEFT (10)(25) and RIGHT (7)(33) arrow buttons.
Select a menu item with the UP (6)(32) and DOWN (9)(34) arrow buttons. To open a menu item, press the OK button (26) on the remote control or the INPUT/OK/PLAY/PAUSE button (11) on the projector.
To go a step back, press the MENU button (8)(24). To close the settings menu immediately, press the BACK button (23) on the remote control.
Picture
Picture mode
Select the desired picture mode (Standard, Mild, Dynamic, Personal) with the LEFT (10)(25) and RIGHT (7)(33) arrow buttons. Select Personal picture mode to manually set values for contrast, brightness, colour and sharpness. Use the arrow buttons to do this.
Colour temperature
Select the desired colour temperature (Normal, Warm, Personal, Cold) with the LEFT (10)(25) and RIGHT (7)(33) arrow buttons. Select Personal colour temperature to manually set values for red, green and blue. Use the arrow buttons to do this.
Aspect ratio
Select the desired aspect ratio (16:9, 4:3) with the UP (6)(32) and DOWN (9)(34) arrow buttons.
Noise reduction
Select the desired noise reduction (Off, Low, Middle, High) with the UP (6)(32) and DOWN (9)(34) arrow buttons.
Projection direction
Select this menu item and press the OK button (26) or the INPUT/OK/PLAY/PAUSE button (11) to change the orientation of the projected picture. Switch between projection direction settings (Front, Rear, Ceiling, Ceiling Rear) with the OK button (26) or INPUT/OK/PLAY/PAUSE button (11).
Reduce display size
You can shrink the projected picture to 75% during playback. Select the desired value with the LEFT (10)(25) and RIGHT (7)(33) arrow buttons.
HDMI mode
Select PC if you are connecting a PC or laptop. Select VIDEO if you are connecting an audio/video device (e.g. a DVD player).
Sound
Sound mode
Select the desired sound mode (Standard, Music, Movie, Sports, Personal) with the LEFT (10)(25) and RIGHT (7)(33) arrow buttons. Select Personal sound mode to manually set values for treble and bass. Use the arrow buttons to do this.
Surround sound
Press the OK button (26) or INPUT/OK/PLAY/PAUSE button (11) to switch surround sound ON or OFF.
Equalizer
Select the desired value (0 - 100) for each frequency band (120 Hz, 500 Hz, 1.5 kHz, 5 kHz, 10 kHz) with the UP (6)(32) and DOWN (9)(34) arrow buttons.
Time
Sleep timer
Select the desired time interval in minutes (OFF, 10, 20, 30, 60, 90) with the UP (6)(32) and DOWN (9)(34) arrow buttons. The projector will enter sleep mode if it is not used during this period.
Options
OSD language
Select the desired menu language with the arrow buttons.
Restore factory default
Press the OK button (26) or the INPUT/OK/PLAY/PAUSE button (11) and confirm with the LEFT arrow button (10)(25) to restore the projector to its factory default. Cancel with the RIGHT (7)(33) arrow button.
Osd Duration
Press the OK button (26) or INPUT/OK/PLAY/PAUSE button (11) to change the time interval (OFF, 5 seconds, 10 seconds, 15 seconds). The projector will switch to the main menu if it is not operated during this period.
Blue screen
Press the OK button (26) or INPUT/OK/PLAY/PAUSE button (11) to switch blue screen ON or OFF.
Auto source
Press the OK button (26) or INPUT/OK/PLAY/PAUSE button (11) to switch auto source ON or OFF.
7. TECHNICAL SPECIFICATIONS
General
• Article description: OPR100
• EAN code: 4049011141834
Picture
• Picture format: 16:9 (widescreen)
• Screen diagonal: 55 - 120 inch (162 - 304 cm)
• Resolution: 800 x 480 p
• Supported resolution: 480 p/575 i/480 i/720 p/1080 i/1080 p
- Contrast value: 600/1
• Picture format adjustment: 4:3, 16:9
- Projection type: LED
- Keystone correction: 15^
Multimedia applications
• Media playback formats: MP4, MKV, FLV, MOV, MPG, VOB, 3GP, JPG, MP3, WMA, WAV, TXT, MP3, JPEG, BMP
Connectivity
• Number of HDMI connections: 1
• Number of USB connections: 2
• USB connection type: 2.0 connection
• PC connection: VGA
• Miscellaneous connections: 1x AV IN, 2x USB 2.0, 1x VGA, 1x Micro SD card input, 1x AV OUT, 1x HDMI
Power
• Power supply: 100 - 240 V AC, 50 - 60 Hz
Accessories
• Cables supplied: Mains cable, AV video cable
Technical specifications
• Light output: 1000 lumens
Dimensions
• Dimensions main unit: 21 x 14,5 x 7,2 mm
Weight
- Weight: 800 gr
8. CLEANING AND MAINTENANCE
Turn the appliance off and remove the main plug out the socket before you start cleaning the device.
It is not permitted to open the product yourself or to have it opened, neither is it permitted to repair the product yourself or to have it repaired. This will void the warranties. Please let any maintenance be carried out by certified maintenance personnel.
- Clean the outside and the lens of the appliance with a soft cloth. If the appliance is very dirty, dampen the cloth slightly with water and a neutral solution.
9. DISPOSAL OF USED ELECTRIC AND ELECTRONIC EQUIPMENT

The meaning of the symbol on the material, its accessory or packaging indicates that this product shall not be treated as household waste. Please, dispose of this equipment at your applicable collection point for the recycling of electrical and electronic equipments waste. In the European Union and other European countries which there are separate collection systems for used electrical and electronic product. By ensuring the correct disposal of this product, you will help prevent potentially hazardous to the environment and to human health, which could otherwise be caused by unsuitable waste handling of this product. The recycling of materials will help conserve natural resources. Please do not therefore dispose of your old electrical and electronic equipment with your household waste.
For more detailed information about recycling of this product, please contact your local city office, your household waste disposal service or the shop where you purchased the product.
GEBRUIKERSHANDLEIDING
1. BEOOGD GEBRUIK
Projection Direction
Projection Direction

- USER MANUAL
- INTENDED USE
- SAFETY
- Labels in this manual
- General safety instructions
- General
- WARNING
- CAUTION
- Remarks
- PREPARATIONS FOR USE
- Unpacking
- Package contents
- FUNCTIONS
- Mini Projector
- Main components
- Remote control
- INSTALLATION
- Picture size and projection distance
- Positioning and adjustment
- Connecting a playback device
- HDMI connection
- VGA connection
- AV video connection
- Connecting headphones or speakers
- Placing the batteries in the remote control
- Charging a mobile device
- OPERATION
- The main menu
- Selecting an input source
- Opening or playing a multimedia file
- During playback
- The settings menu
- Picture
- Picture mode
- Colour temperature
- Aspect ratio
- Noise reduction
- Projection direction
- Reduce display size
- HDMI mode
- Sound
- Sound mode
- Surround sound
- Equalizer
- Time
- Sleep timer
- Options
- OSD language
- Restore factory default
- Osd Duration
- Blue screen
- Auto source
- TECHNICAL SPECIFICATIONS
- Multimedia applications
- Connectivity
- Power
- Accessories
- Technical specifications
- Dimensions
- Weight
- CLEANING AND MAINTENANCE
- DISPOSAL OF USED ELECTRIC AND ELECTRONIC EQUIPMENT
- GEBRUIKERSHANDLEIDING
- BEOOGD GEBRUIK
Brand : OK
Model : OPR 100
Category : Projector