
10032112 - Food Processor Klarstein - Free user manual and instructions
Find the device manual for free 10032112 Klarstein in PDF.
| Brand | Klarstein |
| Model | 10032112 |
| Product type | Multifunction food processor |
| Power supply | 220-240 V, 50-60 Hz |
| Number of speeds | 5 speeds + pulse (P) |
| Digital timer | Yes, adjustable from 1 to 20 minutes |
| Bowl capacity | Up to 1 kg of dough |
| Bowl material | Stainless steel |
| Accessories included | Dough hooks, whisk, wire beaters, meat grinder, cookie mold, kebbe attachment, sausage stuffing tube, pusher |
| Main functions | Mix, knead, whip, chop, stuff, shape |
| Tilt-head | Yes, for easy bowl access |
| Safety | Automatic shut-off at timer end; sharp blades, do not touch during operation |
| Care and cleaning | Do not wash in dishwasher; wipe with a damp cloth |
| Spare parts | Accessories available (whisks, hooks, grinder) but not specified as separate parts |
| Repairability | Manufactured by Chal-Tec GmbH; customer support for repairs |
| Dimensions (approx.) | Approximately 40 x 30 x 35 cm (estimate) |
| Weight (approx.) | Approximately 5 kg (estimate) |
Frequently Asked Questions - 10032112 Klarstein
User questions about 10032112 Klarstein
0 question about this device. Answer the ones you know or ask your own.
Ask a new question about this device
Download the instructions for your Food Processor in PDF format for free! Find your manual 10032112 - Klarstein and take your electronic device back in hand. On this page are published all the documents necessary for the use of your device. 10032112 by Klarstein.
USER MANUAL 10032112 Klarstein
Congratulations on purchasing this equipment. Please read this manual carefully and take care of the following hints to avoid damages. Any failure caused by ignoring the mentioned items and cautions mentioned in the instruction manual are not covered by our warranty and any liability.
CONTENT
Technical Data 15
Declaration of Conformity 15
Safety Instructions 16
Product Overview and Controls 17
Use and Operation 18
Using the Accessories 20
MeatGrinder23
Care and Cleaning 26
Hints on Disposal 26
TECHNICAL DATA
| Item number 10032111, 10032112 | |
| Power supply 220-240 V ~ 50-60 Hz |
DECLARATION OF CONFORMITY

Producer:
Chal-Tec GmbH, Wallstraße 16, 10179 Berlin, Germany.
This product is conform to the following European Directives:
2014/30/EU (EMC)
2014/35/EU (LVD)
2011/65/EU (RoHS)
SAFETY INSTRUCTIONS
Note: Before use, please read the instructions carefully, and operate the machine strictly according to the instruction of the manual. Duty will be on user's side if the machine is damaged or anyone is hurt by the machine if operated not according to the instruction of the manual.
When using electrical appliance, basic precaution should always be followed including the following:
- Read all instructions.
- To protect against risk of electrical shock, do not put the appliance unit cord or plug into water or other liquid.
- Close supervision is necessary when an appliance is used by or near children.
- Unplug the appliance when not using it, changing accessory or before cleaning.
- Avoid contacting moving parts.
- If the original cord is damaged, it must be replaced by manufacturer or its service agent or similar qualified in order to avoid a hazard.
- The use of attachments not recommended or sold by the manufacturer may cause fire, electrical shock or injury.
- Do not use outdoors.
- Do not let cord hang over edge of table or counter.
- Keep hands and utensils away from moving blades or discs while processing food to reduce risk of severe injury to person or damage to the food mixer.
Blades are sharp, take care of your hands.
To reduce the risk of injury, never place cutting blades or discs on base. - Never feed food by hand, always use food pusher.
- Turn off the machine before replace attachment.
- Use the product and assemble the accessory as mentioned on user manual only.
- Switch Off the appliance before changing accessories or approaching parts which move in use.
- This appliance is not intended for use by persons (including children) with reduced physical, sensory or metal capabilities, or lack of experience and knowledge, unless they have been given supervision or instruction concerning use of the appliance by a person responsible for their safety.
Children should be supervised to ensure that they do not play with the appliance.
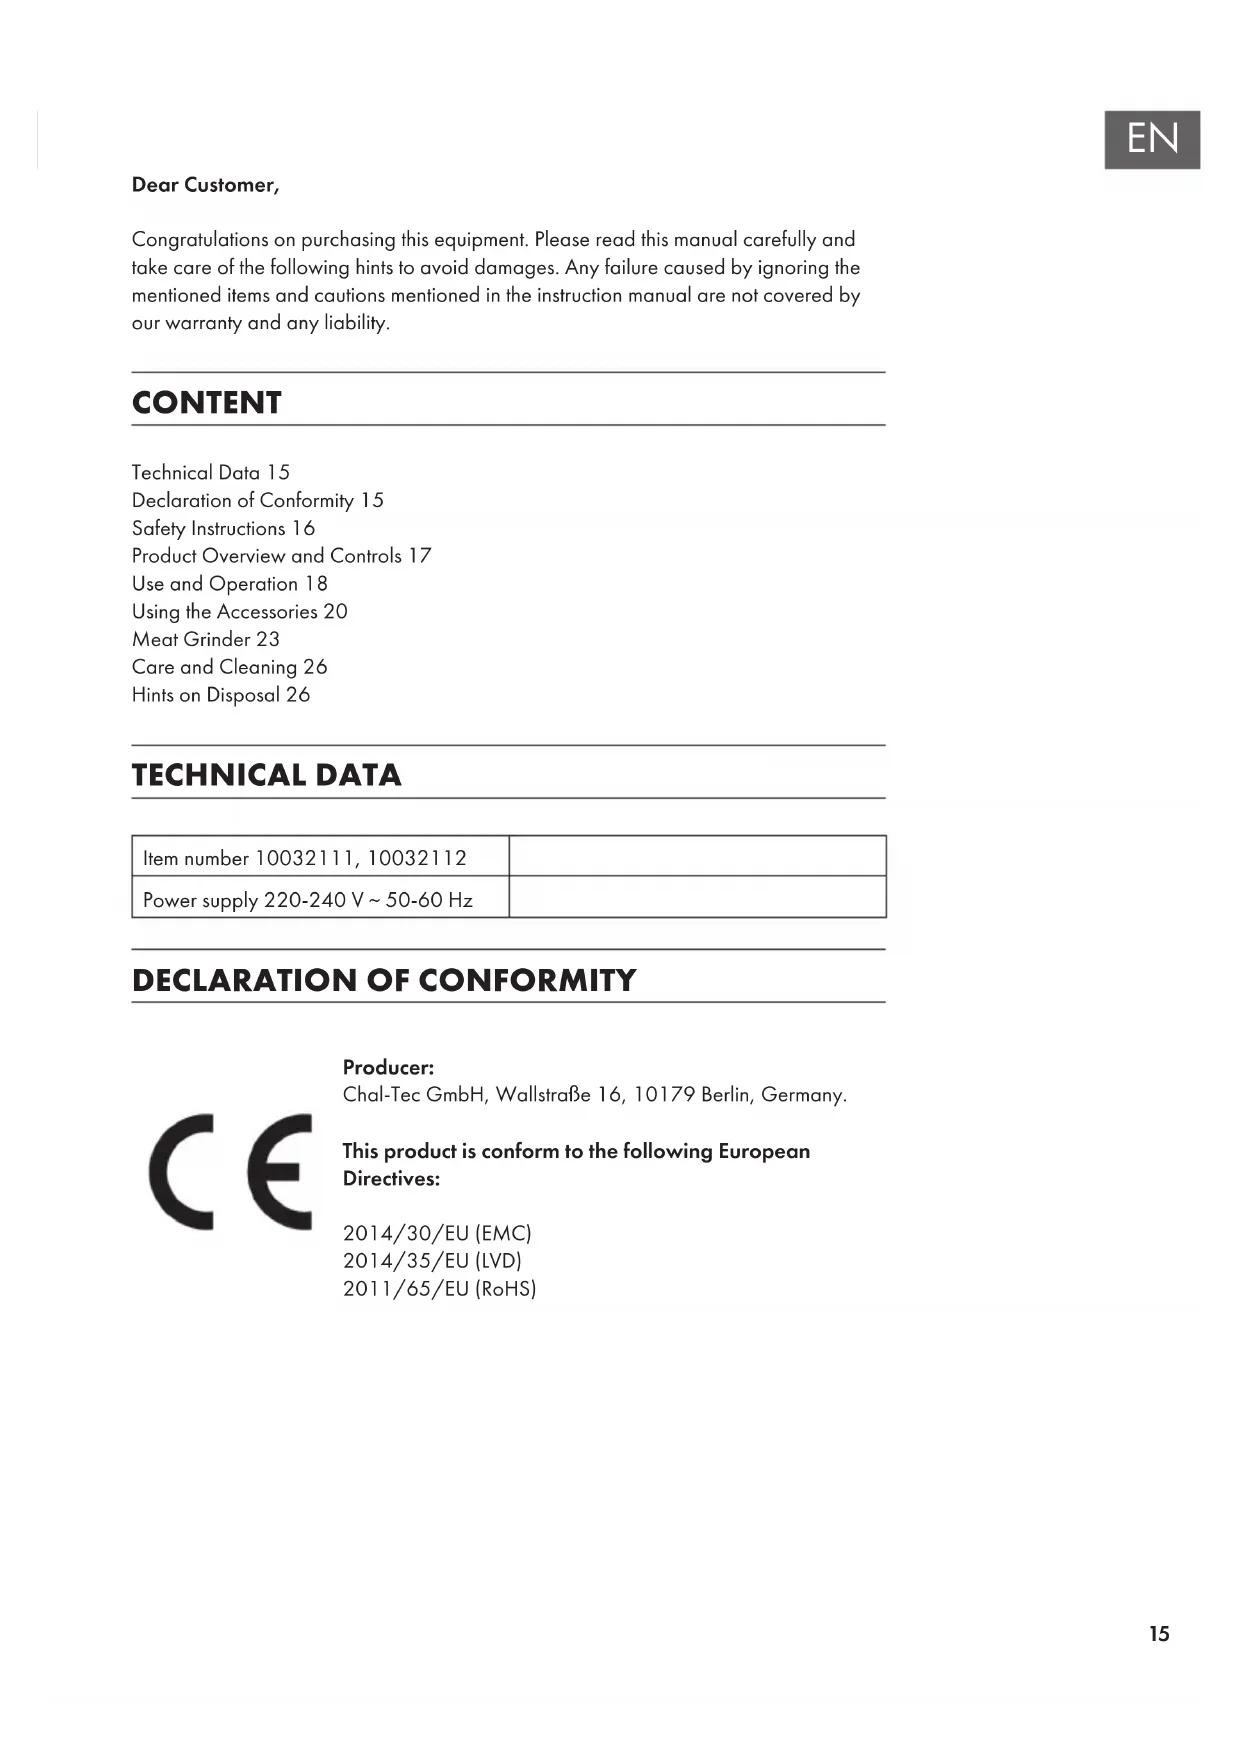
PRODUCT OVERVIEW AND CONTROLS
| 8888+ P 1 2 3 4 5 | On/Off |
| Setting 1-5 Operation speed | |
| Setting 1 Minimum speed (slow) | |
| Setting 5 Maximum speed (fast) |
1 Front cover
2 Upper body
3 Top cover
4 Speed control panel
5 Lower body
6 Transparent bowl cover
7 Balloon whisk
8 Tilt-head button
9 Pedestal
10 Stainless steel bowl
11 Rubber feet
12 kneading hook
13 Beater
14 Meat grinder
15 Cookies maker
16 Kebbe attachment
17 Sausage maker
18 pusher
USE AND OPERATION
Digital display with timing function
- Turn on, when press speed button, it will start timing automatically.
- Turn on, press button " + " to set time you need. Then press speed button, it will start countdown, and stopped automatically when time is up.
The appliance will stop automatically according to below table:
| Speed Setting Default Timer Timing Function | ||
| 1 | 60secs (switches to speed 2 automatically) | 1-20 mins |
| 2 10 mins | -20 mins | |
| 3 10 mins | -20 mins | |
| 4 10 mins | -10 mins | |
| 5 10 mins | -10 mins | |
| P 5 secs / | ||
NOTE: In timing mode, You can switch speed 1, speed 2, speed 3 freely. But for speed 4, speed 5, It can only downshift, can not upshift.
Recommend Speed setting
| Accessories | Picture | Speed | Capacity | Recommend Time | Remark |
| Kneading Hook | 1-2 | 200 g-1000 g | 5 Min. | Dense food like the dough | |
| Beater | 3-4 | 200 g-1000 g | 5 Min. | Medium-density food like salad, mashed potato | |
| Balloon Whisk | 5 | 200 ml-800 ml | 6 Min. | Light-density food like egg, butter, cream etc. | |
| Meat grinder | 4 | < 1000 g | 6 Min. |
Important Notes on Use
- Do not operate the machine continuously more than 10 minutes.
After one time use, the machine should be cooled down for 30 minutes. - Do not add mixture more than 1.0kg .
- Operate the appliance only when the accessory / tool is attached according to this table and is in the operating position.
- Risk of injury from the rotating tools! While the appliance is operating, keep
- fingers far away from the mixing bowl.
- Do not change tools until the appliance is at a standstill and have been unplugged.
- When switch off, the drive continues running.
USING THE ACCESSORIES
Note: The accessories must NOT be cleaned in the dishwasher!
How to attach the accessories:
How to use Beater, Balloon Whisk and Kneading Hook:
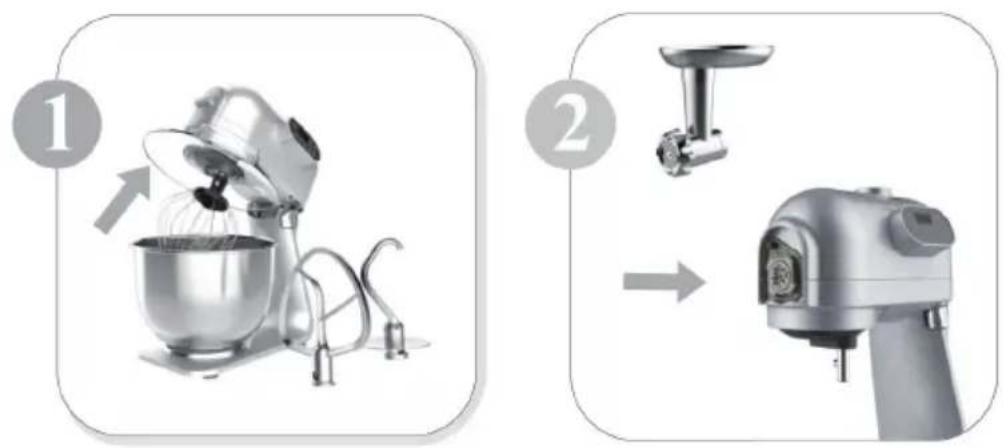
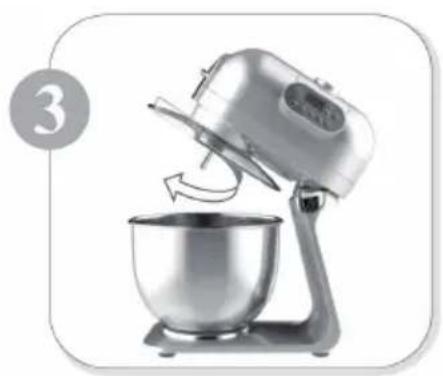
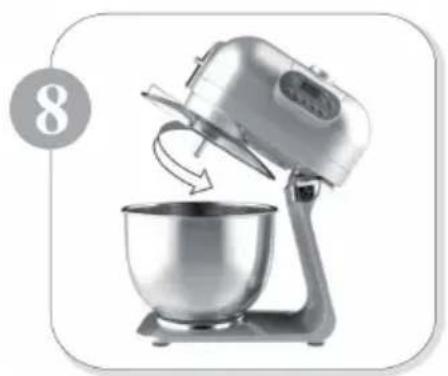
1 One hand press the head down, then, the other hand press the tilt-head button, (as picture shown). lift the head up. until you hear the "click" sound.
2 Assemble the bowl filled with powder into base flute clockwise.
3 Assemble bowl cover clockwise, as picture shows.
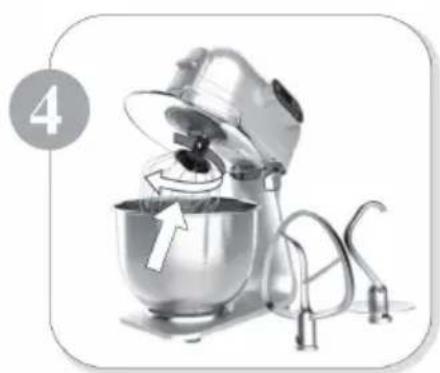
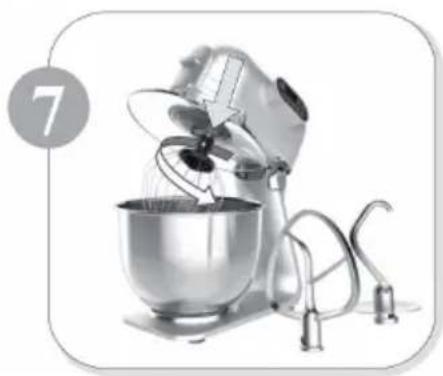
4 According to your needs, assemble beater, balloon whisk, kneading hook into rotating axis then revolve them, clockwise (see picture).
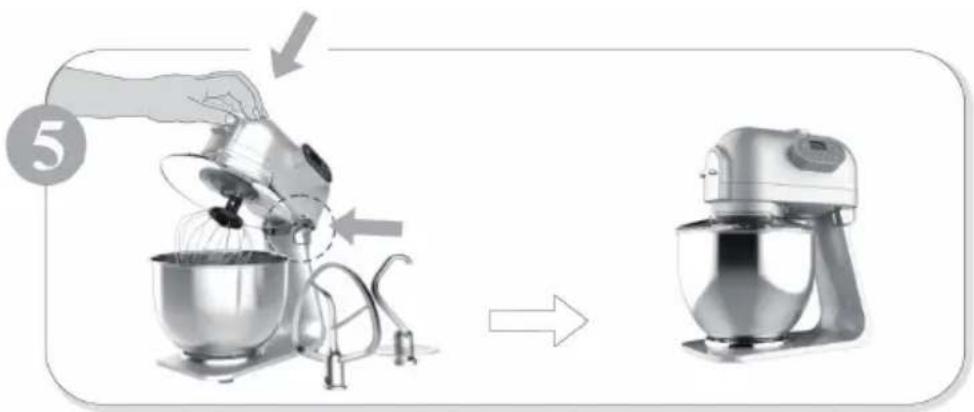
5 One hand press the head down, then, the other hand press the tilt-head button, until you hear the "click" sound, set the head to the position as picture shown. Power on, set appropriate speed.
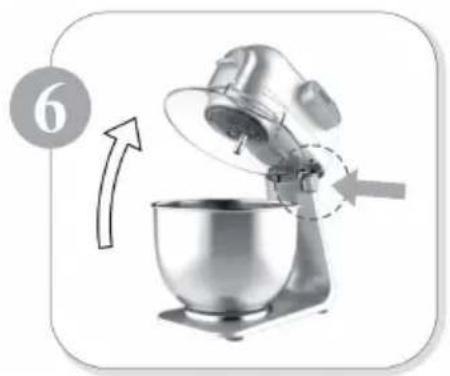
6 After food is ready, Press button "OFF", unplug. one hand press the head down, then, the other hand press the tilt-head button, lift the head up, until you hear the "click" sound. set the head to the position as picture shown.
7 Remove beater, balloon whisk, kneading hook counter-clockwise.
8 Remove bowl cover counter-wise.
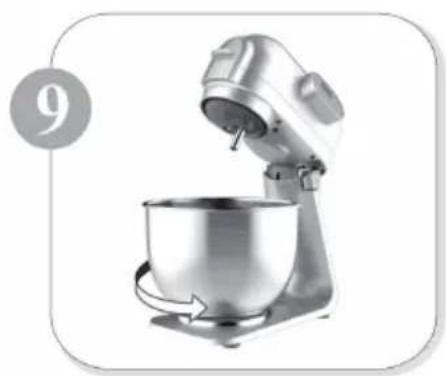
9 Remove bowl with prepared food counter-clockwise.
Fields of Application and Recipe Examples
| Balloon Whisk | At least 4 egg whites |
| Speed 5 For 5 minutes | |
| Kneading Hook | • 500 g flour • 100 g sugar • 25 g milk powder • 10 g yeast • 75 g butter • 3 egg yolks • 8 g salt • 225 ml water |
| Speed 1-2 For 10 minutes | |
| Beater | Cream or salad dressing |
| Speed 3-4 For 5 minutes |
MEAT GRINDER
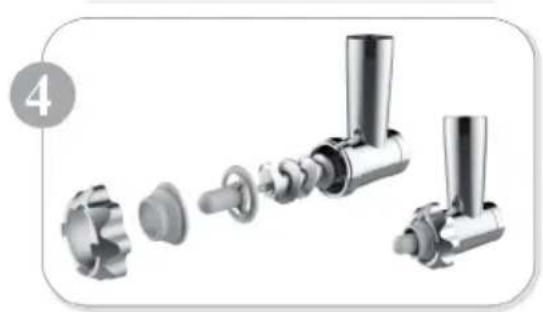
Take off the front cover as picture shown.
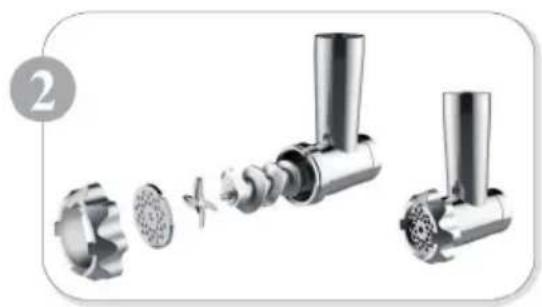
Following their sequence shown as picture, assemble worm shaft blade and cutting disc into cutting meat canister, then assemble cutting screw bar into cutting meat canister clockwise.
Following their sequence shown as picture assemble worm shaft, lead cover, sausage canister into cutting meat canister then assemble cutting screw bar into cutting meat canister clockwise.
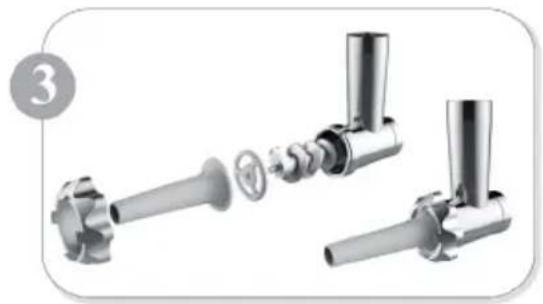
Following their sequence shown as picture, assemble worm shaft, conductor, meatball canister into cutting meat canister then assemble cutting screw bar into cutting meat canister clockwise. Note: Please remember to disassemble cutting cylinder from the machine, when changing these accessories.
Align arrow on cutting cylinder to the other one on arm then assemble prepared cutting meat canister into arm counter-clockwise shown as picture. Fasten cutting screw bar after cutting meat canister fixed correctly.
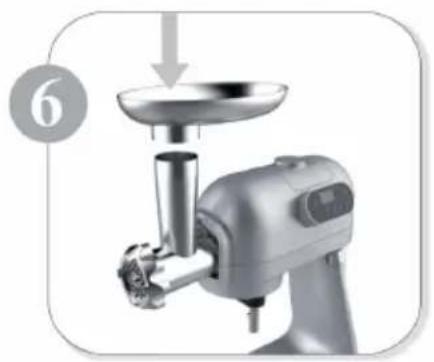
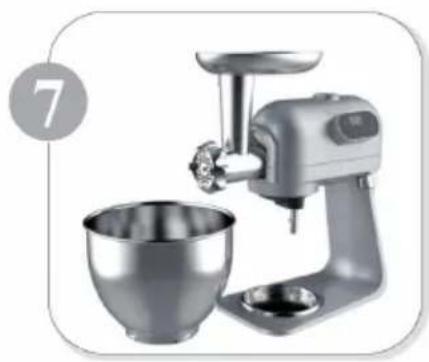
6 Assemble loading tray into cutting meat canister then place bowl to outlet of cutting meat canister.
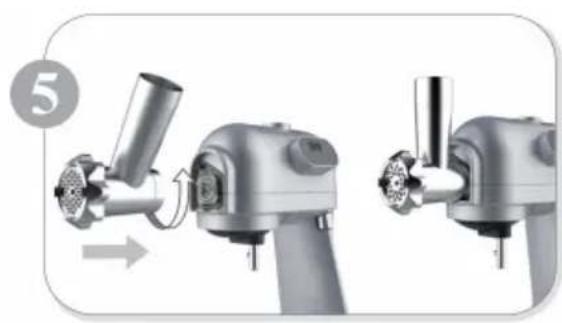
7 Powder on for running. Turn switch to appropriate speed then put food into feeding inlet with pusher to push down food.
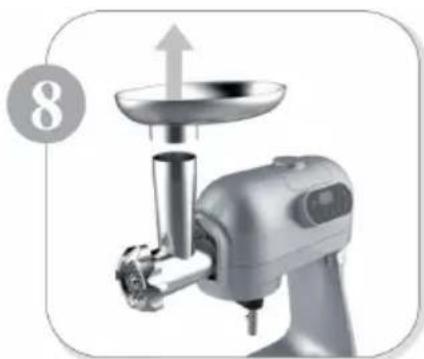
8 Turn switch to "OFF" when food is ready then unplug and cut off power. Remove pusher and loading tray.
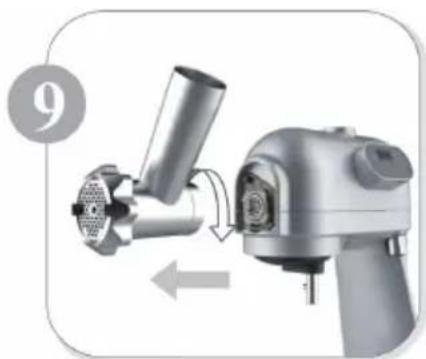
9 Press release button, remove cutting meat canister from arm clockwise.
CARE AND CLEANING
Note: The accessories must NOT be cleaned in the dishwasher!
- Never immerse the base unit in water or hold under running water.
- Do not use abrasive to clean.
- Wipe unit with a damp cloth, if required; use a litter washing up liquid. Then wipe unit dry.
- Do not wedge plastic parts in the dishwasher as they could be warped.
Rinse and dry thoroughly. - After washing and drying, immediately place attachment into the protective sleeve for storage.
HINTS ON DISPOSAL

According to the European waste regulation 2012/19/EU this symbol on the product or on its packaging indicates that this product may not be treated as household waste. Instead it should be taken to the appropriate collection point for the recycling of electrical and electronic equipment. By ensuring this product is disposed of correctly, you will help prevent potential negative consequences for the environment and human health, which could otherwise be caused by inappropriate waste handling of this product. For more detailed information about recycling of this product, please contact your local council or your household waste disposal service.