
RC6438 - Rice cooker BLACK & DECKER - Free user manual and instructions
Find the device manual for free RC6438 BLACK & DECKER in PDF.
| Product type | Rice cooker |
| Brand | Black & Decker |
| Model | RC6438 |
| Maximum capacity | 25 measures of uncooked rice (about 150 g per measure), yielding up to 47 cups of cooked rice |
| Power supply | 120 V, 60 Hz, 1000 W (estimated) |
| Main materials | Cooking bowl with nonstick coating, stainless steel lid with window, steam cooking basket |
| Functions | Rice cooking, steaming, preparing soups and stews, automatic keep warm function (Keep Warm) |
| Included accessories | Measuring cup (150 g uncooked rice), serving spoon, steam basket |
| Safety | Grounded plug, automatic shut-off at end of cooking, do not immerse base |
| Maintenance and cleaning | Bowl, lid, spoon, and cup are dishwasher safe or washable in warm soapy water. Do not use abrasive cleaners. Wipe exterior with a damp cloth. |
| Warranty | 1 year |
Frequently Asked Questions - RC6438 BLACK & DECKER
User questions about RC6438 BLACK & DECKER
0 question about this device. Answer the ones you know or ask your own.
Ask a new question about this device
Download the instructions for your Rice cooker in PDF format for free! Find your manual RC6438 - BLACK & DECKER and take your electronic device back in hand. On this page are published all the documents necessary for the use of your device. RC6438 by BLACK & DECKER.
USER MANUAL RC6438 BLACK & DECKER
38-Cup Commercial Rice Cooker and Steamer
Register your product online at www.prodprotect.com/applica, for a chance to WIN $100,000!
Accessories/Parts (USA/Canada) 1-800-738-0245
When using electrical appliances basic safety precautions should always be followed including the following:
Read all instructions.
Do not touch hot surfaces. Use handles or knobs.
To protect against electrical shock, do not immerse cord, plug or base unit in water or other liquid.
- Close supervision is necessary when any appliance is used by or near children.
Unplug from outlet when not in use and before cleaning. Allow to cool before putting on or taking off parts.
- Do not operate appliance with a damaged cord or plug, or after the appliance malfunctions or has been damaged in any manner. Return appliance to an authorized service facility for examination, repair or adjustment.
The use of accessory attachments not recommended by this appliance manufacturer may cause injuries.
Do not use outdoors.
Do not let cord hang over edge of table or counter, or touch hot surfaces.
Do not place on or near a hot gas or electric burner, or in a heated oven.
Extreme caution must be used when moving an appliance containing hot food, water or other hot liquids.
To disconnect, turn any control to "off", then remove plug from wall outlet.
Do not use appliance for other than intended use.
To reduce the risk of electric shock, cook only in removable container.
COMMERCIAL & HOUSEHOLD USE SAVE THESE INSTRUCTIONS.
GROUNDED PLUG
As a safety feature, this product is equipped with a grounded plug, which will only fit into a three-prong outlet. Do not attempt to defeat this safety feature. Improper connection of the grounding conductor may result in the risk of electric shock. Consult a qualified electrician if you are in doubt as to whether the outlet is properly grounded.
CAUTION: To ensure continued protection against risk of electric shock, connect to properly grounded outlets only.
ELECTRICAL CORD
a) A short power-supply cord (or detachable power-supply cord) is to be provided to reduce the risk resulting from becoming entangled in or tripping over a longer cord.
b) Longer detachable power-supply cords or extension cords are available and may be used if care is exercised in their use.
c) If a long detachable power-supply cord or extension cord is used,
1) The marked electrical rating of the detachable power-supply cord or extension cord should be at least as great as the electrical rating of the appliance,
2) If the appliance is of the grounded type, the extension cord should be a grounding-type 3-wire cord, and
3) The longer cord should be arranged so that it will not drape over the countertop or tabletop where it can be pulled on by children or tripped over.
Note: If the power supply cord is damaged, it should be replaced by qualified personnel or in Latin America by an authorized service center.
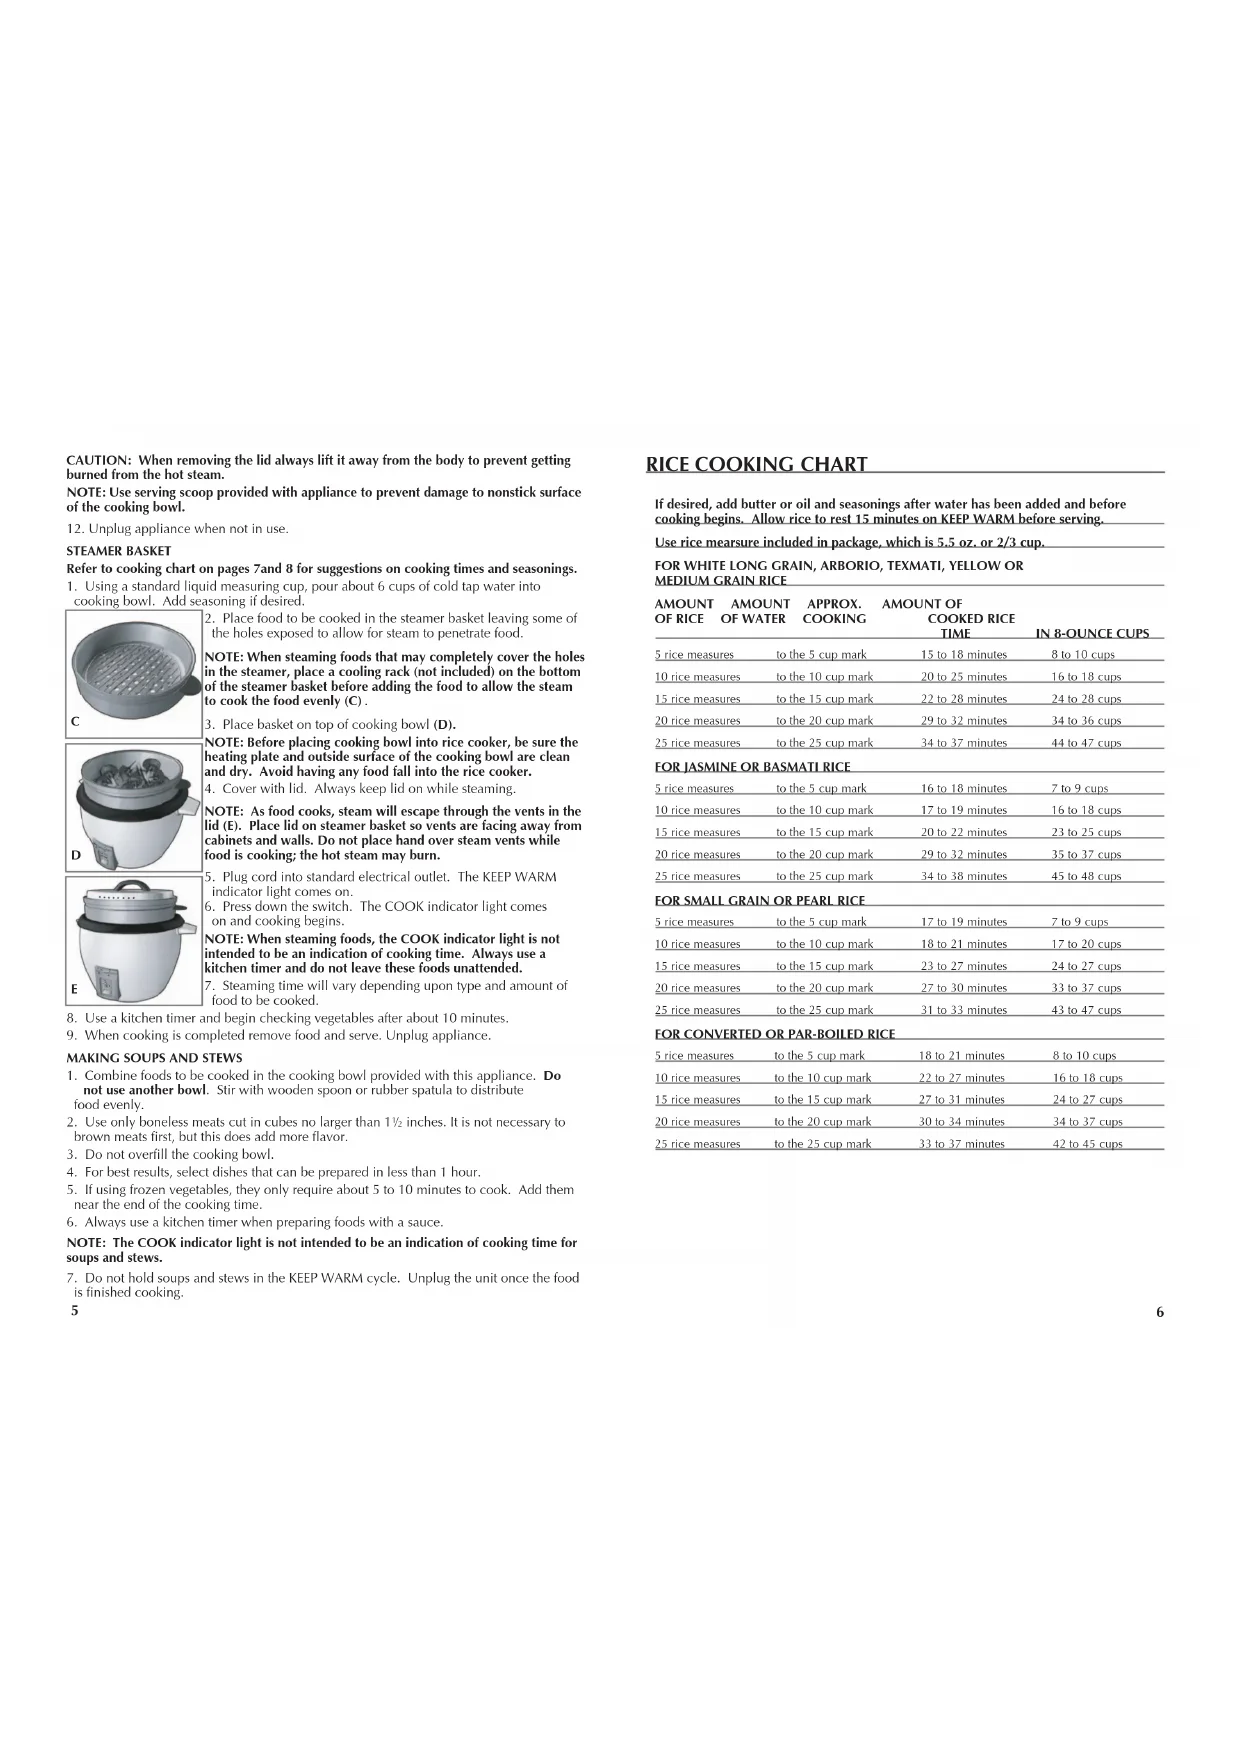
Product may vary slightly from what is illustrated.
- Lid handle
- Stainless steel lid with viewing window (Part# RC6438-01)
- Lid vents
- Steamer basket (Part# RC6438-03)
- Cool-touch side handles
† 6. Cooking bowl with water level marks (inside) (Part# RC6438-04) - Cool-touch side handles
- KEEP WARM indicator light
- COOK indicator light
- ON switch
†11. Rice measure (Part# RC6438-05)
†12. Serving scoop (Part# RC6438-06)
† Consumer replaceable/removable parts
How to Use
This appliance is for commercial and household use only.
GETTING STARTED
Remove all packing material and stickers from the product.
Remove and save literature.
- Wash and dry all removable parts as instructed in CARE AND CLEANING section of this manual.
Place appliance on a flat, stable surface.
COOKING RICE
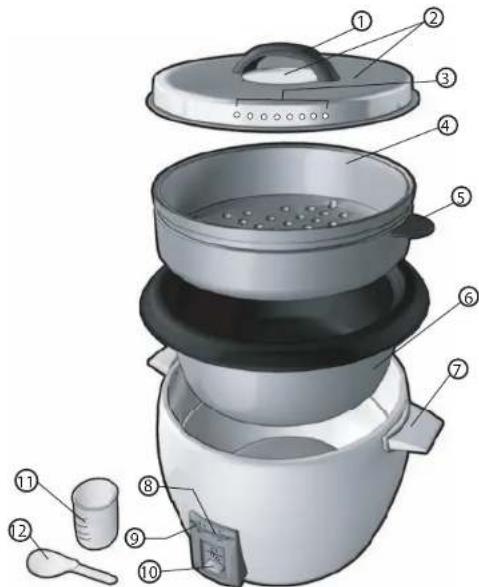
- Measure desired amount of rice to be cooked using rice measure provided; do not use standard 1 cup measuring cup (A). (The rice measure provided holds 2/3 cup uncooked rice - about 5.5 oz, or 150 grams.) This rice cooker can cook up to 25 measures of uncooked rice and yield a maximum of about 50, 8 oz. cups of cooked rice.
- Place rice in the cooking bowl.
NOTE: Use only the cooking bowl provided with this appliance to cook rice.
- Using the water level markings on the inside of the cooking bowl as a guide, add the amount of water that matches the number of measures of rice to be cooked. For example, if preparing 15 measures of rice, add water to 15 cup water level mark. Adding too much water may make the appliance boil over.
- Add butter or oil and desired seasonings.
NOTE: The first time you prepare rice use the handy rice cooking chart included in the Use and Care on pages 6 and 7. For softer, fluffy rice add a little more water; for rice that is more firm and has a drier texture add a little less water.
- Before placing cooking bowl into rice cooker, he sure the heating plate and outside surface of the cooking bowl are clean and dry. Avoid having rice kernels or other foods fall into the rice cooker.
- Insert cooking bowl into rice cooker.
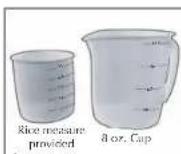
- Place lid on the cooking bowl. For best results always keep lid on while cooking.
NOTE: As rice cooks, steam will escape through the vents in the lid (B). Place lid on rice cooker so vents are facing away from cabinets and walls. Do not place hands over steam vents while rice is cooking or has finished cooking; the hot steam may burn.
- Uncoil cord and plug into standard electrical outlet. The KEEP WARM indicator light comes on.
-
Press down the switch. The COOK indicator light comes on and cooking begins. As the rice cooks and expands, steam comes out through the steam vents on the lid.
-
When rice is cooked, the COOK indicator light turns off and the switch pops up; the rice cooker automatically switches to the KEEP WARM function. The KEEP WARM indicator light will stay on until the appliance is unplugged.
NOTE: Do not try to stop the rice cooker from switching to the KEEP WARM mode. Do not try to press the switch once the KEEP WARM cycle has begun.
- For best results, let the cooked rice rest for 15 minutes, covered, to further steam the rice. If holding cooked rice longer than 30 minutes, stir rice occasionally to prevent browning of rice on the bottom of the cook bowl. Just before serving, remove lid and fluff rice.
CAUTION: When removing the lid always lift it away from the body to prevent getting burned from the hot steam.
NOTE: Use serving scoop provided with appliance to prevent damage to nonstick surface of the cooking bowl.
- Unplug appliance when not in use.
STEAMER BASKET
Refer to cooking chart on pages 7 and 8 for suggestions on cooking times and seasonings.
- Using a standard liquid measuring cup, pour about 6 cups of cold tap water into cooking bowl. Add seasoning if desired.
- Place food to be cooked in the steamer basket leaving some of the holes exposed to allow for steam to penetrate food.
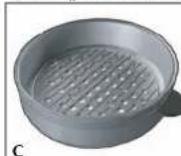
NOTE: When steaming foods that may completely cover the holes in the steamer, place a cooling rack (not included) on the bottom of the steamer basket before adding the food to allow the steam to cook the food evenly (C). - Place basket on top of cooking bowl (D).
NOTE: Before placing cooking bowl into rice cooker, he sure the heating plate and outside surface of the cooking bowl are clean and dry. Avoid having any food fall into the rice cooker. - Cover with lid. Always keep lid on while steaming.
NOTE: As food cooks, steam will escape through the vents in the lid (E). Place lid on steamer basket so vents are facing away from cabinets and walls. Do not place hand over steam vents while food is cooking; the hot steam may burn.
- Plug cord into standard electrical outlet. The KEEP WARM indicator light comes on.
- Press down the switch. The COOK indicator light comes on and cooking begins.
NOTE: When steaming foods, the COOK indicator light is not intended to be an indication of cooking time. Always use a kitchen timer and do not leave these foods unattended.
E 7. Steaming time will vary depending upon type and amount of food to be cooked.
- Use a kitchen timer and begin checking vegetables after about 10 minutes.
- When cooking is completed remove food and serve. Unplug appliance.
MAKING SOUPS AND STEWS
- Combine foods to be cooked in the cooking bowl provided with this appliance. Do not use another bowl. Stir with wooden spoon or rubber spatula to distribute food evenly.
- Use only boneless meats cut in cubes no larger than 112 inches. It is not necessary to brown meats first, but this does add more flavor.
- Do not overfill the cooking bowl.
- For best results, select dishes that can be prepared in less than 1 hour.
- If using frozen vegetables, they only require about 5 to 10 minutes to cook. Add them near the end of the cooking time.
- Always use a kitchen timer when preparing foods with a sauce.
NOTE: The COOK indicator light is not intended to be an indication of cooking time for soups and stews.
- Do not hold soups and stews in the KEEP WARM cycle. Unplug the unit once the food is finished cooking.
RICE COOKING CHART
If desired, add butter or oil and seasonings after water has been added and before cooking begins. Allow rice to rest 15 minutes on KEEP WARM before serving.
Use rice measure included in package, which is 5.5 oz, or 2/3 cup.
FOR WHITE LONG GRAIN, ARBORIO, TEXMATI, YELLOW OR MEDIUM GRAIN RICE
| AMOUNT OF RICE | AMOUNT OF WATER | APPROX. COOKING | AMOUNT OF COoked RICE TIME | IN 8-OUNCE CUPS |
| 5 rice measures | to the 5 cup mark | 15 to 18 minutes | 8 to 10 cups | |
| 10 rice measures | to the 10 cup mark | 20 to 25 minutes | 16 to 18 cups | |
| 15 rice measures | to the 15 cup mark | 22 to 28 minutes | 24 to 28 cups | |
| 20 rice measures | to the 20 cup mark | 29 to 32 minutes | 34 to 36 cups | |
| 25 rice measures | to the 25 cup mark | 34 to 37 minutes | 44 to 47 cups |
FOR JASMINE OR BASMATI RICE
| 5 rice measures | to the 5 cup mark | 16 to 18 minutes | 7 to 9 cups |
| 10 rice measures | to the 10 cup mark | 17 to 19 minutes | 16 to 18 cups |
| 15 rice measures | to the 15 cup mark | 20 to 22 minutes | 23 to 25 cups |
| 20 rice measures | to the 20 cup mark | 29 to 32 minutes | 35 to 37 cups |
| 25 rice measures | to the 25 cup mark | 34 to 38 minutes | 45 to 48 cups |
FOR SMALL GRAIN OR PEARL RICE
| 5 rice measures | to the 3 cup mark | 17 to 19 minutes | 7 to 9 cups |
| 10 rice measures | to the 10 cup mark | 18 to 21 minutes | 17 to 20 cups |
| 15 rice measures | to the 15 cup mark | 23 to 27 minutes | 24 to 27 cups |
| 20 rice measures | to the 20 cup mark | 27 to 30 minutes | 33 to 37 cups |
| 25 rice measures | to the 25 cup mark | 31 to 33 minutes | 43 to 47 cups |
FOR CONVERTED OR PAR-BOILED RICE
| 5 rice measures | to the 5 cup mark | 18 to 21 minutes | 8 to 10 cups |
| 10 rice measures | to the 10 cup mark | 22 to 27 minutes | 16 to 18 cups |
| 15 rice measures | to the 15 cup mark | 27 to 31 minutes | 24 to 27 cups |
| 20 rice measures | to the 20 cup mark | 30 to 34 minutes | 34 to 37 cups |
| 25 rice measures | to the 25 cup mark | 33 to 37 minutes | 42 to 45 cups |
FOR BROWN RICE
| 5 rice measures to the 5 cup mark + % cup | 17 to 30 minutes | 7 to 9 cups | |
| 10 rice measures to the 10 cup mark + % cup | 35 to 38 minutes | 17 to 20 cups | |
| 15 rice measures to the 15 cup mark + % cup | 37 to 40 minutes | 26 to 29 cups | |
| 20 rice measures to the 20 cup mark + % cup | 44 to 48 minutes | 30 to 34 cups | |
| 25 rice measures to the 25 cup mark + % cup | 46 to 50 minutes | 42 to 46 cups | |
| FOR WILD RICE | |||
| 5 rice measures 9 cups 42 to 62 minutes 9 to 11 cups | |||
| 10 rice measures 18 cups 2 hours and 18 to 20 cups 36 to 40 minutes | |||
| FOR PACKAGED BLEND OF WHOLE GRAIN BROWN OR WILD AND BROWN RICE | |||
| 3 pkgs. (16 oz. ea.) + % cup | to the 15 cup mark | 34 to 38 minutes | 22 to 24 cups |
VEGETABLE, FISH AND POULTRY COOKING CHART
| VEGETABLE | AMOUNT | PREPARATION | TIME | SUGGESTIONS |
| Fresh asparagus | 3 lbs. | Whole spears | 12 to 14 minutes | Season with lemon slices, salt and pepper |
| Fresh green beans | 3 lbs. | Whole | 16 to 18 minutes | Season with dill, salt and garlic pepper |
| Fresh beets | 2 lbs./8 cups | Peeled and cut into wedges | 24 to 26 minutes | Add orange peel, salt and pepper |
| Fresh broccoli | 3 lbs. | Broken into florets | 16 to 18 minutes | Add sliced garlic and fresh thyme leaves |
| Fresh carrots | 3 lbs. | Peeled and cut into chunks | 22 to 24 minutes | Season with fresh dill and parsley |
| Fresh cauliflower | 2 heads/8 cups | Cut into florets | 24 to 26 minutes | Serve garnished with buttered bread crumbs |
| Fresh corn on the cob | 10 ears | Broken in half | 15 to 17 minutes | Season with chives or parsley |
| Sugar snap or snow peas | 3 lbs. or 7 cups | Trimmed and left whole | 16 to 18 minutes | Serve drizzled with soy sauce and chopped green onions |
| Peppers | 6 large | Cut in strips | 16 to 18 minutes | Season with chopped garlic and cilantro |
| Potatoes | 4 lbs. | Cut in wedges | 24 to 26 minutes | Season with chopped rosemary, salt and garlic pepper |
| Yellow squash and zucchini | 8 cups | Sliced | 16 to 18 minutes | Serve with sliced tomatoes and shredded Parmesan cheese |
FISH
HELPFUL HINTS
| Add lemon slices to water in the cooking bowl. | ||||
| Salmon | 2½ lbs. | 1 fillet, halved | 16 to 19 minutes | Season with fresh dill and chives |
| Shrimp | 4½ lbs. | Peeled and devined | 14 to 16 minutes | Serve with tartar or cocktail sauce |
| POULTRY | ||||
| Chicken breasts | 4 lbs. | Boneless and skinless | 36 to 40 minutes | Season with Kosher salt and garlic pepper |
- Although the rice measure holds about 5.5 ounces of uncooked rice, the cooked rice is given in 8-ounce cup measures.
- Kosher salt has no impurities and dissolves faster than table salt. If using Kosher salt, you may find you want to add a little more than if using table salt. Use about 14 tsp. Kosher salt to each cup of uncooked rice.
- White rice should be kept in an airtight container in a cool, dark place.
- Brown rice has a limited shelf life; store it for no more than 1 month before using.
- If allowing rice to stand on KEEP WARM in the rice cooker for prolonged periods of time, stir occasionally to prevent rice from browning on the bottom.
TROUBLESHOOTING
| PROBLEM | POSSIBLE CAUSE | SOLUTION |
| Some kernels of rice do not seem fully cooked. | The rice was not allowed to finish cooking. | Once switch on rice cooker changes to KEEP WARM allow rice to rest for 15 minutes before serving. |
| Rice cooking bowl not as clean as I would like. | Starch builds up on sides and bottom of bowl. | Fill bowl with hot soapy water and let stand several minutes; then use a nylon scrubber along sides and bottom. Rinse. |
| Rice boils over. | Too much rice is being cooked. | Make sure to cook no more than the maximum amount suggested in this Use & Care. The amount of rice to be cooked should match the marking on the bowl. |
| Rice is too dry. | Too much rice or not enough water. | Use the rice measure cup that comes with the appliance. The rice measure provided holds2/3cup of uncooked rice - about 5 oz. or 150 grams. |
| PROBLEM POSSIBLE CAUSE SOLUTION | ||
| Rice is gummy. Too much water or not enough rice. | Add water to match markings on the rice bowl. Do not use a liquid measuring cup. | |
| Water boils over sides of rice cooker when steaming foods. | Holes in steaming basket are covered by food. | Place a cooling rack in bottom of steaming basket and place food on that rack. |
RECIPES
JAMBALAYA
10 measures long grain white rice
Water
4 cans (14½ oz. ea.) undrained diced tomatoes
2 lbs. cooked smoked sausage, cut into ¼-inch slices
_2 cup dried minced onion
14 cup dried parsley
14 cup dried beef bouillon granules (4 bouillon cubes)
4 bay lcavcs
2 tsp. garlic powder
2 tsp. dried thyme leaves, crushed
2 tsp. black pepper
1 tsp. cayenne pepper
1 tsp. salt
Place rice in cooking bowl of rice cooker. Add enough water to come to the 10 line on the inside of the rice bowl. Add remaining ingredients in order listed. Stir to blend ingredients. Place cooking bowl into rice cooker and plug in the appliance; the KEEP WARM light will come on. Place cover on appliance. Push down the switch; COOK indicator light comes on.
When rice is cooked, the COOK light turns off and the switch pops up; the rice cooker automatically switches to the KEEP WARM function. Let rice mixture stand on KEEP WARM for 15 minutes.
Just before serving remove bay leaves and garnish with chopped parsley, if desired.
Makes about 25 cups (about 12 servings).
PAELLA
10 measures yellow rice mix
2 cans (12 oz. ea.) beer
Water
2 lbs. shrimp, peeled and veined
1 Ib. tilapia or other firm white fish
1 can (14%) oz.) undrained diced tomatoes
2 large green peppers, seeded and diced
cup olive oil
4 bay leavcs
1 tsp. salt
1 tsp. black pepper
Place rice in cooking bowl. Add beer and enough water to come to the 10 line on the inside of the rice bowl. Add remaining ingredients in order listed. Stir to blend ingredients. Place cooking bowl into rice cooker and plug in the appliance; the KEEP WARM light will come on. Place cover on appliance. Push down the switch; COOK indicator light comes on.
When rice is cooked, the COOK light turns off and the switch pops up; the rice cooker automatically switches to the KEEP WARM function. Let rice mixture stand on KEEP WARM for 15 minutes.
Just before serving remove bay leaves and garnish with chopped cilantro, if desired.
Makes about 25 cups (about 12 servings).
COCONUT CHICKEN CURRY
10 measures packaged, jasmine rice
2 cans (14 oz. ea.) coconut milk
Chicken broth or water
2 lbs. boneless chicken breast, cubed
3 large onions, sliced
2 large jalapenos, seeded and minced
6 tbsp. curry powder
2 tbsp. salt
1½ tbsp. grated fresh ginger
1 tbsp. black pepper
112 tsp. ground cumin
2 cups coarsely chopped cashews
1 cup chopped cilantro
Place rice in cooking bowl of rice cooker. Add the coconut water from the top of each can of coconut milk to the rice. Add enough chicken broth or water to the 10 line on the inside of the rice bowl. Add remaining ingredients including reserved coconut milk in order listed, except cashews and cilantro. Stir to blend ingredients. Place cooking bowl into rice cooker and plug in the appliance; the KEEP WARM light will come on. Place cover on appliance. Push down the switch; COOK indicator light comes on.
When rice is cooked, the COOK light turns off and the switch pops up; the rice cooker automatically switches to the KEEP WARM function. Let rice mixture stand on KEEP WARM for 15 minutes.
Just before serving garnish with cashews and cilantro.
Makes about 25 cups (about 12 servings).
CRANBERRY CRUNCH CHICKEN SALAD
4 lbs. boneless and skinless chicken breasts
1 pkg. (6 oz.) sweetened dried cranberries
114 cups chopped toasted pecans
112 cups diced celery
1 bunch green onions, sliced
1 tbsp. grated orange peel
1 tbsp. grated lemon peel
34 tsp. salt
14 tsp. black pepper
114 cups mayonnaise
Juice from 1 orange
Juice from 1 lemon
Place 4 cups water in bowl of rice cooker. Top with steamer basket and place chicken in basket making; sure all holes are not covered. Place cover on appliance. Plug in the appliance; the KEEP WARM light will come on. Push down the switch; COOK indicator light comes on.
Set a kitchen timer and steam chicken for 30 minutes or until chicken tests done.
Remove from steamer basket. Place in bowl and cover with plastic wrap. Refrigerate several hours or overnight.
Cube cooked chicken and combine with next 8 ingredients in large bowl. In smaller bowl, blend mayonnaise with orange and lemon juice; blend until smooth. Pour over chicken mixture. Toss to blend well. Serve on crisp greens or cover and chill until ready to serve.
Makes about 12 cups.
CHICKEN TERIYAKI WITH BROWN RICE
2 lbs. boneless chicken breasts, diced
2 cups bottled teriyaki sauce
5 measures brown rice
Water
1 bunch broccoli
2 large red peppers, seeded and cut in strips
3 green onions, sliced
1% tsp. salt
2 tbsp. toasted sesame seeds
Place chicken in plastic bag. Add teriyaki sauce. Seal bag and toss to coat chicken. Refrigerate 30 minutes or until ready to cook.
Place rice in cooking bowl. Add enough water to come to the 10 line on the inside of the rice bowl. Add remaining ingredients including chicken and marinade in order listed, except sesame seeds. Stir to blend ingredients. Place cooking bowl into rice cooker and plug in the appliance; the KEEP WARM light will come on. Place cover on appliance. Push down the switch; COOK indicator light comes on.
When rice is cooked, the COOK light turns off and the switch pops up; the rice cooker automatically switches to the KEEP WARM function. Let rice mixture stand on KEEP WARM for 15 minutes.
Just before serving garnish with sesame seeds.
Makes about 8 servings.
BROWN RICE WITH MUSHROOMS AND CRANBERRIES
1 pkg. (8 oz.) mushrooms, quartered
2 medium onions, chopped
6 tbsp. butter or margarine
10 measures packaged brown rice mixture
Chicken broth or water
1 pkg. (8 oz.) sweetened dried cranberries
12 cup chopped parsley
1 tsp. salt
1/2 tsp. coarsely ground black pepper
14 cup toasted chopped pecans
Heat butter in Black & Decker® Electric Skillet. Brown mushrooms and cook onions until tender.
Place rice in cooking bowl. Add enough chicken broth or water to come to the 10 line on the inside of the rice bowl. Stir in mushroom mixture. Add remaining ingredients in order listed, except pecans. Stir to blend ingredients. Place cooking bowl into rice cooker and plug in the appliance; the KEEP WARM light will come on. Place cover on appliance. Push down the switch; COOK indicator light comes on.
When rice is cooked, the COOK light turns off and the switch pops up; the rice cooker automatically switches to the KEEP WARM function. Let rice mixture stand on KEEP WARM for 15 minutes.
Just before serving stir in pecans.
Makes about 15 cups.
Care and Cleaning
This product contains no user serviceable parts. Refer service to qualified service personnel.
- Unplug the unit before cleaning and let it cool completely.
- Never immerse the unit in water or other liquid.
- Wash the cooking bowl, lid, serving scoop and rice measure in hot, soapy water or in the dishwasher. Do not use abrasive cleaners or metal scouring pads - they may scratch the nonstick surface or could result in poor contact with the heating plate.
Helpful Tip: Since the rice cooking bowl has a nonstick coating, try this method: add hot, soapy water and allow the bowl to stand for several minutes. This releases any food particles and with just a wipe of a sponge or plastic scrubber the bowl is perfectly clean.
- Wipe the interior of the unit with a dry cloth. Clean the outside surface with a damp cloth and dry thoroughly.
- If water accidentally gets into the switch area or onto the heating plate, allow to dry thoroughly before using the rice cooker.
IMPORTANT MISES EN GARDE
CARI DE POULET AU COCO
For service, repair or any questions regarding your appliance, call the appropriate "800" number on the cover of this book. Do not return the product to the place of purchase. Do not mail the product back to the manufacturer nor bring it to a service center. You may also want to consult the website listed on the cover of this manual.
One-Year Limited Warranty
(Appplies only in the United States and Canada)
What does it cover?
- Any defect in material or workmanship; provided; however, Applica's liability will not exceed the purchase price of the product.
For how long?
One year after the date of original purchase.
What will we do to help you?
- Provide you with a reasonably similar replacement product that is either new or factory refurbished.
How do you get service?
- Save your receipt as proof of the date of sale.
- Check our on-line service site at www.prodprotect.com/applica, or call our toll-free number, 1-800-231-9786, for general warranty service.
If you need parts or accessories, please call 1-800-738-0245.
What does your warranty not cover?
- Damage from commercial use
- Damage from misuse, abuse or neglect
- Products that have been modified in any way
- Products used or serviced outside the country of purchase
Glass parts and other accessory items that are packed with the unit - Shipping and handling costs associated with the replacement of the unit
- Consequential or incidental damages (Please note, however, that some states do not allow the exclusion or limitation of consequential or incidental damages, so this limitation may not apply to you.)
How does state law relate to this warranty?
- This warranty gives you specific legal rights, and you may also have other rights that vary from state to state or province to province.
;NECESITA AYUDA?
Copyright © 2007 Applica Consumer Products, Inc.
Made in People's Republic of China
Printed in People's Republic of China
Importado por:
APPLICA DE MEXICO, S. DE R. L. DE C. V.
Col. Chapultepec Morales, Mexico D.F.
Deleg. Miguel Hidalgo
CP 11570
MEXICO