
10032788 - Pan Klarstein - Free user manual and instructions
Find the device manual for free 10032788 Klarstein in PDF.

| Product type | Electric heater / Radiator |
| Brand | Klarstein |
| Model | 10032788 |
| Power | 1000 W (2000 W for models 10032789/90) |
| Power supply | 230 V ~ 50 Hz |
| Dimensions (approx.) | Not specified, height approx. 50-60 cm, width approx. 40-50 cm |
| Weight (approx.) | Not specified, approx. 5-8 kg |
| Mounting type | Free-standing or wall mounting |
| Display | LCD screen |
| Control panel | Touch with buttons: Standby, Temp, Prog, Clock, Arrows, OK |
| Heating modes | Comfort, Economy, Anti-freeze |
| Weekly programming | Yes, daily setting with 24h scale in 30 min steps |
| Open window function | Automatic detection if temperature drops by 5°C in 30 min, heating stops |
| Child lock | Yes, by long press on OK |
| Standby consumption | 0.00124 kW |
| Maintenance and cleaning | Unplug, cool down, vacuum for grilles, damp cloth for housing |
| Safety | Do not cover, do not use in damp rooms, damaged cable must be replaced by a professional |
| Storage | In original packaging, dry and cool place |
| Recycling | Compliant with WEEE, do not dispose of with household waste |
Frequently Asked Questions - 10032788 Klarstein
User questions about 10032788 Klarstein
0 question about this device. Answer the ones you know or ask your own.
Ask a new question about this device
Download the instructions for your Pan in PDF format for free! Find your manual 10032788 - Klarstein and take your electronic device back in hand. On this page are published all the documents necessary for the use of your device. 10032788 by Klarstein.
USER MANUAL 10032788 Klarstein
natural_image
Row of white icons representing kitchen appliances including blender, kettle, refrigerator, air conditioner, fan, microwave, and TV (no text or symbols)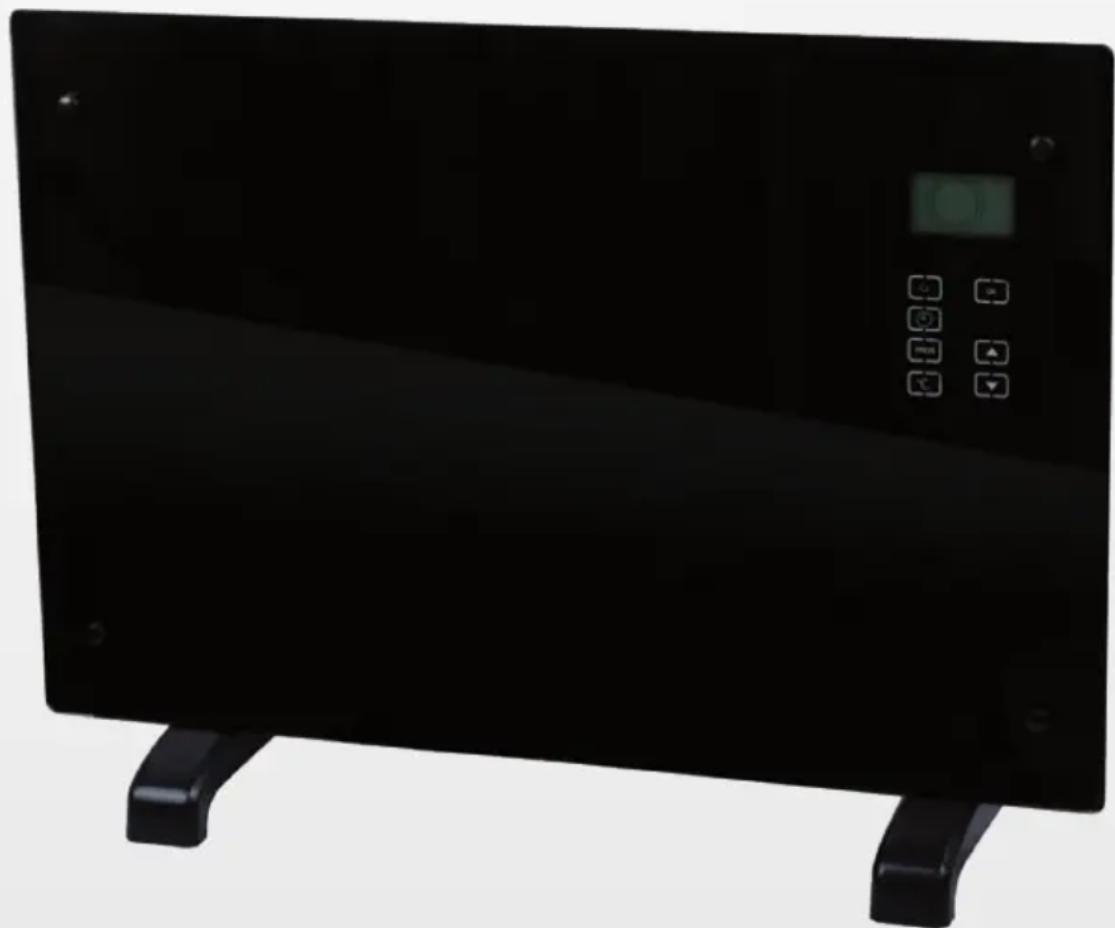
natural_image
Front view of a black electric TV power supply unit with control panel and display (no visible text or symbols)Note: This product is only suitable for well insulated spaces or occasional use.
natural_image
Black rectangular object with two protruding clips and a small arrow pointing downward (no text or symbols)Wandmontage
natural_image
Pure technical line drawing of a heat exchanger or cooling unit with no text, numbers, or symbolsnatural_image
Front view of a computer monitor with multiple drive units and ventilation slots (no text or symbols visible)
natural_image
Simple line drawing of a vertical rectangular object with mounting holes and a small circular symbol at the base (no text or labels)natural_image
Symbol of a trash bin crossed with a diagonal line, no text or numbers presentCongratulations on purchasing this equipment. Please read this manual carefully and take care of the following hints to avoid damages. Any failure caused by ignoring the mentioned items and cautions mentioned in the instruction manual are not covered by our warranty and any liability.
Technical Data
| Item number 10032787 10032788 | 10032789 10032790 | |
| Power supply 230 V ~ 50 Hz | ||
| Power consumption 1000 W 2000 | W | |
Safety Instructions
- Read all instructions carefully before using.
- Make sure the voltage is the same as that indicated on the rating plate of the appliance.
- Do not operate this appliance if the cable or plug becomes damaged.
- Keep the appliance and cable away from sources of heat, sharp objects or anything that may cause damage.
- If the cord is damaged, it must be replaced by the manufacturer, its service agent or similarly qualified persons in order to avoid a hazard.
- Ensure the appliance is switched off before connecting to the mains power supply.
- Switch off the power supply and disconnect from mains supply when not in use, before cleaning or other maintenance.
- To disconnect the appliance, switch it "OFF", and then remove the plug from outlet. Do not pull the cord to disconnect the plug. The heater must not be located immediately below a socket-outlet.
- Do not operate in areas where gasoline, paint or other flammable liquids are used or stored.
- Indoor use only. In order to avoid overheating, do not cover the heater.
- To prevent a possible fire, do not block air intakes or exhaust in any manner.
- Don't touch the hot surfaces.
- Do not insert or allow foreign objects to enter any ventilation or exhaust opening, as this may cause an electric shock, fire or damage to the appliance.
- Always ensure that hands are dry before operating or adjusting any switch on the product or touching the plug and socket-outlet.
- This appliance is not intended for use by persons (including children) with reduced physical, sensory or mental capabilities, or lack of experience and knowledge, unless they have been given supervision or instruction concerning use of the appliance by a person responsible for their safety.
- Children should be supervised to ensure that they do not play with the appliance.
- Do not leave this appliance unattended when it's in use.
- The most common cause of overheating is deposits of dust or fluff in the appliance. Ensure these deposits are removed regularly by disconnect the appliance and vacuum cleaning air vents and grilles.
- Do not place the heater on carpet, don't place the cable under carpets. Arrange cord away from traffic areas so that it will not be tripped over.
- Do not use this heater in the immediate surroundings of a bath, a shower or a swimming pool.
- Do not store away until the heater cools down, store the heater in cool dry location when not in use.
- In order to avoid a hazard due to inadvertent resetting of the thermal cutout, this appliance must not be supplied through an external switching device, such as a timer, or connected to a circuit that is regularly switched on and off by the utility.
Product Data Sheet
| Model identifier(s): 10032787, 10032788 | ||||||
| Item Symbol Value Unit Item Unit | ||||||
| Heat output Type of heat input, for electric storage local space | heaters only | |||||
| Nominal heat output | Pnom | 1.0 | kW | manual heat charge control, with integrated thermostat | N/A | |
| Minimum heat output (indicative) | Pmin 1.0 | kW manual | heat charge control with room and/or outdoor temperature feedback | N/A | ||
| Maximum continuous heat output | Pmax,c 1.0 | kW electronic | heat charge control with room and/or outdoor temperature feedback | N/A | ||
| Auxiliary electricity consumption | fan assisted heat output | N/A | ||||
| At nominal heat output (fan motor) | elmax | N/A | kW | Type of heat output/room temperature control (select one) | ||
| At minimum heat output (fan motor) | elmin | N/A | kW | single stage heat output and no room temperature control | no | |
| In standby mode | elSB | 0.00124 | W | Two or more manual stages, no room temperature control | no | |
| with mechanic thermostat room temperature control | no | |||||
| with electronic room temperature control | no | |||||
| electronic room temperature control plus day timer | no | |||||
| electronic room temperature control plus week timer | yes | |||||
| Other control options (multiple selections possible) | ||||||
| room temperature control, with presence detection | no | |||||
| room temperature control, with open window detection | no | |||||
| with distance control option | no | |||||
| with adaptive start control | no | |||||
| with working time limitation | no | |||||
| with black bulb sensor | no | |||||
| Contact details | Chal-Tec GmbH, Wallstraße 16, 10179, Berlin, Germany | |||||
| Model identifier(s): 10032789 | 10032790 | |||||
| Item Symbol Value Unit Item Unit | ||||||
| Heat output Type of heat input, for electric storage local space | heaters only | |||||
| Nominal heat output Pnom 2.0 kW manual | heat charge control, with integrated thermostat | |||||
| Minimum heat output (indicative) | Pmin 2.0 kW manual heat charge control with room and/or outdoor temperature feedback | |||||
| Maximum continuous heat output | Pmax,c 2.0 kW electronic heat charge control with room and/or outdoor temperature feedback | |||||
| Auxiliary electricity consumption | fan assisted heat output N/A | |||||
| At nominal heat output (fan motor) | elmax | N/A | kW | Type of heat output/room temperature control (select one) | ||
| At minimum heat output (fan motor) | elmin | N/A | kW | single stage heat output and no room temperature control | no | |
| In standby mode | eISB | 0.00124 | W | Two or more manual stages, no room temperature control | no | |
| with mechanic thermostat room temperature control | no | |||||
| with electronic room temperature control | no | |||||
| electronic room temperature control plus day timer | no | |||||
| electronic room temperature control plus week timer | yes | |||||
| Other control options (multiple selections possible) | ||||||
| room temperature control, with presence detection | no | |||||
| room temperature control, with open window detection | no | |||||
| with distance control option | no | |||||
| with adaptive start control no | ||||||
| with working time limitation | no | |||||
| with black bulb sensor | no | |||||
| Contact details | Chal-Tec GmbH, Wallstraße 16, 10179, Berlin, Germany | |||||
Product Description
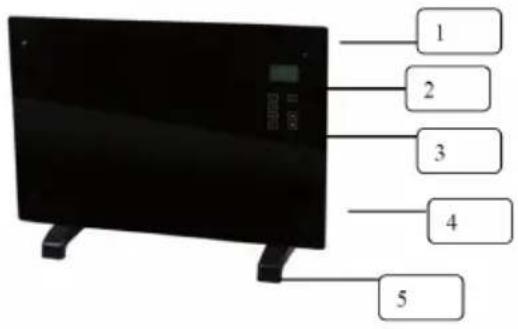
1 Decoration glass
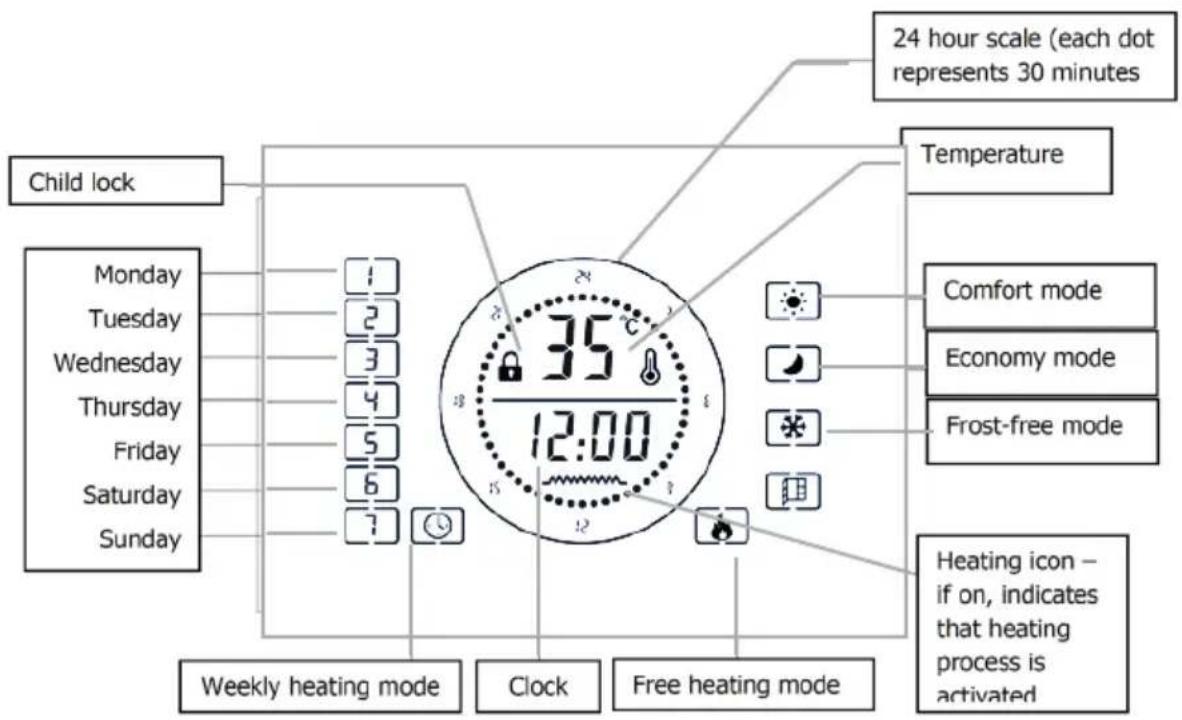
2 LCD screen
3 Operation board
4 Power ON/OFF switch
5 Foot
Display

Control Panel
 | Standby key: Switching the appliance on/off. |  | Setting temperature level. |  | Adjusting value up. |
 | Setting the time. |  | Confirming an input / entering menu. |  | Adjusting value down. |
 | Setting the program mode. | ||||
Installation
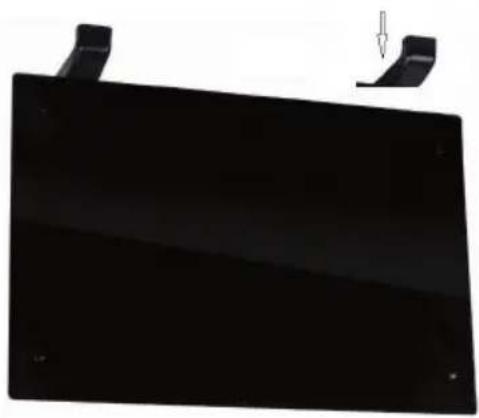
Free-standing installation
- Put the product upside down on a soft cotton cloth or carpet.
- Mount the stand in the corresponding location of the lower part of the product as shown above, and then fix the randomly supplied screw at the bottom of the product with a screwdriver and tighten the screw..
natural_image
Black rectangular object with two protruding clips and a small arrow pointing downward (no text or symbols)Wall mount
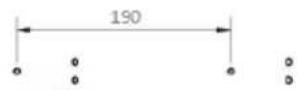
- Take out 4 brackets, 6 expansion screws and 6 screws out from the box, and fix 2 brackets onto the wall according to the distances between holes of the bracket, as depicted in the picture below.

mounting hole for 1000W
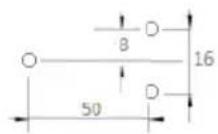
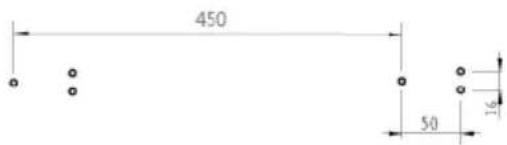
mounting hole for 2000W & 2200W


- Fix 2 brackets onto the bottom of productst, as depicted in the picture below.

natural_image
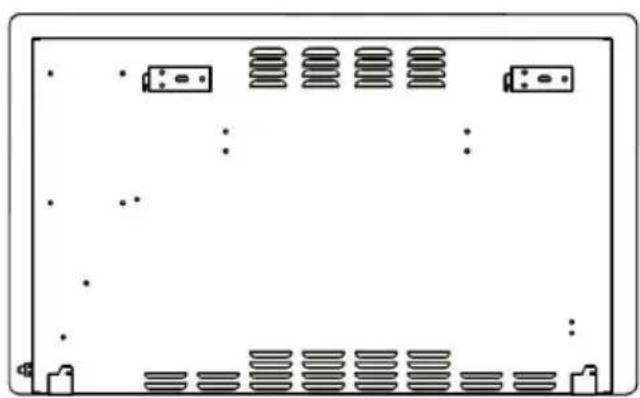
Pure technical line drawing of a heat exchanger or cooling unit with no text, numbers, or symbols- Hold the side of the product, look at the position of the wall hole of the rear cover, and slide the wall to the top of the slot, that is, the installation of the wall is completed, as depicted in the picture below.
natural_image
Front view of a computer monitor with multiple drive units and ventilation slots (no text or symbols visible)
natural_image
Simple line drawing of a vertical rectangular object with mounting holes and a small circular symbol at the base (no text or labels)Use and Operation
Switching the appliance on/off
- Set the I/O switch (4) to the I position.
- Press the Standby key to exit the standby mode, the LCD display (2) shows current ambient temperature and set time (default 12:00). Press the standby key again to active the standby mode.
Note: When turn off the I/O switch to O position, deletes the timer setting only and other function settings remain unchanged.
Choosing operation mode
This heater provides two different operation modes:
- Free heating mode

- Programmed weekly heating mode

Press the “PROG” key and use up and down key to select the desired mode. Icon of the selected mode starts to flash on the LCD display (2). Confirm the selection with “OK” key.
Free heating mode
Free heating mode provides three additional heating functions:
| Comfort |  | Comfortable function is intended to heat the room to the set temperature. To activate or deactivate Comfortable function, press the up or down key, if activated icon appears on the LCD display. Default heating temperature is set to 35°C, to adjust use the key to set temperature. |
| Economy |  | Economy function is intended to maintain the set temperature. When the ambient temperature is equal to the set temperature, heater automatically switches from Comfortable to Economy mode. When the ambient temperature is 5°C lower than the set temperature, heater automatically switches from Economy to Comfortable mode. |
| Frost-free |  | Frost-free function is intended to keep the minimum temperature of 5°C inside the room (this temperature cannot be adjusted). This function is set as a default function for free heating mode. It activated automatically after entering the free heating mode. |
Note: When the ambient temperature is equal to the set temperature use the up and down keys to toggle between Economy and Frost-free function.
Programmed weekly heating mode
- To enter the weekly heating mode press PROG and move the cursor over the clock icon at the bottom left hand side of the LCD screen and press OK.
- Now the cursor is flashing over the days of the week(left side of menu.
- Use the UP and DOWN arrows to choose your day to program; 1 to 7.
- Press the PROG key to confirm the day
- Use the OK arrows to select the heating function between comfort, economy and frost free (you will see the cursor on the right side of the menu scroll between the modes)
- That is the first 30 minute period selected and it moves on to the next 30 minute period
- Press the UP and DOWN arrow to choose the time.
- Program each day of the week separately following the steps above.
24-hour scale
| 24-hour scale: Each square represents 30 minutes | 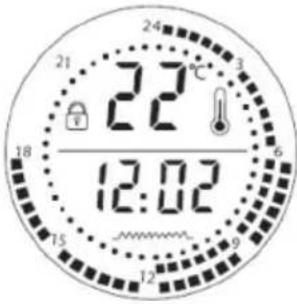 |  | Squares on the outside and inside of the scale indicate Comfortable function. |
 | Squares on the inside of the scale indicate Frost-free function. | ||
 | Squares on the outside of the scale indicate Economy function. |
The drawing illustrates the following setting:
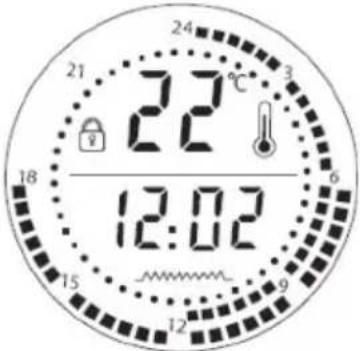 | 0 - 6am: Frost-free function6 - 12pm: Comfortable function12 - 18pm: Economy function.Note:1. The functions cann’t be set simultaneously.2. Setting the I/O switch to “O” position deletes all the settings from the memory. |
Setting temperature
- To adjust the temperature press the [TEMP] key. The temperature starts to flash on the LCD display.
- Use up and down keys to select the desired temperature.
- Press the key again to confirm.
Child lock function
- To set the heater to a standby mode and apply the child lock function, simply hold the OK key and wait for 5 seconds. You will see the padlock image lock on the LCD screen.
- To unlock, press the OK key for 5 seconds.
Setting time
To set the time press the TIME key, when the hour digits “12” starts to blink, use up and down keys to set the hour and confirm by pressing TIME key. Now minute digits “00” to blink, use up and down keys to set the minute and confirm the minute by pressing TIME key again.
Open window function
- The heater is fitted with state of the art energy saving technology such as the open window function
- To activate this feature simply press and hold the TEMP button for 5 second, The open window icon appears on the LCD menu under the Frost Free icon on the right hand side of the menu
- When activated your heater will stop heating when the room temperature drops by 4 C in 20 minutes, the window icon will flash .when you want back before model, please hold the TEMP button for 5 seconds (if the heater lock Please press the OK button for 5 seconds to unlock), the window icon stop flash and the heater back heating!
- To deactivate the feature, simply press and hold the TEMP key for 5 seconds again, then the window icon will disappear!
Cleaning and Care
Maintenance
Always disconnect the appliance and let it completely cool before any maintenance. Use a vacuum cleaner to remove dust on grilles. Clean the outside of the unit with a damp cloth and then dry it with a dry cloth. Never immerse the unit in water, nor let water drip into the unit.
Storing
Always disconnect the appliance, let it completely cool and clean it before storing. If you do not use the device for a long period, put back the unit and the instruction manual to the original carton and store in a dry and ventilated place. Do not place any heavy items on top of carton during storing as this may damage the appliance.
Hints on Disposal
natural_image
Symbol of a trash bin crossed with a diagonal line, no text or numbers presentAccording to the European waste regulation 2012/19/EU this symbol on the product or on its packaging indicates that this product may not be treated as household waste. Instead it should be taken to the appropriate collection point for the recycling of electrical and electronic equipment. By ensuring this product is disposed of correctly, you will help prevent potential negative consequences for the environment and human health, which could otherwise be caused by inappropriate waste handling of this product. For more detailed information about recycling of this product, please contact your local council or your household waste disposal service.
Declaration of Conformity
CE
Producer: Chal-Tec GmbH, Wallstraße 16, 10179 Berlin, Germany.
This product is conform to the following European Directives:
2014/30/EU (EMC)
2014/35/EU (LVD)
2011/65/EU (RoHS)
2009/125/EC (ErP)
Chère cliente, cher client,
FICHE DE DONNÉES PRODUIT
natural_image
Black rectangular object with two protruding clips and a small arrow pointing downward (no text or symbols)Montage mural
natural_image
Technical line drawing of a heat exchanger or cooling unit with cooling fins and cooling ports (no text or symbols)natural_image
Front view of a computer monitor with multiple drive units and ventilation slots (no text or symbols visible)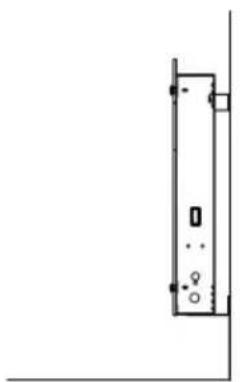
natural_image
Simple line drawing of a vertical rectangular object with mounting holes and a small square on the top (no text or symbols)natural_image
Symbol of a trash bin crossed with a diagonal line, no text or numbers presentnatural_image
Black rectangular object with two protruding clips and a small arrow pointing downward (no text or symbols)Montaggio a parete
natural_image
Pure technical line drawing of a heat exchanger or cooling unit with no text, numbers, or symbolsnatural_image
Front view of a computer monitor with multiple drive bays and indicator lights (no text or symbols visible)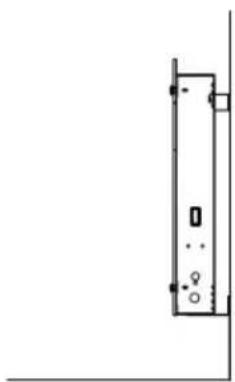
natural_image
Simple line drawing of a vertical rectangular object with mounting holes and a small circular symbol at the base (no text or labels)natural_image
Symbol of a trash bin crossed with a diagonal line, representing no waste or elimination (no text or labels)natural_image
Black rectangular object with two protruding clips and a small arrow pointing downward (no text or symbols)Montaje en pared
natural_image
Pure technical line drawing of a heat exchanger or cooling unit with no text, numbers, or symbolsnatural_image
Front view of a computer monitor with multiple drive units and ventilation slots (no text or symbols visible)
natural_image
Simple line drawing of a vertical rectangular object with mounting holes and a small circular symbol at the base (no text or labels)natural_image
Symbol of a trash bin crossed out by two diagonal lines (no text or labels)a las personas a su
Congratulations on purchasing this equipment. Please read this manual carefully and take care of the following hints to avoid damages. Any failure caused by ignoring the mentioned items and cautions mentioned in the instruction manual are not covered by our warranty and any liability.
Technical Data
| Item number Model 1 Model 2 | ||
| Power supply 230 V ~ 50 Hz | ||
| Power consumption 1000 W 2000 | W | |
Safety Instructions
- Read all instructions carefully before using.
- Make sure the voltage is the same as that indicated on the rating plate of the appliance.
- Do not operate this appliance if the cable or plug becomes damaged.
- Keep the appliance and cable away from sources of heat, sharp objects or anything that may cause damage.
- If the cord is damaged, it must be replaced by the manufacturer, its service agent or similarly qualified persons in order to avoid a hazard.
- Ensure the appliance is switched off before connecting to the mains power supply.
- Switch off the power supply and disconnect from mains supply when not in use, before cleaning or other maintenance.
- To disconnect the appliance, switch it "OFF", and then remove the plug from outlet. Do not pull the cord to disconnect the plug. The heater must not be located immediately below a socket-outlet.
- Do not operate in areas where gasoline, paint or other flammable liquids are used or stored.
- Indoor use only. In order to avoid overheating, do not cover the heater.
- To prevent a possible fire, do not block air intakes or exhaust in any manner.
- Don't touch the hot surfaces.
- Do not insert or allow foreign objects to enter any ventilation or exhaust opening, as this may cause an electric shock, fire or damage to the appliance.
- Always ensure that hands are dry before operating or adjusting any switch on the product or touching the plug and socket-outlet.
- This appliance is not intended for use by persons (including children) with reduced physical, sensory or mental capabilities, or lack of experience and knowledge, unless they have been given supervision or instruction concerning use of the appliance by a person responsible for their safety.
- Children should be supervised to ensure that they do not play with the appliance.
- Do not leave this appliance unattended when it's in use.
- The most common cause of overheating is deposits of dust or fluff in the appliance. Ensure these deposits are removed regularly by disconnect the appliance and vacuum cleaning air vents and grilles.
- Do not place the heater on carpet, don't place the cable under carpets. Arrange cord away from traffic areas so that it will not be tripped over.
- Do not use this heater in the immediate surroundings of a bath, a shower or a swimming pool.
- Do not store away until the heater cools down, store the heater in cool dry location when not in use.
- In order to avoid a hazard due to inadvertent resetting of the thermal cutout, this appliance must not be supplied through an external switching device, such as a timer, or connected to a circuit that is regularly switched on and off by the utility.
Product Data Sheet
| Model identifier(s): xxx | ||||||
| Item Symbol Value Unit Item Unit | ||||||
| Heat output Type of heat input, for electric storage local space | heaters only | |||||
| Nominal heat output | Pnom | 1.0 | kW | manual heat charge control, with integrated thermostat | N/A | |
| Minimum heat output (indicative) | Pmin 1.0 | kW manual | heat charge control | control with room and/or outdoor temperature feedback | N/A | |
| Maximum continuous heat output | Pmax,c 1.0 | kW electronic | heat charge control | control with room and/or outdoor temperature feedback | N/A | |
| Auxiliary electricity consumption | fan assisted heat output | N/A | ||||
| At nominal heat output (fan motor) | elmax | N/A | kW | Type of heat output/room temperature control (select one) | ||
| At minimum heat output (fan motor) | elmin | N/A | kW | single stage heat output and no room temperature control | no | |
| In standby mode | elSB | 0.00124 | W | Two or more manual stages, no room temperature control | no | |
| with mechanic thermostat room temperature control | no | |||||
| with electronic room temperature control | no | |||||
| electronic room temperature control plus day timer | no | |||||
| electronic room temperature control plus week timer | yes | |||||
| Other control options (multiple selections possible) | ||||||
| room temperature control, with presence detection | no | |||||
| room temperature control, with open window detection | no | |||||
| with distance control option | no | |||||
| with adaptive start control | no | |||||
| with working time limitation | no | |||||
| with black bulb sensor | no | |||||
| Contact details | Chal-Tec GmbH, Wallstraße 16, 10179, Berlin, Germany | |||||
| Model identifier(s): NN | ||||||
| Item Symbol Value Unit Item Unit | ||||||
| Heat output Type of heat input, for electric storage local space | heaters only | |||||
| Nominal heat output Pnom 2.0 kW manual | heat charge control, with integrated thermostat | |||||
| Minimum heat output (indicative) | Pmin 2.0 kW manual heat charge control with room and/or outdoor temperature feedback | |||||
| Maximum continuous heat output | Pmax,c 2.0 kW electronic heat charge control with room and/or outdoor temperature feedback | |||||
| Auxiliary electricity consumption | fan assisted heat output N/A | |||||
| At nominal heat output (fan motor) | elmax | N/A | kW | Type of heat output/room temperature control (select one) | ||
| At minimum heat output (fan motor) | elmin | N/A | kW | single stage heat output and no room temperature control | no | |
| In standby mode | eISB | 0.00124 | W | Two or more manual stages, no room temperature control | no | |
| with mechanic thermostat room temperature control | no | |||||
| with electronic room temperature control | no | |||||
| electronic room temperature control plus day timer | no | |||||
| electronic room temperature control plus week timer | yes | |||||
| Other control options (multiple selections possible) | ||||||
| room temperature control, with presence detection | no | |||||
| room temperature control, with open window detection | no | |||||
| with distance control option | no | |||||
| with adaptive start control no | ||||||
| with working time limitation | no | |||||
| with black bulb sensor | no | |||||
| Contact details | Chal-Tec GmbH, Wallstraße 16, 10179, Berlin, Germany | |||||
Product Description
1 Decoration glass
2 LCD screen
3 Operation board
4 Power ON/OFF switch
5 Foot

Display
Control Panel
 | Standby key: Switching the appliance on/off. | | Setting temperature level. | | Adjusting value up. |
 | Setting the time. | | Confirming an input / entering menu. | | Adjusting value down. |
 | Setting the program mode. | ||||
Installation
Free-standing installation
- Put the product upside down on a soft cotton cloth or carpet.
- Mount the stand in the corresponding location of the lower part of the product as shown above, and then fix the randomly supplied screw at the bottom of the product with a screwdriver and tighten the screw..

natural_image
Black rectangular object with two protruding clips and a small arrow pointing downward (no text or symbols)Wall mount
- Take out 4 brackets, 6 expansion screws and 6 screws out from the box, and fix 2 brackets onto the wall according to the distances between holes of the bracket, as depicted in the picture below.
mounting hole for 1000W


mounting hole for 2000W & 2200W


- Fix 2 brackets onto the bottom of productst, as depicted in the picture below.

natural_image
Pure technical line drawing of a heat exchanger or cooling unit with no text, numbers, or symbols- Hold the side of the product, look at the position of the wall hole of the rear cover, and slide the wall to the top of the slot, that is, the installation of the wall is completed, as depicted in the picture below.

natural_image
Front view of a computer monitor with multiple drive units and ventilation slots (no text or symbols visible)
natural_image
Simple line drawing of a vertical rectangular object with mounting holes and a small circular symbol at the base (no text or labels)Use and Operation
Switching the appliance on/off
- Set the I/O switch (4) to the I position.
- Press the Standby key to exit the standby mode, the LCD display (2) shows current ambient temperature and set time (default 12:00). Press the standby key again to active the standby mode.
Note: When turn off the I/O switch to O position, deletes the timer setting only and other function settings remain unchanged.
Choosing operation mode
This heater provides two different operation modes:
- Free heating mode

- Programmed weekly heating mode

Press the “PROG” key and use up and down key to select the desired mode. Icon of the selected mode starts to flash on the LCD display (2). Confirm the selection with “OK” key.
Free heating mode
Free heating mode provides three additional heating functions:
| Comfort | | Comfortable function is intended to heat the room to the set temperature. To activate or deactivate Comfortable function, press the up or down key, if activated icon appears on the LCD display. Default heating temperature is set to 35°C, to adjust use the key to set temperature. |
| Economy | | Economy function is intended to maintain the set temperature. When the ambient temperature is equal to the set temperature, heater automatically switches from Comfortable to Economy mode. When the ambient temperature is 5°C lower than the set temperature, heater automatically switches from Economy to Comfortable mode. |
| Frost-free | | Frost-free function is intended to keep the minimum temperature of 5°C inside the room (this temperature cannot be adjusted). This function is set as a default function for free heating mode. It activated automatically after entering the free heating mode. |
Note: When the ambient temperature is equal to the set temperature use the up and down keys to toggle between Economy and Frost-free function.
Programmed weekly heating mode
- After entering the weekly heating mode and when the Monday icon [☐]. is flashing use the up or down key to select the day to be programmed. Each number corresponds to respective day of the week.
- Press the PROG key to confirm.
- Use the up or down key to select the heating function.
- Press OK key to confirm selection.
- Now using the up and sown key and 24-hour scale as reference set the desired length of operation for selected mode. Press OK key and wait for 10 seconds to save the settings. Press the PROG key during time settings resets the time to default value.
- Program each day of the week separately following the steps above.
24-hour scale
| 24-hour scale: Each square represents 30 minutes | 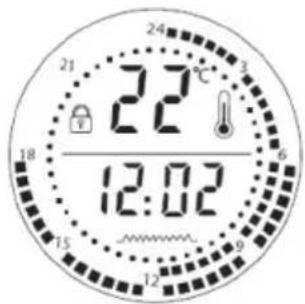 |  | Squares on the outside and inside of the scale indicate Comfortable function. |
 | Squares on the inside of the scale indicate Frost-free function. | ||
 | Squares on the outside of the scale indicate Economy function. |
The drawing illustrates the following setting:
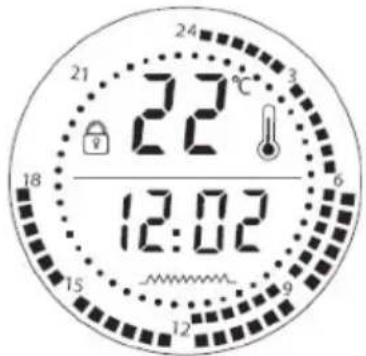 | 0 - 6am: Frost-free function6 - 12pm: Comfortable function12 - 18pm: Economy function.Note:1. The functions cann’t be set simultaneously.2. Setting the I/O switch to “O” position deletes all the settings from the memory. |
Setting temperature
- To adjust the temperature press the [TEMP] key. The temperature starts to flash on the LCD display.
- Use up and down keys to select the desired temperature.
- Press the key again to confirm.
Child lock function
- To set the heater to a standby mode and apply the child lock function, simply hold the OK key and wait for 5 seconds.
- To unlock, press the OK key for 5 seconds.
Setting time
To set the time press the TIME key, when the hour digits “12” starts to blink, use up and down keys to set the hour and confirm by pressing TIME key. Now minute digits “00” to blink, use up and down keys to set the minute and confirm the minute by pressing TIME key again.
Open window function
In all heating modes (comfort mode; ECO mode;), when opening the room window, the room temperature drops 5 degrees in 30 minutes, the product automatically stops heating, the screen opens the window function icon to icon flash. If you need to resume heating work, you must first unlock (if locked), and then long press the temperature OK key for 5 seconds to restore to the working mode before the window was opened.
Cleaning and Care
Maintenance
Always disconnect the appliance and let it completely cool before any maintenance. Use a vacuum cleaner to remove dust on grilles. Clean the outside of the unit with a damp cloth and then dry it with a dry cloth. Never immerse the unit in water, nor let water drip into the unit.
Storing
Always disconnect the appliance, let it completely cool and clean it before storing. If you do not use the device for a long period, put back the unit and the instruction manual to the original carton and store in a dry and ventilated place. Do not place any heavy items on top of carton during storing as this may damage the appliance.
Hints on Disposal

natural_image
Symbol of a trash bin crossed with a diagonal line, no text or numbers presentAccording to the European waste regulation 2012/19/EU this symbol on the product or on its packaging indicates that this product may not be treated as household waste. Instead it should be taken to the appropriate collection point for the recycling of electrical and electronic equipment. By ensuring this product is disposed of correctly, you will help prevent potential negative consequences for the environment and human health, which could otherwise be caused by inappropriate waste handling of this product. For more detailed information about recycling of this product, please contact your local council or your household waste disposal service.
Declaration of Conformity
Producer: Chal-Tec GmbH, Wallstraße 16, 10179 Berlin, Germany.

This product is conform to the following European Directives:
2014/30/EU (EMC)
2014/35/EU (LVD)
2011/65/EU (RoHS)
2009/125/EC (ErP)


- Wandmontage
- Technical Data
- Safety Instructions
- Product Data Sheet
- Product Description
- Installation
- Free-standing installation
- Wall mount
- Use and Operation
- Switching the appliance on/off
- Programmed weekly heating mode
- 24-hour scale
- Setting temperature
- Child lock function
- Setting time
- Open window function
- Cleaning and Care
- Maintenance
- Storing
- Hints on Disposal
- Declaration of Conformity
- Montage mural
- Montaggio a parete
- Montaje en pared
Brand : Klarstein
Model : 10032788
Category : Pan