
MZ-B100 - MiniDisc Player SONY - Free user manual and instructions
Find the device manual for free MZ-B100 SONY in PDF.

| Product Type | Portable MiniDisc player/recorder |
| Brand | Sony |
| Model | MZ-B100 |
| Dimensions (W × H × D) | 105.7 × 80.0 × 24.9 mm |
| Weight (without batteries) | Approx. 160 g |
| Power source | 1 LR6 (AA) alkaline battery or AC-E30HG AC power adaptor (optional) |
| Input voltage | 3 V DC |
| Recording modes | Normal stereo, LP2 stereo, LP4 stereo, Mono |
| Maximum recording time (MD 80 min) | 80 min (stereo), 160 min (LP2 or mono), 320 min (LP4) |
| Battery life (recording, stereo) | Approx. 9 hours (Sony LR6 alkaline battery) |
| Battery life (playback, headphones) | Approx. 34.5 hours (stereo) with Sony LR6 alkaline battery |
| Built-in speaker | Mono, 28 mm diameter |
| Inputs | Mini stereo microphone (with Plug-in Power), line/optical input (shared stereo mini-jack) |
| Output | Mini stereo headphones (via supplied remote), built-in speaker |
| Frequency response | 20 Hz - 20 kHz (±3 dB) |
| Special features | Synchro recording, VOR (voice-operated recording), Easy Search, Speed Control, Group Function, track marking, name editing |
| Display | LCD display with adjustable contrast |
| Supplied accessories | Remote control with headphones, carrying case, hand strap, LR6 alkaline battery (world model) |
| Maintenance and cleaning | Clean the casing with a soft, slightly damp cloth. Do not use solvents. Clean the battery terminals with a cotton swab. |
| Safety | HOLD function to lock buttons. Do not expose to moisture, shocks, or extreme temperatures. |
| Spare parts and repairability | Standard AA alkaline battery. Optional AC-E30HG AC power adaptor. For repairs, contact a Sony authorized service center. |
| General information | Portable MiniDisc recorder/player with ATRAC and ATRAC3 technology. MDLP compatible. Laser code: GaAlAs, λ=790 nm. |
Frequently Asked Questions - MZ-B100 SONY
User questions about MZ-B100 SONY
0 question about this device. Answer the ones you know or ask your own.
Ask a new question about this device
Download the instructions for your MiniDisc Player in PDF format for free! Find your manual MZ-B100 - SONY and take your electronic device back in hand. On this page are published all the documents necessary for the use of your device. MZ-B100 by SONY.
USER MANUAL MZ-B100 SONY
Portable MiniDisc Recorder
Operating Instructions GB
The serial number is located at the rear of the disc compartment lid and the model number is located at the top and bottom. Record the serial number in the space provided below. Refer to them whenever you call upon your Sony dealer regarding this product.
Model No. MZ-B100
Serial No. ____
This equipment has been tested and found to comply with the limits for a Class B digital device, pursuant to Part 15 of the FCC Rules. These limits are designed to provide reasonable protection against harmful interference in a residential installation. This equipment generates, uses, and can radiate radio frequency energy and, if not installed and used in accordance with the instructions, may cause harmful interference to radio communications. However, there is no guarantee that interference will not occur in a particular installation. If this equipment does cause harmful interference to radio or television reception, which can be determined by turning the equipment off and on, the user is encouraged to try to correct the interference by one or more of the following measures:
— Reorient or relocate the receiving antenna.
— Increase the separation between the equipment and receiver.
— Connect the equipment into an outlet on a circuit different from that to which the receiver is connected.
— Consult the dealer or an experienced radio/TV technician for help.
This device complies with Part 15 of the FCC Rules. Operation is subject to the following two conditions: (1) This device may not cause harmful interference, and (2) this device must accept any interference received, including interference that may cause undesired operation.
You are cautioned that any changes or modifications not expressly approved in this manual could void your authority to operate this equipment.
Caution
The use of optical instruments with this product will increase eye hazard.
CAUTION — INVISIBLE LASER RADIATION WHEN OPEN
AVOID EXPOSURE TO BEAM
Information
IN NO EVENT SHALL SELLER BE LIABLE FOR ANY DIRECT, INCIDENTAL OR CONSEQUENTIAL DAMAGES OF ANY NATURE, OR LOSSES OR EXPENSES RESULTING FROM ANY DEFECTIVE PRODUCT OR THE USE OF ANY PRODUCT.
Certain countries may regulate disposal of the battery used to power this product. Please consult with your local authority.
Disposal of Old Electrical & Electronic Equipment (Applicable in the European Union and other European countries with separate collection systems)

natural_image
Symbol of a trash bin crossed with a diagonal line, no text or numbers presentThis symbol on the product or on its packaging indicates that this product shall not be treated as household waste. Instead it shall be handed over to the applicable collection point for the recycling of electrical and electronic equipment. By ensuring this product is disposed of correctly, you will help prevent potential negative consequences for the environment and human health, which could otherwise be caused by inappropriate waste handling of this product. The recycling of materials will help to conserve natural resources. For more detailed information about recycling of this product, please contact your local city office, your household waste disposal service or the shop where you purchased the product.
Applicable accessories: Remote control, Headphones
Table of contents
Looking at the controls 6
Preparing a power source 9
Recording an MD right away! 11
Playing an MD right away! 14
Various ways of recording 16
Recording for long times 16
VOR (Voice Operated Recording) 17
Recording from a microphone ....18
Recording from externally connected equipment ....19
Recording with digital (optical) input (optical cable required) .....20
Recording with analog (line) input (line cable required) .....21
Recording tracks using the Group Function (Group mode recording) .22
To activate the group mode (Group mode recording) .....23
Recording a track into a new group ....23
Recording a track into an existing group ....23
To start/stop recording in sync with the source player (Synchro-recording) 24
Setting the clock to stamp the recorded time 25
Checking the remaining time or the recording position ....26
Various ways of playback 27
Changing the sound setting 27
Finding a point quickly (Easy Search) 28
Changing the playback speed (Speed Control) 28
Playing tracks repeatedly ....29
Checking the remaining time or the playing position ....29
Using the Group Function (Group mode) ....30
Listening to tracks using the group mode (group mode playback) 30
Selecting and playing groups (Group skip mode) ....31
Editing recorded tracks 32
Adding a track mark 32
Track marking to divide a recording 32
Track marking important points 32
Erasing a track mark 33
Labeling recordings 34
Registering tracks or groups as a new group (Group setting) ...... 36
To release a group setting 37
Moving recorded tracks 38
Moving a track to a different group 38
Changing the order of a group on a disc (Group move) 39
Erasing tracks 39
To erase a track 39
To erase the whole disc 40
To erase a group 40
Other operations 41
Adjusting the contrast of the display window (Contrast adjustment) .. 41
Locking the controls (HOLD) 41
Power sources 42
When to replace the batteries 42
Battery life 42
Using house current 43
Additional information 44
Precautions 44
Troubleshooting 46
System limitations 49
Messages 50
Specifications 52
Explanations 53
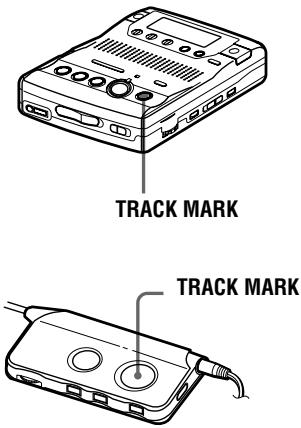
Looking at the controls
See pages in ( ) for more details.
Front of the recorder
How to attach the hand strap.
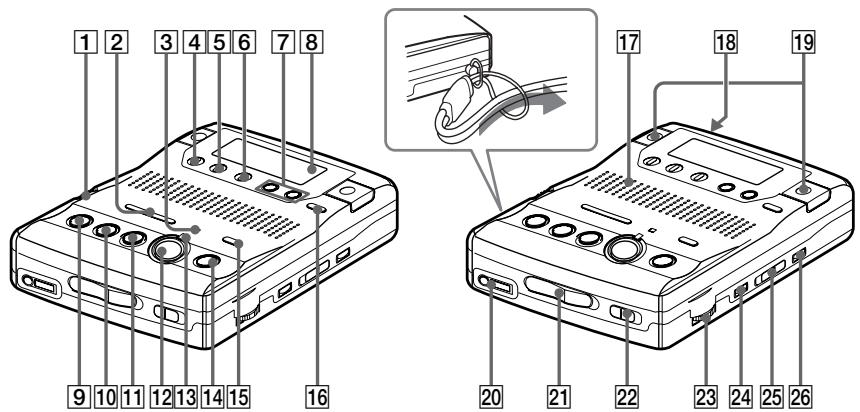
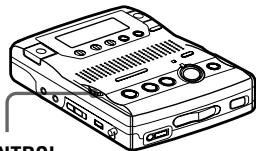
1 SPEED CONTROL dial (28)
2 ◀◀ REVIEW/AMS/▶▶ICUE/AMS (search /AMS) buttons (12) (15) (23) (25) (31) (33) (34) (41)
3 VOR indicator (17)
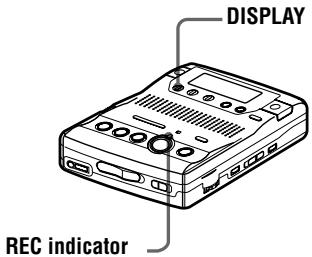
4 DISPLAY button (26) (29) (35)
5 PLAY MODE button (29) (35)
6 EDIT/ENTER button (31) (34) (41)
7 EASY SEARCH +/- buttons (28) (35)
8 Display window (24) (27) (33)
9 ■ STOP button (12) (14) (25) (35)
10 ▶ PLAY (play) button (12) (14) (25)
(34)
The ▶ PLAY button has a tactile dot.
11 ☐ PAUSE button (13) (15) (33) (34)
12 ●REC button (12) (16)
13 REC indicator (12) (26)
14 TRACK MARK button (32) (33)
15 REC MODE switch (12) (16)
16 GROUP button (23) (30) (37)
17 Speaker (14)
18 DC IN 3V jack (43)
19 Microphones (12) (17)
20 Ⓝ (headphones) jack (12) (14)
21 OPEN switch (11) (14)
22 HOLD switch (9) (41)
23 VOL control (14) The VOL control has a tactile dot.
24 VOR button (17)
25 SYNCHRO REC ON/OFF switch (24)
26 ERASE button (39)
Back of the recorder
1 Battery compartment (9)
2 CLOCK SET button (25)
3 SOUND button (27)
4 LINE IN (OPTICAL) jack (20) (21)
⑤ MIC (PLUG IN POWER) jack (18) The MIC (PLUG IN POWER) jack has a tactile dot.
6 MIC SENS (H/L) switch (11) (17)
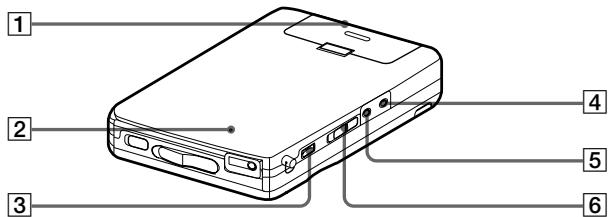
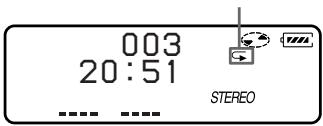
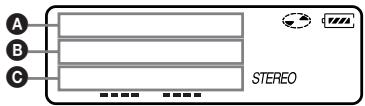
The display window

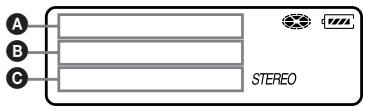
1 Character information display (16) (27) (33)
Displays the disc and track names, date, error messages, track numbers, recording level, etc.
2 Group indication (23) (30) (35)
3 Play mode indication (29)
4 Disc indication (16) (27) (33) Shows that the disc is rotating for recording, playing or editing an MD.
5 VOR indication (17)
6 Battery level indication (42)
7 SYNC (synchro-recording) indication (24)
8 Playback level meter (30) (33)
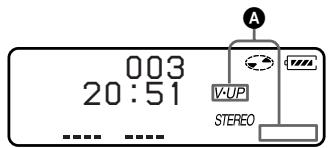
9 V-UP indication (27)
10 STEREO (stereo), LP2 (LP2 stereo), LP4 (LP4 stereo), MONO (monaural) indication (12) (16)
11 Pause indication
12 SOUND indication (27)
13 REC indication (12)
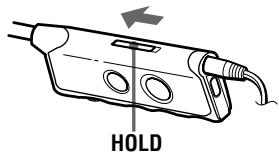
The remote control
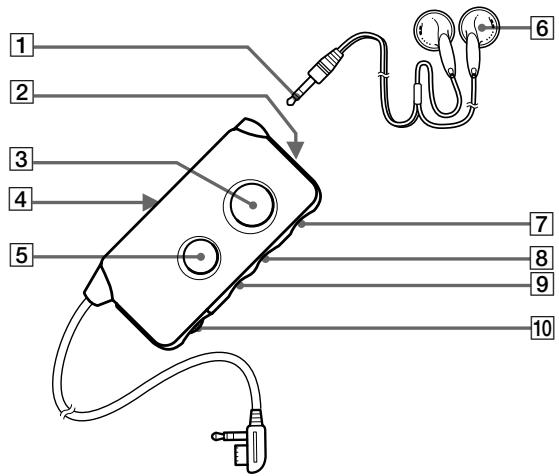
1 Stereo mini plug
2 SOUND button (27)
3 TRACK MARK button (32) (33)
4 HOLD switch (9) (41)
Slide to lock the controls of the remote control.
5 II (pause) button (15)
6 Headphones
7 ■ (stop) button (14)
8 ▶▶▶▶ buttons (15)
The ▶▶▶▶ button has a tactile dot.
9 REVIEW/AMS (15)
10 VOL control (14)
The VOL control has a tactile dot.
Preparing a power source
This section explains how to prepare the recorder for battery-powered operation. For information on connecting the recorder to an AC power outlet, see page 43.
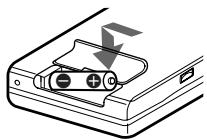
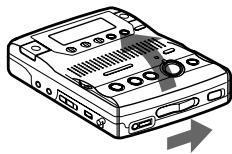
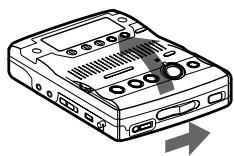
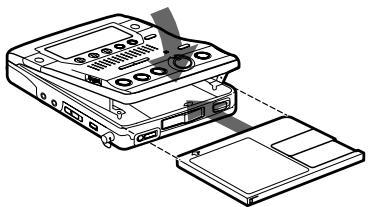
1 Insert dry batteries.
Back of the recorder
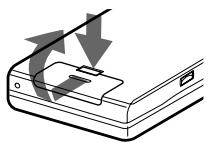
natural_image
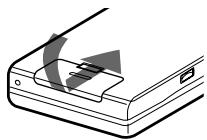
Diagram of a device with arrows indicating motion or force, no text or symbols presentPress and slide the battery compartment lid as shown in the illustration.
natural_image
Diagram of a device with a battery cover and a downward arrow indicating a process (no text or symbols present)Insert one LR6 (size AA) alkaline dry battery (supplied with the world model only).
natural_image
Diagram of a device with a curved arrow indicating motion or force, no text or symbols presentClose the lid.
Notes
- Do not use manganese dry battery. If you do, recording may not be possible.
- Insert the and poles of the battery correctly as shown on the recorder.
2 Unlock the control.
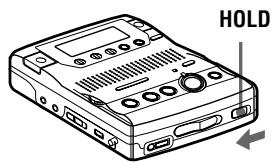
Slide HOLD to the direction of the arrow in the illustration.
Charging the built-in battery for the clock
When you use the recorder for the first time or after a long period of disuse, charge the built-in battery for the clock. After setting the clock, leave the dry batteries installed for about more than two hours so that the built-in battery is automatically charged. You can use the recorder while charging. When the built-in battery is charged, the settings, such as clock, will remain for about one month after dry batteries are taken out. For details on setting a clock, see page 25.
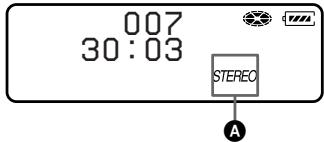
Recording an MD right away!
Use the built-in microphones to record in stereo. Make sure the record-protect tab on the disc is closed (page 54). The use of new alkaline dry battery is recommended. The recording may not be possible if you use manganese dry battery.
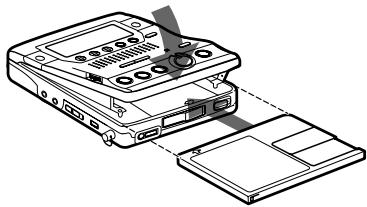
1 Insert a recordable MD.
natural_image
Line drawing of a portable electronic device with ports and buttons, showing an arrow indicating leftward movement (no text or symbols present)① Slide OPEN to open the lid.
natural_image
Diagram of a device with an open rear panel and internal components, showing no text or symbols.② Insert a recordable MD with the label side facing up, and press down on the lid (at the center of the front edge as shown above) to close it firmly.
2 Select the microphone sensitivity.
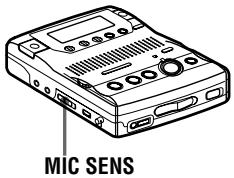
① Slide MIC SENS to H or L.
| MIC SENS | When |
| H (high) | recording a soft or a sound in the distance (e.g. to record a meeting). |
| L (low) | recording a laud or a sound at close range (e.g. to record a speech through a microphone). |
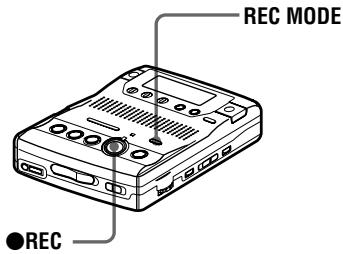
3 Select the recording mode.
REC MODE
natural_image
Line drawing of a portable electronic device with ports and a screen (no text or symbols)① Press REC MODE repeatedly until “STEREO” lights up in the display.
You can select normal stereo, LP2 stereo, LP4 stereo, or monaural as the recording mode. For details, see “Recording for long times” (page 16). The factory setting is normal stereo.
The recording mode cannot be changed when recording is in progress.
4 Record an MD.
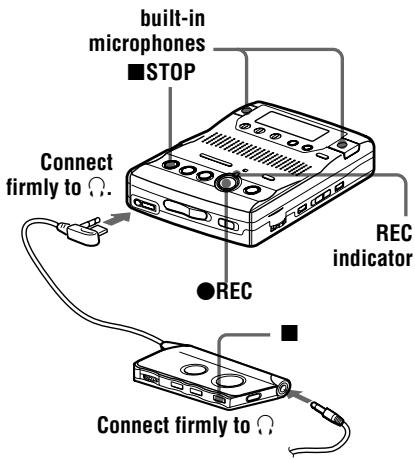
① Press ●REC.
“REC” appears, REC indicator lights up, and then recording starts. You can monitor the recording conditions, such as the recording position, through the display or the REC indicator (page 26).
If the disc is blank, the recording starts from the beginning. If the disc is partially recorded, the recording automatically starts from the end of the existing material.
To stop recording, press ■STOP.
After you press the ■STOP button to stop the recorder, the recorder will automatically turn off after about 10 seconds (when using an alkaline dry battery) or 5 minutes (when using the AC power adaptor).
To monitor the sound during recording.
Connect the supplied headphones with remote control to the ⏻ jack. You can adjust the volume by turning the VOL control. This adjustment does not affect the recording level since the level is adjusted automatically.
^1) The REC indicator flashes during recording pause. Track marks are not added while recording with microphones, even when the recorder is paused.
| To | Operation |
| Record partway through the previous recording | Press ▶PLAY, ▶ICUE/AMS or ◀◀◀ REVIEW/ AMS to find the beginning of the material to be recorded, and then press ▪PAUSE. Press ●REC so that the recorder changes to recording pause. Press ▪PAUSE again to start recording. |
| Pause^1) | Press PAUSE while recording.Press PAUSE again to resume recording. |
| Remove the MD | STOP to stop recording and open the lid. (Be sure that “TOC Edit” has disappeared from the display before opening the lid.) |
If the recording does not start
- Make sure the recorder is not locked (pages 9 and 41).
- Make sure the MD is not record-protected (page 54).
- Premastered MDs cannot be recorded over.
Notes
- For long recordings, it is recommended that you power the recorder from a house current using an optional AC power adaptor AC-E30HG (page 43).
- Do not connect an optional AC power adaptor during a recording operation if you are operating the recorder on battery power. If you do, the material recorded up to that point will not be saved to the disc
- The lid will not open during recording or until “TOC Edit” disappears from the display after the recording has completed.
- If the power supply is disrupted (i.e. the batteries are removed or becomes exhausted or the optional AC power adaptor is disconnected) during a recording operation, or while “TOC Edit” appears in the display, then it will not be possible to open the lid until power is restored.
- “Data Save” or “TOC Edit” flashes while data of the recording (the track’s start and end points, etc.) is being recorded. Do not move or jog the recorder or disconnect the power source while the indication is flashing in the display. If you do, the material recorded up to that point will not be saved to the disc.
- When you record through the microphones, the various sounds made by the recorder may also be recorded.
- The built-in microphones do not operate whenever an optional microphone is connected into the MIC (PLUG IN POWER) jack on the recorder.
- The built-in microphones do not operate whenever an optical cable or a line cable is connected into the LINE IN (OPTICAL) jack on the recorder.
Playing an MD right away!
You can play recordable MDs or premastered MDs. Sound output from the built-in speaker is monaural, but stereo listening is possible through the supplied headphones with a remote control.
1 Insert an MD.
natural_image
Line drawing of a portable electronic device with ports and control buttons, showing an arrow indicating leftward movement (no text or symbols present)① Slide OPEN to open the lid.
natural_image
Diagram of a device with ports and connectors, showing internal components (no text or symbols)② Insert an MD with the label side facing up, and press down on the lid (at the center of the front edge as shown above) to close it firmly.
2 Play an MD.
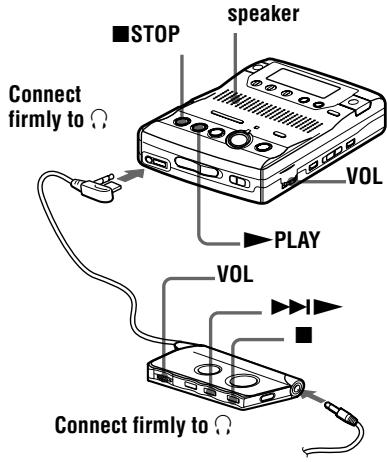
① Press ▶ PLAY.
② Turn VOL to adjust the volume.
The volume will be shown in the display.
To stop play, press ■STOP.
Playback starts from the point you last stopped playing. To start playback from the beginning of the disc, press ▶PLAY for 2 seconds or more on the recorder, or press ▶▶▶ for 2 seconds or more on the remote control.
After you press the ■STOP button to stop the recorder, the recorder will automatically turn off after about 10 seconds (when using an alkaline dry battery), or 5 minutes (when using the AC power adaptor).
On the remote control, use the ▶▶▶ button to start playback, the ■STOP button to stop the recorder, and the VOL control to adjust the volume. If you are using the remote control, you will hear short beeps whenever you press the ▶▶▶ button, and a long beep whenever you press the ■STOP button.
To listen in stereo
Connect the supplied headphones with a remote control to the jack on the recorder.
| To | Operation on the recorder | Operation on the remote control (Beeps in the headphones) |
| Find the beginning of the current track or a previous track1) | Press ◀◀◀ REVIEW/AMS. Press ◀◀◀ REVIEW/AMS repeatedly until you reach the beginning of the desired track. | Press ◀◀◀ . (Three short beeps) Press ◀◀◀ repeatedly until you reach the beginning of the desired track. |
| Find the beginning of the next track2) | Press ▶▶▶ICUE/AMS. | Press ▶▶▶▶. (Two short beeps) |
| Pause | Press ▶■PAUSE. Press ▶■PAUSE again to resume play. | Press ▶■ on the remote control. (Continuous short beeps) Press ▶■ again to resume play. |
| Go backwards while playing | Press and hold ◀◀◀ REVIEW/ AMS. | Press and hold ◀◀◀. |
| Go forward while playing | Press and hold ▶▶▶ICUE/ AMS. | Press and hold ▶▶▶▶. |
| Remove the MD | Press ■STOP and open the lid.3) | Press ■. (One short beep) |
1) If you press ◀REVIEW/AMS during the first track of the disc, the recorder goes to the beginning of the last track on the disc.
2) If you press ▶▶ICUE/AMS during the last track of the disc, the recorder goes to the beginning of the first track on the disc.
3) Once you open the lid, the point to start play will change to the beginning of the first track.
If the play does not start
Make sure the recorder is not locked (pages 9 and 41).
To locate a point quickly
Use the EASY SEARCH +/- buttons (page 28).

Playback will switch automatically between stereo and monaural according to the sound source.
Notes
- The sound may skip during playback when the recorder is exposed to continuous vibration, such as while jogging.
- If the power supply is disrupted (i.e. the batteries are removed or become exhausted or the optional AC power adaptor is disconnected) when the recorder is operating, the lid may not open until the power is restored.
Recording for long times
Select each recording mode according to the recording time that you want. Stereo recording is possible at 2 times (LP2) or 4 times (LP4) the normal (stereo) recording time. Monaural recording at 2 times normal recording speed is also possible.
MDs recorded in monaural, LP2 stereo, or LP4 stereo mode can be played back only on MD players or recorders with monaural, LP2 stereo, or LP4 stereo playback mode.
1 Insert a recordable disc.
2 Press REC MODE repeatedly until desired recording mode lights up in the display.
Each time you press the button, Ⓐ changes as follows.
| Recording mode1) | A | Recording time3) |
| Stereo | STEREO | approx. 80 min. |
| Recording mode1) | A | Recording time3) |
| LP2 stereo | LP2 | approx. 160 min. |
| LP4 stereo | LP4 | approx. 320 min. |
| Monaural2) | MONO | approx. 160 min. |
^1) For better sound quality, record in normal stereo or LP2 stereo mode.
^2) If you record a stereo source in monaural, the sounds from left and right will be mixed.
^3) When using an 80-minute recordable MD
3 Press ●REC.
For other operations on recording, see “Recording an MD right away!” (page 11).
To stop recording, press ■.
The recorder switches back to stereo recording when you record the next time.

- Audio components that support the LP2 stereo or LP4 stereo modes are indicated by the MDLP or MDLP logo marks.
- The recording mode can be changed during recording pause. When you change the recording mode, a track mark is automatically added at that point.
Notes
- “LP:” will be added at the beginning of the track name of a track recorded in MDLP mode.
- It is recommended that you use the supplied AC power adaptor for long recordings.
- During monaural recording of a stereo sound source connected through the digital (optical) input jack, you can still monitor the recorded sound in stereo by using headphones or earphones connected to the /LINE OUT jack.
- When you record in LP4 mode, momentary noise may be produced on very rare occasions with certain sound sources. This is because of the special digital audio compression technology that enables a recording time 4 times longer than normal. If noise is produced, it is recommended that you record in normal stereo or LP2 mode to obtain better sound quality.
VOR (Voice Operated Recording)
VOR causes the recorder to automatically record when there is sound, and to pause when there is no sound. This allows you to record without troublesome button operations.
1 Insert a recordable disc and slide MIC SENS to H (high) or L (low).
2 Press REC MODE repeatedly until “STEREO”, “LP2”, “LP4”, or “MONO” lights up in the display. For details on the recording mode, see “Recording for long times” (page 16).
3 Press ●REC.
4 Press VOR.
VOR turns on.
“VOR” appears in the display and the VOR indicator lights up when the recorder is recording. Both “VOR” and the VOR indicator flash when the recorder is not recording.
To cancel VOR while recording
Press VOR again.
“VOR” and the VOR indicator goes off and the recorder changes to normal recording mode.

- VOR automatically turns off when you press the ■STOP button to stop recording.
- You can change the recording mode when VOR is on and the recorder is not recording (while “VOR” and VOR indicator flash). A track mark is added each time you press the REC MODE button.
Notes
- You cannot record with the built-in microphones while an optional microphone is connected to the MIC (PLUG IN POWER) jack or an optical cable (not supplied) is connected to the LINE IN (OPTICAL) jack.
- VOR is sensitive to the surrounding sound conditions. Set the MIC SENS switch to H or L to suit the conditions. If you cannot get the desired recording results, cancel VOR and record in manual mode.
- Power from the batteries is consumed as long as VOR is on, even when recording is not taking place (i.e., when “VOR” and the VOR indicator flash.)
Recording from a microphone
Connect a stereo microphone (ECM-717, etc.; not supplied) to the MIC (PLUG IN POWER) jack. The recorder input automatically switches to the externally connected microphone input.
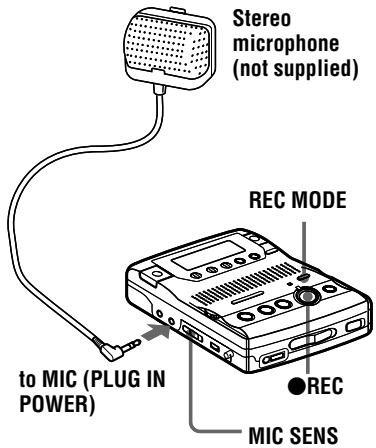
1 Insert a recordable disc and slide MIC SENS to H (high) or L (low).
2 Press REC MODE repeatedly until “STEREO”, “LP2”, “LP4”, or “MONO” lights up in the display. For details on the recording mode, see “Recording for long times” (page 16).
3 Press ●REC.
For other operations on recording, see “Recording an MD right away!” (page 11).

When using a plug-in-power microphone, no battery is needed for the microphone since power is supplied by the recorder.
If you are using the optional stereo microphone ECM-717, set the switch on the microphone to OFF to allow the recorder to provide power to the microphone. It is recommended that you set the switch on the microphone to OFF during use.
Notes
- You cannot record through the externally connected microphone while an optical cable is connected to the LINE IN (OPTICAL) jack. The recorder automatically selects the recorder input in the following order of priority; optical input, externally connected microphone input, analog (line) input, and built-in microphones input.
- The microphone may pick up the operating sound of the recorder itself (such as the sound of the motor). Use the microphone away from the recorder in such cases. Do not use a microphone with a short connector, as this may cause the operating sound of the recorder to be picked up.
Recording from externally connected equipment
The input jack of this recorder works as both digital and analog input jacks. Connect the recorder to a CD player or a cassette recorder using either digital (optical) input or analog (line) input. To record, see “Recording with digital (optical) input (optical cable required)” (page 20) to record using digital (optical) input and “Recording with analog (line) input (line cable required)” (page 21) to record using analog (line) input.
LINE IN (OPTICAL) jack is for both digital and analog input.
The recorder automatically recognizes the type of line cable and switches to digital or analog input.
Difference between digital (optical) and analog (line) inputs
| Difference | Digital (optical) input | Analog (line) input |
| Connectable source | Equipment with an digital (optical) output jack | Equipment with an analog (line) output jack |
| Usable cord | Optical cable (with an optical or an optical-mini plug)(page 20) | Line cable (with 2 phono plugs or a stereo-mini plug)(page 21) |
| Signal from the source | Digital | AnalogEven when a digital source (such as a CD) is connected, the signal sent to the recorder is analog. |
| Recorded track numbers | Marked (copied) automaticallyat the same positions as the source (when the sound source is a CD or an MD).after more than 2 seconds of blank or low-level segment (with a sound source other than a CD or an MD) (page 53).when the recorder is paused while recording (the recorder pauses automatically when it encounters a section with no audio signal for 3 seconds or more) (page 53).You can erase unnecessary marks after recording. (“Erasing a track mark”, page 33). | Marked automaticallyafter more than 2 seconds of blank or low-level segment.when the recorder is paused while recording.You can erase unnecessary marks after recording (“Erasing a track mark”, page 33). |
| Recorded sound level | Same as the source. | Adjusted automatically. |
Note
Track marks may be copied incorrectly:
- when you record from some CD players or multi disc players using digital (optical) input.
- when the source is in shuffle or program play mode while recording using digital (optical) input. In this case, play the source in normal play mode.
- when recording BS or CS programs through digital (optical) input.
Recording with digital (optical) input (optical cable required)
Connect to a digital source using an optical cable (not supplied) to make digital recordings. Digital recording is possible even from digital equipment with different sampling rates, such as a DAT deck or a BS tuner, using the built-in sampling rate converter.
1 Insert a recordable disc.
2 Press REC MODE repeatedly until “STEREO”, “LP2”, “LP4”, or “MONO” lights up in the display. For details on the recording mode, see “Recording for long times” (page 16).
3 Press ●REC.
“REC” appears in the display, the REC indicator lights up, and the recording starts.
4 Play the source sound.
For other operations on recording, see “Recording an MD right away!” (page 11).

When recording from digital media, track marks in the original are copied automatically to the MD.
Notes
- You can make a digital recording with an optical cable only from an optical type output.
- When recording from a portable CD player, play it on AC power and disable the anti-skip function (such as ESP*).
- When recording from a portable CD player, pause the CD player before doing the recording procedure.
- Digital output may be disabled on some portable CD players when the AC power adaptor is not connected to the player.
- A track mark is added at the point where you press the IIPAUSE button again to resume recording while pausing recording; thus the remainder of the track will be counted as a new track.
* Electronic Shock Protection
Recording with analog (line) input (line cable required)
Connect the recorder with a line cable (not supplied) to make analog recording. The sound will be sent from the connected equipment as analog signal but will be sent recorded digitally on the disc.
* Use the connecting cords without an attenuator. To connect to a portable CD player having a stereo mini-jack, use the RK-G136HG connecting cord (not supplied).
1 Insert a recordable disc.
2 Press REC MODE repeatedly until “STEREO”, “LP2”, “LP4”, or “MONO” lights up in the display. For details on the recording mode, see “Recording for long times” (page 16).
3 Press ●REC.
“REC” appears in the display, the REC indicator lights up, and the recording starts.
4 Play the source sound.
For other operations on recording, see “Recording an MD right away!” (page 11).
Note
A track mark is added at the point where you press the ☐PAUSE button again to resume recording while pausing recording; thus the remainder of the track will be counted as a new track.
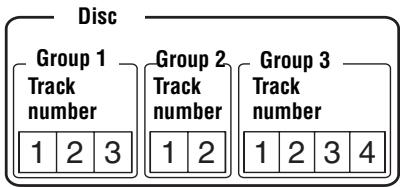
Recording tracks using the Group Function (Group mode recording)
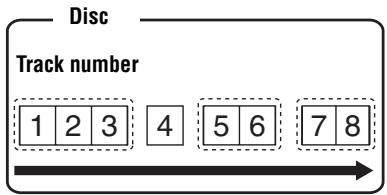
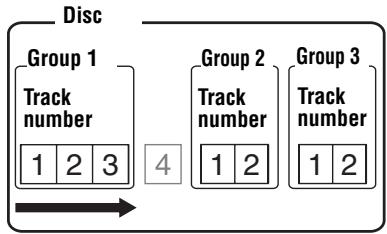
What is the group function (group mode)?
It is a function that allows you to separate tracks on a disc into different groups for playback, recording and editing.
When the Group mode is OFF.
When the Group mode is ON.
flowchart
graph TD
    A["Disc"] --> B["Group 1 Track number"]
    A --> C["Group 2 Track number"]
    A --> D["Group 3 Track number"]
    B --> E["1 2 3"]
    C --> F["1 2"]
    D --> G["1 2 3 4"]
It is convenient for managing multiple CD albums recorded in MDLP (LP2 stereo/LP4 stereo) mode onto a single MD.
How is group information recorded?
When recording in group mode, the group information is written to the disc name recording area.
This information consists of text strings that are written as shown in the following example.
Disc name recording area Example
0;June.26//1-5;Lecture 1//6-9;Lecture 2// ① ② ③
① Disc name: "June.26"
② Group name for tracks 1 to 5: "Lecture 1"
③ Group name for tracks 6 to 9: "Lecture 2"
Therefore, the above character string is displayed in its entirety as the disc name if you load an MD recorded in group mode into a system that does not support group mode, or if you try to edit the contents of a disc on this recorder with the group mode turned off.
Note that if you perform the procedure for “To relabel recordings” of “Labeling recordings” (page 35) and rewrite this character string by mistake, you may be unable to use the group function of that MD.
Note
In group mode, the recorder treats all tracks without group settings as belonging to the last group on the disc. The last group is indicated in the display window on the recorder as “Group -”. Within a group, the tracks appear in their order on the disc, not their order within the group.
To activate the group mode (Group mode recording)
To record tracks in group mode, you must first turn the group mode on before the start of recording.
1 Press GROUP for 2 seconds or more.
“☐” lights up in the display and the group mode turns on.
To cancel the group mode, press GROUP for 2 seconds or more again.
Note
The group function setting will be canceled when you eject the MD.
Recording a track into a new group
1 While the recorder is stopped, press GROUP for 2 seconds or more.
“☐” lights up in the display and the group mode turns on.
2 Press ●REC.
3 Play the source sound.
To stop recording, press ■.
The material that was recorded up until ■ was pressed is entered as a new group.
To record a track into another new group.
Turn the group mode off, and then follow steps 1 to 3
Recording a track into an existing group
1 While the recorder is stopped, press GROUP for 2 seconds or more.
“☐” lights up in the display and the group mode turns on.
2 Press GROUP slightly.
“☐” flashes in the display and you can select a group directly (group skip mode) (page 31).
3 Within 5 seconds, press
REVIEW/AMS or ICUE/AMS repeatedly until the group you want the track to belong to appears.
4 Press ●REC.
5 Play the source sound.
Note
The group skip mode turns off automatically in step 3 if nothing is done within 5 seconds. To continue the procedure, do step 2 again.

- The track will be added at the end of the group.
- For details on the group skip mode, see page 31.
- To add a track that is playing to a group, stop playing the track first, and then do the procedure from step 4.
- If you select “Group --” in step 2, the recorded material will be automatically stored as “Group01”.
To start/stop recording in sync with the source player (Synchro-recording)
You can easily make digital recordings of a digital source on an MD. Before synchro-recording, make connections to the digital source with a digital cable, and insert a recordable MD.
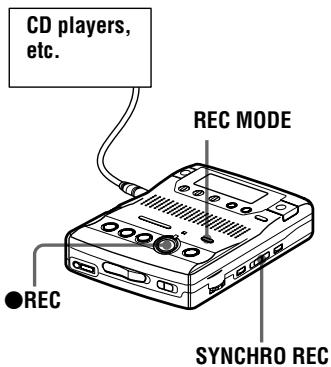
1 Press REC MODE repeatedly until “STEREO”, “LP2”, “LP4”, or “MONO” lights up in the display. For details on the recording mode, see “Recording for long times” (page 16).
2 Slide SYNCHRO REC to ON. "SYNC" appears in the display.
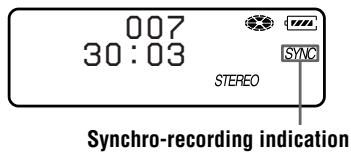
“SYNC” doesn’t appear if optical cable is not connected to the LINE IN (OPTICAL) jack on the recorder.
3 Press ●REC.
The recorder stands by for recording.
4 Play the source sound.
The recorder starts recording when it receives the playing sound.
To stop recording
Press ■STOP.

- You cannot pause manually during synchro-recording.
- When there is no sound from the player for more than 3 seconds during synchro-recording, the recorder goes into the standby mode automatically (page 53). When the sound comes from the player again, the recorder resumes synchro-recording. If the recorder is kept in the standby mode for 5 minutes or longer, the recorder stops automatically.
Notes
- Do not switch the SYNCHRO REC switch after step 3. Recording may not be done properly.
- The recording mode setting (stereo, LP2 stereo, LP4 stereo, or monaural) cannot be changed during synchro-recording.
- Even when there is no recorded sound on the sound source (page 53), there may be cases when recording does not pause automatically during synchro-recording due to the noise level emitted from the sound source.
- If a silent portion is encountered for 2 seconds or more during synchro-recording, a new track mark is automatically added at the point where the silent portion ends (page 53).
- Synchro-recording cannot be done if the connecting cord is not an optical cable, or if the cable is connected to the MIC (PLUG IN POWER) jack.
- You cannot change the recording mode during recording.
Setting the clock to stamp the recorded time
To stamp the date and time on the MD when you record, you first need to set the clock.
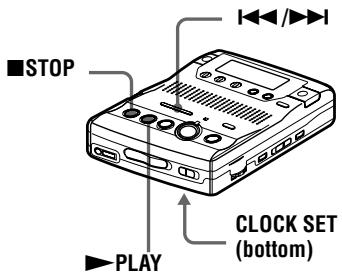
1 Press CLOCK SET at the button of the recorder.
Use a pointed object.
The digits of the year flash.
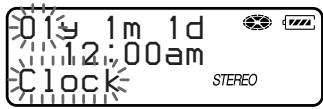
2 Change the current year by pressing ◀◀◀ or ▶▶◀.
To change the digits rapidly, keep pressing ◀◀◀ or ▶▶◀.
3 Press ▶ PLAY to enter the year. The digit of the month flashes.
4 Repeat step 2 and 3 to enter the current month, date, hour, and minute.
When you press ▶PLAY to enter the minute, the clock starts operating.
If you make a mistake while setting the clock
Press ■STOP, and set the clock again from step 1. You can skip a step by pressing ▶PLAY.
To display the current time
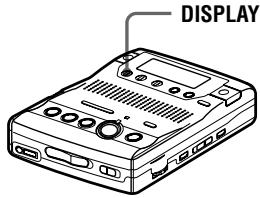
When the recorder is not operating or while recording, press DISPLAY repeatedly until the current time appears in the display.
To display the time in the 24-hour system
While setting the clock, press ☐PAUSE. To display the time in the 12-hour system, press ☐PAUSE again.

You can also use the SPEED CONTROL dial to set the clock. Turn the dial instead of ◀◀/▶▶ in step 2, and press the dial instead of ▶PLAY in step 3.
Notes
- Make sure the time is correctly set if you want the time stamp to be accurately recorded for an important recording.
- Under normal conditions, the clock may vary by about plus or minus 2 minutes per month.
Checking the remaining time or the recording position
You can check the remaining time, track number, etc. when recording or during stop.
Items related to the group function appear when you play and then stop a track with group settings.
1 Press DISPLAY while the recorder is recording or stopped.
Each time you press the button, the display changes as follows.
While recording
| A | B | C |
| Track number | Elapsed time | — |
| Track number | Remaining time for recording | RecRemain |
| Current date | Current time | Clock |
In stop mode
| A | B | C |
| Track number | Elapsed time | — |
| Track name | Remaining time for recording | RecRemain |
| Group name | Remaining time in the group | GP Remain |
| Disc name | Remaining time after the current location | AllRemain |
| Current date | Current time | Clock |
Note
Items may appear differently or may not be selectable, depending on the group mode's on/off status, the recorder's operating status, or the recorder settings.
To know the recording condition
The REC indicator lights up or flashes according to the recording condition.
| Recording condition | REC indicator |
| While recording | lights up |
| Recording standby | flashes |
| Less than 3 minutes' recording time available | flashes slowly |
| A track mark has been added (when controlling by the recorder only) | goes off momentarily |

If you want to check the playing position or track name while playing, see page 29.
Changing the sound setting
You can select your desired sound when playing.
This function is effective when using the supplied headphones to listen to stereo recordings.
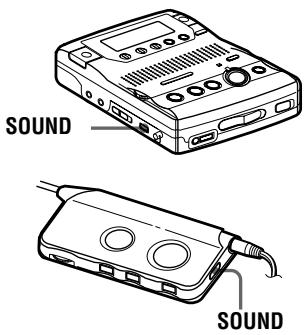
1 Press SOUND repeatedly.
Each time you press the button, Ⓐ changes as follows.
| A | Sound setting |
| — (none) | Factory setting |
| SOUND 1 | Strong bass(Digital Mega Bass 1) |
| SOUND 2 | Stronger bass(Digital Mega Bass 2) |
| V-UP1) | Enhancing voice clarity(Voice Up function) |
1) During stereo playback, the Voice Up function emphasizes the left-right orientation of individual voices, making them easier to distinguish and hear. You cannot use the Voice Up function when monaural recording.
To cancel the sound setting
Press SOUND repeatedly until nothing appears in the display.
Notes
- The use of the Voice Up function is not recommended when playing a music disc.
- You cannot set the Voice Up function on monaural recording.
- If sound distortion occurs when you turn the volume up while “SOUND 1” or “SOUND 2”, turn the volume down again or change the play mode.
- The setting of “SOUND 1” or “SOUND 2” does not affect the sound being recorded.
Finding a point quickly (Easy Search)
Use the Easy Search function to find a particular point quickly.
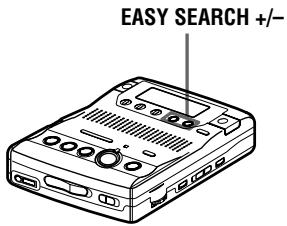
1 Press EASY SEARCH + or – while the recorder is playing or stopped. Each press of the + button moves the playback point ahead by about one minute. Each press of the – button moves the playback point back about one minute.
When the + button was pressed once. (Playback position moves one minute ahead.)
When the – button was pressed once. (Playback position moves one minute behind.)

- The + and – buttons can be pressed up to 20 times each.
- If you reach the beginning of the disc while using the Easy Search function, the recorder will start playing automatically. If you reach the end of the disc while using the Easy Search function, “END” will appear in the display. If this happens, press the ■STOP button to stop the recorder.
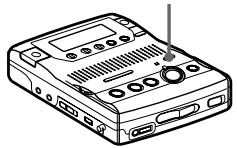
Changing the playback speed (Speed Control)
The playback speed can be adjusted in 7 steps (80%, 85%, ...100%, 105%, 110%).
natural_image
Line drawing of a portable electronic device with ports and buttons (no text or symbols)SPEED CONTROL
1 Turn the SPEED CONTROL dial while the recorder is playing.
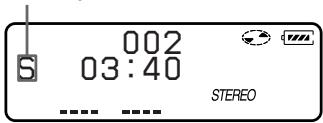
Each turn changes the playback speed. Select your desired speed while listening. “S” appears in the display when playback speed is changed.
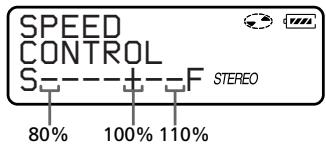
Fast Playback indication
To switch to normal playback
Press the SPEED CONTROL dial.
To change the playback speed again, turn the dial.

You can pause or find track marks pressing the IIPAUSE, ◀◀REVIEW/AMS or ▶▶ICUE/AMS button during Fast Playback.
Playing tracks repeatedly
You can play tracks repeatedly in two ways — all repeat and single repeat.
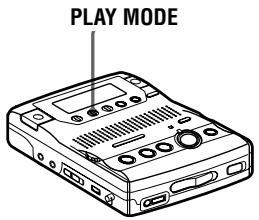
1 Press PLAY MODE while the recorder is playing.
Each time you press the button, the play mode indication changes as follows.
Play mode indication
| Indication | Play mode |
| — | All the tracks are played once. |
| ⇐ | All the tracks are played repeatedly. |
| ⇐ 1 | A single track is played repeatedly. |

You can specify the playback mode for a selected group when the group mode is on. To activate the group mode, see “Selecting and playing groups (Group skip mode)” (page 31).
Checking the remaining time or the playing position
You can check the track name, disc name, etc. during playback.
Items related to the group function appear only when the recorder is playing a track with group settings.
1 Press DISPLAY while the recorder is playing.
Each time you press the button, the display changes as follows.
| A | B | C |
| Track number | Elapsed time | — (none) |
| Track name | Remaining time of the current track | 1 Remain |
| Group name | Remaining time after the current location in the group | GP Remain |
| Disc name | Remaining time after the current location | AllRemain |
| Recorded date | Recorded time | RecDate ^1) |
^1) The recording mode (page 16) of the track appears momentarily after “RecDate” disappears from the display.
Note
Items may appear differently or may not be selectable, depending on the group mode's on/off status, the recorder's operating status, or the recorder settings.

If you want to check the remaining time or the recording position while recording or in stop mode, see page 26.
Using the Group Function (Group mode)
The recorder can operate various playback with a disc which has group setting. For more information on the group mode, see “Recording tracks using the Group Function (Group mode recording)” (page 22).
Listening to tracks using the group mode (group mode playback)
Playback when the group mode is off: Playback starts with the first track in the disc, and stops with the last track in the disc.
Playback when the group mode is on: Playback of the selected group starts with the first track in the group, and stops with the last track in the group.
flowchart
graph TD
    A["Disc"] --> B["Group 1\nTrack number\n1 2 3"]
    A --> C["Group 2\nTrack number\n1 2"]
    A --> D["Group 3\nTrack number\n1 2"]
    B --> E["Arrow pointing left"]
    C --> F["Arrow pointing right"]
    D --> G["Arrow pointing right"]
1 Insert a disc which has group settings into the recorder and play the disc.
2 Press GROUP for 2 seconds or more. “☐” and “GROUP ON” light in the display up and the group mode turns on.
Playback stops at the end of the last track in the selected group.
For details on selecting another group, see “Selecting and playing groups (Group skip mode)” (page 31).

You can also play the tracks repeatedly in the selected group. After the procedures here, follow the steps of “Playing tracks repeatedly” (page 29).
To turn off the Group function
Press GROUP for 2 seconds or more again.
Note
In group mode, the recorder treats all tracks without group settings as belonging to the last group on the disc. The last group is indicated in the display window on the recorder as “Group -”. Within a group, the tracks appear in their order on the disc, not their order within the group.
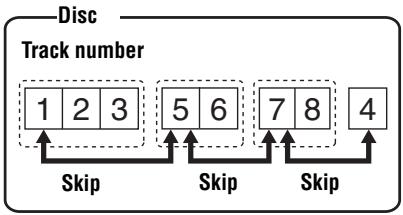
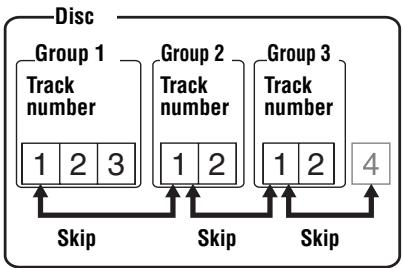
Selecting and playing groups (Group skip mode)
When playing a disc with group settings, the group skip mode allows you to jump from the currently playing group to any other group on the MD. The group skip mode can be used at any time during playback, regardless of whether the player is in group mode on or not.
When the group mode is off:
flowchart
graph TD
    A["1 2 3"] --> B["Skip"]
    C["5 6"] --> D["Skip"]
    E["7 8"] --> F["Skip"]
    G["4"] --> H["Skip"]
When the group mode is on:
flowchart
graph TD
    A["Disc"] --> B["Group 1 Track number"]
    B --> C["1 2 3"]
    D["Skip"] --> E["Group 2 Track number"]
    E --> F["1 2"]
    G["Skip"] --> H["Group 3 Track number"]
    H --> I["1 2"]
    J["Skip"] --> K["4"]
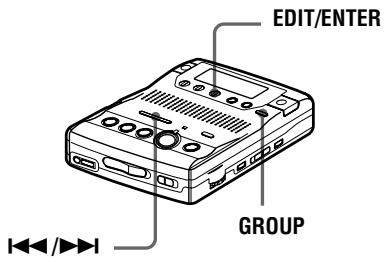
1 Insert a disc which has group settings into the recorder and play the disc, and then press GROUP slightly.
“☐” flashes in the display and the group skip mode turns on.
2 Within 5 seconds, press ◀◀REVIEW/AMS/▶▶ICUE/AMS until your desired group appears, and then press EDIT/ENTER.
The recorder starts playing from the first track in the group.

The group skip mode operates regardless of whether the group mode is on or off.
Notes
- If no operation is performed within 5 seconds after step 1, the group skip mode will be canceled and you will not be able to perform step 2 thereafter. To continue with step 1 at this point, repeat from the beginning of the procedure.
- The group skip mode cannot be used with a disc that has no group settings.
You can edit your recordings by adding/ erasing track marks or labeling tracks and MDs. Premastered MDs cannot be edited.
Notes on editing
- You cannot edit tracks on an MD that is record-protected. Before editing tracks, close the tab on the side of the MD (page 54).
- If you perform an editing operation while playing, be sure not to turn the power off until “TOC Edit” disappears in the display.
- Do not move or jog the recorder while “TOC Edit”* is flashing in the display.
- The lid will not open until “TOC Edit” disappears in the display after editing.
- When the group mode is on, editing can be performed only for the tracks registered into the selected group.
* TOC = Table of Contents
Adding a track mark
You can add two kinds of track marks: regular track marks and special track marks. A total of 254 track marks can be added on one disc.
Track marking to divide a recording
You can add track marks so that the part after the new track mark is counted as a new track.
The track numbers will increase as follows.

Track numbers increase
1 While recording, playing or pausing an MD, press TRACK MARK at the point you want to mark.
“MARK ON” appears in the display, and a track mark is added. The track number will increase by one.
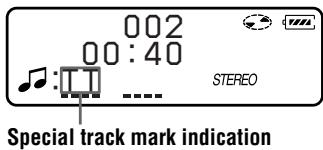
Track marking important points
While recording, not only can you add regular track marks, you can also add special track marks (“TT”), to mark the position of important points.
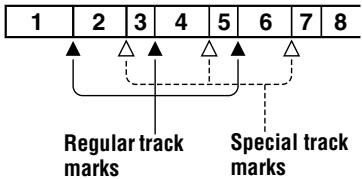
1 Press TRACK MARK on the remote for 2 seconds or more at the desired point while recording.
A special track mark is added and the track number will increase by one.
“!MARK ON!” appears in the display and “TT” is automatically added at the beginning of a track name.
Note
Make sure to press the TRACK MARK button for 2 seconds or more, if not, a regular track mark will be added.
To locate special track marks during playback
While pressing down VOR, momentarily press ◀◀◀ REVIEW/AMS or ▶▶ ICUE/AMS.
The track number appears after the special track mark indication (“TT”).
Press ◀◀◀ REVIEW/AMS repeatedly to go to previous special track marks. Press ▶▶ICUE/AMS repeatedly to go to succeeding special track marks.
To change a regular track mark to a special track mark
After the completion of recording, add “TT” at the beginning of the name of the track you want to change.
To change a special track mark to a regular track mark
After the completion of recording, erase “TT” at the beginning of the track name or change the name of the track.
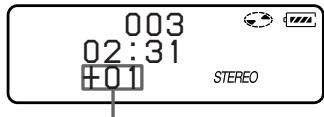
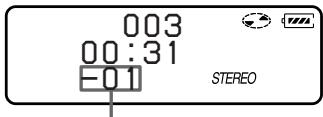
Erasing a track mark
When you erase a regular track mark or a special track mark, the track numbers will change as follows.
Example
When combining track 2 and track 3
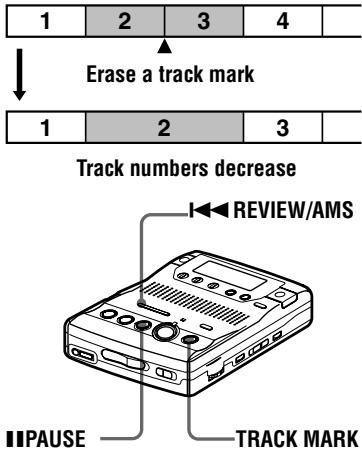
1 While playing the track with the track mark you want to erase, press IIPAUSE to pause.
To erase the third track mark, play the third track and press ■■PAUSE.
2 Find the track mark by pressing ◀◀◀ REVIEW/AMS slightly.
Find the beginning of the third track. "00:00" appears in the display.
“MARK” appears in the display for 2 seconds.
3 Press TRACK MARK to erase the mark.
“MARK OFF” appears in the display. The track mark is erased and the two tracks are combined.

When you erase a track mark, the date, time, and name assigned to the mark are also erased.
Notes
- When you erase a track mark between the two consecutive tracks that are registered to different groups, the second track is re-registered into the group containing the first track. In addition, if you combine a track that is registered to a group with a track that is not (consecutive tracks), the second track takes the same registration setting as the first track. For example, if the first track is registered to a group, the second track will be registered to the same group as the first track.
- You cannot erase track marks according to the system limitations. For details, see “System limitations” (page 49).
Labeling recordings
You can name tracks during playback, discs during stop, and both during recording. Each name can be as long as 200 letters.
Each disc can hold up to 1700 alphanumeric letters during playback or stop.
You can enter about 500 alphanumeric characters and symbols during the recording of each track.
Available characters
• Capital and small letters of the English alphabet
- Numbers 0 to 9
• ! " # \$ % & ( ) * . ; <= > ?
@ _ ` + - ', / : _ (space)
Notes
- “NAME FULL” appears when you try to enter more than 1,700 characters on a disc. Enter a shorter name for the track, group, or disc, or delete “LP:” from the track name recorded in MDLP mode.
- When labeling a disc which has been recorded using the group function, be sure to turn the group function on to avoid misoverwrite the group information.
- If you enter the symbol “//” between the characters in disc names such as “abc//def”, you may be unable to use the group function.
Labeling a disc during stop
To label a disc that contains group settings, you must turn the group mode on before doing the labeling procedure (page 23).
1 Insert a disc.
When a disc is already inserted, make sure the recorder is stopped.
2 Press EDIT/ENTER.
“○: Name” flashes in the display.
3 Press EDIT/ENTER again.
The disc is ready to be labeled.
4 Press ◀◀ or ▶▶▶ repeatedly to select a letter and press ▶ to enter.
The selected letter stops flashing and the cursor moves to the next input position.
| Press/Turn | Functions |
| II | To switch between capital letters, small letters, and marks / numbers. |
| |◀◀/▶▶| | To change the letter to the one before / next one. |
| SPEED CONTROL | To move the cursor to the right (Press slightly)To enter the phrase (Press 1.5 seconds or more)To select a letter (Turn) |
| EASY SEARCH +/- | To move the cursor to the left or right. |
| DISPLAY | To insert a blank space to type in a new letter. |
| PLAY MODE | To delete a letter and move back all following letters to the left. |
| ■STOP | Cancel labeling. |
5 Repeat step 4 and enter all characters of the label name.
6 Press EDIT/ENTER.
The track or disc is labeled.
Labeling a track during playback
1 To label a track, insert a disc and play the track you want to label.
To label a group, insert a disc, turn the group mode on, and play the group you want to label (page 30).
2 Press EDIT/ENTER. The recorder plays the selected track repeatedly.
3 To label a track, press EDIT/ENTER while “♪: Name” is flashing.
To label a group, press ◀◀◀ or ▶▶▶ repeatedly until “☐: Name” flashes in the display, and then press EDIT/ENTER.
The track or group is ready to be labeled.
4 Follow steps 4 to 6 of “Labeling a disc during stop”.
Labeling a track or a disc during recording
To label a group, you must first turn the group mode on before the start of recording (page 23).
1 While recording, press EDIT/ENTER. “♪: Name” flashes in the display.
2 To label a track, press EDIT/ENTER while “♪: Name” is flashing. To label a group, press ◀◀◀ or ▶▶◀▶ repeatedly until “☐: Name” flashes in the display, then press EDIT/ENTER.
To label a disc, press ◀◀◀ or ▶▶▶ repeatedly until “💡 : Name” flashes in the display, then press EDIT/ENTER.
The track, group, or disc is ready to be labeled.
3 Follow steps 4 to 6 of “Labeling a disc during stop”.
To cancel labeling
Press ■STOP.
To relabel recordings
Follow the steps corresponding to the labeling method until the track, group, or disc is ready to be labeled. Enter a new character over the one you want to change, then press the EDIT/ENTER button.

You can also use the SPEED CONTROL dial to select and then enter the menu. Turn the dial (instead of ◀◀/▶▶) to show the menu items one by one and press the dial (instead of EDIT/ENTER) to enter the selected menu.
Notes
- “LP:” has been added at the beginning of the track name of the track recorded in MDLP mode.
- When the recording is stopped while labeling a track or a disc during recording, or when the playback moves on to the next track while labeling a track, the input at that point is entered automatically.
- When recording through the built-in microphones, the sound of the recorder operations, such as the pressing of buttons, will also be recorded. To avoid this, it is recommended to label a disc or a track after completing the recording.
- You cannot relabel parametrized MDs or label MDs that have not been recorded.
- The recorder is able to display, but cannot label using Japanese “Katakana” characters.
- The recorder cannot rewrite a disc or track name of more than 200 letters that was created by another device.
Registering tracks or groups as a new group (Group setting)
Do the following procedure to register tracks (or groups). A series of tracks (or groups) can be registered by selecting the starting and ending tracks (or groups). The tracks (or groups) must, however, be sequential. If the desired tracks (or groups) are not consecutive, you must move them to make them consecutive before you can register them (“Moving recorded tracks”, page 38). This function can be used at any time, whether group mode is on or off.
| Group | ||||||||
| 1 | 2 | 3 | 4 | 5 | 6 | 7 | 8 | 9 |
Making a new group with tracks 1 to 3.

Making a new group with 2 groups.
| Group | Group | |||||||
| 1 | 2 | 3 | 4 | 5 | 6 | 7 | 8 | 9 |
- Registration of non-consecutive tracks is not possible (for example, the 1, 3, 2, 4, 3, 5, 6, 6, 8 and then 9).
- Tracks always appear according to their order on the disc, not their order within the group (even when group mode is on).
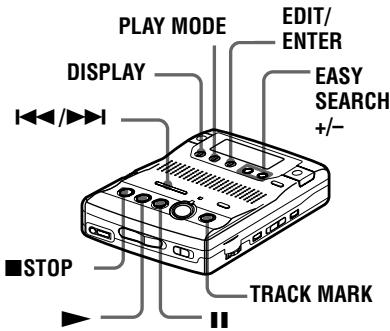
1 While the recorder is stopped, press EDIT/ENTER.
2 Press ◀◀◀ or ▶▶▶I repeatedly until “☐ : Set” flashes in the display, and then press EDIT/ENTER. “001” flashes in the display.
3 Press ◀◀◀ or ▶▶▶ repeatedly until the number or name of the desired first track flashes in the display, and then press EDIT/ENTER.
This selects the first track of the new group.
Even when the group mode is on, track numbers appear according to their order on the disc, not their order within the group.
4 Press ◀◀◀ or ▶▶▶ repeatedly until the number or name of the desired last track flashes in the display, and then press EDIT/ENTER.
This selects the last track of the new group.
5 Follow steps 4 to 6 of “Labeling recordings” (page 34) to label a group.

You can also use the SPEED CONTROL dial to select and then enter the menu. Turn the dial (instead of ◆◀◀/▶▶) to show the menu items one by one and press the dial (instead of EDIT/ENTER) to enter the selected menu.
Notes
- In step 3, the first track must either be the first track of an existing group or a track that does not belong to a group.
- When selecting the last track in step 4, make sure the track comes after the one selected in step 3. The last track must either be the last track of an existing group or a track that does not belong to a group.
To release a group setting
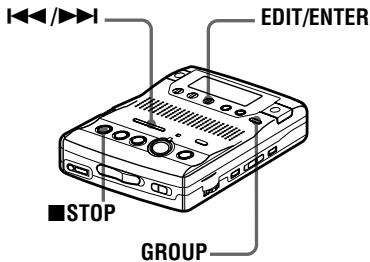
1 Press GROUP for 2 seconds or more. "☐" lights up in the display and the group mode turns on.
2 Follow steps 1 and 2 of “Selecting and playing groups (Group skip mode)” (page 31) and check the contents of the group you want to release. Then press ■STOP.
3 Press EDIT/ENTER.
4 Press ◀◀ or ▶▶▶ repeatedly until “☐ : Release” flashes in the display, and press EDIT/ENTER.
“Release?” appears and “PushENTER” flashes in the display.
5 Press EDIT/ENTER.
The group setting of the selected group is released.

You can also use the SPEED CONTROL dial to select and then enter the menu. Turn the dial (instead of ◀◀◀/▶▶) to show the menu items one by one and press the dial (instead of EDIT/ENTER) to enter the selected menu.
Moving recorded tracks
You can change the order of the recorded tracks.
Example
Move track C from the third to the second track.
Before moving
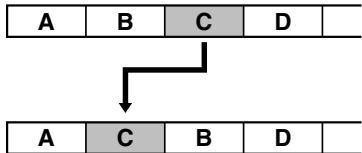
flowchart
graph TD
    A["A"] --> B["B"]
    B --> C["C"]
    C --> D["D"]
    D --> E["End"]
After moving

- Portable MiniDisc Recorder
- Caution
- Information
- Disposal of Old Electrical & Electronic Equipment (Applicable in the European Union and other European countries with separate collection systems)
- Table of contents
- Looking at the controls 6
- Preparing a power source 9
- Recording an MD right away! 11
- Playing an MD right away! 14
- Various ways of recording 16
- Various ways of playback 27
- Editing recorded tracks 32
- Other operations 41
- Power sources 42
- Additional information 44
- Looking at the controls
- Front of the recorder
- Back of the recorder
- The display window
- The remote control
- Preparing a power source
- Insert dry batteries.
- Notes
- Unlock the control.
- Charging the built-in battery for the clock
- Recording an MD right away!
- Insert a recordable MD.
- Select the microphone sensitivity.
- Select the recording mode.
- Record an MD.
- To monitor the sound during recording.
- If the recording does not start
- Playing an MD right away!
- Insert an MD.
- Play an MD.
- To stop play, press ■STOP.
- To listen in stereo
- If the play does not start
- To locate a point quickly
- Recording for long times
- Press ●REC.
- To stop recording, press ■.
- VOR (Voice Operated Recording)
- To cancel VOR while recording
- Recording from a microphone
- Recording from externally connected equipment
- LINE IN (OPTICAL) jack is for both digital and analog input.
- Note
- Recording with digital (optical) input (optical cable required)
- Recording with analog (line) input (line cable required)
- Recording tracks using the Group Function (Group mode recording)
- What is the group function (group mode)?
- How is group information recorded?
- Disc name recording area Example
- Note that if you perform the procedure for “To relabel recordings” of “Labeling recordings” (page 35) and rewrite this character string by mistake, you may be unable to use the group function of that MD.
- To activate the group mode (Group mode recording)
- Recording a track into a new group
- To record a track into another new group.
- Recording a track into an existing group
- To start/stop recording in sync with the source player (Synchro-recording)
- Play the source sound.
- To stop recording
- Setting the clock to stamp the recorded time
- If you make a mistake while setting the clock
- To display the current time
- To display the time in the 24-hour system
- Checking the remaining time or the recording position
- To know the recording condition
- Changing the sound setting
- To cancel the sound setting
- Finding a point quickly (Easy Search)
- Changing the playback speed (Speed Control)
- To switch to normal playback
- Playing tracks repeatedly
- Checking the remaining time or the playing position
- Using the Group Function (Group mode)
- Listening to tracks using the group mode (group mode playback)
- To turn off the Group function
- Selecting and playing groups (Group skip mode)
- Notes on editing
- Adding a track mark
- Track marking to divide a recording
- Track numbers increase
- Track marking important points
- To locate special track marks during playback
- To change a regular track mark to a special track mark
- To change a special track mark to a regular track mark
- Erasing a track mark
- Example
- Labeling recordings
- Available characters
- Labeling a disc during stop
- Labeling a track during playback
- Labeling a track or a disc during recording
- To cancel labeling
- To relabel recordings
- Registering tracks or groups as a new group (Group setting)
- To release a group setting
- Moving recorded tracks
Brand : SONY
Model : MZ-B100
Category : MiniDisc Player