
MZ-R909 - MiniDisc Player SONY - Free user manual and instructions
Find the device manual for free MZ-R909 SONY in PDF.
User questions about MZ-R909 SONY
0 question about this device. Answer the ones you know or ask your own.
Ask a new question about this device
Download the instructions for your MiniDisc Player in PDF format for free! Find your manual MZ-R909 - SONY and take your electronic device back in hand. On this page are published all the documents necessary for the use of your device. MZ-R909 by SONY.
USER MANUAL MZ-R909 SONY
取拔說明書/Operating Instructions
Operating Instructions
Operating Instructions 85
付属品を確かたの
**它的三元之二元之二元之二元之二元之二元之二元之二元之二元之二元之二元之二元之二元之二元之二元之二元之二元之二元之二元之二元之二元之二元之二元之二元之二元之二元之二元之二元之二元之二元之二元之二元之二元之二元之二
解說
Looking at the controls
The numbers are keyed to the illustrations in the Japanese text (pages 5 to 7).
The recorder
1 Display window
2 T MARK button
END SEARCH button
4 Battery compartment
REC (record) switch
6 HOLD switch (at the rear)
7 Terminals for attaching dry battery case.
[8] DC IN 3V jack
9 OPEN switch
10 (play/enter) button
II (pause) button
1/REW/FF) button
stop)/CHG(charge)button
11 GROUP/CANCEL button
12 Jog dial (MENU/ENTER)
13 LINE IN (OPT) jack
MIC (PLUG IN POWER) jack
15 VOL (volume) + / - buttons
16 LINE OUT jack
The display window of the recorder
1 Character information display Displays the disc and track name*, date, error messages, track numbers, etc.
- Disc and track names appear only with MDs that have been electronically labeled.
2 Group indication
3 Alarm indication
4 Disc indication
Shows that the disc is rotating for recording, playing or editing an MD.
5 Play mode indication Shows the play mode of the MD.
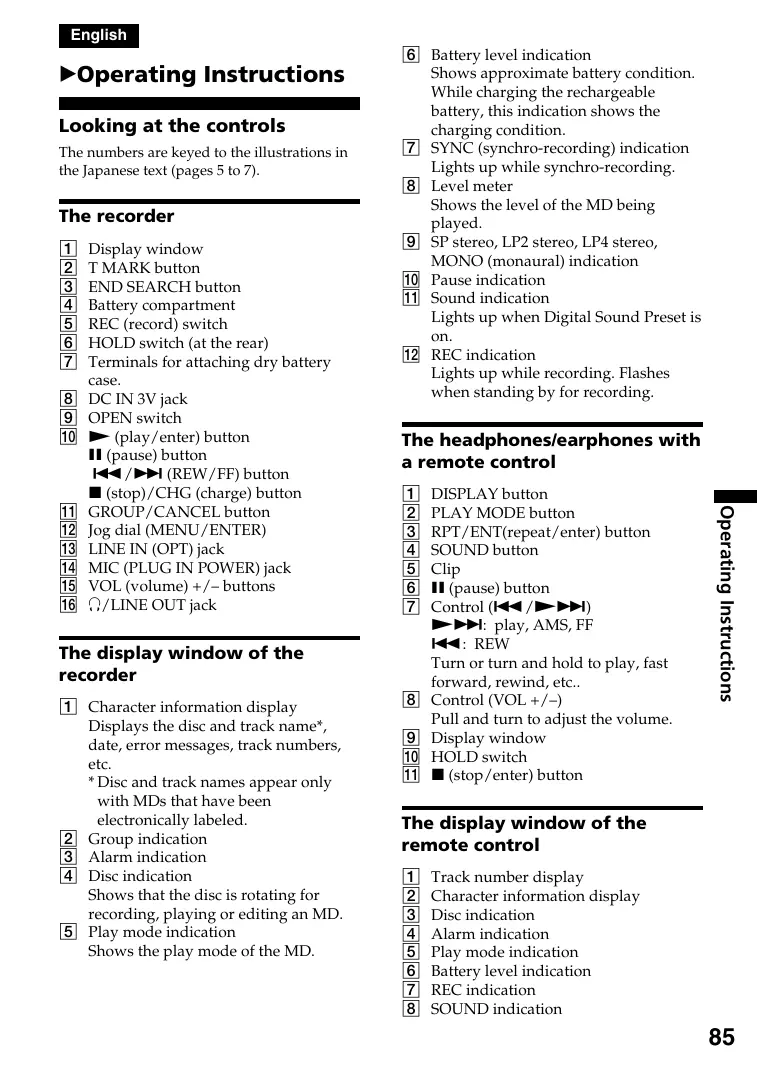
6 Battery level indication Shows approximate battery condition. While charging the rechargeable battery, this indication shows the charging condition.
SYNC (synchro-recording) indication Lights up while synchro-recording.
8 Level meter Shows the level of the MD being played.
SP stereo, LP2 stereo, LP4 stereo, MONO (monaural) indication
10 Pause indication
Sound indication Lights up when Digital Sound Preset is on.
REC indication Lights up while recording. Flashes when standing by for recording.
The headphones/earphones with a remote control
1 DISPLAY button
2 PLAY MODE button
RPT/ENT(repeat/enter) button
4 SOUND button
5 Clip
6 II (pause) button
7 Control (I< / play, AMS, FF
REW
Turn or turn and hold to play, fast forward, rewind, etc..
8 Control (VOL + / -
Pull and turn to adjust the volume.
9 Display window
10 HOLD switch
11 (stop/enter) button
The display window of the remote control
1 Track number display
2 Character information display
3 Disc indication
4 Alarm indication
5 Play mode indication
6 Battery level indication
7 REC indication
8 SOUND indication
How to use the jog dial
See the illustrations in Japanese text (page 8).
The jog dial on the recorder can be used to perform various operations during playback, recording, editing, and when the recorder is stopped.
Display window while selecting the menu items
Press the jog dial to display menu items in the display window on the recorder. Turn the jog dial down to scroll downward, and turn it up to scroll upward. Press the jog dial while an item is flashing in the display to select it.
List of menus
Menu functions
To use menu items on the recorder, press the jog dial to enter the menu, turn the dial to select the item, and then press the dial again to confirm the menu.
To use menu items on the remote control, press DISPLAY for 2 seconds or more, turn the control towards 口 or to select the item, and then press to confirm the menu.
menu of the functions recorder/the remote control
| EDIT/EDIT | Selecting editing operations (labeling tracks, groups, or discs, erasing tracks, groups, or discs, etc.) (pages 103 to 111). |
| DISPLAY/— | Displaying elapsed playing time, remaining playing time, etc.. |
| PLAY MODE/— | Selecting the play mode (repeat play, shuffle play, etc.) (pages 98 and 99). |
| RecVolume/— | Selecting the automatic or manual recording level adjustment (page 94). |
| REC MODE/— | Selecting the recording mode (SP stereo, LP2 stereo, LP4 stereo, or monaural) (page 91). |
| M-TIMER/M-TIMER | Setting the alarm (Melody timer) (pages 111 and 112). |
| AUDIO OUT/- | Selecting ∩/LINE OUT jack output (page 102). |
| SOUND/- | Selecting "SOUND1", "SOUND2," or "SOUND OFF" (Digital Sound Preset) (page 100). |
| -/SPEED | Changing the playback speed during play (page 101). |
| -/GROUP | Turning the group function on and off (page 92). |
| PERSONAL/PERSONAL | Entering or erasing the disc information in the Personal Disc Memory (page 101). |
| SYNC REC/- | Selecting "SYNC ON" or "SYNC OFF" when synchro-recording (page 93). |
| TIME MARK/- | Selecting the Auto Time Stamp setting (page 94). |
| MIC SENS/- | Selecting the microphone sensitivity (page 94). |
| -/SEARCH | Selecting the search mode (Index search/Time search) (page 97). |
| OPTION/OPTION | • AVLS (Automatic Volume Limiter System) Selecting "AVLS ON" or "AVLS OFF". • BEEP Selecting "BEEP ON" or "BEEP OFF" (headphones/earphones beep). |
| OPTION/- | • REC-Posi Selecting the start point when recording (page 93). • LP Stamp Selecting "Stamp ON" ("LP:" will be added when recording with MDLP mode) or "Stamp OFF" ("LP:" will not be added) (page 91). • CONTRAST Adjusting the contrast of the display. • CLOCK SET Setting the clock (page 95). |
To check the menus and menu items that can be selected at each menu level, see the following pages in Japanese text.
Menu while the recorder is:
- stopped, see pages 10 and 11.
— playing, see page 12.
recording, see page 13.
Menus while the remote control is:
stopped, see page 14.
— playing or recording, see page 15.
Preparing
Getting started!
See the illustrations in Japanese text (pages 16 and 17).
Charge the rechargeable battery before using. Even if the rechargeable battery is not charged, you can use the recorder as long as the AC power adaptor is connected.
1 Insert the supplied nickel metal hydride rechargeable battery into the recorder with the minus end first.
2 Assemble the battery charging stand, connect the AC power adaptor, and then place the recorder on the battery charging stand.
When charging is completed, battery indication disappears.
A completely discharged battery takes about 6 hours.
To use the recorder with an alkaline dry battery, insert the dry battery into the supplied dry battery case and attach it to the recorder.
3 Connect the supplied headphones/earphones with the remote control to the recorder and slide HOLD to unlock the control.
4 Insert an MD.
① Slide OPEN to open the lid.
② Insert an MD with the label side facing front, and press the lid to close. Insert an recordable MD when recording.
Notes on rechargeable battery
- The supplied battery charging stand can be used only with this recorder. Any other models cannot be charged.
-
Do not use the recorder to charge any other battery besides the supplied one or the one designated for it (NH-14WM).
-
Though the battery charging stand and the battery may become hot during the charging procedure, this poses no danger.
- Be sure to use the supplied AC power adaptor.
- When a rechargeable battery is charged for the first time or charged after a long period of disuse, battery life may be shorter than usual. Repeat discharging and recharging a few times. The battery life should return to normal. The rechargeable battery can be recharged approximately 300 times.
- When the battery life of a fully charged rechargeable battery becomes about half the normal life, replace it.
- Make sure to remove the recorder from the battery charging stand and disconnect the AC power adaptor from the wall outlet as soon as charging is complete. Keeping it connected to the power source for a long time may reduce the operating efficiency of the battery.
- Please note the following points when charging the battery directly with the supplied AC power adaptor.
If you press CHG immediately after charging has completed, charging will begin again. In this case, press CHG to stop the recorder because the battery is already fully charged.
- Charging stops when you try to operate the recorder during charging.
- If you remove the recorder from the battery charging stand for more than 3 or 4 seconds while it is charging, and then return it to the stand, the CHARGE lamp will not go off until approximately 6 hours later, no matter how many hours the recorder had been on the stand till then. Please note, however, that the recorder will become full charged when the total time on the stand (the time up until you removed it and the time after you returned it to the stand) reaches approximately 6 hours, even if the CHARGE lamp does not go off.
Notes on dry battery
Incorrect battery usage may lead to leakage of battery fluid or bursting batteries. To prevent such accidents, observe the following precautions :
- Insert the + and - poles of the battery correctly.
- Do not try to recharge the battery.
- When the recorder is not be used for a long time, be sure to remove the battery.
- If a battery leak should develop, carefully and thoroughly wipe away battery fluid from the battery compartment before inserting new ones.
Recording an MD right away!
See the illustrations in Japanese text (pages 19 and 20).
Connect to a digital source using an optical cable to make digital recordings. Digital recording is possible even from digital equipment with different sampling rates, such as a DAT deck or a BS turner, using the built-in sampling rates converter. To record from an analog source, see "Recording with analog input (line cable required)." To record a track into an existing group, see "Recording tracks using the group function" (page 92). It is recommended to use the supplied the AC power adaptor when recording.
1 Make connections. (Insert the cables firmly and completely into the appropriate jacks.)
① Connect the LINE IN (OPT) jack of recorder to the DIGITAL OUT jacks of the source with a optical cable. The recorder switches to analog input automatically.
② Connect the DC IN 3V jack of the recorder to a wall outlet with the supplied AC power adaptor. When the recorder has different sound sources connected at the same time, the recorder switches to the digital, microphone, or analog input in this order of priority.
2 Specifying the recording position. Set the "REC-Posi" setting to "From End" (recording starts from the end of the current contents) or "From Here" (recording starts overwriting the current contents).
3 Start recording.
① Press and slide REC to the right. "REC" lights up and recording starts.
② Play the sound source. The level of the recorded sound is adjusted automatically.
To stop recording, press
After you press to stop, the recorder will automatically turn off in about 10 seconds (when using batteries) or about 5 minutes (when using AC power adaptor).
| To | Do this |
| Record from the end of the current contents1) | Press END SEARCH and then press and slide REC to the right. |
| Record over partway through the previous recording | Press▶, ➔, or ↘ to find the start point of recording and press ■ to stop. Then press and slide REC to the right. |
| Pause | ■.2) Press ■ again to resume recording. |
| Remove the MD | ■, then slide OPEN to open the lid.3) |
1) By setting "REC-Posi" to "From End," recording operations will always start from the end of the previously recorded material.
2) A new track mark is added at the point where you pressed again to resume recording while pausing, and the recording will be marked with the new track number when you resume recording.
3) If you open the lid while "REC-Posi" is set to "From Here", recording will begin with the first track the next time you record, the point to start recording will change to the beginning of the first track. When recording on a recorded MD, check the point to start recording on the display.
If the recording does not start
- Make sure the recorder is not locked.
- Make sure the MD is not record-protected.
- Premastered MDs cannot be recorded over.
Notes
- "Data Save" or "TOC Edit" flashes while data of the recording (the track's start and end points, etc.) is being recorded. Do not move or jog the recorder or disconnect the power source while the indication is flashing in the display.
- The lid does not open until "TOC Edit" disappears in the display.
- If the power supply is disrupted (i.e. the battery is removed or becomes exhausted or the AC power adaptor is disconnected) during a recording or editing operation, or while "TOC Edit" appears in the display, then it will not be possible to open the lid until power is restored.
- You can make a digital recording only from an optical type output.
- When recording from a portable CD player, set the CD player to pause, and then do the recording procedure on the recorder.
- Note the following when recording from a portable CD player:
Some portable CD players may not be capable of digital out unless powered by the AC power. If this is the case, connect the AC power adaptor to the portable CD player and use it on AC power as the power source.
- On some portable CD players, optical output may not be possible when using an anti-skip function (e.g., ESP*). If this is the case, turn off the anti-skip function.
- Electronic Shock Protection
Playing an MD right away!
See the illustration in Japanese text (page 22).
If you want to use the rechargeable battery, be sure to recharge them before playing (page 87).
1 Start playing.
① Press. Turn the control towards on the remote control. A short beep sounds in the headphones/earphones.
② Press VOL + / - on the recorder to adjust the volume.Pull and turn the control towards VOL ^+ or towards VOL-on the remote control.
Playback starts from the point you last stopped playing. To start playback from the beginning of the disc, press for 2 seconds or more on the recorder, or turn and hold the control towards for 2 seconds or more on the remote control.
To stop play, press ■.
| To | Do this (Beeps in the headphones/earphones1) |
| Find the beginning of the current track2) | Press ↓. Turn the control towards ↓ on the remote control. (Three short beeps) |
| Find the beginning of the next track3) | Press ↑. Turn the control towards ↑ on the remote control. (Two short beeps) |
| Go backwards while playing | Keep pressing ↓. Turn and hold the control towards ↓ on the remote control. |
| Go forward while playing | Keep pressing ↑. Turn and hold the control towards ↑ on the remote control. |
| Pause | Press ↓. (Continuous short beeps) Press ↓ again to resume play. |
| Remove the MD | Press ↓, then slide OPEN to open the lid.4) |
1) You can turn off the beep sound.
2) If you press during the first track of the disc, the recorder goes to the beginning of the last track on the disc.
3) If you press during the last track of the disc, the recorder goes to the beginning of the first track on the disc.
4) Once you open the lid, the point to start play will change to the beginning of the first track (except when the disc information has been stored in the Personal Disc Memory).
If the playback does not start
Make sure the recorder is not locked. If it is locked, slide the HOLD switch in the opposite direction of the arrow.
When using the headphones/earphones connect them directly to the recorder
The VOL + / - buttons and the Digital Sound Preset function may become inoperative. In this case, do the procedure below.
1 Press the jog dial, turn the dial until "AUDIO OUT" flashes in the display, and then press the dial again.
2 Turn the jog dial until "HeadPhone" appears in the display.
3 Press the jog dial again.
Note
If the power supply is disrupted (i.e. the battery is removed or becomes exhausted or the AC power adaptor is disconnected) when the recorder is operating, the lid will not open until the power is restored.
Various ways of recording
Connecting digital (optical) and analog (line) inputs
The recorder selects digital or analog input according to how the sound source is hooked up.
| Input Difference | Digital (optical) input | Analog (line) input |
| Connectable source | Equipment with an digital (optical) output jack | Equipment with an analog (line) output jack |
| Usable cord | Optical cable (with an optical or an optical-mini plug) | Line cable (with 2 phono plugs or a stereo-mini plug) |
| Signal from the source | Digital | Analog Even when a digital source (such as a CD) is connected, the signal sent to the recorder is analog. |
| Recorded track numbers | Marked (copied) automatically •at the same positions as the source1). •after more than 2 seconds of blank or low-level segment 2). •when recording is paused while synchro-recording3). | Marked •after more than 2 seconds of blank or low level segment. •while the recorder is paused while recording. •automatically at specified intervals when the Auto time stamp is on. You can erase unnecessary marks after recording. |
| Recorded sound level | Same as the source. | Adjusted automatically. |
| You can also adjust it manually. | You can also adjust it manually. | |
| (Digital REC level control). |
1) When the sound source is a CD or an MD.
2) With a sound source other than a CD or an MD.
3) The recorder pauses automatically when it encounters a section with no audio signal for 3 seconds or more.
Notes
Track marks may be copied incorrectly:
- when you record from some CD players or multi disc players using digital (optical) input.
- when the source is in shuffle or program play mode while recording using digital (optical) input. In this case, play the source in normal play mode.
- when recording BS or CS programs through digital (optical) input.
Recording with analog input (line cable required)
See the illustration in Japanese text (page 25).
The sound will sent from the connected equipment as analog signal but will be recorded digitally on the disc.
1 Connect the LINE IN (OPT) jack of the recorder to the line output jack of the source with an line cable (not supplied). The recorder switches to analog input automatically.
2 Connect the power source. To use on AC power, see "Recording an MD right away!". To use on other power sources, see page 88.
3 Press and slide REC to the right. "REC" and the REC indicator lights up and recording starts.
4 Play the sound source.
Note
If you temporarily stop a recording operation by pressing I, a new track mark will be added at that point where you pressed I again to resume recording. The recording continues from a new track.
Recording for long times
See the illustration in Japanese text (page 26).
Select each recording mode according to the recording time that you want.
Stereo recording is possible at 2 times (LP2) or 4 times (LP4) the normal recording time (MDLP mode).
1 Press the jog dial, turn the dial until "REC MODE" flashes in the display, and then press the dial again.
2 Turn the jog dial to select the desired recording mode. The recording mode can be selected from "none"(standard stereo mode), "LP2" (2× normal recording mode), "LP4" (4× normal recording mode), and "MONO" (monaural).
3 Press and slide REC to the right. Recording starts.
4 Start the sound source.
When you do not want "LP:" added at the beginning of the track
The recorder is factory set to add "LP:" at the beginning of tracks recorded in MDLP mode. If you do not want "LP:" to be added, do the procedure below.
1 While the recorder is stopped, press the jog dial, turn the dial until "OPTION" flashes in the display, and then press the dial again.
2 Turn the jog dial until "LP Stamp" flashes in the display, and then press the jog dial.
3 Turn the jog dial until "Stamp OFF" flashes in the display, and then press the jog dial. If you want "LP:" added, select "Stamp ON" in step 3, and then press the jog dial.
Notes
- It is recommended that you use the supplied AC power adaptor for long recordings.
Continued
- During monaural recording of a stereo sound source connected through the digital (optical) input jack, you can still monitor the recorded sound in stereo by using headphones/earphones connected the / LINE OUT jack.
- When you record in LP4 stereo mode, momentary noise may be produced on very rare occasions with certain sound sources. This is because of the special digital audio compression technology that enables a recording time 4 times longer than normal. If noise is produced, it is recommended that you record in normal stereo or LP2 stereo mode to obtain better sound quality.
Recording tracks using the Group Function (Group mode recording)
See the illustration in Japanese text (pages 27 and 28).
What is the group function (group mode)?
It is a function that allows you to separate tracks on a disc into different groups for playback, recording and editing. It is convenient for managing multiple CD albums recorded in MDLP (LP2 stereo/LP4 stereo) mode onto a single MD.
How is group information recorded?
When recording in group mode, the group information is written to the disc name recording area.
Therefore, the character string written in the disc name recording area is displayed in its entirety as the disc name if you load an MD recorded in group mode into a system that does not support group mode, or if you try to edit the contents of a disc on this recorder with the group mode turned off.
Note that if you perform the procedure for "Relabeling recordings" of "Labeling recordings" (page 105) and rewrite this character string by mistake, you may be unable to use the group function of that MD.
Notes
- The group function setting is stored even if you eject the MD or turn off the recorder.
- In group mode, the recorder treats all tracks without group settings as belonging to the last group on the disc. The last group is indicated in the display window on the recorder as "Group--." Within a group, the tracks appear in their order on the disc, not their order within the group.
To activate the group mode
To record tracks in group mode, you must first turn the group mode on before the start of recording.
On the recorder
1 Press GROUP for 2 seconds or more. " lights up in the display and the group mode turns on. To cancel the group mode, press GROUP for 2 seconds or more again.
On the remote control
1 Press DISPLAY for 2 seconds or more, turn the control towards || or || until "GROUP" flashes in the display, and then press.
2 Turn the control towards 1 or 2 until "GROUP ON" flashes in the display, and then press. To cancel the group mode, select "GROUP OFF" in step 2.
Recording a track into a new group
1 While the recorder is stopped, press GROUP for 2 seconds or more.
2 Press END SEARCH.
3 Press and slide REC to the right.
4 Play the source sound.
To stop recording, press ■.
The material that was recorded up until was pressed is entered as a new group.
Recording a track into an existing group
1 While the recorder is stopped, press GROUP for 2 seconds or more.
2 Press GROUP slightly. You can select a group directly (group skip mode).
3 Within 5 seconds, press or repeatedly until the group you want the track to belong to appears.
4 Press and slide REC to the right.
5 Play the source sound.
Notes
- Even if "REC-Posi" is set to "From Here", newly recorded tracks are inserted after the existing tracks in the specified group without recording over the current contents.
- The group skip mode turns off automatically in step 3 if nothing is done within 5 seconds. To continue the procedure, do step 2 again.
Synchro-recording from a digital source
See the illustrations in Japanese text (pages 29 and 30).
You can easily make a digital recording of a digital source on an MD.
Before synchro-recording, be sure to make digital connection and insert a recordable MD. Note that track marks are automatically marked at the same positions as the source.
1 While the recorder is stopped, press the jog dial, turn the dial until "SYNC REC" flashes in the display, and then press the dial again.
2 Turn the jog dial until "SYNC ON" flashes in the display, and then press the jog dial. "SYNC" lights up in the display.
3 Press and slide REC to the right. "REC" lights up in the display. The recorder starts recording when you start playing the source player.
4 Start the sound source.
To cancel synchro-recording
Select "SYNC OFF" in step 3.
Notes
- The pause function cannot be turned on or off manually during synchro-recording.
- Do not switch the "SYNC REC" setting while recording. Recording may not be done properly.
Even when there is no recorded sound on the sound source, there may be cases when recording does not pause automatically during synchro-recording due to the noise level emitted from the sound source. - If a silent portion is encountered for about 2 seconds during synchro-recording from a sound source other than a CD or an MD, a new track mark is automatically added at the point where the silent portion ends.
- Synchro-recording cannot be done if the connecting cord is not an optical cable, or if the cable is connected to the MIC (PLUG IN POWER) jack.
- You cannot change the recording mode during recording.
Recording without overwriting existing material
See the illustration in Japanese text (page 30).
If you wish to avoid overwriting the current contents of an MD, do the following procedure. All new material will then be recorded from the end of the current contents.
1 While the recorder is stopped, press the jog dial, turn the dial until "OPTION" flashes in the display, and then press the dial again.
2 Turn the jog dial repeatedly until "REC-Posi" flashes in the display, and then press the dial.
3 Turn the jog dial repeatedly until "From End" flashes in the display, and then press the dial.
To start recording from the current point.
Select "From Here" in step 3.
Notes
- If you start recording while the recorder is in play-pause mode, the recording will begin from the point at which it is paused.
-
The setting will remain even after the power is turned off.
-
When the group mode is on, recording always starts after the current contents.
Recording from a microphone
See the illustration in Japanese text (page 31).
1 Connect a stereo microphone (ECM-717, ECM-MS907, ECM-MS957, etc., not supplied) to the MIC (PLUG IN POWER) jack.
2 Press and slide REC to the right.
To select microphone sensitivity
1 Press the jog dial while the recorder is stopped, turn the dial repeatedly until "MIC SENS" flashes in the display, and then press the dial again.
2 Turn the jog dial repeatedly to select "SENS HIGH" or "SENS LOW", and then press the dial.
Notes
- You cannot record through the microphone while an optical cable is connected to the LINE IN (OPT) jack. In this case, disconnect the optical cable from the LINE IN (OPT) jack. The recorder automatically switches input in the following order; optical input, microphone input, and analog input.
- Do not use a microphone with a short connector connected directly to the recorder, as this may cause the operation sound of the recorder to be picked up.
Adding track marks automatically at specified intervals (Auto Time Stamp)
See the illustration in Japanese text (page 32).
Use this feature to add track marks automatically at specified intervals when recording through the analog input connector or a microphone.
1 While the recorder is recording or in recording pause, press the jog dial.
2 Turn the jog dial repeatedly until "TIME MARK" flashes in the display, and then press the dial again.
3 Turn the jog dial repeatedly until the desired time interval flashes in the display.
Select one of the following intervals: "OFF"
"5 min. ON" (track marks are added in every 5 minutes.)
"10 min. ON" (track marks are added in every 10 minutes)
"15 min. ON" (track marks are added in every 15 minutes)
To cancel the setting, select "OFF" in this step.
4 Press the jog dial.
Notes
Automatic track marking by Auto Time Stamp starts when you add a normal track mark to the disc (i.e., by pressing T MARK or II, etc.).
- The setting will be lost when the recording stopped.
Adjusting the recording level manually (Manual recording)
See the illustrations in Japanese text (page 33).
When you record, the sound level is adjusted automatically. If necessary, you can set the level manually.
Note
Adjust the recording level while the recorder is in standby mode. You cannot adjust it while recording.
1 While holding down, press and slide REC to the right.
The recorder stands by for recording.
2 Press the jog dial, turn the dial until "RecVolume" flashes in the display, and then press the dial again.
3 Turn the jog dial until "ManualREC" flashes in the display, and then press the dial.
To switch back to the automatic level adjustment, repeat the procedure from step 2 and press the dial while "Auto REC" flashes in the display.
4 Play the program source.
5 While observing the level meter in the display, adjust the recording level by turning the dial.
Set the level so that the meter segments light up between A (the fifth segment) and B (the ninth segment). If lights up, reduce the input level.
The upper level meter shows the L channel input level, the middle meter shows the R channel input level, and the the lower meter shows the recording level.
Recording does not start in this step. If your source is an externally connected component, be sure to cue the source to the beginning of the material to be recorded before you start playback.
6 Press again to start recording.
Notes
- If you press during recording operation, the recorder will revert to automatic recording level adjustment mode the next time you start a recording operation.
- "RecVolume" cannot be selected in step 2 during synchro-recording. To set the recording level manually during synchro-recording, do the procedure below.
1 Select "SYNC OFF" in step 2 of "To start/stop recording in sync with the source player (Synchro-recording)" (page 93).
2 Do steps 1 to 5 of manual recording procedure. Then do the procedure from step 1, and select "SYNC ON" in step 2 of the synchro-recording procedure (page 93).
Recording starts automatically whenever the source sound is played.
Setting the clock to stamp the recorded time
See the illustrations in Japanese text (page 36).
To stamp the date and time on the MD when you record, you first need to set the clock.
1 Press the jog dial while no disc is inserted or the recorder is stopped.
2 Turn the jog dial until "OPTION" flashes in the display, and then press the jog dial.
3 Turn the jog dial until "CLOCK SET" flashes in the display, and then press the dial. The digits of the year flash.
4 Change the current year by turning the jog dial and press to enter. The digit of the month flashes.
5 Repeat steps 4 to enter the current month, date, hour, and minute. When you press the jog dial to enter the minute, the clock starts operating.
If you make a mistake while setting the clock
Press CANCEL, and set the clock again from step 1. You can skip a step by pressing the jog dial.
To display the current time
When the recorder is not operating or while recording, press the jog dial, turn the dial until "DISPLAY" appears in the display, and then press the dial again.
Turn the jog dial until "Clock" flashes in the display, and then press the dial again.
The current time appears in the display.
To display the time in the 24-hour system
Press T MARK while setting the clock. To change the clock to the 12-hour system, press T MARK again.
To maintain the correct time
Once you set the clock, it will keep correct time as long as the recorder is connected to a power source, such as the rechargeable battery, alkaline dry battery, or AC power adaptor. However, if no power source is connected, the clock setting will change back to the factory setting after about 3 minutes.
When changing the rechargeable battery or alkaline dry battery, make sure to do it within 3 minutes.
Notes
- Make sure the time is correctly set if you want the time stamp to be accurately recorded for an important recording.
- Under normal conditions, the clock may vary by about plus or minus 2 minutes per month.
Copying CD text information while recording (Joint Text)
CD text connecting cable, CD that support CD-TEXT, and CD player that support Joint Text required.
See the illustrations in Japanese text (pages 37 and 38)
By connecting the recorder to a Sony portable CD player that supports Joint Text (the CD text copying function) (D-E999, etc.), you can copy track and disc names automatically during recording. In addition to the CD text connecting cable (RK-TXT1), make sure to connect the recorder to the portable CD player with an optical cable.
1 Press and slide REC to the right to start recording on the recorder, and start playing the CD in the portable CD player.
"SYNC" and "REC" light up in the display.
"CD TEXT" appears for a few seconds, then "001 TEXT?" lights up and "PushENTER" flashes in the display.
"NO TEXT" appears at this time if no track name information exists in the CD. In this case, the track name will not be copied.
2 Press the jog dial.
Track name scrolls, and then the track name lights up and "PushENTER" flashes in the display.
3 Press the jog dial.
Track name scrolls in the display while the name is copied.
4 Follow steps 2 and 3 to copy each new track name that appears.
5 Press on the recorder at the point you want to stop recording.
"000 TEXT?" lights up and "PushENTER" flashes in the display. If you don't want to copy the disc name information, press again. The disc name is not copied and the operation ends.
"NO TEXT" appears at this time if no disc name information exists in the CD. In this case, the operation ends without copying the disc name.
6 Press the jog dial.
Disc name scrolls, and then disc name lights up and "PushENTER" flashes in the display.
7 Press the jog dial.
"TOC Edit" flashes.
Afterwards, the disc name scrolls in the display.
Notes
- If you copy disc name information to a disc with a previously recorded disc name, the old disc name will be overwritten with the new one.
- When the CD text copying function is on, various settings and editing functions cannot be accessed with the jog dial.
- To record CD text information as a single group using the CD text copying function, turn the group mode on before step 1 (page 92). The disc name will be copied as the name of the group.
- The CD text copying function (joint text) can only be used with component (D-E01, D-E999, D-E990, D-E888, D-E880, D-E777, D-E770, D-F700) with the joint text logo.
- The CD text copying function can only be used with CDs and component (D-E999, etc.) that support CD-TEXT.
- The RK-TXT1 CD text connecting cable is designed for exclusive use with this recorder and Sony portable CD player (D-E999, etc.). Do not use a connecting cable of another make to copy CD text information.
- The remote becomes inoperative when the CD text connecting cable (RK-TXT1) is connected to the recorder.
- Stopping or pausing playback on the CD player automatically causes recording on the recorder to pause. A new track mark is automatically added when you resume recording.
- The track name of the track currently played will not be recorded if you stop or pause CD playback in the middle of the copying process on the recorder.
- The name of the source CD is copied as the name of the disc when group mode is off, and as the name of a group when group mode is on.
Various ways of playback
Searching for a specific track or a position quickly (Quick Search)
See the illustrations in Japanese text (page 39).
You can do two kinds of quick search.
- Index search — Searching quickly while monitoring the track numbers or track names.
- Time search — Searching quickly while monitoring the elapsed time.
Selecting the search mode
The search mode can be selected only on the remote control while the recorder is stopped, playing, or play-paused.
1 Press DISPLAY for 2 seconds or more.
2 Turn the control towards or until "SEARCH" flashes in the display, and then press.
3 Turn the control towards or until "Index"(index search) or "Time"(time search) flashes in the display, and then press.
The recorder is factory set to "Index".
Searching for a specific track while monitoring track numbers or track names (Index Search)
To do an index search, do the procedures "Selecting the search mode" and select "Index" in step 3.
On the recorder
1 Turn the jog dial until the desired track appears in the display, and then press the dial.
The selected track name appears in the display and the recorder starts playing by pressing the jog dial.
If the track has no name, the track number appears in the display.
On the remote control
1 Press while playing a disc.
2 Turn and hold the control towards or until the desired track number or track name appears in the display.
3 Press to cancel the pause. Playback starts from the selected track.
Searching for a specific point while monitoring the elapsed time (Time Search)
To do a time search, do the procedures of "Selecting the search mode" and select "Time" in step 3.
On the recorder
1 Press while playing a disc.
2 Keep pressing or until the desired point appears in the display.
3 Press to cancel the pause. Playback starts from the selected point.
On the remote control
1 Press while playing a disc.
2 Turn and hold the control towards or until the desired point appears in the display.
3 Press to cancel the pause. Playback starts from the selected point.
Using the Group Function
See the illustrations in Japanese text (page 40).
The recorder can operate various playback with a disc which has group setting.
Listening to tracks in a specific group (Group mode playback)
On the recorder
1 Insert a disc which has group settings into the recorder and play the disc.
2 Press GROUP for 2 seconds or more. " lights up and the group mode turns on.
Playback stops at the end of the last track in the selected group.
For details on selecting another group, see "Selecting and playing desired groups (Group skip function)"(page 98).
On the remote control
1 Insert a disc which has group settings into the recorder and play the disc.
2 Press DISPLAY for 2 seconds or more, turn the control towards 14 or 15 until "GROUP" flashes in the display, and then press.
3 Turn the control towards or until "GROUP ON" flashes in the display, and then press.
The elapsed time of the track and "G" (group mode) appears in the display and then group mode turns on. Playback stops at the end of the last track in the selected group.
For details on selecting another group, see "Selecting and playing desired groups (Group skip function)" (this page).
To turn off the Group function
On the recorder, press GROUP for 2 seconds or more again.
On the remote control, select "GROUP OFF" in step 3, and then press.
Note
In group mode, the recorder treats all tracks without group settings as belonging to the last group on the disc. The last group is indicated in the display window on the recorder as "Group --." Within a group, the tracks appear in their order on the disc, not their order within the group.
Selecting and playing desired groups (Group skip function)
With a disc which has group settings, you can skip from the currently playing group to any other group on the disc. You can select a desired group directly using the jog dial on the recorder.
On the recorder
1 Insert a disc which has group settings into the recorder and play the disc, and then press GROUP slightly.
The group skip mode turns on.
2 Within 5 seconds, turn the jog dial to select your desired group, and then press the jog dial.
The recorder starts playing from the first track in the group.
On the remote control
1 Insert a disc which has group settings into the recorder and play the disc.
2 Press and hold PLAYMODE until "--" flashes in the display. The group skip mode turns on.
3 Within 5 seconds, turn the control towards 山 or to select your desired group.
During playback on group mode, playback of the desired group starts with the first track in the group and stops with the last track in the group. During normal playback, playback of the selected group starts with the first track in the group and stops with the last track on the disc.
Notes
- If no operation is performed within 5 seconds after step 1, the group skip mode will be canceled and you will not be able to perform step 2 thereafter. To continue with step 1 at this point, repeat from the beginning of the procedure.
- The group skip mode cannot be used with a disc that has no group settings.
Changing a play mode
See the illustrations in Japanese text (pages 42 to 44).
Steeings can be stored to the Personal Disc Memory.
On the recorder
Selecting a play mode
1 While the recorder is playing, press the jog dial, turn until "PLAY MODE" flashes in the display, and then press the dial again.
2 Turn the jog dial to select the play mode, and then press the dial.
Each time you turn the dial, the play mode changes and when you press the dial to select, indication appears in the display as follows.
play mode/indication
"Normal"/"(none)" (All the tracks are played once)

"AllRepeat"/" " (All the tracks are played repeatedly)

"1 Track"/"1" (A single track is played)

"1 Repeat"/" 一 1 " (A single track is played repeatedly)

"Shuffle"/"SHUF" (After currently selected track finishes playing, the remaining tracks are played in random order)

"Shuf. Rep"/" SHUF" (After currently selected track finishes playing, the remaining tracks are played repeatedly in random order)

"PGM"/"PGM" (Tracks are played in the order that you specified)

"PGMRepeat"/" PGM" (tracks are played repeatedly in the order that you specified).
Creating a Program (Program play)
1 Press the jog dial while "PGM" flashes in the display at step 2 of "Selecting a play mode."
2 Turn the jog dial to select a track.
3 Press the jog dial to enter a track number.
4 Repeat Step 2 and 3 to program more tracks.
5 Press the jog dial for 2 seconds or more.
On the remote control
You can select various play mode using the PLAYMODE and RPT/ENT buttons on the remote control.
Selecting a play mode
Press PLAYMODE during playback. Each time you press this button, the play mode changes as follows.
"(none)" (All the tracks are played once)

"1" (A single track is played)
"SHUF" (After currently selected track finishes playing, the remaining tracks are played in random order)

"PGM" (Tracks are played in the order that you specified).
Creating a Program (Program play)
1 While the recorder is playing, press PLAYMODE repeatedly until "PGM" flashes in the display.
2 Turn the control towards 口 or to select a track.
3 Press RPT/ENT to enter a track number.
4 Repeat Step 2 and 3 to program more tracks.
5 Press RPT/ENT for 2 seconds or more.
Repeat play
Press RPT/ENT on the remote control during playback.
" " appears in the display.
Notes
- All program settings are lost when the lid of the recorder is opened.
- If the recorder is stopped and left inactive for 5 minutes in the middle of a programming operation, the tracks selected up to that point are entered as the program.
- You cannot turn the group mode on or off while programming tracks.
- If you turn the group mode on during program play, the program play is canceled.
To adjust the sound quality (Digital Sound Preset)
See the illustrations in Japanese text (pages 45 and 46).
You can make adjustments to the sound quality to suit your taste, and then store two sets of these adjustments.
The sound can be adjusted in 8 steps (-4, -3, , +0, , +2, +3) .
Settings can be stored to the Personal Disc Memory.
Selecting the sound quality
Factory settings of the Digital Sound Preset
Factory settings of the Digital Sound Preset are the followings:
"ROUND1": bass +1, treble ±0
"ROUND2": bass +3, treble ± 0
To select a preset sound
- On the recorder
1 Press the jog dial, turn the dial until "SOUND" flashes in the display, and then press the dial again.
2 Press the jog dial, turn the dial until "SOUND1" or "SOUND2" flashes in the display, and then press the dial again.
- On the remote control
1 Press SOUND repeatedly to select "SOUND 1" or "SOUND 2."
Adjusting the sound quality
On the recorder
1 While playing, press the jog dial, turn the dial until "SOUND" flashes in the display, and then press the dial again.
2 Turn the jog dial until "SOUND 1" or "SOUND 2" flashes in the display. The display shows the currently selected T (treble) and B (bass) settings. Select "T" or "B" pressing (to move the cursor downward) or (to move the cursor upward).
You can change the adjust the item in which the cursor is flashing.
3 Turn the jog dial to adjust the sound level.
Press to move the cursor from "T" to "B" (from the middle row to the bottom row in the display) and press to move the cursor from "B" to "T" (from the bottom row to the middle row in the display).
To switch between "SOUND 1" to "SOUND 2", move the cursor to the top row by pressing while the cursor is flashing on the "T" row, and then turn the jog dial.
4 Press the jog dial.
The sound settings are saved and the playback display appears again.
On the remote control
1 Press SOUND on the remote control repeatedly to select "SOUND 1" or "SOUND 2".
2 During playback, press SOUND for 2 seconds or more.
The recorder changes to B (bass)-setting mode. Pressing the SOUND button for 2 seconds again changes the recorder back to T (treble)-setting mode.
3 Turn the control on the remote control towards 1 or 2 to adjust the B (bass) or the T (treble).
Pressing the SOUND button for less than 2 seconds toggles the display between "SOUND 1" and "SOUND 2". When you press SOUND slightly while adjusting bass or treble, the setting for that sound is entered and the display switches to the other sound setting.
4 Press RPT/ENT.
The sound settings are saved and the playback display appears again.
Notes
- Digital Sound Preset becomes inoperative when the "AUDIO OUT" parameter for the / LINE OUT jack is set to "LINE OUT". In this case, set the "AUDIO OUT" to "HeadPhone" (page 90).
- When you use the Digital Sound Preset, the sound may break or become distorted depending on the settings or the track. In this case, change the settings of the sound quality.
- Changing to another Digital Sound Preset during a recording operation will not affect the quality of recorded sound.
To change playback speed (Speed Control)
See the illustrations in Japanese text (pages 47 and 48).
The playback speed can be adjusted in 7 steps (80%, 85%, ...100%, 105%, 110%).
Setting can be stroed to the Personal Disc Memory.
1 Press DISPLAY on the remote control for 2 seconds or more during playback.
2 Turn the control on the remote control towards or until "SPEED" flashes in the display, and then press on the remote control.
The recorder changes to speed-setting mode.
3 Turn the control towards or to select the playback speed.
^ 十 + ^ 十 shows the normal speed and the cursor shows the playback speed you are selecting.
4 Press to set the playback speed.
"S" appears in the display when the speed is changed.
Notes
- You cannot change playback speed with the recorder.
- The playback sound will be affected by the playback speed.
- All settings will be lost when you remove the disc from the recorder (except when the settings of the disc has been stored to the Personal Disc Memory).
Storing the settings for individual discs (Personal Disc Memory)
See the illustrations in Japanese text (pages 48 and 49).
The recorder can store the various settings for each disc, and then retrieve them automatically whenever the disc is inserted. Do the following procedure to store the volume, playback mode, group mode playback, playback order, sound quality (Digital Sound Preset), and playback speed (Speed control) settings for a disc.
On the recorder
1 While the recorder is stopped, playing, or play-paused, press the jog dial.
2 Turn the jog dial until "PERSONAL" flashes in the display, and then press the dial.
"Entry?" flashes in the display.
3 Press the jog dial.
"Entry OK" appears in the display and the disc settings are stored in the recorder.
On the remote control
1 While the recorder is stopped, playing, or play-paused, press DISPLAY for 2 seconds or more.
2 Turn the control towards or until "PERSONAL" flashes in the display, and then press.
"Entry?" flashes in the display.
3 Press ■.
"Entry OK" appears in the display and the disc settings are stored in the recorder.
Erasing the disc information
Insert the disc whose information is to be erased and verify its contents. Do steps 1 and 2, then turn the jog dial on the recorder or turn the control towards or on the remote control until "Erase?" flashes in the display, and then press the jog dial on the recorder or on the remote control. "Erase OK" appears in the display and the disc information is erased. If you try to erase the disc information of a disc that have never been stored, "No Entry!" appears in the display for 2 seconds.
Notes
- The settings for up to 20 discs can be stored. Any settings stored afterwards will replace the settings for the least used disc among the 20.
- If you use another minidisc recorder to edit or add tracks to a disc whose settings have been stored on the recorder, the disc will no longer be recognizable by the recorder and the stored information will become useless.
Connecting to a stereo system (LINE OUT)
See the illustration in Japanese text (page 51).
Connect the /L LINE OUT jack of the recorder to the LINE IN jacks of an amplifier or a tape recorder with a line cable (RK-G129 or RK-G136, not supplied). The output is analog. The recorder plays the MD digitally and sends analog signals to the connected equipment.
When connecting a line cable to the /LINE OUT jack
When connecting a line cable (not supplied), be sure to set the "AUDIO OUT" parameter for the / LINE OUT jack.
1 Press the jog dial, turn the dial until "AUDIO OUT" flashes in the display, and then press the dial again.
2 Turn the dial until "LINE OUT" flashes in the display, and then press the dial.
Notes
- If the "AUDIO OUT" parameter for the / LINE OUT jack is set to "LINE OUT", VOL + / - or Digital Sound Preset will not function.
- The "AUDIO OUT" parameter for the / LINE OUT jack cannot be set to "LINE OUT" when the supplied remote control is connected.
- When you connect the headphones/earphones directly to the recorder, set the "AUDIO OUT" parameter for the / LINE OUT jack to "HeadPhone".
Editing recorded tracks
You can edit your recordings by adding/ erasing track marks or labeling tracks and discs.
Premastered MDs cannot be edited.
Notes on editing
- Do not move or jog the recorder while "TOC Edit"* is flashing in the display.
- You cannot edit tracks on an MD that is record -protected. Before editing tracks, close the tab on the side of the MD.
- If you perform an editing operation while playing, be sure not to turn the power off until "TOC Edit" disappears in the display.
- The lid does not open until "TOC Edit" disappears in the display after editing.
- When the group mode is on, editing can be performed only for the tracks registered into the selected group.
TOC = Table of Contents
Labeling recordings
See the illustrations in Japanese text (pages 52, 53 and 55).
You can name tracks during playback, discs during stop, and both during recording. Each name can be as long as 200 letters. Each disc can hold up to 1,700 alphanumeric letters or 800 katakana characters during playback or stop.
Available characters
- Katakana characters (Japanese model only)
- Capital and small letters of the English alphabet.
- Numbers 0 to 9
• ! " # $ % & ( ) * . ; < = > ? @ _ ` + - ' , / : _(space)
Notes
- "NAME FULL" appears when you try to enter more than 1,700 characters on a disc. Enter a shorter name for the track, group, or disc, or set the "LP Stamp" setting to "Stamp OFF" so that "LP:" is not be added at the beginning of the track name.
-
When labeling a disc which has been recorded using the group function, be sure to turn the group function on to avoid misoverwrite the group management information.
-
If you enter the symbol 12 between the characters in disc names such as "abc/ def," you may be unable to use the group function.
About the character palette
The character palette appears in the display when the recorder is ready to accept character input.
For configuration of the character palette, see page 53 in Japanese text.
On the recorder
Labeling a disc during stop
To label a disc that contains group settings, you must turn the group mode on before doing the labeling procedure.
1 Insert a disc.
2 Press the jog dial, turn the dial until "EDIT" flashes in the display, and then press the dial again.
" : Name" flashes in the display.
3 Press the jog dial again.
The disc is ready to be labeled.
The cursor flashes in the letter input area and the character palette appears in the display.
4 Press to move the cursor form the letter input area to the character palette.
5 Press or repeatedly to select a letter and press to enter.
The selected letter appears in the letter input area and the cursor moves to the next input position. The buttons used for character input and their functions are listed below.
| Buttons (Press/ Turn) | Functions |
| ■ | To move the cursor from the character palette to the letter input area. To move the cursor upward in the character palette. |
| ■ | To move the cursor from the letter input area to the character palette. To move the cursor downward in the character palette. |
| ■/▲ | To move the cursor to the left or right. |
| ▲ | To enter a letter in the character palette. To enter the text string in the letter input area (Press for 2 seconds or more). |
| VOL + | To insert a blank space before the cursor in the letter input area. To move the cursor to the right in the character palette. |
| VOL - | To delete a letter in the letter input area. To move the cursor to the left in the character palette. |
| Jog dial | To select a character in the letter input area (Turn). To scroll the character palette by turning (Turn). To enter a letter (Press). To enter a name (Press for 2 seconds or more). |
| GROUP/CANCEL | To cancel labeling in the letter input area. To m the cursor from the character palette to the letter input area, |
| T MARK | To display “:”, “-” and “/” repeatedly at the input position in the letter input area. |
6 Repeat step 4 and 5, and then enter all characters of the label name.
7 Press down the jog dial for 2 seconds or more.
The disc is labeled.
Labeling a track or a group during playback
1 To label a track, insert a disc and play the track you want to label. To label a group, insert a disc, turn the group mode on, and then play the group you want to label (page 97).
2 Press the jog dial, turn the dial until "EDIT" flashes in the display, and then press the dial again.
:Name^ flashes in the display.
Continued
3 To label a track, press the jog dial while " : Name" is flashing.
To label a group, turn the jog dial until " :Name" flashes in the display, and then press the dial.
The track or group is ready to be labeled.
4 Follow steps 4 to 6 of "Labeling a disc during stop."
Labeling a track, a group, or a disc during recording
To label a group, you must first turn the group mode on before the start of recording (page 92).
1 While recording, press the jog dial, turn the dial until "EDIT" flashes in the display, and then press the dial again.
" :Name" flashes in the display.
2 To label a track, press the jog dial while
:Name" is flashing.
To label a group, turn the jog dial until
" : Name" flashes in the display, then press the dial.
To label a disc, turn the jog dial until
" : Name" flashes in the display, then press the dial.
The track, group, or disc is ready to be labeled.
3 Follow steps 5 to 7 of "Labeling a disc during stop".
To cancel labeling
Press CANCEL to cause "CANCEL?" to light up and "PushENTER" to flash in the display, and then press the jog dial.
On the remote control
Labeling a disc during stop
To label a disc that contains group settings, you must turn the group mode on before doing the labeling procedure.
1 Insert a disc.
2 Press DISPLAY for 2 seconds or more.
3 Turn the control towards 山山 or 山山 until "EDIT" flashes in the display, and then press.
" : Name" flashes in the display.
4 Press. The disc is ready to be labeled.
5 Turn the control towards or to select a letter and press to enter. The selected letter stops flashing and the cursor moves to the next input position.
| Buttons (Press/Turn) | Functions |
| I | To switch between katakana, the alphabet (capital letters and small letters), symbols/numbers, and phrases. |
| Control (VOL +/-) | To move the cursor to the left or right. |
| Control (I←/→→I) | To change the letter to the one before/next one. |
| DISPLAY | To insert a blank space to type in a new letter (Press within 2 seconds). To cancel labeling by (Press for 2 seconds or more). |
| PLAYMODE | To delete a letter and move back all following letters to the left. |
6 Repeat step 4 and enter all characters of the label name.
7 Keep pressing for 2 seconds or longer. The track or disc is labeled.
Labeling a track or a group during playback
1 To label a track, insert a disc and play the track you want to label. To label a group, insert a disc, turn the group mode on, and play the group you want to label (page 98).
2 Press DISPLAY for 2 seconds or more.
3 Turn the control towards or until "EDIT" flashes in the display, and then press. " :Name" flashes in the display.
4 To label a track, press while "Name" is flashing.
To label a group, turn the control towards or until "GP: Name" flashes in the display, and then press.
The track or group is ready to be labeled.
5 Follow steps 5 to 7 of "Labeling a disc during stop".
Labeling a track, a disc, or a group during recording
To label a group, you must turn the group mode on before the start of recording (page 92).
1 Press DISPLAY for 2 seconds or more during recording.
2 Turn the control towards or until "EDIT" flashes in the display, and then press. "J:Name" flashes in the display.
3 To label a track, press while "Name" is flashing. To label a group, turn the control towards or until "GP: Name" flashes in the display, then press .
To label a disc, turn the control towards
or until " :Name"
flashes in the display, then press.
The track, group, or disc is ready to be labeled.
4 Follow steps 5 to 7 of "Labeling a disc during stop."
To cancel labeling
Press DISPLAY for 2 seconds or more.
Notes
- When the recording is stopped while labeling a track, a group, or a disc during recording, or when the playback moves on to the next track while labeling a track during playback, the input at that point is entered automatically.
- "LP:" has automatically been added at the beginning of the track names for tracks recorded in MDLP mode.
Relabeling recordings
Follow the steps corresponding to the labeling method until the track, group, or disc is ready to be labeled. Enter a new character over the one you want to change, then press the jog dial for 2 seconds or more (keep pressing for 2 seconds or more on the remote control).
Notes
- Track and disc titles that were entered in Japanese katakana characters will appear in Roman letters on minidisc players that do not support the display of katakana characters. Such titles will be marked with a "^" at the beginning and the end.
- You cannot relabel premastered MDs or label MDs that have not been recorded.
- The recorder cannot rewrite a track, group, or disc name of more than 200 letters that was created by another device.
Storing phrases frequently used in labeling
See the illustrations in Japanese text (pages 57 and 59).
Phrases that you often use in track or disc labeling can be stored in the recorder's memory. Approximately 40 phrases of about 10 characters each (with a total character count of about 600) can be stored in the phrase bank. The actual number will depend on the length of each phrases.
On the recorder
Storing phrases into the name bank (Name Bank function)
1 Press the jog dial, turn the dial until "EDIT" flashes in the display, and then press the dial again.
2 Turn the jog dial until "Name Bank" flashes in the display, and then press the dial.
3 Enter the phrase you want to store, and then press the jog dial for 2 seconds or more.
"Entry!" appears in the display and the phrase is stored.
Storing phrases while labeling a track or disc
1 Do the procedure "On the recorder" in "Labeling recordings" (page 103) to enter a phrase.
2 After entering the phrase, press END SEARCH for 2 seconds or more. "Entry!" appears in the display and the cursor flashes after the phrase you just stored. You can then continue with labeling operation.
Retrieving phrases
You can retrieve a phrase stored in the recorder's memory anytime you want to use it in a track, group, or disc name.
Note
Phrases stored in the name bank cannot be retrieved by the procedure described in "Searching for a phrase by displaying the stored phrase one by one." To retrieve a phrase from the name bank, follow the procedure described in "Searching for a phrase by its first letter."
Searching for a phrase by displaying the stored phrase one by one
1 Do the procedure "On the recorder" in "Labeling recordings" (page 103) until "Name," "Name," or "Name" flashes in the display. Then press the jog dial.
2 Press END SEARCH so that the phrase stored in the recoder's memory appears in the display.
3 Press to move the cursor from the letter input area to the character palette, and then turn the jog dial until the desired phrase flashes in the display. Turning the jog dial causes the phrases stored in the recoder's memory to appear one by one in sequential order.
4 Press the jog dial while the phrase you want flashes in the display. The phrase is selected and lights up in the letter input area.
5 Press the jog dial for 2 seconds or more. The phrase is retrieved.
Searching for a phrase by its first letter
1 When labeling a track, group, or disc, turn the jog dial in the letter input area until the first letter of the desired phrase appears.
2 Press END SEARCH to search so that the phrase corresponding to the letter appears.
3 Press to move the cursor from the letter input area to the character palette, and then turn the jog dial until the desired phrase flashes in the display.
4 Press the jog dial while the desired phrase flashes in the display. The phrase is selected and lights up in the letter input area.
5 Press the jog dial for 2 seconds or more. The selected phrase is retrieved.
Erasing phrases
1 While the recorder is stopped, press the jog dial, turn the dial until "EDIT" appears, and then press the dial again.
2 Turn the jog dial until "BankErase" appears, and then press the dial.
3 Turn the jog dial until the phrase you want to erase appears, and then press the dial. "Erase!" appears and the phrase is erased.
To cancel the operation
Press CANCEL to cause "CANCEL?" lights up and "PushENTER" flashes in the display, and then press the jog dial.
On the remote control
Storing phrases into the name bank (Name Bank function)
1 Press DISPLAY for 2 seconds or more, turn the control towards or until "EDIT" flashes in the display, and then press.
2 Turn the control towards or until "Name Bank" flashes in the display, and then press.
3 Enter the phrase you want to store, then press for 2 seconds or more. "Entry!" appears in the display and the phrase is stored.
Storing phrases while labeling
1 Do the procedure "On the remote control" in "Labeling recordings" (page 104) to enter a phrase.
2 After entering the phrase, press I for 2 seconds or more.
"Entry!" appears in the display and the cursor flashes after the phrase you just stored. You can then continue with labeling operation.
Retrieving phrases
Note
Phrases stored in the name bank cannot be retrieved by the procedure described in "Searching for a phrase by displaying the stored phrase one by one." To retrieve a phrase from the name bank, follow the procedure described in "Searching for a phrase by its first letter."
Searching for a phrase by displaying the stored phrase one by one
1 Do the procedure "On the remote control" in "Labeling recordings" (page 104) until " :Name," "GP: Name," or " :Name" appears in the display. Then press
2 Press I repeatedly until the first phrase stored in the recoder's memory appears in the display.
3 Turn the control towards or repeatedly. Turning the control causes the phrases stored in the recoder's memory to appear one by one.
4 Press while the phrase you want is shown in the display, and then press for 2 seconds or more. The cursor flashes after the phrase you just retrieved.
Searching by the first letter of a phrase
1 When labeling a track, group, or disc, turn the control towards |口 | or |口 | to move the cursor to the letter which the desired phrase begins with.
2 Press to search so that the phrase corresponding to that letter appears.
3 Turn the control towards until the desired phrase flashes in the display. Turning the control causes all the other phrases stored in the name bank appear one by one.
After all the phrases have appeared, the characters in the character palette appear in the display one by one.
4 Press while the phrase you want is shown in the display, and then press for 2 seconds or more.
The cursor flashes after the phrase you just retrieved. You can then continue with labeling operation.
Erasing phrases
1 Press DISPLAY for 2 seconds or more, turn the control towards or until "EDIT" flashes in the display, and then press.
2 Turn the control towards or repeatedly until "BankErase" appears in the display, and then press.
3 Turn the control towards or repeatedly until the phrase you want to erase appears, and then press.
"Erase!" appears in the display and the phrase is erased.
To cancel the operation
Press DISPLAY for 2 seconds or more.
Registering tracks or groups as a new group (Group setting)
See the illustrations in Japanese text (pages 60 and 61).
Do the following procedure to register tracks (or groups). A series of tracks (or groups) can be registered by selecting the starting and ending tracks (or groups). The tracks (or groups) must, however, be sequential. If the desired tracks (or groups) are not consecutive, you must move them to make them consecutive before you can register them ("Moving recorded tracks", page 108). This function can be used at any time, whether group mode is on or off.
1 While the recorder is stopped, press the jog dial, turn the dial until "EDIT" flashes in the display, and then press the dial again.
2 Turn the jog dial until "Set" flashes in the display, and then press the jog dial. "001" flashes in the display.
3 Turn the jog dial until the number or name of the desired first track flashes in the display, and then press the jog dial. This selects the first track of the new group.
Even when the group mode is on, track numbers appear according to their order on the disc, not their order within the group.
4 Turn the jog dial until the number or name of the desired last track flashes in the display, and then press the jog dial. This selects the last track of the new group.
5 Follow steps 4 to 7 of "Labeling recordings" (page 103) to label a group.
Notes
- In step 3, the first track must either be the first track of an existing group or a track that does not belong to a group.
- When selecting the last track in step 4, make sure the track comes after the one selected in step 3. The last track must either be the last track of an existing group or a track that does not belong to a group.
To release a group setting
See the illustration in Japanese text (page 61).
1 Press GROUP for 2 seconds or more. The group mode turns on.
2 Follow steps 1 and 2 of "On the recorder" in "Selecting and playing desired groups (Group skip function)" (page 98) and check the contents of the group you want to release. Then press
3 Press the jog dial, turn the dial until "EDIT" flashes in the display, and then press the dial again.
4 Turn the jog dial until "▶: Release" flashes in the display, and press the jog dial.
"Release?" appears and "PushENTER" flashes in the display.
5 Press the jog dial. The group setting of the selected group is released.
Moving recorded tracks
See the illustrations in Japanese text (page 62).
You can change the order of the recorded tracks.
On the recorder
1 While playing the track you want to move, press the jog dial, turn the dial until "EDIT" flashes in the display, and then press the dial again.
2 Turn the jog dial until "Move" flashes in the display, and then press the dial.
The selected track number or name of the group that the selected track belongs flashes in the display. If the track has been labeled, press to make the track name appear in the display. Press to display the track number again.
3 Turn the jog dial until the destination track number flashes in the display.
4 Press the jog dial again. The track moves to the selected destination track.
On the remote control
1 Press DISPLAY for 2 seconds or more, turn the control towards or until "EDIT" flashes in the display, and then press.
2 Turn the control towards or until " : Move" flashes in the display, and then press.
3 Turn the control towards or to select the destination track number.
4 Press. The selected track moves just before the destination track.
To cancel moving
Press CANCEL on the recorder.
Press DISPLAY for 2 seconds or more on the remote control.
Moving a track to a different group
See the illustration in Japanese text (page 63).
On the recorder
1 Press GROUP for 2 seconds or more.
2 While playing the track you want to move, press the jog dial, turn the dial until "EDIT" flashes in the display, and then press the dial again.
3 Turn the jog dial until "Move" flashes in the display, and then press the dial.
4 Turn the jog dial until the destination group flashes in the display, and then press the jog dial.
5 Turn the jog dial until the number of the destination track within the group flashes in the display, and then press the jog dial.
On the remote control
1 Follow the procedure of "To activate the group mode" (page 92) to turn the group mode on
2 Press DISPLAY for 2 seconds or more while the track you want to move is playing.
3 Turn the control towards or until "EDIT" flashes in the display, and then press.
4 Turn the control towards or until " : Move" flashes in the display, and then press.
5 Turn the control towards or until the destination group flashes in the display, and then press.
6 Turn the control towards or until the number of the destination track within the group flashes in the display, and then press.
Changing the order of a group on a disc (Group move)
See the illustrations on Japanese text (page 64).
On the recorder
1 Press GROUP for 2 seconds or more.
2 While playing a track within a group whose order you want to change, press the jog dial, turn the dial until "EDIT" flashes in the display, and then press the dial again.
3 Turn the jog dial until "Move" flashes in the display, and then press the jog dial.
4 Turn the jog dial to select the destination point on the disc, and then press the dial.
On the remote control
1 Follow the procedure of "To activate the group mode" (page 92) to turn the group mode on.
2 While playing a track within a group whose order you want to change, press DISPLAY for 2 seconds or more.
3 Turn the control towards or until "EDIT" flashes in the display, and then press.
4 Turn the control towards or until "GP:Move" appears in the display and then press.
5 Turn the control towards or to select a destination point on the disc, and then press.
Adding a track mark
See the illustrations in Japanese text (page 65). You can insert a track mark into a track.
1 While playing or pausing an MD, press T MARK on the recorder at the point you want to mark.
"MARK ON" appears in the display, and the track mark is added.
To add track marks while recording (except while synchro-recording)
Press T MARK at the point you want to add a track mark. You can use Auto Time Stamp to add track marks automatically at specified intervals (except while digital recording).
Erasing a track mark
See the illustrations in Japanese text (page 65).
When you record with analog (line) input, unnecessary track marks may be recorded where recording level is low. You can erase a track mark to combine the tracks before and after the track mark.
1 While playing the track with the track mark you want to erase, press I to pause.
2 Find the track mark by pressing slightly. "MARK" appears in the display for 2 seconds.
3 Press T MARK to erase the mark while "MARK" appears in the display. "MARK OFF" appears in the display. The track mark is erased and the two tracks are combined.
Notes
- When you erase a track mark between the two tracks that are registered into different groups, the second track is re-registered into the group containing the first track. In addition, if you combine a track that is registered to a group with a track that is not registered to a group, the second track takes the same registration setting as the first track. However, when the group function is on, you can only combine tracks within the selected group.
- You cannot erase track marks according to the system limitations.
Erasing tracks or groups
See the illustration in Japanese text (page 66).
You can quickly erase a recorded tracks, all the tracks and data of the MD, or groups.
Note that once a recording has been erased, you cannot retrieve it. Make sure of the contents you are erasing.
Erasing a track
1 While playing the track you want to erase, press the jog dial, turn the dial repeatedly until "EDIT" flashes in the display, and then press the dial again.
2 Turn the jog dial until "J: Erase" flashes in the display, and then press the dial. "Erase OK?" appears and "PushENTER" flashes in the display.
3 Press the jog dial again. The track is erased and the next track starts to play. All the tracks after the one erased are automatically renumbered.
To erase a part of a track
Add track marks at the beginning and the end of the part you want to erase, then erase the part.
Erasing a whole disc
1 While the recorder is stopped, press the jog dial, turn the dial until "EDIT" flashes in the display, and then press the dial again.
2 Turn the jog dial until "Erase" flashes in the display, and then press the dial.
"AllErase?" appears and "PushENTER" flashes in the display.
3 Press the jog dial again. "TOC Edit" flashes in the display, and all the tracks will be erased. When erasing is complete, "BLANKDISC" flashes and "00:00" appears in the display.
To erase a group
1 Press GROUP for 2 seconds or more.
2 Follow steps 1 and 2 of the procedure described under "On the recorder" in "Selecting and playing desired groups (Group skip function)" (page 98) to check the contents of the group you want to erase. Then press .
3 Press the jog dial, turn the dial until "EDIT" flashes in the display, and then press the dial again.
4 Turn the jog dial until "Erase" flashes in the display, and then press the jog dial. The group name and "GP Erase?" appear and "PushENTER" flashes in the display.
5 Press the jog dial again. The group is erased.
To cancel erasing
Press CANCEL.
Other operation
G-PROTECTION function
The G-PROTECTION function was developed to provide a higher level of shock resistance than that of existing players in order to allow the recorder to be used while jogging.
Note
The playback sound may skip if:
- the recorder receives stronger continuous shock.
- a dirty or scratched MiniDisc is played.
Setting the alarm (Melody Timer)
See the illustrations in Japanese text (pages 68 and 69).
You can set the alarm to go off in 1 to 99 minutes.
The following sounds can be selected:
"TIMER 1" Classical music 1
"TIMER 2" Classical music 2
"TIMER 3" Beeps
On the recorder
1 While the recorder is stopped, playing, or play-paused, press the jog dial.
2 Turn the jog dial until "M-TIMER" flashes in the display, and press the dial.
3 Turn the jog dial until "ON" flashes in the display, and then press the dial.
lights up in the display and the alarm sound can be selected.
4 Turn the jog dial repeatedly to select the alarm sound.
5 Press the jog dial. The alarm sound is set.
6 Turn the jog dial repeatedly to select the elapsed time. One rotation of the control changes the elapsed time setting (TIME:) by 1 minute, within a range of 1 to 99 minutes. To change the time quickly, keep turning the jog dial.
7 Press the jog dial.
Melody timer is set.
The time remaining until the alarm is shown in the display while the recorder is stopped or play-paused.
To show the remaining time during play, do steps 1 to 3. After verifying the time, press CANCEL.
On the remote control
1 While the recorder is stopped, playing, or play-paused, press DISPLAY for 2 seconds or more, and then press.
2 Turn the control towards or until "M-TIMER" flashes in the display, and then press.
3 Turn the control towards or until "ON" flashes in the display, and then press.
lights up in the display and the alarm sound can be selected.
4 Turn the control towards 口 or to select the alarm sound.
5 Press ■.
The time is set.
6 Turn the control towards or to select the elapsed time.
One rotation of the control changes the elapsed time setting (TIME:) by 1 minute, within a range of 1 to 99 minutes. To change the time quickly, turn and hold the control towards or
7 Press ■.
The alarm is set.
The time remaining until the alarm is shown in the display while the recorder is stopped or play-paused.
To show the remaining time during play, do steps 1 to 3. After verifying the time, press DISPLAY for 2 seconds or more.
To cancel setting the alarm.
Press CANCEL on the recorder, or press DISPLAY for 2 seconds or more on the remote control.
To cancel Melody Timer.
Select "OFF" in step 2, and then press the jog dial on the recorder or on the remote control.
To stop the alarm.
Press any button.
Notes
- The settings will be lost when you start recording.
- The timer will begin counting down (using the factory setting) from the moment you select "ON" in step 3. The recorder will begin counting down again from the moment you change the elapsed time in step6.
▶Power sources
You can use the recorder on ...
house current.
- a nickel metal hydride rechargeable battery (supplied).
- dry battery (not supplied).
It is preferable to use the recorder on house current when recording for a long time.
Battery life1)
When recording2) (JEITA3)
(Unit: approx. hours)
| Batteries | Stereo | LP2 | LP4 |
| NH-14WM nickel metal hydride rechatgeable battery4) | 8.5 | 11 | 14 |
| LR6 (SG) alkaline dry battery5) | 7.5 | 12 | 15 |
| NH-14WM nickel metal hydride rechargeable battery4) + one LR6 (SG)5) | 20 | 28 | 37 |
When playing (JEITA3)
(Unit: approx. hours)
| Batteries | Stereo | LP2 | LP4 |
| NH-14WM nickel metal hydride rechargeable battery4) | 24 | 27 | 31 |
| LR6 (SG) alkaline dry battery5) | 34 | 40 | 45 |
| NH-14WM nickel metal hydride rechargeable battery4) + one LR6 (SG)5) | 64 | 75 | 84 |
1) The battery life may be shorter due to operating conditions and the temperature of the location.
2) When you record, use a fully charged rechargeable battery.
3) Measured value by the standard of JEITA(Japan Electronics and Information Technology Industries Association).
4) When using a 100% fully charged rechargeable battery.
5) When using a Sony LR6 (SG) "STAMINA" alkaline dry battery (produced in Japan).
When to replace the batteries
When the dry battery or rechargeable battery are weak, flashing or "LOW BATT" appears in the display. Replace the dry battery or charge the rechargeable battery.
The battery level indicator is approximate. It may be more or less than the indication depending on the operating condition.
Note
Stop the recorder before replacing battery.
Messages
If the recorder cannot carry out an operation, error messages may flash in the display window as follows.
BANKFULL:
The phrase bank is almost full and cannot store the phrase you tried to enter. Delete some phrases from the phrase bank, and then reenter the new phrase.
BLANK DISC :
You tried to play an MD with no recording on it.
BUSY:
You tried to operate the recorder while it was accessing the recorded data. Wait until the message goes out (in rare cases, it may take a few minutes).
Data Save :
The MD recorder is recording information (sounds) from the memory to the disc. Wait until this process is completed. Do not expose the recorder to any physical shock, nor disrupt power supply.
DISC ERR :
The recorder cannot read the MD (it is scratched or dirty). Reinsert the MD. If the same message still appears, replace the MD.
DISC FULL :
There is no more space to record on the MD.
EMPTY:
You tried to erase data in the phrase bank but no data have been recorded.
Hi DC in :
The power supply is higher than required. Use the recommended power sources.
HOLD:
You tried to operate the recorder with the HOLD switch slid in the direction of the arrow. Slide back the switch.
LINE OUT :
You pressed VOL + / - while the "AUDIO OUT" parameter is set to "LINE OUT." Use the jog dial to set the "AUDIO OUT" parameter to "HeadPhone."
LOW BATT:
The rechargeable battery or dry battery is weak. Charge the rechargeable battery or replace the dry battery.
MEMOVER:
You started recording with the recorder receiving continuous vibration. Put the recorder on the stable place and start recording again.
MENU:
You pressed a key on the remote control while selecting a menu on the recorder.
NAME FULL:
You tried to enter more than 200 letters to label a single track or disc.
You tried to enter a total of more than 1700 letters for track or disc names.
NO BATT :
The rechargeable battery is not inserted. Insert a rechargeable battery.
NO COPY:
You tried to make a copy from a disc that is protected by the Serial Copy Management System. You cannot make copies from a digitally connected source which was itself recorded using the digital connection. Use the analog connection instead.
NO DISC:
You tried to play or record with no disc in the recorder.
No Entry! :
You tried to erase a setting in the Personal Disc Memory on a disc that contains no settings in the Personal Disc Memory.
No Group:
You tried to turn the group function on with a disc which has no group information. Use a disc which the group information has been recorded.
NO SIGNAL :
The recorder could not detect digital input signals. Make sure that the source is connected firmly. If the message appears while recording, press to end recording.
NO TEXT
You tried to use the CD text copying function to copy a track or disc name from a CD that has no text data.
P/B ONLY:
You tried to record or edit on a premastered MD (P/B stands for playback).
PROTECTED:
You tried to record or edit on an MD with its tab in the record-protect position.
SORRY:
You tired to set Digital Sound Preset while the "AUDIO OUT" parameter is set to "LINE OUT." Use the jog dial to set the "AUDIO OUT" parameter to "HeadPhone."
You tried to erase a track mark while playing the MD or at the beginning of the first track.
You tried to erase a track mark to combine tracks the recorder cannot combine (a track recorded in different recording mode such as in LP2 and LP4, or a track recorded through analog connection and digital connection)*.
You tried to overwrite a track marrk. You tried to press III, T MARK or REC MODE while synchro-recording or the joint text function is active.
- If you have recorded or erased many times on the same MD, the data of a single track may be scattered throughout the MD. When the data is scattered in groups of less than 12 seconds long, the recorder will not be able to combine the tracks.
TEMPOVER:
Heat has built up in the recorder. Wait until the recorder cools down.
TOC Edit :
The MD recorder is recording information (track start and end position) from the memory to the disc. Wait until this process is completed. Do not expose the recorder to physical shock, nor disrupt power supply.
TR FULL:
You tried to record more than 254 tracks.
TrPROTECT :
You tried to record over or edit a track which has been protected from being recorded over*.
- Track-protected MiniDiscs — Some MD recorders will let you protect individual tracks from being recorded over. This recorder, however, does not offer this feature.
案内
S二一はは客樣技術相談窓口とて
「テク二力ルインフ人才培养会」
を開設ていestr。
- 取拔說明書/Operating Instructions
- Operating Instructions
- 付属品を確かたの
- 解說
- Looking at the controls
- The recorder
- The display window of the recorder
- The headphones/earphones with a remote control
- The display window of the remote control
- How to use the jog dial
- Display window while selecting the menu items
- List of menus
- Menu functions
- To check the menus and menu items that can be selected at each menu level, see the following pages in Japanese text.
- Preparing
- Getting started!
- Notes on rechargeable battery
- Notes on dry battery
- Recording an MD right away!
- To stop recording, press
- If the recording does not start
- Notes
- Playing an MD right away!
- If the playback does not start
- When using the headphones/earphones connect them directly to the recorder
- Note
- Various ways of recording
- Connecting digital (optical) and analog (line) inputs
- Recording with analog input (line cable required)
- Recording for long times
- When you do not want "LP:" added at the beginning of the track
- Recording tracks using the Group Function (Group mode recording)
- What is the group function (group mode)?
- How is group information recorded?
- To activate the group mode
- On the recorder
- On the remote control
- Recording a track into a new group
- To stop recording, press ■.
- Recording a track into an existing group
- Synchro-recording from a digital source
- To cancel synchro-recording
- Recording without overwriting existing material
- To start recording from the current point.
- Recording from a microphone
- To select microphone sensitivity
- Adding track marks automatically at specified intervals (Auto Time Stamp)
- Adjusting the recording level manually (Manual recording)
- Setting the clock to stamp the recorded time
- If you make a mistake while setting the clock
- To display the current time
- To display the time in the 24-hour system
- To maintain the correct time
- Copying CD text information while recording (Joint Text)
- Various ways of playback
- Searching for a specific track or a position quickly (Quick Search)
- Selecting the search mode
- Searching for a specific track while monitoring track numbers or track names (Index Search)
- Searching for a specific point while monitoring the elapsed time (Time Search)
- Using the Group Function
- Listening to tracks in a specific group (Group mode playback)
- To turn off the Group function
- Selecting and playing desired groups (Group skip function)
- Changing a play mode
- Selecting a play mode
- play mode/indication
- Creating a Program (Program play)
- Repeat play
- To adjust the sound quality (Digital Sound Preset)
- Selecting the sound quality
- Factory settings of the Digital Sound Preset
- To select a preset sound
- - On the recorder
- - On the remote control
- Adjusting the sound quality
- To change playback speed (Speed Control)
- Storing the settings for individual discs (Personal Disc Memory)
- Erasing the disc information
- Connecting to a stereo system (LINE OUT)
- When connecting a line cable to the /LINE OUT jack
- Editing recorded tracks
- Notes on editing
- Labeling recordings
- Available characters
- About the character palette
- Labeling a disc during stop
- Labeling a track or a group during playback
- Labeling a track, a group, or a disc during recording
- To cancel labeling
- Labeling a track, a disc, or a group during recording
- Relabeling recordings
- Storing phrases frequently used in labeling
- Storing phrases into the name bank (Name Bank function)
- Storing phrases while labeling a track or disc
- Retrieving phrases
- Searching for a phrase by displaying the stored phrase one by one
- Searching for a phrase by its first letter
- Erasing phrases
- To cancel the operation
- Storing phrases while labeling
- Searching by the first letter of a phrase
- Registering tracks or groups as a new group (Group setting)
- To release a group setting
- Moving recorded tracks
- To cancel moving
- Moving a track to a different group
- Changing the order of a group on a disc (Group move)
- Adding a track mark
- To add track marks while recording (except while synchro-recording)
- Erasing a track mark
- Erasing tracks or groups
- Erasing a track
- To erase a part of a track
- Erasing a whole disc
- To erase a group
- To cancel erasing
- Other operation
- G-PROTECTION function
- Setting the alarm (Melody Timer)
- To cancel setting the alarm.
- To cancel Melody Timer.
- To stop the alarm.
- ▶Power sources
- Battery life1)
- When recording2) (JEITA3)
- When playing (JEITA3)
- When to replace the batteries
- Messages
- BANKFULL:
- BLANK DISC :
- BUSY:
- Data Save :
- DISC ERR :
- DISC FULL :
- EMPTY:
- Hi DC in :
- HOLD:
- TOC Edit :
- TR FULL:
- TrPROTECT :
- 案内
Brand : SONY
Model : MZ-R909
Category : MiniDisc Player