
SDZP2000WXE - Bread maker PANASONIC - Free user manual and instructions
Find the device manual for free SDZP2000WXE PANASONIC in PDF.
Rate this manual
Loading...
This manual is not available in your language
| Product Type | Automatic Bread Machine |
| Brand | Panasonic |
| Model | SD-ZP2000 (SDZP2000WXE) |
| Capacity | 1 kg (2.2 lb) of finished bread |
| Number of Programs | 14 automatic programs (including white, whole wheat, rapid, gluten-free, dough, jam, bake only) |
| Main Functions | Kneading, rising, baking, keep warm, delayed timer (up to 13 h), yeast and nut dispenser |
| Display | Backlit LCD screen with program selection and remaining time |
| Color | White/Silver |
| Housing Material | ABS plastic, non-stick aluminum bowl |
| Dimensions (W × D × H) | 30.5 × 24.5 × 35.5 cm |
| Weight | 6.8 kg |
| Power Supply | 220 – 240 V, 50/60 Hz |
| Maximum Power | 720 W |
| Power Cord Length | Approximately 1 m |
| Included Accessories | Non-stick bowl, kneading hook, yeast dispenser, ingredient dispenser (nuts), measuring bottle, double measuring spoon, instruction manual |
| Care and Cleaning | Clean the bowl and hook after each use with a soft sponge; wipe the housing with a damp cloth; do not immerse the base; the dispensers are removable and hand washable |
| Safety | Automatic shutdown at end of program, overheat protection, locked lid during operation, anti-tangle short cord |
| Spare Parts and Repairability | Bowl and hook available under reference (SDZP2000WXE); repair by Panasonic authorized center; repairability index not provided |
| General Information | Household use only; do not use abrasive wipes; store in a dry place |
Frequently Asked Questions - SDZP2000WXE PANASONIC
User questions about SDZP2000WXE PANASONIC
0 question about this device. Answer the ones you know or ask your own.
Ask a new question about this device
Download the instructions for your Bread maker in PDF format for free! Find your manual SDZP2000WXE - PANASONIC and take your electronic device back in hand. On this page are published all the documents necessary for the use of your device. SDZP2000WXE by PANASONIC.
USER MANUAL SDZP2000WXE PANASONIC
Representative in EU :
Panasonic Marketing Europe GmbH
Panasonic Testing Centre
Winsbergring 15, 22525 Hamburg, Germany
Panasonic Taiwan Co., Ltd.
https://www.panasonic.com
© Panasonic Taiwan Co., Ltd. 2018

DZ50B2113
MX0818E30522
WXE
Printed in China
Panasonic®
natural_image
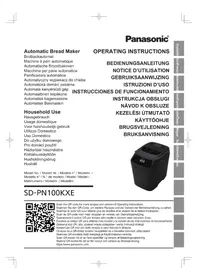
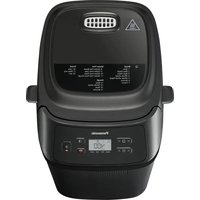
White Panasonic rice cooker with lid and front panel (no visible text or symbols on body)Automatic Bread Maker
OPERATING INSTRUCTIONS (Household Use)
Brotbackautomat
natural_image
Basket of bread and sliced bread on a wooden cutting board, with a glass of liquid in the background (no text or symbols visible)
EXPERIENCE
FRESH
For recipes, visit: www.experience-fresh.eu
Thank you for purchasing the Panasonic product.
- Please read instructions carefully to use the product correctly and safely.
- Before using this product, please give your special attention to Safety Precautions (P. GB3–GB5) and Important Information (P. GB5) of this instructions.
- Please keep instructions for future use.
- Panasonic will not accept any liability if the product is subject to improper use, or failure to comply with these instructions.
Contents
Safety Precautions.... GB3
Important Information GB5
Parts Names and Instructions GB6
- Main Unit & Accessories...... GB6
- Control Panel and Display.... GB7
Bread-making Ingredients...... GB8
- Bread Ingredients.... GB8
- Additional Ingredients ...... GB9
- Gluten Free Information...... GB9
Menu Charts and Baking Options GB10
Handling Instructions and Recipes ....GB11
- Before Use....GB11
- Preparations ....GB11
● Baking Bread GB12
- Bread Recipes GB13
● Baking Brioche GB14
- Baking Cake GB14
● Baking Gluten Free Bread...... GB15
- Baking Gluten Free Cake.... GB15
● Making Bread Dough...... GB16
● Making Pizza Dough GB16
● Making Jam.... GB16
Cleaning & Care GB17
Troubleshooting......GB18
Specifications GB21
Safety Precautions
Please make sure to follow these instructions.
To reduce the risk of personal injury, electric shock or fire, please observe the following:
■ The following signals indicate the degree of harm and damage when the appliance is misused.

WARNING Indicates potential hazard that could result in serious injury or death.

CAUTION: Indicates potential hazard that could result in minor injury or property damage.
■ The symbols are classified and explained as follows.

This symbol indicates prohibition.

This symbol indicates requirement that must be followed.
WARNING
To avoid risk of electric shock, fire due to short circuit, smoke, burn or injury.

- Do not allow infants and children to play with packaging material. (It may cause suffocation.)
- Do not disassemble, repair or modify this appliance.
→ Consult the place of purchase or Panasonic service centre.
● Do not damage the mains lead or mains plug.
Following actions are strictly prohibited:
Modifying, touching on or placing near heating element or hot surfaces, bending, twisting, pulling, hanged/pulled over sharp edges, putting heavy objects on top, bundling the mains lead or carrying the appliance by the mains lead.
- Do not use the appliance if the mains lead or mains plug is damaged or the mains plug is loosely connected to the household mains socket.
→ If the mains lead is damaged, it must be replaced by the manufacturer, its service agent or similarly qualified person in order to avoid a hazard.
● Do not plug or unplug the mains plug with wet hands.
- Do not immerse the appliance in water, or splash it with water and/or any liquid.
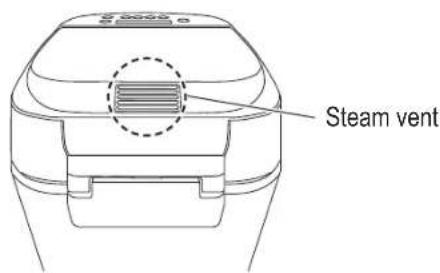
- Do not touch, block or cover the steam vent during use.
• Especially pay attention to children.

● This appliance can be used by children aged from 8 years and above and persons with reduced physical, sensory or mental capabilities, or lack of experience and knowledge if they have been given supervision or instruction concerning use of the appliance in a safe way and understand the hazards involved.
Children shall not play with the appliance.
Cleaning and user maintenance shall not be made by children unless they are older than 8 and supervised.
Safety Precautions
Please make sure to follow these instructions.

WARNING
To avoid risk of electric shock, fire due to short circuit, smoke, burn or injury.

- Keep the appliance and its mains lead out of reach of children less than 8 years.
● Make sure the voltage indicated on the label of the appliance corresponds to your local supply.
Also avoid plugging other devices into the same household mains socket to prevent electrical overheating. However, if you are connecting a number of mains plugs, make sure the total wattage does not exceed the rated wattage of the household mains socket.
- Insert the mains plug firmly.
● Dust off the mains plug regularly.
→ Unplug the mains plug, and wipe with a dry cloth.
● Discontinue using the appliance immediately and unplug in the unlikely event that this appliance stops working properly.
Example for abnormal occurrences or breaking down:
• The mains plug and the mains lead become abnormally hot.
• The mains lead is damaged or the appliance power fails.
- The main body is deformed, has visible damage or is abnormally hot.
• There is abnormal turning noise while in use.
• There is unpleasant smell.
• There is another abnormality or failure.
→ Consult the place of purchase or Panasonic service centre for inspection or repair.

CAUTION
To avoid risk of electric shock, fire, burn, injury or property damage.

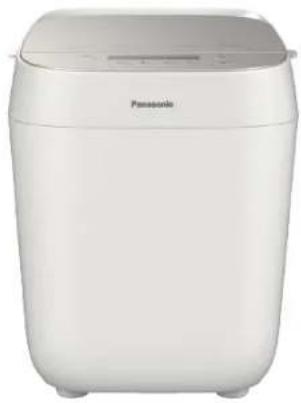
● Do not use the appliance on following places.
- On uneven surfaces, on electrical appliances such as a refrigerator, on materials such as tablecloths or on carpets, etc.
- Places where it may be splashed with water or near a heat source.
→ Position the appliance on a firm, dry, clean, flat heatproof worktop at least 10 cm from edge of worktop and at least 5 cm from adjacent walls and other objects.
- Do not remove the bread pan or unplug the appliance during use.

CAUTION
To avoid risk of electric shock, fire, burn, injury or property damage.

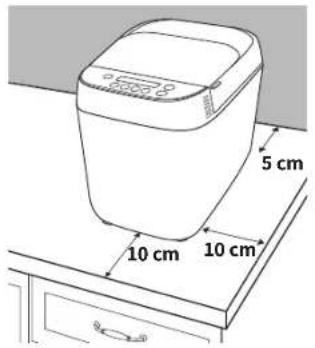
- Do not touch hot area such as bread pan, inside of unit, heating element or inside of the lid while the appliance is in use or immediately after use.
The accessible surfaces may become hot during use. Be careful with the residual heat source especially after use.
→ To avoid burn, always use oven gloves to remove the bread pan or the finished bread. (Do not use wet oven gloves.)
● Do not use an external timer etc.
- This appliance is not intended to be operated by means of an external timer or separate remote-control system.
- Do not insert any object in the gaps.
- Do not exceed the maximum quantities of flour (500 g) and raising ingredients such as dry yeast (7 g) or baking powder (13 g). (See P. GB21)

● Unplug the mains plug when the appliance is not in use.
● Make sure to hold the mains plug when unplugging it. Never pull on the mains lead.
● Before handling, moving or cleaning, unplug the appliance and allow it to cool down.
● This appliance is intended for household use only.
● Ensure to clean the appliance especially surfaces in contact with food after use. (See P. GB17)
Important Information
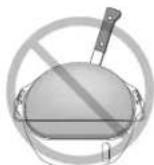
- Do not use the appliance outdoors, in rooms of high humidity, or use excessive force on the parts as is illustrated on the right to avoid malfunction or deformation.
- Do not use a knife or any other sharp tool to remove residues.
- Do not drop the appliance to avoid damaging it.
- Do not store any ingredients or bread in the bread pan.
Temperature sensor

This symbol on the appliance indicates "Hot surface and should not be touched without caution".
Parts Names and Instructions
Main Unit & Accessories
Main Unit
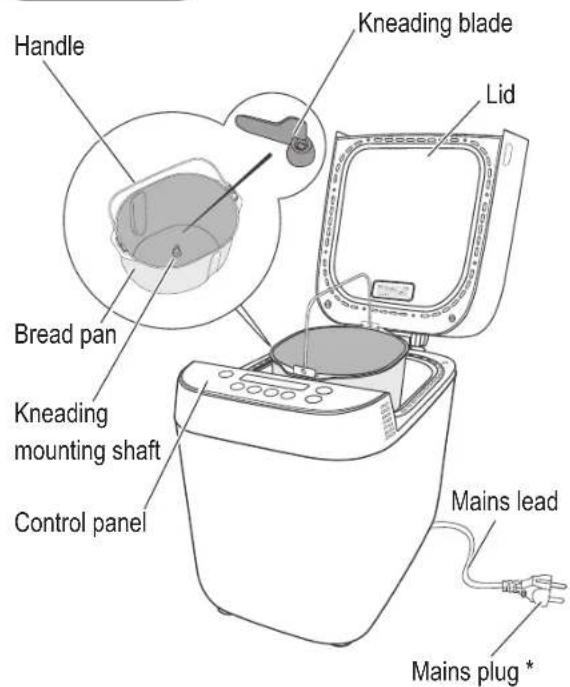
Accessories
Measuring cup Measuring spoon

(Max. 310 mL)
- 10 mL increments
(15 mL) (5 mL)

Tablespoon
- 12 marking
Teaspoon
• 14 , 12 , 34 markings
* The shape of mains plug may be different from illustration.
Bread pan and kneading blade are coated with ceramic to avoid stains and to make bread easier to remove.
■ To avoid damaging their ceramic coating, please follow the instructions below:
- Do not use hard or sharp utensils such as a knife or a fork when removing the bread from the bread pan or / and removing the kneading blade from the bread or bread pan.
- If bread sticks to bread pan and is difficult to be taken out, leave the bread pan for 5 minutes—10 minutes to cool. Turn the bread pan upside down using oven gloves (see P. GB12). Tap holding both hands onto a clear cooking surface covered with kitchen towel until the bread comes out.
- The kneading blade may remain stack in the bread. If still remains, wait for the bread cool down and take it out before slicing.
- If the kneading blade cannot be removed from bread pan, pour warm water into the bread pan and wait 5 minutes—10 minutes.
Still difficult to remove, turn kneading blade laterally and pull it out.
- Use the soft sponge when cleaning the bread pan and the kneading blade. Do not use anything abrasive such as cleansers or scouring pads.
- Hard, coarse or large ingredients such as flours with whole or ground grains, sugar, or the addition of nuts and seeds may damage their ceramic coating. If using large chunk of ingredient, break or cut into small pieces. Please follow the information of Additional Ingredients (see P. GB9) and the recipe quantities stated.
- Use only supplied kneading blade for this appliance.
The bread pan, kneading blade, and bread may be very hot after baking. Always handle with care.

Control Panel and Display
● Picture shows all words and symbols, but only those relevant will be displayed during operation.

- Set delay timer (time until bread is ready). For available menu, it can be set up to 13 hours. (See P. GB10)
e.g.: It is 9:00 PM now, and you want the bread to be ready at 6:30 the next morning.
→ Set the timer to 9:30 (9 hours and 30 minutes from now).


Current time Ready time
- Setting time for menu 13 and 18:
-Menu13
Press the button once will advance the baking time including additional baking time by 1 minute.
-Menu18
Press the button once will advance the cooking time by 10 minutes but additional cooking time will be by 1 minute.
▲ Press this button to increase the time.
▼ Press this button to decrease the time.
(To advance more quickly, press this button once then hold it.)
Bread - making Ingredients
It is extremely important to use the correct measure of ingredients for best results.
Liquid ingredients
Use the measuring cup or measuring spoon provided.
If the recipes indicate a mixture (the liquid plus egg), should be weighted on scales. Using digital scale is recommended.
Dry ingredients
Should be weighed on scales or measured with measuring spoon provided for the small amounts. Using digital scale is recommended.
Bread Ingredients
Flour
Main ingredient of bread. The protein in flour forms gluten during kneading. Gluten provides structure and texture and helps the bread to rise.
Use strong bread flour. Strong bread flour is milled from hard wheat and has a high content of protein which is necessary for the development of gluten.
Carbon dioxide produced during fermentation is trapped within the elastic network of gluten, thus making the dough rise.
Dry yeast
Enables the bread to rise.
Be sure to use dry yeast that does not require pre-fermentation (Do not use dry yeast requiring fermentation before using).
Dry yeast which has Instant Yeast, Easy Blend, Fast Action or Easy Bake written on the packet is recommended. When using dry yeast from sachets, seal the sachet again immediately after use, and keep in the refrigerator. (Use within the manufacturer's recommended time.)
Dairy products
Add flavour and nutritional value.
- If you use milk instead of water, the nutritional value of the bread will be higher, but do not use in timer setting as it may not keep fresh overnight.
→Reduce the water content accordingly.
Sugar (granulated sugar, brown sugar, honey, treacle, etc.)
Food for the dry yeast, sweetens and adds flavour to the bread, changes the colour of the crust.
- Use less sugar if using raisins or other fruits, which contain fructose.
You can make your bread taste better by adding other ingredients.
Eggs
Improve the nutritional value and colouring of the bread.
- Reduce the liquid (water) content proportionally.
- Beat eggs when adding them. Do not use timer setting for the recipe with egg. Eggs go rotten quickly and it may not keep fresh.
Bran
Increases the bread's fibre content.
- Use max. 30 g (2 tbsp).
Wheat germ
Gives the bread a nuttier flavour.
- Use max. 30 g (2 tbsp).
■ Spices, herbs
Enhance the flavour of the bread.
Only use a small amount (max. 1 tbsp) for spices.
Use up to 1 - 2 tbsp of dried herbs.
For fresh herbs, follow the instructions in the recipe.
Water
Use normal tap water.
- When room temperature is low, use tepid water for menu 1, 2, 3, 9, 11, or 14.
- When room temperature is high, use chilled water for menu 12.
- Regardless of room temperature, use chilled water for menus 6 and 7.
Always measure out liquids using the measuring cup provided.
Fat
Adds flavour and softness to the bread.
Use butter (unsalted), margarine or oil.
Salt
Improves the flavour and strengthens gluten to help the bread rise.
The bread may lose size / flavour if measuring is inaccurate.
Gluten Free Ingredients
- Gluten free flours, these include flours made from rice, brown rice, almond, seeds, potato starch, etc. do not have protein to firm gluten and on their own do not have this elasticity for bread making.
- Xanthan gum is a one of thickening agent that works in the place of gluten protein during fermentation in gluten free bread baking.
If using a bread mix...
■ Bread mixes including dry yeast
① Place the mix in the bread pan, then add water.
(Follow instructions on the packet for the quantity of water)
② Select the menu 9, choose a size according to the volume of the mix and start the baking.
- 500 g-L - 400 g-M
- With some mixes, it is not clear how much dry yeast is included, some trial and error may be required to obtain optimum results.
■ Bread mix with separate dry yeast sachet
① Place the dry yeast in the bread pan first, then the bread mix and pour the water.
② Set the machine according to the type of flour included in the mix, and start the baking.
Additional Ingredients (Dried fruits, nuts, bacon, cheese etc.)
Available Menu 2, 3, 5, 7, 10, 11 and 12
Make your flavoured breads without smashing additional ingredients.
Procedure
After the Start button was pressed, you will hear beep sounds.
Place the additional ingredients into the bread pan manually while √flashing.
Time until the beep sounds from start (approximately)
- Menu 2 / White Raisin Bread: 20 minutes – 25 minutes
- Menu 3 / White Stuffed Bread: 20 minutes – 25 minutes
- Menu 5 / Whole Wheat Raisin Bread: 1 hour 25 minutes – 1 hour 55 minutes
- Menu 7 / Lean Raisin Bread: 1 hour – 2 hours 35 minutes
- Menu 10 / Soft Raisin Bread: 50 minutes – 1 hour 15 minutes
- Menu 11 / Soft Raisin Rapid Bread: 20 minutes – 25 minutes
- Menu 12 / Brioche: 55 minutes
Attention of ingredients
Follow the recipe / menu instructions for the quantities of each ingredients.
Otherwise,
- The ingredients may scatter from bread pan to cause unpleasant smells and smoke.
• The bread may not rise well.
Dry / insoluble ingredients
Apply to menu name with Raisin: Menu 2, 5, 7, 10, and 11.
Dried fruits
- Chop into approx. 1 cm cubes.
Nuts, seeds
- Chop into approx. 1 cm cubes.
- Nuts impair the effect of gluten, so avoid using too much.
- Using large, hard seeds may scratch the coating of the bread pan.
Soft and easy break ingredients
Apply to Stuffed Bread: Menu 3.
■ Bacon, salami, olive, dry tomato
- Cut the bacon and the salami into 1 cm cubes.
- Cut the olive into 14 .
■ Cheese, chocolate
- Cut the cheese into 1 cm cubes.
- Chop chocolate finely.
Gluten Free Information
Making gluten free bread is very different from the normal way of producing bread.
It is very important if you are making gluten free bread for health reasons that you have consulted your doctor and follow the guidelines below.
- This program has been developed especially for certain gluten free ingredients, therefore using your own mix may not produce such good results.
- When gluten free is selected, the details for each recipe must be followed carefully. (Otherwise, the bread may not turn out well.)
There are two types of gluten-free baking mixtures; mixtures with low content of gluten and mixtures which do not consist of wheat and contain no gluten. If you have to pick one out using this baking program, please consult your doctor beforehand. - The baking results and bread's appearance may differ according to the type of mix. Occasionally a bread may have some flour remaining on the side. The wheat free mixes can produce more variable results.
- Wait for the bread to cool before slicing it for the better performance.
- The bread should be stored in a cool dry place and used within 2 days. If you will not be able to use up all the bread within that time, it can be put into freezer bags, in convenient sized portions, and frozen.
- The baking results and bread's appearance may differ according to the type of mix. Occasionally a bread may have some flour remaining on the side. The wheat free mixes can produce more variable results.
- Wait for the bread to cool before slicing it for the better performance.
- The bread should be stored in a cool dry place and used within 2 days. If you will not be able to use up all the bread within that time, it can be put into freezer bags, in convenient sized portions, and frozen.
Warning for the users who use this program for health reasons:
When using the gluten free program, make sure to consult your doctor or the Coeliac Association and only use the ingredients which are suitable for your health conditions.
Panasonic will not be responsible for any consequences resulting from ingredients that have been used without professional consultation.
It is very important to avoid cross contamination with flours that contain gluten if bread is being made for dietary reasons. Particular attention must be paid to the cleaning of the bread pan and kneading blade as well as any utensils that are used.
Menu Charts and Baking Options
■ Function Availability and Time Required
- The machine stop or move during process based on the operating program.
- Time required for each process will differ according to room temperature.
| Menu Number | Menu Options | Processes | Remark*1(###) | Refer.Page | ||||||
| Size Crust Timer | Rest | Knead Rise * | 2 | Bake Total | ||||||
| Hard Crust Bake | 1 | White | — — | √ | — 5 min–10 min | 2 h 15 min –2 h 20 min | 50 min 3 h 15 min — | P. GB11-GB13 | ||
| 2 | White Raisin | — — — | 25 min–35 min*4 | 1 h 50 min –2 h | 55 min 3 h 20 min | √ | P. GB11-GB13 | |||
| 3 | White Stuffed | — — — | 25 min–35 min*4 | 1 h 50 min –2 h | 55 min 3 h 20 min | √ | P. GB11-GB13 | |||
| 4 | Whole Wheat | — — | √ | 1 h–1 h 30min | 10 min–20 min | 2 h 15 min –2 h 55 min | 55 min 5 h — | P. GB11-GB13 | ||
| 5 | Whole Wheat Raisin | — — | 1 h–1 h 30min | 30 min–35 min*4 | 2 h–2 h 35 min | 1 h 5 h 5 min | √ | P. GB11-GB13 | ||
| 6 | Lean | — — | √ | 45 min–2 h 20 min*3 | 10 min–15 min | 2 h 35 min –4 h 15 min | 50 min 6 h — | P. GB11-GB13 | ||
| 7 | Lean Raisin | — — | 45 min–2 h 20 min*3 | 15 min–25 min*4 | 2 h 30 min –4 h 5 min | 55 min 6 h 5 min | √ | P. GB11-GB13 | ||
| Bake | 8 | Soft | √√√ | 30 min–1 h | 25 min–30 min*4 | 1 h 45 min –2 h 10 min | 50 min 4 h — | P. GB11-GB13 | ||
| 9 | Soft Rapid | √√ | — | — | 15 min–25 min | 55 min–1 h 5 min | 40 min 2 h — | P. GB11-GB13 | ||
| 10 | Soft Raisin | √√ | — | 30 min–1 h | 20 min–35 min*4 | 1 h 45 min –2 h 15 min | 50 min 4 h | √ | P. GB11-GB13 | |
| 11 | Soft Raisin Rapid | √√ | — | — | 25 min–35 min*4 | 45 min–55 min | 40 min 2 h | √ | P. GB11-GB13 | |
| 12 | Brioche | —√ | —30 min | 35 min–45 min*4*6 | 1 h 35 min –1 h 45 min*7 | 50 min 3 h 40 min | √ | P. GB11,GB14 | ||
| 13 | Bake Only | — — — — | — | 30 min–1 h 30 min | 30 min–1 h 30 min | — | ||||
| Gluten Free | 14 | Gluten Free Bread | — — — | 15 min–20 min | 40 min–45 min | 50 min 1 h 50 min — | P. GB11,GB15 | |||
| 15 | Gluten Free Cake | — — — | 20 min*5 | — | 1 h 30 min 1 h 50 min | √ | P. GB11,GB15 | |||
| Others | 16 | Bread Dough | — — | 30 min–50 min | 20 min–30 min*4 | 1 h 10 min –1 h 20 min | — 2 h 20 min — | P. GB11,GB16 | ||
| 17 | Pizza Dough | — — | √ | — | 30 min–35 min*4 | 10 min–15 min | — 45 min — | P. GB11,GB16 | ||
| 18 | Jam | — — — — | — | — | 1 h 30 min –2 h 30 min | — | ||||
- Abbreviations used in this instructions, a full name written as follows: min = minute (s); h = hour (s).
*1 Remark (↓↓): The menu is available to add additional ingredients or do manual operation when beep sounds.
*2 The machine will operate for a short time during the rise period (to ensure optimal gluten development).
*3 There is a three-minute kneading process at the beginning depending on the room temperature.
*4 There is a period of rise during the knead period.
*5 There is a period of scraping during the knead period.
*6 There is a manual process during the knead period.
*7 There is a manual process during the rise period.
GB10
Handling Instructions and Recipes
Before Use
- For the first time use, remove packing material and clean the machine. (P. GB17)
- Clean the machine when you have not used for a long time. (P. GB17)
Preparations
1 Open the lid, remove the bread pan (1) and set the kneading blade into the kneading mounting shaft. (2)
(1)
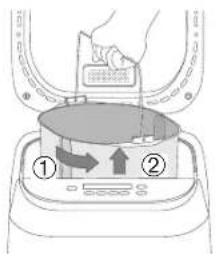
(2)

2 Prepare the ingredients with exact measurement according to the recipe.
3 Place measured ingredients into the bread pan in the top-to-bottom order. (3)
- Place dry yeast away from the kneading blade and kneading mounting shaft. If some of the yeast getting into it, bread may not rise well.
- Place dry ingredients over the dry yeast. It must be kept separate from any liquid until mixing commences.
- After above, pour liquid in the edge of bread pan's sidewall to avoid splashing. (4)
(3) Placing ingredients Example
(4)
natural_image
Line drawing of a bucket filled with food, no text or symbols present4 Wipe off any moisture and flour around the bread pan, and return it into the main unit. (5)
Close the lid.
(5)
5 Plug the machine into 230 V socket.
Make sure to complete the preparation steps before setting menu.
Handling Instructions and Recipes
Baking Bread (Menu 1–11)

Press Menu (button to select a menu.
- Choose the options for selected menu. See P. GB10.

Bread size

Crust colour

Delay timer: set it to delay bread making process up to 13 hours.
* Options of each menu also indicate by above icon in the recipe.

Press Start ( ◇ button to start the machine.
- Display shows the remaining time until the selected program is complete.

* The remaining time is changed depending on the room temperature.
- Menu 2, 3, 5, 7, 10, and 11 (Additional ingredients available menu)
Display shows the remaining time until beep sounds for additional ingredients.
When you hear beep sounds, add it manually, then press 📋 button to restart.
Kneading will continue whether 📷 button is pressed or not. (Beep sounds will be heard after 3 minutes)
* Complete placing additional ingredients while 🔊 is flashing on the display. When 🔊 stop flashing, display shows the remaining time.
* Do not add ingredients after display shows remaining time.
- For optimum results, do not open the lid unless the menu requires, as it affects bread quality.

When bread is ready (machine beeps 8 times and End flashes), press Stop ( ☑ ) button and unplug.

Remove the bread immediately by using dry oven gloves and place it on a wire rack. (6)/(7)
(6)
Hold the handle with oven gloves and shake the bread out.
Outside base shaft of bread pan
- Moving the outside base shaft may damage the bread shape.
(7)
natural_image
Simple line drawing of a bottle with two side cups, no text or symbols presentIf you have difficulty after (6), turn the bread pan upside down and tap it onto the kitchen towel by holding both sides of bread pan until bread comes out. (See P. GB6.)
natural_image
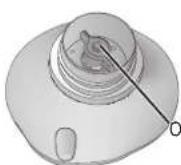
Illustration of a hand holding a small object, possibly a tool or device, within a circular frame (no text or symbols)- Always remove the kneading blade before slicing bread.
GB12
Bread Recipes
For recipe, visit: www.experience -fresh.eu
The available options of each recipe and necessary operation was indicated as following icons:

Bread size

Crust colour

Delay timer

Place measured ingredients into bread pan in the top-to-bottom order.

Add additional ingredients or do manual operation.
English
Menu 1 White
Process time: 3 h 15 min
preset range: 3 h 15 min - 13 h
White Bread
| Dry yeast 1 tsp | ||
| Strong white bread flour 400 g | ||
| Butter 10 g | ||
| Sugar 3/4 tsp | ||
| Salt 13⁄4 tsp | ||
| Water 260 mL |
Menu 5 Whole Wheat Raisin
Process time: 5 h 5 min
about 1 h 25 min–1 h 55 min after step 7 (beep sounds will be heard)
Whole Wheat Raisin Bread
| Dry yeast 1 tsp | ||
| Strong whole wheat bread flour 400 g | ||
| Butter 20 g | ||
| Sugar 1 12 tsp | ||
| Salt 1 14 tsp | ||
| Water 300 mL | ||
| Raisins *1 100 g |
Menu 9 Soft Rapid
Process time: 2 h
Light, Medium

Soft Rapid Bread
| M | L | ||
| Dry yeast 1 tsp 1 14 tsp | |||
| Strong white bread flour | 400 g | 500 g | |
| Butter | 15 g | 25 g | |
| Sugar | 1 tsp 1 12 tsp | ||
| Salt | 1 tsp 1 14 tsp | ||
| Water | 280 mL | 350 mL | |
Menu 2 White Raisin
Process time: 3 h 20 min
about 20 min – 25 min after step 7 (beep sounds will be heard)
White Raisin Bread
| Dry yeast 1 tsp | ||
| Strong white bread flour 400 g | ||
| Butter 10 g | ||
| Sugar 34 tsp | ||
| Salt 114 tsp | ||
| Water 280 mL | ||
| Raisins * ^1 150 g |
Menu 6 Lean
Process time: 6 h
preset range: 6 h – 13 h
Lean Bread
| Dry yeast | 14 tsp | |
| Strong white bread flour 300 g | ||
| Salt | 1 tsp | |
| Water (5 °C ) | 220 mL |
Menu 10 Soft Raisin
Process time: 4 h
Light, Medium M.L
about 50 min–1 h 15 min after step 7 (beep sounds will be heard)
Soft Raisin Bread
| M | L | |
| Dry yeast | 14 tsp | 1 tsp |
| Strong white bread flour | 400 g | 500 g |
| Butter | 15 g | 25 g |
| Sugar | 1 tsp 112 tsp | |
| Salt | 1 tsp 114 tsp | |
| Water | 280 mL | 350 mL |
| Raisins *1 | 120 g | 150 g |
Menu 3 White Stuffed
Process time: 3 h 20 min
about 20 min – 25 min after step 7 (beep sounds will be heard)
White Stuffed Bread
| Dry yeast 1 tsp | ||
| Strong white bread flour 400 g | ||
| Butter 10 g | ||
| Sugar 34 tsp | ||
| Salt 114 tsp | ||
| Water 280 mL | ||
| Bacon ^*2 | 150 g |
Menu 7 Lean Raisin
Process time: 6 h 5 min
about 1 h – 2 h 35 min after step 7 (beep sounds will be heard)
Lean Raisin Bread
| Dry yeast | 34 tsp | |
| Strong white bread flour 300 g | ||
| Salt | 1 tsp | |
| Water (5 °C ) | 220 mL | |
| Raisins *1 100 g |
Menu 11 Soft Raisin Rapid
Process time: 2 h
Light, Medium M.L
about 20 min – 25 min after step 7 (beep sounds will be heard)
Soft Raisin Rapid Bread
| M | L | ||
| Dry yeast 1 tsp 1 14 tspStrong white bread flour | 400 g | 500 g | |
| Butter | 15 g | 25 g | |
| Sugar | 1 tsp | 1 12 tsp | |
| Salt | 1 tsp | 1 14 tsp | |
| Water | 280 mL | 350 mL | |
| Raisins ^+1 120 g | 150 g |
Menu 4 Whole Wheat
Process time: 5 h
preset range: 5 h – 13 h
Whole Wheat Bread
| Dry yeast 1 tsp | ||
| Strong whole wheat bread flour 400 g | ||
| Butter 10 g | ||
| Sugar 34 tsp | ||
| Salt 114 tsp | ||
| Water 280 mL | ||
Menu 8 Soft
Process time: 4 h
Light, Medium
M.L preset range: 4 h–13 h
Soft Bread
| M | L | ||
| Dry yeast | 14 tsp | 1 tsp | |
| Strong white bread flour | 400 g | 500 g | |
| Butter | 15 g | 25 g | |
| Sugar | 1 tsp | 112 tsp | |
| Salt | 1 tsp | 114 tsp | |
| Water | 280 mL | 350 mL |
*1 Chop into approx. 1 cm cubes.
*2 Cut up roughly into approx. 1 cm cubes.
- Abbreviations used in this instructions, a full name written as follows: tsp = tea spoon; tbsp = table spoon; approx. = approximately.
Handling Instructions and Recipes
Baking Brioche
Menu 12 Brioche
Process time: 3 h 40 min

Light, Medium
Basic Brioche
| Dry yeast 1 tsp | ||
| Strong white bread flour 320 g | ||
| Butter *1 | 50 g | |
| Sugar 31⁄2 tbsp | ||
| Skimmed milk powder 11⁄2 tbsp | ||
| Salt 11⁄4 tsp | ||
| 2 egg yolks (Medium) | ||
| Mixture | ||
| Water | ||
| Butter *2 | 70 g |
*1 Cut into 2 – 3 cm cubes and keep in refrigerator.
*2 Cut into 1 – 2 cm cubes and keep in refrigerator.
Tips
- Do not add butter or additional ingredients after display shows remaining time.
- For additional ingredients such as raisins, add them with butter in step 8.
To bake brioche in simple way
- Cut butter into 1 – 2 cm cubes and keep them in refrigerator.
- Place them with other ingredients at the beginning and follow step 5.
- Skip step 8 process in this way. This brioche is a little different than the other.
1—5 See P. GB11 of Preparations
6 Select menu 12, choose crust colour
7 Press
Other manuals PANASONIC
Discover other manuals and user guides for the brand PANASONIC

- Panasonic®
- Contents
- Safety Precautions
- WARNING
- CAUTION
- Important Information
- Parts Names and Instructions
- Main Unit & Accessories
- Accessories
- Bread pan and kneading blade are coated with ceramic to avoid stains and to make bread easier to remove.
- Control Panel and Display
- Bread - making Ingredients
- Liquid ingredients
- Dry ingredients
- Bread Ingredients
- Flour
- Dry yeast
- Dairy products
- You can make your bread taste better by adding other ingredients.
- Eggs
- Bran
- Wheat germ
- ■ Spices, herbs
- Water
- Fat
- Salt
- Gluten Free Ingredients
- If using a bread mix...
- ■ Bread mixes including dry yeast
- ■ Bread mix with separate dry yeast sachet
- Additional Ingredients (Dried fruits, nuts, bacon, cheese etc.)
- Procedure
- Time until the beep sounds from start (approximately)
- Attention of ingredients
- Dry / insoluble ingredients
- Soft and easy break ingredients
- Gluten Free Information
- Menu Charts and Baking Options
- ■ Function Availability and Time Required
- Handling Instructions and Recipes
- Before Use
- Preparations
- Baking Bread (Menu 1–11)
- Press Menu (button to select a menu.
- Press Start ( ◇ button to start the machine.
- When bread is ready (machine beeps 8 times and End flashes), press Stop ( ☑ ) button and unplug.
- Remove the bread immediately by using dry oven gloves and place it on a wire rack. (6)/(7)
- Bread Recipes
- For recipe, visit: www.experience -fresh.eu
- Place measured ingredients into bread pan in the top-to-bottom order.
- Menu 1 White
- Menu 5 Whole Wheat Raisin
- Menu 9 Soft Rapid
- Menu 2 White Raisin
- Menu 6 Lean
- Menu 10 Soft Raisin
- Menu 3 White Stuffed
- Menu 7 Lean Raisin
- Menu 11 Soft Raisin Rapid
- Menu 4 Whole Wheat
- Menu 8 Soft
- Baking Brioche
- Menu 12 Brioche
- Tips
- To bake brioche in simple way
- 1—5 See P. GB11 of Preparations
- Select menu 12, choose crust colour
- Press
- Press button and remove bread when machine beeps 8 times and End flashes.
- Baking Cake
- Menu 13 Bake Only
- Select menu 13
- Additional Baking
- Baking Gluten Free Bread
- Menu 14 Gluten Free Bread
- Tips for Gluten Free Bread:
- Baking Gluten Free Cake
- Menu 15 Gluten Free Cake
- Making Bread Dough
- Menu 16 Bread Dough
- Making Pizza Dough
- Menu 17 Pizza Dough
- Making Jam
- Menu 18 Jam
- How to set jam firmly
- Cleaning & Care
- Before cleaning, unplug the machine and allow it to cool down.
- Bread pan & Kneading blade
- Interior
- Exterior & Steam vent
- Measuring cup & Measuring spoon
- Troubleshooting
- Problem Cause and Action
- During or after cooking
- [Soft Bread]
- Puzzle
- Display exception
- Specifications
- Disposal of Old Equipment
- Inhalt
- Sicherheitsvorkehrungen
- WARNUNG
- VORSICHT
- Wichtige Informationen
- Teilebezeichnungen und Anweisungen
- Hauptgerät & Zubehör
- Backform und Knethaken sind mit einer Keramikbeschichtung versehen, die der Vermeidung von Flecken und dem einfachen Entnehmen des Brotes dient.
- Bedienfeld und Display
- Zutaten für die Brotherstellung
- Für optimale Ergebnisse ist es extrem wichtig, die richtige Menge an Zutaten zu verwenden.
- Flüssige Zutaten
- Trockene Zutaten
- Brotzutaten
- Mehl
- Trockenhefe
- Milchprodukte
- Sie können den Geschmack des Brotes durch andere Zutaten verbessern.
- Wasser
- Fett
- Salz
- Glutenfreie Zutaten
- Verwendung einer Brotbackmischung...
- Zusätzliche Zutaten (Trockenfrüchte, Nüsse, Speck, Käse usw.)
- Verfügbare Menüs 2, 3, 5, 7, 10, 11, und 12
- Verfahren
- Zeit bis der Signalton ab dem Start ertönt (ungefähr)
- Sorgfalt bei Zutaten
- Andernfalls
- Trockene / nicht lösliche Zutaten
- ■ Trockenfrüchte
- ■ Nüsse, Kerne
- Weiche und leicht zu mahlende Zutaten
- Informationen zur Glutenfreiheit
- Tabelle mit Menüs und Backoptionen
- ■ Verfügbarkeit der Funktion und erforderliche Zeit
- Handhabungsanweisungen und Rezepte
- Vor der Inbetriebnahme
- Vorbereitung
- Brot backen (Menü 1–11)
- Zur Auswahl eines Menüs die Taste Menu (☐) drücken.
- Drücken Sie die Start-Taste (zum Starten des Geräts.
- Sobald das Brot fertig ist (Gerät gibt 8 Signaltöne aus und End (Ende) blinkt), drücken Sie die Stop-Taste (☐) und ziehen Sie den Netztecker.
- Nehmen Sie das Brot sofort mit trockenen Ofenhandschuhen und setzen Sie es auf einen Rost. (6)/(7)
- Brot Rezepte
- Entdecken Sie Rezepte auf: www.experience - fresh.eu
- Die abgewogenen Zutaten in der Reihenfolge von oben nach unten die Backform geben.
- Menü 1 Krustenbrot
- Menü 5 Krustenvollkornbrot mit Rosinen
- Menü 2 Krustenbrot mit Rosinen
- Menü 6 Knuspriges Fitnessbrot
- Menü 3 Knuspriges Schlemmerbrot
- Menü 7 Knuspriges Fitnessbrot mit Rosinen
- Menü 4 Krustenvollkornbrot
- Menü 8 Weißbrot
- Menü 9 Weißbrot schnell
- Menü 10 Weißbrot mit Rosinen
- Menü 11 Weißbrot schnell, mit Rosinen
- Briochebacken
- Menü 12 Brioche
- Tipps
- Brioche einfach backen
- Nur Backen
- Menü 13 Nur Backen
- Zusätzliches Backen
- Glutenfreies Brot backen
- Menü 14 Glutenfreies Brot
- Tipps für glutenfreies Brot:
- — 5 Siehe S. DE11 der Vorbereitungen
- Wählen Sie Menü 14
- Drücken Sie die Taste zum Starten.
- Drücken Sie die Taste und entnehmen Sie das Brot, wenn das Gerät 8 Signaltöne ausgibt und End (Ende) blinkt.
- Glutenfreien Kuchen backen
- Menü 15 Glutenfreier Kuchenteig
- Wählen Sie Menü 15
- Nach ca. 2 Minuten. Öffnen Sie den Deckel, wenn Sie das Piepen hören.
- Nach ca. 12 Minuten. Öffnen Sie den Deckel, wenn Sie das Piepen hören. Kratzen Sie das Mehl innerhalb von 3 Minuten ab, während
- Drücken Sie die Taste und entnehmen Sie den Kuchen, wenn das Gerät 8 Signaltöne ausgibt und End (Ende) blinkt.
- Brotteig zubereiten
- Menü 16 Brotteig
- Pizzateig zubereiten
- Menü 17 Pizzateig
- Marmelade kochen
- Menü 18 Marmelade
- So gelieren Sie feste Marmelade
- Zusätzliches Kochen
- Reinigung & Pflege
- Vor der Reinigung ziehen Sie den Netzstecker und lassen Sie das Maschine abkühlen.
- Backform & Knethaken
- Innere
- Außen & Dampfabzugsöffnung
- Messbecher & Messlöffel
- Fehlerbehebung
- Problem Ursache und Maßnahme
- Während oder nach dem Backen
- [Weißbrot]
- Weitere Probleme
- Ungewöhnliche Anzeige
- Technische Daten
- Entsorgung von Altgeräten
- Zusätzliche WEEE-Informationen nur für Deutschland
- Datenschutz
- Memo
- Table des matières
- Consignes de sécurité
- AVERTISSEMENT
- ! AVERTISSEMENT
- ATTENTION
- Informations importantes
- Nomenclature et mode d'emploi
- Unité principale & Accessoires
- Le moule à pain et le bras pétrisseur sont recouverts de céramique non salissant et qui permet d'enlever le pain plus facilement.
- Panneau de commande et affichage
- ■ Départ différé
- Ingrédients pour la fabrication du pain
- Il est extrêmement important d'utiliser les bonnes doses d'ingrédients pour de meilleurs résultats.
- Ingrédients liquides
- Ingrédients secs
- Recette de pain
- Farine
- Levure sèche
- Laitages
- Vous pouvez améliorer le goût de votre pain en ajoutant d'autres ingrédients.
- Œufs
- Son
- Germes de blé
- ■ Epices, fines herbes
- Eau
- Matière grasse
- Sel
- Ingrédients Sans Gluten
- Utilisation de préparation pour pain (aussi appelées Mix)
- ■ Préparations pour pain contenant de la levure sèche
- ■ Préparations pour pain avec sachet de levure sèche séparé
- Ingrédients supplémentaires (Fruits séchés, noix, bacon, fromage, etc.)
- Procédure
- Temps approximatif jusqu'à ce que le signal sonore retentisse
- Ingrédients supplémentaires à rajouter
- Ingrédients secs / insolubles
- Fruits secs
- ■ Noisettes, graines
- Informations sur le sans gluten
- Graphiques de menus et options de cuisson
- ■ Options disponibles et durées correspondantes
- Instructions d'utilisation et recettes
- Avant l'utilisation
- Préparations
- Ouvrez le couvercle, retirez le moule à pain (1) et placez le bras pétrisseur sur l'axe du bras pétrisseur prévu à cet effet. (2)
- Préparez les ingrédients avec la mesure exacte selon la recette.
- Placez les ingrédients mesurés dans le moule à pain de haut en bas.(3)
- Essuyez toute trace d'humidité et de farine autour du moule à pain et replacez - le dans l'unité principale. (5) Fermez le couvercle. (5)
- Branchez la machine dans une prise 230 V.
- Cuisson du pain (Menu 1–11)
- Appuyez sur le bouton Menu ( 📄 ) pour sélectionner un menu.
- Appuyez sur le bouton Marche ( pour démarrer la machine.
- Lorsque le pain est prêt (la machine bipe 8 fois et End (Fin) clignote), appuyez sur le bouton Arrêt ( ⊗ ) et débranchez la machine.
- Retirez le pain immédiatement en utilisant des gants de cuisine secs et placez-le sur une grille. (6)/(7)
- Recettes de pain
- Pour les recettes, visitez: www.experience-fresh.eu
- Menu 1 Pain blanc
- Menu 5 Pain complet raisins secs
- Menu 9 Pain de mie rapide
- Menu 2 Pain blanc aux raisins secs
- Menu 6 Pain tradition
- Menu 10 Pain de mie raisins secs
- Menu 3 Pain blanc avec ingrédients spéciaux
- Menu 7 Pain tradition aux raisins secs
- Menu 11 Pain de mie raisins secs rapide
- Menu 4 Pain complet
- Menu 8 Pain de mie
- Cuisson de brioche
- Conseils
- Pour faire cuire simplement une brioche.
- Cuisson de gâteau
- — 5 Voir P. FR11 de Préparations
- Sélectionnez le menu 12, choisissez la couleur de la croûte.
- Appuyez sur le bouton pour commencer.
- Après environ 55 minutes. Ouvrez le couvercle lorsque vous entendez le bip sonore. Ajoutez le beurre supplémentaire pendant que 🎨 clignote (ceci durera environ 5 minutes). Fermez le couvercle et redémarrez.
- Menu 13 Cuisson seule
- Cuisson supplémentaire
- Cuisson de pain sans gluten
- Menu 14 Pain sans gluten
- Conseils pour le pain sans gluten:
- Sélectionnez le menu 14
- Cuisson d'un gâteau sans gluten
- Menu 15 Gâteau sans gluten
- Sélectionnez le menu 15
- Préparation de pâte à pain
- Menu 16 Pâte à pain
- Préparation de pâte à pizza
- Menu 17 Pâte à pizza
- Faire de la confiture
- Menu 18 Confiture
- Comment épaissir la confiture
- Nettoyage & Entretien
- Avant de nettoyer la machine, débranchez - la et laissez - la refroidir.
- Moule à pain & Bras pétrisseur
- Intérieur
- Extérieur & Grille d'aération
- Verre doseur & Cuillère doseuse
- Problèmes et solutions
- Problème Cause et Action
- Pendant ou après la cuisson
- [Pain de mie]
- Divers
- Exception d'affichage
- L'élimination des équipements usagés
- Inhoud
- Veiligheidsmaatregelen
- WAARSCHUWING:
- WAARSCHUWING
- LET OP
- Belangrijke informatie
- Onderdeelnamen en instructies
- Hoofdgedeelte & Accessoires
- Het bakblik en het kneedmes zijn bedekt met een keramische laag om vlekken te voorkomen en het brood gemakkelijker uit de pan te kunnen nemen.
- Bedieningspaneel en display
- Ingrediënten voor het maken van brood
- Vloeibare ingrediënten
- Droge ingrediënten
- Broodingrediënten
- Bloem
- Droge gist
- Zuivelproducten
- U kunt uw brood nog lekkerder maken door andere ingrediënten toe te voegen.
- Eieren
- Zemelen
- Tarwekiemen
- Kruiden
- Vet
- Zout
- Glutenvrij
- Als u een broodmix gebruikt...
- ■ Broodmixen met droge gist
- ■ Broodmix met een apart zakje droge gist
- Extra ingrediënten toevoegen (Gedroogde vruchten, noten, spek, kaas, etc.)
- Tijd vanaf de start tot de pieptoon klinkt (bij benadering)
- Let op de ingrediënten
- Droge / onoplosbare ingrediënten
- ■ Gedroogde vruchten
- ■ Noten, zaden
- Glutenvrij informatie
- Zachte en makkelijk breekbare ingrediënten
- ■ Bacon, salami, olijven, droge tomaat
- ■ Kaas, chocolade
- Menudiagrammen en bakopties
- ■ Beschikbare functies en vereiste tijd voor ieder programma
- Bedieningsinstructies en recepten
- Voor gebruik
- Voorbereiding
- Brood bakken (Menu 1–11)
- Druk op de menutoets (☐) om een menu te selecteren.
- Druk op Start ( ◆ om de machine te starten.
- Wanneer het brood klaar is (machine geeft 8 keer een pieptoon en End (Einde) knippert), drukt u op de Stop ( ☉ ) knop en trekt u de stekker uit het stopcontact.
- Verwijder het brood onmiddellijk met droge ovenhandschoenen en laat het afkoelen op een rooster. (6)/(7)
- Brood recepten
- Menu 1 Wit
- Menu 5 Volkoren met rozijnen
- Menu 2 Wit met rozijnen
- Menu 6 Mager
- Menu 3 Wit gevuld
- Menu 7 Mager met rozijnen
- Menu 4 Volkoren
- Menu 8 Zacht
- Menu 9 Zacht snel
- Menu 10 Zacht met rozijnen
- Menu 11 Zacht met rozijnen snel
- Brioche bakken
- Brioche eenvoudig bakken
- — 5 Zie P. NL11 van bereidingen
- Selecteer menu 12, de kleur van de korst kiezen
- Druk op de eknop om te starten.
- Na ongeveer 55 minuten. Open het deksel na de pieptoon. Voeg de extra boter toe terwijl propert (dit zal ongeveer 5 minuten duren). Sluit het deksel en start opnieuw.
- Druk op de toets en verwijder het brood na 8 pieptonen en als End (Einde) knippert.
- Cake bakken
- Menu 13 Enkel Bakken
- Verwijder het kneedmes en breng een laag boter aan (zonder recept) op het bakblik.
- Meng room, boter en suiker in een grote kom tot een luchtig mengsel. Voeg één per één eieren toe en kluts grondig.
- Voeg melk toe, gezeefde mix A en gemengde gedroogde vruchten en sla na elke toevoeging grondig om.
- Giet het mengsel in het bakblik en zet dit in het apparaat. Sluit het deksel en steek de stekker in het stopcontact.
- Selecteer menu 13
- Stel de baktijd in
- Druk op de knop om te starten.
- Druk op de ②toets en verwijder de cake na 8 pieptonen en als End (Einde) knippert.
- Aanyullend bakken
- Glutenvrij brood bakken
- Menu 14 Glutenvrij brood
- Tips voor glutenvrij brood:
- Selecteer menu 14
- Druk op de- toets en verwijder het brood na 8 pieptonen en als End (Einde) knippert.
- Glutenvrije cake bakken
- Menu 15 Glutenvrije cake
- 1—5 Zie P. NL11 van bereidingen
- Selecteer menu 15
- Druk op de ◆-knop om te starten.
- Na ongeveer 2 minuten. Open het deksel na de pieptoon. Schraap de bloem weg binnen de drie minuten terwijl 🚪ippert. Sluit het deksel en start opnieuw.
- Na ongeveer 12 minuten. Open het deksel na de pieptoon. Schraap het deeg van de zijkant van het bakblik weg terwijl 🚫hippert. Sluit het deksel en start opnieuw.
- Druk op de- toets en verwijder de cake na 8 pieptonen en als End (Einde) knippert.
- Brooddeeg maken
- Menu 16 Brooddeeg
- Pizzadeeg maken
- Menu 17 Pizzadeeg
- Confituur maken
- Menu 18 Confituur
- Hoe stevige confituur maken
- Aanvullend koken
- Reiniging & Onderhoud
- Neem de stekker uit het stopcontact en laat de machine afkoelen voordat u deze gaat schoonmaken.
- Bakblik & kneedmes
- Binnenkant
- Buitenkant & Stoomventiel
- Maatbeker & Maatlepeltje
- Problemen oplossen
- Probleem Oorzaak en Actie
- Tijdens of na het koken
- [Zacht brood]
- Puzzel
- Uitzondering display
- Het ontdoen van oude apparatuur
- Indice
- Precauzioni di sicurezza
- AVVERTENZA:
- ATTENZIONE:
- AVVERTENZA
- ATTENZIONE
- Informazioni importanti
- Nomi delle parti e istruzioni
- Unità principale & Accessori
- Il cestello del pane e la lama impastatrice sono dotati di un rivestimento in ceramica per impedire la formazione di macchie e rendere più semplice rimuovere il pane.
- Pannello di controllo e Display
- Ingredienti per la preparazione del pane
- È estremamente importante utilizzare le misure corrette degli ingredienti per ottenere risultati ottimali.
- Ingredienti liquidi
- Ingredienti secchi
- Ingredienti per il pane
- Farina
- Lievito secco granulare
- Prodotti caseari
- È possibile arricchire il sapore del pane aggiungendo altri ingredienti.
- Acqua
- Grassi
- Sale
- Ingredienti senza glutine
- Utilizzo di miscele per pane...
- Ingredienti aggiuntivi (Frutta secca, noci, pancetta, formaggio ecc.)
- Procedura
- Tempo (approssimativo) dall'inizio al segnale acustico.
- Attenzione agli ingredienti
- Ingredienti secchi / insolubili
- Frutta secca
- Noci, Semi
- Informazioni Senza Glutine
- Tabella dei menu e opzioni di cottura
- ■ Funzioni e tempi
- Istruzioni per l'uso e ricette
- Prima dell'utilizzo
- Preparazioni
- Cottura del pane (Menu 1–11)
- Premere il tasto menu ( ) per selezionare un menu.
- Premere il pulsante (Avvio per avviare la macchina.
- Quando il pane è pronto (la macchina emette 8 segnali acustici e lampeggia End (Fine)), premere il pulsante ( ☉ ) Arresto e scollegare.
- Rimuovere il pane immediatamente utilizzando guanti da forno asciutti e posizionarlo su una griglia metallica. (6)/(7)
- Ricette per pane
- Per scoprire tante gustose ricette, visita: www.experience-fresh.eu
- Menu 1 Pane bianco
- Menu 5 Pane integrale con uvetta
- Menu 9 Pane in cassetta rapido
- Menu 2 Pane bianco con uvetta
- Menu 6 Pane rustico
- Menu 10 Pane in cassetta con uvetta
- Menu 3 Pane bianco farcito
- Menu 7 Pane rustico con uvetta
- Menu 11 Pane in cassetta con uvetta rapido
- Menu 4 Pane integrale
- Menu 8 Pane in cassetta
- Cottura di brioche
- Consigli
- Sistema semplice per cuocere la brioche
- Cottura di torte
- Menu 13 Solo cottura
- Cottura Ulteriore
- Cottura del pane senza glutine
- Menu 14 Pane senza glutine
- Consigli per il pane senza glutine:
- Cottura della torta senza glutine
- Menu 15 Torte senza glutine
- Preparazione dell'impasto per pane
- Menu 16 Impasto per pane
- Preparazione dell'impasto per pizza
- Menu 17 Impasto per pizza
- Per preparare marmellata
- Menu 18 Marmellata
- Come addensare la marmellata
- Ulteriore cottura
- Pulizia & Conservazione
- Prima di pulire la macchina per il pane, scollegarla dalla presa e lasciarla raffreddare.
- Cestello del pane & lama impastatrice
- Interno
- Esterno & Aperture per la fuoriuscita del vapore
- Bicchiere dosatore & Cucchiaio dosatore
- Risoluzione dei problemi
- Problemi Causa e azione
- Durante o dopo la cottura
- [Pane in Cassetta]
- Difficoltà
- Eccezione sul display
- Specifiche tecniche
- Smaltimento di vecchie apparecchiature
- Índice
- Precauciones de seguridad
- ADVERTENCIA
- PRECAUCIÓN
- Información importante
- Nombres de los componentes e instrucciones
- Unidad principal y Accesorios
- El recipiente del pan y la pala de amasar están recubiertos con cerámica para evitar las manchas y para facilitar la extracción del pan.
- Panel de control y pantalla
- Temporizador
- Ingredientes para hacer pan
- Es sumamente importante utilizar la medida correcta de ingredientes para conseguir los mejores resultados.
- Ingredientes líquidos
- Ingredientes secos
- Ingredientes del pan
- Harina
- Levadura seca
- Productos lácteos
- Puede mejorar el sabor del pan añadiendo otros ingredientes.
- ■ Huevos
- Salvado
- ■ Germen de trigo
- ■ Especias, hierbas
- Agua
- Grasa
- Sal
- Ingredientes sin gluten
- Si va a utilizar una mezcla de harinas para pan...
- ■ Mezclas de harina para pan que incluyen levadura seca
- ■ Mezclas de harina para pan con levadura seca separada
- Ingredientes adicionales (Frutas secas, nueces, panceta, queso, etc.)
- Procedimiento
- Tiempo hasta que el suene el pitido desde el inicio (aproximado)
- Atención de ingredientes
- Ingredientes secos e insolubles
- Frutos secos
- ■ Nueces, semillas
- Ingredientes suaves y fáciles de romper
- ■ Panceta, embutidos, aceitunas, tomate seco
- ■ Queso, chocolate
- Información pan sin gluten
- Gráficos de menús y opciones de cocción
- ■ Disponibilidad de las funciones y tiempo necesario
- Instrucciones de Manejo y Recetas
- Antes del uso
- Preparativos
- Cocción del pan (Menú 1–11)
- 6
- 7
- 8
- 9
- Recetas de pan
- Para recetas, visita: www.experience -fresh.eu
- Coloque los ingredientes medidos en el recipiente del pan en el orden de arriba hacia abajo.
- Menú 1 Pan blanco
- Menú 2 Pan blanco con pasas
- Menú 3 Pan blanco con ingredientes variados
- Menú 4 Pan integral
- Menú 5 Pan integral con pasas
- Menú 6 Pan dietético
- Menú 7 Pan dietético con pasas
- Menú 8 Pan básico
- Menú 9 Pan básico rápido
- Menú 10 Pan básico con pasas
- Menú 11 Pan básico con pasas rápido
- Cocer Brioche
- Menú 12 Brioche
- Consejos
- Para hacer brioche de una manera sencilla
- — 5 Consulte la página SP11 de Preparativos
- Seleccione el menú 12, elegir el color de la corteza
- Pulse el botón para iniciar.
- Después de aproximadamente 55 minutos. Abra la tapa cuando escuche el pitido. Agregue la mantequilla adicional mientras está parpadeando (durará unos 5 minutos). Cierre la tapa y reinicie.
- Cocer pasteles
- Menú 13 Coccion solo
- Retire la pala de amasar y aplique una capa con mantequilla (sin receta) en el recipiente del pan.
- En un tazón grande, bata la mantequilla y el azúcar hasta que la mezcla esté suave y esponjosa. Añada huevos, uno a uno, batiendo bien.
- Agregue leche, tamizada A y mezcle frutas secas, batiendo bien después de cada adición.
- Seleccione el menú 13
- Ajuste del tiempo de cocción
- Pulse el botón extraiga el pastel cuando la máquina emita 8 pitidos y el icono End (Fin) parpadee.
- Horneado adicional
- Cocción de pan sin gluten
- Menú 14 Pan sin gluten
- Sugerencias para pan sin gluten:
- Seleccione el menú 14
- Pulse el botón y quite el pan cuando la máquina emita 8 pitidos y End (Fin) parpadee.
- Cocción de pastel sin gluten
- Menú 15 Pastel sin gluten
- Seleccione el menú 15
- Después de aproximadamente 2 minutos. Abra la tapa cuando escuche el pitido. Raspe la harina dentro de los 3 minutos mientras
- Después de aproximadamente 12 minutos. Abra la tapa cuando escuche el pitido. Raspe la masa en la pared lateral del recipiente del pan mientras está parpadeando. Cierre la tapa y reinicie.
- Pulse el botón y extraiga el pastel cuando la máquina emita 8 pitidos y el icono End (Fin) parpadee.
- Amasado de masa de pan
- Menú 16 Masa de pan
- Amasado de masa de pizza
- Menú 17 Masa de pizza
- Menú 18 Mermelada
- Cómo hacer para que la mermelada quede firme
- Cocción adicional
- Cuidados y Limpieza
- Antes de la limpieza, desenchufe la máquina panificadora y espere a que se enfríe.
- Recipiente del pan & Pala de amasar
- Exterior & Orificio de salida de vapor
- Vaso de medir & Cuchara de medir
- Resolución de problemas
- Problema Causa y Acción
- Durante o después del cocinado
- [Pan básico]
- Dudas
- Excepción de pantalla
- Especificaciones
- Eliminación de Aparatos Viejos
- Spis treści
- Uwagi dotyczące bezpieczeństwa
- OSTRZEŻENIE
- UWAGA
- Ważne informacje
- Nazwy części i instrukcje
- Urządzenie i akcesoria
- Panel sterujący i wyświetlacz
- Składniki wypieków
- Składniki płynne
- Składniki suche
- Składniki do chleba
- Maka
- Drożdże
- Produkty mleczne
- Smak swojego chleba można jeszcze bardziej poprawić, dodając także inne składniki.
- ■ Jajka
- Otręby
- Kiełki pszenicy
- ■ Przyprawy, zioła
- Woda
- Tłuszcz
- Sól
- Składniki bezglutenowe
- W przypadku korzystania z gotowych mieszanek do wypieku chleba...
- ■ Mieszanki chlebowe zawierające drożdże
- ■ Mieszanki chlebowe z saszetką z drożdżami
- Dodatkowe składniki (Suszone owoce, orzechy, boczek, ser itp.)
- Czas do usłyszenia sygnału dźwiękowego od początku. (W przybliżeniu)
- Zwróć uwagę na składniki
- Składniki suche / nierozpuszczalne
- Składniki miękkie i łatwo się łamiące
- Informacje o produkcie bezglutenowym
- Diagramy menu i opcje pieczenia
- ■ Dostępne funkcje i wymagany czas
- Instrukcje i przepisy
- Przed rozpoczęciem użytkowania
- Przygotowanie
- Pieczenie chleba (Menu 1–11)
- Nacisnąć przycisk Menu ( [icon] i wybrać menu.
- Nacisnąć przycisk Start ( ◎ by uruchomić maszynę.
- Gdy chleb będzie gotowy (maszyna wygeneruje 8 razy sygnał dźwiękowy i zacznie migotać kontrolka End (Koniec)), nacisnąć przycisk Stop ( i odłączyć.
- Natychmiast wyjąć chleb za pomocą suchych rękawic kuchennych i położyć go na drucianym stelażu. (6)/(7)
- Przepisy na chleb
- Przepisy można znaleźć na stronie: www.experience -fresh.eu
- Menu 1 Biale
- Menu 2 Białe z rodzynkami
- Menu 5 Pełnoziarniste pszenne z bakaliami
- Menu 6 Niskokaloryczne
- Menu 3 Białe nadziewane
- Menu 7 Niskokaloryczne z rodzynkami
- Menu 4 Pełnoziarniste pszenne
- Menu 8 Miękkie
- Menu 9 Miękkie błyskawiczne
- Menu 10 Miękkie z rodzynkami
- Menu 11 Miękkie błyskawiczne z rodzynkami
- Pieczenie Brioche
- Wskazówki
- W celu prostego upieczenia Brioche
- — 5 Patrz str. PL11 Przygotowanie
- Wybierz menu 12, aby wybrać kolor przyrumienienia
- Naciśnij przycisk by uruchomić.
- Po 55 minutach. Po usłyszeniu sygnału dźwiękowego otworzyć pokrywę. Dodać więcej masła w czasie, gdy migocze przycisk (migotanie będzie trwać około 5 minut). Zamknąć pokrywę i uruchomić ponownie.
- Pieczenie ciasta
- Menu 13 Sam wypiek
- Wybierz menu 13
- Ustaw czas pieczenia
- Naciśnij przycisk ◇ by uruchomić.
- Naciśnij przycisk i wyjmij ciasto po wygenerowaniu przez maszynę 8 sygnałów dźwiękowych, gdy zacznie migotać kontrolka End (Koniec).
- Dodatkowe pieczenie
- Pieczenie chleba zwykłego bezglutenowego
- Menu 14 Zwykły chleb bezglutenowy
- Wskazówki dotyczące pieczywa bezglutenowego:
- Wybierz menu 14
- Naciśnij przycisk ◎ by uruchomić.
- Nacisnąć przycisk ◎wyjąć chleb po wygenerowaniu przez maszynę 8 sygnałów dźwiękowych, gdy zacznie migać kontrolka End (Koniec).
- Pieczenie ciasta bezglutenowego
- Menu 15 Ciasto bezglutenowe
- Wybierz menu 15
- Naciśnij przyciskł, by uruchomić.
- Po około 2 minutach. Po usłyszeniu sygnału dźwiękowego otworzyć pokrywę. Zeskrobać mąkę w ciągu 3 minut, gdy miga przycisk 🎯 Zamknąć pokrywę i uruchomić ponownie.
- Po około 12 minutach. Po usłyszeniu sygnału dźwiękowego otworzyć pokrywę. Zeskrobać ciasto z bocznych ścianek formy do pieczenia, gdy miga przycisk 🔍 zamknąć pokrywę i uruchomić ponownie.
- Naciśnij przycisk i wyjmij ciasto po wygenerowaniu przez maszynę 8 sygnałów dźwiękowych, gdy zacznie migotać kontrolka End (Koniec).
- Przygotowywanie ciasta na chleb
- Menu 16 Ciasto na chleb
- Przygotowywanie ciasta na pizzę
- Menu 17 Ciasto na pizze
- Przygotowywanie dżemu
- Menu 18 Dżem
- Jak uzyskać gęsty dżem
- Dodatkowe gotowanie
- Czyszczenie i konserwacja
- Przed czyszczeniem odłącz maszynę od sieci i pozwól jej ostygnąć.
- Forma do pieczenia i nóż do wyrabiania ciasta
- Wnętrze maszyny
- Części zewnętrzne i otwory wentylacyjne
- Kubek z miarką i łyżeczka do odmierzania
- Rozwiązywanie problemów
- Problem Przyczyna i rozwiązanie
- W trakcie lub po gotowaniu
- [Chleb miękki]
- Obawy
- Wyłączenie wyświetlacza
- Dane techniczne
- Pozbywanie się zużytych urządzeń elektrycznych i elektronicznych
- Obsah
- Bezpečnostní opatření
- VAROVÁNÍ
- ! VAROVÁNÍ
- ! UPOZORNĚNÍ
- UPOZORNĚNÍ
- Důležité informace
- Názvy součástí a pokyny
- Hlavní jednotka a Příslušenství
- Příslušenství
- Pečicí nádoba a hnětací hák jsou opatřeny keramickou povrchovou úpravou, aby se na ně nelepilo těsto a upečený chléb se snáze vyklápěl.
- Ovládací panel a displej
- Časovač
- Suroviny pro přípravu chleba
- Pro dosažení nejlepších výsledků je naprosto zásadní používat správné množství přísad.
- Tekuté přísady
- Suché přísady
- Chlebové směsi
- Mouka
- Sušené droždí
- Mléčné výrobky
- Chut' chleba můžete vylepšit různými přísadami.
- ■ Vejce
- Otruby
- ■ Pšeničné klíčky
- ■ Koření, bylinky
- Voda
- Tuk
- Sül
- Bezlepkové přísady
- Použití chlebové směsi...
- ■ Chlebové směsi se sušeným droždím
- ■ Chlebová směs obsahující sáček se sušeným droždím
- Zvláštní přísady (Sušené ovoce, ořechy, slanina, sýr atd.)
- Postup
- Čas do zaznění zvukového signálu od spuštění (přibližně)
- Upozornění k přísadám
- Suché / nerozpustné přísady
- Měkké a snadno dělitelné přísady
- Informace pro bezlepkovou dietu
- Přehled menu a možnosti pečení
- ■ Dostupné funkce a potřebný čas
- Pokyny pro manipulaci a recepty
- Před použitím
- Příprava
- Otevřete víko, vyndejte pečicí nádobu (1) a nasuňte hnětací hák na hřídel hnětacího háku. (2)
- Připravte si přísady v přesných dávkách podle receptu.
- Odměřené ingredience vkládejte do pečicí nádoba v pořadí shora dolů. (3)
- Otřete jakoukoliv vlhkost a mouku z pečicí nádoby a vrat'te ji do hlavní jednotky. (5)
- Zařízení připojte do zásuvky 230 V.
- Pečení chleba (Menu 1–11)
- Po stisknutí tlačítka Menu (☐ vyberte menu.
- Stisknutím tlačitka Start (spust'te zařizení.
- S použitím suchých kuchyňských rukavic vyndejte chléb a dejte jej na mřížku. (6)/(7)
- Recepty na chléb
- Pro recepty navštivte: www.experience-fresh.eu
- Odměřené ingredience vkládejte do pečicí nádoba v pořadí shora dolů.
- Menu 1 Svétly chléb
- Menu 5 Celozrnný pšeničný s rozinkami
- Menu 9 Jemný rychlý
- Menu 2 Světlý s rozinkami
- Menu 6 Fitness chleba
- Menu 10 Jemný s rozinkami
- Menu 3 Svétly plnény
- Menu 7 Fitness s rozinkami
- Menu 11 Jemný rychlý s rozinkami
- Menu 4 Celozrnný pšeničný
- Menu 8 Jemný chléb
- Pečení brioška
- Menu 12 Brioška
- Tipy
- Velmi jednoduché pečení briošky
- Pečení koláče
- Menu 13 Jen pečení
- Dodatečné pečení
- Pečení základního bezplepkového chleba
- Menu 14 Bezlepkový chléb
- Tipy pro bezlepkový chléb:
- — 5 Viz str. CZ11 z Přípravy.
- Vyberte menu 14.
- Stisknutím tlačítka spust'te menu.
- Stiskněte tlačítko a vyjměte chléb, když zařízení vydá 8krát akustický signál a bliká indikátor End (Konec).
- Pečení bezplepkového dortu
- Menu 15 Bezlepkový dort
- – 5 Viz str. CZ11 z Přípravy.
- Vyberte menu 15.
- Po asi 2 minutách. Po zvukovém signálu otevřete víko. Seškrábněte mouku během 3 minut, kdy bliká 🚪️zavřete víko a zařízení znovu spustěte.
- Po asi 12 minutách. Po zvukovém signálu otevřete víko. Seškrábněte těsto ze stěn pečicí nádoby, když bliká 🚪Zavřete víko a zařízení znovu spustěte.
- Stiskněte tlačítko a vyjměte dort, když zařizení vydá 8krát akustický signál a bliká indikátor End (Konec).
- Příprava chlebového těsta
- Menu 16 Chlebové těsto
- Příprava těsta na pizzu
- Menu 17 Těsto na pizzu
- Příprava džemu
- Menu 18 Džem
- Jak správně nastavit hustotu džemu
- Dodatečná tepelná příprava
- Čištění a údržba
- Než budete spotřebič čistit, odpojte jej ze zásuvky a nechte vychladnout.
- Pečicí nádoba a Hnětací hák
- Vnitřek
- Odměrka a Dávkovací lžička
- Odstraňování potíží
- Problém Příčina a rešení
- Během tepelné přípravy nebo po ní
- [Jemný chléb]
- Problém Příčina a řešení
- Neobvyklé situace
- Chybová hlášení na displeji
- Technické údaje
- Likvidace použitých zařízení
- Sisältö
- Turvallisuusohjeet
- VAROITUS
- VAARA:
- VAARA
- Tärkeää tietoa
- Osien nimet ja ohjeet
- Päälaite & Tarvikkeet
- Leipävuoka ja taikinakoukku on pinnoitettu keraamisella pinnoitteella tahrojen välttämiseksi ja helpottamaan leivän poistamista.
- Ohjauspaneeli ja näyttö
- Leivän valmistusaineet
- On hyvin tärkeää käyttää oikeita määriä aineksia parhaiden tulosten saamiseksi.
- Nestemäiset ainesosat
- Kiinteät ainekset
- Leivän ainekset
- Jauhot
- Kuivahiiva
- Maitotuotteet
- Saat leivästä maukkaampaa lisäämällä muitakin aineksia.
- Munaa
- Leseet
- Vehnänalkiot
- ■ Mausteet, yrtit
- Vesi
- Rasva
- Ruokasuola
- Gluteenittomat ainekset
- Jos käytät leipäseosta...
- ■ Leipäseos, jossa on erillinen kuivahiivapussi
- Lisääinekset (Kuivatut hedelmät, pähkinät, pekoni, juusto, jne.)
- Käytettävissä oleva ohjelma 2, 3, 5, 7, 10, 11, ja 12
- Työvaiheet
- Aika aloituksesta siihen, kun merkkiääni kuuluu (noin)
- Ainesten valvonta
- Kuivat/liukenemattomat ainekset
- Pehmeät ja helposti särkyvät ainekset
- Gluteenittomuus tietoa
- Ohjelmakaaviot ja leivontavalinnat
- ■ Valittavissa olevat toiminnot ja toiminta - ajat
- Käsittelyohjeet ja reseptit
- Ennen ensimmäistä käyttöä
- Valmistelu
- Avaa kansi, ota leipävuoka (1) pois ja kiinnitä taikinakoukku taikanakoukun akseliin. (2)
- Valmistele ainekset reseptin tarkkojen mittojen mukaan.
- Lisää mitatut ainesosat leipävuokaan annetussa järjestyksessä ylhäältä alas. (3)
- Pyyhi pois kosteus ja jauho leipävuoan ympäriltä, ja laita se takaisin päälaitteeseen. (5) Sulje kansi. (5)
- Kytke leipäkone 230 V:n pistorasiaan
- Leivän leipominen (Ohjelma 1–11)
- Paina Ohjelma ( -painiketta valitaksesi ohjelman.
- Käynnistä kone painamalla Aloita (paineketta.
- Kun leipä on valmis (koneesta kuuluu 8 äänimerkkiä ja End (Loppu) vilkkuu), Paina Seis ( ) - painiketta ja irrota virtajohto pistorasiasta.
- Käytä kuivia uunikintaita ottaessasi leivän ulos välittömästi ja aseta se ritilälle. (6)/(7)
- Leipäreseptejä
- Reseptejä varten, käy: www.experience - fresh.eu
- Lisää mitatut ainesosat leipävuokaan annetussa järjestyksessä ylhäältä alas.
- Ohjelma 1 Valkoinen
- Ohjelma 2 Valkoinen ja rusinoita
- Ohjelma 3 Valkoinen täytetty
- Ohjelma 4 Täysjyvävehnä
- Ohjelma 5 Täysjyvävehnä, rusina
- Ohjelma 6 Laiha
- Ohjelma 7 Laiha ja rusinoita
- Ohjelma 8 Pehmeä
- Ohjelma 9 Pehmeä, Nopea
- Ohjelma 10 Pehmeä ja rusinoita
- Ohjelma 11 Pehmeä ja Rusinoita, Nopea
- Briossin leipominen
- Ohjelma 12 Briossi
- Vinkkejä
- Yksinkertainen tapa leipoa Briossi.
- Kakun leipominen
- Ohjelma 13 Pelkkä paisto
- Lisäpaistaminen
- Gluteenittoman normaali leivän leipominen
- Ohjelma 14 Gluteeniton normaali leipä
- Vinkkejä gluteiinittomasta normaalista leivästä:
- — 5 Katso valmisteluiden sivu FI11
- Valitse ohjelma 14
- Paina paikiketta aloittaaksesi.
- Paina - painiketta ja poista leipä, kun koneesta kuuluu 8 äänimerkkiä ja End (Loppu) vilkkuu.
- Gluteenittoman kakun leipominen
- Ohjelma 15 Gluteeniton kakku
- Valitse ohjelma 15
- Paina ♦paikiketta aloittaaksesi.
- Noin 2 minuutin kuluttua. Avaa kansi kuluttua piippauksen kuulemisesta. Kaavi jauhot pois 3 minuutin kuluessa 🚫herkin vilkkuessa. Sulje kansi ja käynnistä uudestaan.
- Noin 12 minuutin kuluttua. Avaa kansi kuluttua piippauksen kuulemisesta. Kaavi taikina pois leipävuoan sivuseinämästä -merkin vilkkuessa. Sulje kansi ja käynnistä uudestaan.
- Paina - painiketta ja poista kakku, kun koneesta kuuluu 8 äänimerkkiä ja End (Loppu) vilkkuu.
- Leipätaikinan valmistaminen
- Ohjelma 16 Leipätaikina
- Pizzataikinan valmistaminen
- Ohjelma 17 Pizzataikina
- Hillon valmistaminen
- Ohjelma 18 Hillo
- Kuinka hyydyttää hillo lujasti
- Puhdistaminen ja hoito
- Ennen kuin puhdistat koneen, irrota sähköjohto pistorasiasta ja anna koneen jäähtyä.
- Leipävuoka ja Taikinakoukku
- Sisäpuoli
- Ulkopuoli ja Höyryaukko
- Mittakuppi ja Mittalusikka
- Vianmääritys
- Ongelma Syyja toiminta
- Kypsennyksen aikana tai jälkeen
- [Pehmeä leipä]
- Arvoitus
- Näytön poikkeus
- Tekniset tiedot
- Vanhojen laitteiden hävittäminen
- Indholdsfortegnelse
- Sikkerhedsforanstaltninger
- ADVARSEL
- FORSIGTIG
- Vigtig information
- Delnavne og vejledninger
- Hovedenhed & Tilbehør
- Bageformen og dejkrogene er belagt med keramik for at undgå pletter og for at gøre det nemmere at fjerne brød.
- Betjeningspanel og skærm
- Ingredienser til tilberedning af brød
- Flydende ingredienser
- Tørre ingredienser
- Ingredienser til brød
- Mel
- Tørgær
- Mejeriprodukter
- Du kan få brødet til at smage bedre ved at tilsætte andre ingredienser.
- ■ Æg
- Klid
- Hvedekim
- ■ Krydderier, krydderurter
- Vand
- Fedtstof
- Glutenfrie ingredienser
- Hvis du bruger en brødblanding...
- ■ Brødblandinger med tørgær
- ■ Brødblanding med særskilt tørgærpose
- Flere ingredienser (Tørret frugt, nødder, bacon, ost etc.)
- Tid ind til bippet lyder fra start (cirka)
- Vær forsigtig med ingredienserne
- Ellers,
- Tørre / uopløselige ingredienser
- ■ Tørrede frugter
- ■ Nødder, frø
- Blødgør og bræk ingredienserne i mindre stykker
- ■ Bacon, salamipølse, oliven, tørret tomat
- ■ Ost, chokolade
- Glutenfri information
- Menuoversigt og tilberedningsindstillinger
- ■ Funktioner og tidsforbrug
- Håndteringsinstruktioner og opskrifter
- Før ibrugtagning
- Forberedelser
- Åbn låget, tag bageformen (1) ud, og sæt dejkrogen i drivakslen. (2)
- Forbered ingredienserne med de nøjagtige mål ifølge opskriften.
- Placer de afmålte ingredienser i bageformen i rækkefølge fra top til bund. (3)
- Tør al fugt og mel rundt om bageformen af, og sæt den tilbage i hovedenheden. (5) Luk låget. (5)
- Sæt maskinen netstik i en 230 V stikkontant.
- Bage brød (Menu 1–11)
- Tryk på menuknappen ( ) for at vælge en menu.
- Tryk på Start ( ◆ - knappen for at starte maskinen.
- Når brødet er klart (maskinen bipper 8 gange og End blinker på skærmen), skal du trykke på Stop ( )-knappen og tage stikket ud af stikkontakten.
- Brug ovnhandsker til straks at tage brødet ud, og lad det køle ned på en rist. (6)/(7)
- Brødopskrifter
- For opskrifter, besøg: www.experience -fresh.eu
- Placer de afmälte ingredienser I bageformen I rækkefølge fra top til bund.
- Menu 1 Hvidt brød
- Menu 5 Fuldkornsbrød m / rosin
- Menu 9 Blødt brød, hurtigbag
- Menu 2 Hvidt brød m. rosin
- Menu 6 Magert brød
- Menu 10 Blødt brød m. rosin
- Menu 3 Hvidt madbrød
- Menu 7 Magert brød m. rosin
- Menu 11 Blødt brød m. rosin, Hurtigbag
- Menu 4 Fuldkornsbrød
- Menu 8 Blødt brød
- Bage brioche
- Sådan bager du brioche på enkel måde.
- Bage kage
- Menu 13 Kun bagning
- Yderligere bagning
- Bage glutenfri normal brød
- Menu 14 Glutenfri normal brød
- Tips til glutenfri normal brød:
- — 5 Se S. DK11 under Forberedelser
- Vælg menu 14
- Tryk på knappen för at starte.
- Tryk på knappen Ⓤ og fjern brødet, när maskinen bipper 8 gange og End blinker.
- Bage glutenfri kage
- Menu 15 Glutenfri kage
- Vælg menu 15
- Tryk på knappen for at starte.
- Efter ca. 2 minutter. Abn låget, når du hører biplyden. Skrab melet af inden for 3 minutter, mens linker. Luk låget og start igen.
- Efter ca. 12 minutter. Åbn låget, när du hører biplyden. Skrab dejen af bageformens sidevæg, mens blinker. Luk låget og start igen.
- Tryk på knappen og fjern kagen, når maskinen bipper 8 gange og End blinker.
- Tilberedning af brøddej
- Menu 16 Brøddej
- Tilberedning af pizzadej
- Menu 17 Pizzadej
- Tilberedning af marmelade
- Menu 18 Marmelade
- Sådan stivner marmelade helt
- Yderligere tilberedning
- Rengøring & Pleje
- Træk maskinen stik ud af stikkontakten, og lad den køle ned, før du rengør den.
- Bageform og Dejkroge
- Indvendig
- Udvendig og Ventilationshuller
- Målebæger & Måleske
- Problemløsning
- Problem Årsag og handling
- Under eller efter tilberedningen
- [Blødt brød]
- Gåder
- Skærmudklip
- Indsamling af elektronikskrot
- Innehåll
- Säkerhetsföreskrifter
- ! WARNING
- FÖRSIKTIGHET
- Viktig information
- Namn på delar och instruktioner
- Huvudenhet & Tillbehör
- Bakformen och degblandare är belagda med keramik för att undvika fläckar och för att lättare ta bort brödet.
- Kontrollpanel och display
- Ingredienser för bakning
- Det är mycket viktigt att använda rätt mängd ingredienser för bästa resultat.
- Flytande ingredienser
- Torra ingredienser
- Ingredienser till bröd
- Mjöl
- Torrjäst
- Mjölkprodukter
- Socker (strösocker, farinsocker, honung, sirap, etc.)
- Du kan få ditt bröd att smaka ännu bättre genom att tillsätta andra ingredienser.
- ■ Ägg
- Kli
- ■ Vetegroddar
- ■ Kryddor, örter
- Vatten
- Glutenfria ingredienser
- Om du använder brödmix...
- ■ Brödmix som innehåller torrjäst
- ■ Brödmix med separat torrjästpåse
- Extra ingredienser (Torkad frukt, nötter, bacon, ost mm.)
- Förfarande
- Tid tills det pipande ljudet hörs från start (ungefärlig tid)
- Hantera ingredienserna rätt
- Torra / olösliga ingredienser
- Använd mjuka ingredienser som lätt bryts.
- Information om glutenfritt
- Menytabeller och bakalternativ
- ■ Tillgängliga funktioner och uppskattad tidsåtgång
- Hanteringsanvisningar och recept
- Före användning
- Förberedelser
- Öppna locket, ta bort bakformen (1) och sätt degblandaren på plats på axeln till degblandaren. (2)
- Förbered ingredienserna med exakta mått enligt receptet.
- Placera de uppmätta ingredienserna i bakformen i ordning uppifrån och ned. (3)
- Torka bort vätska och mjöl runt kanten på bakformen och sätt tillbaka den i huvudenheten. (5) Stäng locket. (5)
- Anslut maskinen till ett 230 V uttag.
- Baka Bröd (Meny 1–11)
- Tryck på Meny-knappen ( ) för att välja meny.
- Tryck på Starta-knappen ( ◇ ) för att starta maskinen.
- När brödet är klart (maskinen piper 8 gånger och End (Slut) blinkar), tryck på Stoppa-knappen ( ☑ ) och koppla ur maskinen.
- Ta genast ut brödet med hjälp av torra grytvantar och lägg det på ett galler. (6)/(7)
- Brödrecept
- För recept, besök: www.experience -fresh.eu
- Placera de uppmätta ingredienserna I bakformen I ordning uppifrån och ned.
- Meny 1 Vitt bröd
- Meny 5 Fullkorn russin
- Meny 9 Mjukt och snabbt
- Meny 2 Vitt bröd m. russin
- Meny 6 Magert
- Meny 10 Mjukt m. russin
- Meny 3 Vitt bröd m. fyllning
- Meny 7 Magert m. russin
- Meny 11 Mjukt m. russin snabbt
- Meny 4 Fullkorn
- Meny 8 Mjukt
- Baka brioche
- Meny 12 Brioche
- Att baka brioche på ett enkelt sätt.
- — 5 Se S. SE11 i Förberedelser
- Välj meny 12, välj skorpans färg
- Tryck på knappen för start.
- Efter ca. 55 minuter. Öppna locket när du hör ett pipande ljud. Tillsätt det extra smöret medan blinkar (i ca. 5 minuter). Stäng locket och starta maskinen igen.
- Baka kaka
- Meny 13 Endast gräddning
- Ta bort degblandaren och smörj bakformen med smör (utan recept).
- Vispa smör och socker i en stor skål tills blandningen är vit och pösig. Tillsätt äggen ett i taget och vispa hela tiden.
- Tillsätt mjölk, silad A, och blanda torkad frukt, vispa kraftigt efter varje tillsats.
- Häll blandningen bakformen och sätt tillbaka den i huvudenheten. Stäng locket och koppla in.
- Välj meny 13
- Ställ in gräddningstiden
- Tryck på knappen och ta ut kakan mär maskinen piper 8 gånger och End (Slut) blinkar.
- Ytterligare bakning
- Baka glutenfritt bröd
- Meny 14 Glutenfritt Normalt Bröd
- Tips för glutenfritt bröd:
- Välj meny 14
- Tryck på 📋 -knappen och ta bort brödet när maskinen piper 8 gånger och End (Slut) blinkar.
- Baka glutenfri kaka
- Meny 15 Glutenfri Kaka
- – 5 Se S. SE11 i Förberedelser
- Välj meny 15
- Efter ca. 2 minuter. Öppna locket när du hör ett pipande ljud. Skrapa loss mjölet inom 3 minuter medan blinkar. Stäng locket och starta maskinen igen.
- Efter ca. 12 minuter. Öppna locket när du hör ett pipande ljud. Skrapa bort degen från bakformens sidoväggar medan vlinkar. Stäng locket och starta maskinen igen.
- Tryck på 📋 -knappen och ta ut kakan mär maskinen piper 8 gånger och End (Slut) blinkar.
- Framställning av bröddeg
- Meny 16 Bröddeg
- Framställning av pizzadeg
- Meny 17 Pizzadeg
- Göra sylt
- Meny 18 Sylt
- Hur du får sylten att bli fast
- Ytterligare matlagning
- Rengöring & Underhåll
- Innan du rengör maskinen ska du koppla ur den och låta den svalna.
- Bakform & Degblandare
- Insidan
- Utsidan & Ångventiler
- Doseringskopp & Doseringssked
- Felsökning
- Problem Orsa
- och Åtgärd
- Under eller efter tillagning
- [Mjukt bröd]
- Problem Orsa och Åtgärd
- Tvivel
- Skärmundantag
- Specifikationer
- Avfallshantering av produkter
Brand : PANASONIC
Model : SDZP2000WXE
Category : Bread maker