
ORPE09 - Air Conditioning Orima - Free user manual and instructions
Find the device manual for free ORPE09 Orima in PDF.

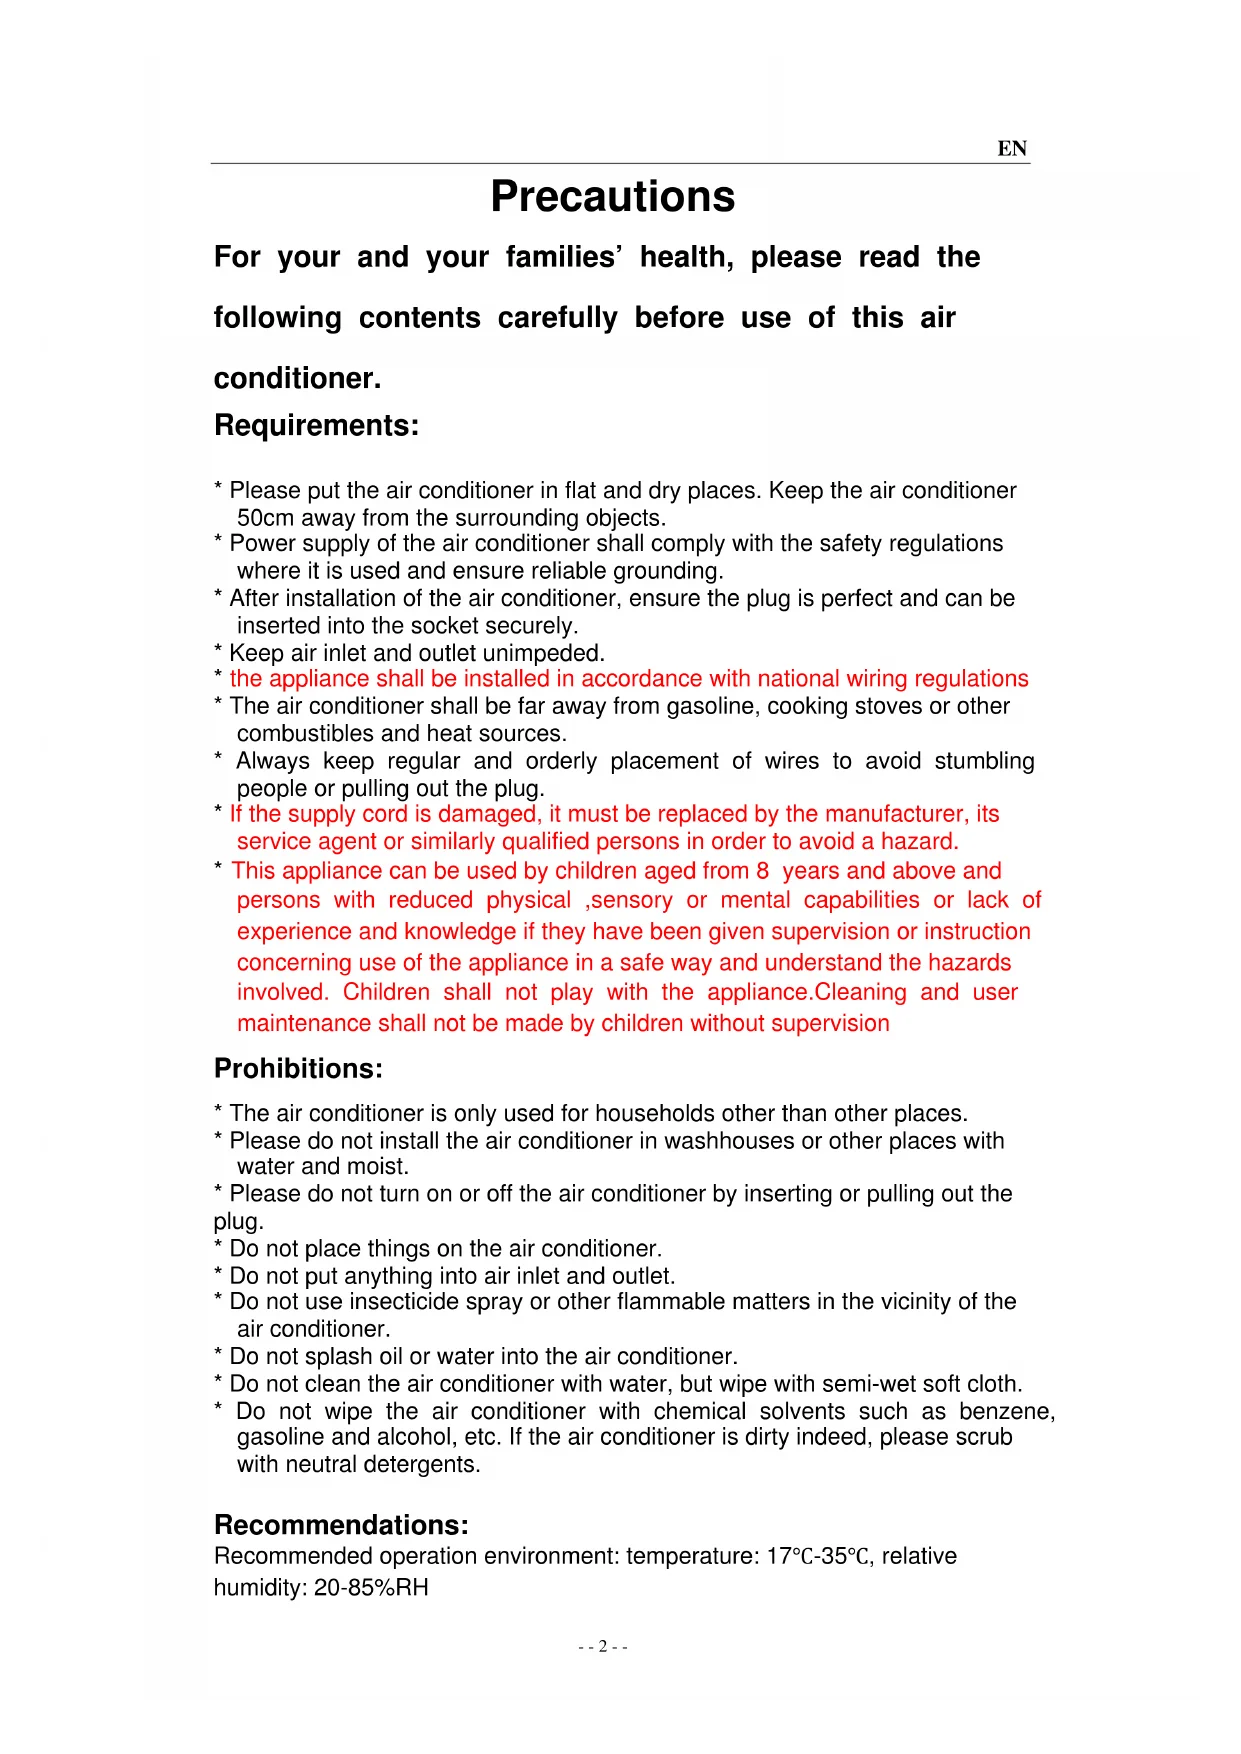


| Product type | Monoblock mobile air conditioner |
| Brand | Orima |
| Model | ORPE09 |
| Energy efficiency class | A - A+ |
| Energy consumption | 1.0 kWh/h |
| Cooling power | 9000 BTU |
| Dimensions (H x W x D) | 621 x 320 x 455 mm |
| Noise level | 61 dB(A) |
| Power supply voltage | 220-240 V ~ 50 Hz |
| Operating modes | Cool, Heat, Dehumidifier, Fan |
| Fan speeds | 3 levels: Low, Medium, High |
| Programmable timer | 24 h (automatic on/off) |
| Automatic louver oscillation | Yes |
| Automatic air outlet closure | Yes |
| Remote control | Included |
| Water tank | Manual drain; audible and visual alarm when full |
| Filters | Washable; cleaning recommended every 15 days |
| Exhaust hose length | 60 to 170 cm |
| Maintenance | Clean with soft cloth and soapy water; do not use solvents |
| Safety | Automatic shut-off if tank full; frost protection; child lock not mentioned |
| Country of manufacture | Not specified |
Frequently Asked Questions - ORPE09 Orima
User questions about ORPE09 Orima
0 question about this device. Answer the ones you know or ask your own.
Ask a new question about this device
Download the instructions for your Air Conditioning in PDF format for free! Find your manual ORPE09 - Orima and take your electronic device back in hand. On this page are published all the documents necessary for the use of your device. ORPE09 by Orima.
USER MANUAL ORPE09 Orima
facebook.com/orima.pt
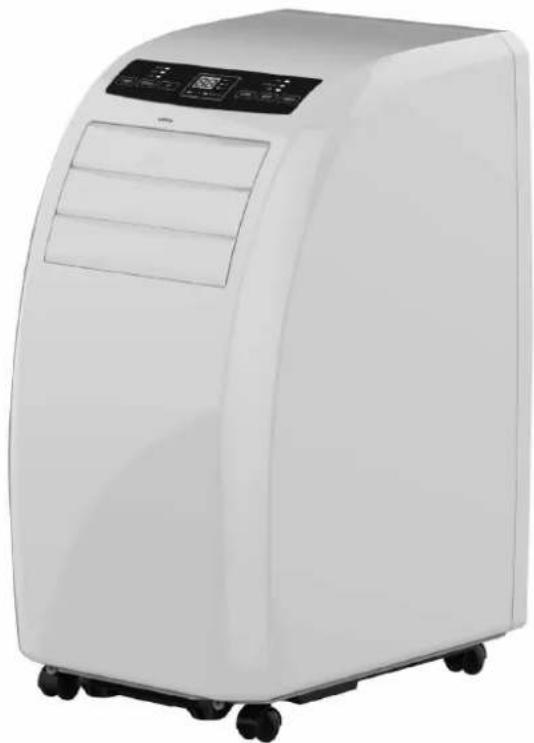

MMA
Portable Air Conditioner User's Manual
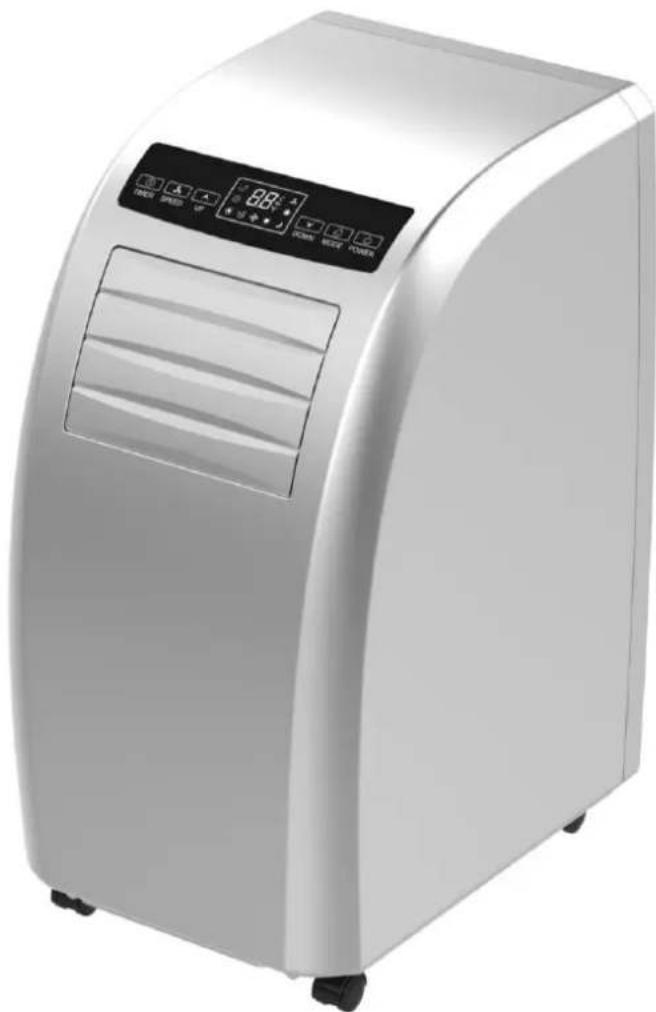
Thanks for selecting this high-quality mobile air conditioner. Before use please read this manual carefully. For problems, if any, please contact professional servicemen in time.
Thanks for selecting this high-quality mobile air conditioner. Before use please read this manual carefully. For problems, if any, please contact professional servicemen in time.
Table of Contents
Table of Contents. 1
Precautions 2
Features and Parts. 3
Control Panel 4
Controller. 5
Operating Methods. 6
Installation. 8
Drainage Operation. 10
Maintenance. 11
Fault Removal. 12
List of Fittings. 13
Accessories. 14
Precautions
For your and your families' health, please read the following contents carefully before use of this air conditioner.
Requirements:
- Please put the air conditioner in flat and dry places. Keep the air conditioner 50cm away from the surrounding objects.
- Power supply of the air conditioner shall comply with the safety regulations where it is used and ensure reliable grounding.
- After installation of the air conditioner, ensure the plug is perfect and can be inserted into the socket securely.
- Keep air inlet and outlet unimpeded.
- the appliance shall be installed in accordance with national wiring regulations
- The air conditioner shall be far away from gasoline, cooking stoves or other combustibles and heat sources.
- Always keep regular and orderly placement of wires to avoid stumbling people or pulling out the plug.
- If the supply cord is damaged, it must be replaced by the manufacturer, its service agent or similarly qualified persons in order to avoid a hazard.
- This appliance can be used by children aged from 8 years and above and persons with reduced physical, sensory or mental capabilities or lack of experience and knowledge if they have been given supervision or instruction concerning use of the appliance in a safe way and understand the hazards involved. Children shall not play with the appliance. Cleaning and user maintenance shall not be made by children without supervision
Prohibitions:
- The air conditioner is only used for households other than other places.
- Please do not install the air conditioner in washhouses or other places with water and moist.
- Please do not turn on or off the air conditioner by inserting or pulling out the plug.
- Do not place things on the air conditioner.
- Do not put anything into air inlet and outlet.
- Do not use insecticide spray or other flammable matters in the vicinity of the air conditioner.
- Do not splash oil or water into the air conditioner.
- Do not clean the air conditioner with water, but wipe with semi-wet soft cloth.
- Do not wipe the air conditioner with chemical solvents such as benzene, gasoline and alcohol, etc. If the air conditioner is dirty indeed, please scrub with neutral detergents.
Recommendations:
Recommended operation environment: temperature: 17^ - 35^ , relative
humidity: 20 - 85% RH
Features and Parts
Features:
- Brand new generation condensate self-evaporation design without need of pouring water, environment friendly and more energy-saving.
L type evaporator design, enabling more compact and efficient body. - Superhigh loading quantity, 2 times higher than normal height, greatly saving logistics cost.
- Downsizing and compact design of the whole air conditioner.
- Simple and convenient installation of accessories such as exhaust pipe, etc.
- Self-diagnosis function and 24h on/off timer function.
- Guarantee under 90% humidity, and never full of water.
* Design of universal wheel with convenience for movement. - Quiet design, applicable to use during sleep.
* Low noise and powerful air supply.
* Design of wide-angle air supply and automatic swing of horizontal guide vane. - After shutdown automatic closing of air outlet can prevent dust effectively.
- Protective function of automatic restart of compressor after 3min
time delay.
Name of parts:
- Guide strip
- Control panel
- Inlet grid
- Exhaust pipe
- Corner wheel
- Handle
- Strainer
- For installation of power line plug
- Buckle of power line
- Drainage outlet
- Power line with plug
- Exhaust outlet
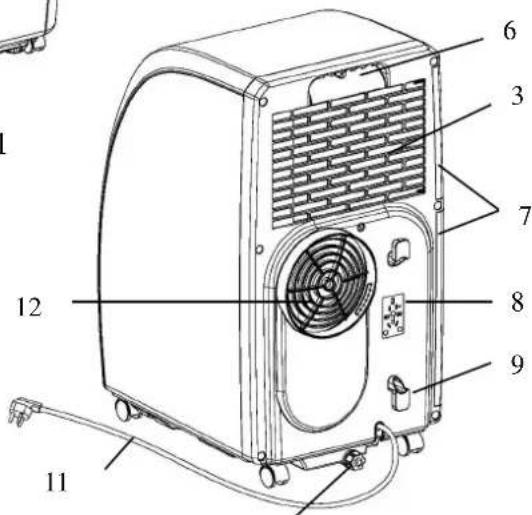
Fig.1
10
Fig.2
Control panel
Attention: if the air conditioner is restarted immediately after shutdown in COOL or HEAT mode, 3min protection time is necessary before automatic start.
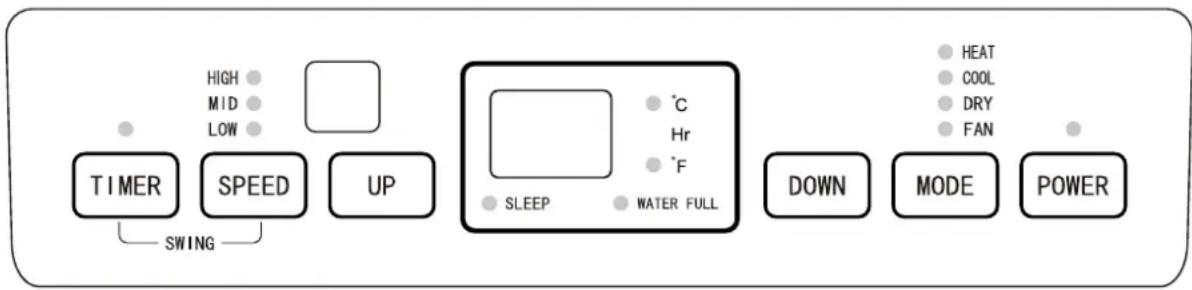
Fig.3
Instructions of panel
1. Buttons and display
POWER: press this button to turn on or off the air conditioner, and the powered indicator lamp is normally on.
MODE: During on or timer on pressing this button can select COOL,DEHUMIDIFY, FAN and HEAT modes, etc. (the HEAT mode only exists in COOL/HEAT YPE-H model). The corresponding indicator lamp to the selected mode is on.
UP and DOWN: If the timer on or timer off is set, pressing UP or DOWN can adjust on/off time; in running state of COOL or HEAT mode or timer state, pressing UP or DOWN can adjust the set temperature; and pressing UP and DOWN simultaneously can realize conversion between and , and is displayed in default.
SPEED: Pressing this button can select different speeds in cycle of HIGH, MID and LOW; in FAN mode press this button for 5s to run the internal dry function, press this button for another 5s to cancel, the corresponding indicator lamp to the selected speed is on.
TIMER: Press this button to enter timer setting state, and the indicator lamp is on.
88: This pattern displays the set temperature in COOL and HEAT modes, and displays room temperature in FAN and DEHUMIDIFY modes; display of C shows current centigrade temperature, and display of F shows current Fahrenheit temperature.
SLEEP: This indicator lamp is normally on when SLEEP state is started.
WATER FULL: In water full state this indicator lamp flickers with buzzer to prompt drainage.
Remote control
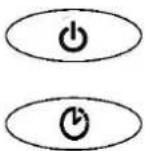
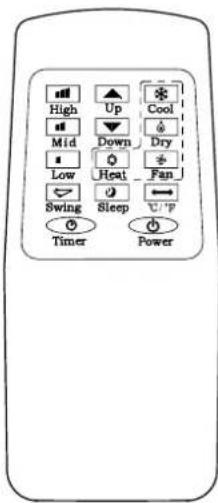
POWER Press this button to turn on/off the air conditioner.
TIMER Press this button to set timer.

SWING Press this button, and the horizontal guide vane rotates automatically.

TEMPERATURE CONVERSION BUTTON Temperature is converted from C to F.

COOL Press this button to select COOL mode.

HEAT Press this button to select HEAT mode.

DEHUMIDIFY Press this button to select DEHUMIDIFY mode.
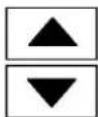
FAN Press this button to select FAN mode. UP/DOWN Press UP or DOWN to set temperature or adjust timer.

HIGH Press this button to select HIGH speed.

MID Press this button to select MID speed.

LOW Press this button to select LOW speed.

SLEEP Press this button to set SLEEP mode. At the moment the speed of upper and lower
fans is fixed at LOW speed, in SLEEP mode speed cannot be changed. Press this button again to cancel.
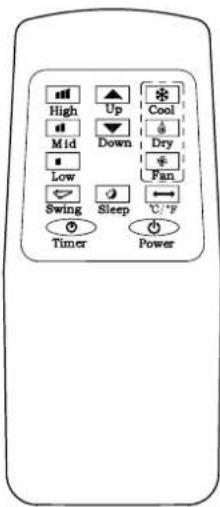
Single cool remote control
Operating methods
Timer setting
1. Setting of timer off
When the air conditioner is running, press this button, the timer LED lamp is on, and meanwhile 88 Nixie tube will flicker "00" for 5 times, at the moment, press UP and DOWN to adjust time from 1h to 24h. up/down adjustment once changes 1h. When the set time expires, the air conditioner turns off automatically.
2. Setting timer on
When the air conditioner is in standby state, press TIMER, the timer LED lamp is on, and meanwhile 88 Nixie tube will flicker "00" for 5 times, at the moment press UP/DOWN to adjust the desired time, and the method of adjustment is the same as that during timer off. During setting of timer, the operating modes after start can be selected, if COOL or HEAT mode is selected, the set temperature can be adjusted simultaneously; if DEHUMIDIFY mode is selected, the set humidity can be adjusted simultaneously. After the set time expires, the air conditioner starts automatically and runs in the selected operating mode.
3. Change of the set time
In the running process of timer, if you are intended to change the existing timer, you can press TIMER once, at the moment 88 Nixie tube will flicker and display the remaining time, during flicker pressing UP/DOWN can increase/decrease time on the basis of the original time. If you press TIMER again during flicker, the set time will be cancelled, namely timer quits.
Operation of operating modes
1. COOL and HEAT modes
-
In on or timer on state press MODE to select COOL or HEAT mode. At the moment the corresponding LED on panel displays.
-
Press UP/DOWN to set appropriate temperature in a range of 18^ 30^ C( 64 - 86^ F) . When UP or DOWN is pressed once, temperature will go up or down by 1^ C or 1^ F every time.
-
Press SPEED to select appropriate speed, and LOW, MID and HIGH speeds can be circularly selected.
-
After selecting COOL or HEAT mode, press SLEEP on remote control (or press UP and TIMER on operating panel simultaneously) to enter SLEEP mode, both upper and lower fans are forcibly set at LOW speed. In approximate 7h the air conditioner turns off automatically. If SLEEP is to be cancelled, press SLEEP again or conversion mode to cancel the sleep function.
-
Press SWING to turn off or turn on the swing function.
2. DEHUMIDIFY mode
- In on or timer on state press MODE to select DEHUMIDIFY mode. At the moment the corresponding indicator lamp is on.
- Temperature and speed are not adjustable.
- Press SWING to turn off or turn on the up/down swing function.
3. FAN mode
- In on or timer on state press MODE to select FAN mode. At the moment the corresponding indicator lamp is on.
- Press SPEED to select appropriate speed, and LOW, MID and HIGH speeds can be circularly selected. In this mode press SPEED for "5s" to run the internal dry function, i.e. both upper and lower fans work simultaneously. Press SPEED for another "5 s" to cancel the internal dry function.
- Temperature is not adjustable.
- Press SWING to turn off or turn on the up/down swing function.
Cautions:
- When full water indication is displayed, the air conditioner will stop work, you should drain water in time. After drainage the air conditioner will start automatically.
- In DEHUMIDIFY and FAN (including the internal dry function) modes, you need not use exhaust pipe.
- If your room faces the sun directly, please draw the curtains.
Installation
1. Select mounted place
Install in a flat and dry place, and 50cm must be left around the air conditioner to enable smooth circulation of air, as shown in Fig.5 (before connection of exhaust pipe).
2. Assembly method of exhaust pipe
- Connect exhaust pipe assembly with round joint (as shown in Fig.6).
- Fix the round end of the connected exhaust pipe
assembly at air outlet of the air conditioner as shown in Fig.7.
- Connect the oblate joint of the connected exhaust pipe assembly with sealplate of window.
Install sealplate on the nearest window. No Obstacles at a distance of 50cm around the Window should be ensured to guarantee unimpeded air exhaust.
Cautions
- Exhaust pipe is 60cm 170cm long (including adapter). We recommend using the minimum length so as to save energy for you.
- The length of exhaust pipe is especially designed in accordance with the specification of the air conditioner. Please do not use other exhaust pipes of different lengths or materials, in such way failure may be caused.
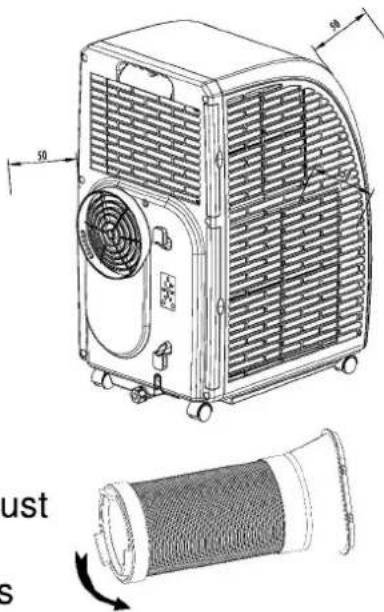
Fig.6
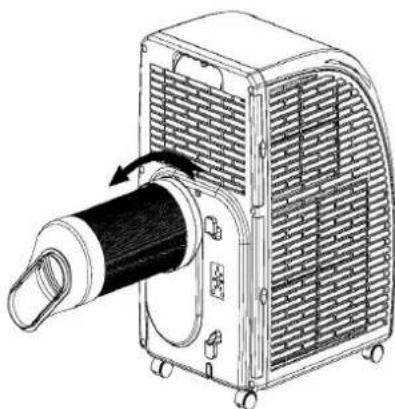
Fig.7
Installation of window sealplate
Design of window sealplate complies with most standard horizontal or vertical windows, and the installation methods are shown in Fig.8 and Fig.9.
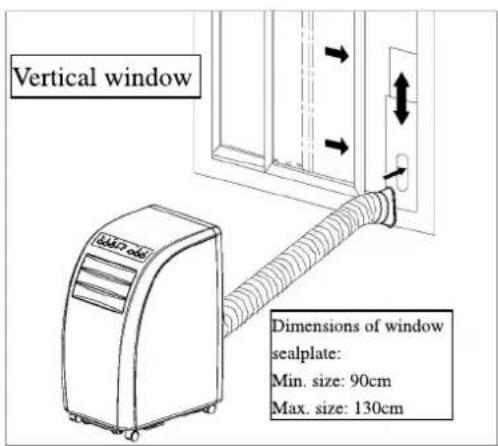
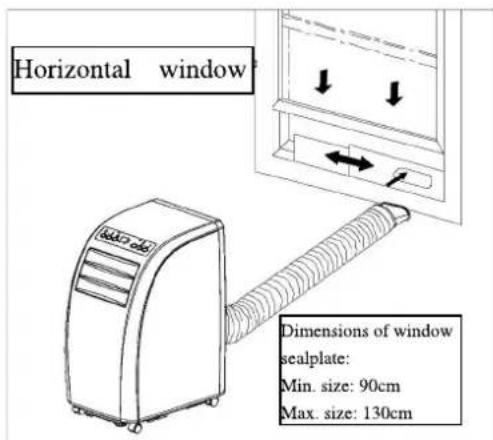
Fig.9
Fig.8
4. Illustration of installation
1) Wall mounted
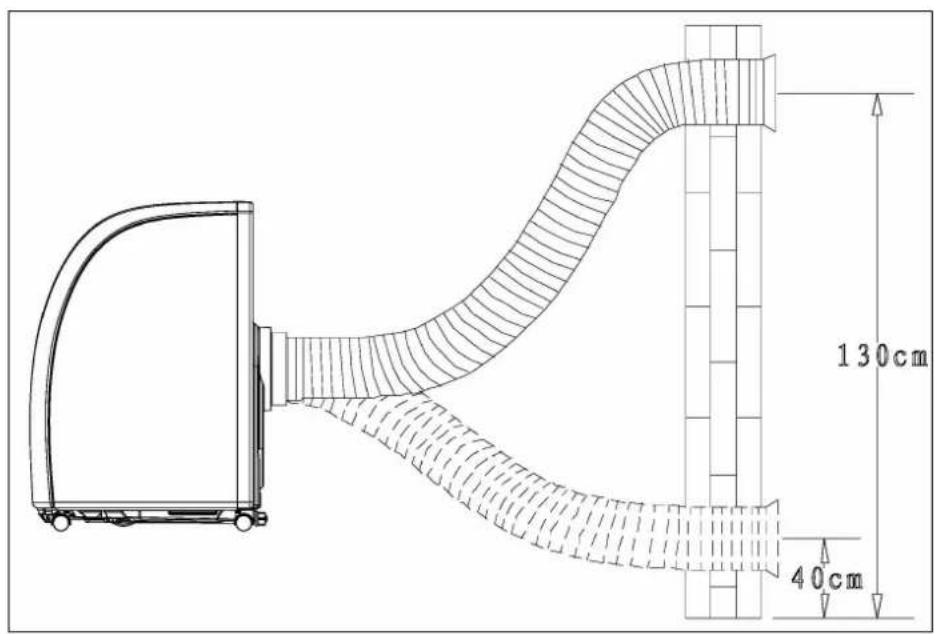
Fig.10
2) Bow alignment
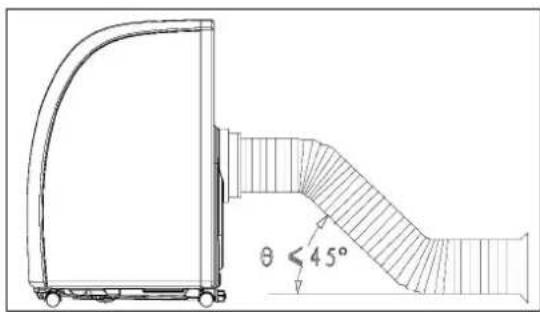
Fig.11
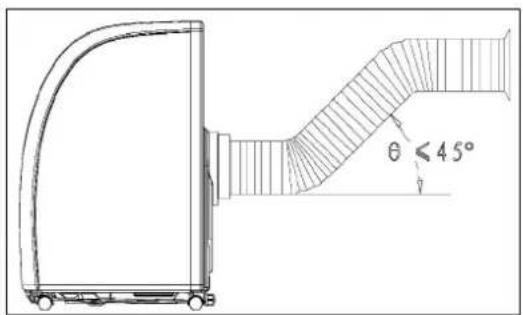
Fig.12
3) Incorrect bending
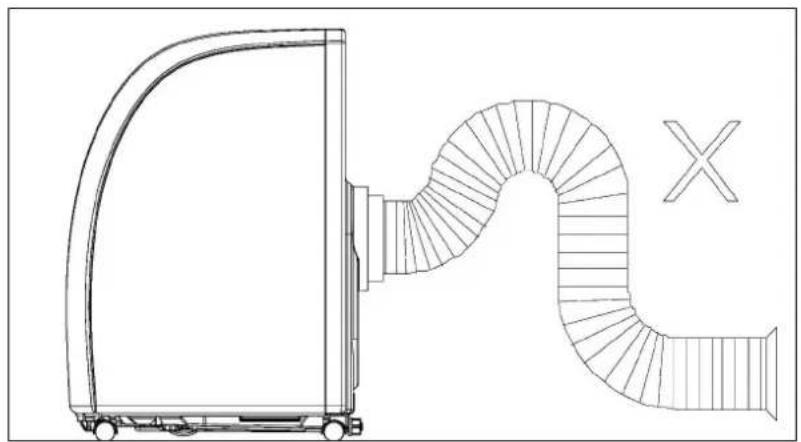
Fig.13
Drainage operation
Drainage operation
-
When COOL or DEHUMIDIFY or HEAT is run in humid weather, more condensate is produced, water full alarm will be issued as he level in water pan reaches a certain location, compressor stops operation. Water full indication on display screen will light up and an audible alarm will be issued simultaneously till the level in water pan is lower than alarm level or water in water pan has been drained manually. When the alarm is relieved, the air conditioner will resume normal operation automatically.
-
When the air conditioner issues water full alarm, please drain water in time. You can move the air conditioner to the site where water can be drained directly (such as toilet or sewer), unscrew nut and pull out water plug to drain all water. Install water plug and nut before use.
Caution
When water is full, please move the air conditioner steadily, otherwise, water may overflow from inside.
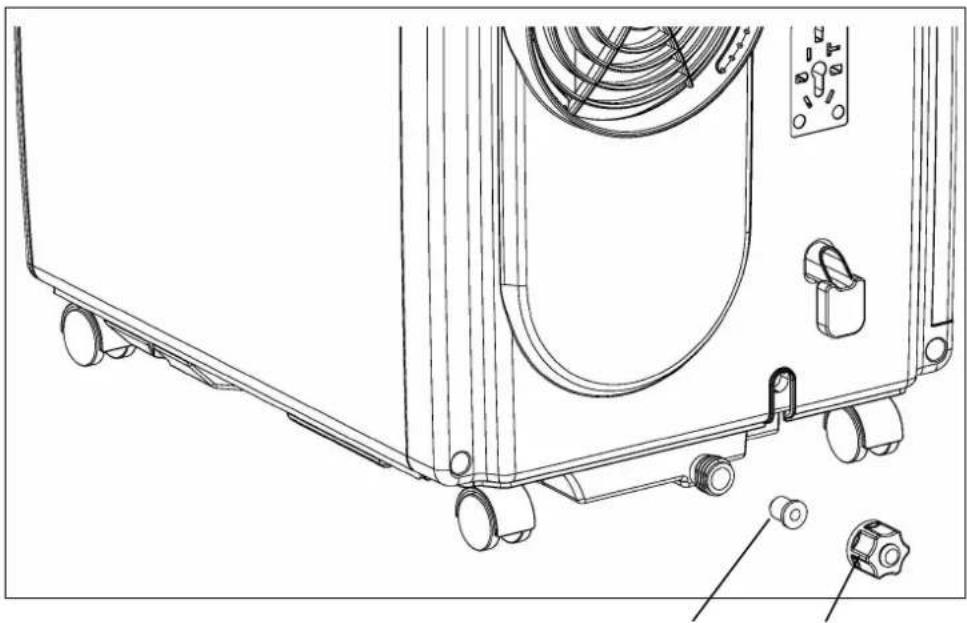
Fig.14
Water plug Nut
Maintenance
Cleaning
Caution
Before cleaning please turn off the air conditioner and pull out the plug.
1. Cleaning surface
Clean surface of the air conditioner with duster or semi-wet soft cloth.
Do not use chemical reagents, such as benzene, alcohol and gasoline, etc.
Otherwise surface of the air conditioner will be damaged, and even the whole air conditioner is damaged.
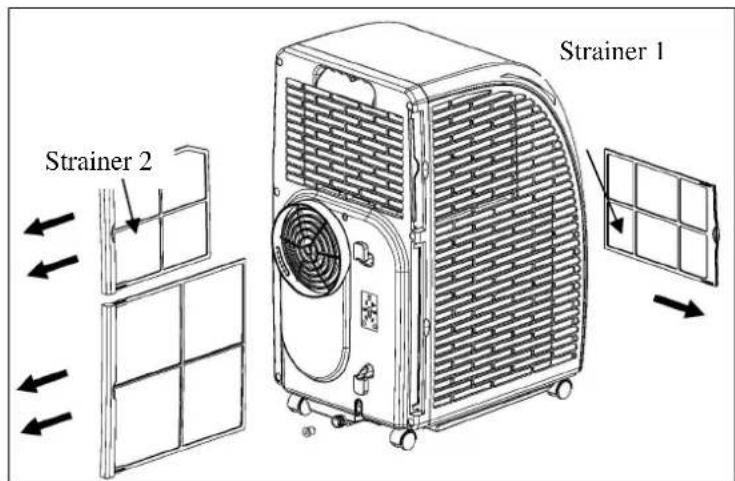
Fig.15
2. Cleaning of strainers
-
If strainers are blocked by dust, air circulation will be impeded to reduce efficiency of the air conditioner.
-
On condition that the air conditioner is used for long time, cleaning strainers once per two weeks is recommended.
1) Pull out strainers in the direction as shown in Fig.15.
2) Put strainers into warm water with neutral detergent (about 40^ ) and clean up, and after that dry in shade place.
3) Install strainers to the original position in the direction as shown in Fig.15.
4) Process of taking out strainers: first take out strainer 2 and then strainer 1; process of installing strainers: first install strainer 1 and then strainer 2.
Postseason storage
When the air conditioner is out of season or not used for long time, corresponding maintenance measures should be taken.
- Drain all water in water pan from outlet (water can be poured out by slowly leaning the body backward during drainage), and adjust operating mode to FAN mode, and then press SPEED for 5s till fan works, keep this operating mode for 2 3h . This method can dry inside of the body and prevent mildew.
Turn off the air conditioner and pull out power plug. - Wind up, fasten and put away power line.
Remove exhaust pipe and keep properly. - Set the air conditioner into plastic bag and put it in a dry place.
- Take out of cells of remote control and keep properly.
Fault removal
Please check the following before contact with professional electricians:
| Faults | Check | Solutions |
| The air condition does not work | Power off?Plug not inserted?Fuse burnt out or power supply turned off?Time set properly?Water full alarm? | Normal phenomenon.Insert power plug steadily.Replace fuse or turn on power supply.Change time setting.Pour water. |
| COOL/HEAT effect not good | Air inlet/outlet blocked?Other heating sources availab in room?Strainers too dirty?Temperature setting appropriate?Fan speed set at LOW? | Remove blocking.Remove other heat sources.Clean strainers.Change temperature.Select appropriate speed. |
| Noise too large and shake | Body inclined?Ground uneven? | Put the air conditioner on even ground. |
Caution: when the following abnormalities occur to the air conditioner, shut down and pull out the plug, and then contact a professional electrician.
- Fuse and switch are often broken.
- Power line is overheating or its coat is naked.
The body produces abnormal odour.
Intelligent detection functions
| Detection codes | Meaning |
| E1 | Abnormal sense of coil pipe sensor |
| E2 | Abnormal sense of room temperature sensor |
| E4 | Anti-frost protection |
| FL | The air conditioner is in water full alarm state |

Caution
When heating indicator is displayed, the air conditioner is in anti-freezing or defrosting state, and this is a normal phenomenon.
List of fittings
Description:
Exhaust hose 1 pc
Outer diameter and extended length
φ15cm 28cm~150cm
Oblate joint. 1 pc
Round joint. 1 pc
Adjustable window mounting plate 1 set
Length 90cm 130cm
Screw (length 10mm) 1 pc
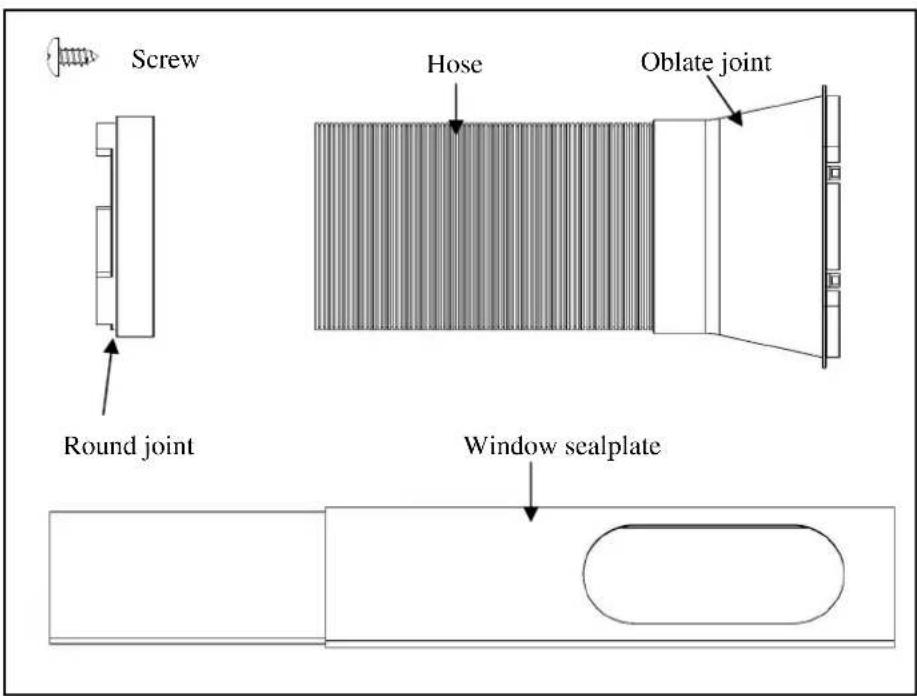
Fig.16
Accessories
1. Parameters of fuse
Model: FSD
Voltage: 250V
Current: 3.15A
Meaning of crossed -out wheeled dustbin:
Do not dispose of electrical appliances as unsorted municipal waste, use separate collection facilities. waste, use separate collection facilities. Contact your local government for information regarding the collection systems available.
If electrical appliances are disposed of in landfills or dumps, hazardous substances can leak into the groundwater and get into the food chain, damaging your health and well-being.
When replacing old appliances with new ones, the retailer is legally obligated to take back your old appliance for disposals at least free of charge.
ORIMA
1) Installation murale
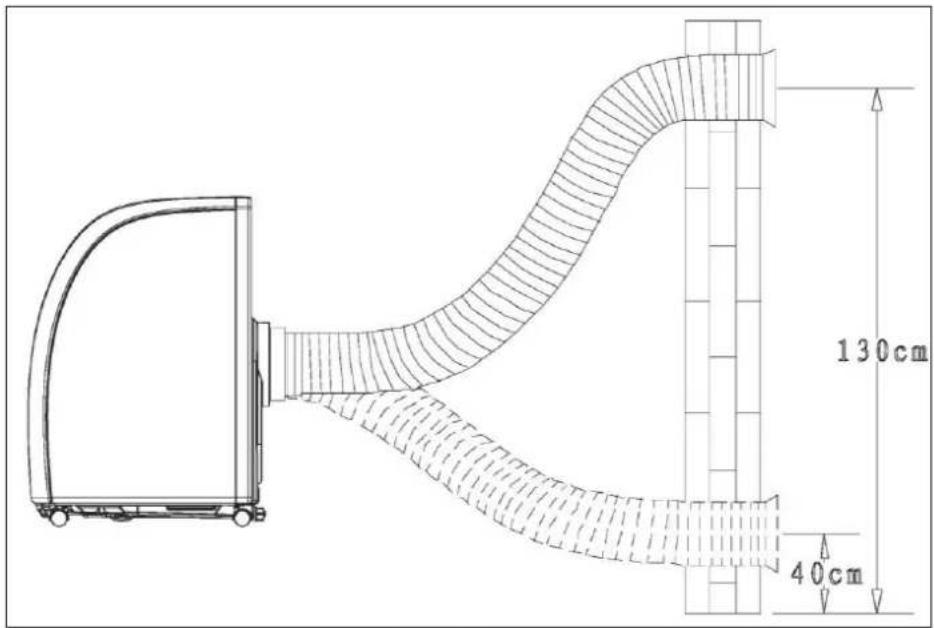
Scheme 9


- Portable Air Conditioner User's Manual
- Table of Contents
- Precautions
- Requirements:
- Prohibitions:
- Recommendations:
- Features and Parts
- Features:
- Name of parts:
- Control panel
- Instructions of panel
- Buttons and display
- Remote control
- Operating methods
- Timer setting
- Setting of timer off
- Setting timer on
- Change of the set time
- Operation of operating modes
- COOL and HEAT modes
- DEHUMIDIFY mode
- FAN mode
- Cautions:
- Installation
- Select mounted place
- Assembly method of exhaust pipe
- Cautions
- Installation of window sealplate
- Illustration of installation
- 1) Wall mounted
- 2) Bow alignment
- 3) Incorrect bending
- Drainage operation
- Caution
- Maintenance
- Cleaning
- Cleaning surface
- Cleaning of strainers
- Postseason storage
- Fault removal
- Intelligent detection functions
- List of fittings
- Description:
- Accessories
- Parameters of fuse
- Meaning of crossed -out wheeled dustbin:
- ORIMA
- 1) Installation murale
Brand : Orima
Model : ORPE09
Category : Air Conditioning