
BTS Elysium X1 - Loudspeaker ECG - Free user manual and instructions
Find the device manual for free BTS Elysium X1 ECG in PDF.
| Product type | Wireless Bluetooth speaker |
| Brand | ECG |
| Model | BTS Elysium X1 |
| Bluetooth version | 4.2 |
| Power supply | DC 5 V / 2 A (max) |
| Output power | 2 x 10 W + 2 x 2.5 W |
| Impedance | 4 Ω |
| Built-in battery | 8800 mAh |
| Battery life | 12 hours (at 70% volume) |
| Charging time | Approximately 4 hours (with 5V/2A adapter) |
| Dimensions (L x W x H) | 249 x 133 x 141 mm |
| Weight | 2001 g |
| FM reception range | 87.5 – 108 MHz |
| Supported audio formats | MP3, WMA, APE, FLAC |
| Water resistance | IPX6 (splash resistant) |
| Functions | Bluetooth stereo, hands-free, AUX-IN, Micro SD player, FM radio, power bank, voice assistant |
| Equalizer | 3 preset profiles |
| Package contents | Speaker, Micro USB cable, strap, user manual |
| Maintenance | Clean with a damp cloth; do not use liquid or spray products |
| Safety | Do not open the casing; entrust repairs to qualified personnel |
| Repairability | No user-serviceable parts; authorized after-sales service |
Frequently Asked Questions - BTS Elysium X1 ECG
User questions about BTS Elysium X1 ECG
0 question about this device. Answer the ones you know or ask your own.
Ask a new question about this device
Download the instructions for your Loudspeaker in PDF format for free! Find your manual BTS Elysium X1 - ECG and take your electronic device back in hand. On this page are published all the documents necessary for the use of your device. BTS Elysium X1 by ECG.
USER MANUAL BTS Elysium X1 ECG
natural_image
Black cylindrical portable electronic device with visible speaker grille and control buttons (no text or symbols on body)BTS Elysium X1 Black
CZ
PŘENOSNÝ BEZDRÁTOVÝ REPRODUKTOR NÁVOD K OBSLUZE
SR/MNE
PRENOSNI BEŽIČNI ZVUČNIK UPUTSTVO ZA UPOTREBU
SK
PRENOSNÝ BEZDRÔTOVÝ REPRODUKTOR NÁVOD NA OBSLUHU
FR
HAUT-PARLEUR MOBILE SANS FIL MODE D'EMPLOI
PL
PORTABLE WIRELESS SPEAKER INSTRUCTION MANUAL
LT
NEŠIOJAMASIS BELAIDIS GARSIAKALBIS INSTRUKCIJŲ VADOVAS
HR/BIH
PRIJENOSNI BEŽIČNI ZVUČNIK UPUTE ZA UPORABU
LV
PORTATIVS BEZVADU SKALRUNIS ROKASGRAMATA
SI
BREZŽIČNI PRENOSNI ZVOČNIK NAVODILA
BEZPEČNOSTNÍ POKYNY
- Dlouhé stisknutí: zapnutí/vypnutí reproduktoru
- Ekvalizér
SK


Read carefully and save for future use!
- Before you begin using the device, read this manual carefully and follow the instructions provided here. Keep this manual for future reference.
- Follow all warnings on the product and in the documentation supplied with the appliance.
- Do not use liquid cleaners or spray cleaners for cleaning. Use wet cloth for cleaning.
- Use only accessories recommended by the manufacturer. Otherwise there is a risk of injury or damage to the device.
- Do not place the device on unstable surfaces (stands, carts, tables, holders, etc.). The device could fall and could cause serious injury to a child or an adult and damage the appliance.
- Place the device on a horizontal, flat and firm surface with good ventilation. Do not cover the air vents. Doing so may damage the device by overheating. Do not place the device in a confined space with poor ventilation, for example, in glass cabinets or on tight shelves.
- The appliance should be powered only from a power sources indicated on the product label. If you are unsure of your power network parameters, consult your vendor or your electricity provider.
- The power adapter cord should be led so as to avoid stepping on the cord or its excessive straining or pinching. Pay special attention to places where then cord exits from the appliance and close to the plug. If the device is not used for long periods, unplug the power cord. Unplug the power supply also during a thunderstorm to prevent damage by lightning.
- The electrical outlet has to be constantly accessible.
- Do not overload electrical outlets by plugging in too many appliances.
- Protect the device against infiltration of liquids or foreign objects and do not insert any object into the ventilation openings, with potentially hazardous contact with voltage inside the device.
- Do not open the device box. There are no elements inside that can be configured by the user. Have a qualified service technician perform repairs on the device.
- Do not expose batteries to excessive temperatures, e.g. direct sunlight, fire etc.
- In the following cases, unplug the device and contact a qualified service:
• The power cord was damaged.
- The device was infiltrated by a foreign object or liquid, or it was exposed to rain or water.
- The appliance does not operate normally in accordance with the manual. Set only the elements described in the operating manual.
- The device has significant functionality changes, indicating a need for service.
- Do not expose the device to heat sources such as radiators, heating or other heat-producing appliances such as amplifiers.
- Changes or modifications not expressly approved by the responsible authority can lead to loss of authorization to use the device.
- Excessive sound can cause hearing damage.
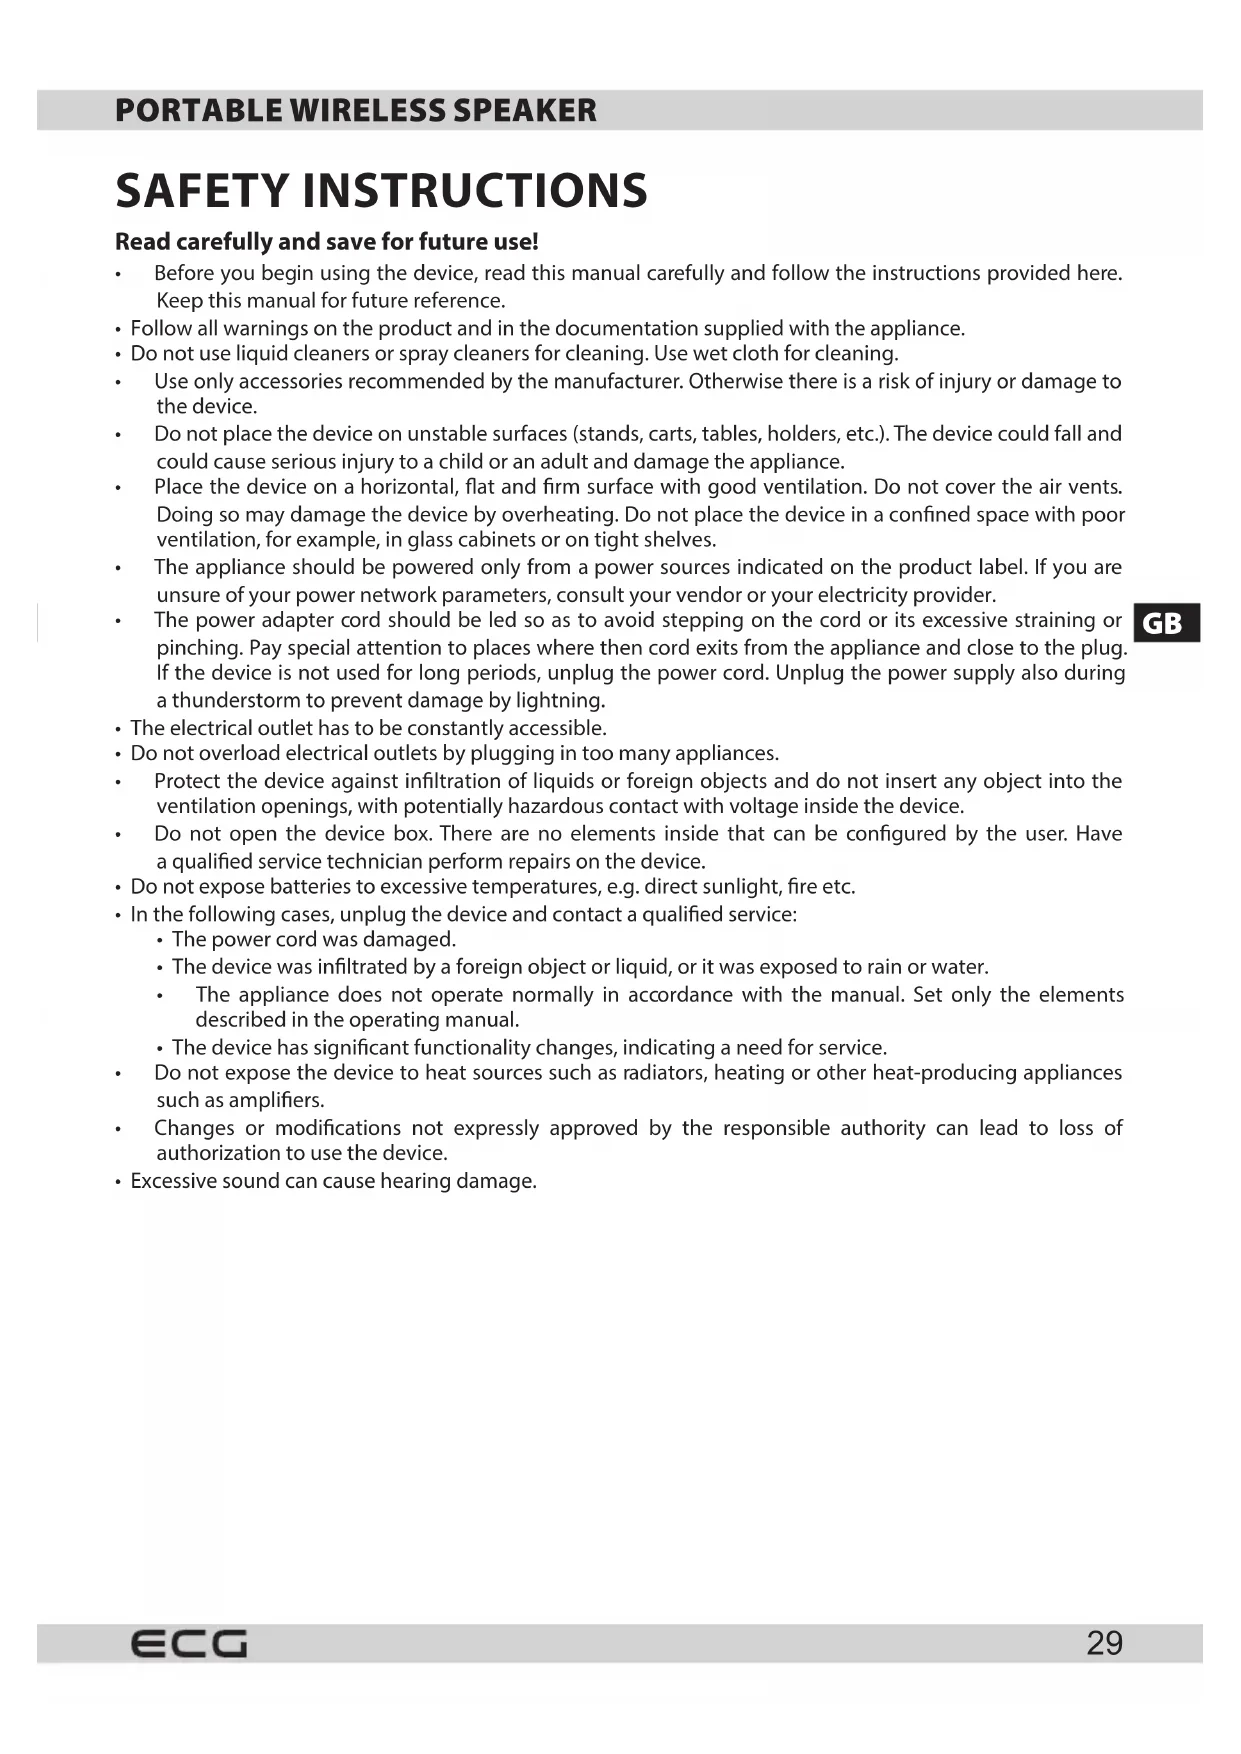
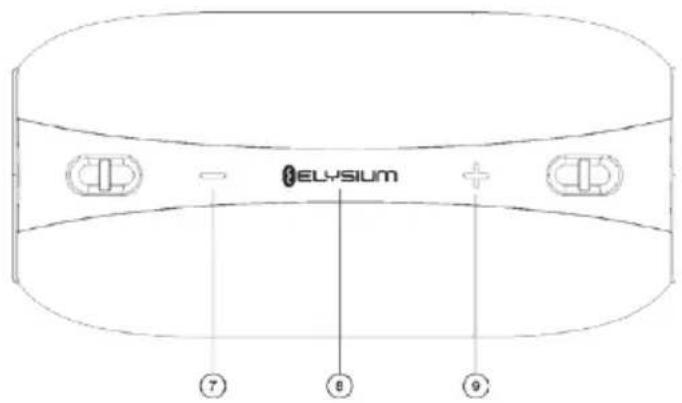
DESCRIPTION
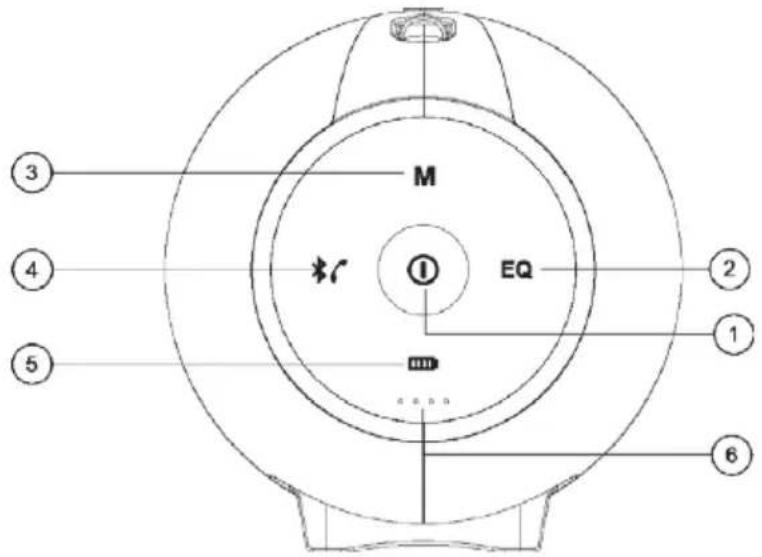


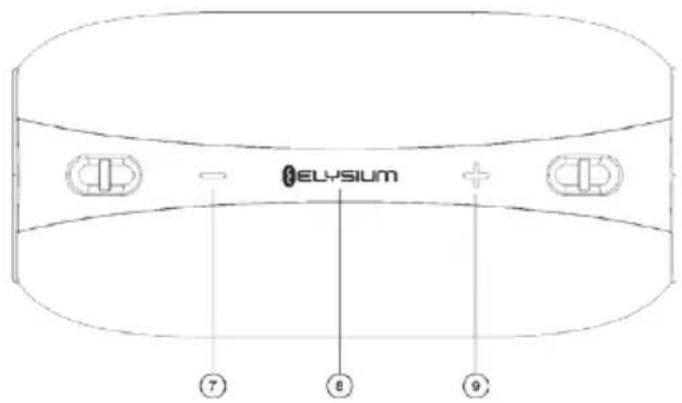
- Long press: turn speaker ON/OFF
- Equalizer
Brief press: switching equalizer profiles
Long press: Automatic search for stations in FM mode
- Switching modes
- Short press: turn Bluetooth ON / accept incoming phone call / hang up phone
Long press: unpair Bluetooth device / reject incoming phone call
Double short press: redial previously called number
- Power bank
- Battery charge level indicator
- Short press: previous track
Long press: decrease volume
Double Brief Press: Change a folder when playing back from the Micro SD Memory Card
- Short press: PLAY/PAUSE/MUTE
Long press: mute or unmute sound
- Brief press: next track
Long press: increase volume
Double Brief Press: Change a folder when playing back from the Micro SD Memory Card
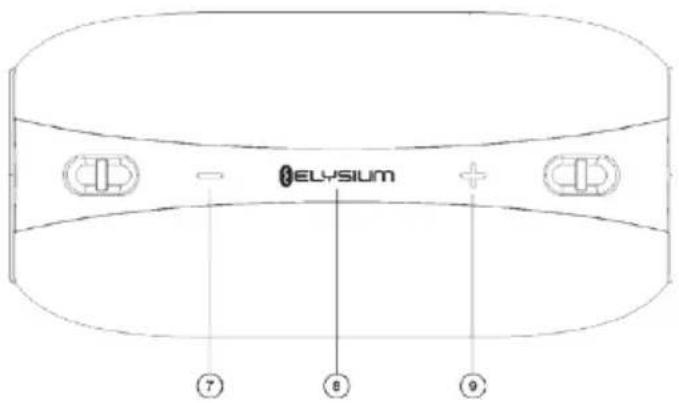
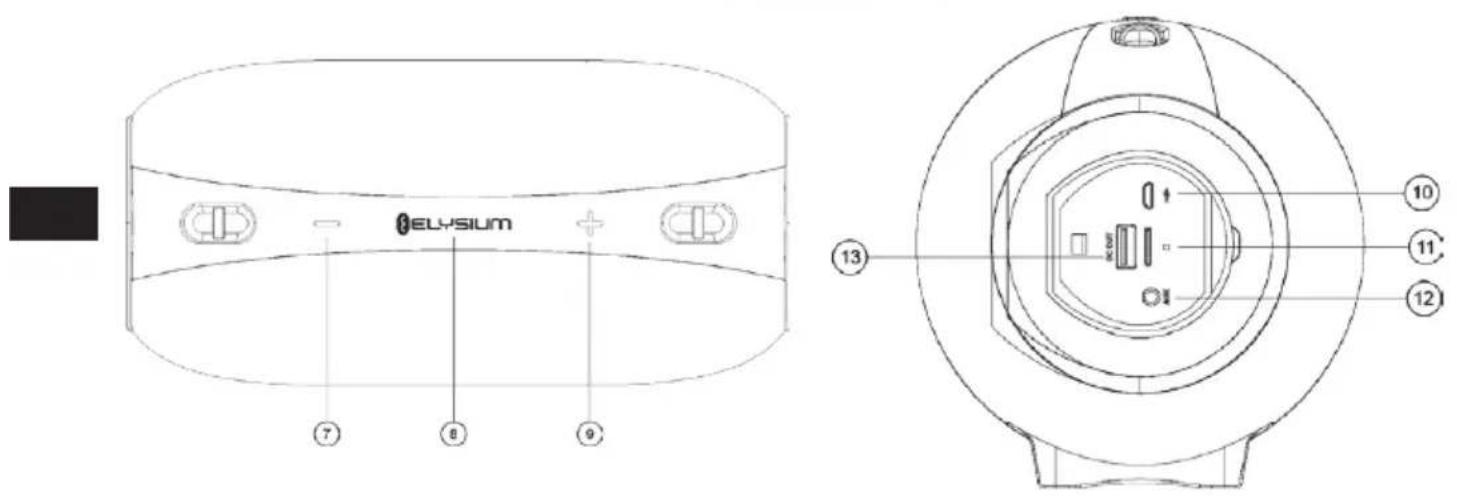
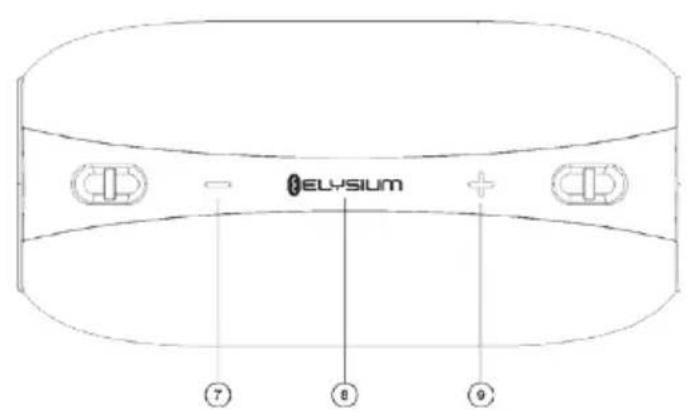
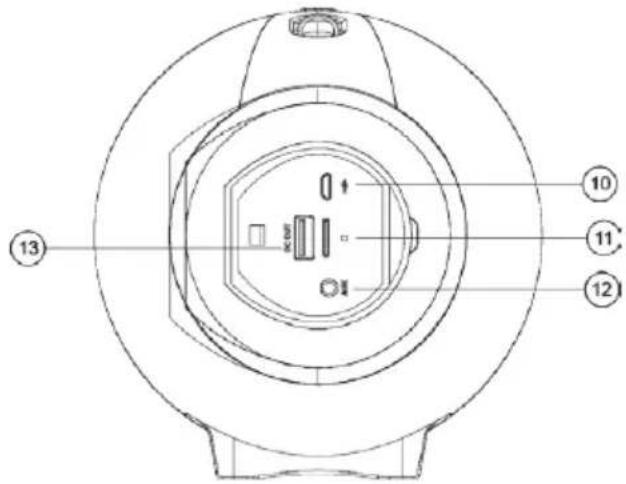
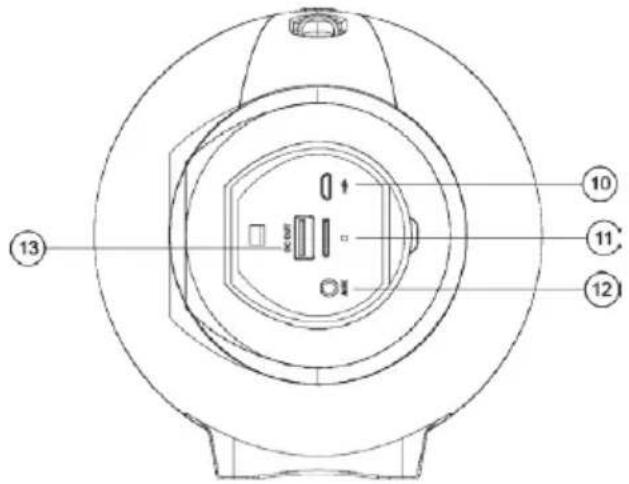
- Charging connector
- Micro SD memory card slot
- Analogue input AUX
- Power bank connector
Features
- Wireless music playback (Bluetooth 4.2 stereo) and hands-free function
- Powerful amplifier with DSP (Digital Signal Processor)
- Analogue input AUX-IN – available to use as an external computer speaker, mobile phone, PSP/MP3/MP4 player etc.
• Equalizer with 3 preset profiles - Playback from a 32GB Micro SD memory card with MP3/WMA/APE/FLAC formats support
- FM tuner
• Memory card reader and charging via the same USB cable - Splashproof – IPX6 protection
- Voice guide – for changing modes and overall control
- Power bank – the player can be used as a power bank to charge phone or another device
Package contents
Wireless Bluetooth speaker, Micro USB cable, strap, Operating Manual
USING THE SYSTEM
GB
Before using the device for the first time, fully charge the integrated battery.
If you do not plan to use the speaker for a longer period of time, charge the device once a month to prevent problems of damage caused by an excessively discharged battery.
1. Turn the speaker ON/OFF
Long press ① for 2 seconds to turn the speaker ON or OFF.
2. Bluetooth mode
1) Bluetooth pairing
Once on, the ECG indicator starts flashing. Next, enable Bluetooth on your mobile phone or other device and initiate the search for Bluetooth devices. The BTS Elysium X1 device will appear among the available devices. Connect to this device. Once connected, the speaker announces "Device paired" (Device paired) and the LED indicator turns blue.
2) Wireless music playback
Simply start the playback on your mobile phone or music player and listen to music from your speaker.
3) Hands-free paired with your mobile phone
Accepting an incoming call
Short press ④ to accept an incoming call.
Hang up
Short press ④ again to hang up.
Redial
Double press ④ to initiate a call to the previously called number.
Private call
Press briefly the button ⑦ or ⑨ to be able to switch between the speaker and the phone during a call.
Reject an incoming call
Long press ④ to reject an incoming call.
4) Disconnect an existing Bluetooth connection
The speaker will automatically pair with the last known Bluetooth device. Long press ④ to disconnect from the current Bluetooth connection, the speaker will indicate "Device disconnected". The speaker is then ready to be paired with another device.
3. Playing music from micro SD card
After inserting the micro SD card (see fig.) into the speaker and briefly pressing the button ③ the speaker switches to playback mode from the memory card and plays music directly from the micro SD card. The speaker will indicate "Memory card mode" before playing.
Press briefly the button ⑧ to start/stop playback.
Long press the button ⑧ to jump back to the start of the music playlist.
Press briefly ⑨ to skip to the next track.
Long press the button ⑨ to raise the playback volume.
4. AUX IN mode
Connect the speaker to an audio source (PC, MP3/MP4, mobile phone) via 3.5mm audio cable. Short press ③ to enter "AUX IN" mode (speaker indicates "AUX IN"). Music begins to play from the audio source.
Notes:
- If you are connecting the speaker to a computer with a 3.5 mm audio cable, we recommend using a genuine adapter (5 V / 2 A) to charge the speaker instead of the computer USB port. Powering the device from the computer may be insufficient.
- Short press ⑧ to lower the music volume. The source of music continues to play the music at a lower volume.
5. FM tuner
Short press ③ to initiate FM mode (the speaker indicates "Mode FM"). Short press ⑦ / ⑧ to tune to previous/ next station. Long press the buttons ⑦ / ⑨ to adjust the playback volume.
6. Card reader
Insert your Micro SD card into the speaker and switch OFF. Connect the speaker to the computer via USB cable. After the speaker switches to memory card mode, files can be read and written to the computer from the Micro SD card.
Note: The necessary computer driver is installed when using this feature for the first time.
7. Intelligent energy-saving feature
The speaker will turn off automatically if you pause playback or pause the Bluetooth connection for more than 10 minutes in playback mode.
Note:Longpress① again to switch the speaker ON again.
8. Power bank
When the speaker is off, press the button ⑤ the battery indicator starts flashing. Use the USB cable to connect the mobile phone/MP3 player/tablet, etc. to the speaker, the speaker starts charging the device as a power bank.
9. Charging
If the speaker battery is nearly empty, the speaker will report it with the message "out of battery" (empty battery). Charge the battery using the USB adapter. During charging, the orange LED indicator lights up. When the charging is finished that orange indicator turns off.
Notes:
- Only use a quality adapter to charge the speaker.
• We recommend using an adapter with the following parameters: 5 V / 2 A, full charge takes about 4 hours.
• Always charge the speaker immediately after the speaker indicates the battery is empty. - The speaker can also be charged with a lower charging current. The charging cycle can take a very long time when the battery is charged via standard USB port with a current of 500 mA.
TROUBLESHOOTING
| Problem Solution | |
| The speaker cannot connect to the Bluetooth device and play music. | 1. Check the specifications / manual of the Bluetooth device (mobile phone or computer) and make sure the device supports A2DP stereo audio transmission. If the device does support A2DP, enable A2DP stereo mode.2. Make sure the speaker is in Bluetooth mode. If there are many Bluetooth devices in your vicinity, it can be difficult to find the correct device. In such a case, turn off all other devices. |
| The micro SD card does not work. | 1. Make sure that the Micro SD card is in good condition. Check the audio files for supported format: MP3/WMA/WAV/APE/FLAC.2. In addition to the above mentioned, there may be a problem with Micro SD card compatibility.When formatting the Micro SD card or USBB flash drive, we recommend using a FAT 32 file format. |
TECHNICAL SPECIFICATIONS
Bluetooth version: 4.1
Power: DC 5 V / 2 A (Max)
Impedance: 4 Ω
Power: 2 × 10 W + 2 × 2.5 W
Integrated battery: 8800 mAh
FM frequency range: 87.5–108 MHz
Dimensions (L × W × D): 249 × 133 × 141 mm
Playing time: 12 hours at 70 % volume
Weight: 2001 g
USE AND DISPOSAL OF WASTE
Wrapping paper and corrugated paperboard – deliver to scrapyard. Packing foil, PE bags, plastic elements – throw into plastic recycling containers.
PRODUCT DISPOSAL AFTER END OF LIFE
Disposal of electric and electronic equipment (valid in EU member countries and other European countries with an implemented recycling system)
The represented symbol on the product or package means the product shall not be treated as domestic waste. Hand over the product to the specified location for recycling electric and electronic equipment. Prevent negative impacts on human health and the environment by properly recycling your product. Recycling contributes to preserving natural resources. For more information on the recycling of this product, refer to your local authority, domestic waste processing organization or store, where you purchased the product.
Hereby, K+B Progres, a.s. declares that the radio equipment type ECG BTS Elysium X1 is in compliance with Directive 2014/53/EU. The full text of the EU declaration of conformity is available at the following internet address: www.ecg-electro.eu.

08/05

The operating manual is available on internet at www.ecg-electro.eu.
Changes of text and technical parameters are reserved.
SIGURNOSNE UPUTE


Moč: 2× 10 W + 2× 2,5 W
Vstavljena baterija: 8800 mAh
Razpon frekvenc FM: 87,5–108 MHz
Velikost (D × Š × G): 249 × 133 × 141 mm
SR/MNES

- Appui bref: lecture/pause/silence


- Pikaajaline vajutamine: kölari SISSE/VÄLJA lülitamine
- Ekvalaiser
Lühiajaline vajutamine: ekvalaiseri profilide lülitamine


250 69 Klíčany, Czech Rep. e-post: ECG@kbexpert.cz
LT
K+B Progres, a.s.
U Expertu 91 tel.: +420 272 122 111
250 69 Kličany, Czech Rep. el. paštas: ECG@kbexpert.cz
LV
K+B Progres, a.s.
U Expertu 91 tel.: +420 272 122 111
250 69 Klíčany, Czech Rep. e-pasts: ECG@kbexpert.cz


- BTS Elysium X1 Black
- BEZPEČNOSTNÍ POKYNY
- Read carefully and save for future use!
- DESCRIPTION
- Features
- Package contents
- USING THE SYSTEM
- Turn the speaker ON/OFF
- Bluetooth mode
- 1) Bluetooth pairing
- 2) Wireless music playback
- 3) Hands-free paired with your mobile phone
- Accepting an incoming call
- 4) Disconnect an existing Bluetooth connection
- Playing music from micro SD card
- AUX IN mode
- Notes:
- FM tuner
- Card reader
- Intelligent energy-saving feature
- Power bank
- Charging
- TROUBLESHOOTING
- TECHNICAL SPECIFICATIONS
- USE AND DISPOSAL OF WASTE
- PRODUCT DISPOSAL AFTER END OF LIFE
- SIGURNOSNE UPUTE
- LT
- LV
Brand : ECG
Model : BTS Elysium X1
Category : Loudspeaker