Trail Spacer 8 - Bag Vaude - Free user manual and instructions
Find the device manual for free Trail Spacer 8 Vaude in PDF.

User questions about Trail Spacer 8 Vaude
0 question about this device. Answer the ones you know or ask your own.
Ask a new question about this device
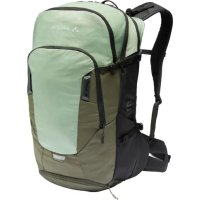
Download the instructions for your Bag in PDF format for free! Find your manual Trail Spacer 8 - Vaude and take your electronic device back in hand. On this page are published all the documents necessary for the use of your device. Trail Spacer 8 by Vaude.
USER MANUAL Trail Spacer 8 Vaude
USER MANUAL/MOUNTAIN BACKPACKS
USER MANUAL
MOUNTAIN BACKPACKS
vaude.com
DEUTSCH....1
ENGLISH....11
FRANÇAIS....21
ITALIANO.... 31
ESPAÑOL....41
中文....52
INHALT
natural_image
Simple line drawing of a bag with a rope tied around it (no text or symbols)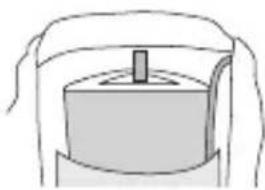
natural_image
Simple line drawing of a container with a lid and handle, no text or symbols presentnatural_image
Line drawing of a backpack with straps and straps (no text or symbols)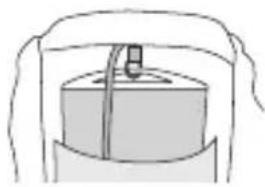
natural_image
Simple line drawing of a cylindrical object inside a container (no text or symbols)DEUTSCH

RUCKSACKDECKEL - SEILHALTERUNG
DEUTSCH

natural_image
Line drawing of two different backpacks with seatbelt covers, one showing front view and the other side profile (no text or symbols)General Instructions....11
How to pack your backpack correctly ....11
Fit and Adjustment ....13
Shoulder Harness Adjustment F.L.A.S.H. NT ....14
Mountain Backpack Features ....15
Hipbelt....15
Backpack Lid – Rope Attachment ....16
Backpack Top Lid –
Adjustable Top Lid Volume Extension ....16
Main Compartment – Side Zip Access ....16
Equipment & Co. – Ice Gear Attachment ....17
Equipment & Co. – Gear Attachment ....17
Equipment & Co. – Crampon Pocket ....18
Equipment & Co. – Side Ski Attachment ....18
Winter Features – Safety Pocket ....18
Winter Features – Snowboard Attachment .....19
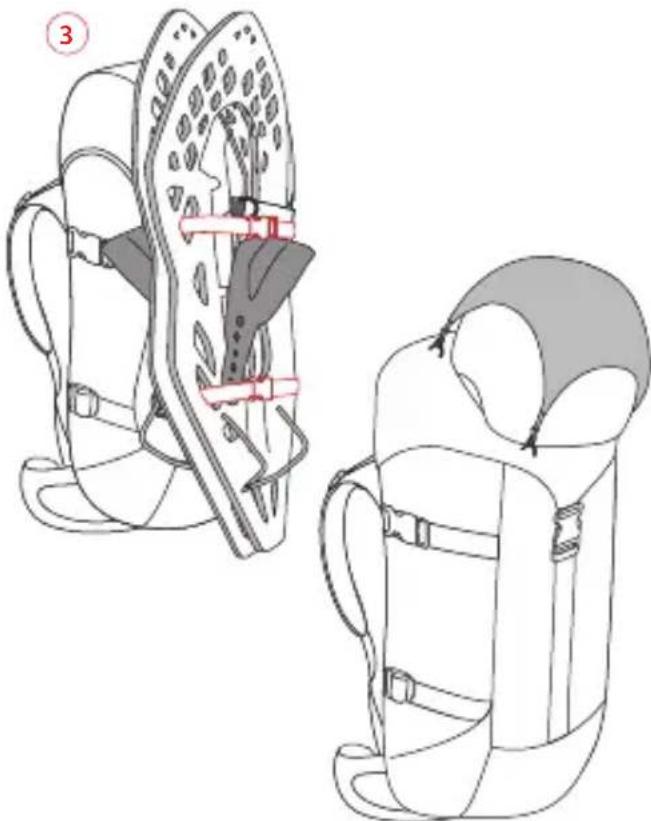
Winter Features – Snowshoe Attachment ....19
Winter Features – Helmet Holder ....20
GENERAL INSTRUCTIONS
HOW TO PACK YOUR BACKPACK CORRECTLY
The rule of thumb is to make sure the loaded pack's center of gravity lies directly above your own.
Heavy items should therefore be packed as close to your back as possible..
-
Lid i Compartment: small; lightweight items of gear that need to be close at hand, e.g. mobile phones, GPS, compass.
-
Main Compartment: Lighter items such as clothing
ENGLISH
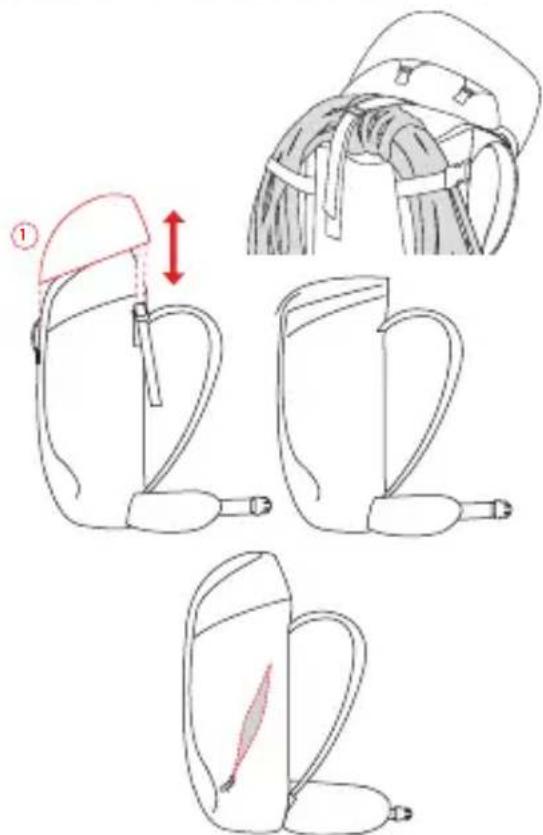
Hydration tube port with top lid closure
natural_image
Line drawing of a bag with a strap and handle, no text or symbols present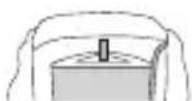
Hydration bladder attachment: velcro
Hydration tube port with front zip closure
natural_image
Line drawing of a backpack with straps and straps (no text or symbols)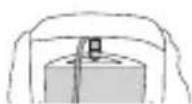
Hydration bladder attachment: hook
should be packed at the bottom, top and on the sides. Heavier items such as climbing equipment (carabiners, wedges, quickdraws), the tent, tinned food or water supplies should be packed in the middle, close in to your back.
-
Bottom Compartment: This is the best place to store lightweight, bulky items that would take up too much room in the main compartment (sleeping bag, dirty laundry bag).
-
Outer Pockets and Mesh Pockets: Room for smaller items (rain jacket, cap, tissues, gloves etc.). Each side should weigh about the same.
-
Map Pocket: Flat outer pocket for easy access to maps, climbing topos and hiking guides.
-
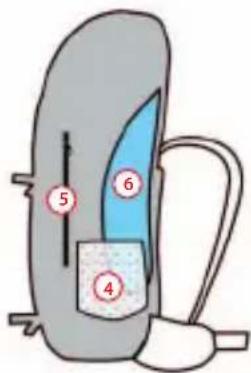
Hydration System: The pocket for the hydration bladder always lies close to your back so that it doesn't offset your center of gravity. The hydration tube port in backpacks with top lids is located underneath the top lid closure. In backpacks with front zip closures, the hydration tube port is found above the shoulder straps.
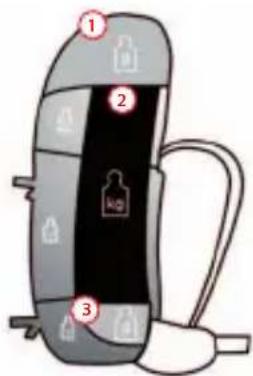
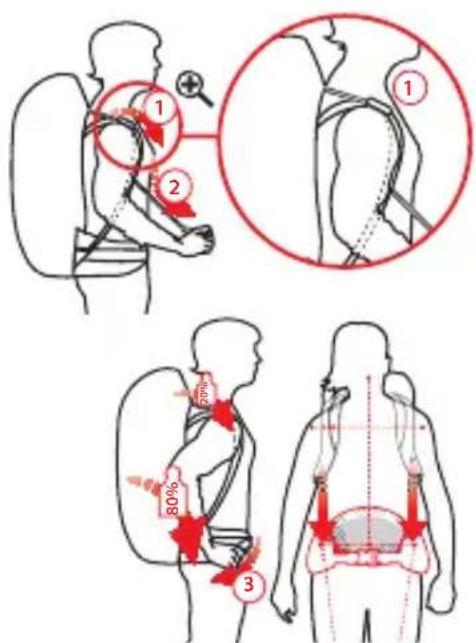
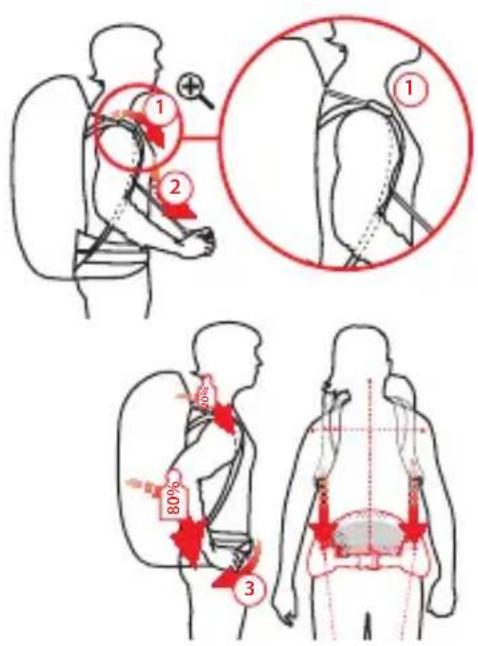
FIT AND ADJUSTMENT
To adjust a loaded backpack, hoist it onto your back and proceed as follows:
- Fasten the shoulder straps and load adjustment straps (1 and 2) and tighten slightly. The buckles and load lifter straps should lie between your collarbone and the top of your shoulder (red arrow). The mid-point of the padded shoulder strap should be about at the top of your shoulders. If this is not the case, adjust the length of the shoulder strap accordingly.
- Raise your shoulders and fasten the hipbelt, then tighten it (3). The hipbelt should straddle your hip-bones and carry about 80% of the pack's weight.
- Loosen the shoulder straps until the entire weight of the pack is resting on your hips. Then tighten the straps gently to stabilize the pack on your shoulders.
-
Pull the load-lifting straps tight. The shoulder straps will lift away from the shoulders slightly and take the weight off this area.
-
Last but not least, slide the sternum strap to a comfortable height (red arrow) and fasten it. Make sure when tightening the strap that the elastic is not overstretched as this may restrict breathing.
ENGLISH
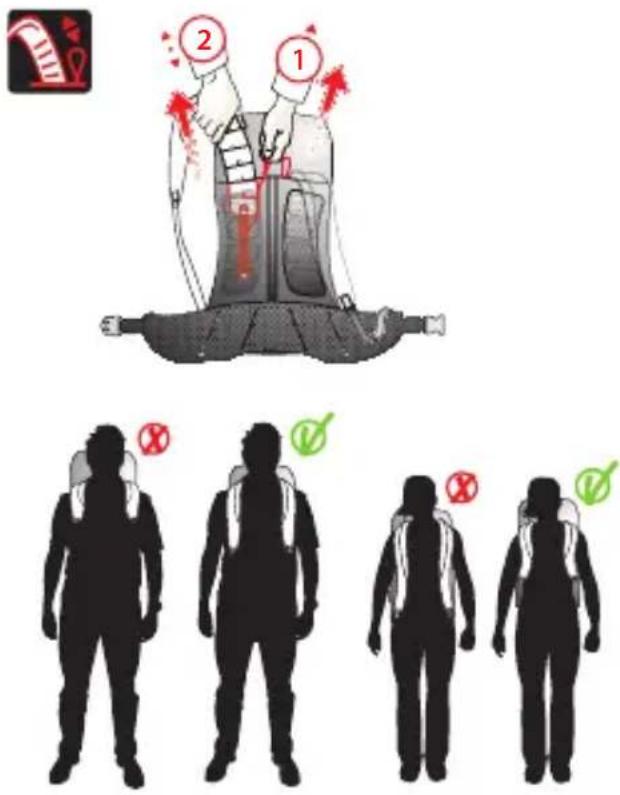
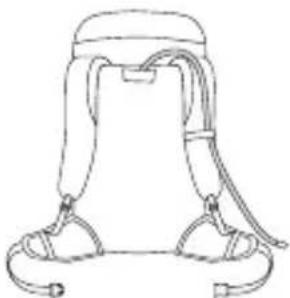
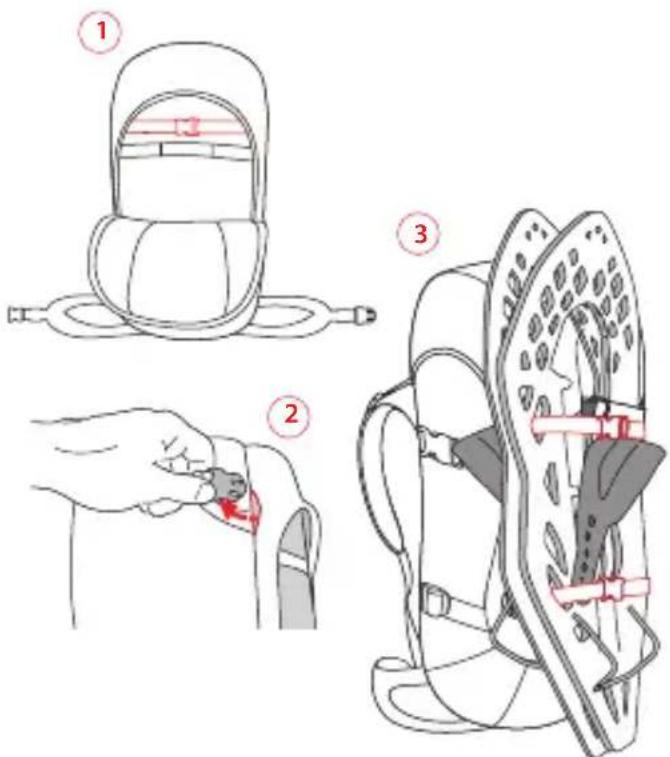
SHOULDER HARNESS ADJUSTMENT F.L.A.S.H. NT
Every person has an individual torso length and shape. With the help of F.L.A.S.H. NT shoulder harness adjustment, the backpack's suspension system can be optimally adjusted to suit your upper body proportions for custom-fi tting carrying comfort.
ADJUSTMENT:
The F.L.A.S.H. NT system has two pull loops that allow you to precisely adjust the length of the shoulder straps quickly, continuously and comfortably for individual torso length comfort. A red pull loop at the point where the shoulder strap exits the pack releases the shoulder strap adjustment. The strap can then be pulled out or inserted as desired (2). To refasten the shoulder strap, release the red pull loop (1). Size indicators underneath the shoulder straps help determine the correct shoulder strap length. Instructions for the precise adjustment of the suspension system can be found on our YouTube channel www.youtube.com/vaudesport
MOUNTAIN BACKPACK FEATURES
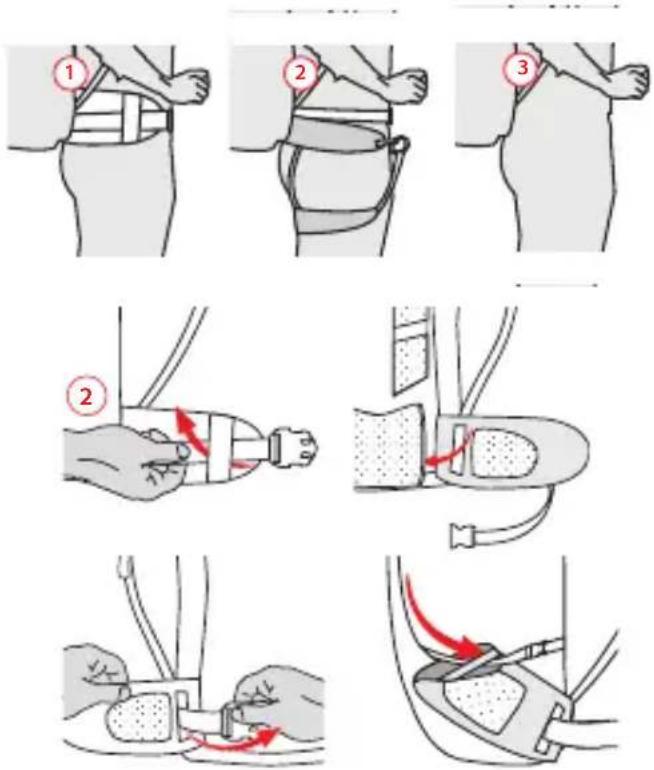
HIPBELT
The VAUDE Mountain Backpack hipbelt can be optimally adjusted for different activities:
- As a standard hipbelt with wide, comfortable hip wings.
- With the hip wings folded back, a webbing belt then secures the backpack. This is especially useful when wearing a harness (only available in the Anatomic Alpine suspension system). Pull the webbing belt out from behind the hip wings, fold the hip wings back or secure them with the lower compression strap.
- Without the hipbelt. The hipbelt can be completely detached. A velcro strap attachment secures the hipbelt within the storage pocket at the back of the pack. First lift the hipbelt and detach the Velcro closure, then pull the complete hipbelt out of its compartment.
ENGLISH

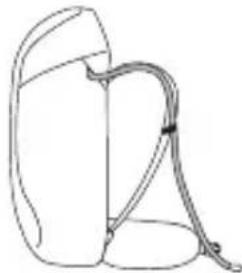
BACKPACK LID - ROPE ATTACHMENT
The rope attachment under the top lid prevents the rope from sliding out from under the lid, and provides more storage space inside the main compartment.
BACKPACK TOP LID – ADJUSTABLE TOP LID VOLUME EXTENSION
By loosening the lid straps, the backpack volume can be expanded by about 10 liters. The lid can also be completely removed when needed, such as for climbers who need more headroom. To remove the lid, unthread the load adjustment straps (1) and then detach the lid from the velcro attachment.
MAIN COMPARTMENT - SIDE ZIP ACCESS
Access to the main compartment is also possible through the side zip.
ENGLISH
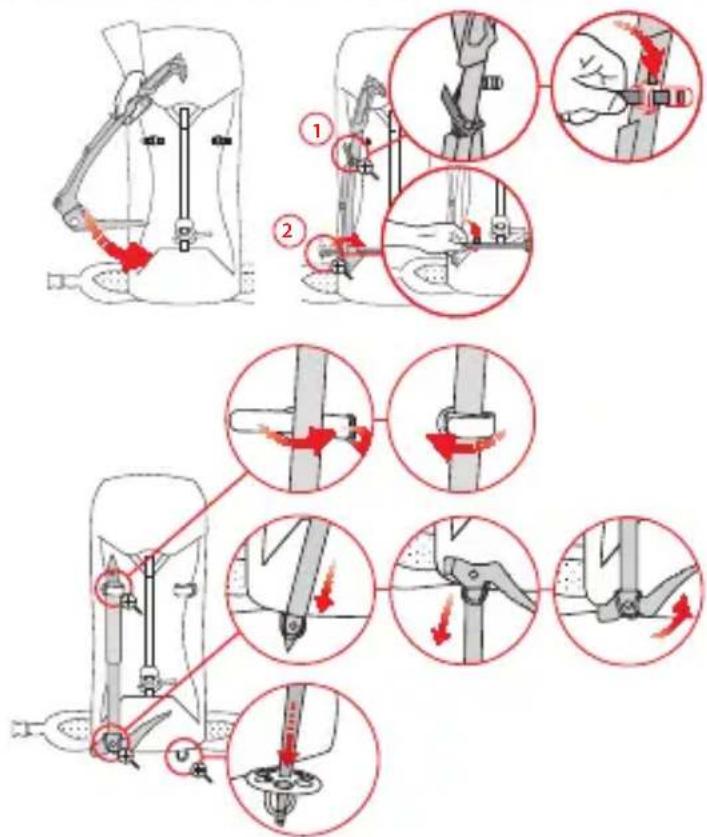
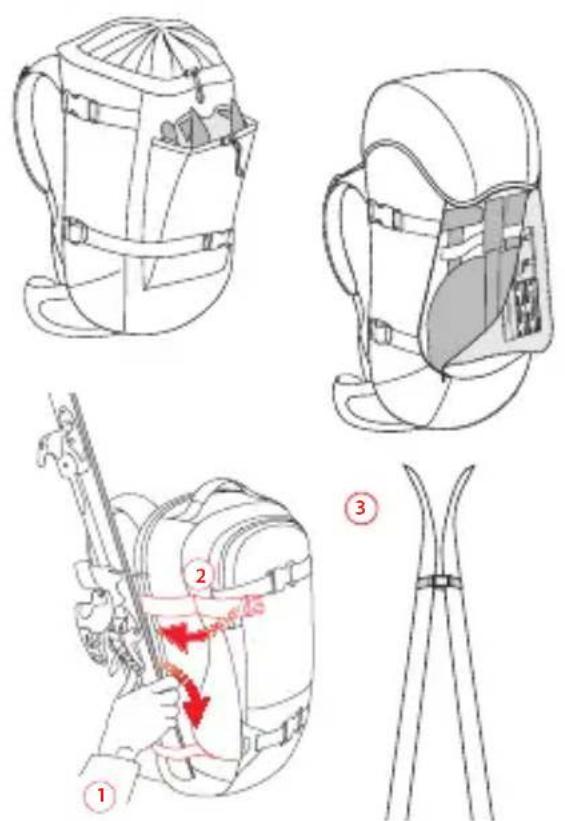
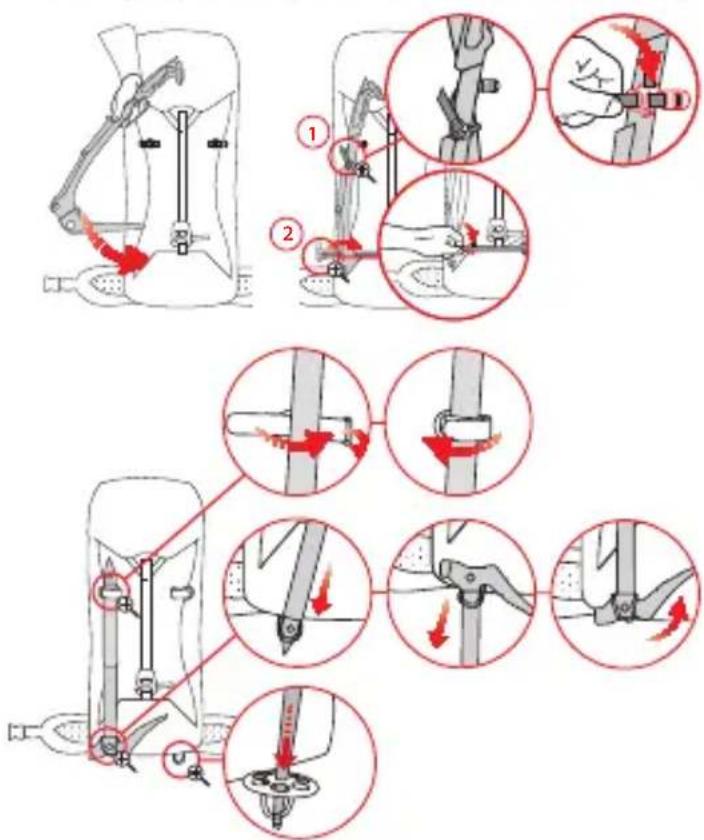
EQUIPMENT & CO. - ICE GEAR ATTACHMENT
Ice tool / ice axe attachment with practical holster for the axe. The tool is inserted into the pocket with the axe side first. The straps are then used to attach the shaft at the top and bottom.
EQUIPMENT & CO. - GEAR ATTACHMENT
Trekking poles are inserted from below into the loop at the bottom of the pack. The shaft is then attached at the top with either a velcro strap or webbing strap.
The shaft of the ice gear is inserted from the top through the loop and then flipped over. Attach the shaft on top with either the velcro strap or webbing strap.
ENGLISH
EQUIPMENT & CO. - CRAMPON POCKET
Additional front pocket for safe storage of crampons or climbing skins.
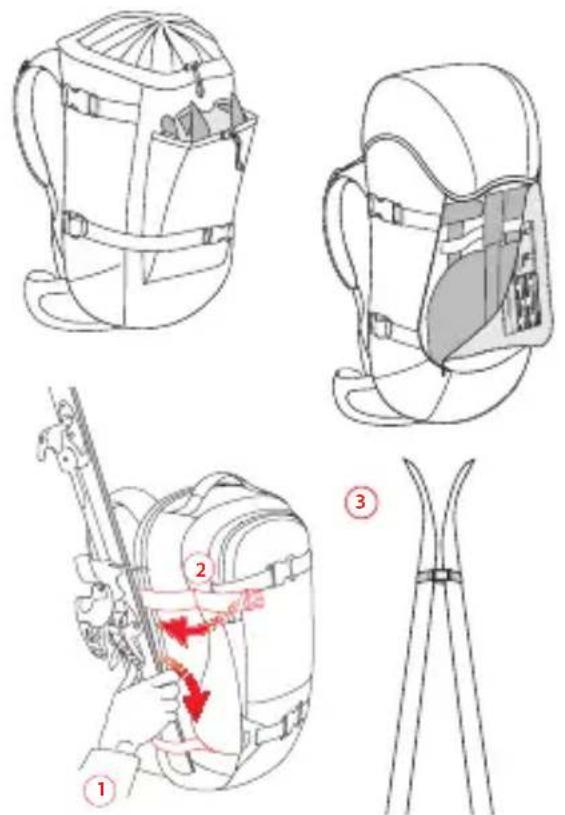
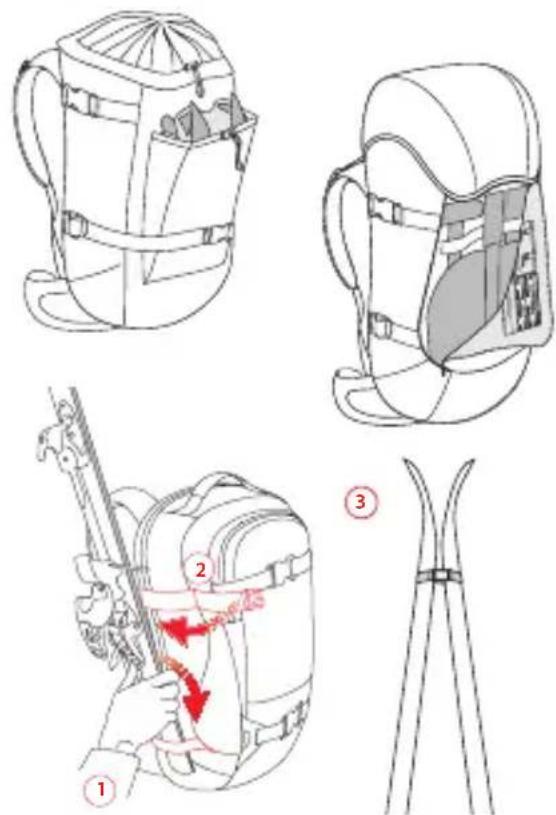
EQUIPMENT & CO. - SIDE SKI ATTACHMENT
Side Ski Attachment
Attach one ski to the left and one to the right side of the pack (1). With the bottom surface against the pack, slide each ski down into the respective lower loop until you reach the ski binding, then tighten the upper compression loop to fi x the ski fi rmly (2).
Tip: Skis are most secure if they are tied together at the top. This prevents them from swinging back and forth. You can do this with an extra piece of cord or strap.
WINTER FEATURES – SAFETY POCKET
Safety Pocket: Probe and shovel are safely stored and also quickly accessed at the front of the backpack. Inside the pocket, elastic drawcord attachment secures the shovel handle and probe to keep them from bumping around.
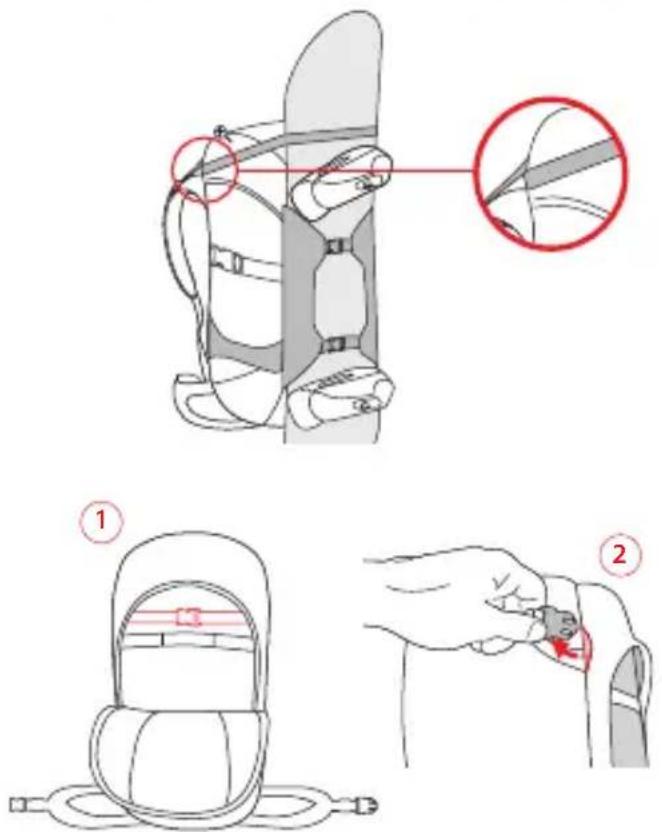
WINTER FEATURES – SNOWBOARD ATTACHMENT
Snowboard attachment straps
Open the straps at the front of the pack and lay the snowboard, with the bottom side facing the pack, onto the backpack. Fasten the straps again and tighten until secure. The upper strap should be just under the binding to prevent the snowboard from sliding down.
Tip: For more legroom on ascents, we recommend using an additional webbing strap to pull the upper part of the snowboard slightly forward. Thread the strap through the load adjusters (1) above the shoulder straps, wrap it around the snowboard and then tighten it.
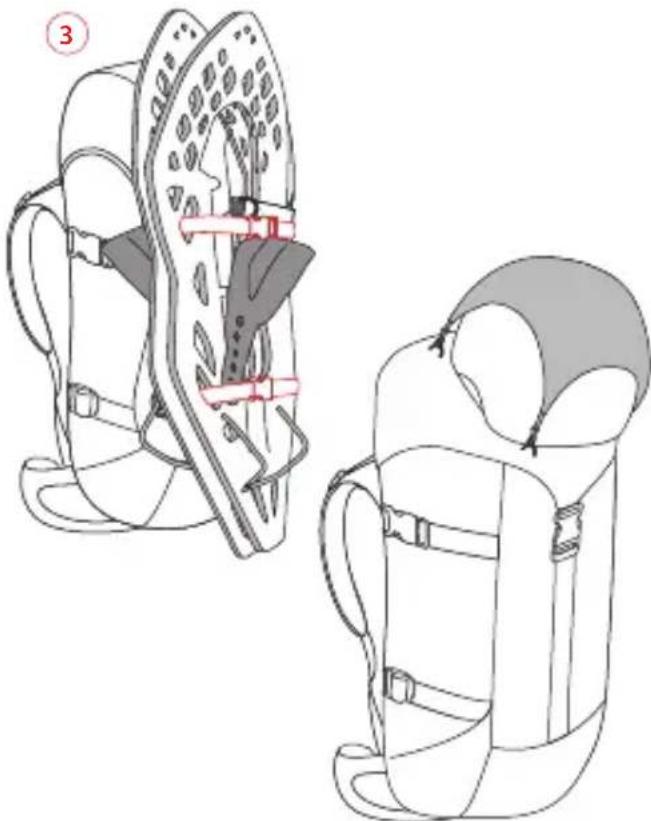
WINTER FEATURES – SNOWSHOE ATTACHMENT
In order to transport snowshoes, open the front pocket (1) and pull out the carrying straps through the side opening of the pocket (2). Close the front pocket again, lay the snowshoes (as depicted) against the backpack,
ENGLISH

natural_image
Line drawing of two different backpacks with seatbelt covers, one showing front view and the other side profile (no text or symbols)thread the straps through the snowshoes and then fasten the buckle (3).
WINTER FEATURES - HELMET HOLDER
Winter backpacks have a detachable helmet holder. The main compartment remains easily accessible even with the helmet attached.
Hook the helmet holder into the grommets at the front or on the lid of the backpack. Slip the helmet underneath and then tighten the straps.
INHALT
Réglages de base 21
Compartment principal –
natural_image
Simple line drawing of a backpack with a rope tied around its neck (no text or symbols)
natural_image
Line drawing of a backpack with straps and straps (no text or symbols)

SYSTÈME DE RÉGLAGE DE LA LONGUEUR DES BRETELLES F.L.A.S.H. NT
FRANÇAIS

OUTILS & CO. - POCHE POUR LES CRAMPONS
FRANÇAIS
natural_image
Line drawing of two different backpacks with seatbelt covers, one showing front view and the other side profile (no text or symbols)SPÉCIAL HIVER -
FIXATION POUR LES RAQUETTES
Zaini Mountain –Features 35
Cinturone a vita 35
Attrezzi & Co. – Portattrezzi 37
Attrezzi & Co. – Scomparto per ramponi ..... 37
Attrezzi & Co. – Portascì laterale 38
Winter specials – Scomparto Safety 38
Winter specials - Portasnowboard 39
Winter specials – Porta racchette da neve ..... 39
Winter specials – Portacasco 40
natural_image
Line drawing of a backpack with straps and feet (no text or symbols)
natural_image
Simple line drawing of a backpack with a rope tied around it (no text or symbols)
ITALIANO

REGOLAZIONE DELLA LUNGHEZZA DEGLI SPALLACI CON F.L.A.S.H. NT
ITALIANO
PATELLA DELLO ZAINO - PORTACORDA
ITALIANO
ATTREZZI & CO. - PORTASCI LATERALE
WINTER SPECIALS – SCOMPARTO SAFETY
ITALIANO
natural_image
Line drawing of two different backpacks with seat covers and straps, no text or symbols presentCompartimento principal –
natural_image
Line drawing of a backpack with a strap and handle (no text or symbols)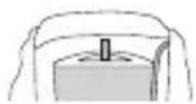
natural_image
Line drawing of a person wearing a full-body helmet and harness (no text or symbols)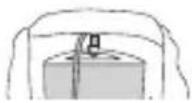
ESPAÑOL
da o la correa de velcro.
natural_image
Diagram of a person wearing a seatbelt with two red circles highlighting specific positions (no text or symbols present)ESPAÑOL
Consejo práctico:
natural_image
Line drawing of a backpack with straps and a hat (no text or symbols)德语
保修
常规设置....52
正确使用背包 52
调整与设置....54
natural_image
Simple line drawing of a bag with a handle and rope, no text or symbols present
饮水袋
饮水管开口处
natural_image
Line drawing of a person wearing a backpack with straps and straps (no text or symbols)
饮水袋
德语
调整与设置
调整设置背包的具体步骤如下:
德语
装备与附件一冰雪装备袋
配备有专门的口袋以放置冰镐的登山装备。
先将手柄插入口袋,再将镐头用织带固定。
装备与附件一装备固定扣
natural_image
Diagram of a person wearing a seatbelt with a magnified inset showing the cable detail (no text or symbols present)冬季特别装配一滑雪单板固定带