CFT63X - Basket CANDY - Free user manual and instructions
Find the device manual for free CFT63X CANDY in PDF.
| Brand | Candy |
| Model | CFT63X |
| Category | Hood |
| Installation type | Wall-mounted or under cabinet |
| Operating mode | Extracting (external evacuation) or recirculating (charcoal filter) |
| Number of speeds | 3 |
| Lighting | Halogen bulb 28 W, socket E14 |
| Grease filter | Washable metal (or disposable paper depending on version) |
| Maintenance grease filter | Monthly cleaning (dishwasher or by hand) |
| Charcoal filter (recirculation) | Yes, replace every 4 months maximum |
| Minimum installation distance | 60 cm (electric cooker), 75 cm (gas or mixed) |
| Safety | Disconnect before maintenance; do not use without filter |
| Power supply | See rating plate (230 V typical) |
| Material | Stainless steel (estimated) |
| Weight | Approximately 8 kg (estimated) |
Frequently Asked Questions - CFT63X CANDY
User questions about CFT63X CANDY
0 question about this device. Answer the ones you know or ask your own.
Ask a new question about this device
Download the instructions for your Basket in PDF format for free! Find your manual CFT63X - CANDY and take your electronic device back in hand. On this page are published all the documents necessary for the use of your device. CFT63X by CANDY.
USER MANUAL CFT63X CANDY
EN Instruction on mounting and use
natural_image
Diagram of two gray rectangular panels placed on a tray, with one panel showing an arrow indicating rotation (no text or symbols)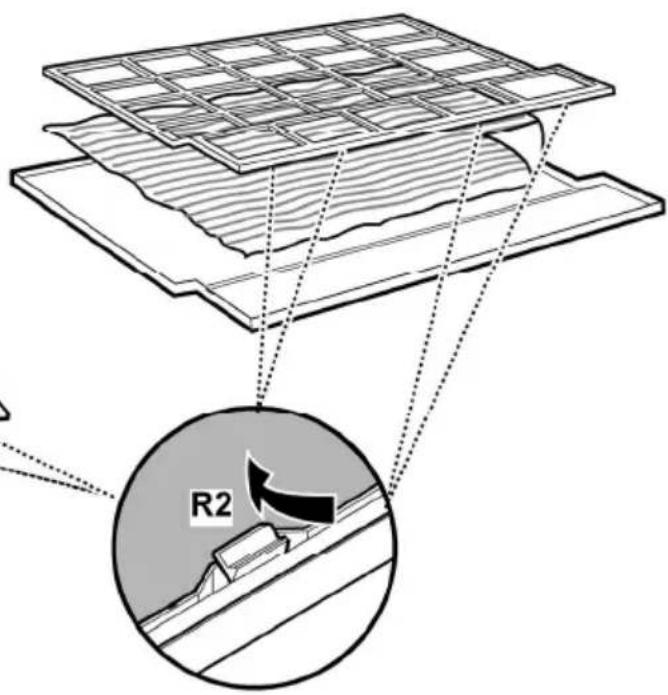
Filtro ai carboni attivi Aktivkohlefilter Charcoal filter Filtre à charbon actif Koolstofffilter Filtro al carbón activo Угольный фильтр
natural_image
Technical diagram of a mechanical component with labeled parts (no readable text or symbols)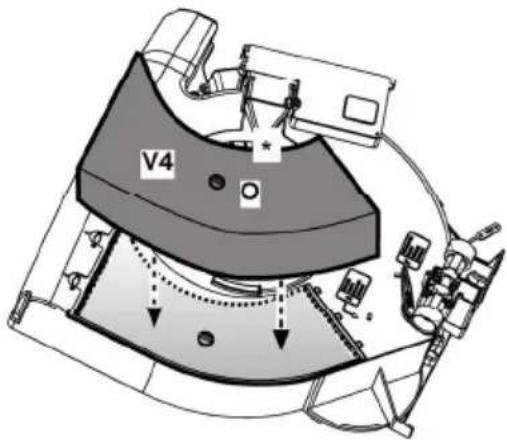
Sostituzione lampada alogena Ersetzten der Halogenlampe Replacing the halogen bulbs Remplacement des lampes halogène Halogeenlamp vervanging Substitución làmparas halógenas Замена галогенной лампы Substituição das lâmpadas de halogéneos Halogeenilampun vaihto Utskifting av halogenpære Byte av halogenlampor Zamjena halogene lampe Výmina halogenového svítidla Wymiana lamp halogenowych Schimbarea becului halogen Halogén izzó cseréje Výmena halogenového svítidla Zamenjivanje halogene lampe Menjava halogene žarnice Заміна галогенної лампочки Halogeninës lempos pakeitimas Halogçna spuldzes maiòa Halogeenlampide vahetamine
حیباصملا لیدبت
natural_image
Illustration of a hand holding a magnifying glass over an open contact lens, with no text or symbols present.EN - Instruction on mounting and use
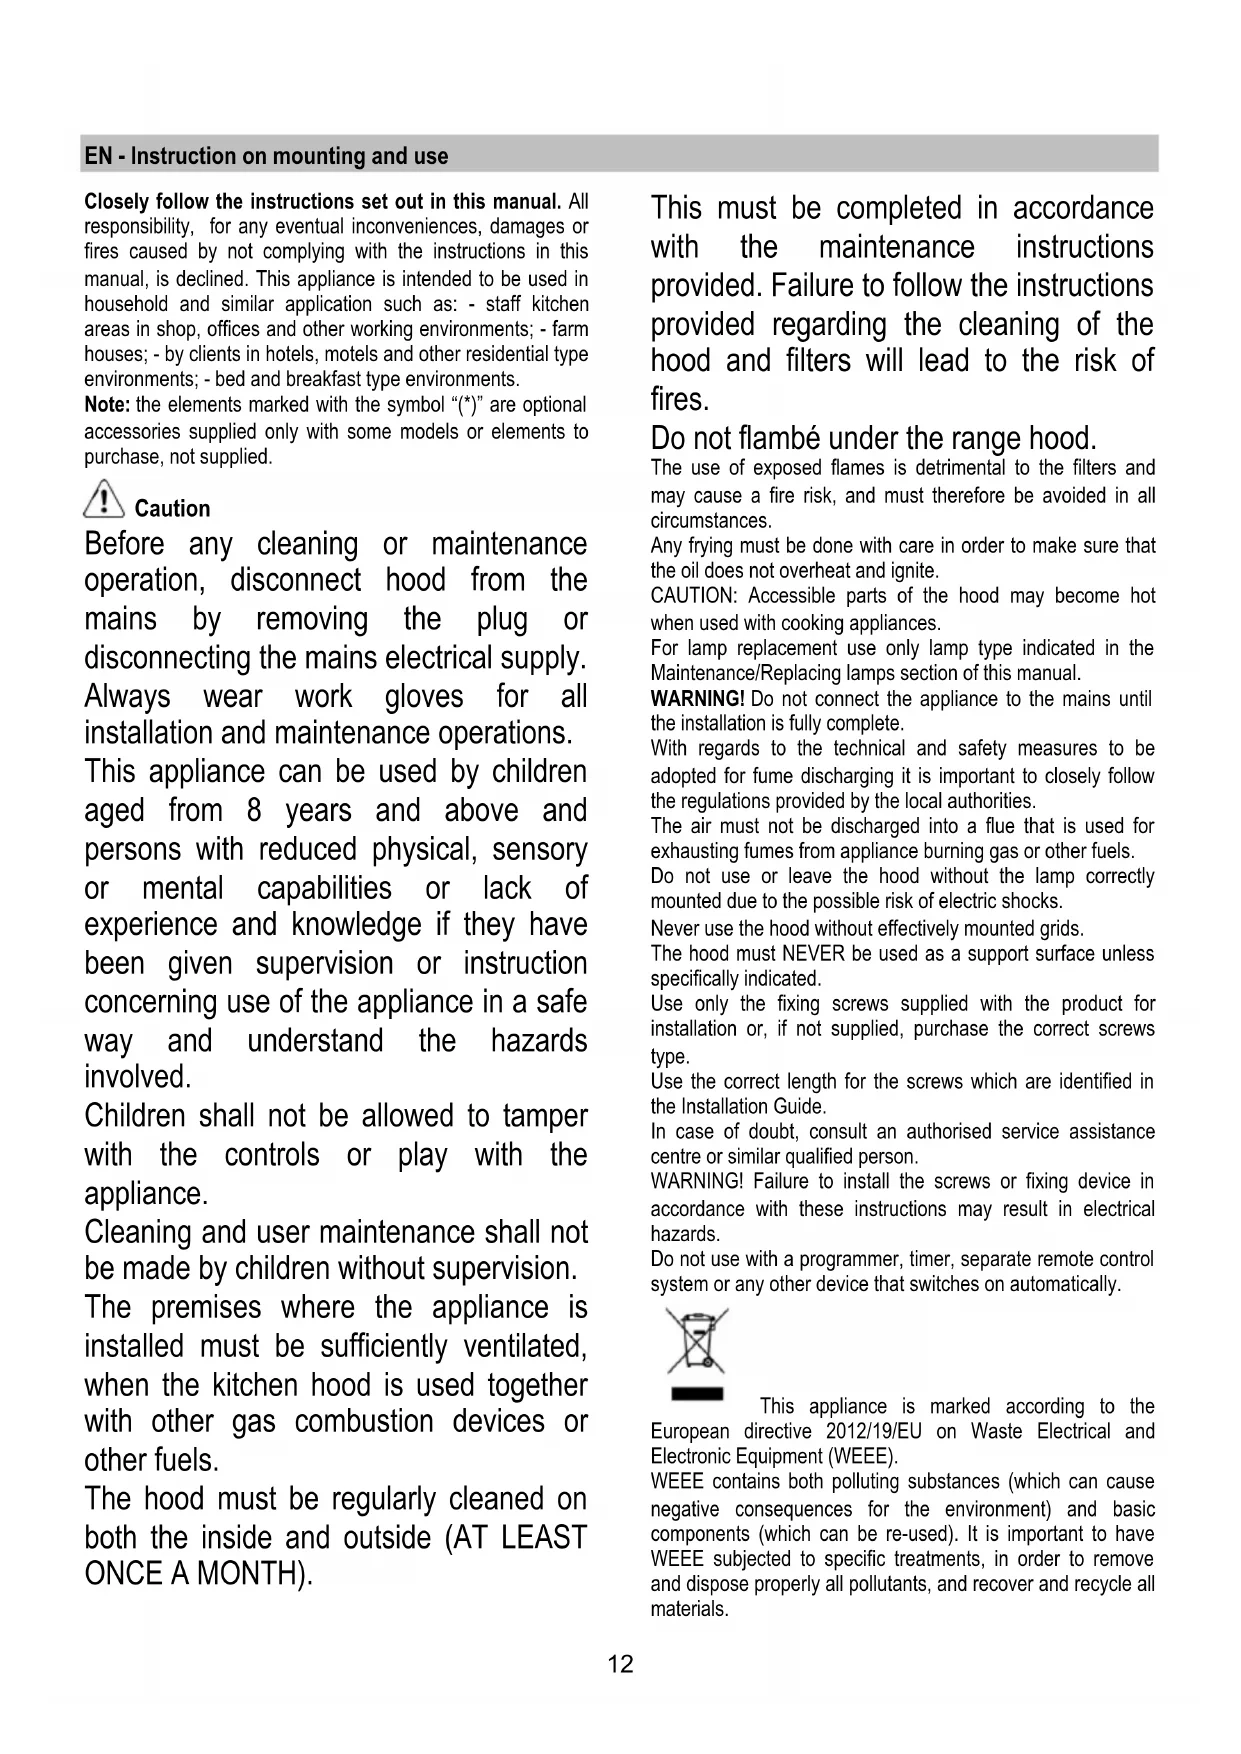
Closely follow the instructions set out in this manual. All responsibility, for any eventual inconveniences, damages or fires caused by not complying with the instructions in this manual, is declined. This appliance is intended to be used in household and similar application such as: - staff kitchen areas in shop, offices and other working environments; - farm houses; - by clients in hotels, motels and other residential type environments; - bed and breakfast type environments.
Note: the elements marked with the symbol “(*)” are optional accessories supplied only with some models or elements to purchase, not supplied.

Caution
Before any cleaning or maintenance operation, disconnect hood from the mains by removing the plug or disconnecting the mains electrical supply. Always wear work gloves for all installation and maintenance operations. This appliance can be used by children aged from 8 years and above and persons with reduced physical, sensory or mental capabilities or lack of experience and knowledge if they have been given supervision or instruction concerning use of the appliance in a safe way and understand the hazards involved.
Children shall not be allowed to tamper with the controls or play with the appliance.
Cleaning and user maintenance shall not be made by children without supervision. The premises where the appliance is installed must be sufficiently ventilated, when the kitchen hood is used together with other gas combustion devices or other fuels.
The hood must be regularly cleaned on both the inside and outside (AT LEAST ONCE A MONTH).
This must be completed in accordance with the maintenance instructions provided. Failure to follow the instructions provided regarding the cleaning of the hood and filters will lead to the risk of fires.
Do not flambé under the range hood.
The use of exposed flames is detrimental to the filters and may cause a fire risk, and must therefore be avoided in all circumstances.
Any frying must be done with care in order to make sure that the oil does not overheat and ignite.
CAUTION: Accessible parts of the hood may become hot when used with cooking appliances.
For lamp replacement use only lamp type indicated in the Maintenance/Replacing lamps section of this manual.
WARNING! Do not connect the appliance to the mains until the installation is fully complete.
With regards to the technical and safety measures to be adopted for fume discharging it is important to closely follow the regulations provided by the local authorities.
The air must not be discharged into a flue that is used for exhausting fumes from appliance burning gas or other fuels.
Do not use or leave the hood without the lamp correctly mounted due to the possible risk of electric shocks.
Never use the hood without effectively mounted grids.
The hood must NEVER be used as a support surface unless specifically indicated.
Use only the fixing screws supplied with the product for installation or, if not supplied, purchase the correct screws type.
Use the correct length for the screws which are identified in the Installation Guide.
In case of doubt, consult an authorised service assistance centre or similar qualified person.
WARNING! Failure to install the screws or fixing device in accordance with these instructions may result in electrical hazards.
Do not use with a programmer, timer, separate remote control system or any other device that switches on automatically.
This appliance is marked according to the European directive 2012/19/EU on Waste Electrical and Electronic Equipment (WEEE).
WEEE contains both polluting substances (which can cause negative consequences for the environment) and basic components (which can be re-used). It is important to have WEEE subjected to specific treatments, in order to remove and dispose properly all pollutants, and recover and recycle all materials.
Individuals can play an important role in ensuring that WEEE does not become an environmental issue; it is essential to follow some basic rules:
— WEEE should not be treated as household waste;
- WEEE should be handed over to the relevant collection points managed by the municipality or by registered companies. In many countries, for large WEEE, home collection could be present.
In many countries, when you buy a new appliance, the old one may be returned to the retailer who has to collect it free of charge on a one-to-one basis, as long as the equipment is of equivalent type and has the same functions as the supplied equipment.
Appliance designed, tested and manufactured according to:
- Safety: EN/IEC 60335-1; EN/IEC 60335-2-31, EN/IEC 62233.
• Performance: EN/IEC 61591; ISO 5167-1; ISO 5167-3; ISO 5168; EN/IEC 60704-1; EN/IEC 60704-2-13; ISO 3741; EN 50564; IEC 62301. - EMC: EN 55014-1; CISPR 14-1; EN 55014-2; CISPR 14-2; EN/IEC 61000-3-2; EN/IEC 61000-3-3. Suggestions for a correct use in order to reduce the environmental impact: Switch ON the hood at minimum speed when you start cooking and kept it running for few minutes after cooking is finished. Increase the speed only in case of large amount of smoke and vapour and use boost speed(s) only in extreme situations. Replace the charcoal filter(s) when necessary to maintain a good odour reduction efficiency. Clean the grease filter(s) when necessary to maintain a good grease filter efficiency. Use the maximum diameter of the ducting system indicated in this manual to optimize efficiency and minimize noise.
By placing the CE marking on this product, we declare, on our own responsibility, compliance to all of European safety, health and environmental requirements stated in the legislation for this product.
Use
The hood is designed to be used either for exhausting or filter version.
Ducting version
The cooker hood has an upper air duct B1 and an optional rear air duct B2*, for external fumes exit.
Select the suitable air duct and apply the flange C supplied, ensure to close the unused hole duct with cap D* supplied if provided.
Note: in some models upper hole B1 is supplied closed: Press firmly to detach the detachable part that closes the outlet hole and remove it.
Attention! The detachable part cannot be mounted in position again. Carry out this operation only if you are sure of the type of installation to make.
Caution! In some models the rear hole duct is not easily accessible, even when the tap (if mounted) is removed, in this case remove the plastic piece E1 or E2 that is blocking the hole duct, by unwinding using pliers and cutter. Check that the filter/suction selector (inside the cooker hood) G is in the suction (A) position.
Filter version
In the case where it is not possible to discharge the cooking fumes externally, the cooker hood may be used in the filter version by fixing a carbon filter, the fumes and vapours are recycled via the anterior grill placed above the control panel. Check that the filter/suction selector (inside the cooker hood) G is in the filter (F) position.
The models with no suction motor only operate in ducting mode, and must be connected to an external suction device (not supplied).
The connecting instructions are supplied with the peripheral suction unit.
Installation
The minimum distance between the supporting surface for the cooking equipment on the hob and the lowest part of the range hood must be not less than 60cm from electric cookers and 75cm from gas or mixed cookers.
If the instructions for installation for the gas hob specify a greater distance, this must be adhered to.

Electrical connection
The mains power supply must correspond to the rating indicated on the plate situated inside the hood. If provided with a plug connect the hood to a socket in compliance with current regulations and positioned in an accessible area, after installation. If it not fitted with a plug (direct mains connection) or if the plug is not located in an accessible area, after installation, apply a double pole switch in accordance with standards which assures the complete disconnection of the mains under conditions relating to over-current category III, in accordance with installation instructions.
Warning! Before re-connecting the hood circuit to the mains supply and checking the efficient function, always check that the mains cable is correctly assembled.
Warning! If the supply cord is damaged, it must be replaced by the manufacturer, its service agent or similarly qualified persons in order to avoid hazard.
Mounting
The cooker hood may be installed on the wall or on the base of a cabinet; if supplied, use the hole gauge H to drill the correct distance, otherwise lean the cooker hood on the wall or on the base of the cabinet and mark the holes with a pencil.
Wall mounting - Insert the wall screw anchors J in the drilled holes and the two K screws in the upper drill holes, remove the grill and hook the cooker hood to the 2 screws, finally from the inside, insert the third screw L and lock them all in.
Cabinet fixing - Affix the cooker hood with the 4 M screws from inside the cabinet.
Operation
The hood is fitted with a control panel with aspiration speed selection control and a light switch to control cooking area lights.
Always open the vapour catcher N*.
If your product is provided with an electrically or mechanically activated valve, the keys and/or the buttons and/or the handles available are for controlling the lights and for opening and closing the valve.
Maintenance
Cleaning
Clean using ONLY the cloth dampened with neutral liquid detergent. DO NOT CLEAN WITH TOOLS OR INSTRUMENTS. Do not use abrasive products. DO NOT USE ALCOHOL!
Grease filter
Traps cooking grease particles.
If situated inside the support grill, it may be one of the following types:
Paper filter must be replaced once a month or if colouring appears on upper side, in such cases the colouring is evident through the grill openings.
Metallic filter must be cleaned once a month, with non abrasive detergents, by hand or in dishwasher on low temperature and short cycle.
When washed in a dishwasher, the grease filter may discolour slightly, but this does not affect its filtering capacity.
In order to remove the grease filter open the grill via the P hooks and free the R1 or R2 stoppers.
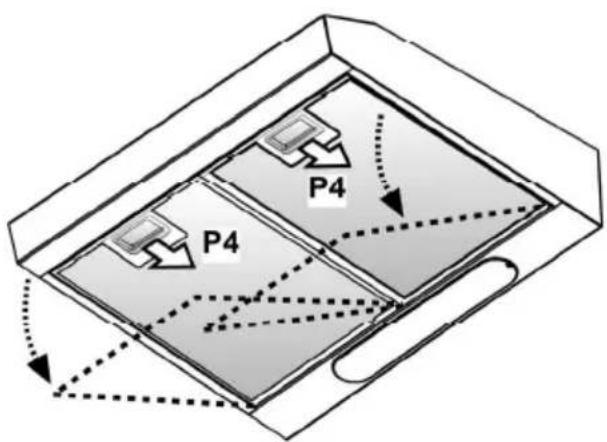
The self-supporting metal filter does not include a support grill, in order to remove the filter – pull the release springs P4 backwards and slide the filter downwards.
Charcoal filter (filter version only)
It absorbs unpleasant odours caused by cooking.
The saturation of the charcoal filter occurs after more or less prolonged use, depending on the type of cooking and the regularity of cleaning of the grease filter.
In any case it is necessary to replace the cartridge at least every four months.
The charcoal filter may NOT be washed or regenerated.
It may be one of the following types:
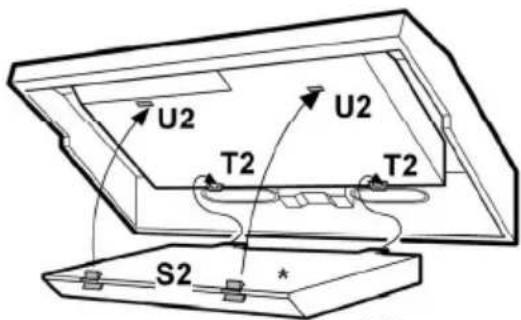
Rectangular S1 or S2 or S3:
Mounting (S1 or S2) : insert the rear side T and hook further to the front (U).
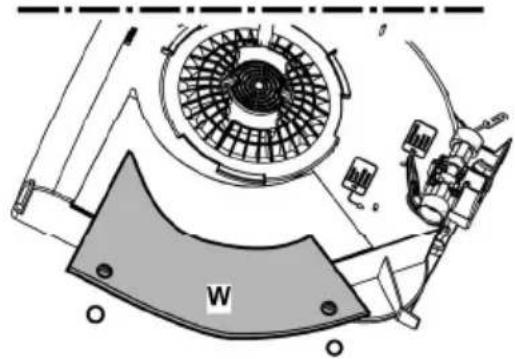
Mounting (S3): Remove the cover W by rotating the O knobs to 90°, fit the filter inside and lock in place with the central knob O, then close the cover.
Proceed in the inverse for dismounting.
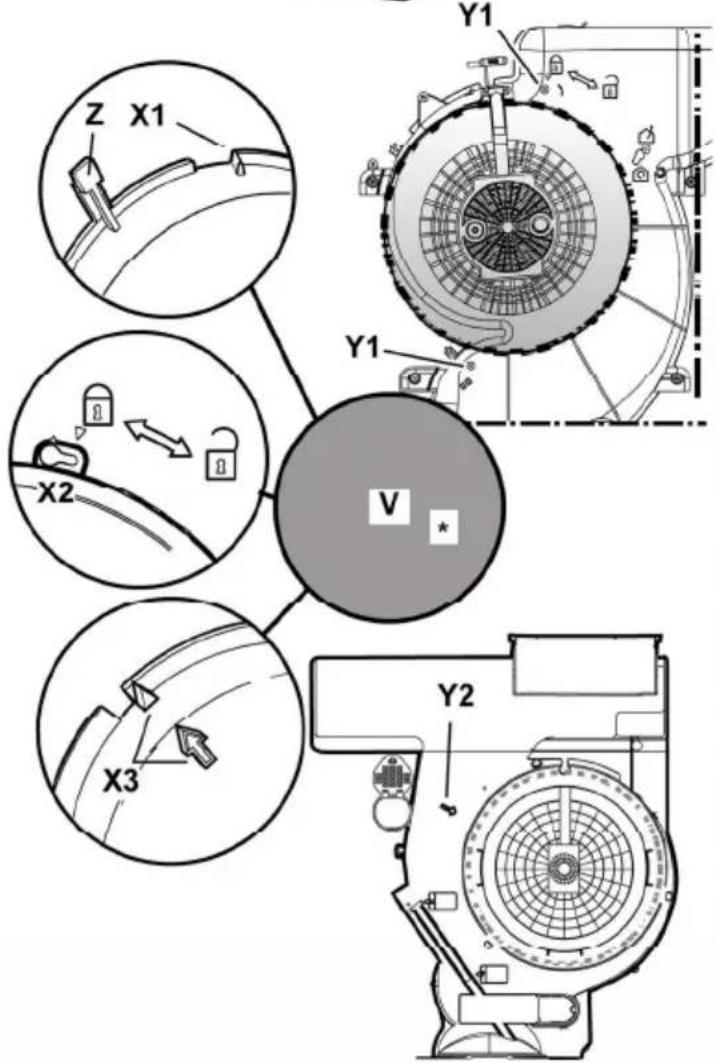
Circular (V1-V2-V3-various models):
Bayonet mount position the filter in the middle of the motor protection grill covering ensuring that the reference to X1 or X2 or X3 on the carbon filter match the Y1 or Y2 references
on the conveyor, then turn clockwise; in case of dismounting turn anticlockwise, if provided with a Z tape remember to gently lift first.
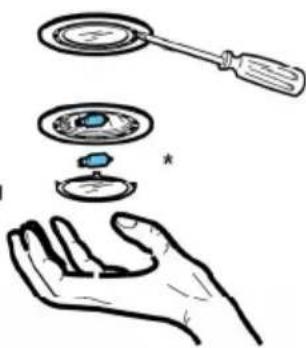
Replacing lamps
Disconnect the appliance from the electricity.
Warning! Prior to touching the light bulbs ensure they are cooled down.
Replace the old light bulb with the one of the same type as specified in the feature label or near the light lamp on the hood.
Replace the damaged lamp.
Use ∅35mm E14 28W halogen candle lamps only.
If the lights do not work, make sure that the lamps are fitted properly into their housings before you call for technical assistance.
Rechthoekig S1 of S2 of S3: