
VL 8632 - Fan SEVERIN - Free user manual and instructions
Find the device manual for free VL 8632 SEVERIN in PDF.
| Product type | Pedestal fan |
| Brand | SEVERIN |
| Model | VL 8632 |
| Supply voltage | 220-240 V ~ 50 Hz |
| Number of speeds | 4 (including off) |
| Oscillation | Yes, button-controlled |
| Tilt | Manually adjustable, auto-locking |
| Protective grille | Yes, lockable with collar |
| Adjustable height | Yes, extendable tube with clamping ring |
| Base type | Cross base with protective covers |
| Cleaning | Dry, lint-free cloth |
| Warranty | 2 years |
| Usage | Indoor use only |
| Customer service | Authorized centers |
| Spare parts | Available through after-sales service |
Frequently Asked Questions - VL 8632 SEVERIN
User questions about VL 8632 SEVERIN
0 question about this device. Answer the ones you know or ask your own.
Ask a new question about this device
Download the instructions for your Fan in PDF format for free! Find your manual VL 8632 - SEVERIN and take your electronic device back in hand. On this page are published all the documents necessary for the use of your device. VL 8632 by SEVERIN.
USER MANUAL VL 8632 SEVERIN
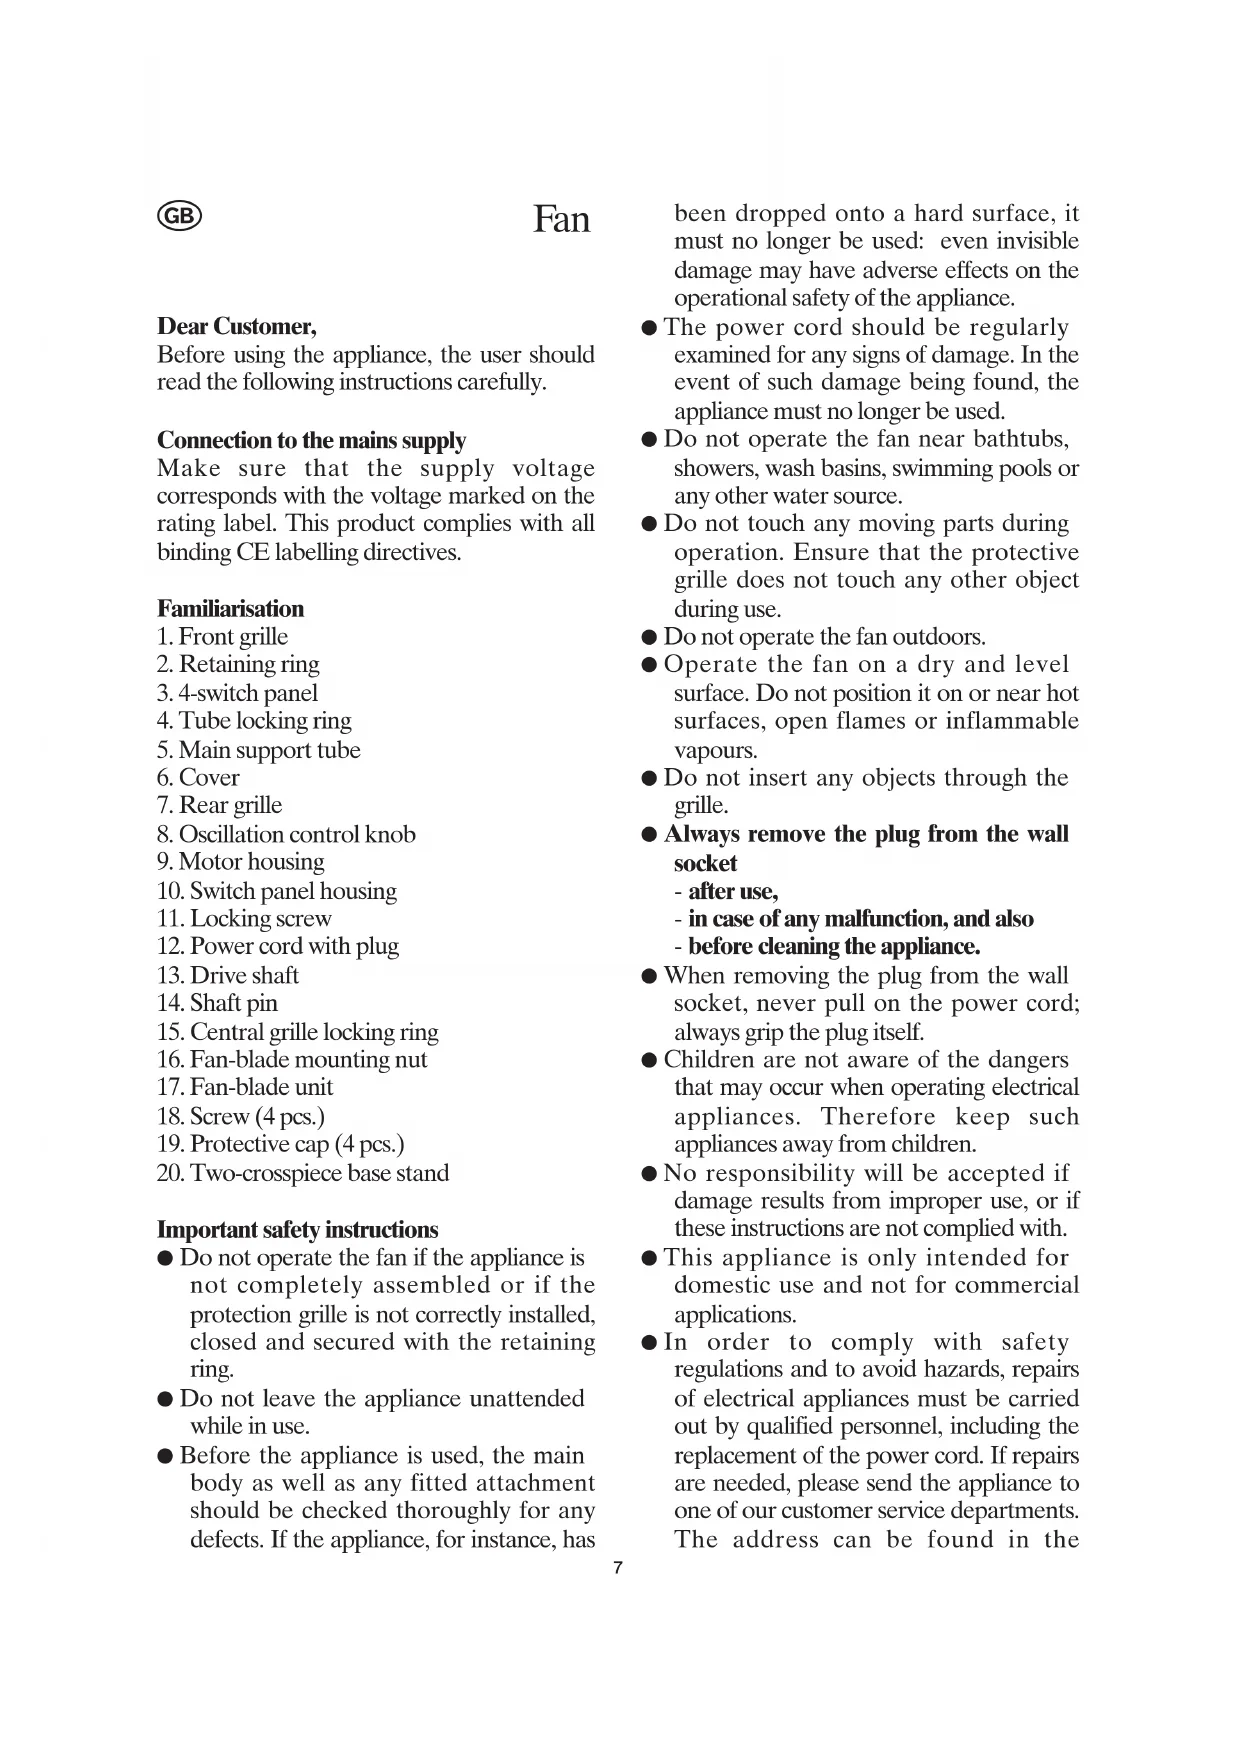
text_image
Labeled diagram of a desktop fan with numbered parts and zoomed-in insets for detailed details.D
Ventilator
Before using the appliance, the user should read the following instructions carefully.
Connection to the mains supply
Make sure that the supply voltage corresponds with the voltage marked on the rating label. This product complies with all binding CE labelling directives.
Familiarisation
- Front grille
- Retaining ring
- 4-switch panel
- Tube locking ring
- Main support tube
- Cover
- Rear grille
- Oscillation control knob
- Motor housing
- Switch panel housing
- Locking screw
- Power cord with plug
- Drive shaft
- Shaft pin
- Central grille locking ring
- Fan-blade mounting nut
- Fan-blade unit
- Screw (4 pcs.)
- Protective cap (4 pcs.)
- Two-crosspiece base stand
Important safety instructions
- Do not operate the fan if the appliance is not completely assembled or if the protection grille is not correctly installed, closed and secured with the retaining ring.
- Do not leave the appliance unattended while in use.
● Before the appliance is used, the main body as well as any fitted attachment should be checked thoroughly for any defects. If the appliance, for instance, has
been dropped onto a hard surface, it must no longer be used: even invisible damage may have adverse effects on the operational safety of the appliance.
● The power cord should be regularly examined for any signs of damage. In the event of such damage being found, the appliance must no longer be used.
- Do not operate the fan near bathtubs, showers, wash basins, swimming pools or any other water source.
- Do not touch any moving parts during operation. Ensure that the protective grille does not touch any other object during use.
- Do not operate the fan outdoors.
- Operate the fan on a dry and level surface. Do not position it on or near hot surfaces, open flames or inflammable vapours.
- Do not insert any objects through the grille.
● Always remove the plug from the wall socket
- after use,
- in case of any malfunction, and also
- before cleaning the appliance.
- When removing the plug from the wall socket, never pull on the power cord; always grip the plug itself.
● Children are not aware of the dangers that may occur when operating electrical appliances. Therefore keep such appliances away from children. - No responsibility will be accepted if damage results from improper use, or if these instructions are not complied with.
● This appliance is only intended for domestic use and not for commercial applications. - In order to comply with safety regulations and to avoid hazards, repairs of electrical appliances must be carried out by qualified personnel, including the replacement of the power cord. If repairs are needed, please send the appliance to one of our customer service departments. The address can be found in the
appendix to this manual.
Before using the appliance for the first time
Remove all packaging completely before the appliance is used for the first time.
Fan-blade unit and grille assembly
- Remove the central grille locking ring from the motor housing by turning it anti-clockwise.
- Put the rear grille in position. The two alignment pins on the motor housing must fit into the corresponding slots in the rear grille.
- Fit the central grille locking ring and turn it clockwise to tighten it.
- Push the fan-blade unit onto the drive shaft; ensure that the pin on the shaft is properly engaged in the corresponding recess on the unit.
- Fit the fan-blade mounting nut and turn it anti-clockwise to tighten it.
- Place the retaining ring onto the rim of the rear grille. (The retaining ring locking screw may have to be loosened).
- Place the front grille in front of the rear grille into the retaining ring and tighten the retaining ring screw. Ensure that both grille rims are correctly positioned in each of the corresponding recesses inside the retaining ring.
Tube-assembly mounting
- Place the protective caps on each end of the base crosspieces. The ends may be compressed to facilitate fitting the caps, which click audibly into place.
- Fit the two parts of the base stand into each other.
- Loosen the screws on the base stand.
- Fit the main support tube and secure it with the screws on to the base stand.
- Turn the tube locking ring anti-clockwise to loosen it and push the cover down the main supporting tube until it sits firmly on the base stand.
- Pull out the inner support tube as far as desired; then fit the tube locking ring
and turn it clockwise to tighten it.
- Fit the motor housing onto the tube assembly and secure it by tightening the locking screw.
Operation
- Insert the plug into a suitable wall socket.
- To adjust the tilt angle of the fan head, simply push the head upwards or downwards. The fan head assembly automatically locks into its various positions.
- In addition, the oscillation function can be engaged by pushing the control knob in.
- The fan speed is adjustable by means of the four separate switches in the switch panel. At the '0' setting, the fan is switched off.
General Care and Cleaning
- Remove the plug from the wall socket before cleaning.
● To avoid the risk of electric shock, do not clean the appliance with water and do not immerse it in water. - Do not use abrasives or harsh cleaning solutions.
- If it becomes necessary, clean the fan with a dry lint-free cloth only.
Disposal
Do not dispose of old or defective appliances in domestic garbage; this should only be done through public collection points.
Guarantee
This product is guaranteed against defects in materials and workmanship for a period of two years from the date of purchase. Under this guarantee the manufacturer undertakes to repair or replace any parts found to be defective, providing the product is returned to one of our authorised service centres. This guarantee is only valid if the appliance has been used in accordance with the instructions, and provided that it has not
been modified, repaired or interfered with by any unauthorised person, or damaged through misuse.
This guarantee naturally does not cover wear and tear, nor breakables such as glass and ceramic items, bulbs etc. If the product fails to operate and needs to be returned, pack it carefully, enclosing your name and address and the reason for return. If within the guarantee period, please also provide the guarantee card and proof of purchase.
F
Ventilateur
Chère Cliente, Cher Client,
Czech Republic / Slowak Republic
ARGO spol. s r.o.
Žihobce 137
CZ 342 01 Sušice
Tel.: +376 597 197
Fax: +376 597 197
Narva: CENTRALSERVICE,
Tallinna 6A, tel: 35 60 708
Haapsalu: Teco KM OÜ,
Jalaka 1A, tel: 47 56 900
Pikk 1B, tel: 45 55 978
Bahar Administration and
Commercial Center
No. 668, 7th Floor, Ave.
South Bahar
TEHRAN-IRAN
Tel.: 009821-7516483
e-mail: info@iranseverin.com
Internet: www.iranseverin.com
Italia
via Dino Col 52r-54r-56r,
I - 16149 Genova
Green Number: 800240279
Tel.: 010/6 45 11 02 - 01041 86 09
Fax: 010/6 42 50 09
e-mail: videoelettronica@panet.it
Jordan
F.A. Kettaneh
P.O. Box 485
Amman, 11118, Jordan
Tel: 00962-6-439 8642
e-mail: app@kettaneh.com.jo
Korea
Euko Trading
Namho B/D 3F, 194-6,
Neungpyeong-Ri
Opo.Eup, Gwangju-Si,
Kyunggi-do
Korea 464 892
Tel: +82-31-714 5394
Fax: +82-31-714 8394
Service Hotline: 080-001-0190
Latvia
SERVO Ltd.
Mr. Janis Pivovarenoks
Tel: +371 7279892
servo@apollo.lv
Lebanon
The Right Angle S.A.L.
Boulos Building
Hazmieh- Damascus Highway
P.O. Box 1656-09
BEIRUT, Lebanon
Tel.: 05-952 162 and 3
Fax: 05-950 190
e-mail: rightangle@inco.com.lb
Luxembourg
Ser-Tec
Serbia and Montenegro
tel: +381-21-524-638
tel: +381-21-553-594
fax: +381-21-522-096
Finland
Oy Harry Marcell Ab
Rälssitie 6, PL 63
01511 Vantaa