
SACT2002I - Toaster SHARP - Free user manual and instructions
Find the device manual for free SACT2002I SHARP in PDF.
| Product type | Toaster |
| Brand | Sharp |
| Model | SACT2002I |
| Power supply | 220-240 V ~ 60 Hz |
| Power | 850 W |
| Weight | 1.8 kg |
| Dimensions (approx.) | 30 x 20 x 25 cm |
| Slots | Extra-wide with self-adjusting slides |
| Number of slots | 2 |
| Browning control | 7 levels (1-7) |
| Functions | Toasting, defrost (DEFROST), reheat (REHEAT), cancel (CANCEL) |
| Built-in lift | Yes, to lift toasted food |
| Crumb tray | Yes, removable, located at the back |
| Indicator lights | For DEFROST, REHEAT and CANCEL functions |
| Automatic shut-off | Yes, at the end of cycle |
| Power cord | Short, to reduce risks |
| Safety | Do not immerse the appliance, hot surface, supervision required for children |
| Maintenance | Clean the crumb tray regularly, do not use abrasives |
| Non-user-serviceable parts | Yes, repair by authorized personnel only |
| Warranty | Keep the receipt, return to place of purchase |
| Use | Household use only |
Frequently Asked Questions - SACT2002I SHARP
User questions about SACT2002I SHARP
0 question about this device. Answer the ones you know or ask your own.
Ask a new question about this device
Download the instructions for your Toaster in PDF format for free! Find your manual SACT2002I - SHARP and take your electronic device back in hand. On this page are published all the documents necessary for the use of your device. SACT2002I by SHARP.
USER MANUAL SACT2002I SHARP
Important Safeguards
When using electrical appliances, basic safety precautions should always be followed, including the below:
- To protect against fire, electric shock and injury to persons do not immerse cord, plug, or in water or other liquid.
- Unplug from outlet when not in use and before cleaning. Allow to cool before putting on or taking off parts, and before cleaning the appliance.
- Do not operate any appliance with a damaged cord or plug or after the appliance malfunctions, or has been damaged in any manner. Return appliance to an authorized service facility for examination, repair or adjustment.
- The use of accessories not recommended by the appliance manufacturer as it may result in fire, electric shock or injury to persons.
- Do not use outdoors.
- Do not let cord hang over edge of table or counter, or touch hot surface.
- Do not place on or near a hot gas or electric burner, or in a heated oven.
- Do not use appliance for other than intended use.
- Do not clean container with cleansers, steel wool pads, or other abrasive material.
- To disconnect, turn/press any control to "Off", remove plug from the power socket. Always hold the plug. But never pull the cord.
- Some parts of appliance are hot when operated, so do not touch with your hand. Use handles or buttons, dial controls only.
- Close supervision is necessary when any appliance is used by or near children
- Children should not to play with the appliance.
- Appliances can be used by persons with reduced physical, sensory or mental capabilities or lack of experience and knowledge if they have been given supervision or instruction concerning use of the appliance in a safe way and if they understand the hazards involved.
- This appliance is intended for household use only.
- To reduce the risk of fire or electric user shock, do not attempt to disassemble the product. There are no user-serviceable parts inside. Repair should be done only by authorized service personnel.
Electrical Cord
a) A short power-supply cord (or detachable power-supply cord) is to be provided to reduce the risk resulting from becoming entangled in or tripping over a longer cord
b) Longer detachable power-supply cords or extension cords are available and may be used if care is exercised in their use.
c) If a long detachable power-supply cord or extension cord is used:
-
The marked electrical rating of the detachable power-supply cord or extension cord should be at least as great as the electrical rating of the appliance.
-
The longer cord should be arranged so that it will not drape over the countertop or tabletop where it can be pulled on by children or tripped over.
Information on Disposal for Users (private households)
1. In the European Union
Attention: If you want to dispose of this equipment, please do not use the ordinary dust bin!
Used electrical and electronic equipment must be treated separately and in accordance with legislation that requires proper treatment, recovery and recycling of used electrical and electronic equipment.
Following the implementation by members states private households within the EU states may return their used electrical and electronic equipment to designated collection facilities free of charge*.
In some countries* your local retailer may also take back your old product free of charge if you purchase a similar new one.
*Please contact your local authority for further details.
If your used electrical or electronic equipment has batteries or accumulators, please dispose of these separately beforehand according to local requirements.
By disposing of this product correctly you will help ensure that the waste undergoes the necessary treatment, recovery and recycling and thus prevent potential negative effects on the environment and human health which could otherwise arise due to inappropriate waste handling.
2. In other Countries outside the EU
If you wish to discard this product, please contact your local authorities and ask for the correct method of disposal.
For Switzerland: Used electrical or electronic equipment can be returned free of charge to the dealer, even if you don't purchase a new product. Further collection facilities are listed on the homepage of www.swico.ch or www.sens.ch.
Part Names
Product may vary slightly from what is illustrated
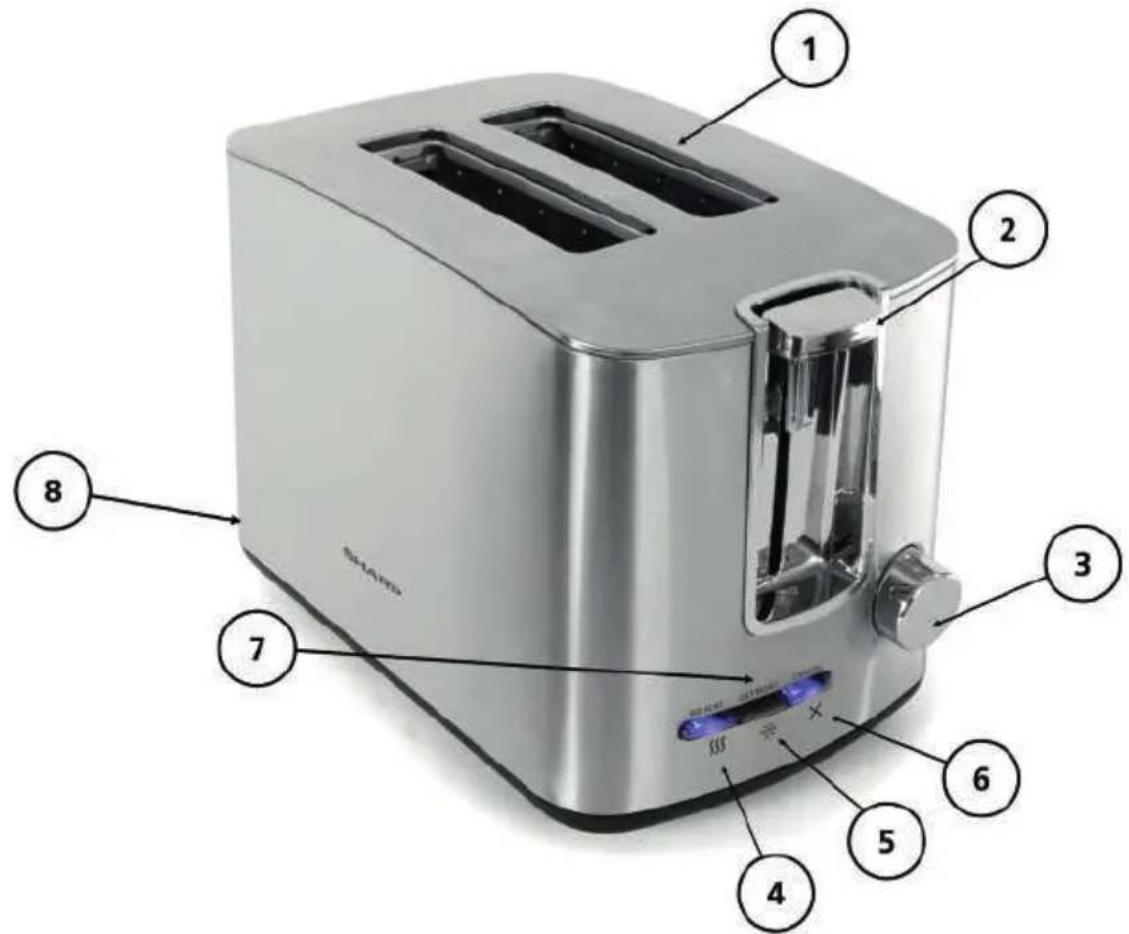
- Extra-wide slots with self-adjusting guides
- Toast control lever
- Toast shade selector knob
- REHEAT button ( $
5.DEFROST button(
6. CANCEL button (X
7. Function indicator lights
8. Removable crumb tray (back of unit)
Getting Started
- Remove all packing material, labels and any stickers.
- Place slide out crumb tray in slot located in back.
- Place toaster on a flat, level surface, where the top of the unit has enough space for the heat to flow without damaging the cabinets or walls.
- Remove tie from cord and unwind.
- Plug unit into electrical outlet.
Built-in Toast Control Lever Rise
This toaster has a built-in toast control lever rise. If toasted food does not clear the top of the toaster use the toast control lever to raise the food for easy removal.
Using your Toaster
Be sure to make defrost or reheat selections immediately after pressing the toast control lever.
- Adjust the toast shade selector knob to the desired setting (1-7).
Note: When using for the first time, select setting 4. Re-adjust the setting to suit your personal preference on successive tasting operations.
Hint: When toasting thin sliced breads, use a lighter setting than you would normally select.
-
Place sliced bread or other foods into the slots and press the toast control lever down until it locks into place. The bread guides will automatically adjust to hold the food in place.
-
When selecting DEFROST or REHEAT function, you must press the toast control lever before selecting one of these settings. (Please see the next page for details.)
Important: If the wrong button is selected, press the CANCEL button and re-select the desired cycle.
- When toasting is complete, the toast control lever goes up and the unit shuts off.
Cancel Function
The CANCEL button illuminates automatically whenever the control lever is pressed and remains lit until the toasting cycle is finished or the CANCEL button is pressed.
Defrost Function
Use to thaw and toast frozen bread, waffles and pastries.
- Adjust the toast shade selector knob to the desired setting (1-7).
- Insert the food to be toasted into the slot or slots.
- Press the toast control lever down until it locks into place.
- Press the DEFROST (for bread and waffles) button.
The buttons illuminate until the defrosting and toasting are complete or until the CANCEL button is pressed.
Important: If the wrong button is selected, press the CANCEL button and re-select the desired cycle.
-
When toasting is complete, the toast control lever goes up and the unit shuts off.
-
Important: If the wrong button is selected, press the CANCEL button and re-select the desired cycle.
- When toasting is complete, the toast control lever goes up and the unit shuts off.
Reheat Function
Use to warm foods that have been toasted and have cooled.
- Insert previously toasted food into slot.
Note: Do not reheat foods with butter or any other toppings.
- There is no need to adjust the toast shade selector knob.
- Press the toast control lever down until it locks into place.
- Press the REHEAT button.
Important: If the wrong button is selected, press the CANCEL button and re-select the desired cycle.
- When reheating is complete, the toast control lever goes up and the unit shuts off.
Helpful Hints
- For best toasting results, be sure to keep the crumb tray clean. This toaster has a built-in toast control lever rise. If toasted food does not clear the top of the toaster use the toast control lever to raise the food for easy removal.
- Never stick any metal object or fingers into the toaster slot.
- If food becomes jammed, unplug the unit, then raise and lower the toast control lever to loosen the jammed food.
- Never use metal utensils to lift food from the toaster or to free jammed food.
- To interrupt toasting at anytime, press the CANCEL button.
Troubleshooting
| Problem Possible Cause Solution | ||
| Unit is not heating or stops heating. | Electrical outlet is not working or toaster is unplugged. | Check to make sure outlet is working. Unplug unit and re-insert plug. Test toaster by selecting a setting and depressing the toast control lever with nothing in the toaster. |
| Second toasting is too dark. | Setting on toast is too dark. | If doing repeated toasting in the toaster, you may want to select a shade slightly lighter than the previous setting. |
| Bread is jammed. | The bread may be too thick. | Most breads, pastries and will fit into the slot, however, occasionally the bread may be too thick. Simply remove from the toaster and slice thinner. |
| Toast is too light or too dark. | You may have changed the shade selector and need to re-adjust the setting. | Simply reset the shade selector to the desirable setting for the function you wish to use. |
| You smell burnt food or smoke is coming out when toaster is being used. | Remnants of food in crumb tray. | Refer to the directions in CARE AND CLEANING section of this booklet. Make sure the crumb tray is empty and wiped clean. Check to make sure no large crumbs are caught in the slot. Turn unplugged unit upside down over the sink and shake to remove crumbs. |
Care and Cleaning
This product contains no user serviceable parts. Refer service to qualified service personnel.
Cleaning
Always unplug the cord from the electrical outlet and allow the toaster to cool before cleaning. Do not immerse the toaster in water.
Crumb Tray
- The crumb tray is located in the back of the toaster. To remove it just pull it out.
- Dispose of crumbs and wash the tray in warm, sudsy water.
Note: The tray is not dishwasher safe. You can remove stubborn spots with a nylon mesh pad.
- Be sure to dry thoroughly before slipping the tray back into the toaster.
Cleaning Outside Surfaces
Important: The unit gets hot. Allow the toaster to cool completely before cleaning.
- Wipe the exterior with a damp cloth or sponge and dry with a paper towel.
- Do not use strong cleaners or abrasives that may scratch surfaces and never spray cleaners directly onto the toaster.
Specifications
| AC Line Voltage 50/60 Hz, 220-240 V | |
| Output power 850 W | |
| Weight 1.8 kg | |
Guarantee
Please keep your receipt as this will be required for any claims under this guarantee.
During this guaranteed period, if in the unlikely event the appliance no longer functions due to a design or manufacturing fault, please take it back to the place of purchase, with your till receipt and a copy of this guarantee.
The rights and benefits under this guarantee are additional to your statutory rights, which are not affected by this guarantee. Only Sharp Home Appliances (Europe) has the right to change these terms.
Further Terms & conditions of the warranty, please visit www.sharphomeappliances.com
VEUILLEZ LIRE ATTENTIVEMENT CE MANUEL D'UTILISATION AVANT D'UTILISER L'APPAREIL ET CONSERVEZ-LE SOIGNEUSEDMENT POUR VOUS Y RÉFERER ULTÉRIÉUREMENT.
www.sharphomeappliances.com
*Microwave oven, Vacuum cleaners and SDA service only
Follow us:

Service & Support
Visit our website:
www.sharphomeappliances.com
Or contact us:


- Important Safeguards
- Electrical Cord
- Information on Disposal for Users (private households)
- In the European Union
- In other Countries outside the EU
- Part Names
- Product may vary slightly from what is illustrated
- Getting Started
- Built-in Toast Control Lever Rise
- Using your Toaster
- Cancel Function
- Defrost Function
- Reheat Function
- Helpful Hints
- Care and Cleaning
- Cleaning
- Crumb Tray
- Cleaning Outside Surfaces
- Specifications
- Guarantee
- VEUILLEZ LIRE ATTENTIVEMENT CE MANUEL D'UTILISATION AVANT D'UTILISER L'APPAREIL ET CONSERVEZ-LE SOIGNEUSEDMENT POUR VOUS Y RÉFERER ULTÉRIÉUREMENT.
Brand : SHARP
Model : SACT2002I
Category : Toaster