
W1114 - Warming drawers and cabinets WHIRLPOOL - Free user manual and instructions
Find the device manual for free W1114 WHIRLPOOL in PDF.
| Product type | Warming drawer |
| Brand | Whirlpool |
| Model | W1114 |
| Power supply | 230 V ~ 50 Hz |
| Nominal power | 900 W |
| Temperature range | 40 °C to 75 °C |
| Maximum load capacity | 25 kg |
| Control type | Temperature rotary knob + luminous on/off switch |
| Display | Luminous indicator on the front |
| Cavity material | Stainless steel / iXelium (depending on version) |
| Drawer bottom | Tempered glass |
| Functions | Warming plates, glasses, cups and dishes |
| Preheating required | Yes, empty for 2 h at first use |
| Child safety | Hot surface, keep children away |
| Installation type | Built-in under another appliance (max 60 kg) |
| Net weight (approx.) | 12 kg |
| Nominal dimensions (W x D x H) | 595 x 550 x 140 mm |
| Maintenance | Soft cloth, water or glass cleaner, avoid abrasives |
| Spare parts | Available via authorized after-sales service |
| Repairability | Call a qualified technician |
| Warranty | Refer to the supplied warranty booklet |
Frequently Asked Questions - W1114 WHIRLPOOL
User questions about W1114 WHIRLPOOL
0 question about this device. Answer the ones you know or ask your own.
Ask a new question about this device
Download the instructions for your Warming drawers and cabinets in PDF format for free! Find your manual W1114 - WHIRLPOOL and take your electronic device back in hand. On this page are published all the documents necessary for the use of your device. W1114 by WHIRLPOOL.
USER MANUAL W1114 WHIRLPOOL
natural_image
Simple line icon of a steaming dish with steam, enclosed in a rounded square frame (no text or symbols)Safety instructions, Use and Care and Installation guideSicherheitshinweise, Gebrauchs- und Installationsanleitung Consignes de sécurité, d'utilisation et d'entretien et Guide d'installation Veiligheidsvoorschriften, Gebruiksaanwijzing en Installatiegids Istruzioni per l'uso
Guía de instrucciones de seguridad, uso y cuidado e instalación Guia de Segurança, Utilização e Manutenção e Instalação Sikkerhedsforskrifter, Brugs- og pleje- og installationsvejledning Turvallisuusohjeet, Käyttö-, huolto- ja asennusopas Sikkerhetsinstrukser, Bruk og pleie og Installasjonsveiledning
Downloaded from www.vandenborre.be
Downloaded from www.vandenborre.be
natural_image
Diagram showing a hand holding a tool inside a container, with an inset close-up of the handle (no text or symbols present)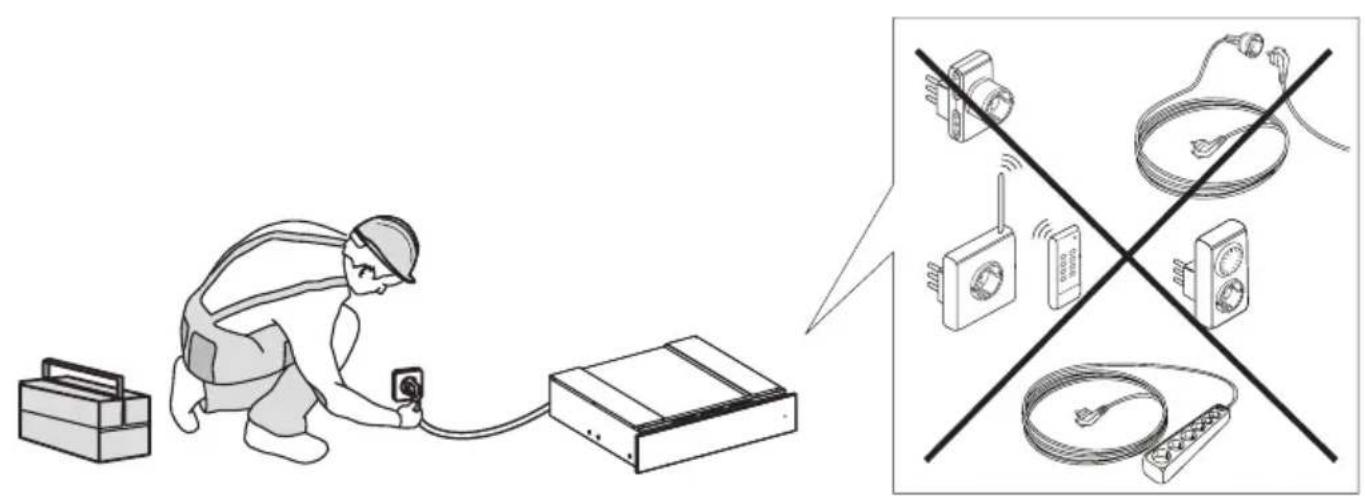
INSTRUCTIONS FOR USE
SAFETY INSTRUCTIONS 6
BEFORE USING THE WARMING DRAWER 9
INSTALLATION 9
HOW TO USE THE PRODUCT 10
CONTROL PANEL DESCRIPTION 10
WARMING DRAWER 10
OPERATION 10
TEMPERATURE SELECTION 11
WARMING TIMES 11
LOAD CAPACITY 11
CLEANING AND MAINTENANCE 12
TROUBLESHOOTING GUIDE 12
AFTER-SALES SERVICE 13
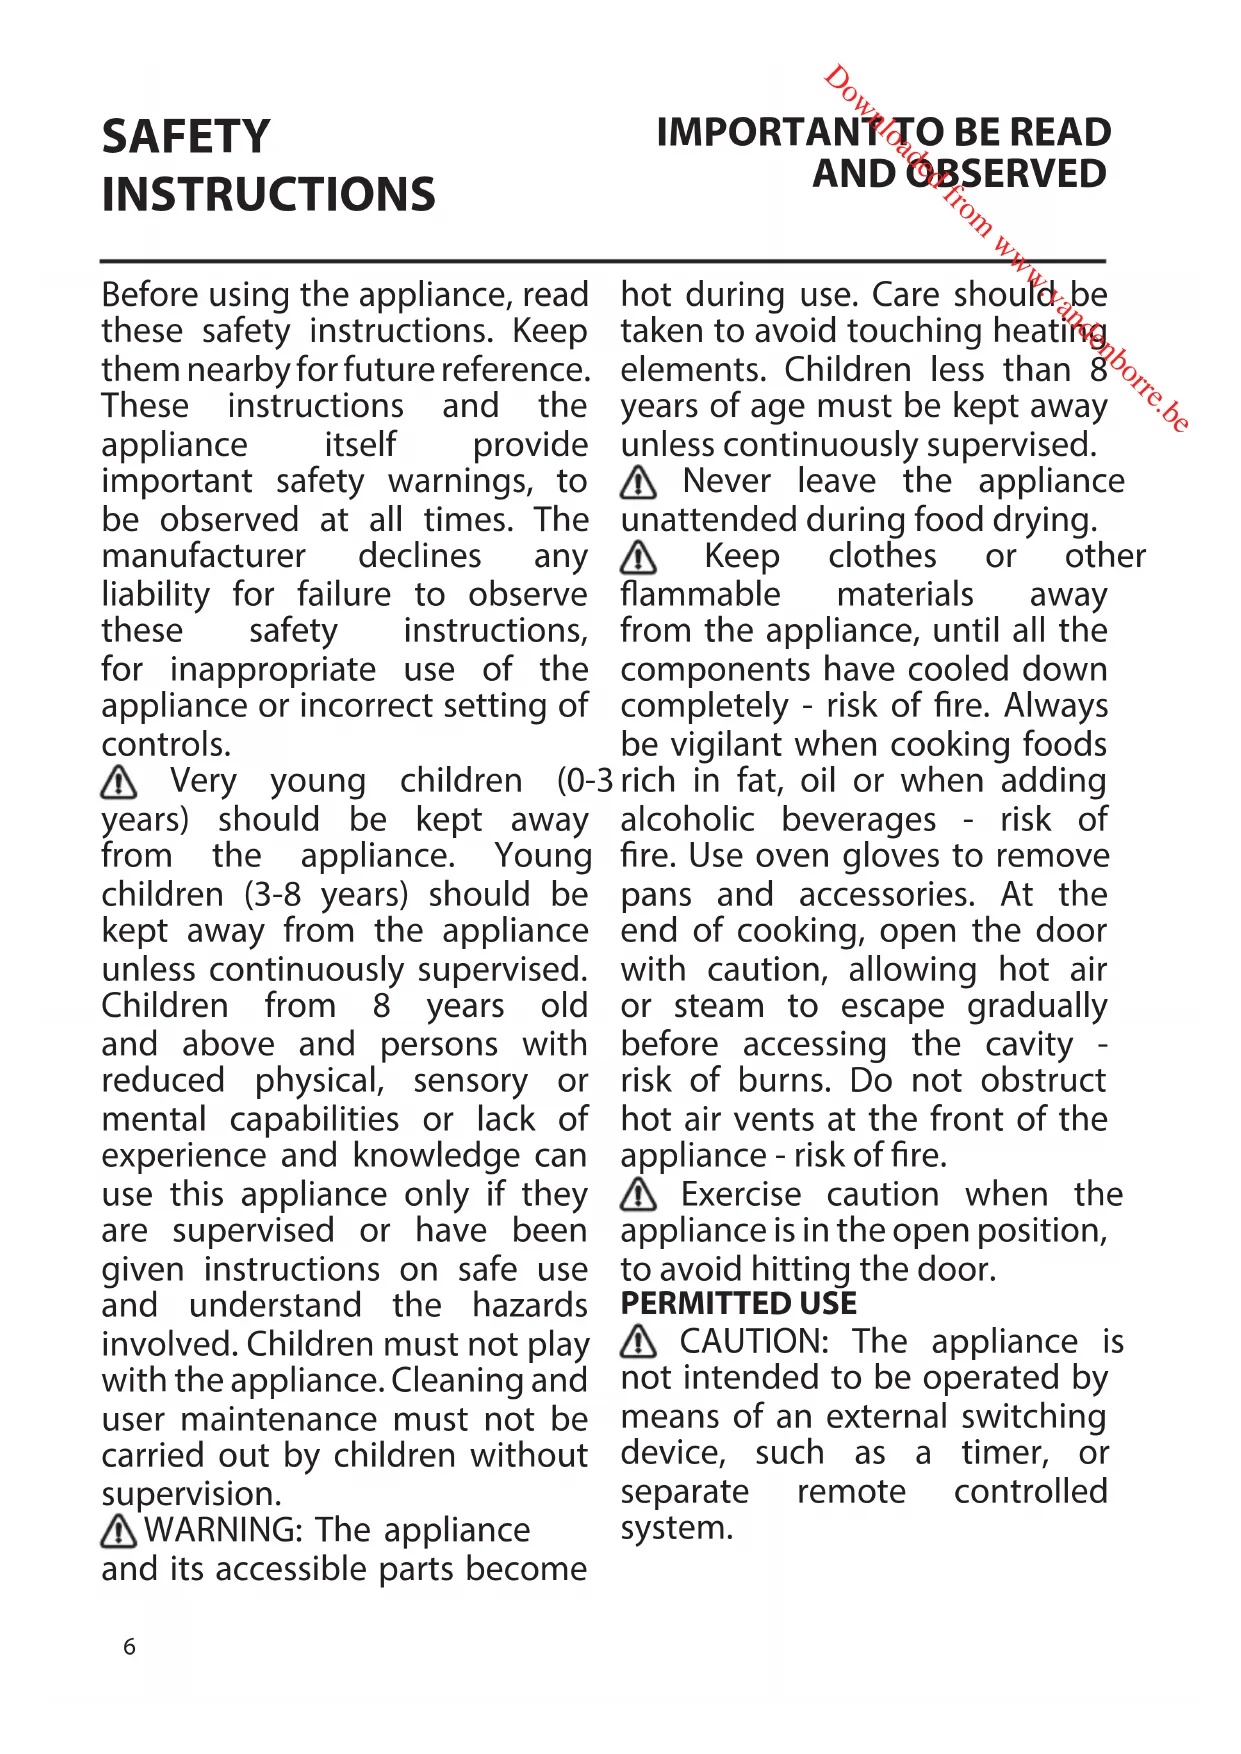
Before using the appliance, read these safety instructions. Keep them nearby for future reference. These instructions and the appliance itself provide important safety warnings, to be observed at all times. The manufacturer declines any liability for failure to observe these safety instructions, for inappropriate use of the appliance or incorrect setting of controls.
⚠️ Very young children (0-3 years) should be kept away from the appliance. Young children (3-8 years) should be kept away from the appliance unless continuously supervised. Children from 8 years old and above and persons with reduced physical, sensory or mental capabilities or lack of experience and knowledge can use this appliance only if they are supervised or have been given instructions on safe use and understand the hazards involved. Children must not play with the appliance. Cleaning and user maintenance must not be carried out by children without supervision.
WARNING: The appliance and its accessible parts become
hot during use. Care should be taken to avoid touching heating elements. Children less than 8 years of age must be kept away unless continuously supervised.
⚠️ Never leave the appliance unattended during food drying.
⚠️ Keep clothes or other flammable materials away from the appliance, until all the components have cooled down completely - risk of fire. Always be vigilant when cooking foods rich in fat, oil or when adding alcoholic beverages - risk of fire. Use oven gloves to remove pans and accessories. At the end of cooking, open the door with caution, allowing hot air or steam to escape gradually before accessing the cavity - risk of burns. Do not obstruct hot air vents at the front of the appliance - risk of fire.
Exercise caution when the appliance is in the open position, to avoid hitting the door.
PERMITTED USE
⚠️ CAUTION: The appliance is not intended to be operated by means of an external switching device, such as a timer, or separate remote controlled system.
⚠ This appliance is intended to be used in household and similar applications such as: staff kitchen areas in shops, offices and other working environments; farm houses; by clients in hotels, motels, bed & breakfast and other residential environments.
⚠️ No other use is permitted (e.g. heating rooms).
This appliance is not for professional use. Do not use the appliance outdoors.
Do not store explosive or flammable substances (e.g. gasoline or aerosol cans) inside or near the appliance - risk of fire. INSTALLATION
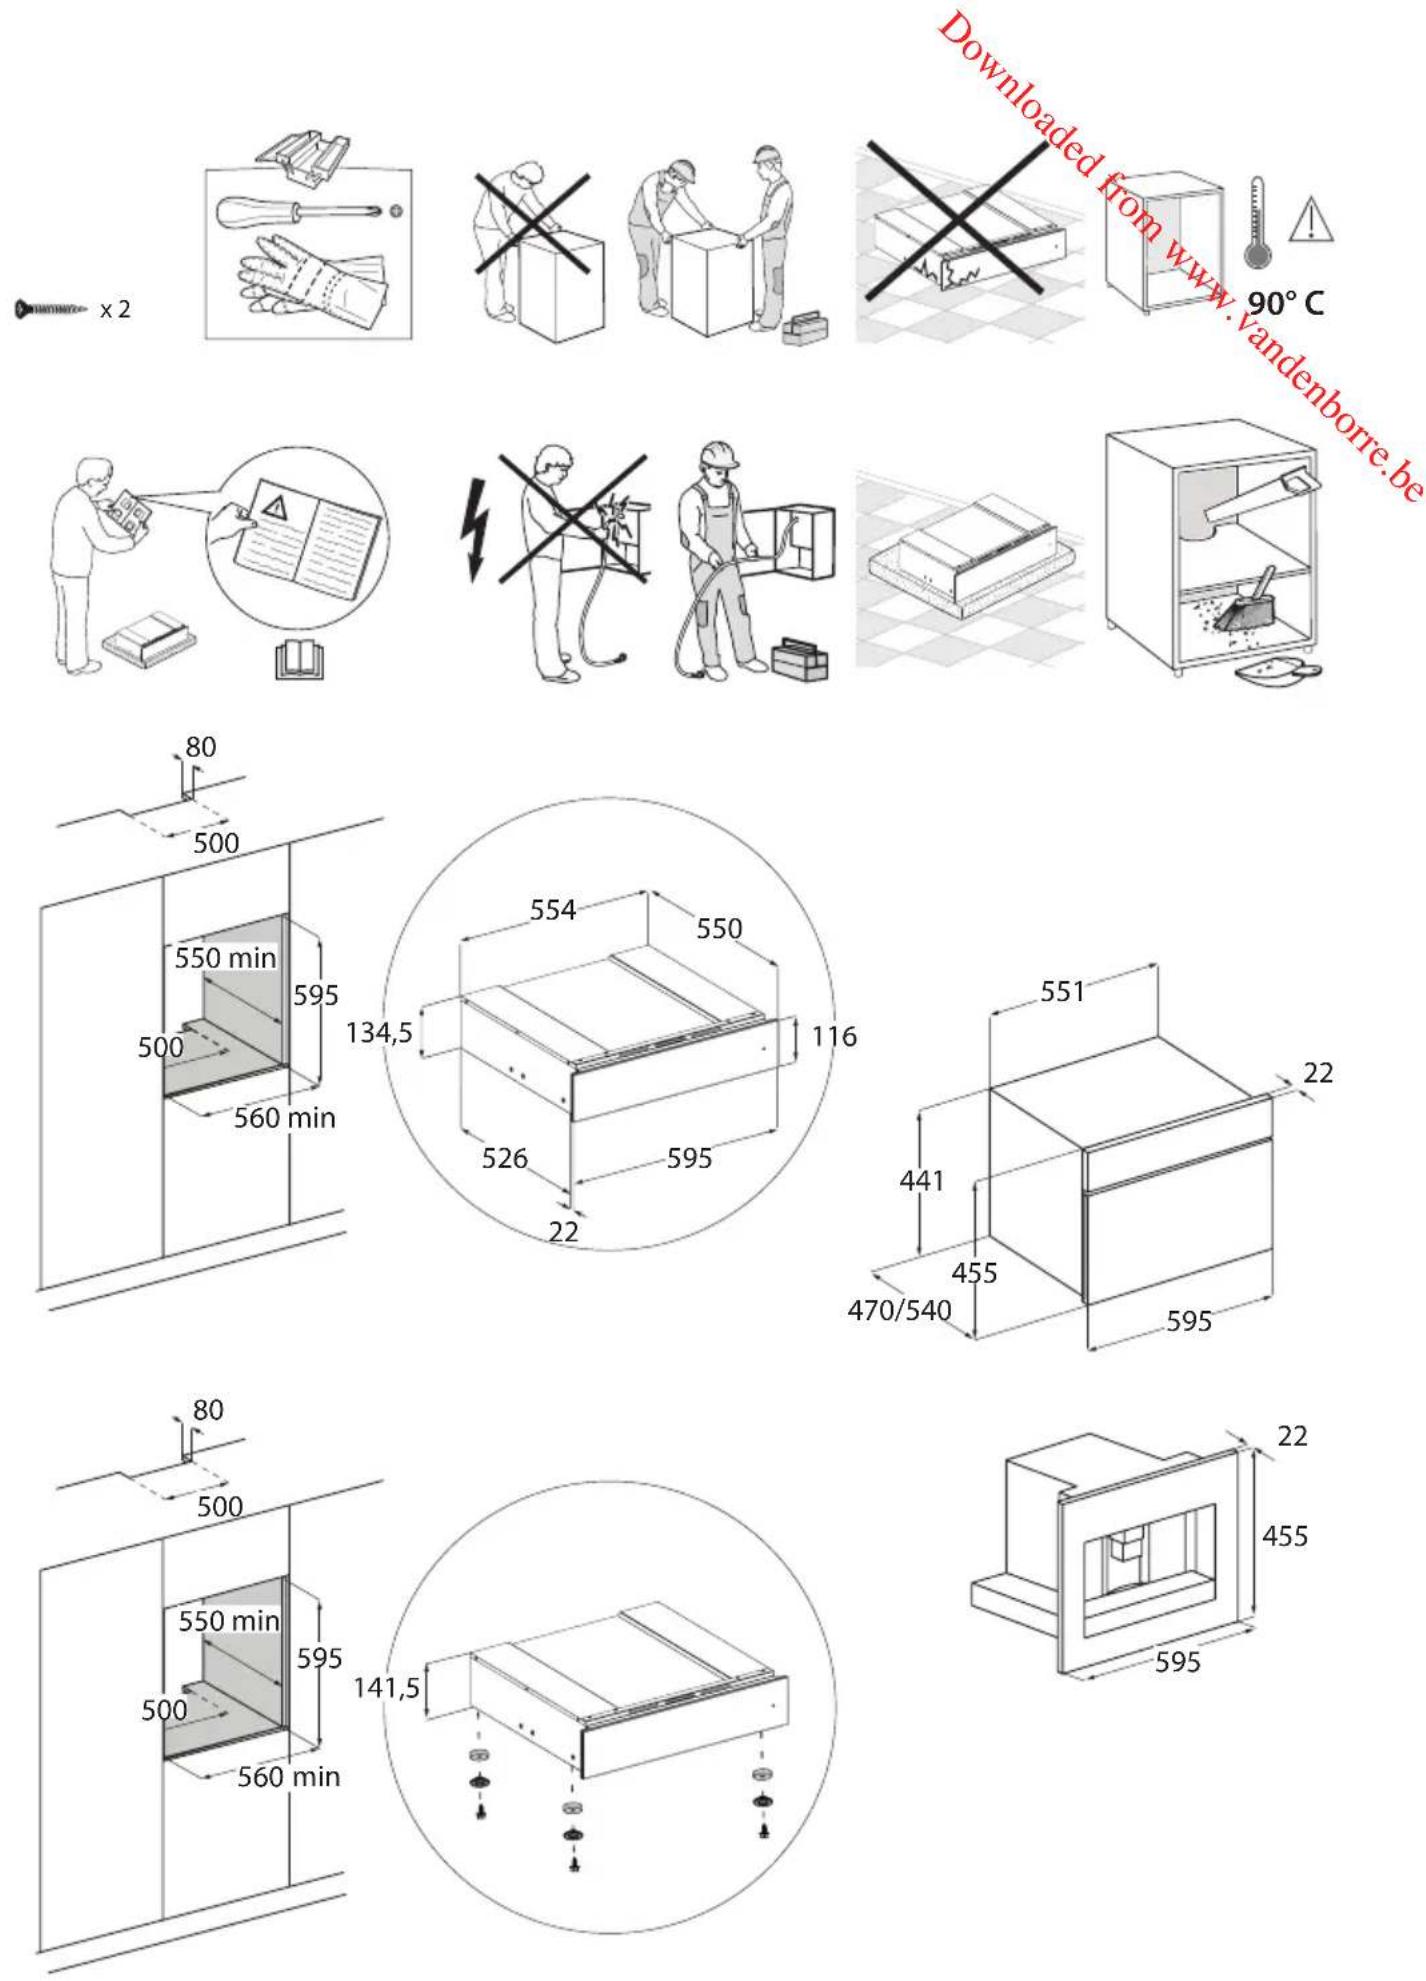
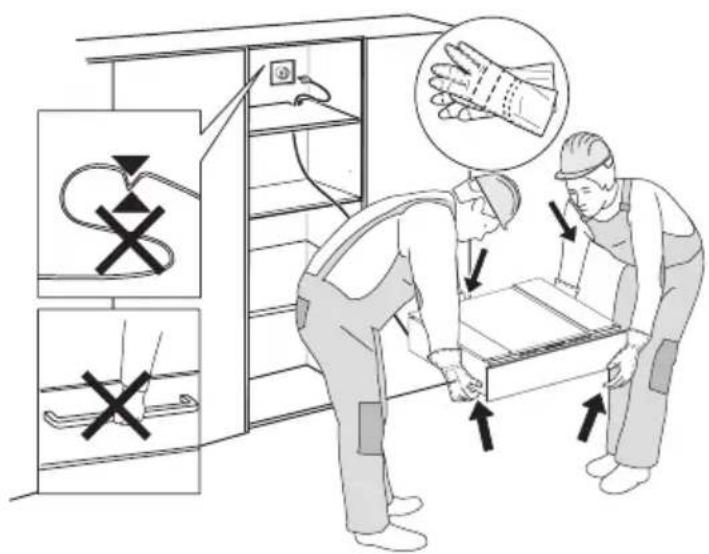
The appliance must be handled and installed by two or more persons - risk of injury. Use protective gloves to unpack and install - risk of cuts.
⚠️ Installation, including water supply (if any) and electrical connections, and repairs must be carried out by a qualified technician. Do not repair or replace any part of the appliance unless specifically stated in the user manual. Keep children away from the installation site. After unpacking the appliance, make sure that it has not been damaged during transport. In the event of problems, contact the dealer or your nearest After-sales Service. Once installed, packaging waste (plastic, styrofoam parts etc.)
must be stored out of reach of children - risk of suffocation. The appliance must be disconnected from the power supply before any installation operation - risk of electrical shock. During installation, make sure the appliance does not damage the power cable - risk of fire or electrical shock. Only activate the appliance when the installation has been completed.
⚠️ Carry out all cabinet cutting works before fitting the appliance in the furniture and remove all wood chips and sawdust.
Do not remove the appliance from its polystyrene foam base until the time of installation.
⚠️ After installation, the bottom of the appliance must no longer be accessible - risk of burn.
⚠ Do not install the appliance behind a decorative door - risk of fire.
ELECTRICAL WARNINGS
⚠ The rating plate is on the front edge of the appliance (visible when the warming drawer is open).
⚠ It must be possible to disconnect the appliance from the power supply by unplugging it if plug is accessible, or by a multi-pole switch installed upstream of the socket in accordance with the wiring rules and the appliance must be earthed in conformity
with national electrical safety standards.
⚠ Do not use extension leads, multiple sockets or adapters. The electrical components must not be accessible to the user after installation. Do not use the appliance when you are wet or barefoot. Do not operate this appliance if it has a damaged power cable or plug, if it is not working properly, or if it has been damaged or dropped.
⚠️ If the supply cord damaged, it must be replaced with an identical one by the manufacturer, its service agent or similarly qualified persons in order to avoid a hazard - risk of electrical shock.
In case of replacement of power cable, contact an authorized service center.
CLEANING AND MAINTENANCE
WARNING: Ensure that the appliance is switched off and disconnected from the power supply before performing any maintenance operation; never use steam cleaning equipment - risk of electric shock.
Do not use harsh abrasive cleaners or metal scrapers to clean the door glass since they can scratch the surface, which may result in shattering of the glass.
⚠ Ensure the appliance is cooled down before any cleaning or maintenance. - risk of burn.
DISPOSAL OF PACKAGING MATERIALS
The packaging material is 100% recyclable and is marked with the recycle symbol 📁. The various parts of the packaging must therefore be disposed of responsibly and in full compliance with local authority regulations governing waste disposal.
DISPOSAL OF HOUSEHOLD APPLIANCES
This appliance is manufactured with recyclable or reusable materials. Dispose of it in accordance with local waste disposal regulations. For further information on the treatment, recovery and recycling of household electrical appliances, contact your local authority, the collection service for household waste or the store where you purchased the appliance. This appliance is marked in compliance with European Directive 2012/19/EU, Waste Electrical and Electronic Equipment (WEEE). By ensuring this product is disposed of correctly, you will help prevent negative consequences for the environment and human health.
The symbol on the product or on the accompanying documentation indicates that it should not be treated as domestic waste but must be taken to an appropriate collection center for the recycling of electrical and electronic equipment.
BEFORE USING THE WARMING DRAWER
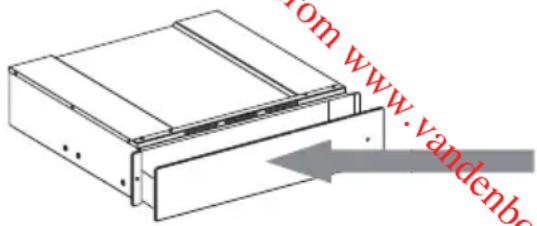
To open and close the drawer, push the middle of the panel as shown in the figure.
At first use, clean the appliance as follows:
- clean the surface with a damp cloth and then dry.
- Preheat the empty drawer for at least two hours: turn the temperature knob to maximum
in order to eliminate any residuals of fat, oil or manufacturing resins that can create unpleasant odors during the warming of dishes. Air the room.
- After completing these operations, the appliance is ready for first use.
- Before use, remove:
- stickers placed on the front and door of the warming drawer, except the rating plate;
- keep children away from the product and the packing materials, to avoid interaction with them, if not properly supervised;
- any stickers from accessories when present.
INSTALLATION
Safety instructions for fitting the warming drawer
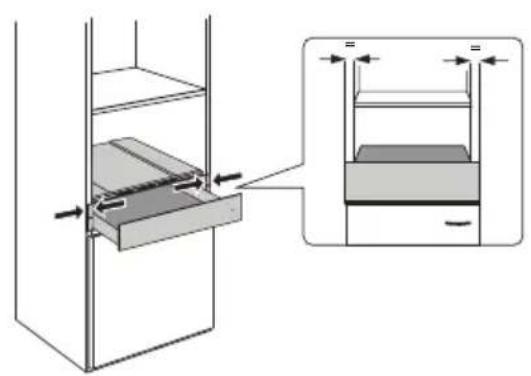
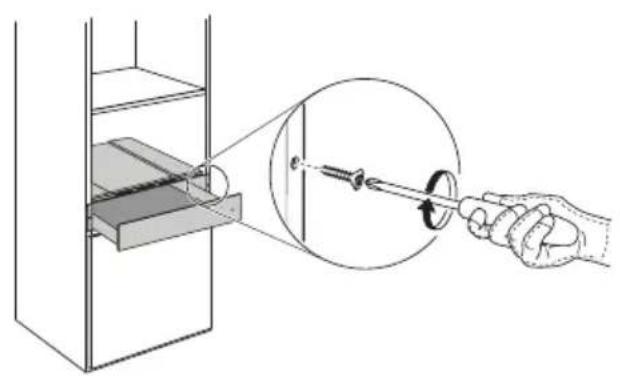
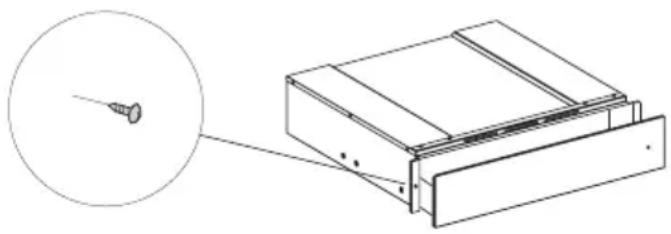
IMPORTANT: The drawer must be immediately fixed to the cabinet, following the instructions given below. The coupled appliance cannot be installed before fixing the drawer to the cabinet.
Fix the drawer as shown in the figure.
Before electrically connecting the appliance, make sure the rating plate data matches the mains power supply, otherwise the appliance could become damaged.
natural_image
Technical line drawing of a screw and its assembly with a bracket (no text or symbols)Make sure the connection to the power supply is easily accessible after the appliance has been fitted.
The warming drawer can only be fitted in combination with other appliances with maximum weight of 60 kg and provided with adequate cooling ventilation.
To install the appliance that can be combined with the dish warmer, follow the instructions given in the relevant use and installation handbook.
Important: The same brand coffee maker or combi microwave oven, sized as shown on the following page, can be installed above the warming drawer. For installation, carefully follow the directions given in the instruction handbooks supplied with the coffee maker and the combi microwave oven.
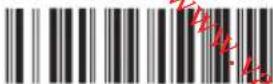
HOW TO USE THE PRODUCT CONTROL PANEL DESCRIPTION
- Temperature knob
- Luminous ON-OFF switch
- ON-OFF Indicator
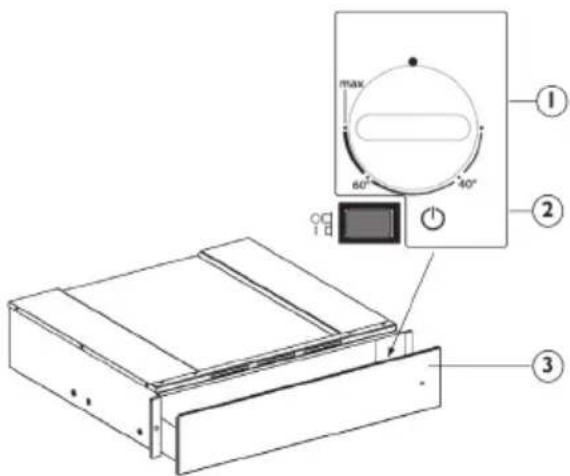
WARMING DRAWER
The control elements are the temperature knob and the luminous ON-OFF switch. With the switch pressed (position 1), the drawer is on, whereas with the switch released (position 0), the drawer is off. These elements are only visible when the drawer is open. When the drawer is closed, a control light located on the front of the appliance indicates if the drawer is on.
OPERATION
- Place the dishes in the drawer
- Set a temperature
- Turn the appliance on; the switch lights up
- Close the drawer, guiding it carefully
- Turn the appliance off before removing the warmed dishes.
TEMPERATURE SELECTION
The temperature control knob allows adjustments up to approx. 75^ C (max). Turn the temperature knob clockwise until the stop which indicates maximum, and then anticlockwise.
Do not force it beyond the stop, otherwise the thermostat will become damaged;
| Temperature adjustment Instructions for use | ||
| 40°C cups, glasses | Cups and glasses warmed at this temperature help delay the cooling time of the beverage subsequently added. Use gloves to remove containers from the drawer. | |
| 60°C plates | Plates warmed at this temperature help delay the cooling time of food subsequently placed on them. Use gloves to remove containers from the drawer. | |
| MAX approx. 75°C | crockery | The thermostat is set to the maximum temperature. Use gloves to remove containers from the drawer. |
WARMING TIMES
The time required to warm dishes, glasses, etc. depends on various factors:
• Material and thickness of the dishes
- Load
- Arrangement of load
- Temperature setting
Therefore absolute indications cannot be given.
It is advisable to establish the optimum settings required, based on practical experience
LOAD CAPACITY
The load capacity depends on the height of the appliance and the size of the dishes.
Remember that the drawer can take a maximum weight of 25 kg.
CLEANING AND MAINTENANCE
Make sure that the appliance has cooled down before carrying out any maintenance or cleaning. Do not use steam cleaners. The appliance must be disconnected from the mains before carrying out any kind of maintenance work.
Wear protective gloves. Do not use wire wool, abrasive/scourers or abrasive/corrosive cleaning agents, as these could damage the surfaces of the appliance.
For drawers with iXelium treatment, proceed as follows:
- Use a soft cloth (preferably microfiber) with water or a normal glass cleaning detergent.
- Do not use paper towels, which could leave traces of paper and streaks on the surface.
- Do not use abrasive or corrosive products, chlorine-based products or scouring pads.
- Do not use flammable steam cleaning devices.
- Do not leave acid or alkaline substances, such as vinegar, mustard, salt, sugar or lemon juice, on the surface.
For glass surfaces, proceed as follows:
- Use a neutral detergent and lukewarm water, then dry with a soft cloth.
- Do not leave acid or alkaline substances, such as vinegar, mustard, salt, sugar or lemon juice, on the surface.
Tempered glass drawer base
It is advisable to clean the bottom of the drawer after each use, making sure to let it cool. This will prevent the build-up of dirt and make cleaning easier.
- Use a clean cloth, paper towels and washing up liquid, or specific products for cleaning the tempered glass.
- Do not use abrasive products, bleach, oven cleaner spray or metallic scouring pads.
TROUBLESHOOTING GUIDE
If the dishes are not warm enough, check that:
• the appliance is switched on
• the right temperature has been set
- ventilation openings are not covered by plates or large bowls
- the dishes were not heated long enough.
- the mains switch has not been turned off.
Different factors affect the warming time, for example:
- material and thickness of the dishes, the load and its arrangement, temperature setting.
- The optimum times for warming dishes vary, therefore it is advisable to do tests to establish them according to needs.
AFTER-SALES SERVICE
Before contacting the After-Sales Service:
- See if you can solve the problem yourself with the help of the "Troubleshooting guide".
- Switch the appliance off and then on again to see if the problem has been eliminated.
For the following problems, contact a qualified technician or the After-Sales Service:
If the dishes do not get warm:
- the electrical power cable could be disconnected or damaged.
If the dishes get too hot:
- the temperature controller could be faulty.
The On/Off switch does not activate when the appliance is turned on:
- the switch control indicator is faulty.
If the problem persists after the above checks, contact the nearest After-Sales Service.
Always specify:
• a brief description of the fault;
- the warming drawer type and exact model;
- the Service number (the number after the word Service on the data plate), located on the outer right edge of the drawer runner. The Service number is also given in the warranty booklet;
- your full address;
- your telephone number.
SERVICE
00 0000 00000
If any repairs are required, contact an authorized After-Sales Service Center (to ensure the use of original spare parts and correct repairs). Failure to comply with these instructions can compromise the safety and quality of the product.
BEDIENUNGSANLEITUNG
Seite
SICHERHEITSHINWEISE
15
natural_image
Technical line drawing of a mechanical assembly with a magnified inset showing a screw and pin (no text or symbols)WÄRMESCHUBLADE
natural_image
Technical line drawing of a screw assembly with a magnified inset showing the screw (no text or symbols)VEILIGHEIDSVOOR- SCHRIFTEN
BELANGRIJK MOET WORDEN GELEZEN EN IN ACHT GENOMEN
natural_image
Technical line drawing of a mechanical assembly with a magnified inset showing a screw (no text or symbols)natural_image
Technical line drawing of a screw assembly with a magnified inset showing the threaded component (no text or symbols)GUIDA ALLA RICERCA GUASTI
CÓMO USAR EL PRODUCTO 55
natural_image
Technical line drawing of a mechanical assembly with a magnified inset showing a screw (no text or symbols)CÓMO USAR EL PRODUCTO
CAJÓN CALENTADOR
natural_image
Technical line drawing of a screw assembly with a magnified inset showing the threaded component (no text or symbols)INSTALLATION
natural_image
Technical line drawing of a screw assembly with a magnified inset showing the screw (no text or symbols)natural_image
Technical line drawing of a screw assembly with a magnified inset showing the screw (no text or symbols)natural_image
Technical line drawing of a mechanical assembly with a magnified inset showing a screw and pin (no text or symbols)HVORDAN BRUKE PRODUKTET BESKRIVELSE AV BETJENINGSPANET
- Temperaturknapp
- Lysende AV/PÅ-bryter
- AV/PÅ-indikator
VARMESKUFF
natural_image
Technical line drawing of a screw assembly with a magnified inset showing the screw detail (no text or symbols)natural_image
Diagram of a mechanical component with a directional arrow indicating movement or force (no text or symbols present)natural_image
Technical line drawing of a screw assembly with a magnified inset showing the screw detail (no text or symbols)Downloaded from www.vandenborre.be
Downloaded from www.vandenborre.be
Downloaded from www.vandenborre.be
Downloaded from www.vandenborre.be

- INSTRUCTIONS FOR USE
- SAFETY INSTRUCTIONS 6
- BEFORE USING THE WARMING DRAWER 9
- INSTALLATION 9
- HOW TO USE THE PRODUCT 10
- CONTROL PANEL DESCRIPTION 10
- WARMING DRAWER 10
- OPERATION 10
- TEMPERATURE SELECTION 11
- WARMING TIMES 11
- LOAD CAPACITY 11
- CLEANING AND MAINTENANCE 12
- TROUBLESHOOTING GUIDE 12
- AFTER-SALES SERVICE 13
- PERMITTED USE
- ELECTRICAL WARNINGS
- CLEANING AND MAINTENANCE
- DISPOSAL OF PACKAGING MATERIALS
- DISPOSAL OF HOUSEHOLD APPLIANCES
- BEFORE USING THE WARMING DRAWER
- To open and close the drawer, push the middle of the panel as shown in the figure.
- INSTALLATION
- Safety instructions for fitting the warming drawer
- IMPORTANT: The drawer must be immediately fixed to the cabinet, following the instructions given below. The coupled appliance cannot be installed before fixing the drawer to the cabinet.
- Fix the drawer as shown in the figure.
- HOW TO USE THE PRODUCT CONTROL PANEL DESCRIPTION
- WARMING DRAWER
- OPERATION
- TEMPERATURE SELECTION
- WARMING TIMES
- LOAD CAPACITY
- Tempered glass drawer base
- TROUBLESHOOTING GUIDE
- If the dishes are not warm enough, check that:
- AFTER-SALES SERVICE
- Before contacting the After-Sales Service:
- For the following problems, contact a qualified technician or the After-Sales Service:
- If the dishes do not get warm:
- If the dishes get too hot:
- The On/Off switch does not activate when the appliance is turned on:
- If the problem persists after the above checks, contact the nearest After-Sales Service.
- BEDIENUNGSANLEITUNG
- Seite
- SICHERHEITSHINWEISE
- WÄRMESCHUBLADE
- VEILIGHEIDSVOOR- SCHRIFTEN
- BELANGRIJK MOET WORDEN GELEZEN EN IN ACHT GENOMEN
- GUIDA ALLA RICERCA GUASTI
- CÓMO USAR EL PRODUCTO
- CAJÓN CALENTADOR
- HVORDAN BRUKE PRODUKTET BESKRIVELSE AV BETJENINGSPANET
- VARMESKUFF
Brand : WHIRLPOOL
Model : W1114
Category : Warming drawers and cabinets