
U448CH1 - Food Processor ROTEL - Free user manual and instructions
Find the device manual for free U448CH1 ROTEL in PDF.
| Product type | Multifunction food processor |
| Brand | Rotel |
| Model | U448CH1 |
| Rated voltage | 220-240 V, 50/60 Hz |
| Motor power | 500 W |
| Cooking power | 1000 W |
| Bowl capacity | 3 liters (max), 2 liters (max fill) |
| Adjustable speed | 1 to 12 |
| Adjustable temperature | 20 °C to 120 °C |
| Timer | 1 second to 100 minutes |
| Main functions | Mixing, cooking, steaming, automatic programs (29 recipes), pulse, turbo, jam, dough, whisk |
| Included accessories | Multifunction blade, butterfly whisk, kneading paddle, steaming basket, steaming tray, measuring cup, spatula, tightening key |
| Bowl material | Stainless steel (estimated) |
| Safety | Overheat protection, automatic shutdown, lid safety, locking system |
| Cleaning | Bowl and accessories hand washable; do not immerse motor unit |
| Warranty | 2 years (according to manufacturer's conditions) |
| Country of manufacture | Not specified |
Frequently Asked Questions - U448CH1 ROTEL
User questions about U448CH1 ROTEL
0 question about this device. Answer the ones you know or ask your own.
Ask a new question about this device
Download the instructions for your Food Processor in PDF format for free! Find your manual U448CH1 - ROTEL and take your electronic device back in hand. On this page are published all the documents necessary for the use of your device. U448CH1 by ROTEL.
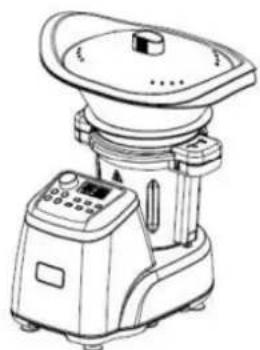
USER MANUAL U448CH1 ROTEL
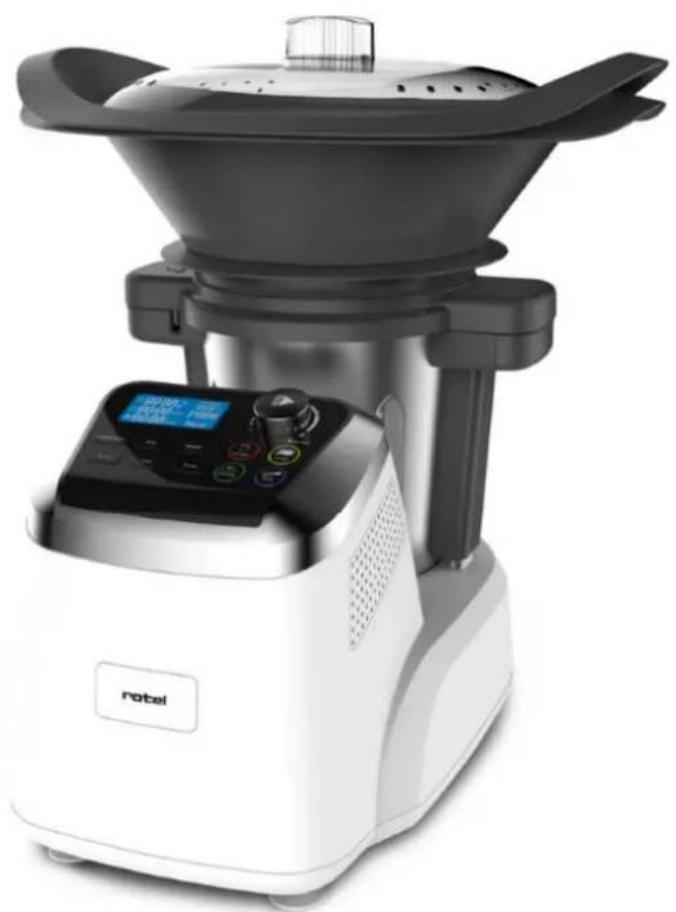
THERMOCOOKEREXPERT448CH1
U448CH1
natural_image
Modern kitchen appliance with digital display and control panel (no visible text or symbols)D/F/I/E
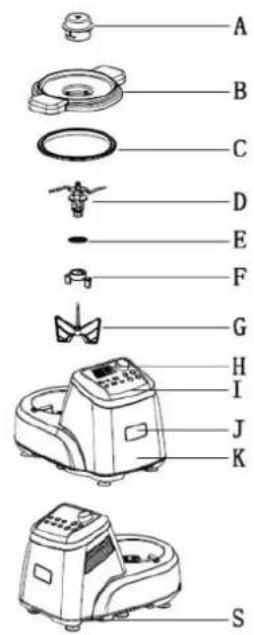
| Deutsch | Français | Italiano | English |
| A. Messbecher | A. Gobelet doseur | A. Misurino | A. Measuring cup |
| B. Deckel der Mix-Schüssel | B. Couvercle du bol | B. Coperchio del boccale | B. Bowl lid |
| C. Dichtungsring (Mix-Schüssel-Deckel) | C. Anneau d'étanchéité (couvercle du bol) | C. Guarnizione isolante (Coperchio del boccale) | C. Sealing ring (bowl lid) |
| D. Universalmesser | D. Lame multifonction | D. Lama multifunzioni | D. Mutliblade |
| E. Dichtungsring (Univer-salmesser) | E. Anneau d'étanchéité (lame multifunction) | E. Guarnizione isolante (lama multifunzioni) | E. Sealing ring (multi-blade) |
| F. Aufsatzspanner | F. Anneau de fixation | F. Anello di fissaggio | F. Tool spanner |
| G. Schmetterlings Aufsatz | G. Fouet papillon | G. Frustino a farfalla | G. Butterfly (Stirring tool) |
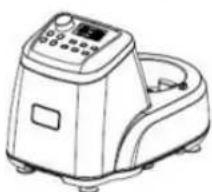
| H. LCD Bildschirm | H. Écran LCD | H. Schermo LCD | H. LCD Display |
| I. Bedienerfeld | I. Panneau de commande | I. Pannello di comando | I. Control panel |
| J. Rotel Logo | J. Marque Rotel | J. Marca Rotel | J. Rotel Logo |
| K. Motoreneinheit | K. Corps du robot | K. Corpo del robot | K. Main body |
| L. Deckel (Dampfkorb) | L. Couvercle (panier vapeur) | L. Coperchio (cestello cottura vapore) | L. Lid (steamer) |
| M. Dampfplatte | M. Plateau vapeur | M. Vassoio salva gusto va-pore | M. Tray (steamer) |
| N. Dampfkorb | N. Panier vapeur | N. Cestello vapore | N. Steamer |
| O. Garflüssigkeitauffang-schale | O. Récipient de récupera-tion du jus de cuisson | O. Recipiente recupero succo di cottura | O. Drip pan for cooking juices |
| P. Teigknetter | P. Pale de pétrissage | P. Pala per impasto | P. Dough kneader |
| Q. Mix-Schüssel | Q. Bol de mixage | Q. Boccale di mixaggio | Q. Bowl |
| R. Spachtel | R. Spatule | R. Spatola | R. Spatula |
| S. An-/Aus-Schalter | S. Interrupreur de mise sous tension | S. Interruttore di accen-sione | S. Power switch |
• TECHNISCHE DATEN
Impulsion (Pulse) 39
Confiture (Marmalade)....40
Pâte (Dough)....40
- Safety instructions....79
- Before first use....82
• Control Panel....82
Start/Stop/Reset knob....82
Temperature....82
Time....83
Speed 83
Turbo 83
Auto 83
Pulse 84
Marmalade 84
Dough 84
Steaming....85
Whisk 85
- LCD Display....86
Actual temperature....86
Time....86
Speed 86
Set temperature 86
- Bowl....86
• sealing rings....87
- Multiblade 88
Inserting the multiblade....88
Working with the multiblade 89
- Butterfly (stirring tool) 89
Inserting the butterfly tool....89
Working with the butterfly tool 90
- Dough kneader....91
Inserting the dough kneader 91
Working with the dough kneader 91
• Getting started with the Thermocooker Expert....92
Inserting the bowl 92
Removing the bowl....93
- Working modes 93
Mode 1: mixing ingredients....93
Mode 2: only cooking....94
Mode 3: chopping and cooking....95
Mode 4: Steaming 96 - Cleaning and maintenance....97
- Troubleshooting 98
- Disposal 99
D/F/I/E....100
• Garantie / Garantie / Garanzia / Warranty .... 100
Deutsch
Ist-Temperatur (Actual temperature)
• DICHTUNGSRINGE
natural_image
Technical line drawing of a mechanical component with a propeller and fan (no text or symbols)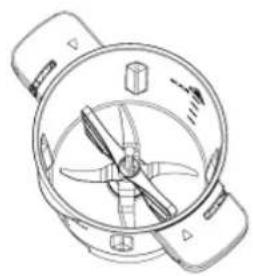
natural_image
Technical line drawing of a mechanical component with no visible text or symbolsflowchart
graph TD
    A["Preparation with a kitchen knife"] --> B["Step 1: preparation of the kitchen knife"]
    B --> C["Step 2: assembly of kitchen equipment"]
    C --> D["Step 3: product inspection and packaging"]
    D --> E["Step 4: final assembly with a small component"]
natural_image
Line drawing of a laboratory instrument with control panel and lid (no text or symbols)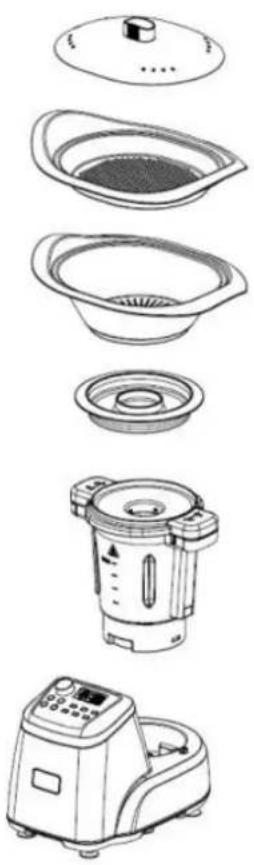
natural_image
Exploded view diagram of a kitchen appliance showing exploded views from top to bottom (no text or labels)VORSICHT:
Confiture (Marmalade)
Température effective (actual temperature)
natural_image
Technical line drawings of two identical mechanical components with internal blades and a separate handle (no text or symbols)flowchart
graph TD
    A["Step 1: preparation of kitchen appliance"] --> B["Step 2: assembly step"]
    B --> C["Step 3: product packaging or cleaning"]
    C --> D["Step 4: assembly end"]
natural_image
Line drawing of a laboratory instrument with control panel and lid (no text or symbols)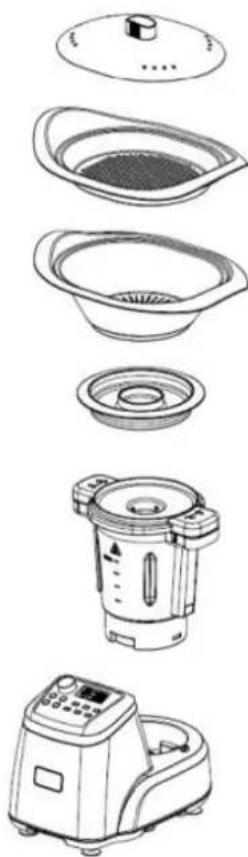
natural_image
Exploded view diagram of a kitchen appliance showing top-down views including a microwave oven, filter bowl, and blender (no text or labels)PRUDENCE :
natural_image
Technical line drawings of two identical fan or fan-shaped devices with internal blades and a separate handle (no text or symbols)natural_image
Line drawings of a cooking pan with lid, showing interior compartments and contents (no text or symbols)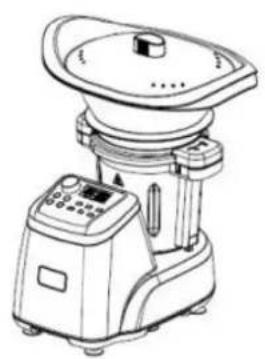
natural_image
Line drawing of a laboratory instrument with control panel and lid (no text or symbols)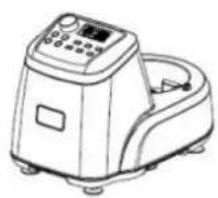
natural_image
Line drawing of a laboratory instrument with control panel and side-mounted device (no text or symbols)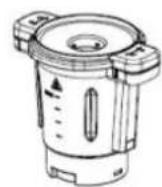
Cautela:
Please read all instructions before using the device.
○ This appliance may be used by persons with limited physical, sensory or mental abilities or lack of experience and/or knowledge, if they are supervised by persons responsible for their security or if they have been instructed about the safe use of the appliance and therefore fully understand the hazards involved.
○ This appliance must not be used by children; the appliance and its power cord must be kept away from children.
- The appliance shall always be disconnected from the mains when not in use or when left unattended, and before assembling, disassembling or cleaning. It must be unplugged by grasping the plug and never by pulling the cord.
Before plugging into a socket, it shall be ensured that the mains voltage matches the voltage specified on the rating plate of the appliance.
○ The appliance shall not be operated with a damaged supply cord or plug, or after the appliance malfunctions, or has been damaged in any manner. It shall
be returned to the nearest authorized service facility for examination, repair or adjustment.
- Incorrect repair attempt, assembly, or use of any accessory attachment not recommended or sold by the manufacturer may cause fire, electric shock or personal injury and will void the manufacturer's warranty.
- To avoid any hazards, the motor base of the appliance, its cord or plug shall not be immersed into water or any other fluid.
- The use of the appliance shall be avoided near sinks or other vessels containing water, and with wet hands.
○ The power cord shall not touch hot surfaces.
- CAUTION - HOT: Burns can occur by touching the hot surfaces, hot water or steam escaping from the appliance. Keep hands clear off the bowl, the measuring cup, the steamer and its lid while processing hot food.
○ Direct contact with the rotating blade/parts of the appliance shall be avoided as they may cause severe injury. Only the upper part of the tool shall be held for removing or re-inserting.
- The maximum filling capacity of the bowl shall not be exceeded to avoid splashing or scalding.

○ The speed setting must never be abruptly increased when processing hot food (above 60^ C).
- The appliance must be used on a flat, stable and heat-resistant surface and placed at a sufficient distance from the edge of this surface to prevent it from falling while processing (vibrations).
○ The lid shall always be properly locked on the bowl before operating the appliance.
○ The appliance is intended to be used in household and similar applications such as:
■ staff kitchen areas in shops, offices and other working environments;
- farm houses;
■ by clients in hotels, motels and other residential type environments;
■ bed and breakfast type environments;
■ catering and similar non-retail applications.
○ The appliance shall not be used outdoors.
- BEFORE FIRST USE
- Remove all packaging materials and stickers from the appliance.
- Check that all listed parts are included. If anything is missing, please contact the after-sales service.
○ Wipe off all removable parts with a damp cloth. Never use abrasive products. DO NOT IMMERSE THE MOTOR BASE IN WATER. The edges of the multiblade are very shard, handle with care.
Place the Thermocooker Expert on a clean, stable and even surface. Ensure a minimum of 30 cm clearance around the device as it can vibrate strongly (when processing dough for example) or let hot steam escape.
o Fully unwind the power cord and check for any signs of damage.
• CONTROL PANEL
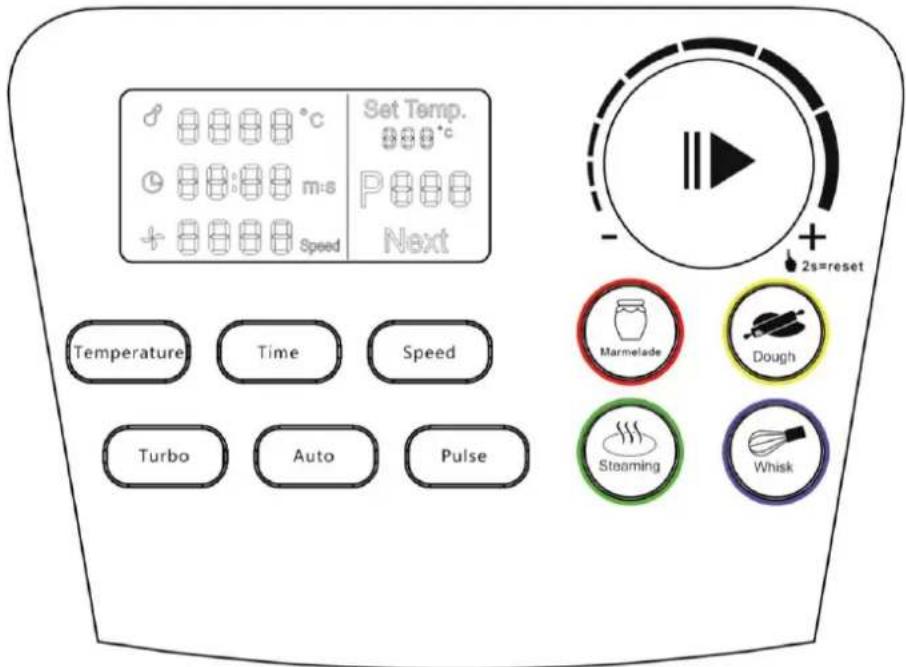
Start/Stop/Reset knob
- Rotate the knob after selecting a function to set temperature, time or speed.
- Press the knob to run, interrupt or stop a programm.
- Press the knob for 2 seconds to stop a program and cancel all settings.
Temperature
To set a working temperature, press the Temperature button and rotate the knob clockwise to increase temperature, counterclockwise to decrease.
o Temperature range: from 20°C to 120°C.
Time
To set the timer function, press the Time button and rotate the knob clockwise to increase time, counterclockwise to decrease.
○ Timer range: from 1 second to 100 minutes (99' 60'').
- 1-60 seconds: the time increases or decreases in increments of 1 second.
- 1-10 minutes: the time increases or decreases in increments of 30 seconds.
- 10-100 minutes: the time increases or decreases in increments of 1 minute.
If the timer is set, the Thermocooker Expert will count down (5, 4, 3, 2, 1) until set time is reached and the appliance will automatically stop.
NOTE: if no time has been preset and a speed or a programm is activated, the appliance will automatically stop after 60 minutes.
Speed
○ Press the Speed button and rotate the knob clockwise to increase speed, counterclockwise to decrease.
○ Speed range: 1-12.
NOTE: if no time has been preset and a speed or a programm is activated, the appliance will automatically stop after 60 minutes.
Turbo
○ In standby mode, press Turbo to use this function as follow:
■ speed 12. until the button is released.
NOTE: this button is invalid if the temperature of the processed food exceeds 60°C.
Auto
Press the Auto button and rotate the knob clockwise to select an automatic programme, based on the Thermocooker's recipe book.
○ Programme range: 1-29.
P01: Vegetable soup
P02: Quiche with goat cheese and courgette
P03: Coconut milk Thai soup
P04: Béchamel sauce
P05: Bolognese sauce
P06: Crêpes batter
P07: Guacamole
P08: Hamburger bun
P09: Mayonnaise
P10: Pizza dough
P11: Chocolate spread
P12: Mashed potato
P13: Parmesan Risotto
P14: Swiss hash browns
P15: Ratatouille
P16: Swiss-style macaroni with apple sauce
P17: Codfish buns with mixed vegetables
P18: Fish gratin
P19: Chicken breast rolls with prunes
P20: Zurich-style veal stew
P21: Cheese fondue
P22: Salmon with lemon sauce
P23: Paella
P24: One pot pasta
P25: Steak tartare
P26: Carrot cake
P27: Raspberry sorbet
P28: Chocolate cake
P29: Tiramisu
Pulse
○ In standby mode, press Pulse to set the automatic pulse function with repeat working interval as follow:
■ speed 12, 10 seconds.
■ Stop, 2 seconds.
■ The same interval continues until the button Pulse is pressed again.
NOTE: this button is invalid in another work mode or if the temperature of the processed food exceeds 60^ C.
Marmalade
○ In standby mode, press Marmelade to run the pre-set function as follow:
■ Sound signal, 3 times
■ Mixing: running speed 12, 10 seconds
■ Heating: 65°C, mixing: speed 1
■ Sound signal, 3 times
■ Increasing speed gradually to speed 12, mixing: 10 seconds
■ Heating: 80°C, mixing: speed 1, heating on/off with 2 seconds increments
■ Heating: 100°C, mixing: speed 1, heating on 2 seconds, heating off 5 minutes
■ Stopping: 1 minute
■ Sound signal, 3 times
■ Increasing speed gradually to speed 12, mixing: 20 seconds and 10 seconds stopping, repeated 4 times
■ Sound signal 30 seconds, programm end, display turns off
NOTE: this button is invalid in another work mode. The actual speed and temperature are displayed while the Thermocooker Expert is running.
Dough
○ In standby mode, press Dough to run the pre-set function as follow:
■ Kneading: speed LOW (400 rpm), 20 seconds
■ Stopping: 2 seconds
■ Kneading: speed 2, 10 seconds, stopping: 2 seconds, repeated 4 minutes
■ Sound signal 30 seconds, programm end, display turns off
NOTE: this button is invalid in another work mode or if the temperature of the processed food exceeds 60^ C.
NOTE: The running time of this programm is 4 minutes, run by countdown. Press again Dough or the Start/Stop/Reset knob to stop the appliance while running this program.
Steaming
- In standby mode, press Steaming to run the pre-set function as follow:
■ Heating: up to 120°C
■ Default time: 30 minutes (Time setting can be modified).
NOTE: this button is invalid in another work mode.
NOTE: set temperature, actual speed and temperature are displayed while the Thermocooker Expert is running.
Whisk
- For best results, insert the butterfly (stirring tool) inside the bowl before processing.
○ In standby mode, press Whisk to run the pre-set function as follow:
■ Whisking: speed 3, 3 minutes
■ Stopping: 10 seconds
■ Whisking: speed 3, 20 seconds
■ Sound signal 30 seconds, programm end, display turns off.
NOTE: this button is invalid in another work mode or if the temperature of the processed food exceeds 60^ C.
NOTE: the running time of this programm is 4 minutes, run by countdown, speed 3. Press again Whisk or the Start/Stop/Reset knob to stop the appliance while running this program.
- LCD DISPLAY
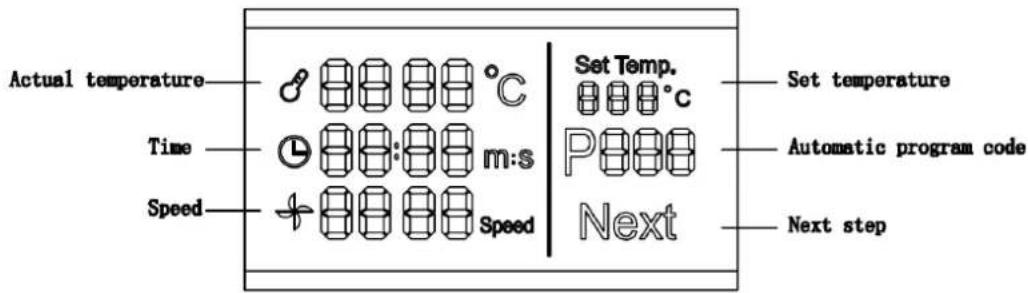
Actual temperature
- The display shows the actual temperature of the processed food inside the bowl.
Time
With timer function: the display shows the remaining time, counted backwards (...5, 4, 3, 2, 1).
○ Without timer function: the display shows the actual running time.
Speed
- The display shows the actual running speed, within a range from 1 to 12.
Set temperature
- The display shows the set temperature.
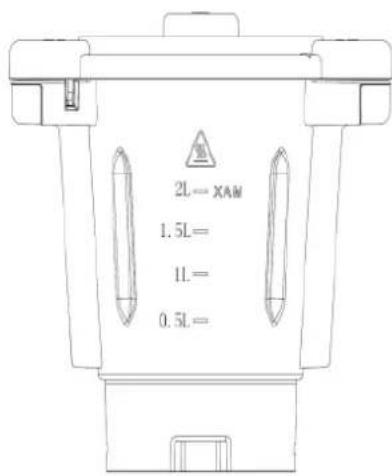
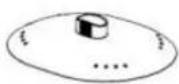
- BOWL

○ WARNING: Hot surface!
The logo marked on the bowl indicates that this item will become hot while cooking.
- When processing hot food, avoid touching the bowl and only use the insulating handles to remove it from the base unit of the Thermocooker Expert!
○ Maximum capacity: 3 litres.
○ Effective filling capacity: 2 litres.
CAUTION: do not exceed the effective filling capacity of two litres to prevent from scalding by splashing hot food/liquids.
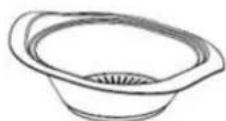
- SEALING RINGS
- Please insert both sealing rings as shown below.
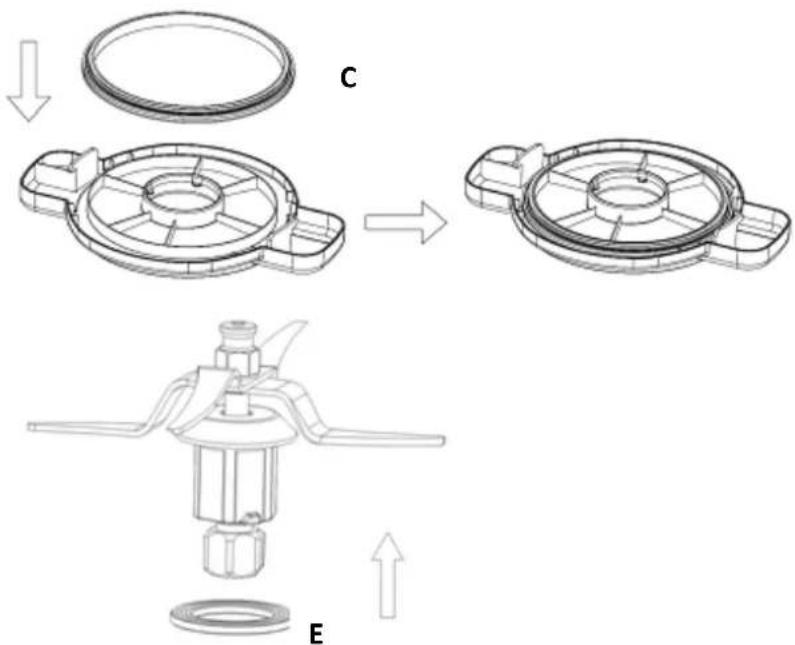
The sealing rings prevent liquid or food from escaping between the bowl and the lid (Fig. C) and between the multiblade and the bottom of the Thermocooker Expert (Fig. E).
○ Only use the Thermocooker Expert with correctly fitted and clean sealing rings to prevent damage or injury.
○ Inspect them regularly as they might become brittle over time. Replace them immediately if leakage occurs or at last every two years.
- MULTIBLADE
This tool is a perfect allrounder for chopping or mincing meat, nuts, onions, herbs, vegetables and all kind of ingredients.
For homemade applesauce, soup ou mashed potatoes, use the multiblade to reduce the food to a smooth purée, directly after cooking.
The multiblade of the Thermocooker Expert is also to be used to blend fruits and dairy to create delicious and healthy smoothies, ice creams or sorbets.
Inserting the multiblade
flowchart
graph TD
    A["Top Component"] --> B["Downward Arrow"]
    B --> C["Left Panel: Internal fan blade, central hub"]
    C --> D["Right Panel: Top housing with valve and handle"]
    D --> E["Bottom Panel: Left side, central hub with valve and handle"]
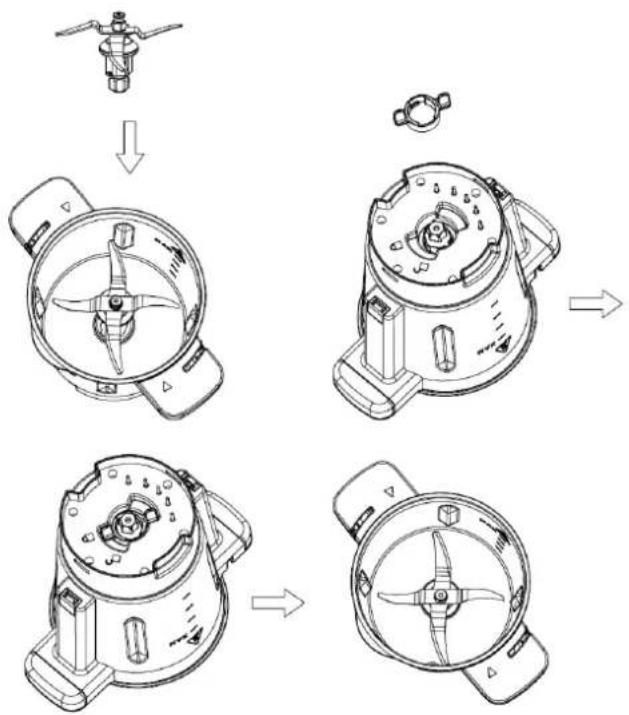
- Put the sealing ring (E) on the bottom end of the multiblade.
Carefully hold the upper part of the multiblade with one hand and the bowl with the other. Gently insert the multiblade through the opening in the bottom of the bowl. Ensure that the blade lock buckle is properly positioned (see figure above).
Turn the bowl while still holding the multiblade and set the spanner (F) on the blade base from the external side of the bowl.
- Rotate the spanner clockwise to lock the multiblade inside the bowl.
To remove the multiblade from the bowl, carefully hold the upper part of the blade with one hand, and release the spanner counterclockwise with the other hand.
Working with the multiblade
○ Assemble the multiblade into the bowl.
○ Insert the bowl into the main unit.
o Put the food to be processed into the bowl and close the lid, including measuring cup.
- Plug in and switch the Thermocooker Expert on.
- Set the mixing time required and select the speed (1-12). Press the Start/Stop/Reset knob for the appliance to start working.
○ A sound signal indicates when the working time is over. The Thermocooker Expert stops automatically. Turn it off.
○ Remove the bowl from its socket and open the lid.
- Take out the processed food with the spatula.
CAUTION:
The multiblade is very sharp. Handle with care. Only hold the upper part of the multiblade to insert or remove it!
The sealing ring (E) must be set onto the blade before locking the spanner. Without the sealing ring, the food to be chopped or cooked may leak out and damage the appliance.
• BUTTERFLY (STIRRING TOOL)
This tool is perfect for whipping cream, whisking mayonnaise, stirring cake batter or beating egg whites.
When cooking rice pudding, porridge ou sauces, the butterfly allows constant and smooth movements of ingredients that prevents them from sticking.
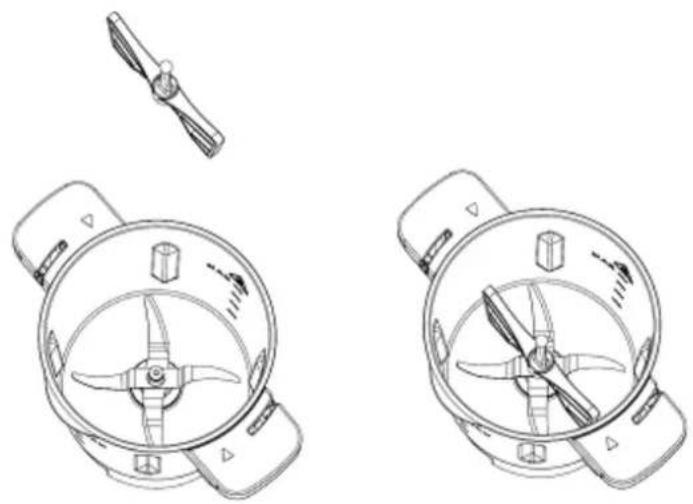
Inserting the butterfly tool
○ Hold the ball-shaped end of the butterfly.
○ Insert the tool on the upper part of the multiblade, as shown in the figure above.
natural_image
Technical line drawings of two identical mechanical components with internal blades and mounting brackets (no text or symbols)Working with the butterfly tool
○ Insert the multiblade as shown before and the butterfly tool onto the multiblade.
- Put the food to be processed into the bowl and close the lid, including measuring cup.
○ Insert the bowl into the main unit.
- Plug in and start the appliance.
○ Set the time and select the speed (1-5).
○ A sound signal indicates when the working time is over. The Thermocooker Expert stops automatically.
- Turn off the appliance and remove the bowl.
- Open the lid and take out the processed food with the spatula.
To remove the butterfly tool from the multiblade, hold the ball-shaped end and pull it out with rotations in both directions.
CAUTION:
○ Only start the Thermocooker Expert after the butterfly tool has been properly inserted!
- Do not use speed level over 5 when using the butterfly to avoid damaging it.
o Do not proceed hard ingredients that might damage or block the butterfly tool!
Do not use the spatula to stir the processed food when the butterfly tool is currently used.
- DOUGH KNEADER
With the dough kneader, mixing and kneading yeast dough such as bread, pizza and pasta dough is getting very easy.
Inserting the dough kneader
- Put the sealing ring (E) on the bottom end of the dough kneader.
Hold the upper part of the dough kneader with one hand and the bowl with the other. Gently insert the dough kneader through the opening in the bottom of the bowl. Ensure that the lock buckle is properly positioned.
Turn the bowl while still holding the dough kneader and set the spanner (F) on the kneader base from the external side of the bowl.
○ Rotate the spanner clockwise to lock the dough kneader into the bowl.
To remove the dough kneader from the bowl, hold the upper part of the tool with one hand, and release the spanner counterclockwise with the other hand.
Working with the dough kneader
○ Assemble the dough kneader into the bowl.
o Put the food to be processed into the bowl and close the lid, including measuring cup.
- Insert the bowl into the main unit.
- Plug in and start the appliance.
- Set the time and select the speed (1-2).
○ A sound signal indicates when the working time is over. The Thermocooker Expert stops automatically.
- Turn off the appliance and remove the bowl.
- Open the lid and take out the processed dough with the spatula.
NOTE:
To avoid overheating of the Thermocooker Expert, do not proceed more than 500 g dough. We recommend not to exceed speed 2 and 60°C of temperature.
• GETTING STARTED WITH THE THERMOCOOKER EXPERT
Spout
flowchart
graph TD
    A["Preparation with a bowl-shaped container"] --> B["Add a lid component"]
    B --> C["Product with a fan or plate"]
    C --> D["Assembly of two kitchen units"]
    D --> E["Final assembly with a small tank and control panel"]
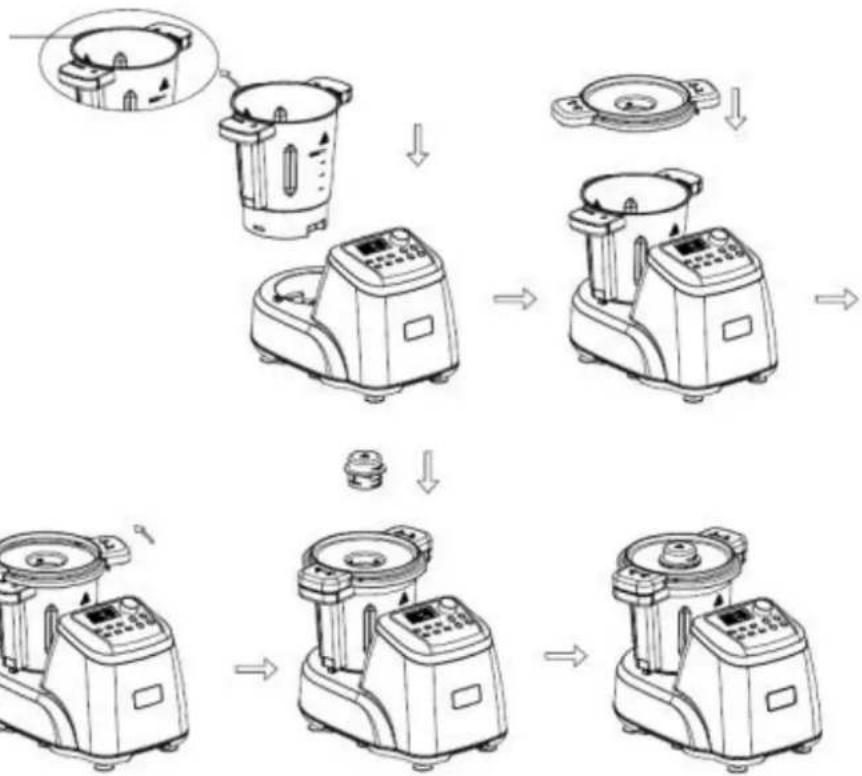
Inserting the bowl
○ Always ensure that the Thermocooker Expert is switched off before inserting the bowl.
- Check that the multiblade and the butterfly tool where appropriate, are correctly placed inside the bowl.
Place the bowl onto the socket of the main unit. Ensure that the spout of the bowl is pointing to the back.
- Set the lid onto the bowl and rotate it clockwise until its securely locks into place.
- Put the measuring cup onto the lid.
WARNING!
The Thermocooker Expert features a safety lock between the bowl and the main unit. The appliance cannot be switched on unless the lid has been closed properly.
To avoid scalding from splashing hot food, never try to force open the lid of the bowl. Open the lid only after the processed program has stopped.
Removing the bowl
- Wait until the cooking process is finished and switch off the Thermocooker Expert.
- Rotate the bowl lid counterclockwise to release the bowl.
- Lift the bowl out of the main unit.
CAUTION: The bowl may become very hot while cooking. Avoid touching the bowl and use the insulating handles to remove it from the base unit of the Thermocooker Expert!
- WORKING MODES
Mode 1: mixing ingredients
The Thermocooker Expert is perfectly suited for chopping and mixing all kind of ingredients.
○ Assemble the blade to the bowl.
- Insert the bowl into the main unit.
- Put the food to be processed into the bowl and close the lid, including measuring cup.
- Plug in and switch on the Thermocooker Expert.
- Push the button Time and rotate the knob to set the mixing time required. Confirm the setting by pushing the knob.
- Press the button Speed and rotate the knob to select the speed (1-12). Press again the Start/Stop/Reset knob for the appliance to start working.
○ A sound signal indicates when the working time is over. The Thermocooker Expert stops automatically. Turn it off.
- Remove the bowl from its socket and open the lid.
- Take out the processed food with the spatula.
CAUTION: For hard food, such as coffee beans and almond, don't proceed longer than 40 seconds. Wait for the appliance to cool down at least 10 minutes before the next operation!
Mode 2: only cooking
Use the Thermocooker Expert for cooking baby food, stews, etc.
○ Assemble the blade to the bowl.
○ Insert the bowl into the main unit.
- Put the ingredients to be cooked in the bowl and close the lid, including measuring cup.
- Plug in and switch on the Thermocooker Expert.
- Set the cooking time required by pushing the key Time and rotate the knob. Confirm the setting by pushing the knob.
- Set temperature requested: push the key Temperature and press the Start/Stop/Reset knob for the appliance to start heating.
○ A sound signal indicates when the cooking time is over. The Thermocooker Expert stops automatically. Turn it off.
○ Remove the bowl from its socket and open the lid.
- Take out the processed food with the spatula.
CAUTION:
○ Avoid touching the metal walls of the bowl while the processed food is still hot!
○ Only hold the bowl by its handles!
- Never heat up an empty bowl!
o Do not heat up more than 500 ml milk as it could boil over!
Mode 3: chopping and cooking
Cook a whole meal such as risotto, bolognese sauce, vegetable soup in the Thermocooker Expert by combining its various functions.
○ Assemble the blade to the bowl.
- Set the bowl onto the main unit.
- Put the ingredients to be processed into the bowl and close the lid, including measuring cup.
- Plug in and switch on the Thermocooker Expert.
- Set the mixing time required by pushing the key Time and rotating the knob. Confirm the setting by pushing the knob.
○ Select the speed (1-12) by pushing the corresponding button. Press the Start/Stop/Reset knob for the appliance to start working.
○ A sound signal indicates when the working time is over.
- Set the time, temperature and speed as indicated previously, to cook the chopped/minced food or add some more ingredients. Press the Start/Stop/Reset knob again. The Thermocooker Expert will heat up to the set temperature.
○ A sound signal indicates when the working time is over. The Thermocooker Expert stops automatically. Turn it off.
○ Remove the bowl from its socket and open the lid.
- Take out the processed food with the spatula.
CAUTION:
○ Avoid touching the metal walls of the bowl while the processed food is still hot!
○ Only hold the bowl by its handles!
- Never heat up an empty bowl!
○ Overheating protection: If the actual temperature of the processed food is over 60^ C when setting the speed higher than 5, the Thermocooker Expert will gradually accelerate its tempo to reach the pre-set speed and in the same time, it will stop heating.
Mode 4: Steaming
The steamer of the Thermocooker Expert is ideal to cook healthy meals, combining vegetables with meat, sausages, steamed bread, steamed fish etc.
- The steamer can be used in either of the following two combinations:
■ Combination 1: Tray (M) + steamer (N) + lid Use this combination for cooking different food at the same time.
■ Combination 2: Steamer (N) + lid Use this combination for larger amount of the same food, e.g. vegetables, potatoes or large pieces of meat or sausages.
○ Assemble the blade to the bowl.
○ Insert the bowl into the main unit.
○ Add water or broth (min 0,5/max 2,0 L) to the bowl.
○ Make sure the sealing ring (C) is properly fitted in the bowl lid.
- Put the lid onto the bowl and remove the measuring cup.
○ Set the drip pan (O) on the lid, if you wish to use the cooking juices for a sauce, for example.
○ Assemble the steamer and/or the tray onto the lid.
○ Add the food to be steamed in the basket(s) and close the lid of the steamer.
- Plug in and switch on the Thermocooker Expert.
- Pressing the button Steaming and rotate the Start/Stop/Reset knob to set time, if another time as the default time of 30 minutes is required. Press again to confirm the setting. The Thermocooker Expert will heat up to the set temperature, developing hot steam.


natural_image
Line drawing of a laboratory instrument with a control panel and lid (no text or symbols)
natural_image
Line drawing of a laboratory instrument with control panel and side arm (no text or symbols)CAUTION:
30 minutes of steam cooking require 0.5 litre (500 g) of water. For every additional 15 minutes, add 250 ml water into the bowl.
○ Mind the hot steam that escapes at the sides and from the top of the lid during operation.
○ After steaming, carefully remove the lid and place it upside down onto the work surface.
NOTE:
o Vegetables will be evenly cooked if cut into similar-sized pieces.
To cook food of different consistency and hardness at the same time, place food requiring longer cooking at the bottom and food requiring less cooking at the top, for example vegetables in the steamer and fish in the tray.
• CLEANING AND MAINTENANCE
Before you clean the Thermocooker Expert, switch it off and remove the plug from the socket. Let it cool down.
Remove the multiblade from the bowl. The edges of the blade are very sharp! Handle with care! To clean the multiblade, hold it under running water, pointing upwards, and use a brush.
○ Clean the inside and outside of the bowl with warm water and mild detergent. DO NOT IMMERSE THE BOWL INTO WATER. Always keep the contact pins at the bottom of the bowl clean and dry. Only wipe the contact pins with a wet cloth!
- DO NOT IMMERSE THE MOTOR BASE IN WATER. Wipe it clean with a damp cloth only.
Do not use anything harsh or abrasive cleaners or tools that can scratch or damage the surfaces of the appliance or its accessories.
○ Make sure that the cutting edges of the multiblade do touch hard objects. This could blunt them.
o Lubricate the multiblade after cleaning with some vegetable oil.
Should the bowl and the multiblade be hard to clean, add some hot soapy water in the bowl. Run the appliance at speed 1 for few seconds to remove the food residue.
• TROUBLESHOOTING
| Code | Explanation | Solution |
| E01 | The temperature sensor of the bowl is not functioning properly | Please contact your local service center |
| E02 | Machine failure | Please contact your local service center |
| E03 | The bowl does not sit correctly on the unit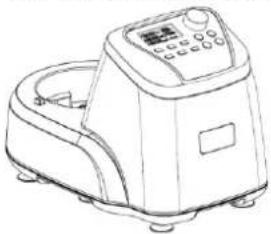 | Turn off the appliance. Insert the bowl or put the lid on the bowl, or take out the bowl lid and reinstall it correctly. Restart the machine. |
Bowl lid is not installed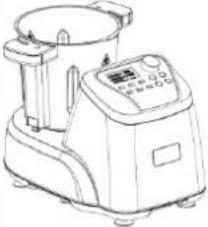 | ||
Bowl lid is not locked onto the bowl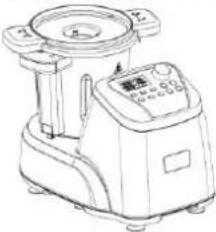 | ||
| E04 | 1. Too much food is being processed or the speed is too low: the motor cannot run properly2. The overheating protection has activated because of a long working time | 1. Reduce food amount or set higher speed2. Allow the appliance to cool down for a few minutes |
| E05 | Overheating protection | Turn off the appliance and let cool down before restarting it |
| E06 | Machine failure | Please contact your local service center |
| E07 | Machine failure | Please contact your local service center |
- DISPOSAL
- For proper disposal, please return device to a retailer, a service agent or Rotel AG.
European Directive 2012/19/EC concerning Waste Electrical and Electronic Equipment (WEEE) states that household appliances should not be disposed of using the normal solid urban waste cycle. Exhausted appliances should be collected separately to optimise the cost of re-using and recycling materials comprising the machine, while preventing potential damage to public health and the environment. The crossed-out wheeled bin symbol appears on all products to remind owners of the obligations regarding separate waste collection. Owners should contact their local authorities or appliance dealers for further information concerning the correct disposal of household appliances.
This appliance conforms to the following EU directives:
CE
2014/35/EU (Low Voltage Directive)
2014/30/EU (Electromagnetic Compatibility Directive)
D/F/I/E
• GARANTIE / GARANTIE / GARANZIA / WARRANTY
• 2 JAHRE GARANTIE
• 2 ANS DE GARANTIE
• 2 ANNI DI GARANZIA
• 2 YEARS WARRANTY
○ Warranty commitment
We commit ourselves to repair this device free of charge, should a failure occur within the period of warranty despite proper handling. We repair all defects caused by material or manufacturing faults. The guarantee will be fulfilled either by repairing the device or replacing the defective parts, according to our judgement. A warranty does not cover damages due to wearing parts, damages and defects caused by improper handling or maintenance (such as limescale and commercial use). It will only be granted if either the warranty card stating date of purchase, dealer's stamp and signature, or the purchase receipt is sent with the device to the relevant after-sales service (see address below). Devices shall be returned in their original packaging. Transport costs are to be borne by the purchaser. Remember to specify your address to your sending, as well as a short declaration about the failure, shall the defect not be obvious.
Servicestation:
Service après-vente: Rotel AG

- THERMOCOOKEREXPERT448CH1
- D/F/I/E
- • TECHNISCHE DATEN
- Deutsch
- Ist-Temperatur (Actual temperature)
- • DICHTUNGSRINGE
- VORSICHT:
- Confiture (Marmalade)
- Température effective (actual temperature)
- PRUDENCE :
- Cautela:
- - BEFORE FIRST USE
- Start/Stop/Reset knob
- Temperature
- Time
- Speed
- Turbo
- Auto
- Pulse
- Marmalade
- Dough
- Steaming
- Whisk
- - LCD DISPLAY
- Actual temperature
- Set temperature
- - BOWL
- - SEALING RINGS
- - MULTIBLADE
- Inserting the multiblade
- Working with the multiblade
- CAUTION:
- • BUTTERFLY (STIRRING TOOL)
- Inserting the butterfly tool
- Working with the butterfly tool
- - DOUGH KNEADER
- Inserting the dough kneader
- Working with the dough kneader
- NOTE:
- • GETTING STARTED WITH THE THERMOCOOKER EXPERT
- Inserting the bowl
- WARNING!
- Removing the bowl
- - WORKING MODES
- Mode 1: mixing ingredients
- Mode 2: only cooking
- Mode 3: chopping and cooking
- Mode 4: Steaming
- • CLEANING AND MAINTENANCE
- - DISPOSAL
- • GARANTIE / GARANTIE / GARANZIA / WARRANTY
- ○ Warranty commitment
Brand : ROTEL
Model : U448CH1
Category : Food Processor