
AM09AA1GAA - Air Conditioning HAIER - Free user manual and instructions
Find the device manual for free AM09AA1GAA HAIER in PDF.
| Product type | Portable monoblock air conditioner |
| Brand | Haier |
| Model | AM09AA1GAA |
| Power supply | 230 V ~ 50 Hz, 16 A |
| Power plug | Grounded plug |
| Refrigerant | R290 (propane), quantity not specified |
| Operating modes | Cooling, heating (on some models), dehumidification, fan |
| Set temperature range | 16 °C to 30 °C |
| Fan speeds | 3 speeds (low, medium, high) |
| Timer | Delayed stop and delayed start (up to 24 h) |
| Swing function | Yes, oscillating wind guide bar |
| Remote control | Included (batteries not included) |
| Display | Temperature in °C or °F (switchable) |
| Exhaust | Exhaust hose to connect to a window (adjustable length) |
| Condensate drainage | Self-evaporation in cooling mode; manual or continuous drainage for heating mode or high humidity |
| Minimum clearance required | 51 cm from any wall or obstacle |
| Air filter | Washable, cleaning recommended every 2 weeks |
| Safety | Automatic shutdown when water tank is full (FL indicator) |
| Installation | Requires 2 people, window kit provided (adaptable to vertical or horizontal window) |
| Weight | Not specified, estimated approximately 25-30 kg |
| Dimensions (W × H × D) | Not specified |
Frequently Asked Questions - AM09AA1GAA HAIER
User questions about AM09AA1GAA HAIER
0 question about this device. Answer the ones you know or ask your own.
Ask a new question about this device
Download the instructions for your Air Conditioning in PDF format for free! Find your manual AM09AA1GAA - HAIER and take your electronic device back in hand. On this page are published all the documents necessary for the use of your device. AM09AA1GAA by HAIER.
USER MANUAL AM09AA1GAA HAIER
Installation and User Manual
Model:
AM09AA1TAA
AM12AA1TAA
AM09AA1GAA
AM12AA1GAA
Thank you very much for selecting this new model of Portable Air Conditioner, please read this Operation Manual carefully before installing and using this appliance. Please keep this Operation Manual properly for future reference.
TABLE OF CONTENTS
AIR CONDITIONER SAFETY 2
PARTS AND FEATURES 3
INSTALLATION REQUIREMENTS 3
Tools and Parts 3
Location Requirements 4
Electrical Requirements 4
INSTALLATION INSTRUCTIONS 5
Step 1 - Unpack Air Conditioner 5
Step 2 - Install Exhaust Nozzle to Main Window Panel 5
Step 3 - Attach Exhaust Pipe Assembly To The Window Panel 5&6
Step 4 - Connect Exhaust Hose To The Air Conditioner 6
Step 5 - Complete Installation 6
CONTROL PANEL 7
7
Remote Control 8
Indicator Lights 8
AIR CONDITIONER USE 8
DRAINAGE INSTRUCTION 9
AIR CONDITIONER CARE 10
Cleaning 10
Air Filters 10
Internal Water Tank 10
Storage 10
TROUBLESHOOTING 11
SPECIFICATION 12
RECORD KEEPING
Thank you for purchasing this GE Applet. This user manual will help you get the best performance from your new air conditioner.
For future reference, record the model and serial number located on the label on the side of your air conditioner, and the date of purchase.
Staple your proof of purchase to this manual to aid in obtaining warranty service if needed.
Model number
Serial number
Date of purchase
AIR CONDITIONER SAFETY
Your safety and the safety of others are very important.
We have provided many important safety messages in this manual and on your appliance. Always read and obey all safety messages.

This is the safety alert symbol.
This symbol alerts you to potential hazards that can kill or hurt you and others. All safety messages will follow the safety alert symbol and either the word "DANGER," "WARNING" or "CAUTION."
These words mean:

DANGER

WARNING

CAUTION
An imminently hazardous situation. You could be killed or seriously injured if you don't immediately follow instructions.
A potentially hazardous situation which, if not avoided, could result in death or serious bodily injury.
A potentially hazardous situation which, if not avoided, may result in moderate or minor injury.
All safety messages will tell you what the potential hazard is, tell you how to reduce the chance of injury, and tell you what can happen if the instructions are not followed.
IMPORTANT SAFETY INSTRUCTIONS
WARNING: To reduce the risk of fire electrical shock, injury to persons, or damage when using the air conditioner,
follow basic precautions, including the following:
- Read all of the instructions before using this appliance.
- Plug into a grounded outlet. only
- Do not remove ground contacts from the power cord plug.
- Do not use an adapter.
- Do not use an extension cord.
- Do not operate the air conditioner if it has a damaged cord or plug, if it is not working properly, or if it has been damaged or dropped.
-
The air conditioner should be serviced only by qualified service personnel. Call an authorized service company for examination, repair, or adjustment.
-
Disconnect power before cleaning.
NOTE: Turning off power by pressing the Power button does NOT disconnect the appliance from the power supply. - Do not install or use the air conditioner in any area where the atmosphere contains combustible gases or where the atmosphere is contaminated. Avoid any chemicals coming in contact with your air conditioner.
- Do not store anything directly on top of the air conditioner.
- Use two or more people to move and install air conditioner.
- Never operate the air conditioner without the filter in place.
- Do not use the air conditioner near a bathtub, shower or wash basin or other wet area.
READ AND SAVE THESE INSTRUCTIONS
PARTS AND FEATURES
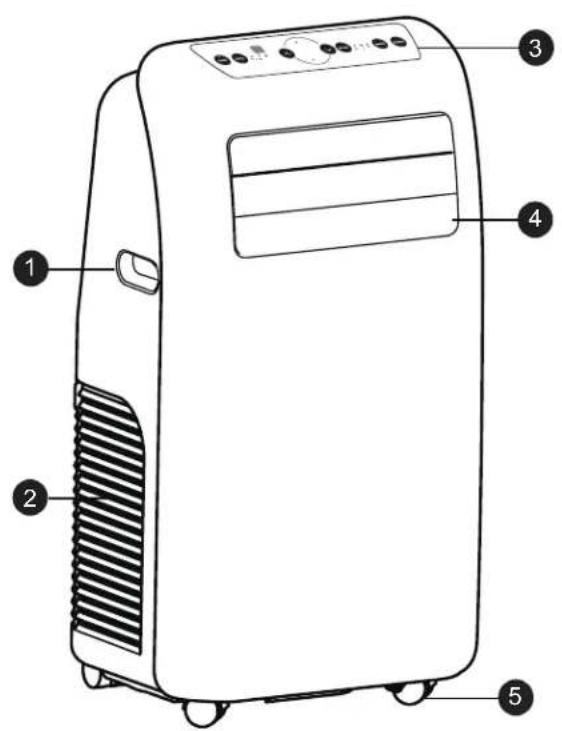
1 Handle
② Air inlet
(3) Control panel
④ Wind guide bar
⑤ Caster
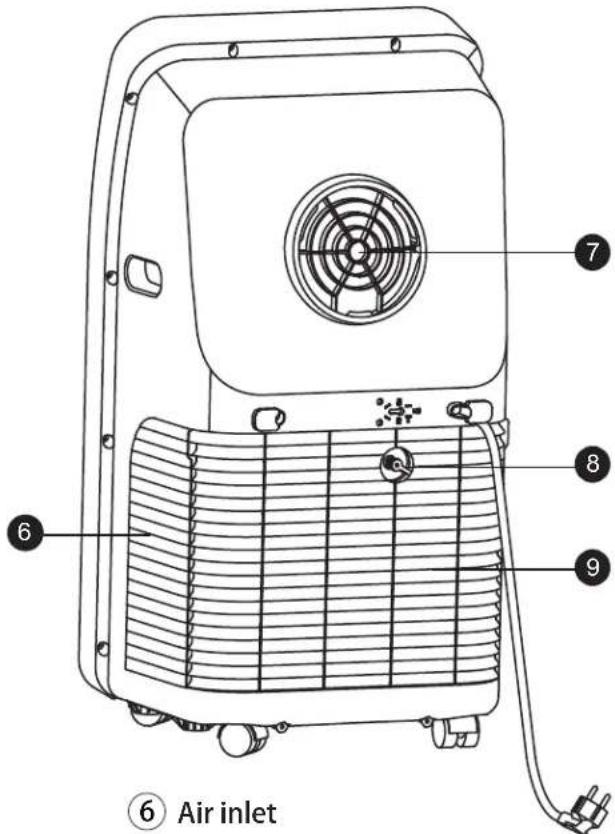
Air outlet
⑧ Deh umidificatio n drainage nozzle
⑨ Air inlet grille
INSTALLATION REQUIREMENTS
TOOLS AND PARTS
Gather the required tools and parts before starting installation.
TOOLS NEEDED
- Flat-blade Screwdriver
PARTS SUPPLIED
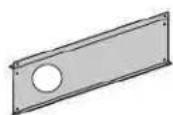
- Main Window Panel
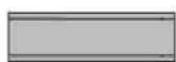
- Extension Panel
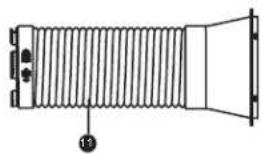
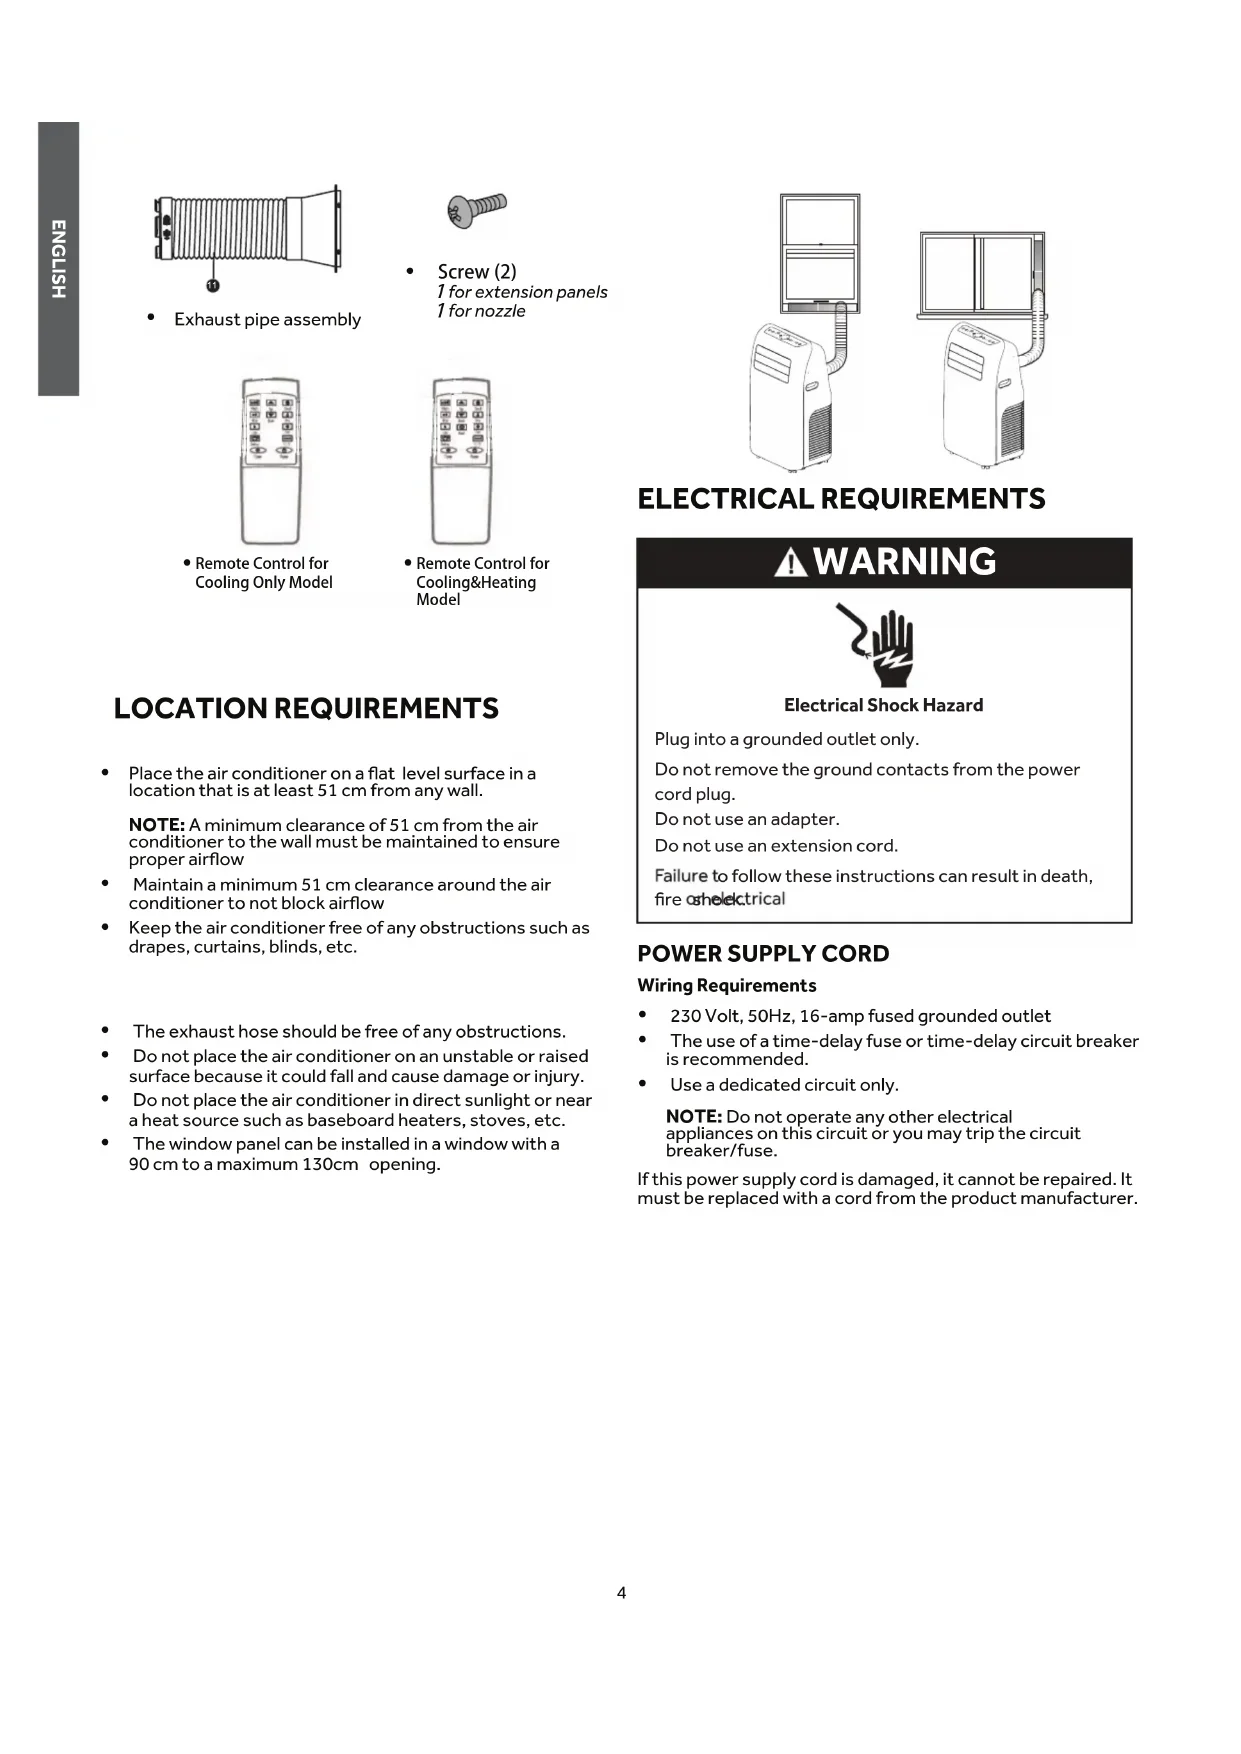
- Exhaust pipe assembly

Screw (2) 1 for extension panels 1 for nozzle

Remote Control for Cooling Only Model

Remote Control for Cooling&Heating Model
LOCATION REQUIREMENTS
- Place the air conditioner on a flat level surface in a location that is at least 51cm from any wall.
NOTE: A minimum clearance of 51 cm from the air conditioner to the wall must be maintained to ensure proper airflow
- Maintain a minimum 51 cm clearance around the air conditioner to not block airflow
- Keep the air conditioner free of any obstructions such as drapes, curtains, blinds, etc.
The exhaust hose should be free of any obstructions.
- Do not place the air conditioner on an unstable or raised surface because it could fall and cause damage or injury.
- Do not place the air conditioner in direct sunlight or near a heat source such as baseboard heaters, stoves, etc.
- The window panel can be installed in a window with a 90 cm to a maximum 130cm opening.
ELECTRICAL REQUIREMENTS
WARNING

Electrical Shock Hazard
Plug into a grounded outlet only.
Do not remove the ground contacts from the power cord plug.
Do not use an adapter.
Do not use an extension cord.
Failure to follow these instructions can result in death, fire or electrical
POWER SUPPLY CORD
Wiring Requirements
230 Volt, 50Hz, 16-amp fused grounded outlet
- The use of a time-delay fuse or time-delay circuit breaker is recommended.
Use a dedicated circuit only.
NOTE: Do not operate any other electrical appliances on this circuit or you may trip the circuit breaker/fuse.
If this power supply cord is damaged, it cannot be repaired. It must be replaced with a cord from the product manufacturer.
REQUIRED GROUNDING METHOD
This air conditioner must be grounded. The air conditioner is equipped with a power supply cord that has a grounding plug. The power supply cord must be plugged into a mating, grounded outlet, and grounded in accordance with all local codes and ordinances.
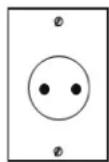
230V
16 Amp
INSTALLATION INSTRUCTIONS
STEP 1 - UNPACK AIR CONDITIONER

WARNING
Excessive Weight Hazard
Use two or more people to move and install air conditioner.
Failure to do so can result in back or other injury.
- Remove packaging materials. Save the carton and the foam packaging for storing the air conditioner when not in use.
NOTE: There are NO packing materials inside the air conditioner to remove—Do Not open the cabinet.
- Properly dispose of/recycle all packing material.
- Handle the air conditioner gently.
- Keep the air conditioner upright and level. Do not set the air conditioner on its side, front, back or upside down.
STEP 2 - INSTALL MAIN WINDOW PANEL AND EXTENSION PANELS
NOTE: Depending on the size of your window opening, use the main panel and one or both of the extension panels.
- Open the window and place the main window panel into the window.
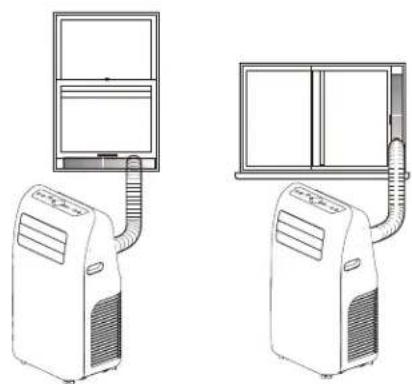
NOTE: The window assembly is designed to accommodate either a vertical slide or horizontal slide window.
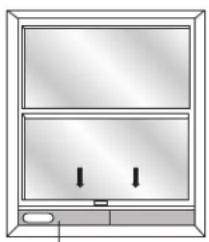
Vertical Slide Window
a

Main Window Panel
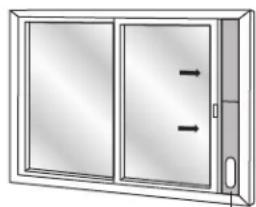
Horizontal Slide Window
a

Main Window Panel
- Adjust the extension panel to of the window as shown.
fit the width or height
NOTE: Some window installations may require the extension panels to be trimmed.
- Use one flat screw to secure the main panel to the extension panel.
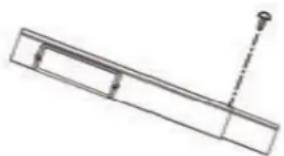
STEP 3 - ATTACH EXHAUST PIPE ASSEMBLY TO THE WINDOW PANEL
- Grasp both ends of the exhaust hose and gently pull to expand the hose.
NOTE: Do not attach additional hoses to extend the length. This would decrease cooling efficiency and may damage the air conditioner.
2.Insert the air exhaust hose into the window sealing plate, fix it with screws

Exhaust pipe assembly

Window panel
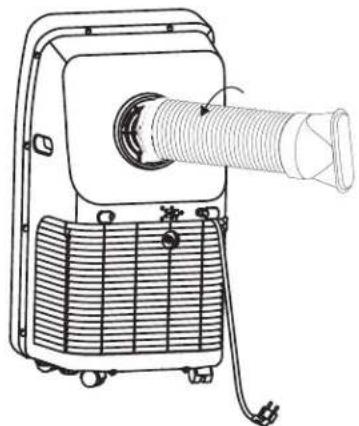
STEP 4 - CONNECT EXHAUST HOSE TO THE AIR CONDITIONER
IMPORTANT: When connecting the hose, the air conditioner must be close enough to the window that you will not dislodge the window seal plate. Once the hose is connected, move the air conditioner 51 cm from the wall.
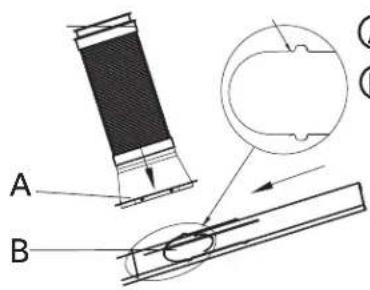
- Align the notches on the connector end of the exhaust hose with the ridges in the opening on the back of the air conditioner.
- Using a counterclockwise motion, screw the exhaust hose (connector end) into the air outlet located on the back of the air conditioner.
STEP 5 - COMPLETE INSTALLATION
WARNING

Electrical Shock Hazard
Plug into a grounded outlet only.
Do not remove the ground contacts from the power cord plug.
Do not use an adapter.
Do not use an extension cord.
Failure to follow these instructions can result in death, fire or electrical shock.
CONTROL PANEL
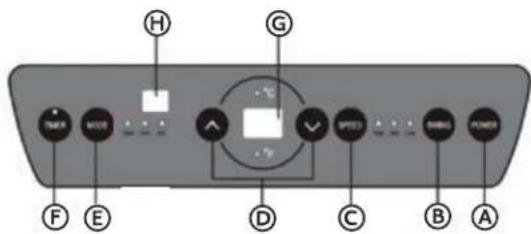
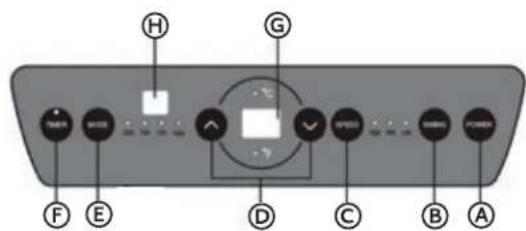
BUTTONS
A POWER BUTTON
Turns ON/OFF power to the air conditioner.
NOTE: Turning off power by pressing the Power button does NOT disconnect the appliance from the power supply.
SWING BUTTON
Press this key at any time after turning on the A/C to swing the wind guide bar automatically.
FANSPEEDBUTTON
The fan speed can be adjusted from Low speed to High speed when the air conditioner is in operation.
NOTE: The fan speed cannot be adjusted when the unit is in Dehum mode.
- Press the Fan Speed button to toggle among the three speeds. The corresponding fan speed indicator will illuminate.
UP AND DOWN ARROW BUTTONS
Adjusts the Temperature or Hours in Time Delay.
To Set the Temperature:
The temperature can be set between 16^ and 30^ when the air conditioner is in Cool mode.
- Press the Mode button until the Cool mode is selected.
- Press the Up Arrow or Down Arrow buttons to select the Temperature.
NOTE: The temperature cannot be set when the air conditioner is in either Fan or Dehum mode.
NOTE: The Up Arrow and Down Arrow buttons, when pressed at the same time, allow you to select between displaying the temperature in ^ C or ^ F . The corresponding indicator will illuminate.
E MODE BUTTON
Press the Mode button to toggle among the operating options. The corresponding indicator will illuminate:
Heat (on some models) - Heats the room to the set temperature
Cool - Cools the room to the set temperature
Dehum - Reduces the humidity in the room
Fan - Circulates the air in the room without cooling
TIMER BUTTON
Program a time from (1-hour to 24-hours) for the air conditioner to turn Off
While the air conditioner is operating:
- Press the Timer button.
- Press the Up/Down arrow buttons to select the number of hours you want the air conditioner to continue to operate before turning Off.
NOTE: Wait approximately 5 seconds for the Turn-Off time to be saved.
While the air conditioner is off:
- Press the Timer button.
- Press the Up/Down arrow buttons to select the number of hours you want the air conditioner to remain off before turning On.
NOTE: Wait approximately 5 seconds for the Turn-On time to be saved.
To cancel the timer:
- Press the Timer button once, the hours remaining will flash, press the timer button again and the timer will be cancelled.
CONTROL PANEL DISPLAY
Displays the Set Temperature in degrees Fahrenheit or degrees Celsius, or the hours remaining in a Time Delay. The corresponding indicator light will illuminate.
REMOTE CONTROL SIGNAL RECEIVING WINDOW
Aim the Remote Control at this window so the Control will receive the signal.
REMOTE CONTROL
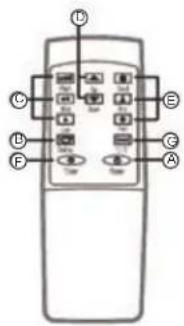
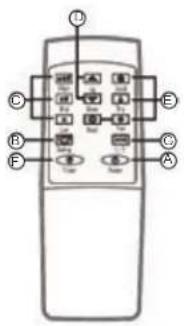
- Insert the two batteries (purchased by users).
- Aim the remote control at the signal receiver on the control panel to operate the air conditioner.
A POWERKEY
Press the key to turn ON/OFF the A/C.
⑥ SWING KEY
Press this key at any time after turning on the A/C to swing the wind guide bar automatically.
SPEED KEY
Press the key to choose high/ low gear wind speed.
TEMPERATURE/TIME ADJUSTING KEY
Press the key at cooling mode to increase/reduce the setting temperature; press it at timing mode to adjust timing ON/OFF time; press Up and Down keys simultaneously to switch Fahrenheit and Centigrade degree temperature.
MODEKEY
Press the key to choose cooling, fan, dehumidification and heating(only for cooling&heating model).
TIMER KEY
Press the key at standby mode to set ON time. Press this key at ON mode to set OFF time.
⑥ ℃/F SWITCHING KEY
Press the key to switch ^ C and F.
AIR CONDITIONER USE
IMPORTANT: If the air conditioner has been tilted on its side, wait 24 hours before turning on the air conditioner to allow the oil to return to the compressor. This will prevent the air conditioner from failing prematurely.
- Allow 51 cm of space around the unit for proper air circulation.
- Do Not operate the air conditioner without air filter in place.
- Do not spill liquid on the control panel; it may cause an electrical short to the interior electronic parts that would either disable them or cause them to function improperly.
-
When turning on the air conditioner for the first time after plugging it into an electrical outlet, the unit will start in Cooling mode set at 22^ , and at low fan speed. The control panel will display the current room temperature.
-
When turning on the unit after previous use, it will remember the last settings used.
After a normal shut down, please wait for 3 minutes before restarting the unit. - In Cooling mode, this unit should not require water to be removed. This model has a unique design that continuously evaporates the water.
- When the unit is operated in high humidity conditions, you may need to empty the water tank periodically.
- The unit will shut down automatically when the water tank is full. The Water Full indicator illuminates to alert you of this condition.
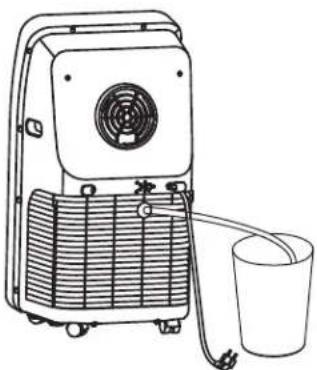
DRAINAGE INSTRUCTION
It also has two drainage methods that can be used - manual drainage and continuous drainage.
MANUAL DRAIN
This unit is designed with a highly efficient selfevaporative system and it is suggested to use manual drainage in cooling mode. Gndensate will recycle in the unit to cool the condenser and enhance cooling performance. However in extreme humidity, the water tank in the chassis will fill up and "the" will show on LED display.tWeeds this happens he water tank drained manually from lower drain port.
- Put a water wedge below the lopper drain port at the back of the unit.
- Screw off the drain port cover and then connect drain-hole 12mm external diameter PVC drain hose to allow water flow into the water wedge.
- After water has stopped flowing, plug in the water stopper back in and screw the drain port cover back onto the drain port tightly.
CONTIOUOUS DRAIN
We strongly recommend to use this method, and drain from the lower drain port if the unit is being used in heating mode, because self-evaporative cooling system does not work heating mode.
1.Screw off the drain port cover.and remove the water
2. Connect drain-hole with 12mm internal diameter PVC drain hose, inserted as deep as possible to avoid leakage
3.Pull the end of the drain hose to a drain outlet within the home, or to the outside of the home.
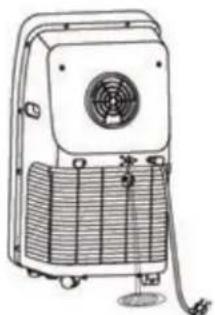
NOTE:
- The drain hose must be installed before unit starts working.
- The drain hose should be routed so that it cannot be accidentally accessed during normal use. It should also be laid as straight as possible, with no sharp bends that would restrict water flow. The entire drain hose should also be kept at a level below that of the drain port.

WARNING
ChokeHazardrd
Keep the drain cover and the water stopper stored safely, out of the sight and reach of infants and children, when continuous drainage has been adopted.

WARNING

Electrical Shock Hazard
Disconnect power before cleaning.
Failure to do so can result in death or electrical shock.
CLEANING
- Unplug or disconnect power.
- Use only a soft cloth dampened with water to clean the cabinet.
NOTE:
-
Do not use a liquid or spray cleaner to clean the air conditioner.
DO NOT use chemicals, abrasives, ammonia, chlorine bleach, concentrated detergents, solvents or scouring pads. Some of these chemicals/items may damage and/or discolor your air conditioner. -
Dry thoroughly with a soft cloth.
- Plug in or reconnect power.
AIR FILTERS
The air filter should be cleaned at least once a week for your unit to operate at optimum efficiency
IMPORTANT: Do Not operate the air conditioner without air filter in place.
-
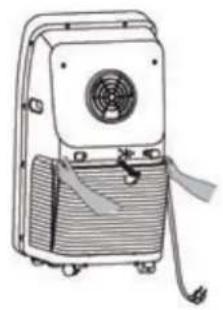
Unplug or disconnect power.
-
Take out the air inlet grille and pull out the filter screen at both sides according to the direction shown in the following figures.
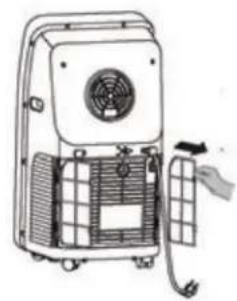
-
Put the filter screen into the warm water (about 40^ ) added with neutral detergent, dry it at a shady place after cleaning.
-
Reinstall the filters
- Plug in or reconnect power.
STORAGE
If the unit is not being used for a long period of time:
- Unplug or disconnect power.
- Drain the water from the water tank. See "Air Conditioner Care."
- Use the original packaging to repack the unit to avoid a buildup of dust or dirt.
- Store the air conditioner in a cool, dry location.
TROUBLESHOOTING
First try the solutions suggested here to possibly avoid the cost of a service call.
| TROUBLE CAUSE SOLUTION | ||
| The A/C doesn't work | Notplugin | Plug in |
| The display panel displays“FL” | Restart the A/C after power off anddraining, then it will become normal | |
| Time OFF function is started | The A/C can be restarted 3 minutes after being turning off. | |
| The A/C starts frequently | Direct sunlight | Draw the curtain |
| Doors and windows keep open; there are lots of people or heat source in room | Close doors and windows, remove heat source | |
| Filter screen is very dirty | Clean or replace it | |
| Air inlet or air outlet is blocked | Remove the stem | |
| Big noise of the A/C | The A/C is placed unevenly | Place it at even and firm ground,avoid shaking |
| The compressor doesn't work | Its delay protection is started | Wait for 3min., turn on it after temperature decreases |
SPECIFICATION
IMPORTANT INFORMATION REGARDSING THE REFRIGERANT USED
This product contains the gas R290, contained in a hermetically sealed system.
AM09AA2TAA/AM09AA2GAA
Charge = 0.235kg
GWP = 3
CO2 Equivalent = 0.000705 tones
AM12AA2TAA/AM12AA2GAA
Charge = 0.245kg
GWP = 3
CO2 Equivalent = 0.000735 tones
EUROPEAN REGULATIONS CONFORMITY FOR THE MODELS
WEEE
In accordance with the directive of the European parliament, herewith we inform the consumer about the dis-posal requirements of the electrical and electronic products.
DISPOSAL REQUIREMENTS:
Your air conditioning product is marked with this symbol. This means that electrical and electronic products shall not be mixed with unsorted household waste. Do not try to dismantle the system yourself: the dismantling of the air conditioning system, treatment of the refrigerant, of oil and of other part must be done by a qualified installer in accordance with relevant local and national legislation. Air conditioners must be treated at a specialized treatment facility for reuse, recycling and recovery. By ensuring this product is disposed of correctly, you will help to prevent potential negative consequences for the environment and human health. Please contact the installer or local authority for more information. Battery must be removed from the remote controller and disposed of separately in accordance with relevant local and national legislation.
Haier
Climatisation Portable
Ces mots signifient:

DANGER
CONDITIONS D'EMPLACEMENT
AM09AA2TAA/AM09AA2GAA
Charge = 0,235kg
GWP=3,
Equivalent CO2 = 0.000705 tonalités
AM 12AA2TAA/AM12AA2GAA
Charge = 0,245kg
GWP=3,
AM09AA2TAA/AM09AA2GAA
Carica = 0.235kg
GWP=3,
CO2 Equivalent=0.000705tonnellate
AM 12AA2TAA/AM12AA2GAA
Carica = 0.245kg
GWP=3,
CO2 Equivalent = 0.000735tonnellate
CONFORMITA DEI REGOLAMENTI EUROPEI PER I MODELLI
WEEE
AM09AA2TAA/AM09AA2GAA
AM 12AA2TAA/AM12AA2GAA
AM09AA2TAA/AM09AA2GAA
Charge = 0,235kg
GWP=3,
CO2-equivalent = 0.000705 tonen
AM12AA2TAA/AM12AA2GAA
Charge = 0,245kg
GWP=3,
CO2-equivalent = 0.000735 tonen
EUROPESE REGELGEVING CONFORM DE MODELLEN
WEEE


- Model:
- TABLE OF CONTENTS
- RECORD KEEPING
- AIR CONDITIONER SAFETY
- Your safety and the safety of others are very important.
- DANGER
- WARNING
- CAUTION
- IMPORTANT SAFETY INSTRUCTIONS
- READ AND SAVE THESE INSTRUCTIONS
- PARTS AND FEATURES
- INSTALLATION REQUIREMENTS
- TOOLS AND PARTS
- TOOLS NEEDED
- PARTS SUPPLIED
- LOCATION REQUIREMENTS
- POWER SUPPLY CORD
- Wiring Requirements
- REQUIRED GROUNDING METHOD
- INSTALLATION INSTRUCTIONS
- STEP 1 - UNPACK AIR CONDITIONER
- STEP 2 - INSTALL MAIN WINDOW PANEL AND EXTENSION PANELS
- STEP 3 - ATTACH EXHAUST PIPE ASSEMBLY TO THE WINDOW PANEL
- STEP 4 - CONNECT EXHAUST HOSE TO THE AIR CONDITIONER
- STEP 5 - COMPLETE INSTALLATION
- Electrical Shock Hazard
- CONTROL PANEL
- BUTTONS
- A POWER BUTTON
- SWING BUTTON
- FANSPEEDBUTTON
- UP AND DOWN ARROW BUTTONS
- To Set the Temperature:
- E MODE BUTTON
- TIMER BUTTON
- While the air conditioner is operating:
- While the air conditioner is off:
- To cancel the timer:
- O CONTROL PANEL DISPLAY
- REMOTE CONTROL SIGNAL RECEIVING WINDOW
- REMOTE CONTROL
- A POWERKEY
- ⑥ SWING KEY
- SPEED KEY
- TEMPERATURE/TIME ADJUSTING KEY
- MODEKEY
- TIMER KEY
- ⑥ ℃/F SWITCHING KEY
- AIR CONDITIONER USE
- DRAINAGE INSTRUCTION
- MANUAL DRAIN
- CONTIOUOUS DRAIN
- NOTE:
- ChokeHazardrd
- CLEANING
- AIR FILTERS
- STORAGE
- If the unit is not being used for a long period of time:
- TROUBLESHOOTING
- SPECIFICATION
- IMPORTANT INFORMATION REGARDSING THE REFRIGERANT USED
- EUROPEAN REGULATIONS CONFORMITY FOR THE MODELS
- WEEE
- DISPOSAL REQUIREMENTS:
- Haier
- Climatisation Portable
- CONDITIONS D'EMPLACEMENT
- CONFORMITA DEI REGOLAMENTI EUROPEI PER I MODELLI
- EUROPESE REGELGEVING CONFORM DE MODELLEN
Brand : HAIER
Model : AM09AA1GAA
Category : Air Conditioning